
Rasp DZ1860 - Wristwatch Diesel - Free user manual and instructions
Find the device manual for free Rasp DZ1860 Diesel in PDF.


| Product Type | Analog Quartz Watch |
| Model | Rasp DZ1860 |
| Brand | Diesel |
| Case Material | Stainless Steel |
| Band Material | Stainless Steel |
| Movement | Quartz |
| Display | Analog with Date Window |
| Water Resistance | 5 ATM (50 meters) |
| Case Diameter | 50 mm |
| Case Thickness | 14 mm |
| Weight | 170 g |
| Battery Type | SR626SW (Replaces 377) |
| Battery Life | Approximately 2 years |
| Crystal Material | Mineral Glass |
| Clasp Type | Fold-over Buckle with Safety Lock |
| Crown Type | Push/Pull Crown |
| Functions | Hours, Minutes, Seconds, Date |
| Luminosity | Luminous Hands and Markers |
| Care and Cleaning | Wipe with soft cloth; avoid solvents |
| Safety | Keep away from strong magnetic fields |
| Spare Parts and Repairability | Authorized Diesel service center recommended |
Frequently Asked Questions - Rasp DZ1860 Diesel
User questions about Rasp DZ1860 Diesel
0 question about this device. Answer the ones you know or ask your own.
Ask a new question about this device
Download the instructions for your Wristwatch in PDF format for free! Find your manual Rasp DZ1860 - Diesel and take your electronic device back in hand. On this page are published all the documents necessary for the use of your device. Rasp DZ1860 by Diesel.
USER MANUAL Rasp DZ1860 Diesel
- When the watch is underwater or wet, never use the pushers/bezels, or set the time. Watch cases and metal bracelets should be rinsed thoroughly in fresh water after being in salt water.
- No hot tub/sauna. Please do not take your DIESEL watch into the hot tub/sauna. The combination of extreme heat and water may cause your watch to lose some of its water-resistance.
- No backward hand, or date, adjustments should be made when the analog hands read between 8pm and 3am. At these times, the gears are too close together and such a change could cause damage.
Resistance to Water
| Water Resistance Water-Related Use | |||||
| Caseback Marking | Depth |  |  |  | 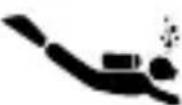 |
| Washing Hands | Shower, Bathing | Swimming, Snorkeling | Scuba Diving | ||
| — | — | × | × | × | × |
| WR — |  | ### | ### | ### | |
| 3 ATM | 3 Bar, 30 Meters | ### | ### | ### | ### |
| 5 ATM | 5 Bar, 50 Meters | ### | ### | ### | ### |
| 10 ATM | 10 Bar, 100 Meters | ### | ### | ### | ### |
| 20 ATM | 20 Bar, 200 Meters | ### | ### | ### | ### |
| 30 ATM | 30 Bar, 300 Meters | ### | ### | ### | ### |
| 50 ATM | 50 Bar, 500 Meters | ### | ### | ### | ### |
| Always set the crown in closed position (the normal position). Tighten screw-lock crown completely. | |||||
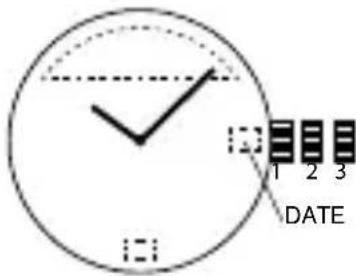
Date Watch 515.2-3, 2117, 2317, VX42EZ-D
DATE SETTING
- Pull crown out to position 2.
- Rotate counter-clockwise to set date.
- Return crown back to position 1.
TIME SETTING
- Pull crown out to position 3.
- Rotate counter-clockwise to set time.
- Return crown to position 1.
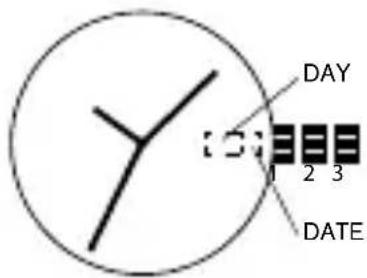
Day/Date Watch 2305
DATE SETTING
- Pull crown out to position 2.
- Rotate clockwise to set date.
- Return crown back to position 1.
DAY SETTING
With crown still in position 2, turn counter-clockwise and set day for previous day.
TIME SETTING
- Pull crown out to position 3.
- Rotate counter-clockwise to set time.
- Return crown to position 1.
Chronograph JS15, JS16, JS26, JS10
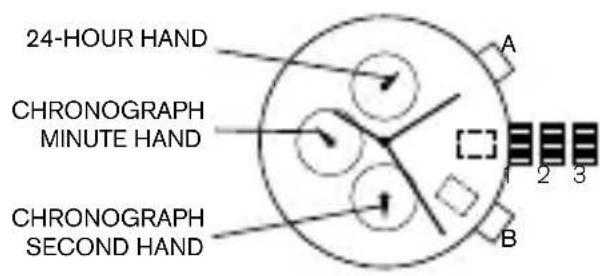
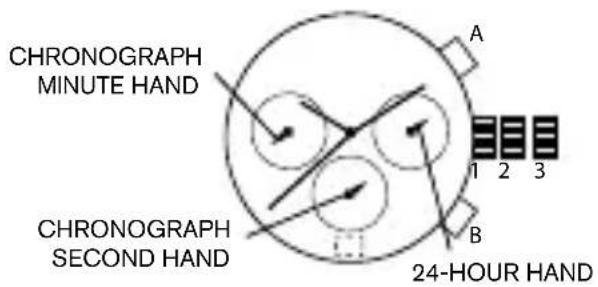
DATE SETTING
- Pull crown out to position 2.
- Rotate clockwise to set date.
- Return crown back to position 1.
TIME SETTING
- Pull crown out to position 3.
- Rotate clockwise to set time.
- Return crown to position 1.
CHRONOGRAPH
- Press A to start/stop the chronograph.
- Press B to reset to zero.
CHRONOGRAPH ZERO RESET
- If either of the chronograph hands is not at the zero (12:00) position, pull crown out to position 3.
- Press A to rotate hands clockwise; press B to rotate hands counter-clockwise.
- Each press of A or B will move the chronograph hands by one increment/decrement. Press and hold A or B for fast increment/decrement.
- When both hands are in the zero position, reset time and return crown to position 1.
NOTE: Chronograph minute hand will synchronize with chronograph second hand during chronograph zero reset.
Chronograph Stopwatch VD57B
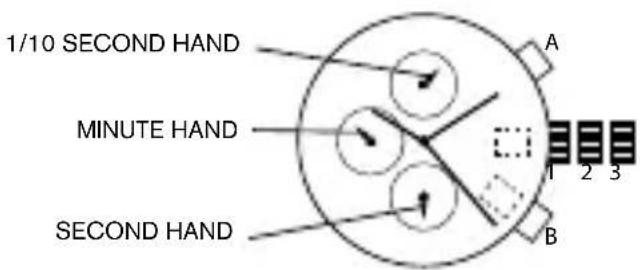
DATE SETTING (on some models only)
- Pull crown out to position 2.
- Rotate clockwise to set date.
- Push crown back to position 1.
TIME SETTING
- Pull crown out to position 3.
- Rotate clockwise to set time.
- Return crown to position 1.
USING THE STOPWATCH
- Press A to start/stop the stopwatch.
- Press B to control the split time and reset.
STOPWATCH HAND ADJUSTMENT
- Pull crown out to position 3.
- Press A to reset the stopwatch 1/10 second hand to the "0" position.
- Press B to reset the second and minute hands.
- Each press of A or B will move the chronograph hands by one increment/decrement. Press and hold A or B for fast increment/decrement.
NOTE: If the stopwatch hands function improperly, pull out crown and press A and B at the same time for over 2 seconds. When the pushers are released, the stopwatch second and 1/10 second hands will spin around and return to "0." This will indicate that the internal circuit has been reset.
Chronograph VD51B
DATE SETTING
- Pull crown out to position 2.
- Rotate the crown clockwise until the preview day's date appears.
- Return crown to position 1.
TIME SETTING
- Pull crown out to position 2 when the second hand is at the 12 o'clock position.
- Rotate crown to set time.
- Return crown to position 1.
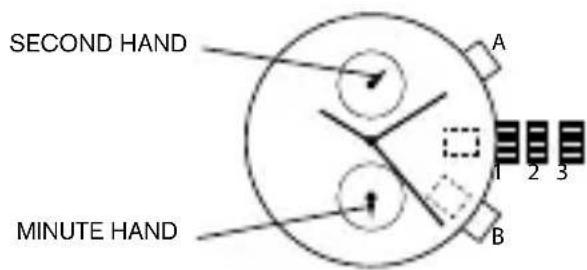
USING THE STOPWATCH
- Press A to start/stop the stopwatch.
- Press B to control split time and reset.
NOTE: The measurement time is indicated by the stopwatch hands that move independently of the center hands (and 24-hour hand where applicable).
NOTE: The stopwatch can measure up to 60 minutes.
STOPWATCH HAND ADJUSTMENT
- Pull crown out to position 3.
- Press A or B to reset all stopwatch hands to "0" position.
- Each press of A or B will rotate hands clockwise; press B to rotate hands counter-clockwise. Press and hold A or B for fast increment/decrement.
- Return crown to position 1.
NOTE: Before setting the time, check if all the chronograph hands - 1/10 second (where applicable), second, minute - are at the "0"(12 o'clock) position.
NOTE: If the stopwatch is in use, press the buttons in the following order to reset it, and then check if the hands return to the "0" position.
*If the chronograph is counting: A → B *If the stopwatch is stopped: B *If the split time is displayed: B → A → B
Chronograph VD53, VD53B, VR32A25
DATE SETTING
- Pull crown out to position 2.
- Rotate clockwise to set date.
- Return crown back to position 1.
TIME SETTING
- Before setting the time, make sure the chronograph is stopped and set to zero (12:00) position.
- Pull crown out to position 3.
- Rotate crown clockwise to set time.
- Return crown to position 1.
CHRONOGRAPH
- Press A to start/stop the chronograph.
- Press B to reset to zero.
SPLIT TIME
- Press B while the chronograph is running.
- Press B again to return to the chronograph.
- Press A to finalize timing.
- Press B to reset.
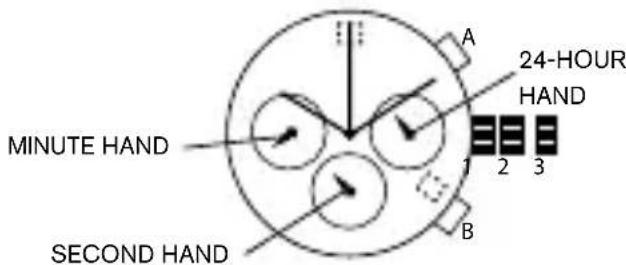
CHRONOGRAPH ZERO RESET
- If either of the chronograph hands is not at the zero (12:00) position, pull crown out to position 3.
- Press A to rotate hands clockwise; press B to rotate hands counter-clockwise.
- Each press of A or B will move the chronograph hands by one increment/decrement. Press and hold A or B for fast increment/decrement.
- When both hands are in the zero position, reset time and return crown to position 1.
Automatic 8N24-N-LR-DZ, NH38A3M
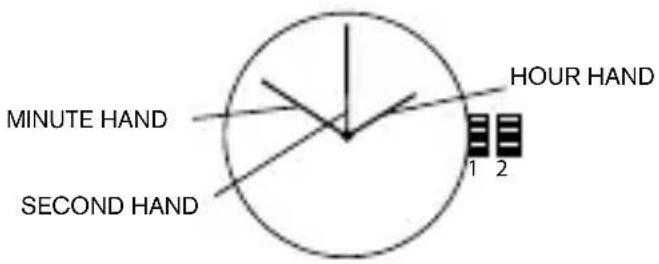
WINDING THE MAINSPRING
- Rotate the crown clockwise at position 1. Wind approximately 10 times clockwise and it will start to move naturally.
TIME SETTING
- Pull the crown out to position 2.
- Rotate crown to set time.
- Return crown back to position 1.
Digital FL137AX, FL137AB, QFOX21CA, QFOX21CB, QFOX21BB
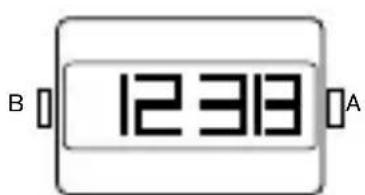
FL137AB FL137AX
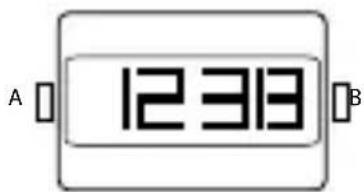
QFOX21CA QFOX21CB
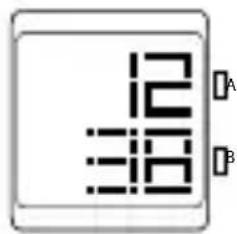
QFOX21BB
OVERVIEW
Features include CALENDAR and TIME.
NORMAL TIME DISPLAY
- Press A to change display. Display sequence is time, calendar, seconds.
- Press B to toggle 12/24-hour format.
TIME AND DATE SETTING
- Press and hold B for 2 seconds to enter setting mode; year will begin flashing.
- Press A to advance digit; press and hold A for fast advance.
- Press B to set and advance to next setting value.
- Setting sequence is year, month, date, hour, minute.
- Press B to exit setting mode.
N OTE: Hour will be displayed in 24-hour format in time setting mode. N OTE: If no pusher/button is operated for 30 seconds, all changes will be saved and the setting will automatically return to display mode.
Digital QFO-015-AA
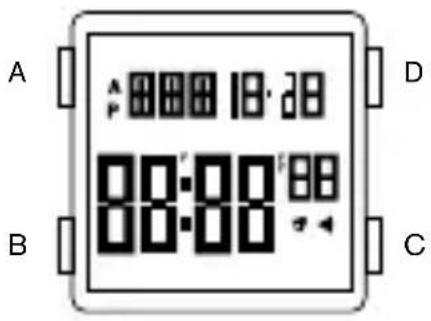
OVERVIEW
Features include CALENDAR, ALARM, 12/24H FORMAT, CHRONO, TIMER, DUAL TIME, EL BACKLIGHT.
TIME SETTING
- Press and hold C for 2 seconds to enter setting mode; seconds will begin flashing.
- Press B to set and advance to next setting value.
- Setting sequence is second, minute, hour 12/24H format, month, day, week.
- Press D to advance the flashing digit.
- Press C to exit setting mode.
NOTE: Pressing D while the seconds are in the range of 30 to 59 resets them to 00 and adds 1 to the minutes. In the range of 00 to 29, the minutes are unchanged.
NOTE: Press A for 3 seconds to activate EL backlight.
ALARM SETTING
- Press D to turn on/off the alarm or chime.
- To set the alarm, press and hold C for 2 seconds to select "hour" setting; Press B to select "minute" setting; Press D to advance the flashing digit.
- When the alarm reaches the scheduled time, the alarm icon will flash and the chime will sound for 20 seconds.
CHRONOGRAPH
- Press D to start/stop chronograph.
- When stopped, press C to return to zero.
- When running, press C to split count, then press D to exit split count and C to return to zero.
- Press B to return to time.
TIMER MODE
- The display range of the timer is 23 hours, 59 minutes and 59 seconds.
- Press D to start/stop the timer. Press C to return to starting value.
- Timer sounds for 10 seconds when counting down to 00:00:00. The timer is automatically reset to its starting value after the alarm stops.
DUAL TIME
- In the Dual Time mode, press and hold C for 2 seconds to select "minute" setting; Press B to select "hour" setting, Press D to adjust the flashing item; Press C to finish setting and to exit setting mode.
DEUTSCH
WICHTIGE HINWEISE
Chronograph JS15, JS16, JS26, JS10
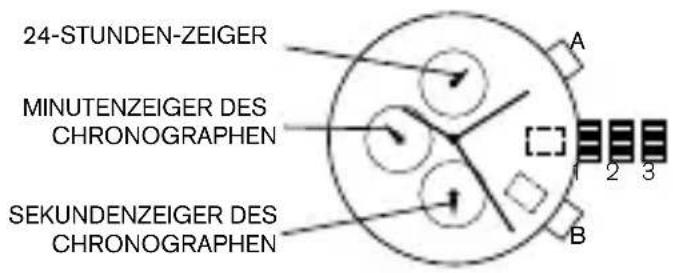
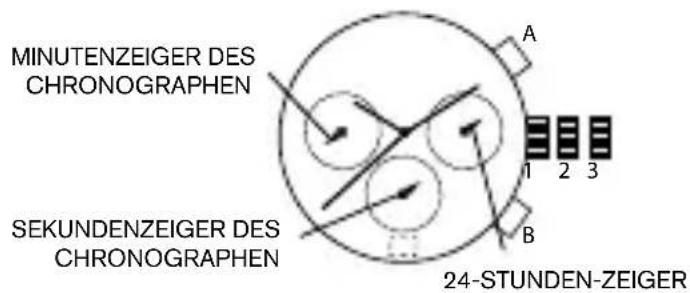
DATUMSEINSTELLUNG
Automatico 8N24-N-LR-DZ, NH38A3M

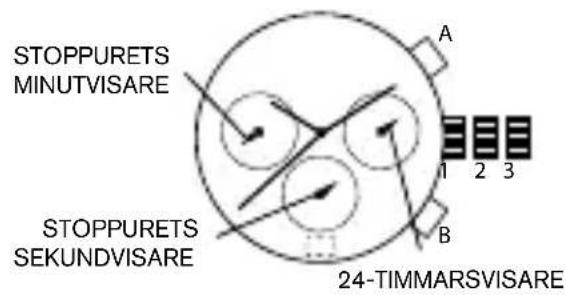
DATUMINSTÄLLNING
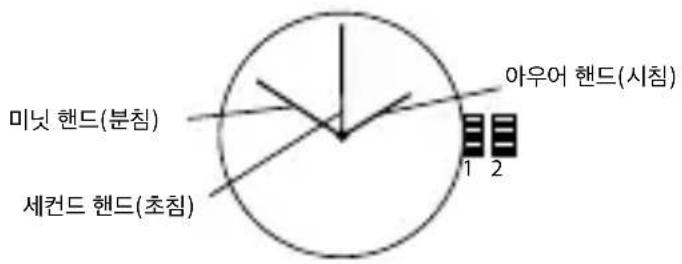
오토매틱 8N24-N-LR-DZ, NH38A3M
Otomatis 8N24-N-LR-DZ, NH38A3M
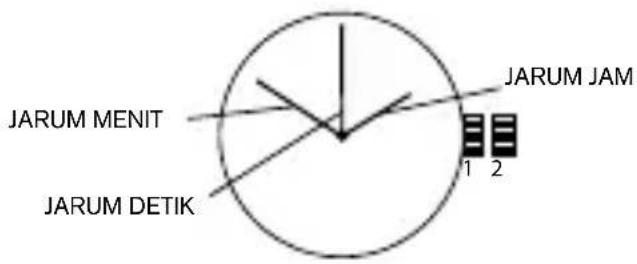
MEMUTAR PEGAS UTAMA
- DATE WATCH 515.2-3, 2117, 2317, VX42EZ-D
- DATE SETTING
- TIME SETTING
- DAY/DATE WATCH 2305
- DAY SETTING
- CHRONOGRAPH JS15, JS16, JS26, JS10
- CHRONOGRAPH
- CHRONOGRAPH ZERO RESET
- CHRONOGRAPH STOPWATCH VD57B
- DATE SETTING (ON SOME MODELS ONLY)
- USING THE STOPWATCH
- STOPWATCH HAND ADJUSTMENT
- CHRONOGRAPH VD51B
- CHRONOGRAPH VD53, VD53B, VR32A25
- SPLIT TIME
- AUTOMATIC 8N24-N-LR-DZ, NH38A3M
- WINDING THE MAINSPRING
- DIGITAL FL137AX, FL137AB, QFOX21CA, QFOX21CB, QFOX21BB
- OVERVIEW
- NORMAL TIME DISPLAY
- TIME AND DATE SETTING
- DIGITAL QFO-015-AA
- ALARM SETTING
- TIMER MODE
- DUAL TIME
- DEUTSCH
- WICHTIGE HINWEISE
- DATUMSEINSTELLUNG
- AUTOMATICO 8N24-N-LR-DZ, NH38A3M
- DATUMINSTÄLLNING
- 오토매틱 8N24-N-LR-DZ, NH38A3M
- OTOMATIS 8N24-N-LR-DZ, NH38A3M
- MEMUTAR PEGAS UTAMA
Brand : Diesel
Model : Rasp DZ1860
Category : Wristwatch