
IAN 285617 - Lighting Livarno Lux - Free user manual and instructions
Find the device manual for free IAN 285617 Livarno Lux in PDF.


| Type | LED Pendant Lamp |
| Model | IAN 285617 |
| Item Numbers | 14102302L / 14111202L / 14122102L |
| Operating Voltage | 230-240 V~, 50 Hz |
| Rated Power | 20 W |
| Illuminant | 1 x 20 W LED module (non-replaceable) |
| Power Factor | 0.506 |
| Rated Current | 174 mA |
| Protection Class | II |
| Protection Type | IP20 |
| Dimmable | Yes, via built-in dimmer switch (not compatible with external dimmers) |
| Height Adjustable | Yes, via counterweight |
| Suitable for Indoor Use | Yes, dry enclosed spaces |
| Materials | Glass shade, metal mounting bracket, acrylic block (model 14122102L) |
| Scope of Delivery | 1 pendant lamp, 1 glass shade, 1 acrylic block (14122102L), 2 screws for glass shade, 2 rubber washers, 1 Allen key, 1 cross-tip screwdriver, 1 rope smoother, 2 screws, 2 sleeve nuts, 2 rawlplugs, instructions |
| Warranty | 36 months |
| Cleaning Instructions | Disconnect power, allow to cool, clean with dry lint-free cloth |
| Safety Features | Protection class II, no earth wire required, only for indoor use |
| Disposal | Recycle according to local regulations; do not dispose in household waste |
Frequently Asked Questions - IAN 285617 Livarno Lux
User questions about IAN 285617 Livarno Lux
0 question about this device. Answer the ones you know or ask your own.
Ask a new question about this device
Download the instructions for your Lighting in PDF format for free! Find your manual IAN 285617 - Livarno Lux and take your electronic device back in hand. On this page are published all the documents necessary for the use of your device. IAN 285617 by Livarno Lux.
USER MANUAL IAN 285617 Livarno Lux
Assembly, operating and safety instructions
CZ
LED ZÁVĚSNÉ SVÍTIDLO
Before reading, unfold both pages containing illustrations and familiarise yourself with all functions of the device.
SI
GB Assembly, operating and safety instructions Page 5
| SI Navodila za montažo, uporabo in varnostna navodila | Stran | 11 | ||
| CZ Pokyny k montáži, obsluze a bezpečnostní pokyny Strana 19 | ||||
| SK Pokyny pre montáž, obsluhu a bezpečnostné pokyny | Strana | 25 | ||
| DE/AT/CH Montage-, Bedienungs- und Sicherheitshinweise | Seite 31 | |||
14102302L
natural_image
Technical line drawing of a mechanical component with mounting holes and a curved base (no text or symbols)14111202L 14122102L
natural_image
Technical line drawing of a structural beam with supports and a labeled section (no text or symbols beyond the number)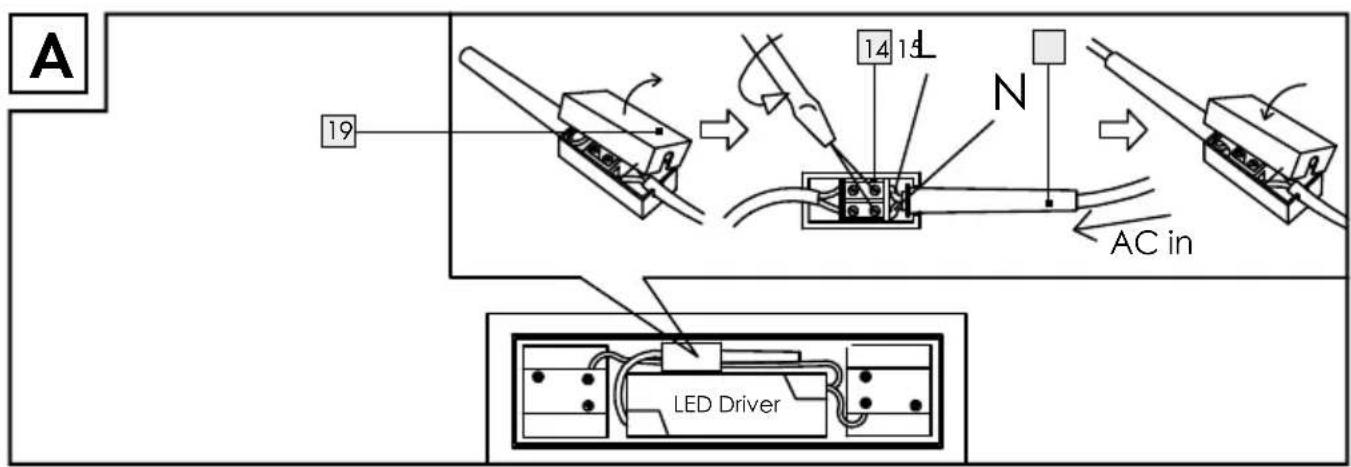
List of pictograms used....Page 6
Introduction......Page 6
Intended use....Page 6
Scope of delivery....Page 6
Parts description Page 7
Technical Data Page 7
Safety Page 7
Safety information......Page 7
Preparation......Page 8
Required tools and material Page 8
Start-up Page 8
Mounting the light....Page 8
Operating the light....Page 9
Adjusting the height Page 9
Maintenance and Cleaning......Page 9
Disposal Page 10
Information......Page 10
Warranty Page 10
Declaration of conformity....Page 10
Manufacturer / Service Page 10
| List of pictograms used | |||
 | Read the instructions! |  | Observe the warning and safety instructions! |
 | This light is only suitable for indoor use in dry and enclosed spaces. |  | Danger to life and risk of accidents for infants and children |
 | Volt (AC) |  | Caution - Risk of electric shock!Danger to life! |
 | Hertz (mains frequency) Safe working |  | |
 | Watt (effective power) |  | This light is not suitable for dimmer or electronic switches. |
 | Safety class II |   | Dispose of packaging and device in an environmentally-friendly way! |
 | LED module lifespan | ||
LED pendant lamp
Introduction

Congratulations on your new product.
You have selected a high quality product.
Please be sure to carefully read the com-
plete operating instructions. Fold out the page with the illustrations. These instructions are part of the product and contain important information on setup and handling. Always follow all safety instructions. Before using this product for the first time verify the correct voltage and that all parts are properly installed. Should you have any questions or you are unsure about operating the product, please contact the dealer or service centre. Please keep these instructions in a safe place and pass them on third parties as applicable.
Intendeduse

This light is only suitable for indoor use in dry and enclosed spaces. The light can be fastened to any normally inflam-
mable surface.
- Scope of delivery
Check immediately after unpacking that the parts are complete and that the product is in proper condition.
1 LED pendant lamp, Model 14102302L / 14111202L/14122102L
1 Glass shade
1 Acrylic block (14122102L)
2 Screws for glass shade
2 Rubber washers
1 Allen key
1 Crosstipp screwdriver
1 Rope smoother
2 Screws
2 Sleeve nuts
2 Rawlplugs
1 Instructions for assembly and use
Partsdescription
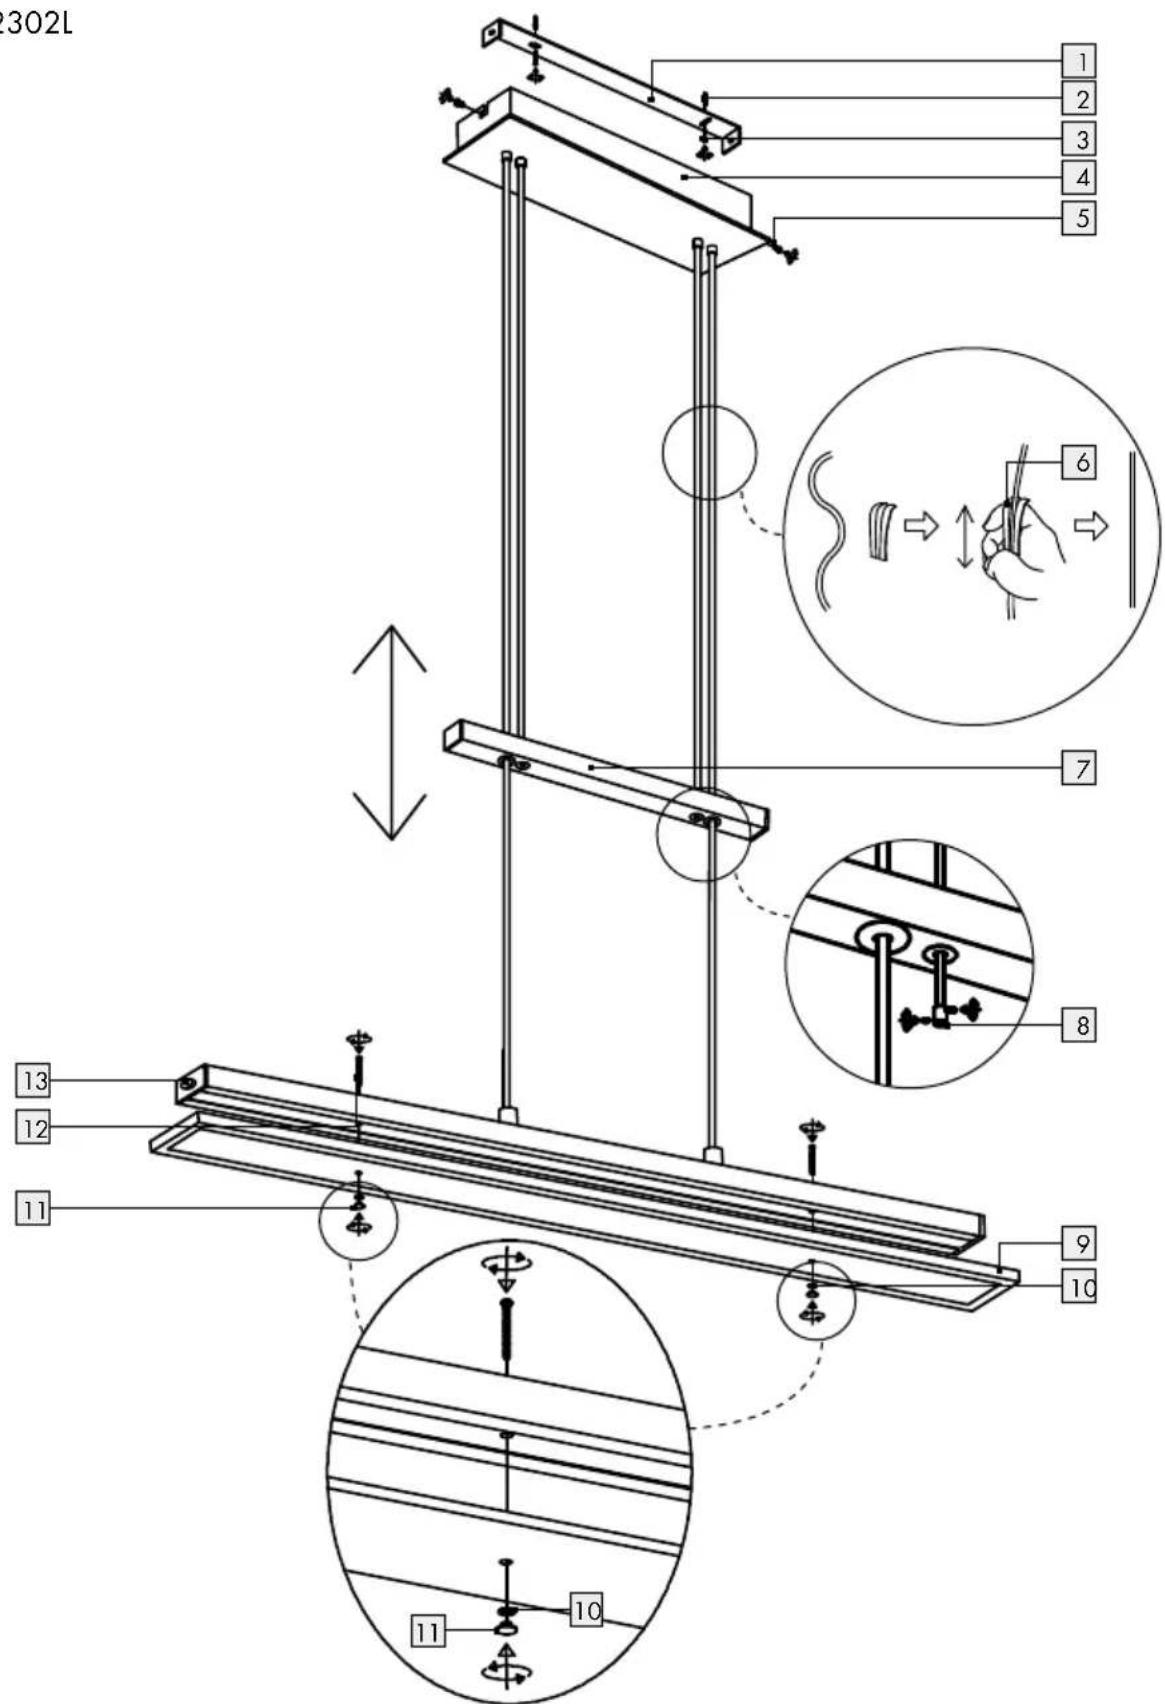
1 Mounting bracket
2 Rawlplug
3 Screw (mounting bracket)
4 Connection housing
5 Screw (connection housing)
6 Rope smoother
7 Counterweight
8 Bushing
9 Lamp glass
10 Washer (rubber)
11 Sleeve nut
12 Screw (lamp glass)
13 Dimmerswitch
14 Terminal block
15 Protective tube
16 Socket head wrench
17 Hexagon socket screws
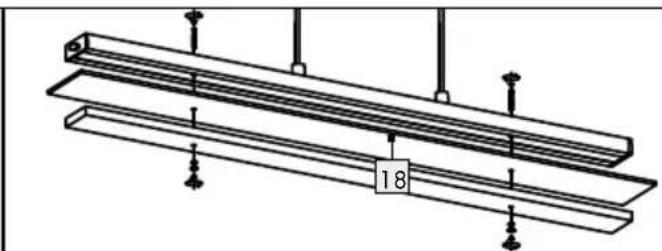
18 Acrylic block (14122102L)
19 Junction box
20 Crosstipp screwdriver
- TechnicalData
Itemno.:14102302L/
14111202L/
14122102L
Operating voltage: 230-240V\~, 50Hz
Rated lamp power: 20 Watt
Illuminant: 1 x 20 W LED module
(LED not replaceable)
Power factor / rated
current LED module: 0.506/174 mA
Protection class: II /☐
Protection type: IP20
Safety

Safetyinformation
Damage due to failure to comply with these operating instructions will invalidate the guarantee! We assume no liability for consequential damage! We assume no liability for material damage or personal injury due to improper handling or failure to comply with the safety instructions!
Only use the included parts, using other parts will void the warranty.
DANGER TO LIFE AND ACCIDENT HAZARD FOR TODDLERS AND SMALL CHILDREN! Never
leave children unsupervised with the packaging materials. The packaging material poses a suffocation hazard. Children frequently underestimate dangers. Please always keep the product out of the reach of children.
This appliance can be used by children aged from 8 years and above and persons with reduced physical, sensory or mental capabilities or lack of experience and knowledge if they have been given supervision or instruction concerning use of the appliance in a safe way and understand the hazards involved. Children shall not play with the appliance. Cleaning and user maintenance shall not be made by children without supervision.

Caution, risk of electric shock
-
Ensure that a qualified electrician, or a person trained to carry out electrical installations, performs the electrical installation.
We assume no liability for material damage or personal injury due to improper handling or failure to comply with the safety instructions!
■ Never use the light if any defects have been identified.
Prior to installation, remove the fuse or switch off the circuit breaker (0 setting) in the fuse box. -
Ensure that the light does not come into contact with water or other liquids under any circumstances.
Prior to installation verify the mains voltage on site corresponds with the operating voltage required for the light (see „Technical Data“).
■ Ensure that no cables are damaged when installing.

Prevent fire and injury hazards
To prevent burns, ensure that the light is switched off and has cooled down before touching it.
Do not attach the light to a damp or conductive substrate.
Do not leave the light or packaging material lying unattended. Plastic film/bags, plastic parts etc. can turn into dangerous toys for children.
Do not look directly into the light source (light bulb, LED etc.).
Do not use optical instruments to look at the illuminant.
Do not cover the lamp with objects. Excessive heat build-up can result in fire.

Safe working
- Install the light so that it is protected from moisture, dirt and excessive heating.
Always be attentive! Always pay attention to what you are doing and use common sense. Never use the light if you are having difficulty concentrating or do not feel well.
Familiarise yourself before use with all instructions and diagrams in this manual as well as with the light itself.
This light is not suitable for dimmer

or electronic switches.
The illuminant in this light is not replaceable; if the illuminant reaches the end of its life, replace the entire light.
RISK OF SHORT CIRCUIT! Ensure the ropes do not touch during operation. This can damage the light.
Preparation
• Required tools and material
The tools and materials specified are not included. This information and these values are non-binding and are only provided as a reference. The nature of the material is determined by the individual local conditions.
- Pencil/marking tool
-
Voltage tester
-
Screwdriver
- Electric drill
- Drill (ø 6 mm)
- Side cutting pliers
- Ladder
- Start-up
- Mounting the light
WARNING! RISK OF ELECTRIC SHOCK!
Disconnect the light from the mains circuit before installing. To do so, remove the fuse or switch off the circuit breaker in the fuse box (0 position).
Note: Ensure the pendant ropes are not crossed before and during installation.
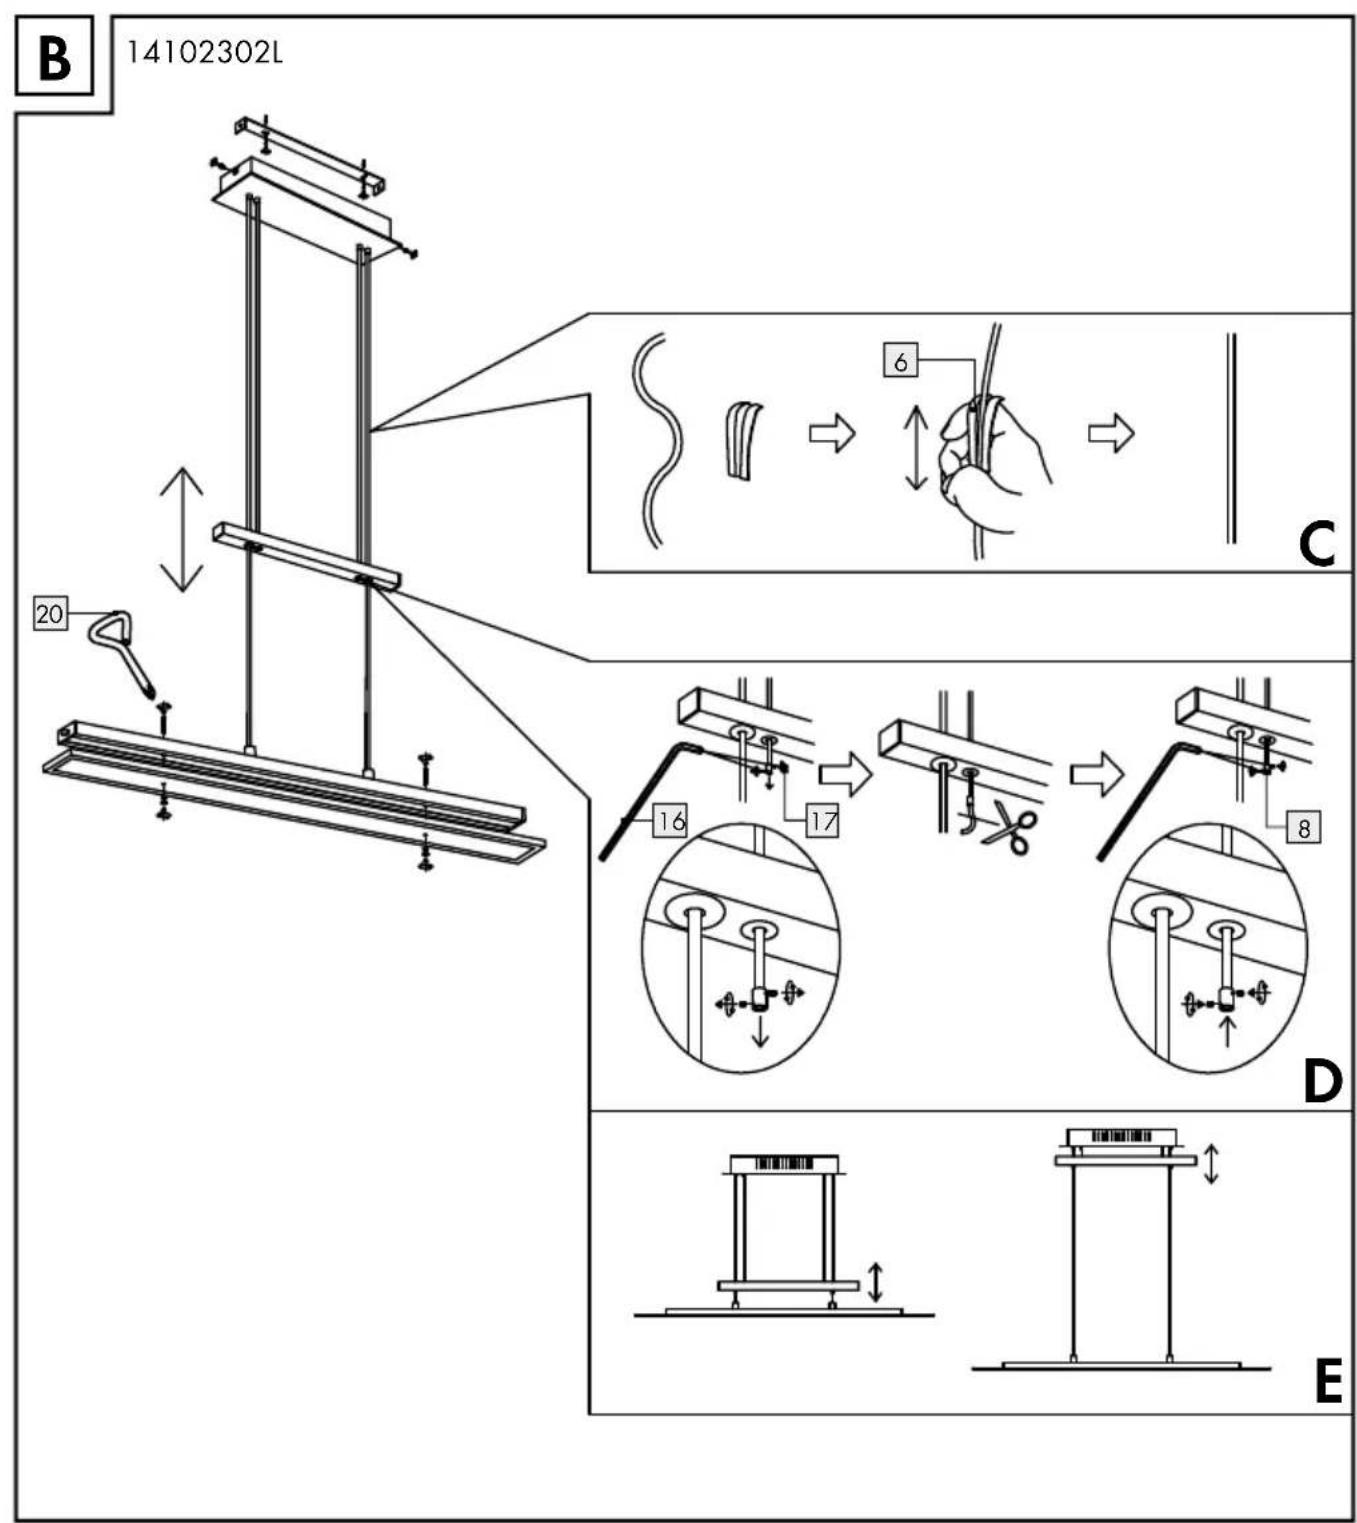
Remove the visible screws on the side of the connection housing 4 and take off the mounting bracket 1 on the rear (see fig. B).
☐ Use the slotted holes intended for the mounting bracket 1 to mark the holes for the screws 3.
Now drill the mounting holes. Ensure that you do not damage the supply line.
☐ Insert the dowels into the holes. Fasten the mounting bracket 1 with the provided screws 3.
Open the junction bd9.
☐ Feed the power cord through the protective tube 15.
Connect the connection cable of the light to the power cord using the terminal block 14 (see Fig. A).
☐ Be sure to correctly connect the individual conductors of the power cord (external): live wire, black or brown = symbol L, neutral wire, blue = symbol N.
A green/yellow conductor which may exist will not be connected. The earth wire is not required, as the light is Protection Class II /☐.
☐ Be sure the protective tube is secured in the bracket of the junction box 19.
☐ Close the junction box.
Now use the screws to screw the light to the mounting bracket 1.
14102302L/14111202L:
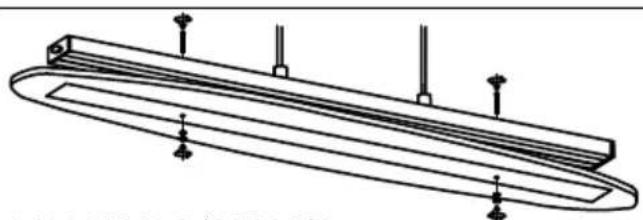
Now screw the lamp glass to the light using the screws 12, the sleeve nut 11 and the washers (rubber) 10. Ensure the rough side of the glass faces the illuminant.
14122102L:
Now screw the lamp glass and the acrylic block 18 to the light using the screws 12, the sleeve nut 11 and the washers (rubber) 10. Ensure that the acrylic block 18 is assembled after the lamp glass 9.
☐ If necessary, smooth the ropes using the rope smoother 6 (see Fig. C).
☐ Replace the fuse or switch on the circuit breaker (Position I) inside the fuse box.
Your light is now ready to use.
- Operating the light
☐ Use the wall switch to switch on the light.
Note: The light is automatically set to the brightest dimmer setting when switching the light on.
☐ The dimmer switch 13 is variable. Hold the dimmer switch 13 until the light is at the desired brightness.
☐ The dimmer switch 13 will only reduce the brightness. Switch the light off and back on to reset the dimmer.
☐ Press the dimmer switch 13 once to switch the light off.
Attention! The light is still in standby mode. Press the wall switch to switch the light all the way off.
☐ With the light in standby mode you can press the dimmer switch 13 once to switch the light back on.
- Adjusting the height
☐ Only position and adjust the light whilst off and cooled down.
Adjust the pendent height by lifting and lowering the counterweight 7 (see Fig. E).
Shortening the ropes:
Note: When shortening, you must leave a minimum of 10 cm of cable between the light fixture and the counterweight.
☐ Remove the fuse or switch off the circuit breaker (Position 0) inside the fuse box.
Using the hexagon socket wrench, remove the socket head screws 17 at the end of the sleeve 8.
☐ Adjust the rope to the desired maximum length.
Use the hexagon socket wrench to tighten the socket head screws 17 at the end of the sleeve 8.
☐ Cut the excess rope ends.
Be sure the sleeves are seated correctly.
☐ Replace the fuse or switch on the circuit breaker (Position I) inside the fuse box.
● Maintenance and Cleaning
WARNING! RISK OF ELECTRIC SHOCK!
Disconnect the light from the mains circuit before cleaning. To do so, remove the fuse or switch off the circuit breaker in the fuse box (0 position).
- Allow the light to cool down all the way.
Only use a dry, lint-free cloth for cleaning. Do not use solvents, spirit or similar substances. They could damage the light.
☐ Replace the fuse or switch on the circuit breaker (Position I) inside the fuse box.
●Disposal

The packaging is made entirely of recyclable materials, which you may dispose of at local recycling facilities. The Green Dot is not valid for Germany.

Observe the marking of the packaging materials for waste separation, which are marked with abbreviations (a) and numbers (b) with following meaning: 1-7: plastics / 20-22: paper and fibre-board/80-98: composite materials.

The product and packaging materials are recyclable, dispose of it separately for better waste treatment. The Triman logo is valid in France only.

Contact your local refuse disposal authority for more details of how to dispose of your worn-out product.

To help protect the environment, please dispose of the product properly when it has reached the end of its useful life and not in the household waste. Information on collection points and their opening hours can be obtained from your local authority.
operating instructions or unauthorised interference are excluded from the warranty. The performance of services under the warranty does not extend or renew the warranty period.
Declaration of conformity
This product fulfils the requirements of the applicable European and national directives. Conformity has been demonstrated. The relevant declarations and documents are held by the manufacturer.
Manufacturer / Service
Please have your register receipt and the item number (e.g. IAN 12345) as your proof of purchase when making enquiries.
Information
Warranty
You receive a 36 month warranty on this product, valid from the date of purchase. The appliance has been carefully produced under strict quality control. Within the warranty period we shall rectify without charge all material and manufacturing defects. In the event of a defect arising during the warranty period, please send the appliance to the listed Service Centre address, making reference to the following article number: 14102302L/14111202L/14122102L. Wear parts (such as bulbs) and damage caused by improper handling, non-observance of the
Legenda uporabljenih piktogramov....Stran 12
Uvod.... Stran 12
Predvidena uporaba.... Stran 12
Obseg dobave.... Stran 12
Opis delov.... Stran 13
Pooblaščeni serviser:
- LED ZÁVĚSNÉ SVÍTIDLO
- List of pictograms used....Page 6
- Introduction......Page 6
- Safety Page 7
- Preparation......Page 8
- Start-up Page 8
- Maintenance and Cleaning......Page 9
- Disposal Page 10
- Information......Page 10
- LED pendant lamp
- Introduction
- Intendeduse
- - Scope of delivery
- Partsdescription
- - TechnicalData
- Safety
- Safetyinformation
- DANGER TO LIFE AND ACCIDENT HAZARD FOR TODDLERS AND SMALL CHILDREN! Never
- Caution, risk of electric shock
- Prevent fire and injury hazards
- Safe working
- Preparation
- • Required tools and material
- - Start-up
- - Mounting the light
- WARNING! RISK OF ELECTRIC SHOCK!
- 14102302L/14111202L:
- 14122102L:
- - Operating the light
- - Adjusting the height
- Shortening the ropes:
- ● Maintenance and Cleaning
- ●Disposal
- Declaration of conformity
- Manufacturer / Service
- Information
- Warranty
- Legenda uporabljenih piktogramov....Stran 12
- Uvod.... Stran 12
- Pooblaščeni serviser:
Brand : Livarno Lux
Model : IAN 285617
Category : Lighting