IAN 270017 - Uncategorized CRIVIT - Free user manual and instructions
Find the device manual for free IAN 270017 CRIVIT in PDF.

| Product Type | Swing Stepper with Resistance Straps |
| Model | IAN 270017 |
| Brand | Crivit |
| Dimensions (W x H x D) | Approx. 52 x 24.5 x 52 cm |
| Weight | Approx. 9.05 kg |
| Power Supply | 1 x 1.5 V (LR03, AAA) battery |
| Rated Power Consumption | 0.09 mW |
| Maximum User Weight | 100 kg |
| Intended Use | Home training equipment, not for therapeutic use |
| Computer Display Modes | TMR (time), REPS (steps), CAL (calories), TTR (total steps) |
| Training Zones (Heart Rate) | 5 zones: Regeneration (50-60%), Fat-burning (60-70%), Carbohydrate-burning (70-80%), Anaerobic (80-90%), Warning (90-100%) |
| Resistance System | Speed-dependent hydraulic dampers |
| Strap Length Adjustment | 60, 70, 80, 90 cm (maximum stretch 165 cm) |
| Strap Force Tolerance | Approx. 20% (+/-) |
| Safety Standards | DIN EN ISO 20957-1:2014, DIN EN ISO 20957-8, DIN 32935 |
| Warranty | 3 years from date of purchase |
| Maintenance | Clean with water only; no aggressive agents; store dry at room temperature |
| Disposal | Do not dispose with household waste; recycle electronic components and batteries properly |
Frequently Asked Questions - IAN 270017 CRIVIT
User questions about IAN 270017 CRIVIT
0 question about this device. Answer the ones you know or ask your own.
Ask a new question about this device
Download the instructions for your Uncategorized in PDF format for free! Find your manual IAN 270017 - CRIVIT and take your electronic device back in hand. On this page are published all the documents necessary for the use of your device. IAN 270017 by CRIVIT.
USER MANUAL IAN 270017 CRIVIT
natural_image
Illustration of a person standing in two views, showing front and side views with no text or symbols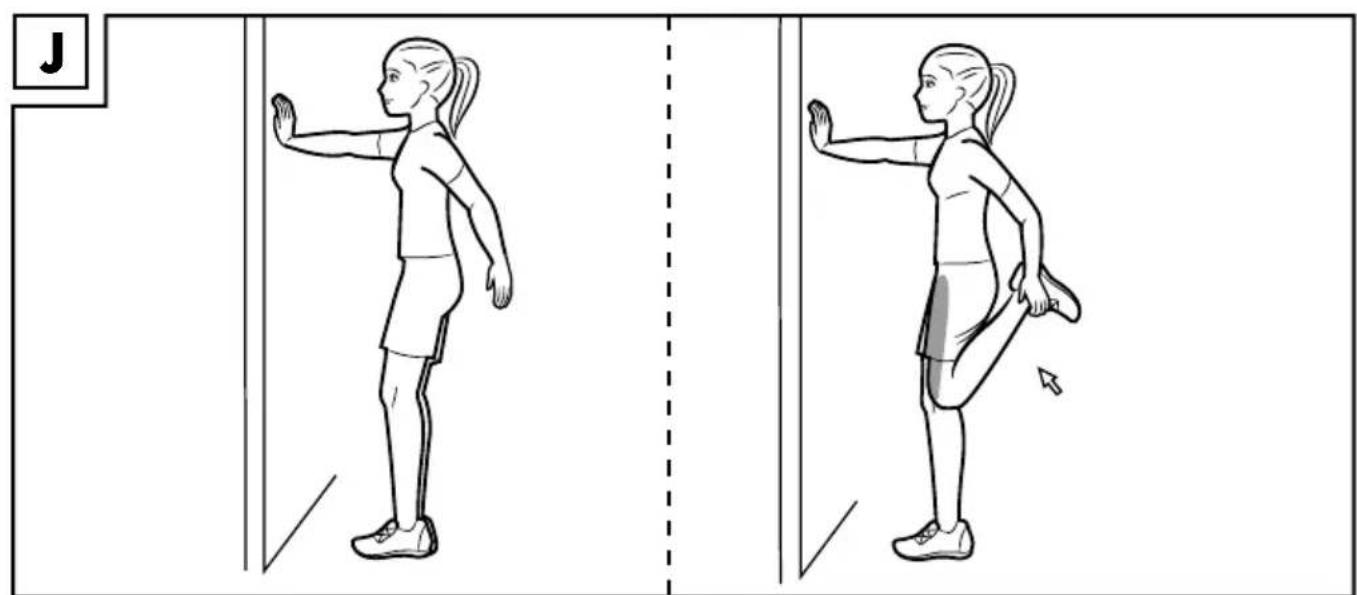
natural_image
Illustration of a woman performing a stretching exercise, showing front and side views (no text or symbols)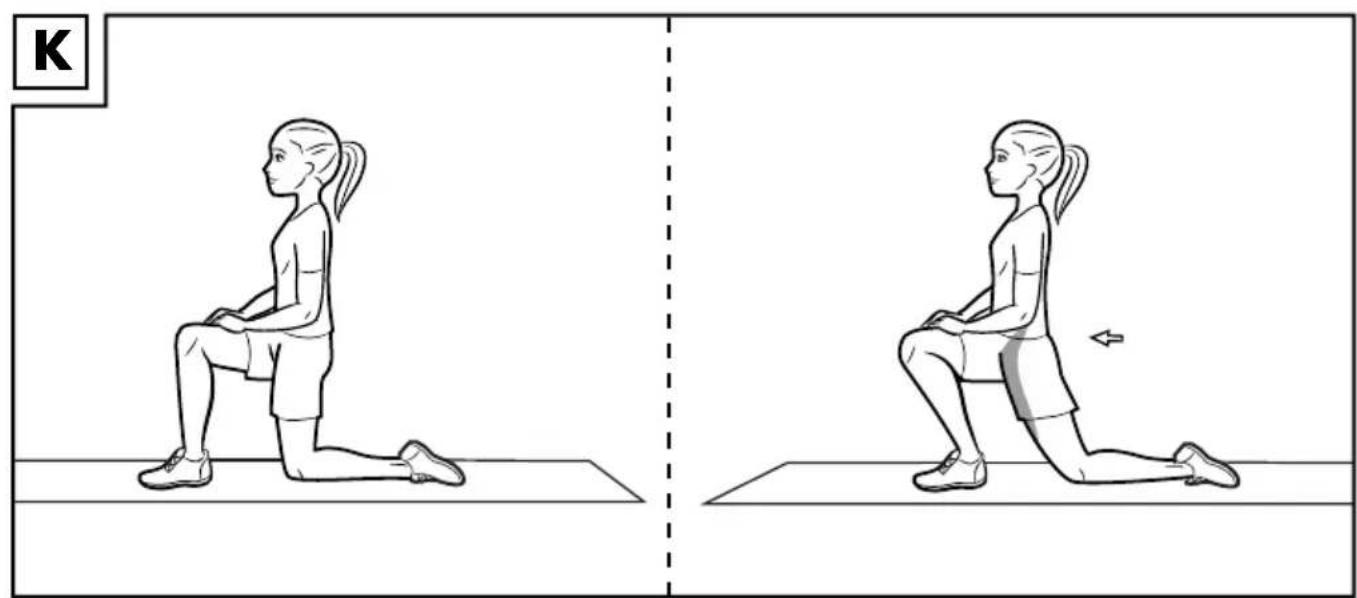
natural_image
Illustration of a woman performing a kneeling exercise, showing two sequential poses with motion arrows (no text or symbols)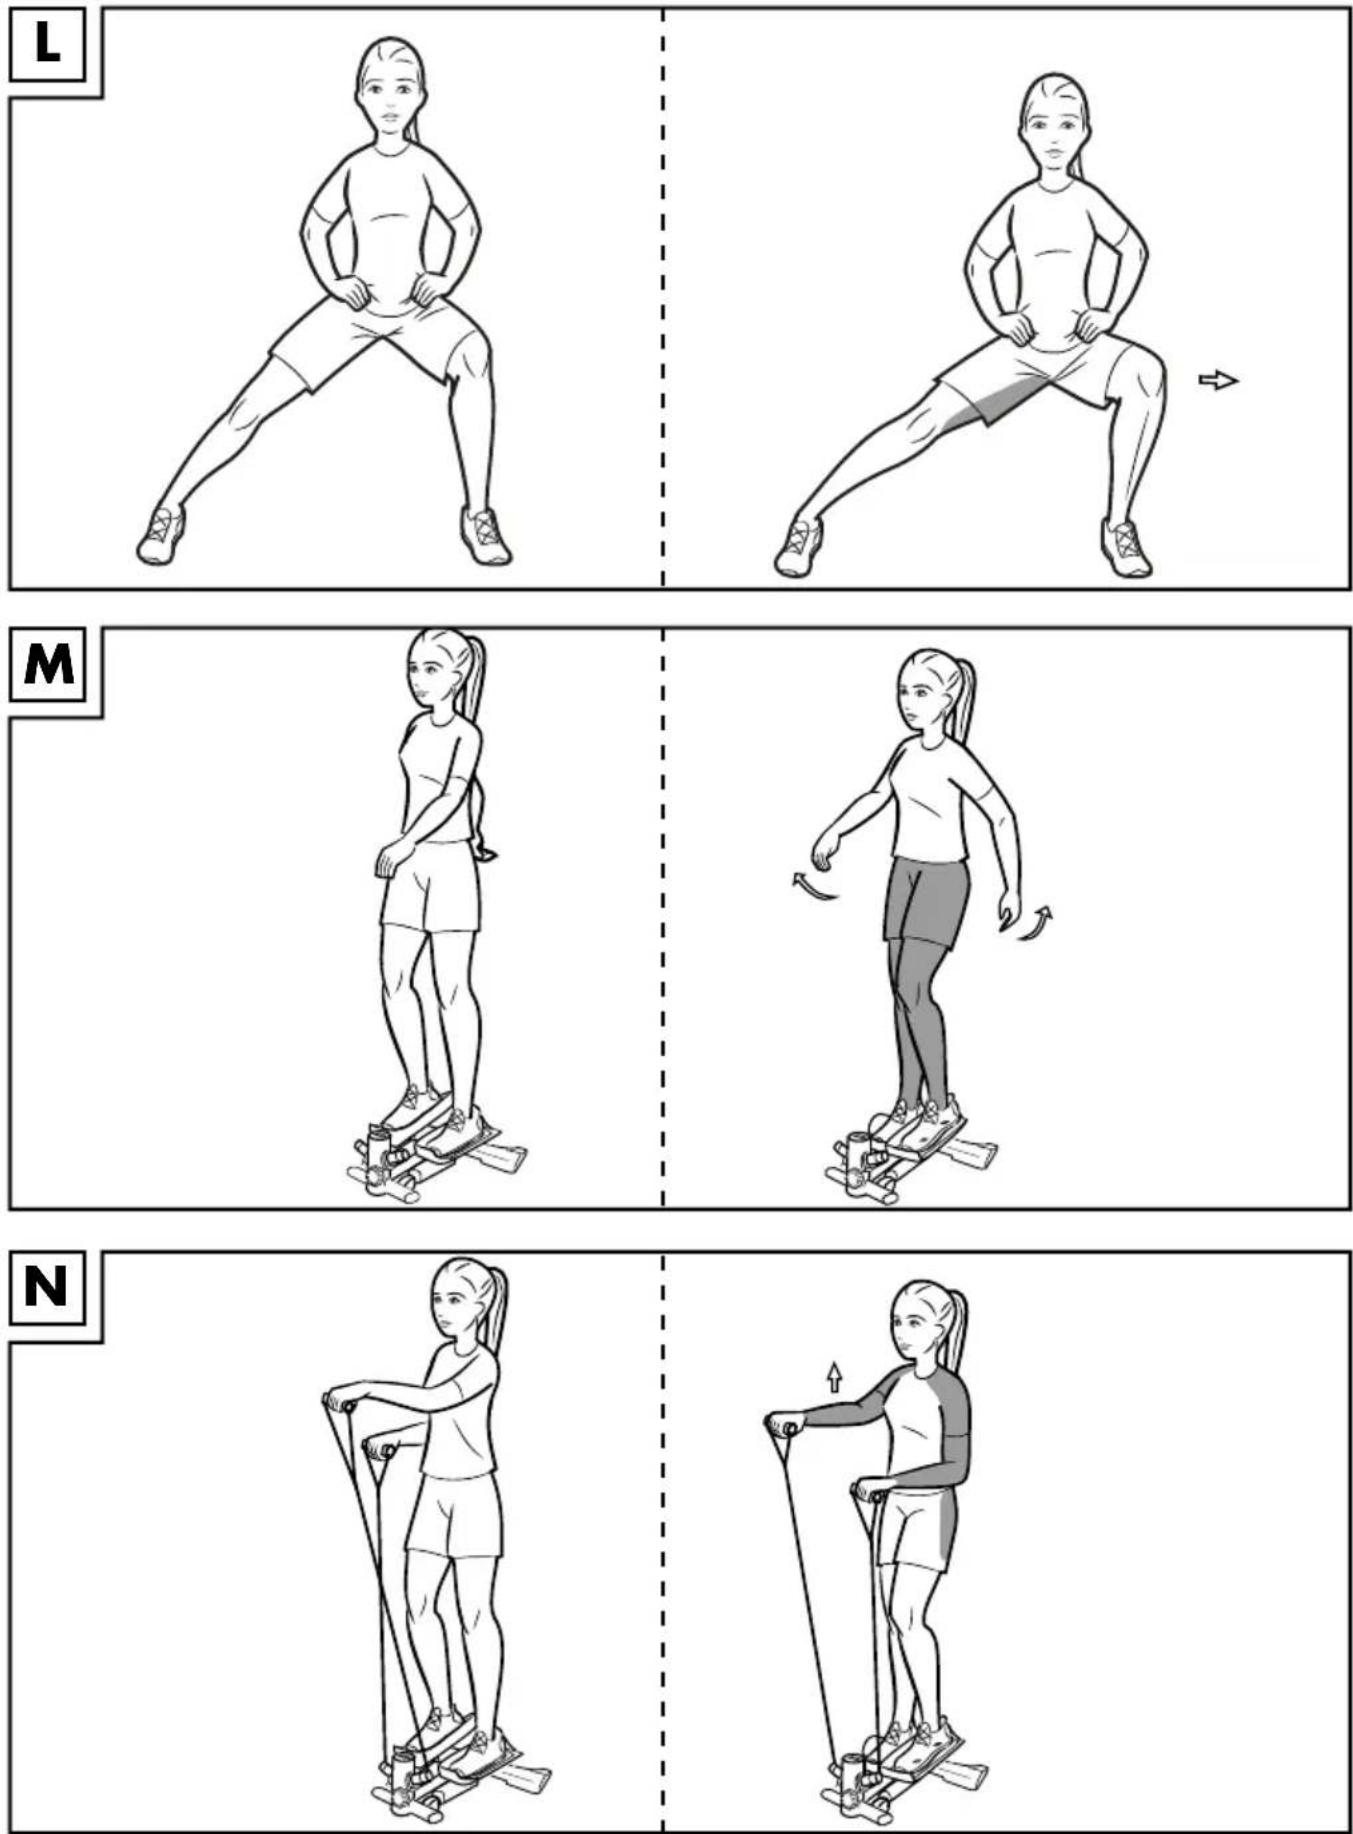

GB CY
Safety information - risks for children ..... 12
Package Contents 12
Technical Data 12
Intended use 12
Safety Information 13-14
Replacing the batteries 14
Assembling the stepper 14
Operating the computer 14 - 15
Training instructions 15 - 17
Stretching exercises 17 - 18
Exercises without straps 18
Exercises with straps 18 - 20
Maintenance, storage 20
Disposal 20
Dispose of batteries carefully 20
Notes on the guarantee and service
handling 20
HR
With your purchase you have decided on a high-quality product. Get to know the product before you start to use it.
Carefully read the following instructions.
Use the product only as described and only for the given areas of application. Keep these instructions safe. When passing the product on to a third party, always make sure that the documentation is included.

Safety information – risks for children
- This apparatus may be used by children from 8 years of age upwards, as well by persons with diminished physical, sensory or mental abilities, or those with little experience and knowledge, if they are supervised or instructed with regard to its safe use, provided they also understand potential risks.
• Children may not play with the apparatus. - Cleaning and maintenance may not be carried out by children without supervision.
Package contents (Fig. A)
1 x Swing-Stepper
2 x strap with handle
2 x plastic foot with support surfaces
2 x self-tapping screw
1 x adjusting screw
1 x Allen key with Phillips screwdriver
1 x battery (1.5V=ER03, AAA)
1 x instructions for use
Technical data
Measurements: approx. 52 x 24.5 x 52cm
$$ (W \times H \times D) $$
Weight: approx. 9.050kg
Energy supply:
$$ 1 \times 1. 5 V = - L R O 3, A A A $$
Rated power consumption: 0.09mW

Maximum load: 100kg

Delta-Sport Handelskontor GmbH hereby declares that this product complies with the following basic requirements as well as other relevant statutory provisions:
2014/30/EU - EMC Directive
2011/65/EU - RoHS Directive
Full declarations of conformity are available under http://www.conformity.delta-sport.com/

Date of manufacture (month/year): 09/2018
Device class: HC (for use in private households, exactitude C)/not intended for therapeutic training Tested according to: DIN EN ISO 20957-1: 2014, DIN EN ISO 20957-8, DIN 32935
Strength table of straps
| Adjusted length (in cm) | 60 70 80 90 | |||
| Maximum Stretch length (in cm) approx. | 165 | 165 165 | 165 | |
| Force (N) approx. | 31 27 | 23 19.5 | ||
The tolerance range for the force is approx. 20% (+/-).
Stepping motion
The stepper facilitates a stepper-determined stepping motion.
Brake resistance system
The stepper uses a speed-dependent system.
Intended use
The item is intended to be used exclusively as training equipment, and is approved for installation and use in the home only.

Safety information General risk
- Please ensure that the packaging materials do not become a deadly trap for a child (risk of suffocation).
- Never let small children play with the battery. Swallowing can cause serious harm to your health.
- Keep children away from the pedals during training sessions (risk of being crushed).
- The item is not a toy. When not in use, please store it so that it is inaccessible to children.
• Maximum load: The item is designed for a maximum body weight of 100kg. - Observe the maximum stretch length of the straps. The stretch length may not be adjusted beyond the marking (MIN.).
- No adjustment devices which may hinder the user's movements may protrude from the item. The item must be positioned in an area that gives you enough space for training. An area of at least 2 × 2m is necessary.
- Position the item on an even and level surface, so that it is stable during training, and does not "wobble".
- Please check that the item is in optimum condition before each use. Do not use it if this is not the case. Defective parts must be replaced, as otherwise function and safety are impaired.
- Repairs may only be performed by authorised specialists.
- Only original spare parts may be used.
- The item may only be used with appropriate gym shoes.
- There must be a clear space of approx. 0.6m around the training area (Fig. E).
- The elastomers of the expander should be protected from direct sunlight.
Risk of burns!
- The hydraulic dampers become hot during training. Do not touch them immediately after training under any circumstances.
Risks due to incorrect/excessive training!
- Please ensure that you observe all the instructions in the chapter entitled "Training Instructions".
Material damages!
- Oil could leak out of the hydraulic dampers. To avoid staining of floors or carpets, place the item on a level, non-slip surface.
- Prevent fluids from penetrating the computer. The sensitive electronics could become damaged. Protect the computer from direct sunlight.
- Check regularly to make sure all bolted connections are tight! Self-securing nuts cannot come loose through vibration.
This characteristic is, however, only guaranteed when tightened once only. In the event that the stepper is dismantled, all self-securing nuts must be replaced.
- When the item is not in use for an extended period, remove the battery from the computer. These could otherwise leak and cause damage.
- We recommend using an underlay during training, to prevent damage to the floor.
Battery warning notice!
- Remove the batteries when they are flat, or if the item is not in use for an extended period.
- Do not use different types or brands of batteries, or combine new and used batteries, nor use batteries with different capacities, as these can leak and cause damage.
- Ensure the polarity (+/-) is correct when inserting the batteries.
- Replace all batteries at the same time and dispose of the old batteries as prescribed.
- Warning! Batteries may not be charged or reactivated by any other means, taken apart, thrown into fire or short-circuited.
• Always keep batteries out of reach of children. - Do not use rechargeable batteries!
- Cleaning and maintenance may not be carried out by children without supervision.
- Clean the battery and device contacts as needed and before inserting.
- Do not expose the batteries to extreme conditions (e.g. radiators or direct sunlight). Otherwise there is an increased risk of leakage.
- Batteries can be life-threatening if swallowed. Therefore, always store them out of reach of small children. Medical attention must be sought immediately if a battery has been swallowed.
Danger!
- Handle damaged or leaking batteries with extreme caution and dispose of them properly as soon as possible. Wear gloves when doing so.
- If you come into contact with battery acid, wash the affected area with soap and water. If battery acid gets in your eye, rinse it with water and seek medical attention immediately!
- The connection terminals must not be short-circuited.
Replacing the batteries
CAUTION! Observe the following instructions to avoid mechanical and electrical damage.

Danger!
There is a battery LR03 in the item. You can replace the battery if it stops working.
- Raise the display on the side, and carefully remove it. The battery is at the back of the display.
- Slide the battery carefully out of the battery casing and replace with a new one.
Note: Make sure that the battery is inserted properly and completely in its casing.
- Insert the display and the cable connections into the casing once again.
Note: Make sure that the display is correctly inserted in the casing once again.
Assembling the stepper
Step 1:
Insert both plastic feet into the pipe on the back of the frame. The ribbed contact surfaces lie on the floor and the sharp ends point backward (Fig. C). To anchor it, a self-tapping screw is inserted into the pre-drilled hole on the underside of the frame.
Note: Make sure that the pre-drilled hole in the frame and the plastic foot are placed exactly on top of each other.
Step 2:
The adjustable screw is screwed into the thread on the front of the stepper.
With the help of this screw, you may adjust the step height of the tread surfaces.
To increase the step height, turn the adjustable screw in a clockwise direction. To lower the step height, turn the adjustable screw in an anticlockwise direction.
Step 3:
Remove the computer from the stepper by pulling it upwards.
Place the supplied battery in its appropriate compartment on the underside of the computer. Ensure that the polarities are correctly aligned.
Connect the computer to the connector on the casing and insert it once again. Make sure that the cable does not get pinched during this procedure.
Step 4:
Observe the maximum stretch length of the straps.
The shorter the straps, the greater the effort expended.
- Shorten the straps by locking the rubber hose with the safety ball into place (Fig. B).
IMPORTANT! Make sure not to shorten the straps too far. Do not go past the "MIN." marking!
- Hook the metal hook into the eyelet on the stepper frame and screw in the fastener on the hook tightly (Fig. D).
Important! Before training, check that the straps are securely fitted, and that the hook is safely and tightly screwed in. Caution! The eyelets are secured for tensile loads upwards only, and may not be subjected to transverse loads. There is a risk of injury, or damage to the stepper.
When you are not training with the straps, unhook them from the eyelets to avoid tripping over them. Check whether all screws and nuts are securely tightened.
Operating the computer
The stepper meets accuracy grade C, i.e., there is no claim to accuracy in the computer displays.
Turning the item on and off
When you start exercising or operating the pedals, the computer switches on automatically. If the stepper is out of operation for approx. 4 minutes, the computer switches off automatically.
Display
The top row displays:
- "STOP", if training is paused;
- The number of steps per minute (projection)
Selecting the mode
The 4 modes are displayed on the bottom row. Briefly press the MODE button to change from one mode to the next.
- "TMR": Training time to date, from 0:00 to 99:59
- "REPS": Number of steps completed during the current training session from 0 to 9999
- "CAL": Calories burned* from 0 to 9999
- "TTR": Number of training steps since inserting the battery, from 0 to 9999
* The calculation is based on pre-programmed standard values, that serve as a guideline only. The calories burned through use of the straps is not considered.
You may display all the training data, one after the other. To do this, press the "MODE" button a few times, until the "TMR" row blinks. The display will then automatically change from mode to mode every 5 seconds.
Entering training goals
You may enter one or more goals:
- Duration of training (TMR)
- Number of steps (REPS)
-
Calorie consumption (CAL)
-
Hold the MODE button down until "0:00 (TMR)" appears in the bottom row and the first 0 blinks (approx. 7 secs.).
-
To enter your training duration, press the MODE button several times, until the display shows the required duration in minutes.
-
After a few seconds the display will show the next mode (REPS). Press the MODE button, to set the amount of steps in increments of 10.
-
You may set the desired calorie consumption in the next mode (CAL) in increments of 10.
-
Now you may start with your training. The computer counts down the pre-programmed values to "0:00".
-
As soon as the pre-programmed goal is reached, the computer ceases to count for approx. 10 seconds. Afterwards, the computer starts again at 0.
Resetting the display
The display is on 0 only when used for the first time. With all subsequent training sessions, the computer continues counting from the last time you trained. To reset the display, keep the MODE button pressed down until all symbols can be seen at the same time. To reset the total number of training steps (TTR), remove the battery.
Training instructions
General
Consult with your doctor before you start training!
Goal-setting
Various goals can be achieved through appropriate training:
• Improvement in your general fitness levels
- Increase in endurance
• Improved feeling of well-being
Success is essentially dependent on the following points, which we would particularly like to bring to your attention:
- Regular training and sufficient duration of training sessions
- Appropriate nutrition
• Monitoring your training milestones
Who can train?
If you haven't trained or participated in sport for an extended period, have cardiovascular or orthopaedic problems, take medication, or are pregnant, you should consult your doctor before you commence training. Tell him/her which training equipment you intend using. Undergo an examination to ascertain which training programmes are suitable for you. To be safe, take the operating instructions with you, so that your doctor may put together an individual training programme with you. In general, every physically healthy person, whether young or old, can begin a fitness training programme, if he/she has consulted a doctor beforehand.
Note!
Incorrect or excessive training can endanger your health.
Load
Intensive workouts make demands on the entire body, and not merely the leg muscles.
The body, especially the heart and circulatory system, requires time to adapt to the changes brought on by the training sessions. For this reason, it is important to increase levels slowly, and to ensure that appropriate breaks are taken during and after training.
Ensure that you train at an appropriate level, i.e. one in which you do not over-strain yourself. Listen to your body; end the workout immediately if you feel unwell, are short of breath or experience dizziness. You are exercising at the correct level if you can have a normal discussion during your training session.
Cool-down/Relaxation
A cool-down, i.e. a relaxation programme is as important as a warm-up regime. Always end your training session appropriately; reduce your pace and effort level, and do light stretching exercises when you have dismounted the item. In this way, your pulse has time to calm down, and your body is able to recover more effectively for further efforts.
The duration of recovery periods between training sessions should be based on your fitness level.
Avoid excessively high training intensities, to prevent over-training. Excessive strain can cause health problems and lead to death. If you feel fatigue or weakness, cease training immediately.
To determine your individual training intensity, you may use the following calculation formula to ascertain your approximate maximum heart frequency (MHF):
$$ M H F = 2 2 0 - \text { your age } $$
Depending on your training goal, there are 5 training zones within which you may push the effort level to your maximum heart frequency.
Zones
Regeneration zone = 50-60 % of the MHF
Fat-burning zone = 60-70 % of the MHF
Carbohydrate-burning zone = 70-80 % of the MHF
Anaerobic zone = 80-90 % of the MHF
Warning zone = 90 - 100 % of the MHF
- Regeneration zone/health zone
This training is aimed at basic physical fitness. It consists of longer endurance exercises, which are to be performed slowly. It is especially suitable for beginners and/or people in weak physical condition.
- Fat-burning zone
Optimized for fat-burning, the workout is designed for strengthening the cardiovascular system. In this zone, the body burns proportionately the most kilojoules from fat. During your training session, you should feel relaxed and be able to converse.
• Carbohydrate-burning zone
In this zone, more carbohydrates are burned than fat. The training effort is more strenuous, but also more effective.
Mounting the stepper
Press one pedal down completely with your foot, so that the pedal arm rests on the floor frame on its stopper.
Then climb onto the foot pedal of the pedal which is in the bottom position.
Then put your other foot onto the other pedal which is leaning upward.
Dismounting
Press one pedal completely down with one foot, so that the one pedal arm rests on the floor frame on its stopper.
Then take your foot from the pedal which is pointing upward, and place it on the floor. Then take your foot from the pedal which is pointing downward.
Movement of the stepper during training
Your stepper simulates climbing stairs.
The swing effect causes the pedals not only to move up and down, but also to swing to the left and right.
Muscle groups exercised
When exercising without the straps, it is mainly the leg and buttocks that are exercised.
During exercises when you use both the stepper and the straps, you strengthen your buttocks, leg, arm and shoulder muscles.
During exercises where you do not step, but use the straps, you strengthen your arm and shoulder muscles.
Body posture
Please ensure that you keep your body straight during training sessions. Avoid a hollow-back posture at all costs.
Important: During exercising, keep constant abdominal tension and keep your upper body erect!
If you maintain an even stepping motion, the pedal arm stoppers should not touch the floor frame. Just before standing up each time you step, shift your body weight from one leg to the other. It can also be helpful if you let your arms swing at a slight angle to your upper body while stepping in a rhythmic motion.
Stretching exercises
Stretching the lower back muscles (Fig. F)
Starting position
- Get down on all fours.
- Position your hand and knee joints under your shoulders and buttocks.
End position
- Tighten your stomach muscles and roll your back into an arch like a cat, until you feel the stretch in your entire back.
- Keep your eyes directed on your hands.
- Stay in this position for a moment and then go back to your starting position.
- Repeat this exercise 2–3 times in three sets.
Important: Keep your back and pelvis straight in the all-fours position.
Stretching the backs of the thighs (Fig. G)
Starting position
- Lie with your back on the floor. Your legs are stretched out in a relaxed position.
End position
- Tense your stomach muscles and lift one leg straight up into a vertical position.
- Grab your upper thigh with your hands and pull it towards you more to increase the stretch.
-
Your toes point downward while your other leg stays stretched on the ground.
-
Stay in this position for a moment and then go back to your starting position.
- Repeat this exercise 2–3 times in sets of three, and then change legs.
Important: Some people have very short rear thigh muscles. If this applies to you, you may use a towel to help pull your thigh towards yourself.
Stretching the chest muscles (Fig. H)
Variation 1
Starting position
- Place one underarm and one elbow on a wall, with your hand facing upwards. The upper and lower arm must form a right angle.
- Keeping your arm on the wall, turn your upper body slightly away from the wall.
- Repeat this exercise 2–3 times in sets of three and then change sides.
End position
Variation 2
Starting position
- Stretch both underarms up and to the sides, so that upper and lower arms form a right angle.
- Lean slightly in a stepping stance in front of a door frame.
- Press your upper body forwards carefully, so that you feel the stretch in your chest area.
- Repeat this exercise 2-3 times in three sets.
End position
Important: Hold the stretch for 5 seconds.
Stretching the neck muscles (Fig. I) Starting position
- Stand up straight.
End position
-
Tilt your head to the side towards your shoulder, while simultaneously pulling the other shoulder down. You should feel the stretch on the side of your neck.
-
Stay in this position for approx. 5 seconds and then go back to your starting position.
-
Repeat this exercise 2–3 times in sets of three, and then change sides.
Important: Keep your head looking straight forward, without twisting your neck. Performing this exercise in front of a mirror will facilitate the correct posture.
Stretching the front thigh muscles (Fig. J)
Starting position
- Tighten your stomach muscles while standing up straight.
- Avoid a hollow back position by pulling your pelvis upwards.
- For better support you may lean against a wall with one hand.
End position
-
Holding the tension, grab one ankle and pull it towards your buttocks. Keep your legs parallel during this movement.
-
The stretch should be felt on the front upper thigh of the bent leg.
-
Stay in this position for approx. 5 seconds and then go back to your starting position.
-
Repeat this exercise 2–3 times in sets of three, and then change legs.
Important: Some people have very short front thigh muscles. If this applies to you, you may use a towel to pull your foot toward yourself.
Stretching the hip flexor (Fig. K) Starting position
- Lunge forward and put your back leg on the ground, with your shin on the floor.
- Upper and lower parts of the front leg make a right angle, and your arms rest on the front leg.
End position
-
With a straight, upright back, push your pelvis forward and towards the floor, so that you can feel the stretch in the hip area of your back leg.
-
The front knee should not jut out over your toes.
-
During this movement, make sure that your back leg and your hip make a straight line, and you don't turn your pelvis outward.
-
Stay in this position for approx. 5 seconds and then go back to your starting position.
-
Repeat this exercise 2–3 times in sets of three, and then change legs.
Important: Keep your back straight during the exercise.
Stretching the inner thigh (Fig. L) Starting position
-
Stand with your legs wide apart, and bend out one leg from this wide-legged stance.
-
Place your hands lightly on your hips. End position
-
Stretch the other leg to the side, and shift your body weight onto the bent leg.
-
Keep the foot of the stretched leg on the floor, so that you feel the stretch in the inner upper thigh of the outstretched leg.
-
Stay in this position for approx. 5 seconds and then go back to your starting position.
-
Repeat this exercise 2–3 times in sets of three, and then change legs.
Important: Keep your back and pelvis straight during the exercise.
Exercises without straps
For thighs, calves and buttocks (Fig. M) Starting position
- Stand with your feet on the stepper.
- Tighten your buttocks and stomach muscles.
- Press down alternately on the pedals with your feet. Your arms should move back and forth naturally, as if you were walking or climbing stairs.
- Your head is an extension of your spine and your upper body is upright.
- Increase the intensity by gradually raising your arms.
- Repeat this exercise 10-15 times in three sets.
End position
Important: Your arms swing in the opposite direction of your legs, and your pelvis remains straight.
Exercises with straps
Notice for training with straps! The strap may be stretched to a maximum of 165cm. Otherwise, it could become damaged and injure the user.
The longer you stretch the strap, the more energy you need to expend.
The correct grip
Ensure that your grip is always kept level when pulling the straps.
Do not bend your wrist joints, as you would overstrain them.
Exercises
For all the following exercises, please note:
• Take hold of the handles.
- Execute the movements in a controlled fashion.
- Keep your arms tense.
- Before each training session, check whether the fastenings of the rope hooks are tightly closed.
- The duration of the exercise sets should be based on your personal fitness level. Divide the exercises into multiple sets and pause between individual sets.
We recommend 3 sets per exercise, with the duration of the repetitions orientated according to your fitness level.
For arms, shoulders, legs and buttocks (Fig. N)
Starting position
- Stand with your feet on the stepper.
- Take hold of the straps. The backs of your hands are pointing upwards.
End position
- Tighten your arm and stomach muscles and buttocks.
- Lift your left arm, slightly bent, in front of you to shoulder height, while you press the right pedal down with your foot.
- Drop your left arm, and lift your right one at the same time, while pressing the left pedal down with your foot.
- Your head is an extension of your spine and your upper body is upright.
- Repeat this exercise 10-15 times in sets of three.
Important: Your arms swing in the opposite direction of your legs, and your pelvis remains straight.
For the arms, especially for the shoulders (Fig. O)
Starting position
- Stand with your feet on the stepper. The pedals are not needed for this exercise.
- Take hold of the straps and hold your hands at hip-height.
End position
- Tighten your arm and stomach muscles.
- Pull your right arm towards your chin.
While doing this, pull your elbow up sideways to shoulder height, with the back of your hand facing upwards.
-
At the same time, lower your left arm.
-
Stay in this position for a moment and then go back to your starting position.
-
Now, pull your left arm up towards your chin. While doing this, pull your elbow up sideways to shoulder height, with the back of your hand facing upwards.
-
At the same time, lower your right arm.
-
Repeat this exercise 10–15 times in sets of three.
Important: During this exercise, keep your upper body and pelvis straight.
For the arms, legs, buttocks and especially the upper arms (Fig. P)
Starting position
- Stand with your feet on the stepper.
- Take hold of the straps and hold your hands at hip-height. Your elbows remain close to your body. The palms of your hands are pointing upwards.
End position
- Tighten your arm and stomach muscles.
- Lift your right underarm up, at the same time pressing the left pedal down with your foot.
- Lift your left underarm up now, pressing the right pedal down with your foot at the same time.
- The right arm is lowered down at the same time.
- Repeat this exercise 10–15 times in sets of three.
Important: During this exercise, keep your upper body and pelvis straight.
For the back, shoulders, chest, legs and buttocks (Fig. Q)
Starting position
- Stand with your feet on the stepper.
- Take hold of the straps and hold your hands close to your body at the sides.
End position
- Tighten your buttocks and stomach muscles.
- Press down alternately on the pedals with your feet. Your arms should move back and forth naturally, as if you were walking or climbing stairs.
- Your head is an extension of your spine and your upper body is upright.
-
With outstretched arms, pull the straps up to shoulder height, and then lower them again. The palms of your hands are pointing downwards.
-
Repeat this exercise 10–15 times in sets of three. Important: During this exercise, keep your upper body and pelvis straight. Variation: Perform the exercise with the palms of your hands facing upwards.
Maintenance, storage
Please remember that regular maintenance and cleaning contribute to the safety of your stepper and mean that you will enjoy using your stepper for a long time. Always store the product in clean and dry condition at room temperature. Only use water to clean and wipe it dry with cleaning cloth. IMPORTANT! Never clean the product with aggressive cleaning agents.
Disposal
Dispose of the article and the packaging materials in accordance with current local regulations. Packaging materials such as foil bags are not suitable to be given to children. Keep the packaging materials out of the reach of children.
Devices that are marked with the symbol shown here may not be disposed of with domestic waste. You are obliged to dispose of kinds of used electrical and electronic devices lately. Ask your local authority about possible loads for regulated disposal. Remove the batteries the article before disposing of it.
Dispose of batteries carefully

Please note: Batteries are hazardous waste and may not be disposed of with domestic waste by law. You can hand over used batteries free of charge at local collection points or at retail outlets. Special containers are provided here for this purpose.
Notes on the guarantee and service handling
The product was produced with great care and under constant supervision. You receive a three-year warranty for this product from the date of purchase. Please retain your receipt.
The warranty applies only to material and workmanship and does not apply to misuse or improper handling. Your statutory rights, especially the warranty rights, are not affected by this warranty. With regard to complaints, please contact the following service hotline or contact us by e-mail. Our service employees will advise as to the subsequent procedure as quickly as possible. We will be personally available to discuss the situation with you. Any repairs under the warranty, statutory guarantees or through goodwill do not extend the warranty period. This also applies to replaced and repaired parts. Repairs after the warranty are subject to a charge.
IAN: 304198
GB Service Great Britain Tel.: 0800 404 7657 E-Mail: deltasport@lidl.co.uk
CY Service Cyprus Tel.: 8009 4409 E-Mail: deltasport@

Srdačno vam čestitamo!