
Xemio-769 - Mp3 player LENCO - Free user manual and instructions
Find the device manual for free Xemio-769 LENCO in PDF.


| Product type | MP3/4 player with Bluetooth |
| Brand | Lenco |
| Model | Xemio-769 |
| Screen | TFT color 1.8 inches |
| Power supply | Rechargeable battery via micro USB port |
| Internal memory | None (requires microSD card) |
| Supported memory card | microSD up to 64 GB (8 GB card included) |
| Audio formats | MP3, WMA, WAV (common audio formats) |
| Video formats | AVI, AMV (max resolution 120 × 160 pixels) |
| Image formats | JPEG, BMP (common image formats) |
| E-book format | TXT |
| Bluetooth connectivity | Yes (for Bluetooth headphones and speakers) |
| Micro USB port | Data transfer and charging |
| Headphone jack | 3.5 mm jack |
| Microphone | Built-in for voice recording |
| Main functions | Music, Bluetooth, Video, Images, Recorder, E-book, Folders, Settings, Stopwatch |
| Sleep timer | 15, 30, 60, 100 min or off |
| Hearing protection | Warning message if volume > 20 |
| Languages | Multilingual (selectable in settings) |
| Firmware upgrade | Via microSD card |
| Care and cleaning | Clean with a soft dry cloth; do not use solvents |
| Safety | Do not use near water; do not open; keep out of reach of children |
| Warranty and service | In accordance with European legislation; contact the retailer or www.lenco.com |
| Spare parts and repairability | Contact the retailer for any repair; warranty void if unauthorized opening |
Frequently Asked Questions - Xemio-769 LENCO
User questions about Xemio-769 LENCO
0 question about this device. Answer the ones you know or ask your own.
Ask a new question about this device
Download the instructions for your Mp3 player in PDF format for free! Find your manual Xemio-769 - LENCO and take your electronic device back in hand. On this page are published all the documents necessary for the use of your device. Xemio-769 by LENCO.
USER MANUAL Xemio-769 LENCO
User Manual – MP3/4 player with Bluetooth and 8GB micro SD card
Usage of controls or adjustments or performance of procedures other than those specified herein may result in hazardous radiaon exposure.
This unit should not be adjusted or repaired by anyone except qualified service personnel.
KEEP THESE INSTRUCTIONS IN MIND:
- Do not use this device near water.
- Clean only with a slightly damp cloth.
- Do not cover or block any venlaon openings. When placing the device on a shelf, leave 5 cm (2") free space around the whole device.
-
Install in accordance with the supplied user manual.
-
*Don't step on or pinch the power adaptor. Be very careful, particularly near the plugs and the cable's exit point. Do not place heavy items on the power adaptor, which may damage it. Keep the enre device out of children's reach! When playing with the power cable, they can seriously injure themselves.
-
*Unplug this device during lightning storms or when unused for a long period.
-
Keep the device away from heat sources such as radiators, heaters, stoves, candles and other heat-generang products or naked ame.
-
Avoid using the device near strong magnec elds.
-
Electrostac discharge can disturb normal usage of this device. If so, simply reset and restart the device following the instrucon manual. During le transmission, please handle with care and operate in a stac-free environment.
-
Warning! Never insert an object into the product through the vents or openings. High voltage ows through the product and inserng an object can cause electric shock and/or short circuit internal parts. For the same reason, do not spill water or liquid on the product.
-
Do not use in wet or moist areas such as bathrooms, steamy kitchens or near swimming pools.
-
Do not use this device when condensaon may occur.
-
Although this device is manufactured with the utmost care and checked several mes before leaving the factory, it is sill possible that problems may occur, as with all electrical appliances. If you noce smoke, an excessive build-up of heat or any other unexpected phenomena, you should disconnect the plug from the main power socket immediately.
-
This device must operate on a power source as specified on the specicaon label. If you are not sure of the type of power supply used in your home, consult your dealer or local power company.
-
*The socket outlet must be installed near the equipment and must be easily accessible.
-
*Do not overload ac outlets or extension cords. Overloading can cause re or electric shock.
-
*Devices with class 1 construcon should be connected to a main socket outlet with a protecve earthed conncon.
-
*Devices with class 2 construcon do not require a earthed conncon.
-
Keep away from rodents. Rodents enjoy bing on power cords.
-
*Always hold the plug when pulling it out of the main supply socket. Do not pull the power cord. This can cause a short circuit.
-
Avoid placing the device on any surfaces that may be subject to vibraons or shocks.
-
To clean the device, use a soft dry cloth. Do not use solvents or petrol based uids. To remove severe stains, you may use a damp cloth with dilute detergent.
-
The supplier is not responsible for damage or lost data caused by malfuncon, misuse, modicaon of the device or baery replacement.
-
Do not interrupt the conncon when the device is formang or transferring les. Otherwise, data may be corrupted or lost.
-
If the unit has USB playback funcon, the usb memory sick should be plugged into the unit directly. Don't use an usb extension cable because it can cause interference resulting in failing of data.
-
The apparatus shall not be exposed to dripping or splashing and make sure that no objects lled with liquids, such as vases, are placed on or near the apparatus.
-
*To completely disconnect the power input, the mains plug of the apparatus shall be disconnected from the mains, as the disconnect device is the mains plug of apparatus.
-
If the unit works with baery, Baery shall not be exposed to excessive heat such as sunshine, re or the like.
-
Attenon should be drawn to the environmental aspects of baery disposal.
-
The apparatus can only be used in moderate extremely cold or climates warm environments should be avoided.
-
The rang label has been marked on the boom or back panel of the apparatus.
-
This device is not intended for use by people (including children) with physical, sensory or mental disabilities, or a lack of experience and knowledge, unless they're under supervision or have received instrucons about the correct use of the device by the person who is responsible for their safety.
- This product is intended for non professional use only and not for commercial or industrial use.
- Make sure the unit is adjusted to a stable posion. Damage caused by using this product in an unstable posion or by failure to follow any other warning or precaution contained within this user manual will not be covered by warranty.
- Never remove the casing of this apparatus.
- Never place this apparatus on other electrical equipment.
- Do not use or store this product in a place where it is subject to direct sunlight, heat, excessive dust or vibraon.
- Do not allow children access to plasc bags.
- Only use aachments/accessories specied by the manufacturer.
- Refer all servicing to qualified service personnel. Servicing is required when the apparatus has been damaged in any way, such as the power supply cord or the plug, when liquid has been spilled or objects have fallen into the apparatus, when the apparatus has been exposed to rain or moisture, does not operate normally, or has been dropped.
- *Do not use a damaged power cord or plug or a loose outlet. Doing so may result in re or electric shock.
- Prolonged exposure to loud sounds from personal music players may lead to temporary or permanent hearing loss.
INSTALLATION
- Unpack all parts and remove protective material.
• *Do not connect the unit to the mains before checking the mains voltage and before all other connexons have been made.
*Those instrucons are related only to products using power cable or AC power adaptor.
- Controls at a glance:
1) [VOL+]: Increase the volume.
2) [VOL-]: Decrease the volume.
3) Screen: 1.8inch TFT.
4) [ ]: Short press for previous track/long press to rewind.
5) [ ]: When on the song screen, press M to change play mode.
6) [ ]: Return to previous menu.
7) [ ]: Short press for next track/long press to fast forward.
8) [ ]: Enter key/play and pause/long press to switch on/off.
9) [ ]: Micro SD card slot, Supports up to 64GB.
10) [ ]: Micro USB port, data transferring & recharging
11) [ ]: ON/OFF switch.
12) Earphone Socket: 3.5mm
13) MIC: recording voice
- Connect to the PC & Download audio les from PC
Connect the player to computer for downloading the les or charging the player.
- Make sure that your computer is switched on before you connect the Xemio to your computer
-
Use the enclosed Micro USB cable to connect it to your computer and it loads to a screen indicang "Charge & transfer" or "Charge & play".
-
The player has no built-in memory. Your music/video les have to be stored on a MicroSD card (included).
3.1 If the player is connected with MicroSD inserted, the computer will show it as removable disk.
3.2 If the player is connected without MicroSD inserted, the computer will recognize it but doesn't show it as removable disk.
- When the MicroSD card is inserted, you can drag and drop les from your computer to your Xemio player.
Note:
- The baery charging animaon will show when the player is connected to the computer.
- Do not disconnect the player from computer during data transfer, it may damage the player/MicroSD card.
- When the powerswitch (11) is o, the computer will recognize the player, but the baery will not be charged.
Important noce:
- If the player doesn't power up, please check the powerswitch (11). It must be switched to "on";
- Make sure the powerswitch (11) is in the 'on' posion before charging the player, to prevent reminding messages on the lcd screen.
- The player comes without built-in memory, please insert a Micro SD card into the player before operaon;
- The players Bluetooth mode is only for transming to Bluetooth devices like headsets or speakers. It can't be connected to mobile phones or computers.
- Basic Operaon
Funcon
Instrucon
Power on/o
• Turn the power switch (11) to 'on' to power on the player
• If the player does not power on then long press buon to power on.
- When no buons are pressed or no music is played for some me, the player will power o automacally to save battery, it will power o automacally by itself.
- Use the arrow to navigate through the main menu and select the desired funcon with the play/pause buon (8) (Music, Bluetooth, Video, Pictures, Recorder, EBook, Folder view, Sengs or Tools.)
Main menu
Listening to music
Select the Music icon and push the play/pause (8) buon, a new list will appear showing the following: All songs, Last played, Arsts, Albums, Genres, Playlists and Update Playlist.
- Press the play/pause (8) buon on “all songs”. Choose a song and press the play/pause (8) buon to start playing on ‘All songs’ and select one song then the player will start playing.
Bluetooth
Select the Bluetooth icon and press the play/pause (8) buon.
A list will appear showing the following: BT Control, Search Device, Device List, All Songs, and Now
| Playing.Push the play/pause (8) buon on ‘BT Control’ then select ‘On’ to acvate the Bluetooth.Press the play/pause (8) buon on ‘Search Device’ to start searching for available Bluetooth devices, select your desired device and press the play/pause (8) buon then press the play/pause (8) buon on the ‘pair’ opon to connect to that Bluetooth device. “BT connected” will show on the display when the device is successfully connected.Now use the next (7) or previous (4) buons to navigate to “All Songs” and press the play/pause (8) buon on the desired song to start playing. | |
| Video | Select the video icon on the main menu and push the Play/pause (8) buon. If there are videos available on your MicroSD card, they will now appear.Format supported: AVI/AMV (The resoluon may not be higher than 120×160pixels), Please check the instrucons below for video conversionSelect a video from the list and push the Play/pause (8) buon to start playing,Press next (7) or previous (4) key to go to next/previous video.Press and hold next (7) or previous (4) arrow key to fast forward/rewind.Press the Play/pause (8) to play/pause the videoPress the [M] button (5) to select ‘Repeat’, ‘Delete video’, ‘Update Playlist’ during video playing, press the Play/pause (8) buon to conrm. |
| Picture | Select icon Picture on the main menu and push the center buon, it will display a list of images available.Push the right single arrow key to move to the image you want to view.Press the center buon to conrm playing the image.When the player is on the picture screen, push [M] buon (5) and it will display ‘Slideshow sengs’, ‘Delete picture’, push the Play/pause (8) buon to conrm setup.Press [] to go back to the main menu. |
| Recorder | Select Recorder icon on the main menu, and push the Play/pause (8) buon, a new list will appear showing the following: ‘Record voice’, ‘Record lib.’, and ‘Set record’.Select opon ‘Record voice’ and push the center buon on it, the player will indicate ‘Please wait’ and then recording starts.Push the center buon to pause the recording.Push [→] and the player indicates ‘Save recording?’, select yes and push center buon to save it.Select opon ‘Set record’ and push the center buon to enter the sengs of ‘Bitrate’, you can move the right arrow key to choose ‘512kbps/768kbps/1024kbps/1536kbps’ for recordings. |
| Listen to the recordings | Select Recorder icon on the main menu, push the right single arrow key (7) to move to opon ‘Record lib’.Push the Play/pause (8) buon to enter, the player shows ‘Delete All’, and a list of recorded les.Select one recorded le and press Play/pause (8) buon to start listening to the le you want. |
| EBook | Select Ebook icon on the main menu and push the center buon, it will appear a list of all the EBook les available.EBook Supported format are. TXT lesPush the next (7) or previous (4) key to move to the le you want to view, and push the Play/pause (8) buon to view the le.When on the e-book screen, Pushing the [M] buon (5) will display a new opon list: ‘Play seng’, ‘Delete eBook’, ‘Delete bookmark’, ‘Add bookmark’ and ‘Page select’.Select ‘Play seng’ to set the Auto play me per page: from 2 seconds to 30 seconds, then press the play/pause (8) buon to conrmWhen on the e-book screen, push the center buon to start Auto playing (a play icon will show on the top of display).Press [→] (6) to go back to the main menu. |
| Folder View | Select Folder icon on the main menu and push the Play/pause buon, the player will show all the les inside, including Music les, video les, images, and EBook les.Press the next (7) or previous (4) buon to move to any le you want to view, and push the Play/pause(8) buon to start playing, the basic operaons are similar to above-menoned content.Press [→] (6) to go back to the main menu. |
| Sengs | Select icon Seng on the main menu and push the Play/pause (8), it will show a list as following:Restore device:Restore factory sengs, select 'Yes' and push the Play/pause (8) buon to conrm restoring, the player will reboot;Ear protect:Enables/disable high volume message if volume level is over 20;Sleep mer:When acvated the player will shut down aer the chosen me, regardless if the music is playing or not. You can choose between 15min, 30min, 60min, 100min, or choose "turn o" to disable this funcon.Note:The sleep mer will be set to the default seng "Turn o" when the Xemio is turned o/on again.Power saving:When the player is idle, it will shut down automacally aer the congured me. You can select Turn o, 30s, 1min, 2min.Backlight mer:The display will darken at the congured me. The Xemio will sll be acve. Press any key to reacvate the display. You can choose 10s, 20s, 30s or Always on.Language:Press next (7) or previous (4) to select the desired language and press the play/pause (8) buon to conrmInformaon:Will show 'Player info' & 'Disk space' of the Player.Format Device:Will erase all data on the memory card. Pressing the Play/pause (8) buon will show the warning message "All data will be erased. Connue?". Select "yes" to start erasing.Auto upgrade:If a new rmware is released, you can install the FW on the MicroSD. Press the Play/pause (8) buon, when the rmware le is selected, to start upgrading.Note:you are suggested to consult with our technical support before upgrading the player, because improper upgrade may damage the player. |
| Tools | In the tools secon you nd the stopwatch funcon. Press the play/pause (8) buon to start the stopwatch. It will show 5 (lap) mes, which you can select with the next (7) or previous (4) buons.Pressing the play/pause (8) buon will start/stop the acve (lap) mer. Press [M] (5) to reset all (lap) mersPress [⇨] (6) to go back to the main menu. |
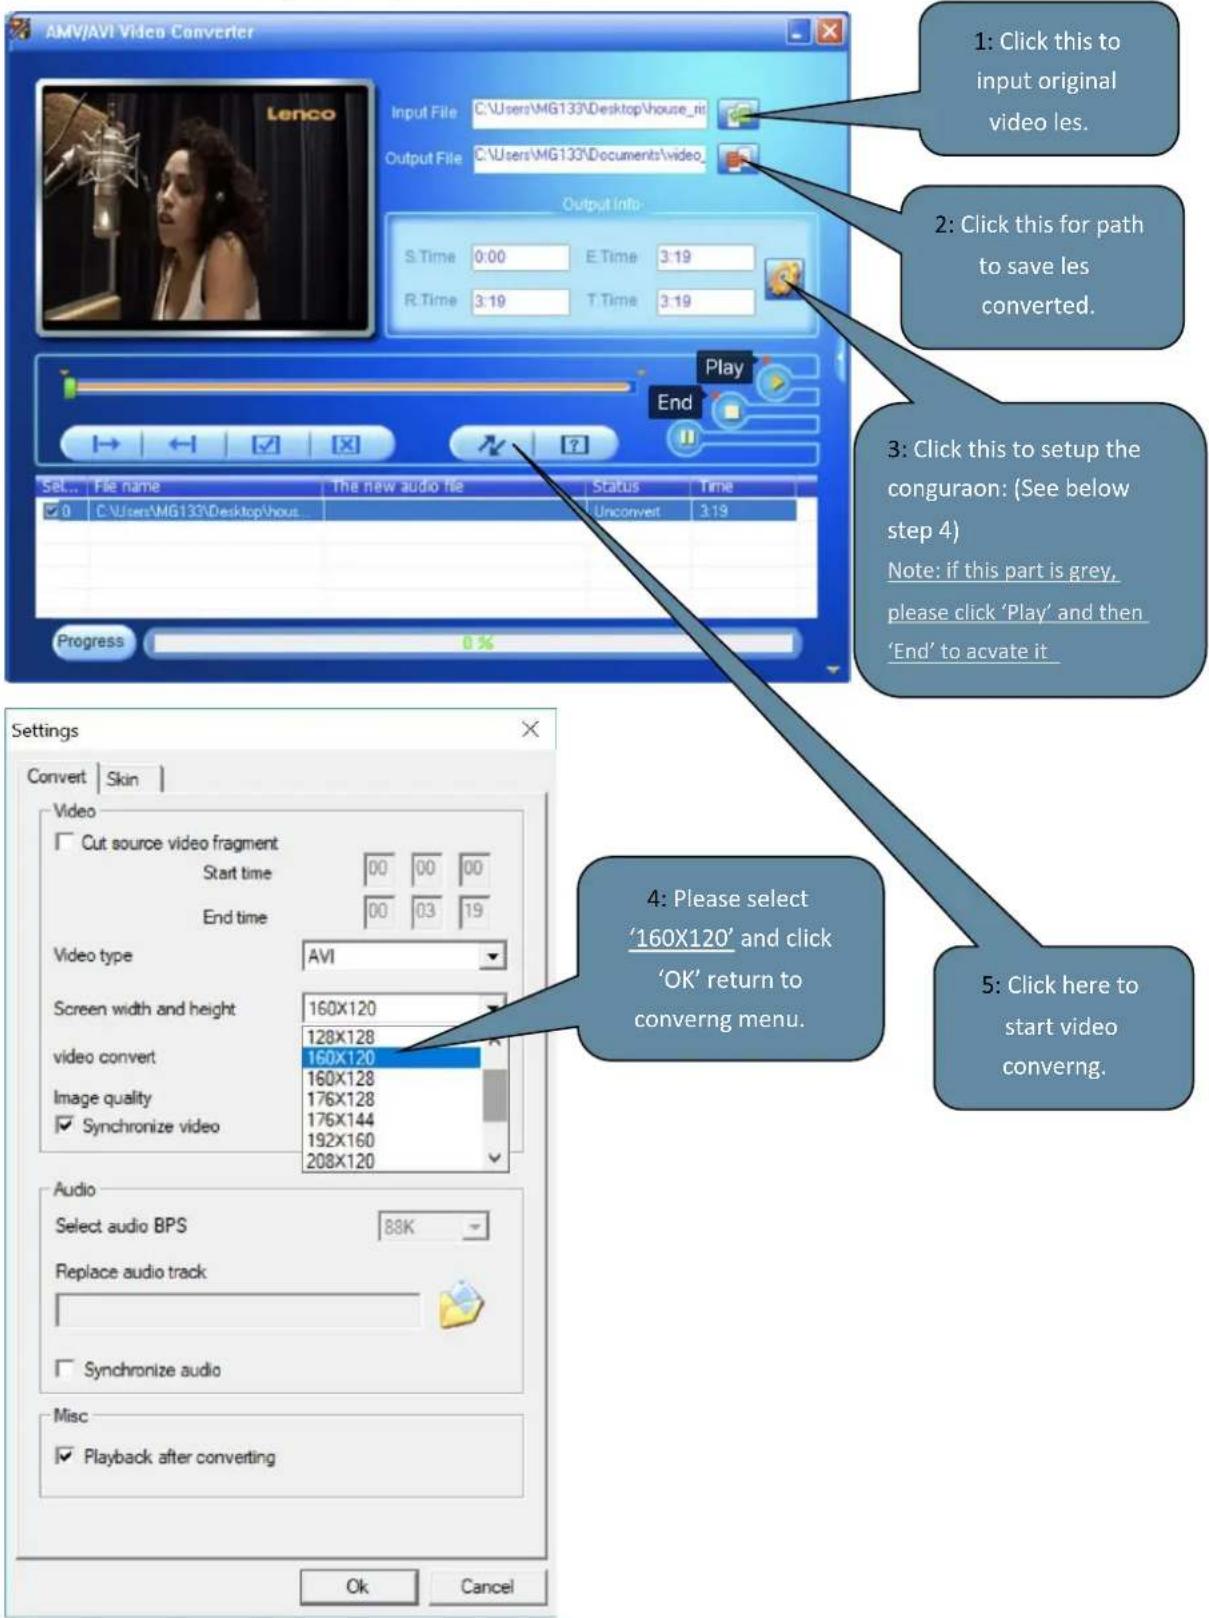
Install the video converng tool
- Double click

the video conversion tool.
- Convert the video les.
Please follow below steps to complete the video convert:
Guarantee
Lenco oers service and warranty in accordance to European law, which means that in case of repairs (both during and aer the warranty period) you should contact your local dealer.
Important note: It is not possible to send products that need repairs to Lenco directly.
Important note: If this unit is opened or accessed by a non-social service center in any way, the warranty expires.
This device is not suitable for professional use. In case of professional use, all warranty obligaons of the manufacturer will be voided.
Disclaimer
Updates to Firmware and/or hardware components are made regularly. Therefore some of the instrucon, specicaons and pictures in this documentaon may dier slightly from your parcular situaon. All items described in this guide for illustraon purposes only and may not apply to parcular situaon. No legal right or entlements may be obtained from the descripon made in this manual.
Disposal of the Old Device
natural_image
Symbol of a trash bin crossed out by two diagonal lines (no text or numbers present)This symbol indicates that the relevant electrical product or baery should not be disposed of as general household waste in Europe. To ensure the correct waste treatment of the product and baery, please dispose them in accordance to any applicable local laws of requirement for disposal of electrical equipment or baeries. In so doing, you will help to conserve natural resources and improve standards of environmental protecon in treatment and disposal of electrical waste (Waste Electrical and Electronic Equipment Directive).

Service
For more informaon and helpdesk support, please visit www.lenco.com
Lenco Benelux BV, Thermiekstraat 1a, 6361 HB, The Netherlands.
LET OP:
natural_image
Symbol of a trash bin crossed out by two crossed lines, with a blank rectangular base below (no text or labels)natural_image
Symbol of a trash bin crossed out by two crossed lines, with a blank rectangular base below (no text or symbols)natural_image
Simple line drawing of a trash bin with diagonal lines crossing it, no text or symbols present.
natural_image
Symbol of a trash bin with crossed lines and a blank rectangular base (no text or labels)
- KEEP THESE INSTRUCTIONS IN MIND:
- INSTALLATION
- - Controls at a glance:
- - Connect to the PC & Download audio les from PC
- Note:
- Important noce:
- - Basic Operaon
- Funcon
- Instrucon
- Power on/o
- Main menu
- Listening to music
- Bluetooth
- Install the video converng tool
- Guarantee
- Disclaimer
- Disposal of the Old Device
- Service
- LET OP:
Brand : LENCO
Model : Xemio-769
Category : Mp3 player