
iRig Pro Duo I/O - Hi-Fi IK Multimedia - Free user manual and instructions
Find the device manual for free iRig Pro Duo I/O IK Multimedia in PDF.


| Type de produit | Interface audio portable |
| Dimensions | 5.5 x 2.5 x 1.5 pouces (14 x 6.4 x 3.8 cm) |
| Poids | 0.5 lb (227 g) |
| Alimentation | Bus USB ou 2 piles AA |
| Entrées | 2 entrées combo XLR/TRS avec préamplis |
| Sorties | 2 sorties TRS équilibrées |
| Fréquence d'échantillonnage | Jusqu'à 96 kHz / 24 bits |
| MIDI | Entrée/sortie MIDI 5 broches |
| Sortie casque | 1 sortie casque 1/8" avec volume dédié |
| Connectivité | USB-A et Lightning (câbles inclus) |
| Logiciel inclus | Suite AmpliTube, SampleTank, etc. |
| Entretien et nettoyage | Essuyer avec un chiffon sec et doux |
| Sécurité | Ne pas exposer à l'eau ou à des températures extrêmes |
| Pièces détachées et réparabilité | Contacter le support IK Multimedia, aucune pièce détachée fournie |
| Informations générales | Marque : IK Multimedia - Modèle : iRig Pro Duo I/O |
Frequently Asked Questions - iRig Pro Duo I/O IK Multimedia
User questions about iRig Pro Duo I/O IK Multimedia
0 question about this device. Answer the ones you know or ask your own.
Ask a new question about this device
Download the instructions for your Hi-Fi in PDF format for free! Find your manual iRig Pro Duo I/O - IK Multimedia and take your electronic device back in hand. On this page are published all the documents necessary for the use of your device. iRig Pro Duo I/O by IK Multimedia.
USER MANUAL iRig Pro Duo I/O IK Multimedia
Register your iRig Pro Duo I/O 3
iRig Pro Duo I/O overview 4
Installation and setup 5
Battery life 5
iOS/Android devices 6
Mac/PC 10
Connecting an external power supply 10
iRig Pro Duo I/O LEDs 11
Status / Audio level LEDs 11
Phantom and MIDI LEDs 11
Direct monitoring 12
Connecting microphones 12
Dynamic microphones 13
Condenser microphones 13
Ribbon microphones 14
Connecting instruments 15
Connecting monitors and headphones 15
MIDI IN/OUT 15
MIDI IN 15
MIDI OUT 16
Setting input gain on iRig Pro Duo I/O 16
Troubleshooting 17
Speci cations 18
Warranty 19
Support and more info 19
Safety information
CAUTION: RISK OF EXPLOSION IF BATTERY IS REPLACED BY AN INCORRECT TYPE. DISPOSE OF USED BATTERIES ACCORDING TO THE INSTRUCTIONS.
iRig Pro Duo I/O can ONLY be used with:
• Consumer grade non-rechargeable CARBON-ZINC batteries
- ALKALINE batteries
• Consumer grade Ni-MH rechargeable batteries
iRig Pro Duo I/O
Thank you for purchasing iRig Pro Duo I/O.
Your package contains:
- iRig Pro Duo I/O
• 2 AA batteries (alkaline)
• Mini-DIN to Lightning cable
• Mini-DIN to USB-A cable
• Mini-DIN to USB-C cable - 2 MIDI adapters
- Quick start guide
- Registration card
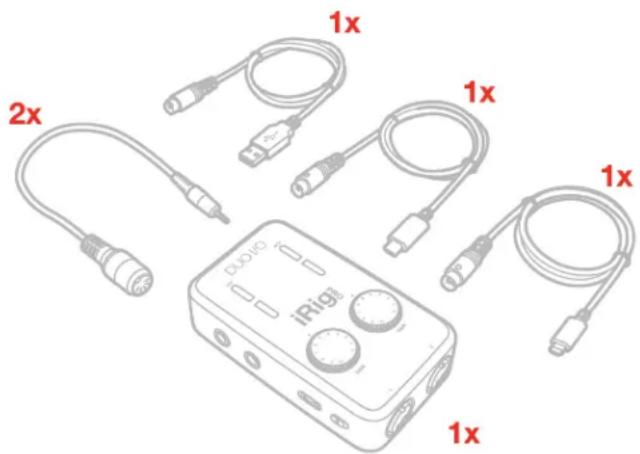
iRig Pro Duo I/O is a universal mobile 2 channel audio and MIDI interface with an ultra-compact and highly portable enclosure, that packs all the necessary connections for making and recording high-quality music on the go with iOS/Android or Mac/PC. On iOS and Mac iRig Pro Duo I/O is plug-and-play, simply connect it to the host device and it's ready to start recording (on Windows based DAWs, IK Multimedia's proprietary driver needs to be installed for latency control).
Register your iRig Pro Duo I/O
By registering, you can access technical support, activate your warranty and receive free JamPoints™ which will be added to your account. JamPoints™ allow you to obtain discounts on future IK purchases! Registering also keeps you informed of all the latest software updates and IK products.
Register at: www.ikmultimedia.com/registration
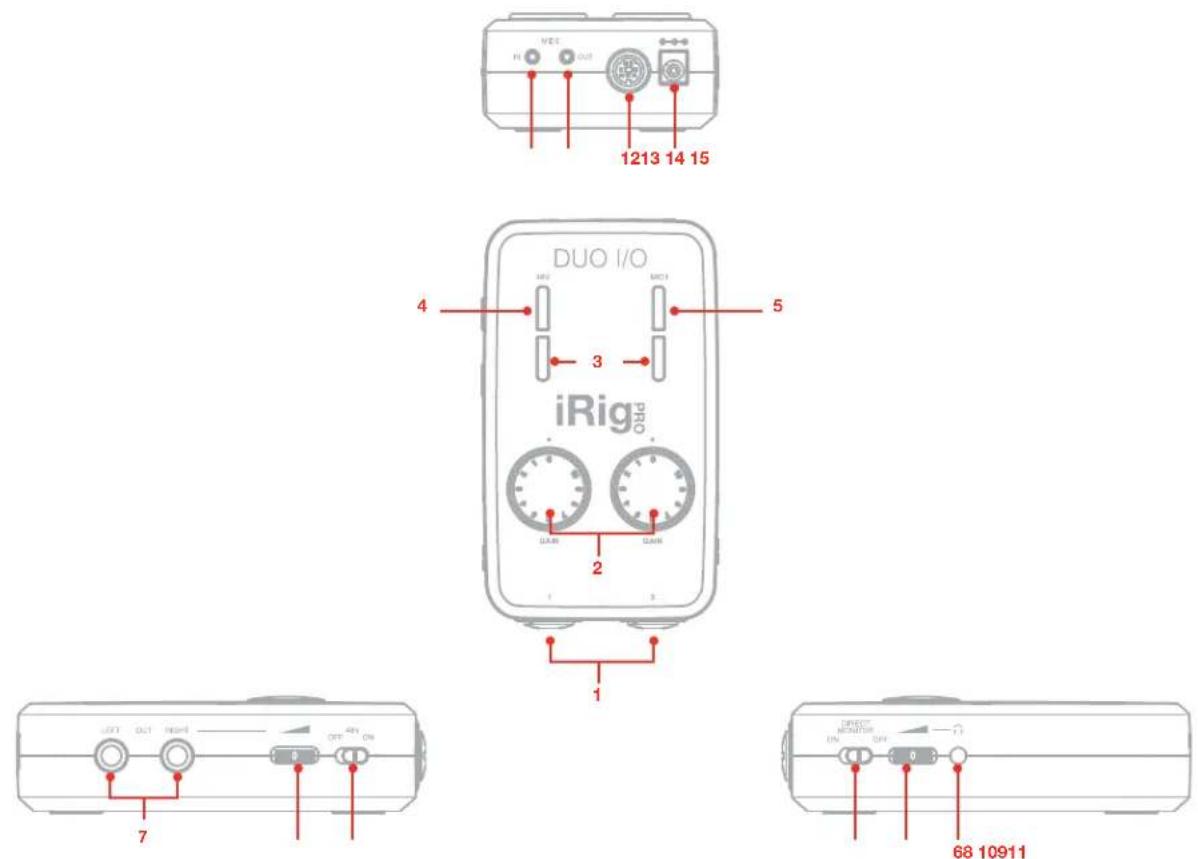
iRig Pro Duo I/O overview
text_image
1213 14 15 DUO I/O iRig ON OUT OUT OUT OUT OUT OUT OUT OUT OUT OUT OUT OUT OUT OUT OUT OUT OUT OUT OUT OUT OUT OUT OUT OUT OUT OUT OUT OUT OUT OUT OUT OUT OUT OUT OUT OUT OUT OUT OUT OUT OUT OUT OUT OUT OUT OUT OUT OUT OUT OUT IN MONITOR OUT 0 3 68 10911- Microphone/Instrument inputs
- Input gain knobs
- Audio level/Status LEDs
- Phantom power (+48V) LED
- MIDI LED
- Headphone output
- Main line outputs
- Direct monitor switch
- Phantom power (+48V) switch
- Headphone level control
- Main output level control
- Mini-DIN device port
- MIDI IN port
- MIDI OUT port
- 9V DC IN
Installation and setup
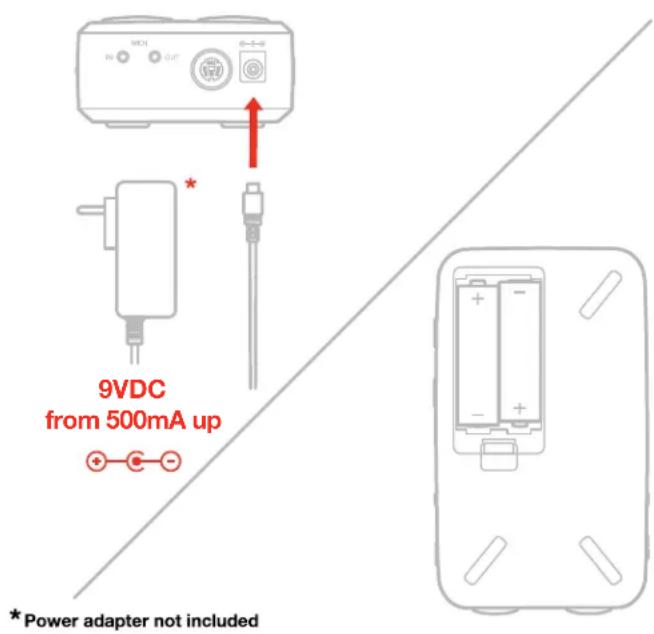
For iOS users: when working with iOS devices, iRig Pro Duo I/O only works when powered by two AA batteries. See specifications about battery life. Insert the included AA batteries in the battery compartment on the bottom side of iRig Pro Duo I/O. If you want to play for a long time, you can connect the DC In port on iRig Pro Duo I/O to an external 9VDC - 500mA (minimum) PSU, for unlimited playing time without a battery.
IMPORTANT: the external power supply will NOT charge the device's battery.
For MAC/PC and Android users: when connected to an USB class compliant host, iRig Pro Duo I/O can be powered as follow:
• By internal AA batteries;
- USB powered, ONLY if the host device is capable of providing enough current. When connected to Android devices, we recommend that you use the internal batteries or the external PSU to avoid running out of battery life;
• By external 9V PSU (no matter if batteries are installed).
text_image
9VDC from 500mA up *Power adapter not includedIMPORTANT: iRig Pro Duo I/O is powered by batteries even when it is connected to a USB port. This allows it to work even with USB ports that can only provide a small amount of current. If you want your iRig Pro Duo I/O to be powered by the USB port please remember to REMOVE the batteries from it.
Battery life
Recording - Max load*: 3 hours, 30 minutes (NiMH rechargeable); 45 minutes (Alkaline)
Playback - Min load**: 10 hours (NiMH rechargeable); 3 hours (Alkaline)
*Max load condition is as follow: both inputs connected to two 1,5mA phantom powered loads, input gains set to maximum, outputs set to maximum.
**Min load condition is as follow: music playing, phantom power OFF.
iOS/Android devices
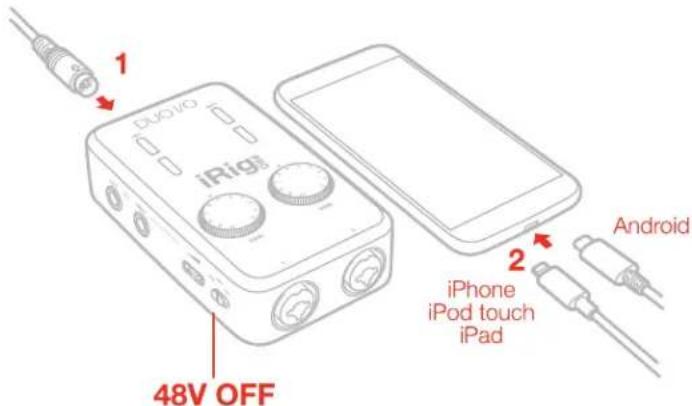
- Connect the included Lightning or USB cable to iRig Pro Duo I/O Mini-DIN port.
- Connect the Lightning or USB cable to your iOS or Android device. Make sure phantom power is turned off by setting the phantom power switch to the OFF position. Check that the phantom power LED is OFF.
text_image
1 iRig 2 iPhone iPod touch iPad Android 48V OFF- Download the IK apps and software.
text_image
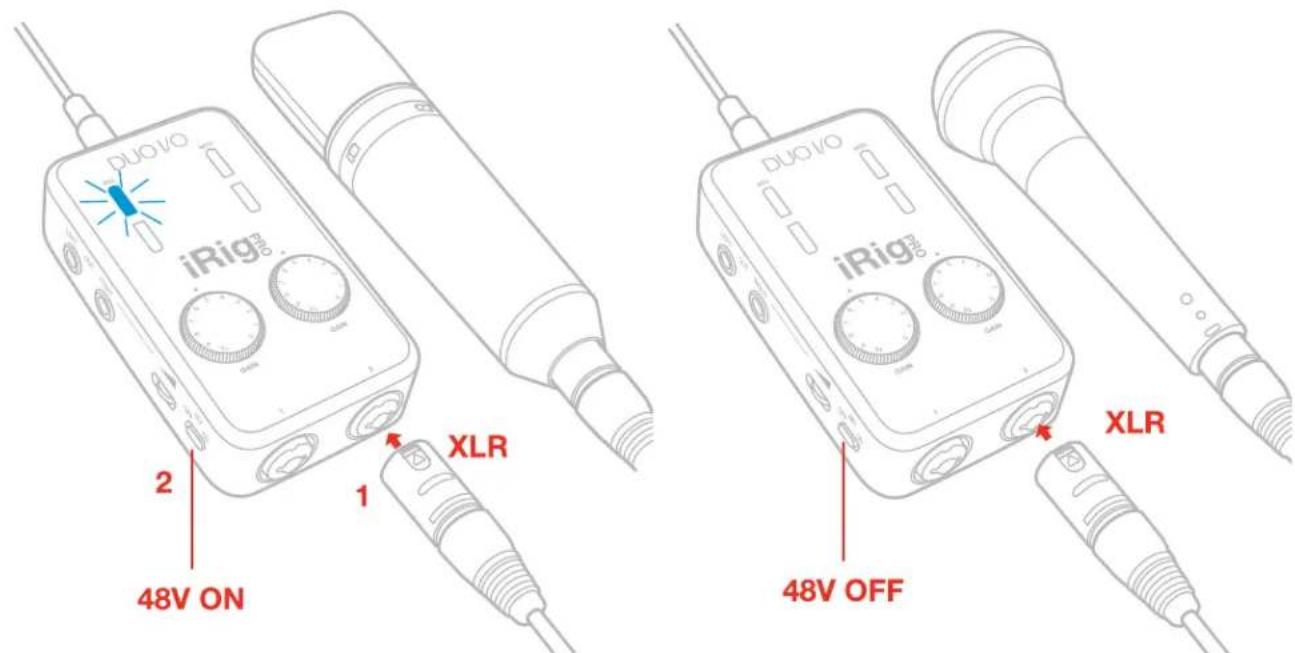
FREE DOWNLOAD IK software, apps, in-app content ikdownloads.com/irigproduoio- If you are using a microphone connect it using an XLR cable to one of the iRig Pro Duo I/O microphone inputs.
text_image
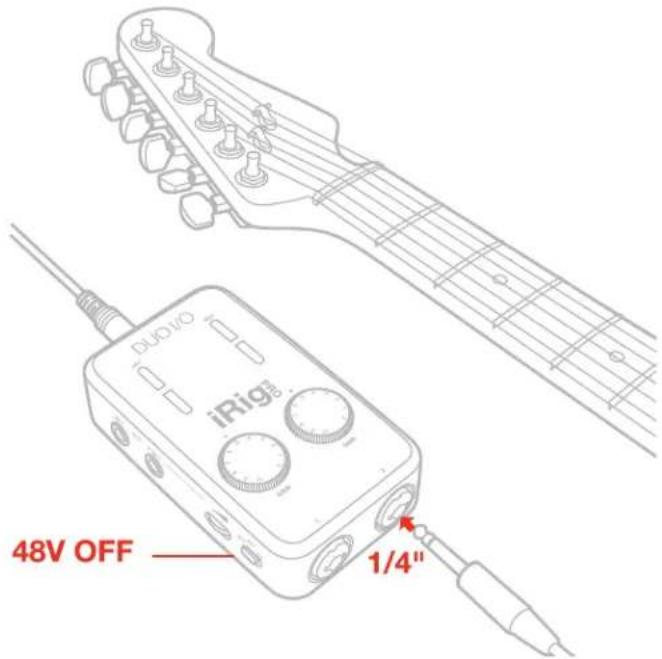
DUOVO iRig™ 2 1 XLR 48V ON XLR 48V OFF- If you are using an instrument like a guitar or a bass, connect it using a regular 14 " guitar cable to one of the iRig Pro Duo I/O instrument inputs.
text_image
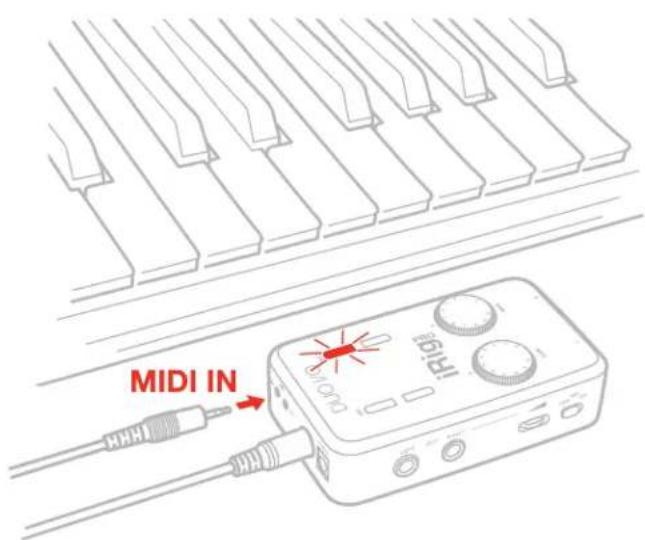
48V OFF 1/4"- To play MIDI compatible apps from an external controller, use the included MIDI cable to connect your controller's MIDI OUT port to iRig Pro Duo I/O's MIDI IN port. Always check the specific MIDI input settings in your app to make sure that the app is ready to receive incoming MIDI data.
text_image
MIDI IN iA101- To control an external MIDI device from an app, use the included MIDI cable to connect the MIDI OUT port of the iRig Pro Duo I/O to the MIDI IN port of the external device. Always check for specific MIDI output settings in your app to make sure they are set to transmit MIDI data.
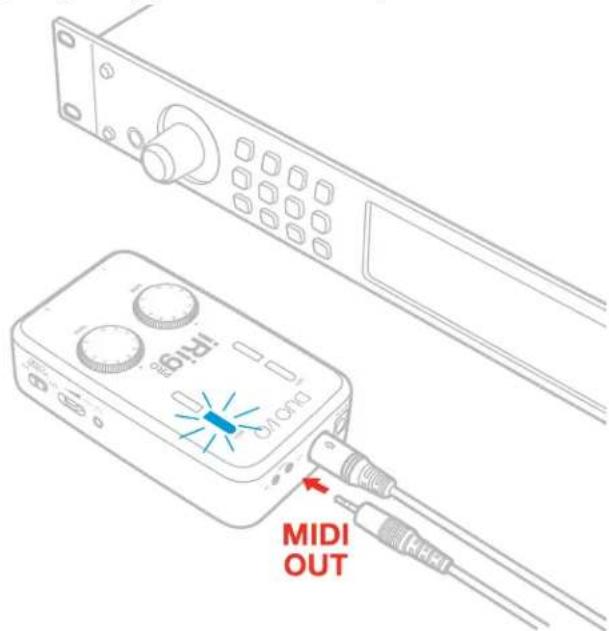
text_image
IRI98 MIDI OUT- Connect your headphones to the Headphone Output jack on iRig Pro Duo I/O and set its level via the dedicated volume wheel.
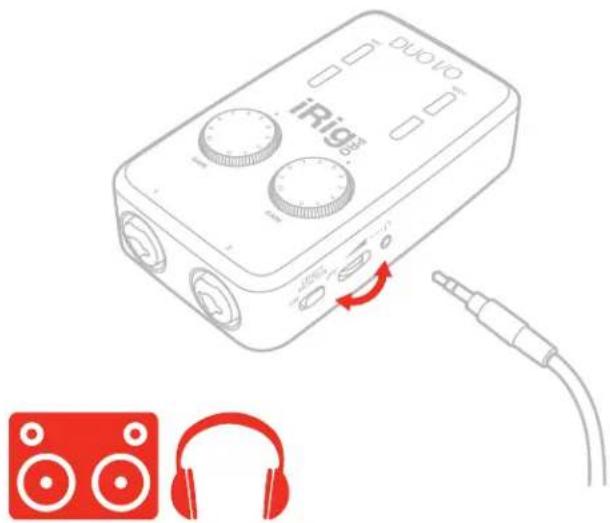
natural_image
Illustration of a iRig device with audio jack and external microphone, accompanied by a red headphone icon (no text or symbols on the device itself)- Connect your mixer or powered speakers to the Main Line Output jacks on iRig Pro Duo I/O and set its level via the dedicated volume wheel. These outputs are high quality balanced outputs, so you don't need to use any DI box when connecting to a PA or Mixer onstage.
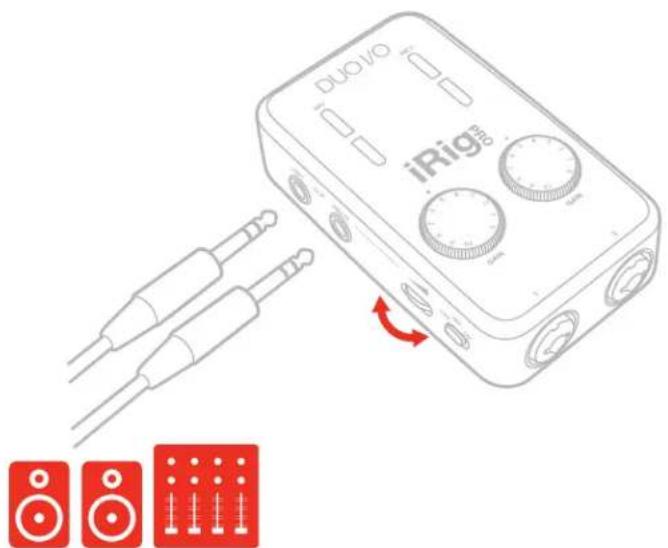
text_image
DuoVO iRigTM iRigTMMac/PC
On Windows based DAWs, IK Multimedia's proprietary driver needs to be installed for latency control. Please visit https://www.ikmultimedia.com/userarea/ to download the driver.
- Connect the included USB cable to iRig Pro Duo I/O's Mini-DIN connector.
- Connect the USB cable to a free USB port on your Mac/PC.
- Make sure phantom power is turned off by setting the Phantom Power switch to the OFF position. Check that the phantom power LED is OFF.
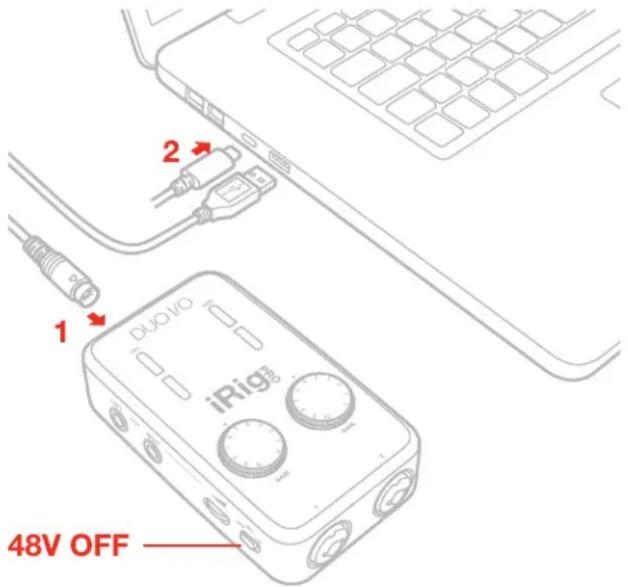
text_image
2 1 iRig 48V OFF- If you are using a microphone connect it using an XLR cable to one of the iRig Pro Duo I/O microphone inputs.
- If you are using an instrument like a guitar or a bass, connect it using a regular 1/4" guitar cable to one of the iRig Pro Duo I/O instrument inputs.
- Launch AmpliTube or any other Core Audio-compatible application and select "iRig Pro Duo" as the input device from your system's audio preferences.
- Connect your headphones to the headphone output jack on iRig Pro Duo I/O and set its level via the dedicated volume wheel.
- Connect your mixer or powered speakers to the Main Line Output jacks on iRig Pro Duo I/O and set its level via the dedicated volume wheel.
Connecting an external power supply
If you want to play for an extended period of time when connected to your iOS device, you can connect the DC In port on iRig Pro Duo I/O to an external power supply (not included), this way you don't need to worry about iRig Pro Duo I/O's battery life. You can use any guitar pedal power supply unit: 9VDC - 500mA
IMPORTANT: the external power supply will NOT charge the device's battery.
iRig Pro Duo I/O LEDs
The four LEDs on iRig Pro Duo I/O give you important information about the unit's operative status. Each status is indicated by a different color.
Status / Audio level LEDs
For each channel iRig Pro Duo I/O will show the audio signal level and the status of the unit as follow:
- Both LEDs Off: iRig Pro Duo I/O is not connected to any power source.
- Both LEDs Dark blue: iRig Pro Duo I/O is connected and in standby mode.
- Ch. LED Bright blue: iRig Pro Duo I/O is connected and a signal is present at the input of the corresponding channel.
• Ch. LED Green: The input signal of the corresponding channel is low.
• Ch. LED Orange: The input signal of the corresponding channel is OK. - Ch. LED Red: The input signal of the corresponding channel is too high.
Phantom and MIDI LEDs
The two upper LEDs show the phantom power and MIDI status.
Phantom LED
• Off: phantom power is OFF
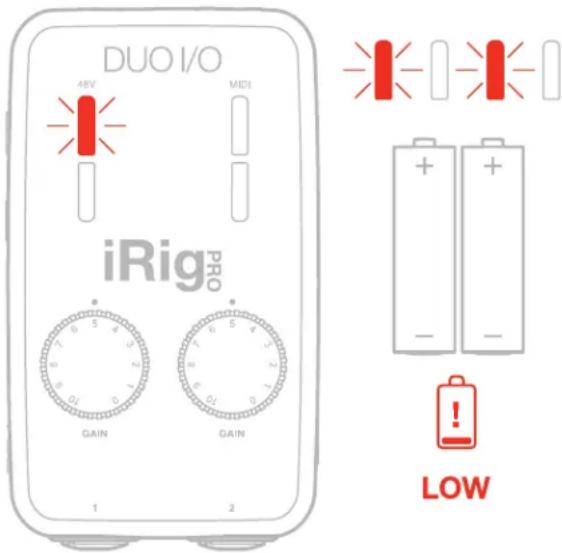
- Flashing Blue: phantom power is powering ON. To avoid audio bumps iRig Pro Duo I/O is muted while phantom power is turning ON, so it is normal to not hear any signal until this LED turns steady BLUE when turning on +48V phantom power.
• Steady Blue: phantom power is ON
- Flashing Red: internal AA batteries are LOW! Before iRig Pro Duo I/O shuts down this LED will start blinking. This means that the battery level is low and it should be replaced as soon as possible.
text_image
DUO I/O iRig PRO 1 2 GAIN MIDI 1 2 GAIN LOWMIDI LED
• Off: iRig Pro Duo I/O is not receiving any MIDI messages.
- Blinking Blue: iRig Pro Duo I/O is transmitting MIDI messages.
- Blinking Red: iRig Pro Duo I/O is receiving MIDI messages.
Direct monitoring
When recording an audio signal into your audio software, there is often a slight delay before it reaches the outputs of the software and iRig Pro Duo I/O. This delay, called latency, is caused by the computer processing required to convert and record audio. Since this delay can be distracting, iRig Pro Duo I/O provides a direct monitoring path from the inputs to the outputs, which is activated by the Direct Monitor switch. When Direct Monitoring is enabled, the input signal is mixed with the output signal from your audio software and routed directly to both the Line and Headphone outputs. This lets you hear the “live” inputs without latency. The Direct Monitor switch has no effect on what is being recorded by your software. When using the Direct Monitor feature, make sure any software monitoring option for direct (or “low latency”) monitoring is disabled. Disabling low latency monitoring prevents “double-monitoring” of input audio signals when using the Direct Monitoring feature. When “double-monitoring” occurs, there will be an increase in volume and an undesirable “phasing” sound. For more details about its monitoring function, refer to the documentation for your audio software.
Connecting microphones
Always connect microphones to iRig Pro Duo I/O with XLR-to-XLR balanced cables. This will ensure a pristine and clean performance from your microphone with iRig Pro Duo I/O.
NOTE: In your audio software, select the appropriate iRig Pro Duo I/O input (1 or 2) as the source of the track you will be recording to. Adjust the channel gain knob until you have a sufficient audio signal without clipping.
Dynamic microphones
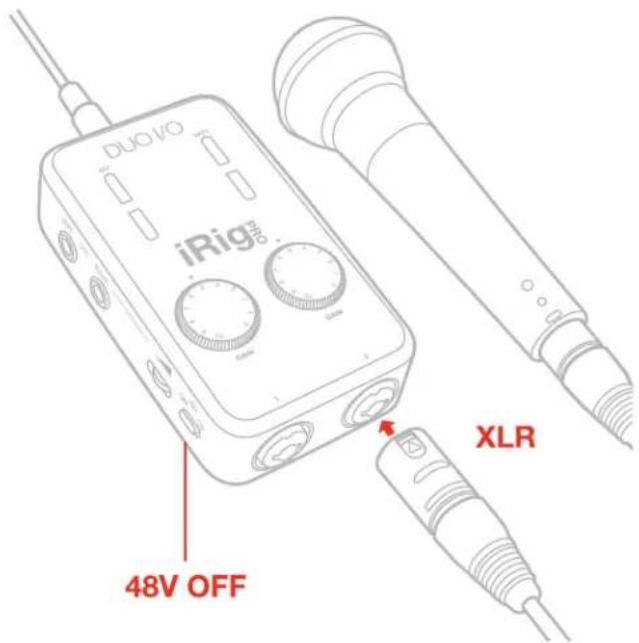
Before connecting dynamic microphones make sure phantom power is turned OFF. Check that the Phantom Power switch is in the OFF position and that the Phantom LED is turned off.
text_image
DuoVO iRig® XLR 48V OFFCondenser microphones
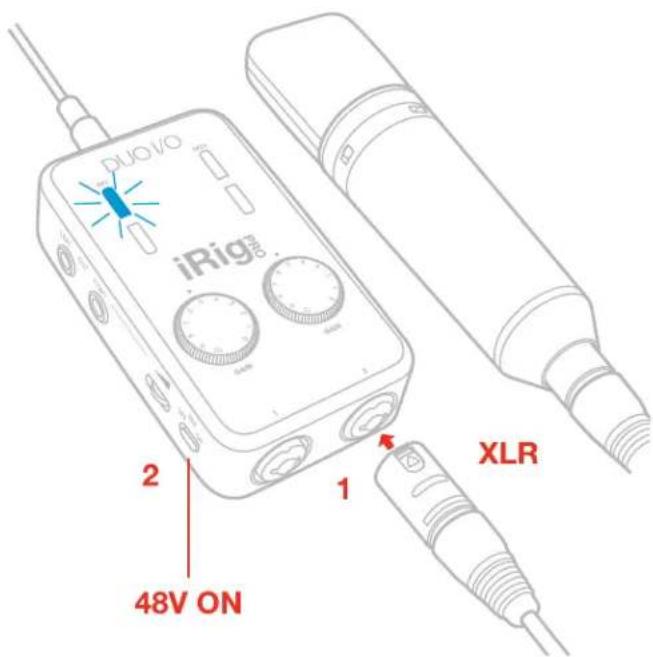
Most condenser microphones require external phantom power. If phantom power is ON, switch it OFF, and then connect your microphone. Turn phantom power ON only after the microphone is connected. Once it's turned ON, check that the phantom power LED has become blue (it will flash for a few seconds before staying on). If the LED doesn't turn blue, check that working batteries are inserted in the iRig Pro Duo I/O's battery compartment on the bottom side, and that an application that is using iRig Pro Duo I/O is open. Phantom power will NOT turn ON if iRig Pro Duo I/O is in standby (status LED lit up dark blue).
text_image
DUOVO iRig® 2 48V ON 1 XLRRibbon microphones
Before connecting a ribbon microphone, turn OFF phantom power and check the microphone's operating instruction manual to see if it requires it. Most ribbon microphones don't require phantom power, and some can even be damaged by it. If you're in doubt just leave it OFF. If the microphone won't work, check its user manual, it may need phantom power. Please note that when +48V phantom power is turned on, it works on both channels simultaneously. It is not possible to turn +48V phantom power on one channel only.
Connecting instruments
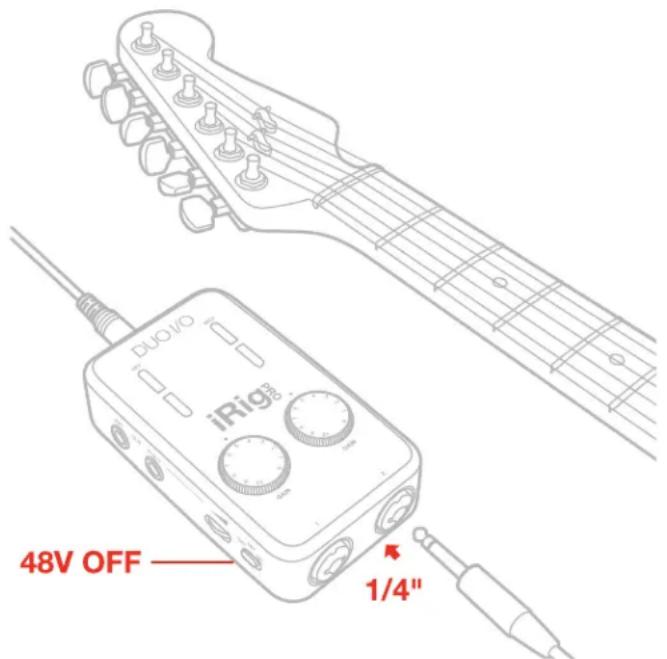
Connect your guitars, basses or any other mono instruments to the instrument inputs on iRig Pro Duo I/O using an 1/4" plug unbalanced (TS or "mono") guitar cord.
IMPORTANT: the instrument input on iRig Pro Duo I/O will NOT work if a cable with balanced (TRS or “stereo”) 1/4” plug is used.
text_image
48V OFF 1/4"NOTE: In your audio software, select the appropriate iRig Pro Duo I/O input (1 or 2) as the source of the track you will be recording to. Adjust the channel gain knob until you have sufficient audio signal without clipping.
Connecting monitors and headphones
- Connect a pair of active studio monitors or an audio amplifier to the 1/4" Line Output jacks labeled Left-Right. If your monitor inputs or amplifier inputs are the RCA type, use 1/4" to RCA cables or adapters to make the connection.
- Connect headphones to the 1/8" output jack and adjust its level via the headphone thumbwheel.
MIDI IN/OUT
MIDI IN
- Connect the 2.5mm-to-MIDI cable to the iRig Pro Duo I/O MIDI IN port and to the MIDI OUT port on your keyboard or controller.
- Open a Core MIDI compatible application on your iOS device or on your computer and set “iRig Pro Duo I/O” as the MIDI input device.
- When iRig Pro Duo I/O is receiving MIDI messages the MIDI LED will blink blue.
MIDI OUT
- Connect the 2.5mm-to-MIDI cable to the iRig Pro Duo I/O MIDI OUT port and to the MIDI IN port on, for example, your sound module.
- Open a Core MIDI compatible application on your iOS device or on your computer.
- When iRig Pro Duo I/O is sending MIDI messages the MIDI LED will blink blue.
Setting input gain on iRig Pro Duo I/O
text_image
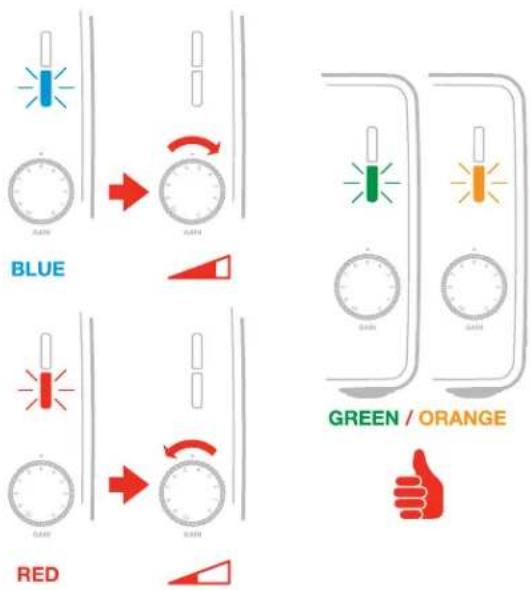
BLUE GREEN / ORANGE REDWhen talking or singing into your microphone, or when playing your instrument, check the audio level/status LED of the corresponding channel on iRig Pro Duo I/O.
- If the LED is alternating between BLUE and GREEN, or is always GREEN, you should increase the iRig Pro Duo I/O input gain by rotating the GAIN control clockwise.
- If the LED sometimes flashes RED, you should decrease the iRig Pro Duo I/O input gain by rotating the GAIN control counter-clockwise.
- When your gain setting is optimal, the LED should alternate between GREEN and ORANGE while you play or sing.
Troubleshooting
Sound is distorted.
You're probably overloading the input. Check that the input gain on iRig Pro Duo I/O is set properly. If the Audio Level LED is red when you play your instrument or sing or talk into a mic, decrease the input gain as described in this guide.
I don't get any sound.
In order for iRig Pro Duo I/O to turn on, a Core Audio-compatible audio app must first be launched on your iOS device or Mac.
iOS: be sure you are using an app that works with audio input from the Lightning dock connector.
Mac: be sure you have set "iRig Pro Duo" as the audio or MIDI input device on the audio app you are using.
Phantom power doesn't turn ON.
Check that you have inserted working AA batteries in iRig Pro Duo I/O's battery compartment, or that you've connected iRig Pro Duo I/O to an external power supply.
I can't get any sound from my condenser microphone.
Your microphone may need phantom power. Turn phantom power on by moving the iRig Pro Duo I/O switch to the ON position and check that the Phantom LED has turned on.
I can't get any sound from my guitar / instrument input.
iRig Pro Duo I/O only works with 1/4" MONO guitar cables. Never use stereo (TRS) plugs cables as the iRig Pro Duo I/O instrument inputs will be muted.
When I connect iRig Pro Duo I/O to my computer or Android device I get a message that says that this device needs more power and the USB port will be disabled. How can I use my iRig Pro Duo I/O on my host device?
This means your USB host device is not capable of providing the necessary current. Please install two AA batteries in iRig Pro Duo I/O in order to use it with this USB host.
I have connected iRig Pro Duo I/O to my iPhone or iPad but it doesnt' turn ON.
iRig Pro Duo I/O only works with AA batteries when connected to iOS devices.
I use iRig Pro Duo I/O onstage and get buzzes and noises when connected to a PA system or main mixer.
Always connect iRig Pro Duo I/O outputs with balanced TRS cables to balanced line inputs. This way your signal will always be perfectly clear.
I do remote recording with my iPad using iRig Pro Duo I/O and two condenser microphones and the iRig Pro Duo I/O's battery life is very short under these conditions.
Use rechargeable high-performance AA batteries from 1,900 mA/h up. iRig Pro Duo I/O will last approx 3.5 hours in these recording conditions.
Specifications
Microphone Input
Microphone Inputs: 2x balanced, XLR. Pin 2: hot / Pin 3: cold / Pin 1: ground
Microphone Input Level: from 6 mVpp to 1.4 Vpp
Microphone Input Impedance: 3,2 kOhms
Gain Range: 50 dB
Phantom Power: +48V ± 4V
Frequency Response: 20 Hz to 20 kHz (+-1.5dB)
Input Noise: -103 dB(A), -97 dB RMS
Instrument Input
Instrument Inputs: 2x unbalanced, Hi-Z, TS 1/4" Jack, Tip: signal / Shield: ground
Instrument Input Level: from 30 mVpp to 6.9 Vpp
Instrument Input Impedance: 1 MOhms
Gain Range: 27 dB
Frequency Response: 20 Hz to 20 kHz (+-1.5dB)
Input Noise: -103 dB(A), -97 dB RMS
Line Output
Line Outputs: 2x balanced, TRS 1/4" Jack, Tip: hot / Ring: cold / Shield: ground
Floating Balanced Outputs with automatic level compensation when working in unbalanced mode
Maximum Output Level: +16 dBu into 600 Ohms balanced load
Instrument Input Impedance: 1 MOhms
Frequency Response: from 10 Hz to 21 kHz (-3dB)
Output Dynamic Range: 106 dB(A)
Output Impedance: 150 Ohms balanced
Common
AD and DA Resolution: 24-bit
Sampling Rate: 44.1 kHz and 48 kHz
Power: USB bus power, battery power (2xAA), or DC power supply (9VDC - 500mA min. positive outside - not included)
Metering: Multicolor LED
Size: 75mm/2.95" x 127mm/5" x 37mm/1.46"
Weight: 197.2g/6.96oz (batteries excluded)
Battery Life:
- Recording - Max load*: 3 hours, 30 minutes (NiMH rechargeable); 45 minutes (Alkaline)
- Playback - Min load**: 10 hours (NiMH rechargeable); 3 hours (Alkaline)
*Max load condition: both inputs connected to two 1,5mA phantom powered loads, input gains set to maximum, outputs set to maximum.
**Min load condition is as follow: music playng, phantom power OFF.
Warranty
Please visit:
www.ikmultimedia.com/warranty
for the complete warranty policy.
Support and more info
www.ikmultimedia.com/support
Apple is not responsible for the operation of this device or its compliance with safety and regulatory standards.

FCC statement
This device complies with Part 15.107 and 15.109 Class B of the FCC Rules CFR47: October 2010.
Operation is subject to the following two conditions:
-
This device may not cause harmful interference.
-
This device must accept any interference received, including interference that may cause undesired operation.
Changes or modifications not expressly approved by the party responsible for compliance could void the user's authority to operate the equipment.
Made for

iPod

iPhone

iPad
"Made for iPod," "Made for iPhone," and "Made for iPad" mean that an electronic accessory has been designed to connect specifically to iPod, iPhone, or iPad, respectively, and has been certified by the developer to meet Apple performance standards. Apple is not responsible for the operation of this device or its compliance with safety and regulatory standards. Please note that the use of this accessory with iPod, iPhone, or iPad may affect wireless performance.
iRig® Pro Duo I/O, AmpliTube®, iRig® Recorder, VocalLive®, SampleTank® are trademarks property of IK Multimedia Production Srl. iPad, iPhone, iPod touch, Retina and Mac are trademarks of Apple Inc., registered in the U.S. and other countries. iPad Air, iPad mini, and Lightning are trademarks of Apple Inc. All other trademarks are property of their respective owners.
iRig® Pro Duo I/O
Mobile 2-channel Audio/MIDI Interface for iPhone, iPad and Mac/PC
ユーザー・マニュアル
Japanese
Table of Contents
目次 2
日本語 3
安全にご利用いただくためのお知らせ 3
iRig Pro Duo I/O 3
製品登録 3
概要 4
インストールと設定 5
電池驅動時間 5
iOS/Androidデバイス 6
Mac/PC 10
text_image
DUOVO iRig32 XLR 2 1 48V ON XLR 48V OFFnatural_image
Illustration of an iRig audio device with a USB cable and headphones, no text or symbols present.text_image
DUOVO iRig® XLR 48V OFFコンデンサー・マイクロフォン
text_image
PUOVO iRig® 2 48V ON 1 XLRリボンマイクロフォン
寸法:75mm/2.95”×127mm/5”×37mm/1.46”
www.ikmultimedia.com/support
This device complies with Part 15.107 and 15.109 Class B of the FCC Rules CFR47: October 2010.
Operation is subject to the following two conditions:
-
This device may not cause harmful interference.
-
This device must accept any interference received, including interference that may cause undesired operation.
Changes or modifications not expressly approved by the party responsible for compliance could void the user's authority to operate the equipment.
Made for

iPod

iPhone

iPad
"Made for iPod," "Made for iPhone," and "Made for iPad" mean that an electronic accessory has been designed to connect specifically to iPod, iPhone, or iPad, respectively, and has been certified by the developer to meet Apple performance standards. Apple is not responsible for the operation of this device or its compliance with safety and regulatory standards. Please note that the use of this accessory with iPod, iPhone, or iPad may affect wireless performance.
iRig ^® Pro Duo I/O, AmpliTube ^® , iRig ^® Recorder, VocalLive ^® , SampleTank ^® are trademarks property of IK Multimedia Production Srl. iPad, iPhone, iPod touch, Retina and Mac are trademarks of Apple Inc., registered in the U.S. and other countries. iPad Air, iPad mini, and Lightning are trademarks of Apple Inc. All other trademarks are property of their respective owners.