
iRig Pro I/O - Hi-Fi IK Multimedia - Free user manual and instructions
Find the device manual for free iRig Pro I/O IK Multimedia in PDF.


| Product Type | Portable streaming audio interface (4-input, 2-output) |
| Dimensions | 123 mm x 67 mm x 40 mm (4.84 x 2.63 x 1.57 in) |
| Weight | 146 g |
| Power Supply | USB bus powered; optional 2x AA batteries or external PSU (iRig PSU 3A, not included) |
| Sampling Rate | 44.1 kHz, 48 kHz, 88.2 kHz, 96 kHz |
| Conversion | 24-bit A/D, 24-bit D/A |
| Inputs | 2x RCA (line), 1x XLR (mic), 1x 1/4" TS (instrument), 1x 1/8" TRRS (headset/mic) |
| Outputs | 1x 1/8" TRS (headphones), 1x 1/8" TRRS (headset) |
| Phantom Power | +48 V, switchable (requires batteries or external PSU) |
| Loopback Function | Routes USB audio from host back to host for streaming |
| Direct Monitoring | Latency-free monitoring of input signals via headphones |
| Multichannel Mode | 4 separate inputs (RCA L/R, Mic/Inst, Headset) assignable to channels |
| Signal LEDs | Blue (low), Green (OK), Red (high) for overall level; Mic/Inst peak indicator |
| Compatibility | iOS, Mac, PC (USB class compliant), Android |
| Battery Life (Phantom On) | Up to 20 hours with alkaline batteries (mic load 3.1 mA) |
| Maintenance | Clean with a soft, dry cloth. Do not use liquids or solvents. |
| Safety Warning | Risk of explosion if battery replaced by incorrect type. Dispose of used batteries properly. |
| Spare Parts / Repairability | Optional PSU (iRig PSU 3A) available. No user-serviceable parts inside; contact support for repairs. |
| General Information | Manufacturer: IK Multimedia. Made for iPod/iPhone/iPad. MFi certified. |
Frequently Asked Questions - iRig Pro I/O IK Multimedia
User questions about iRig Pro I/O IK Multimedia
0 question about this device. Answer the ones you know or ask your own.
Ask a new question about this device
Download the instructions for your Hi-Fi in PDF format for free! Find your manual iRig Pro I/O - IK Multimedia and take your electronic device back in hand. On this page are published all the documents necessary for the use of your device. iRig Pro I/O by IK Multimedia.
USER MANUAL iRig Pro I/O IK Multimedia
4-in, 2-out streaming audio interface
USER MANUAL
Table of Contents
Contents 2
English 3
iRig Stream Pro 3
Register your iRig Stream Pro 3
Overview 4
Installation and setup 5
Connecting iRig Stream Pro to Mac/Pc 12
iRig Stream Pro LEDs 13
Connection examples 16
Connecting headset/phones 16
Connecting line level signal to the RCA inputs 17
Connecting microphone 18
Connecting instrument 19
Connecting RCA headset and microphone/instrument 19
Using the loopback function 20
Direct monitoring 20
Troubleshooting 21
Specifications 21
Warranty 22
Support and more info 22
Regulatory 23
Safety information
CAUTION: RISK OF EXPLOSION IF BATTERY IS REPLACED BY AN INCORRECT TYPE. DISPOSE OF USED BATTERIES ACCORDING TO THE INSTRUCTIONS.
iRig Stream Pro can ONLY be used with:
- Consumer grade non-rechargeable CARBON-ZINC batteries
- ALKALINE batteries
- Consumer grade Ni-MH rechargeable batteries
iRig Stream Pro
Thank you for purchasing iRig Stream Pro.
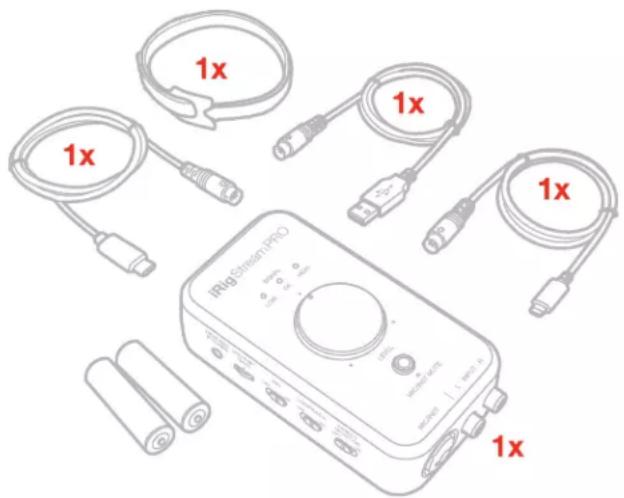
Your package contains:
- iRig Stream Pro.
- Lightning cable.
- USB-A cable.
- USB-C cable.
- 2xAA batteries.
- Velcro strap.
- Registration Card.
The iRig Stream Pro is a compact MFi audio streaming interface perfect for the musician or content creator on the go. The iRig Stream Pro pre-mixes multiple sources of audio (line input, XLR microphone and TRRS microphone) down to a Stereo track that's routed to your favorite streaming media service. Alternatively it can be used as a multi-channel interface 4in-2out. For true ready-to-go convenience, the iRig Stream Pro delivers continuous use via USB power (device powered when phantom power is off) or via 2xAA batteries when the 48V phantom power is active or, alternatively, it can be connected to an optional PSU that will charge the connected iOS device.
Register your iRig Stream Pro
By registering, you can access technical support, activate your warranty and receive free JamPoints™ which will be added to your account. JamPoints™ allow you to obtain discounts on future IK purchases! Registering also keeps you informed of all the latest software updates and IK products.
Register at: www.ikmultimedia.com/registration
Overview
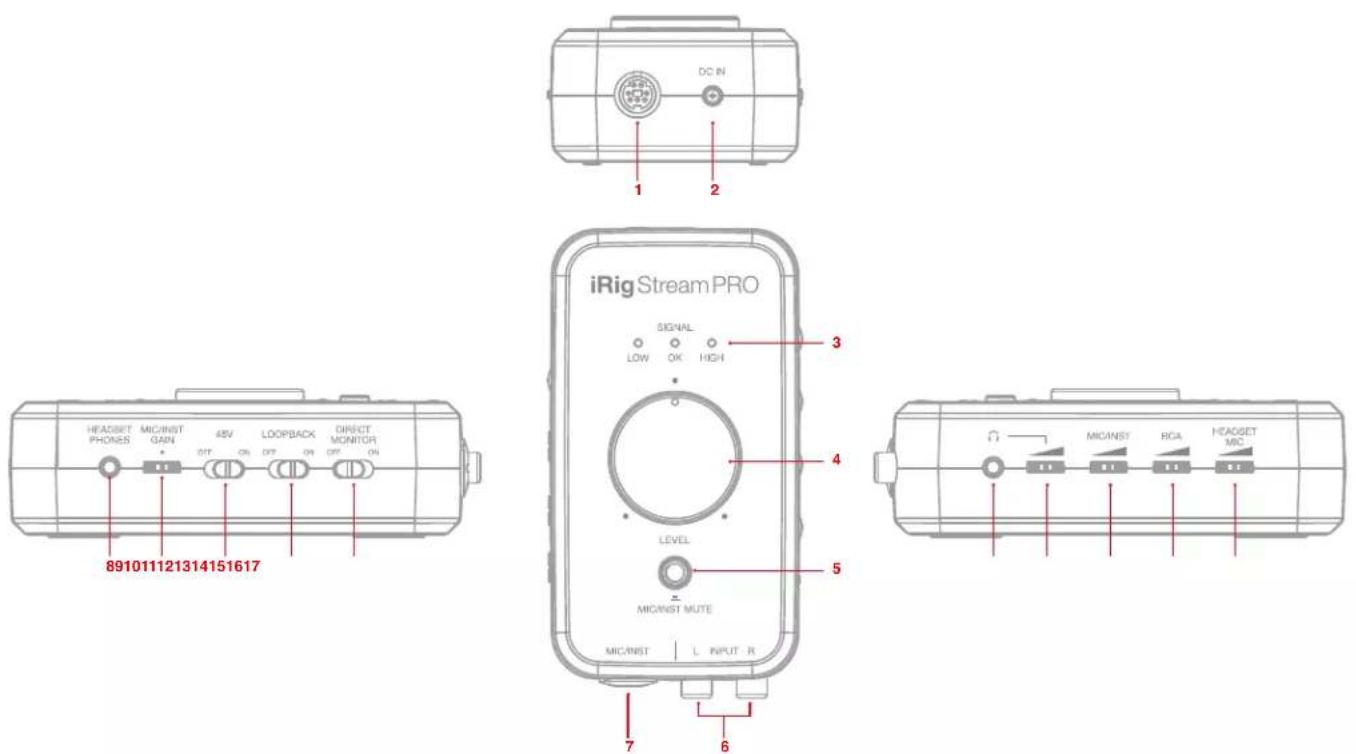
1_ mini-DIN host connection
2_ DC input for optional PSU
3_ LED signal meter
4_ Main Level knob
5_ Mic/Inst Mute button / Peak meter / Mode selection button
6_ RCA line inputs
7_ Microphone/Instrument combo input
8_ Headset/Phones jack
9_Microphone/Instrument gain control
10_ Phantom power 48V switch
11_Loopback switch
12_Direct monitor switch
13_ Headphones output jack
14_ Headphones level control
15_Mic/Inst post-gain level control
16_ RCA level control
17_ Headset's microphone gain control
Installation and setup
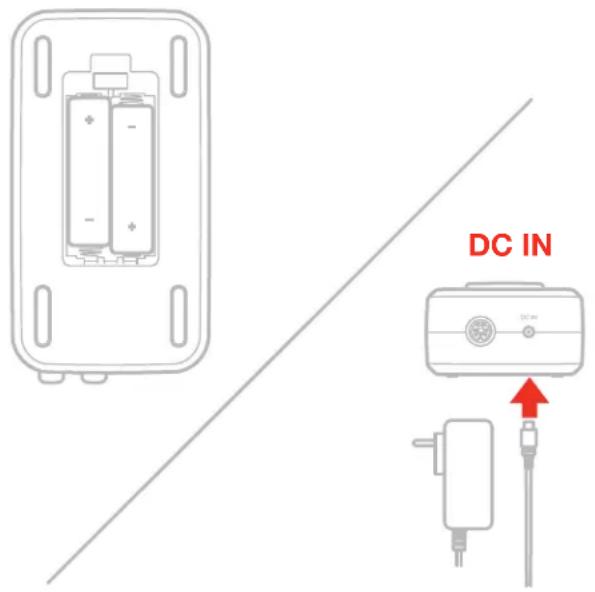
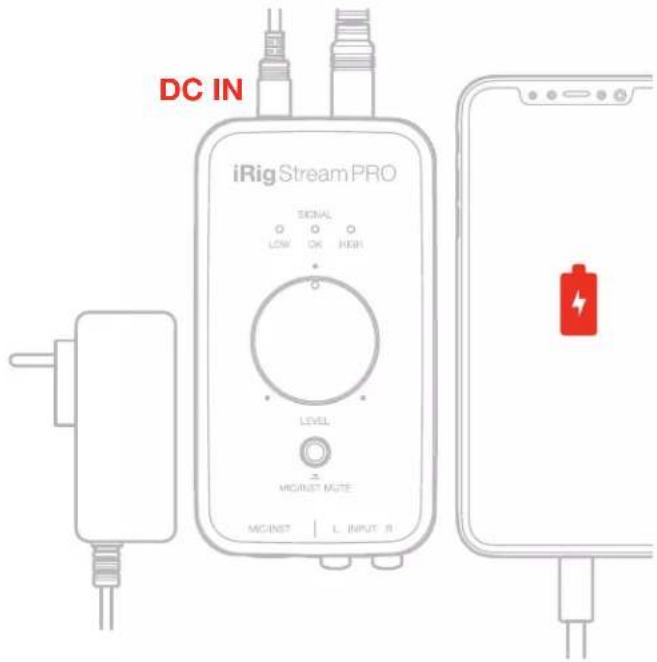
For iOS users: when working with iOS devices and +48V phantom power is required, iRig Stream Pro needs to be powered with two AA batteries. See specifications about battery life. Insert the included AA batteries in the battery compartment on the bottom side of iRig Stream Pro. If you want to stream for a long time, you can connect the DC In port on iRig Stream Pro to the optional PSU (iRig PSU 3A). In this case the iRig Stream Pro will also charge the connected lightning iOS device.
For MAC/PC and Android users: when connected to an USB class compliant host, iRig Stream Pro will be USB powered, ONLY if the host device is capable of providing enough current. When connected to Android devices and phantom power is required, we recommend that you use the optional PSU to avoid running out of battery life.
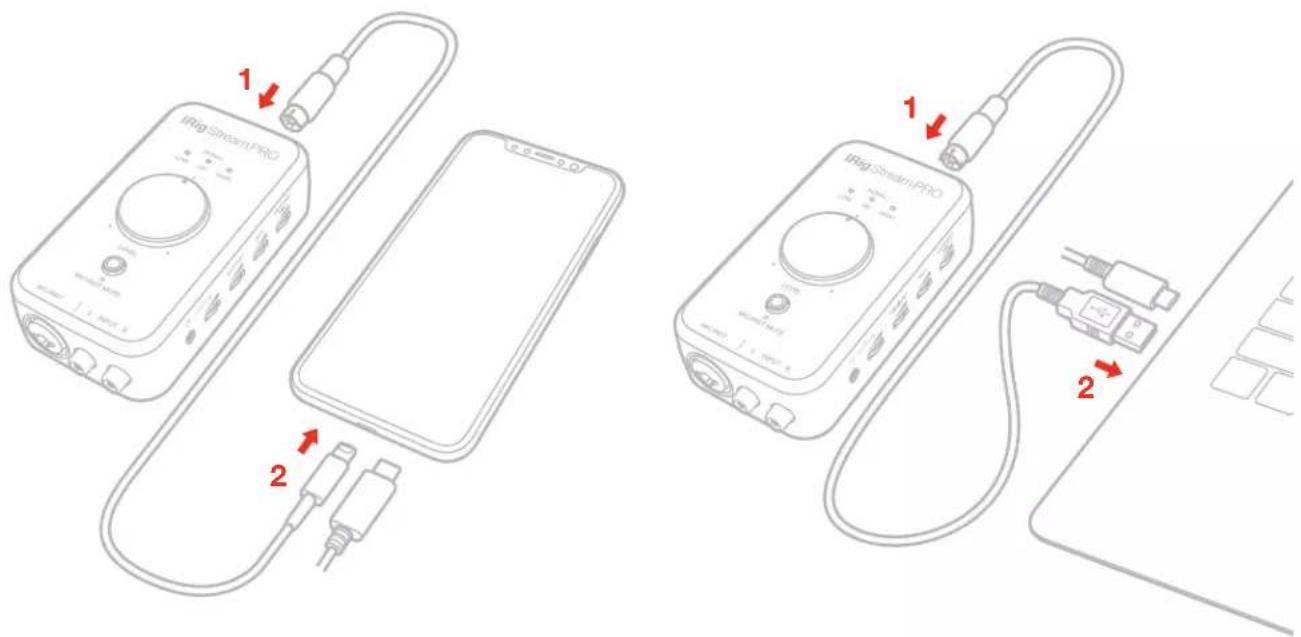
- Connect the iRig Stream Pro to the host device with the provided cable (Lightning, USB-A and USB-C).
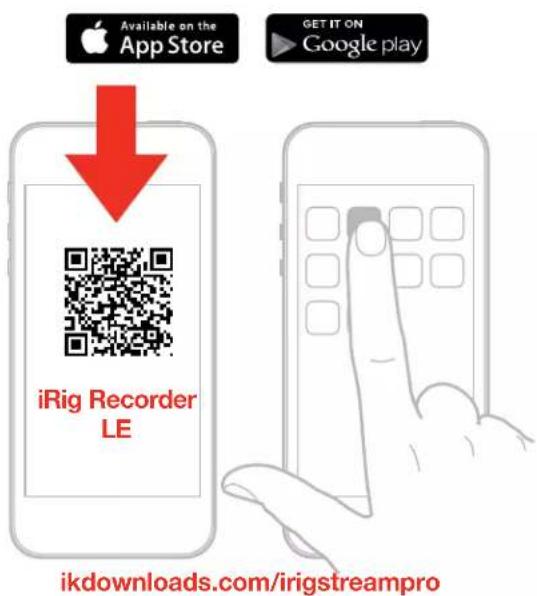
- Download and launch the app. Note that iRig Recorder App will accept only 2 channel inputs: channel 1 and 2. So, if you wish to record channels 3 and 4 (multichannel mode enabled, please refer to dedicated section on this manual) a different App that support multichannel audio is needed.
- In order to monitor the incoming audio with apps and software that do not allow for audio input monitoring, a direct monitoring switch is present. When this switch is set to on the input signal is mixed with the output signal from your audio software and routed directly to the headphone outputs. This lets you hear the "live" inputs without latency. If a "phasing" effect is present, you can disable the input monitoring from your recording app. For more details about its monitoring function, refer to the documentation for the audio software.
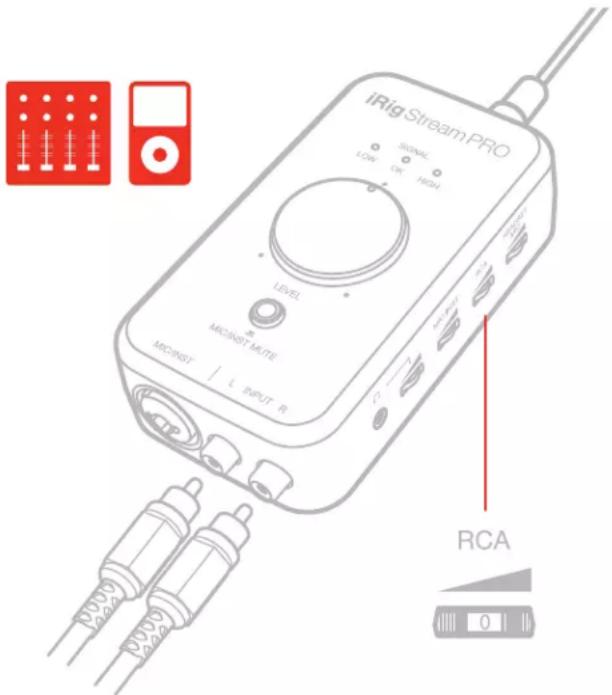
- Connect any line level signal to the front RCA stereo input. To adjust the volume of the device connected to these connectors, use both the volume controls of the device and the numbered thumbwheel "RCA" on side of iRig Stream Pro.
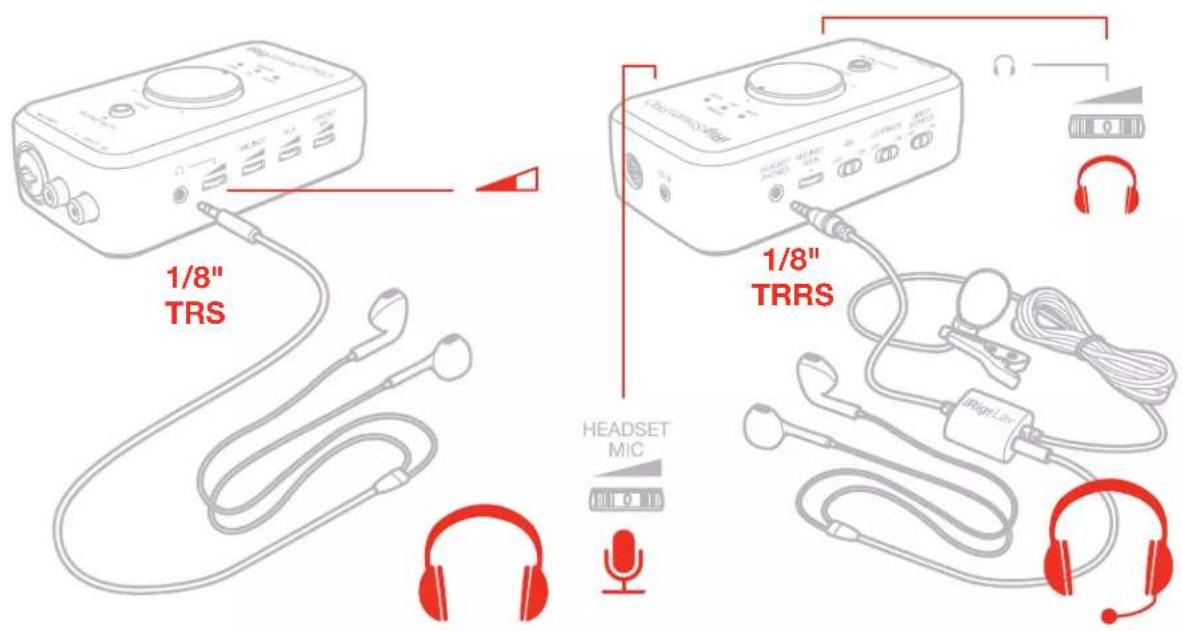
- Connect a TRRS headset (compatible with CTIA standard) or an iRig analog microphone to the 1/8" Headset/Phone jack. You can adjust the microphone level with the "Headset mic" thumbwheel and the headphone level with the "Headphones" thumbwheel. You can also connect a pair of headphone to the Headphone jack and set its level with the "Headphones" thumbwheel: it is also possible to set the headphone's level with the volume buttons on the host device.
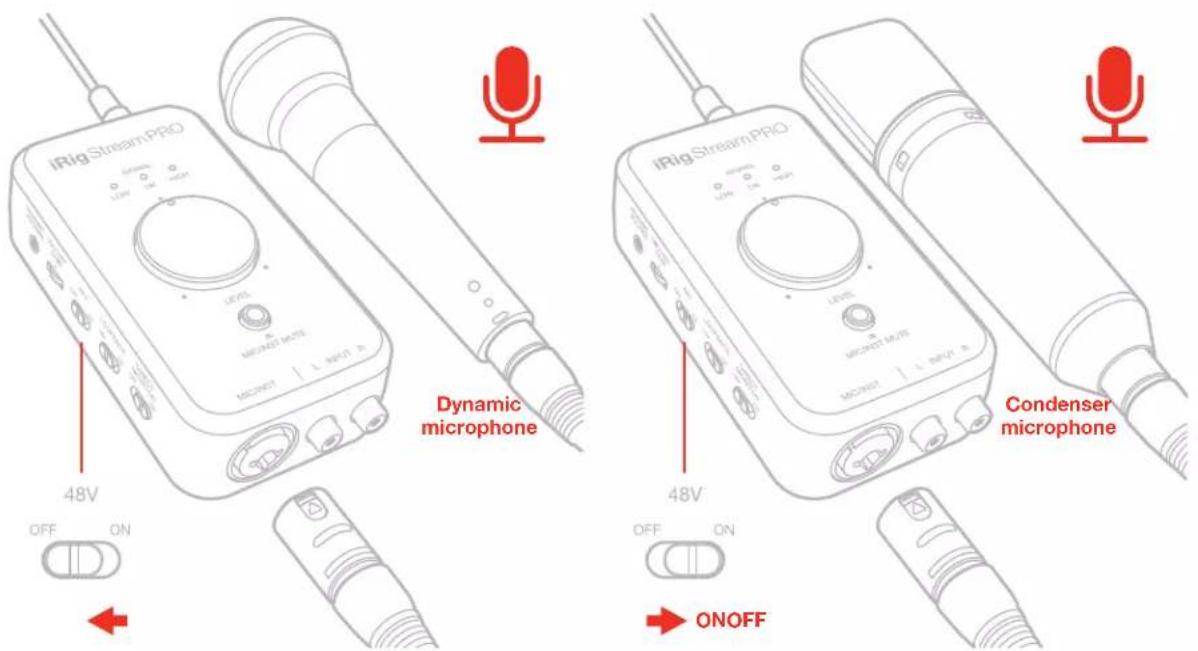
- If you are using a microphone connect it using an XLR cable to the iRig Stream Pro's XLR microphone input.
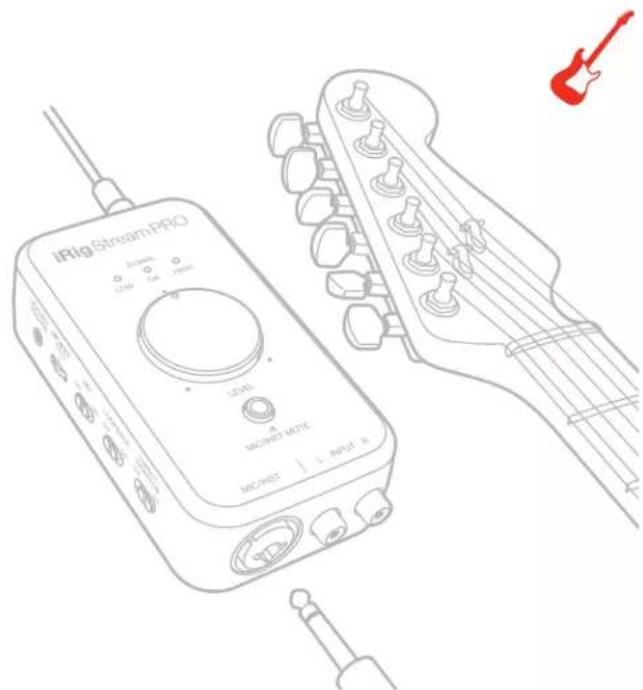
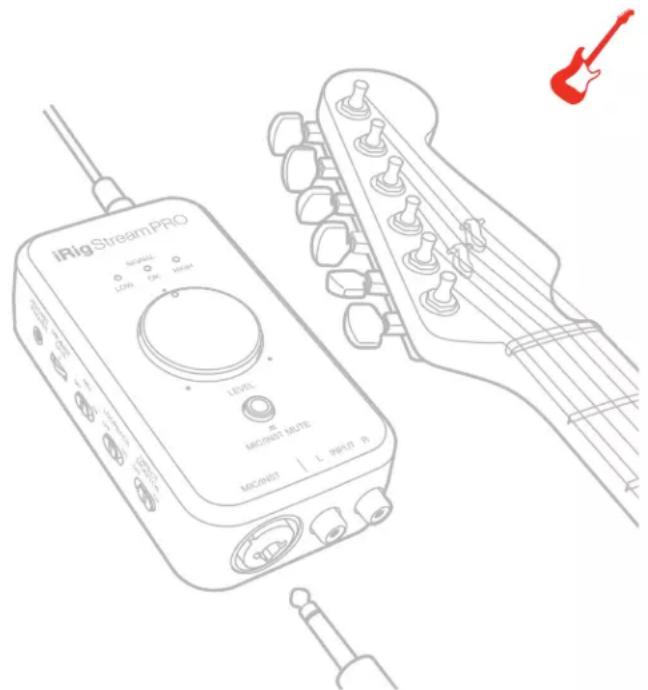
- If you are using an instrument like a guitar or a bass, connect it using a regular 1/4" guitar cable to the iRig Stream Pro's 1/4" instrument input.
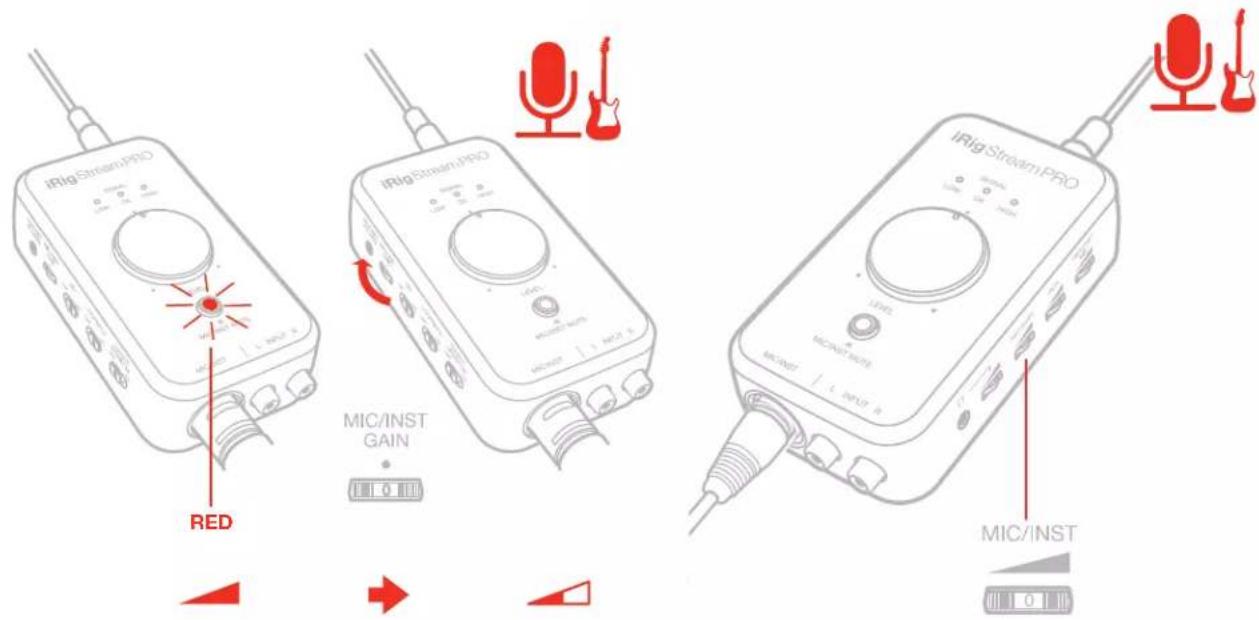
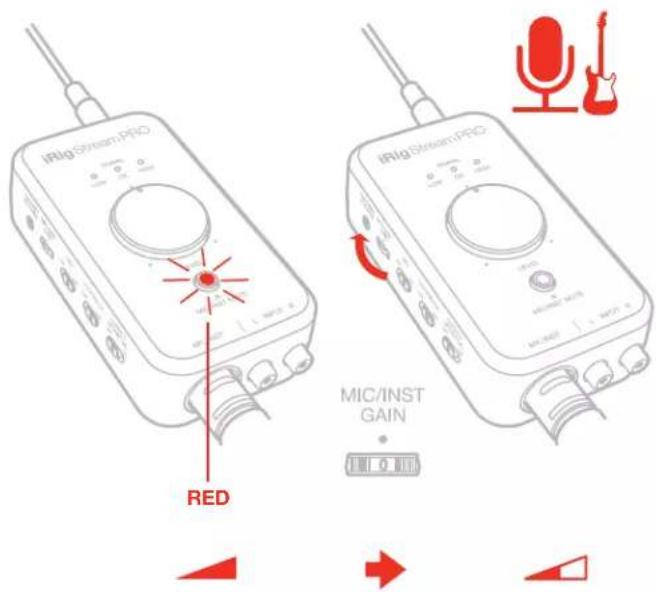
- You can adjust the gain of the microphone/instrument input with the dedicate "Mic/Inst Gain" thumbwheel: if the level of the microphone/instrument input is too high the "Mute" button LED will light up RED for 2 seconds. You should decrease the gain. Also, you can control the post-gain level with the "Mic/Inst" level thumbwheel: this control helps you to adjust the level of the signal before the main Level knob.
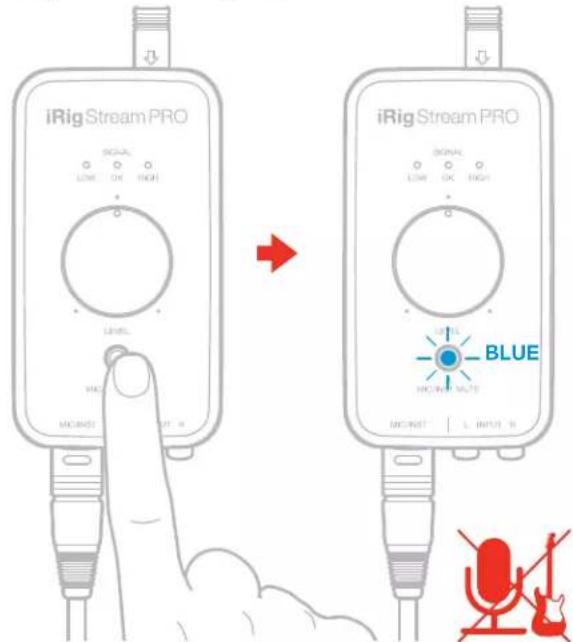
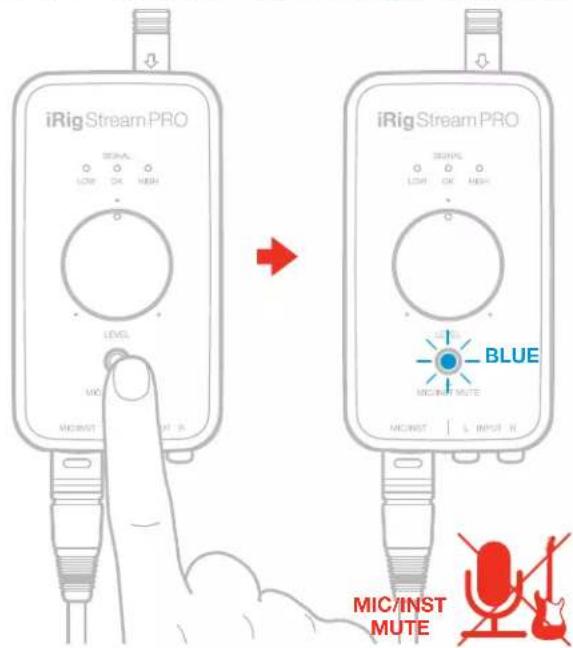
- You can mute the microphone/instrument input by pressing the "Mic/Inst Mute" button: when this input is muted, the LED will light up BLUE.
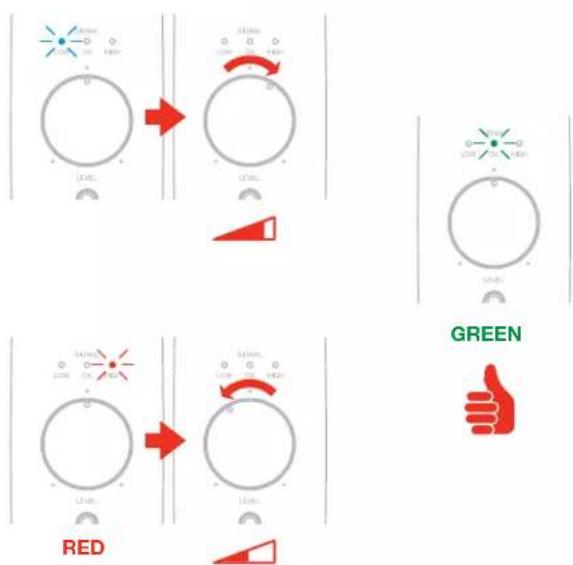
- The main Level knob lets you control the overall audio input streaming level coming from all the inputs.
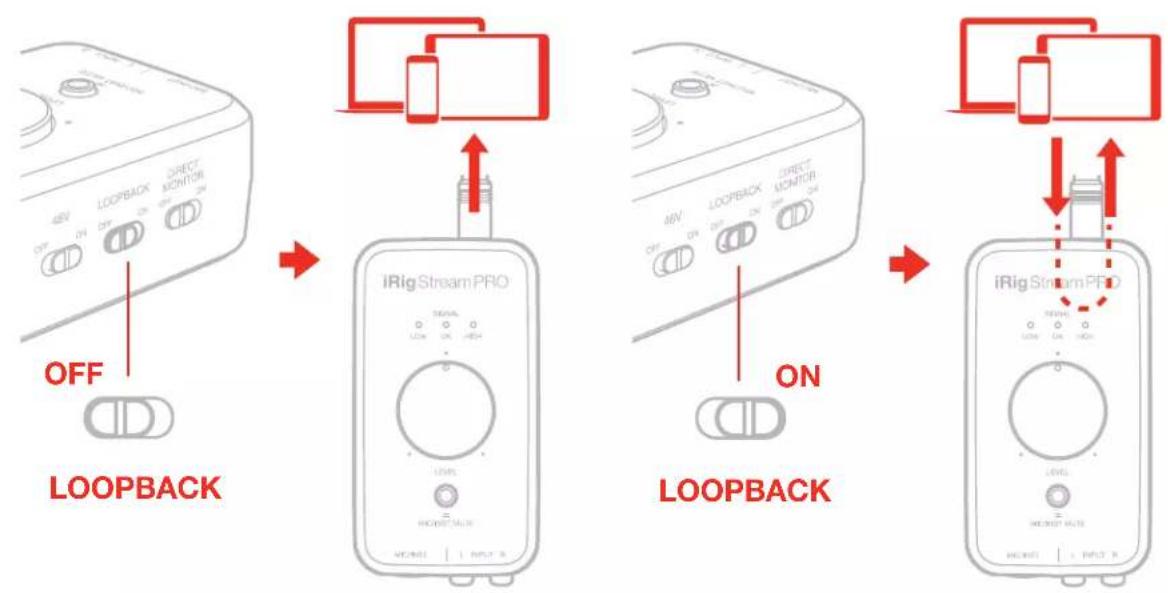
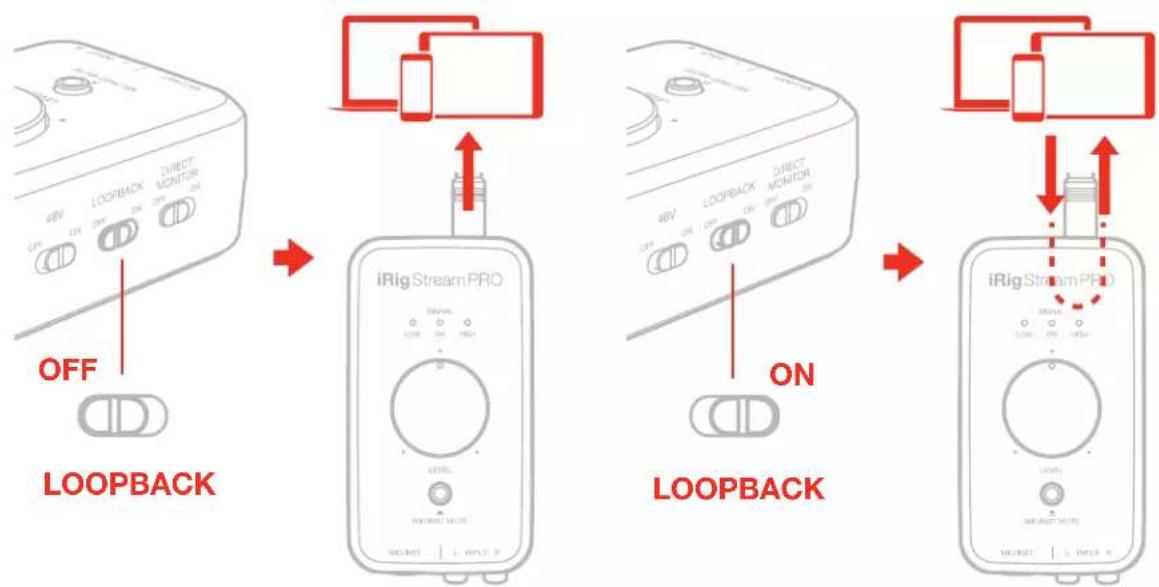
- With the Loopback function turned on, the audio that is input to the iRig Stream Pro from your host via USB is returned back to the host. Also in this case, the main Level knob will control the overall level that is recorded.
flowchart
graph LR
    A["48V LOOPBACK OFF"] --> B["iRigStreamPRO SIGNAL ON ON HIGH"]
    B --> C["LOOPBACK ON"]
    C --> D["iRigStreamPRO ON"]
    D --> E["LOOPBACK ON"]
    E --> F["iRigStreamPRO ON"]
- With the optional PSU (iRig PSU 3A), the iRig Stream Pro can charge the connected lightning iOS device.
Connecting iRig Stream Pro to Mac/Pc
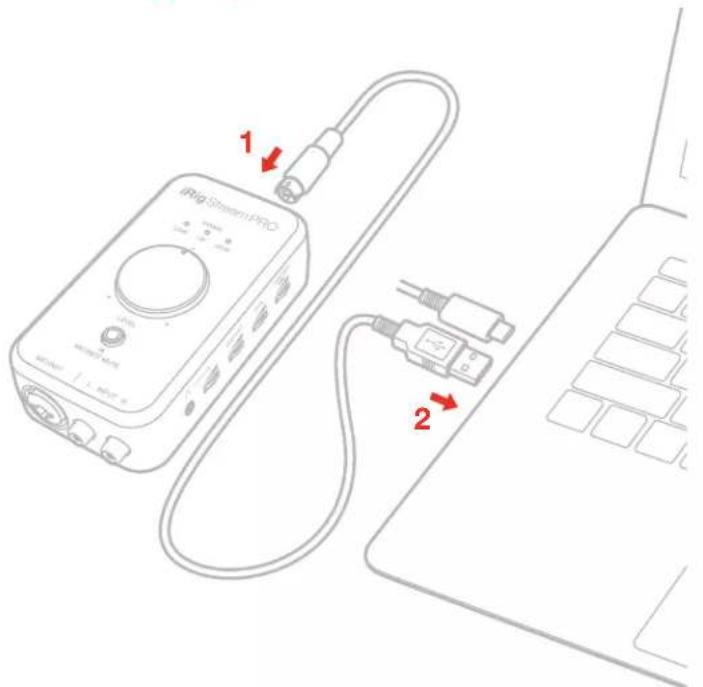
Once the iRig Stream Pro is connected to the host with the appropriate cable, launch your audio application and select iRig Stream Pro as the input/output device from your system's audio preferences. All the functionality described above allows you to cope with any registration and streaming needs.
iRig Stream Pro LEDs
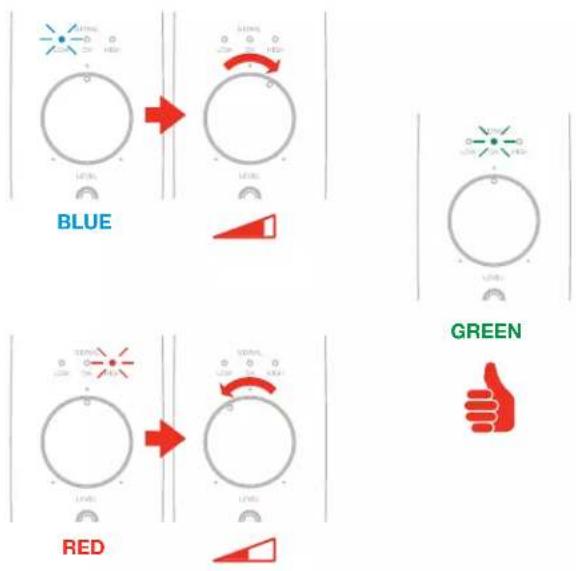
The three LEDs on iRig Stream Pro give you important information about the iRig Stream Pro's operating status. Each status is indicated by a different color:
- Signal LOW: bright blue LED. iRig Stream Pro is connected and active and the input signal is low. Use the main Level knob to increase the overall level that is recorded.
- Signal OK: green LED. iRig Stream Pro is active and the input signal is OK.
- Signal HIGH: red LED. iRig Stream Pro is active and the input signal is too high. Use the main Level knob to decrease the overall level that is recorded.
IMPORTANT: when the interface operates in multichannel mode these LEDs will show the level of the channels 1 and 2 only (RCA and Loopback)
The button “Mic/Inst Mute” lights up red if the level of the microphone/instrument input is too high. In this case, use the “Mic/Inst Gain” thumbwheel in order to decrease the input gain.
The button "Mic/Inst Mute" lights up blue when the Mic/Inst input is muted.
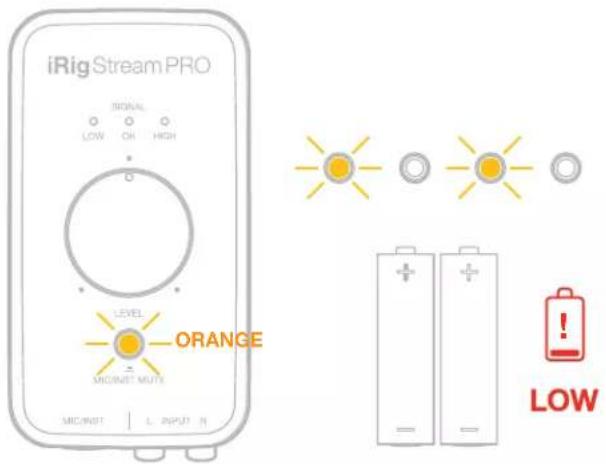
The button “Mic/Inst Mute” flashing orange: internal AA batteries are LOW! Before the 48V phantom power shuts down this LED will start blinking orange each 30 seconds.
This means that the battery level is low and it should be replaced as soon as possible.
Multichannel mode
The iRig Stream Pro can also act as a multichannel interface with 4 separate inputs.
By default the iRig Stream Pro is set to act as a 2-channel interface with the following channel count:
Channel 1: RCA L + LOOPBACK L + MIC/INST IN + HEADSET IN
Channel 2: RCA R + LOOPBACK R + MIC/INST IN + HEADSET IN
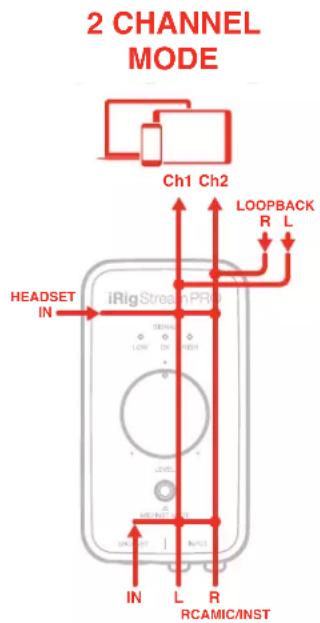
It is possible to change the configuration of the interface to multichannel mode, which will change the channel count as follows:
Channel 1: RCA L + LOOPBACK L
Channel 2: RCA R + LOOPBACK R
Channel 3: MIC/INST IN
Channel 4: HEADSET IN
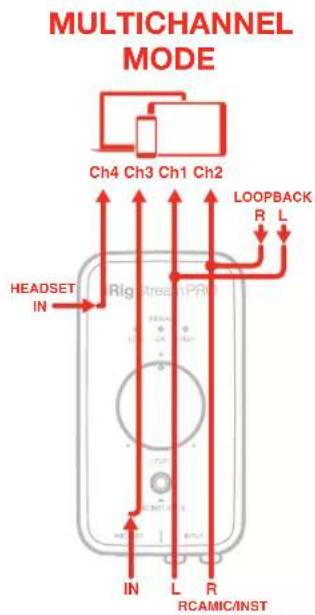
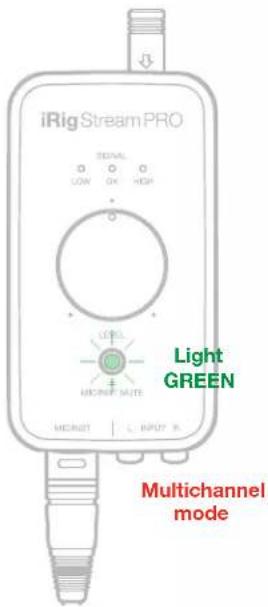
When the interface is set to multichannel mode, the "Mic/Inst Mute" button is lit green at low intensity.
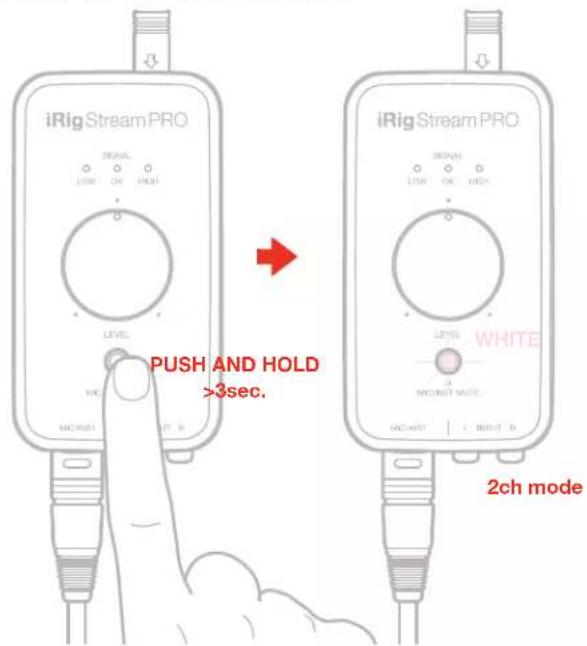
To change the operation mode:
- Push and hold the "Mic/Inst Mute" button for 3 seconds. The button will light up white to indicate that you currently are in 2-channel mode.
- Press the button again and it will light up green to indicate the multichannel mode is selected. Each press of the button will cycle between 2-channel mode (WHITE light) and multichannel mode (GREEN LIGHT).
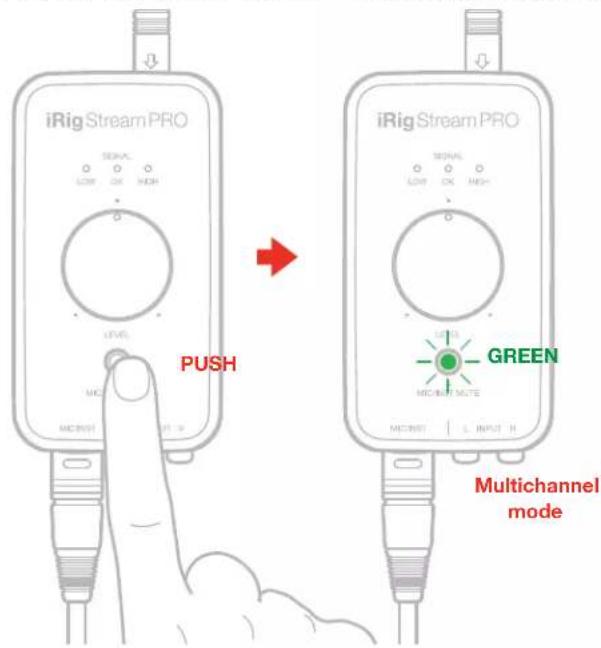
- To confirm your selection, push and hold the "Mic/Inst Mute" button for 3 seconds. The button will remain lit green (low intensity) to indicate that you are currently in multichannel mode.
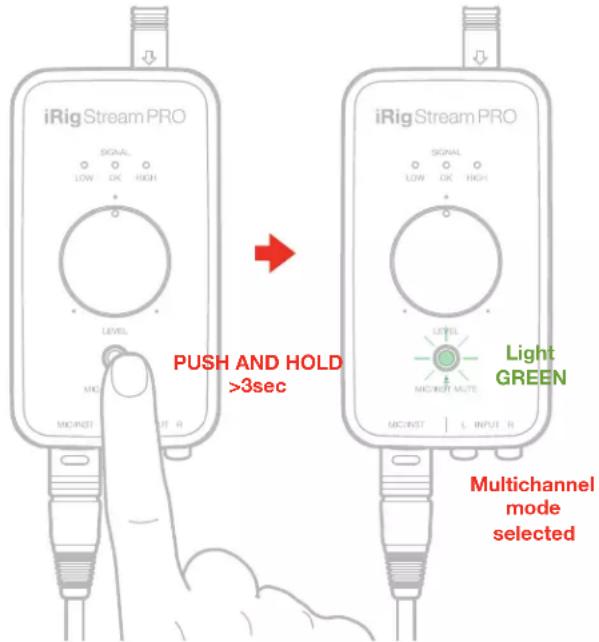
Repeat the steps above to change operation mode per your needs.
HINT: make sure to change the operation mode (stereo or multichannel) before opening your recording/streaming App. This because each time you'll change the operation mode, the interface will restart itself.
Multichannel operations
In order to use the multichannel functionality, a DAW or an App that supports multitrack recording is needed. If you're using an App make sure to set it to run in Background, this allows you to use it while you're using other Apps (such as streaming Apps).
The multichannel operation is particularly useful when you want to stream a processed signal from the Mic/Inst or Headset input to your audience.
IMPORTANT NOTE: please note that some streaming apps may exhibit some anomalous behavior in the management of multichannel interfaces. For example, Apps like Facebook for iOS/Android, will only support channel 1 as input of the audio streaming: this prevents from stereo streaming.
In this case, we suggest to use the iRig Stream Pro as a 2 channel interface. The same if you wish to use the iRig Recorder App: since this App will only recognise input 1 and 2. For multichannel operation, a different App is needed, such as: AmpliTube or VocaLive.
How to stream a processed signal
In order to stream a processed signal to your audience (e.g., an effected guitar or voice), follow these steps:
- Set the iRig Stream Pro to operate in multichannel mode as described above.
- If you are using an instrument like a guitar or a bass, connect it using a regular 1/4" guitar cable to the iRig Stream Pro's 1/4" instrument input and adjust the gain level. You can also use a microphone connected to the XLR input and follow the same following steps.
-
Open a DAW or an App, on the connected host, that supports multitrack recording.
-
Create a mono track assigning Input 3, which corresponds to the Mic/Inst input. This is the track that will be processed.
-
Insert an effect processor on this track and, if it is not on by default, activate the input monitoring. To activate the input monitoring option on the track, please refer to the software documentation.
IMPORTANT: make sure that the App you're using is set to run in Background, this allows you to use it while you're using other Apps (such as streaming Apps). To set the App to run in background please refer to the software documentation.
- Turn on the Loopback function on iRig Stream Pro.
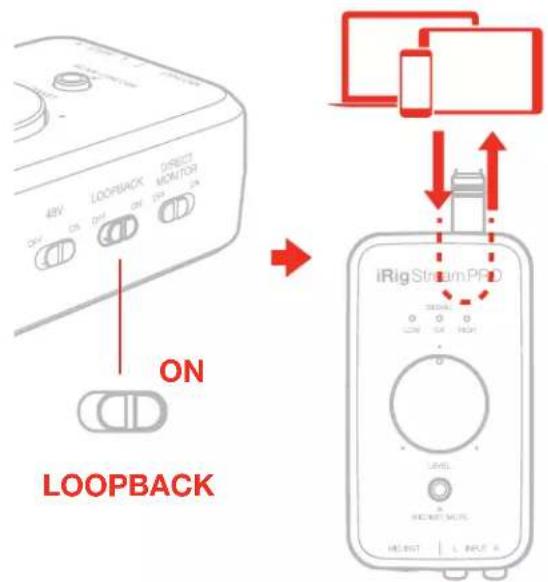
- Now the processed signal from input 3 will come back to the inputs 1 and 2: these are the inputs usually used by your streaming app. You can control the level of the streamed signal by using the "Level" potentiometer.
- Open your preferred streaming software and start your stream. Your audience will be able to listen to the audio that is input to channels 1 and 2.
If you want to use the HEADSET input, you'll need to create a track and assign input 4 and repeat the above steps.
Connection examples
Here are some examples of connecting mic or line level signals to iRig Stream Pro.
Connecting headset/phones
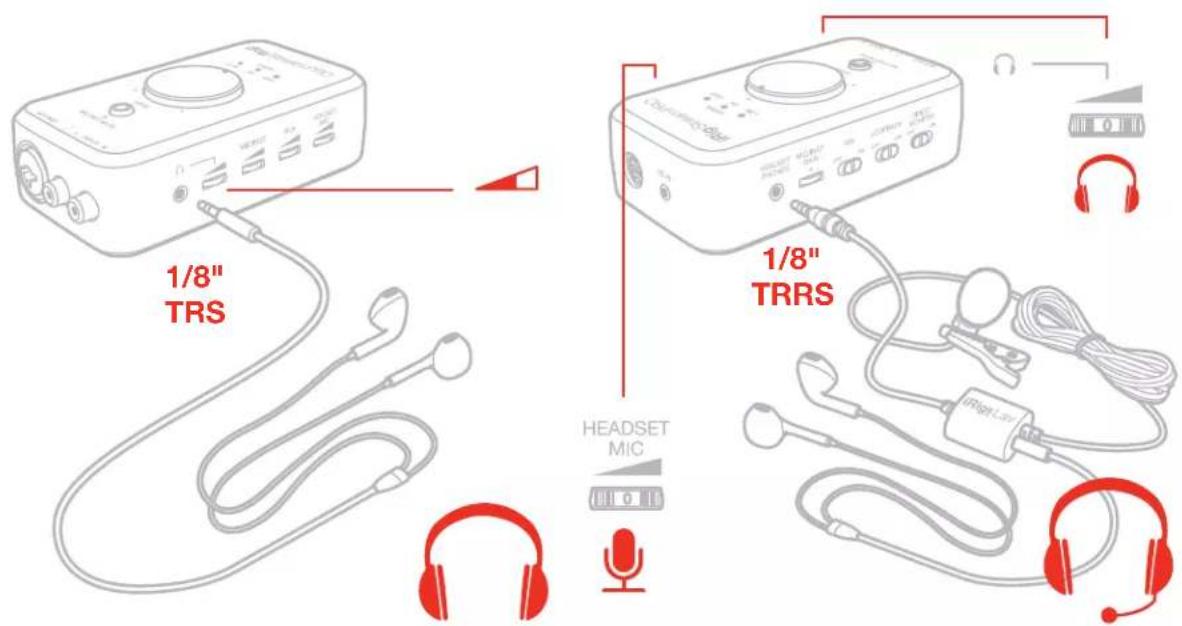
It is possible to connect an headset (compatible with CTIA wiring standard) or an iRig analogue microphone to the “Headset/Phones” port and an headphones to the “Headphones” port. The headset’s microphone gain can be controlled with the “Headset Mic” thumbwheel. In this case the main Level knob will control the overall signal level that is streamed to the connected host. If an headphones is connected, its volume can be controlled with the “Headphones” thumbwheel.
Connecting line level signal to the RCA inputs
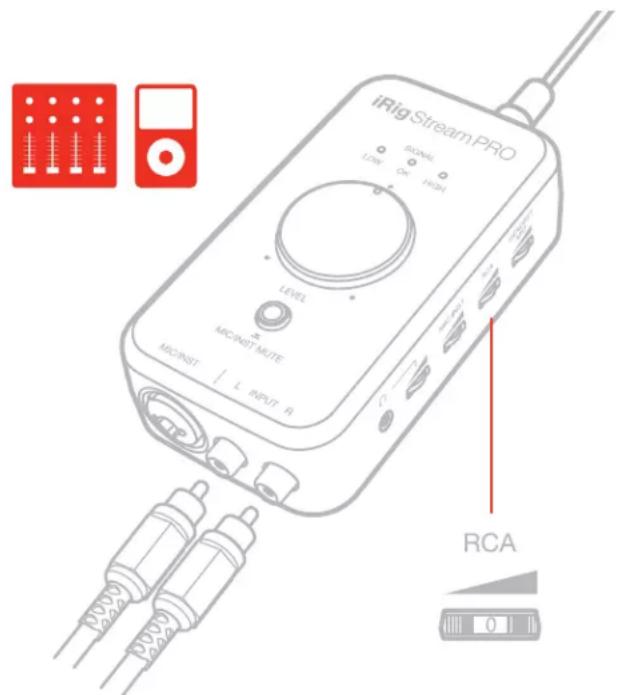
It is possible to connect any line level source to the RCA inputs. This signal can come from an mp3 player, a computer or an audio mixer. The main Level knob adjusts the overall volume that is recorded. To adjust the volume of the device connected to the RCA inputs, use both the volume controls of the device and the numbered thumbwheel "RCA" on the side of iRig Stream Pro.
IMPORTANT: please note that these are line level inputs and not PHONO inputs so, PHONO signal, needs to be converted to a LINE LEVEL signal before to be connected.
Connecting microphone
Always connect the microphone to iRig Stream Pro with XLR-to-XLR balanced cable. This will ensure a pristine and clean performance from your microphone with iRig Stream Pro. Before connecting dynamic microphones make sure phantom power is turned OFF. Check that the Phantom Power switch is in the OFF position.
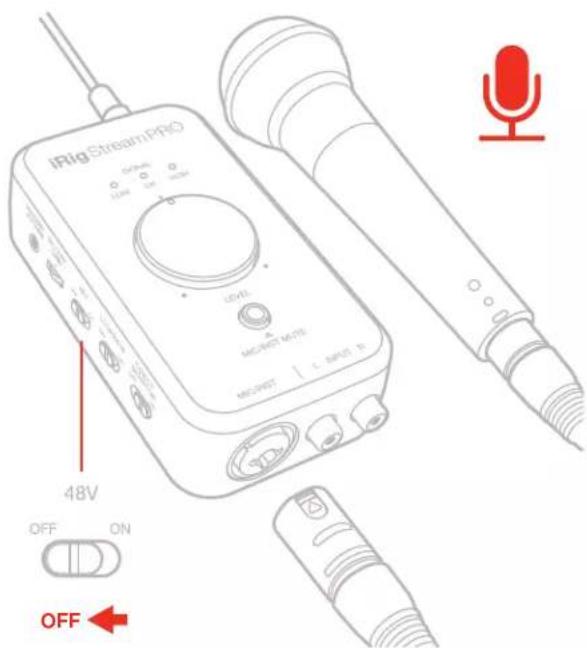
If you're using a condenser microphone, it will probably require external phantom power. If phantom power is ON, switch it OFF, and then connect your microphone. Turn phantom power ON only after the microphone is connected. If the "Mic/Inst Mute" LED flashes orange, check that working batteries are inserted in the iRig Stream Pro battery compartment on the bottom side, and that an application that is using iRig Stream Pro is open.
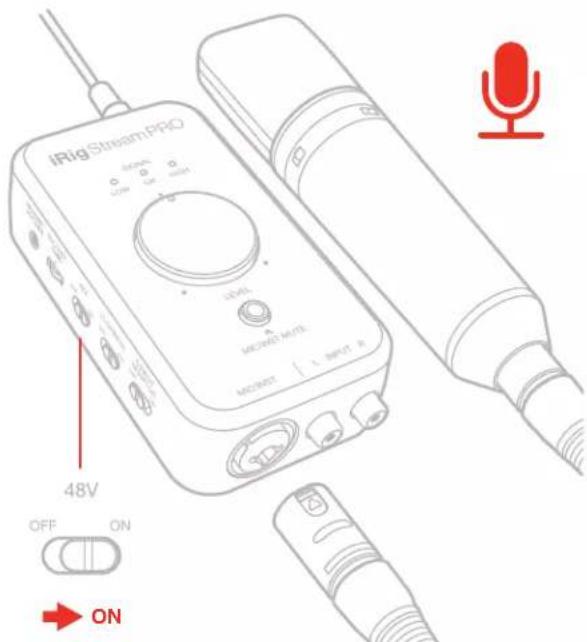
Before connecting a ribbon microphone, turn OFF phantom power and check the microphone's operating instruction manual to see if it requires it. Most ribbon microphones don't require phantom power, and some can even be damaged by it. If you're in doubt just leave it OFF. If the microphone won't work, check its user manual, it may need phantom power.
Connecting instrument
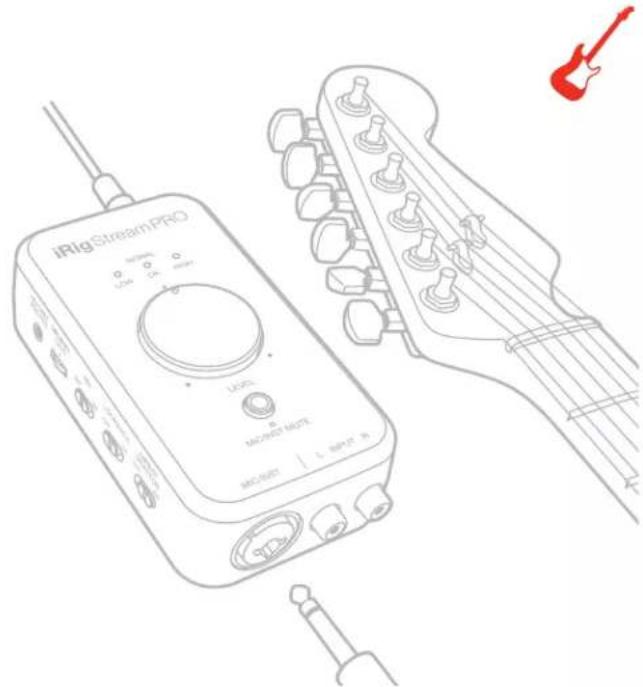
Connect your guitar, bass or any other mono instrument to the instrument input on iRig Stream Pro using an 1/4" plug unbalanced (TS or "mono") guitar cord.
IMPORTANT: the instrument input on iRig Stream Pro will NOT work if a cable with balanced (TRS or "stereo") 1/4" plug is used.
Connecting RCA, headset and microphone/instrument
It is also possible to connect RCA, headset and a microphone/instrument at the same time. You can adjust the levels of each inputs with dedicated numbered thumbwheels and the overall level that is recorded is controlled by the main Level knob.
Using the loopback function
flowchart
graph LR
    A["48V ON LOOPBACK"] --> B["LOOPBACK"]
    B --> C["iRigStreamPRO"]
    C --> D["LOOPBACK"]
    D --> E["iRigStreamPRO"]
With the LOOPBACK function turned on, the audio that is input to the iRig Stream Pro from your host via USB is returned back to the host. The main Level knob will control the overall level that is recorded.
Direct monitoring
When recording an audio signal into your audio software, there is often a slight delay before it reaches the outputs of the software and iRig Stream Pro. This delay, called latency, is caused by the computer processing required to convert and record audio. Since this delay can be distracting, iRig Stream Pro provides a direct monitoring path from the inputs to the outputs, which is activated by the Direct Monitor switch. When Direct Monitoring is enabled, the input signal is mixed with the output signal from your audio software and routed directly to the Headphone outputs. This lets you hear the “live” inputs without latency. The Direct Monitor switch has no effect on what is being recorded by your software. When using the Direct Monitor feature, make sure any software monitoring option for direct (or “low latency”) monitoring is disabled. Disabling low latency monitoring prevents “double-monitoring” of input audio signals when using the Direct Monitoring feature. When “double-monitoring” occurs, there will be an increase in volume and an undesirable “phasing” sound. For more details about its monitoring function, refer to the documentation for your audio software.
Troubleshooting
Sound is distorted.
Check that the input level on iRig Stream Pro has been set properly. If the signal LED is red (HIGH) when you stream your audio, decrease the input level as described in this guide.
I don't get any sound.
In order for iRig Stream Pro to turn on, a Core Audio-compatible audio app must first be launched on your iOS device or Mac.
- iOS: be sure you are using an app that works with audio input from the Lightning dock connector.
- Mac: be sure you have set "iRig Stream Pro" as the audio input device on the audio app you are using.
A “phasing” sound is present while monitoring the incoming signal.
If a “phasing” effect is present, you can disable the input monitoring from your recording app or switch off the direct monitor switch on iRig Stream Pro.
Phantom power doesn't turn ON.
Check that you have inserted working AA batteries in iRig Stream Pro battery compartment, or that you've connected iRig Stream Pro to an external power supply.
No sound is playback thru the connected headphones.
Use the headphones thumbwheel to set the volume and check the volume of the connected host: you can control the volume of the host with its volume buttons.
Specifications
Common
Type: 2 in/2out or 4 in/2out
Conversion: 24-bit A/D, 24-bit D/A
Sampling Rate: 44.1 kHz, 48 kHz, 88.2 kHz, 96 kHz
Power: USB bus powered. 48V operations with iOS devices require battery or DC IN. When connected to an external PSU (iRig PSU 3A, not included), iRig Stream Pro charges the connected iOS lightning device.
Metering: 3x LEDs for overall streaming signal. Peak meter for Mic/Inst input.
Device Connection: mini-DIN
Dimensions: 123 mm/4.84" x 67 mm/2.63" x 40 mm/1.57"
Weight: 146g
Line input
Connector: 2x RCA (unbal.) Left/Right
Nominal Input Level: -10 dBV
Head Room: 10 dB - Level @ max
Input Impedance: 16.5 kOhms
Frequency Response: from 20 Hz to 20 kHz (-1.5 dB)
Signal to Noise Ratio: 84 dB - Level @max
Microphone Input
Microphone Input: balanced, XLR. Pin 2: hot / Pin 3: cold / Pin 1: ground
Microphone Input Level: from 3.8 mV RMS to 388 mV RMS
Microphone Input Impedance: approx 2 kOhms
Analog Gain Range: 40 dB
Phantom Power: +48 V ± 4 V
Frequency Response:
• from 20 Hz to 20 kHz (-1 dB) Gain @ min
• from 20 Hz to 20 kHz (-3 dB) Gain @ max
Signal to Noise Ratio:
- 80 dB - Gain @ min
- 70 dB - Gain @ max
Instrument Input
Instrument Input: unbalanced, Hi-Z, TS 1/4" Jack, Tip: signal / Shield: ground
Instrument Input Level: from 70 mV RMS to 1.8 V RMS
Instrument Input Impedance: 1 MOhms
Analog Gain Range: 28 dB
Frequency Response:
• from 20 Hz to 20 kHz (-1 dB) Gain @ min
• from 20 Hz to 20 kHz (-3 dB) Gain @ max
Signal to Noise Ratio:
- 80 dB - Gain @ min
- 70dB - Gain @ max
Headset/Phone
Connector: 1/8" TRRS jack (CTIA wiring standard)
Supply voltage: >2,5 V
Microphone gain: Adjustable with numbered thumbwheel
Frequency Response: 20 Hz – 20 kHz
Headphone Level control: numbered thumbwheel
Battery Life
Phantom power On with iOS device: up to 20 hours (Alkaline batteries), with mic input connected to 3.1 mA phantom powered load.
Warranty
Please visit:
www.ikmultimedia.com/warranty
for the complete warranty policy.
Support and more info
www.ikmultimedia.com/support
www.irigstreampro.com
IK Multimedia
IK Multimedia Production Srl
IK Multimedia US LLC
590 Sawgrass Corporate Pkwy, Sunrise, FL 33325
Phone: (954) 846-9101 - Fax: (954) 846-9077
IK Multimedia Asia
TB Tamachi Bldg. 1F, MBE #709,
4-11-1 Shiba, Minato-ku, Tokyo 108-0014
www.ikmultimedia.com/contact-us
Made for

iPod


"Made for iPod," "Made for iPhone," and "Made for iPad" mean that an electronic accessory has been designed to connect specifically to iPod, iPhone, or iPad, respectively, and has been certified by the developer to meet Apple performance standards. Apple is not responsible for the operation of this device or its compliance with safety and regulatory standards. Please note that the use of this accessory with iPod, iPhone, or iPad may affect wireless performance.
iRig® Stream Pro is trademark property of IK Multimedia Production Srl. All other product names and images, trademarks and artists names are the property of their respective owners, which are in no way associated or affiliated with IK Multimedia. iPad, iPhone, iPod touch Mac and Mac logo are trademarks of Apple Computer, Inc., registered in the U.S. and other countries. Lightning is a trademark of Apple Inc. App Store is a service mark of Apple Inc.


- Table of Contents
- Contents 2
- English 3
- Regulatory 23
- Safety information
- iRig Stream Pro
- Register your iRig Stream Pro
- Overview
- Installation and setup
- Connecting iRig Stream Pro to Mac/Pc
- iRig Stream Pro LEDs
- Multichannel mode
- Multichannel operations
- How to stream a processed signal
- Connection examples
- Connecting headset/phones
- Connecting microphone
- Connecting instrument
- Connecting RCA, headset and microphone/instrument
- Using the loopback function
- Direct monitoring
- Troubleshooting
- Sound is distorted.
- I don't get any sound.
- A “phasing” sound is present while monitoring the incoming signal.
- Phantom power doesn't turn ON.
- No sound is playback thru the connected headphones.
- Specifications
- Common
- Line input
- Microphone Input
- Instrument Input
- Headset/Phone
- Battery Life
- Warranty
- Support and more info
- IK Multimedia
Brand : IK Multimedia
Model : iRig Pro I/O
Category : Hi-Fi