
IAN 91168 - Lighting Livarno Lux - Free user manual and instructions
Find the device manual for free IAN 91168 Livarno Lux in PDF.


| Product type | LED magnifying lamp for precision work |
| Brand | Livarno Lux |
| Model | IAN 91168 / LLL 90 A2 |
| Dimensions (total height) | 77 cm |
| Arm length | Approx. 40 cm each |
| Head diameter | 18.5 cm |
| Lens diameter | 12.5 cm |
| Weight | 2,500 g |
| Power supply | 220-240 V ~ 50-60 Hz, 6.4 W |
| Safety class | II |
| Light source | 90 LEDs |
| Luminous intensity | 1700 mcd ±10% |
| Luminous flux | 6.0 lm ±10% |
| Color temperature | 6,500 K |
| LED lifespan | > 20,000 h |
| Magnification of magnifying glass | 2.25x (5 diopters) |
| Supported table thickness | Up to 6 cm |
| Intended use | Indoor, dry rooms, private use |
| Maintenance | Clean with a dry cloth, no solvents |
| Repairability | LEDs not replaceable, power cable replaceable by professional |
| Warranty | 3 years |
| Included accessories | Lamp body, screw, wing screw, locking pin, table clamp, instruction manual |
Frequently Asked Questions - IAN 91168 Livarno Lux
User questions about IAN 91168 Livarno Lux
0 question about this device. Answer the ones you know or ask your own.
Ask a new question about this device
Download the instructions for your Lighting in PDF format for free! Find your manual IAN 91168 - Livarno Lux and take your electronic device back in hand. On this page are published all the documents necessary for the use of your device. IAN 91168 by Livarno Lux.
USER MANUAL IAN 91168 Livarno Lux
natural_image
Black-and-white photo of a desk lamp illuminating a small stand with a pen, no visible text or symbols on the lamp or background.User manual and service information
FR CH
LOUPE A ÉCLAIRAGE LED
natural_image
3D rendered image of a desktop desk lamp with adjustable arm and stand (no text or symbols visible)natural_image
Symbol of a trash bin crossed with no text or numbers, representing waste sorting or disposal (no text present)natural_image
3D rendered image of a simple office lamp with adjustable arm and base (no text or symbols visible)natural_image
Symbol of a trash bin crossed out by two crossed lines, with a solid black rectangle below (no text or labels)Cher client, chère cliente,
Flusso luminoso: 6,0 lm +/-10%
natural_image
3D rendering of a desktop desk lamp with adjustable arm and stand (no text or symbols visible)natural_image
Symbol of a trash bin crossed with a diagonal line, no text or numbers presentnatural_image
3D rendering of a adjustable table lamp with adjustable arm and base (no text or symbols visible)natural_image
Symbol of a trash bin crossed with no text or numbers, representing waste sorting or restriction (no text present)Technical Specifications 49
Safety Instructions.... 50
Before You Start 51
Getting Started....52
Switching the magnifier lamp on and off....52
Aligning the magnifier lamp 52
Using the magnifying lens....53
Maintenance / Cleaning 53
Servicing 53
Cleaning....53
Environment and Recycling.... 54
Conformity 54
Warranty Information 55
Introduction
Thank you for choosing a LivarnoLux product.
The magnifier lamp is the ideal tool for scale modelling, arts and crafts or handicrafts. 90 extremely bright, power-saving LEDs and the built-in crystal lens with 2.25 magnification help you performing detailed craftwork.
Thank to its table clamp, the magnifier lamp can be easily secured to a desktop or table. The rotatable arms and the conveniently adjustable head allow you to adjust the light beam to suit your needs.
Intended Use
This magnifier lamp is not intended for commercial use. This magnifier lamp is suitable exclusively for use indoors, in dry, sealed spaces. Make sure the magnifier lamp is always held firmly in place. The device fulfils all relevant norms and standards relating to CE conformity. Any modifications to the magnifier lamp other than recommended changes by the manufacturer may result in these standards no longer being met.
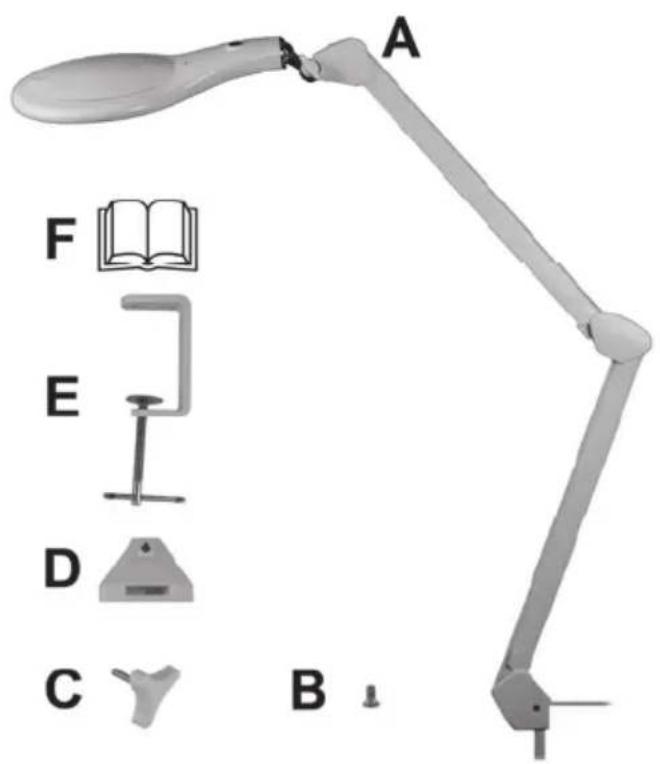
Package contents
A: Lamp body
B: Screw
C: Wing screw
D: Fixing pin
E: Table screw clamp
F: These operating instructions (linear illustration)
Controls
There is an additional diagram of the controls and the reference numbers used in the fold-out front cover of these instructions. You can leave the front cover folded out while you read the other chapters of the instruction. This means you always have a reference on the relevant controls to hand.
1 On/off switch
2 Ball joint for lamp shield
3 Swivel joint with knurled screw
4 Swivel arms
5 Mains cable
6 Clip to open the glass magnifier cover
Technical Specifications
Brand name: LivarnoLux
Model name: LLL 90 A2
Operating voltage: 220 - 240 V \~ 50 - 60 Hz
Power consumption: 6.4 W
Safety Class: II
Light source: 90 LEDs
LEDs:
Light intensity: 1700 mcd +/-10%
Luminous flux: 6.0 lm +/-10%
Power: approx. 0.06 W
Colour temperature: 6500 °K
Lifetime: > 20,000 hrs
Magnifier lens:
Lens power: 5 dioptres
Magnification factor: 2.25x
Dimensions:
Total height*: 77 cm
Length of both arms: approx. 40 cm each
Table clamp for table thickness: Max. 6 cm
Head (diameter): 18.5 cm
Crystal lens (diameter): 12.5 cm
Cable length: 2 m
Weight: 2500 g
SLG: Safety Approved

* Measured from the lamp head bottom in horizontal lamp head position.
Subject to changes in technical specifications or design without prior notice.
Safety Instructions
Before you use the magnifier lamp for the first time, please read and comply with these instructions and warnings, even if you are familiar with handling electronic devices! Keep these operating instructions in a safe place for future reference. If you sell the magnifier lamp or give it away, pass on the operating instructions at the same time.

This symbol indicates important instructions for the safe operation of the device and the protection of the user.
Electrical devices do not belong in the hands of children. Do not allow children to use electrical devices when not under supervision. Children may not understand that they can be dangerous. Keep the packaging away from children too as there is danger of suffocation.
If you notice any smoke, unusual noises or strange smells, switch the magnifier lamp off immediately and disconnect the mains plug from the socket. If this occurs the device should no longer be used and should be inspected by authorized service personnel. Do not inhale any smoke which could have originated from a fire in the device. However, if you do inhale smoke, please consult a doctor. Smoke inhalation can be harmful.
The housing of the magnifier lamp and the power cable may not be damaged in any way. The flexible power cable cannot be repaired. Any damaged power cord must be replaced by the manufacturer or authorised customer service. If the housing or cable is damaged, you could potentially get an electric shock.
The luminaire has no user serviceable parts inside. Never attempt opening the luminaire! Risk of electric shock.
Do not hang anything off the magnifier lamp. The plastic body is not designed to support weights. In particular, do not place flammable materials on or near the magnifier lamp. These can damage the magnifier lamp or cause fires.
Never use any optical devices such as a magnifying glass to look directly into the light beam - this could damage your eyes! If you suspect any eye damage, consult a doctor.
Power cable
Always hold the power cable by the plug and never pull on the cable itself.
Never place the magnifier glass, furniture or other heavy objects on the mains cable and make sure it does not get kinked.
⚠️ Never make knots in the power cable and do not tie it together with other cords. All power cables should be installed so that nobody can trip over them or be obstructed by them.
Never use adapter plugs or extension cables that do not comply with the safety regulations applicable in your country, and do not modify the power cord yourself. Any damaged power cord must be replaced by the manufacturer or authorised customer service. If the power cord is damaged you run the risk of an electric shock.
Before You Start
Remove the magnifier lamp and the accessories from the packaging.
Fix the magnifier lamp to a desk or workbench using the lamp holder. Make sure the magnifier lamp is always held firmly in place.
The procedure is as follows:
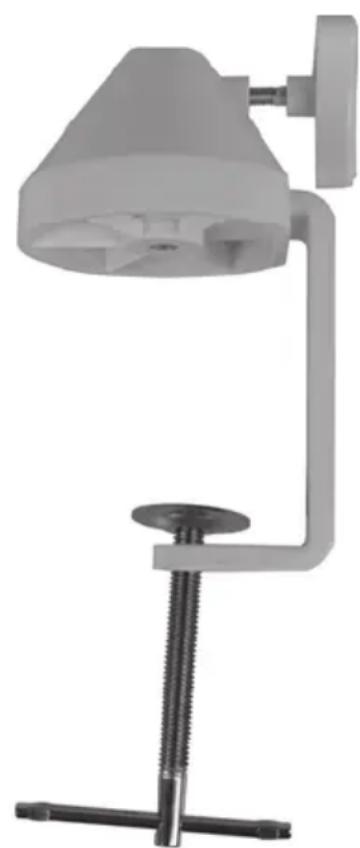
Fully untighten the knurled screw that's integrated into the table screw clamp (E). Guide the table screw clamp (E) into the fixing pin (D) until it stops moving, as shown in the diagram. Connect the two parts by fitting the screw (B) through the hole in the fixing pin (D) and screwing into the thread on the table screw clamp (E). Now turn the wing screw (C) a few turns into the winding on the side of the fitting pin (D). The lamp holder is now sufficiently assembled for you to be able to fit it to your desk or workbench. Now turn the knurled screw clockwise until the lamp holder is firmly and securely fixed.
natural_image
3D rendered image of a desktop desk lamp with adjustable arm and base (no text or symbols visible)Now fit the entire lamp body (A) down into the hole in the fixing pin (D). This means that the outlet opening for the mains cable and the wing screw (C) you undid earlier must be on top of one another. Now tighten the wing screw as far as it will go. The lamp is now fixed in its current position and secured against accidental twisting or removal from the holder. If you release the wing screw (C) a whole turn anticlockwise, you can adjust the lamp body (A) by around 65° to the left or around 65° to the right to suit your requirements. The lamp is still fixed in its current position and secured against accidental twisting or removal from the holder. If you undo the wing screw (C) another 5 to 6 turns anticlockwise, you can rotate the lamp body (A) about 360°. Please note that, in this case, the lamp is no longer secured against accidental removal from the lamp holder.
Getting Started
Switching the magnifier lamp on and off

Note on mains disconnection:
The magnifier lamp is only disconnected from the mains when the mains plug is removed from the socket. Switching off the magnifier lamp using the On/Off switch does not disconnect it from the mains supply.
- Insert the mains plug into a suitable mains socket. Do not use an extension cable or socket strip if it does not comply with the relevant safety regulations.
- Switch the On/Off switch (1) to the "I" position to switch the magnifier lamp on.
- Switch the On/Off switch (1) to the "0" position to switch the magnifier lamp off.
Aligning the magnifier lamp
Using the ball joint (2) on the lamp shade and the rotating arms (4) you can easily adjust the lamp to suit your needs.
Thanks to the rotatable joint (3) it is possible to rotate the lamp head approx. 270^ . The joint is fixed with the corresponding clamp screw.
Please untighten the clamp screw slightly before adjusting the lamp head on the rotatable joint.
Using the magnifying lens
- Open the cover of the lamp shade by pulling on the lug (6).
- Look through the magnifying glass from above to obtain an enlarged view of small objects beneath the lamp shade. To focus on what you are looking at, move the object closer to or further away from the magnifying glass.
• If you no longer need to use the magnifying glass, close the cover again.
Maintenance / Cleaning
Servicing
The light source of the magnifier lamp consists of long-life LEDs. The LEDs can not be replaced and do not require any servicing.
Any damaged power cord must be replaced by the manufacturer or authorised customer service. If the power cable or the housing of the magnifier lamp become damaged, the lamp may no longer be used.
If the power cord is damaged you run the risk of an electric shock.
Cleaning
⚠️ Allow the magnifier lamp to cool down completely before cleaning it. ⚠️ Make sure that no liquid gets into the housing. Otherwise there is the risk of electric shock.
To clean the magnifier lamp and its lens use a dry cloth. Never use any solvents or cleaners that may damage the plastic housing. If the product is very dirty, use a slightly moistened cloth.
Environment and Recycling

natural_image
Symbol of a trash bin crossed out by two crossed lines (no text or numbers present)If the product is labelled with a struck-out waste bin, it is subject to European Directive 2002/96/EC. All electrical and electronic devices must be disposed of separately from household waste at official disposal centres. For environmental protection reasons, bulbs must be properly disposed of.

This device may not be disposed of as domestic waste. You can obtain information on collection points or collection dates from your municipal administration or local waste disposal company.
Recycle the packaging material properly too. Cardboard packaging can be taken to paper recycling containers or public collection points for recycling. Any film or plastic contained in the packaging should be taken to your public collection points for disposal.
Conformity

This magnifier lamp complies with the basic and other relevant requirements of the EMC Directive 2004/108/EC, the Low-voltage Directive 2006/95/EC, the RoHS II Directive 2011/65/EU and the ErP Directive 2009/125/EC. The corresponding Declaration of Conformity can be found at the end of this User's Manual.
Warranty Information
Warranty of TARGA GmbH
Dear Customer,
This device is sold with three years warranty from the date of purchase. In the event of product defects, you have legal rights towards the seller. These statutory rights are not restricted by our warranty as described below.
Warranty conditions
The warranty period commences upon the date of purchase. Please keep the original receipt in a safe place as it is required as proof of purchase. If any material or manufacturing faults occur within three years of purchase of this product, we will repair or replace the product free of charge as we deem appropriate.
Warranty period and legal warranty rights
The warranty period is not extended in the event of a warranty claim. This also applies to replaced and repaired parts. Any damage or defects discovered upon purchase must be reported immediately when the product has been unpacked. Any repairs required after the warranty period will be subject to charge.
Scope of warranty
The device was carefully manufactured in compliance with stringent quality guidelines and subjected to thorough testing before it left the works. The warranty applies to material and manufacturing faults. This warranty does not cover product components which are subject to normal wear and which can therefore be regarded as wearing parts, or damage to fragile components such as switches, rechargeable batteries or components made of glass. This warranty is void if the product is damaged, incorrectly used or serviced. To ensure correct use of the product, always comply fully with all instructions contained in the user manual. The warnings and recommendations in the user manual regarding correct and incorrect use and handling of the product must always be observed and complied with. The product is solely designed for private use and is not suitable for commercial applications. The warranty is rendered void in the event of incorrect handling and misuse, if it is subjected to force, and also if any person other than our authorised service technicians interfere with the device. No new warranty period commences if the product is repaired or replaced.
Submitting warranty claims
To ensure speedy handling of your complaint, please note the following:
Before using your product for the first time, please read the enclosed documentation or online help carefully. Should any problems arise which cannot be solved in this way, please call our hotline.
- Always have your receipt, the product article number as well as the serial number (if available) to hand as proof of purchase.
- If it is not possible to solve the problem on the phone, our hotline support staff will initiate further servicing procedures depending on the fault.

Service

Phone: 0207 - 36 50 744
E-Mail: service.GB@targa-online.com

Phone: 01 - 242 15 83
E-Mail: service.IE@targa-online.com

Phone: 800 - 62 175
E-Mail: service.MT@targa-online.com

Phone: 800 - 92 496
E-Mail: service.CY@targa-online.com
IAN: 91168

Manufacturer
Please note that the following address is not a service address. First contact the service point stated above.
TARGA
GmbH
Coesterweg 45
59494 SOEST
GERMANY
CE
EU Declaration of Conformity
Address:
Targa GmbH
Coesterweg 45
59494 Soest, Germany
Product:
Magnifier lamp LED
Model:
LivarnoLux LLL 90 A2
Identification number:
IAN 91168
The product complies with the requirements of the following European directives:
2006/95/EC
Low Voltage Directive (LVD)
2004/108/EC
Electromagnetic Compatibility
2009/125/EC
Energy Relating Products
2011/65/EU
Restriction of the use of certain hazardous substances in electrical and electronic equipment
Compliance was proved by the application of the following standards:
EMC:
EN 55015: 2006 + A1: 2007 + A2: 2009 (partly)
EN 61000-3-2: 2006 + A1:2009 + A2:2009 (partly)
EN 61000-3-3: 2008 (partly)
EN 61547: 2009
EN 62493: 2010
RoHS:
EN 62321: 2009
ErP:
Regulation 1194/2012
SAFETY:
EN 60598-2-4: 1997
EN 62471: 2008
Year of CE marking:
2013
Soest, 14 ^th October 2013
Matthias Klauke, Managing Director
- Introduction
- Intended Use
- Package contents
- Controls
- Technical Specifications
- Safety Instructions
- Power cable
- Before You Start
- Getting Started
- Switching the magnifier lamp on and off
- Note on mains disconnection:
- Aligning the magnifier lamp
- Using the magnifying lens
- Maintenance / Cleaning
- Servicing
- Cleaning
- Environment and Recycling
- Conformity
- Warranty Information
- Warranty of TARGA GmbH
- Warranty conditions
- Warranty period and legal warranty rights
- Scope of warranty
- Submitting warranty claims
- Service
- Manufacturer
- CE
- EU Declaration of Conformity
- Address:
- Product:
- Model:
- Identification number:
- 2006/95/EC
- 2004/108/EC
- 2009/125/EC
- 2011/65/EU
- EMC:
- RoHS:
- ErP:
- SAFETY:
- Year of CE marking:
Brand : Livarno Lux
Model : IAN 91168
Category : Lighting