
VA0040 - Remplisseuse sous vide Concept - Free user manual and instructions
Find the device manual for free VA0040 Concept in PDF.


| Product type | Vacuum filler / Food vacuum sealer |
| Brand | Concept |
| Model | VA0040 |
| Mains voltage | 220-240 V ~ 50/60 Hz |
| Power | 120 W |
| Dimensions (estimated) | Approximately 40 x 20 x 10 cm |
| Weight (estimated) | Approximately 2.5 kg |
| Main functions | Automatic vacuum (Auto Vac), manual sealing (Seal), dry/moist selection (Dry/Moist), normal/turbo vacuum (Normal/Turbo) |
| Compatible bag types | Concept Fresh bags and rolls VB2203, VB2806, VB2023, VB2635 |
| Optional accessories | Containers VD8100, vacuum hose VA0040 (ref. 42393145) |
| Maintenance and cleaning | Unplug before cleaning. Clean with a damp cloth and mild soap. Do not immerse in water or dishwasher. Dry thoroughly. |
| Safety | Do not use if damaged. Do not immerse in water. Use on a stable and heat-resistant surface. Unplug after use. Suitable for children over 8 years under supervision. |
| Spare parts and repairability | Do not disassemble yourself. Contact an authorized center. Hose reference: 42393145. |
| Warranty | 24 months from the date of purchase. Does not cover normal wear, damage due to improper use, or interventions by third parties. |
| General information | For domestic use only. Manufactured by Jindřich Valenta – Concept, Czech Republic. www.my-concept.com |
Frequently Asked Questions - VA0040 Concept
User questions about VA0040 Concept
0 question about this device. Answer the ones you know or ask your own.
Ask a new question about this device
Download the instructions for your Remplisseuse sous vide in PDF format for free! Find your manual VA0040 - Concept and take your electronic device back in hand. On this page are published all the documents necessary for the use of your device. VA0040 by Concept.
USER MANUAL VA0040 Concept
CZ
HU LV DE FRENSK PL
IT ES
RO
concept
CZ
PODĚKOVÁNÍ
Thank you for purchasing a Concept product. We wish you much joy with your new appliance every day you use it. Please read the instruction manual carefully before initial use. To refer to this manual any time you need to, we recommend you to keep it in a safe place. And please pass it to any future owner of the appliance.
| Technical specifications | |
| Voltage 220-240 V, 50/60 Hz | |
| Input 120 W | |
IMPORTANT SAFETY PRECAUTIONS
- Do not use the appliance in any other way than as described in this manual.
- Remove all the covering and marketing materials from the appliance before the first use.
- Make sure the mains voltage corresponds to the values on the rating plate of the appliance. Only use grounded sockets.
- Only place the appliance on a stable and heat-resistant surface away from all other heat sources.
- Check the appliance or its parts for signs of obvious damage before use.
- Do not use the appliance if it is not working properly.
- Do not strain the AC adapter cord by bending it or folding excessively.
- When disconnecting the appliance from the mains, grasp and pull only the adapter.
• Never disassemble the appliance! - Unplug the AC adapter from the electrical outlet when not in use.
- Never put the appliance in a microwave and do not wash it in a dishwasher!
- Do not immerse the AC adapter or the appliance in water or any other liquid.
- Before cleaning and after use of the appliance, switch the appliance off and disconnect it from the mains.
- The appliance is only suitable for home use and is not intended for commercial use.
- Check the appliance and the power cord for damage regularly. Never switch on a damaged appliance.
- Do not repair the appliance yourself. Contact an authorized service centre.
VA0040

EN
concept
concept
EN
- This appliance can be used by children aged from 8 years and above and persons with reduced physical, sensory or mental capabilities or lack of experience and knowledge if they have been given supervision or instruction concerning the use of the appliance in a safe way and understand the hazards involved. Cleaning and maintenance performed by the user must not be carried out by children unless they are 8 years old and under supervision. Children aged under 8 years of age must be kept away from the appliance and its power cord. Do not let children play with the appliance. - This appliance cannot be used by children or persons with reduced physical, sensory or mental capabilities or lack of experience and knowledge unless they have been given supervision or instruction concerning the use of the appliance in a safe way and understand the hazards involved.
Damages from failure to follow the manufacturer's instructions are not covered by the warranty.
PRODUCT DESCRIPTION
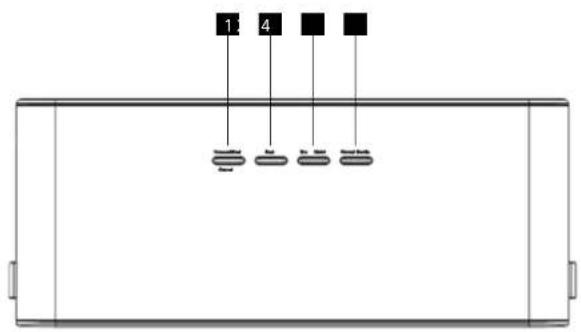
1 Auto Vac / Cancel - This button has two functions:
a) Press this button in standby mode to start the automatic air suction function and the subsequent welding of the vacuum bag.
b) Press this button during suction / vacuum packing to stop the process immediately.
2 Seal - This button has two functions:
a) Sealing of the end of an open bag without air suction (e.g. for vacuum rolls).
b) If the "Auto / Vac" function is activated, pressing the "Seal" button will immediately interrupt the suction and the appliance will start sealing the vacuum bag. This allows you to regulate the vacuum in the bag and thus prevent, for example, crushing of fragile foods.
3 Dry/Moist - Use the "Dry/Moist" button to select between the vacuum packing time settings (the indicator light shows which function is active).
a) Dry: for dry bags and vacuum packed food without moisture.
b) Moist: for bags and food with increased moisture.
4 Normal/Turbo - press this button to set the air suction pressure.
a) Normal: for soft vacuum packed food/objects.
b) Turbo: for food/objects with increased hardness, in which there is no risk of deterioration by higher pressure.
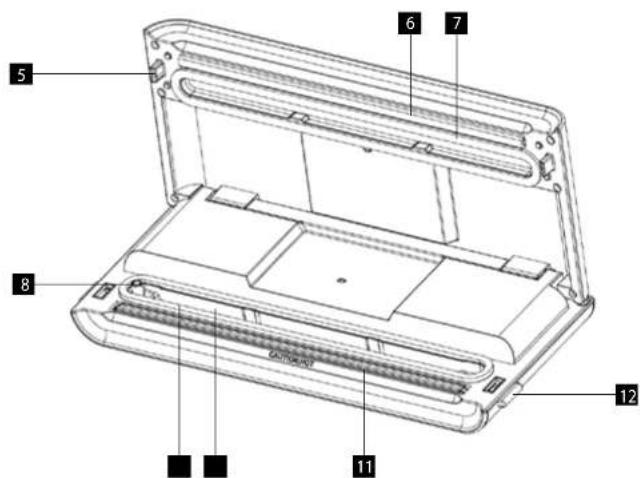
5 Lid lock
6 Sealing of the welding bar
7 The upper sealing of the vacuum chamber
8 Suction opening - for vacuum packing of containers
9 The lower sealing of the vacuum chamber
EN
concept
concept
EN
10 Vacuum chamber - The open end of the bag is placed into the inner part of the chamber, it sucks the air out of the bag and collects any liquid leaking from the bag.
11 Welding bar
12 Lid release button (on both sides of the appliance)
OPERATING INSTRUCTIONS
The process of making a bag from Concept Fresh rolls – VB2203, VB2806 (see the accessories paragraph)
-
Plug the appliance into the socket.
-
Unwind the roll and cut with scissors the length of foil you will need to store the food and add about 10 cm of length to seal and shrink the bag. If you wish to reuse the bags, add another 1.5 cm for each additional use so that a new weld can be made after cutting off the previous weld. Cut both edges of the bag perpendicular to the long edges of the roll.
-
Release the lid by pressing the lid release buttons (12) and open it. Insert one of the cut edges into the appliance so that the edge of the foil touches the sealing of the suction chamber.
-
Close the lid and push it where the lid release buttons are located. You will hear a click when the lid is closed properly. Press the "Seal" button to start welding the bottom side of the bag (the indicator on the "Seal" button lights up when sealing, the indicator goes out when the process is complete).
-
Press the lid release buttons, open the lid and remove the bag from the appliance. The bag is sealed and ready for use.
Vacuum sealing of a bag from Concept rolls - VB2203, VB2635 (see the accessories paragraph)
-
Fill the bag so that there is no filling approximately 7.5 cm from the open edge. This part of the bag must not be stained from the packed food on the outside or inside.
-
Insert the open edge of the bag into the suction chamber between the sealing. The edge of the bag cannot be wrinkled or crumpled.
-
Close the lid and press to secure. Use the "Dry/Moist" button (3) to set the welding mode (dry/moist - the indicator light on the button shows which of the options is currently active) depending on the moisture of the food being vacuum packed. Press the "Auto/Vac" button (1), the appliance starts the vacuum packing process and then automatically seals the bag (during suction / vacuum packing the "Auto/Vac" button indicator lights up, the indicator goes out when the process is completed).
Important notice
Use original bags made exclusively from Concept Fresh VB2203 and VB2806 rolls.
Remove excess moisture from the food before the vacuum packing.
Do not vacuum pack bags filled with any liquid!
Vacuum packing of food in Concept fresh VD8100 containers (see the accessories paragraph)
-
Fill the container max. 2.5 cm below the rim.
-
Wipe off any food residues or moisture on the edge of the container.
-
Insert the hose (not included) of the vacuum welder with one end into the opening (8) and with the other end into the opening in the lid of the container/stopper.
-
Set the button on the lid of the VD8100 containers to the "SEAL" position. Switch on the appliance by pressing the "Auto/Vac" button (1). When the air suction is completed, the appliance switches off automatically. Remove the hose from the lid of the appliance and store the container.
Important safety information:
The sealing element is heated throughout the suction process. Do not touch it!
If you want to open the container: container set VD8100 - turn the button on the lid to the "OPEN" position
Tip:
The appliance is equipped with an opening on the back for storing the power cord.
Do not wrap the power cable around the appliance!
-
Do not overfill the bags or containers. Always leave enough space as specified in the instructions above.
-
Do not insert bags that are dirty or wet at the desired weld point into the appliance. Always thoroughly dry and wipe the ends of the bags before welding them.
-
Do not leave too much air in the bag. Always remove as much excess air as possible from the bag before welding.
-
Do not vacuum pack objects with sharp edges that could rupture the bag. Always use appropriate containers for such objects.
-
Allow the appliance to cool down for 1 minute after each packing.
-
Prevent liquids from entering the suction chamber or opening and damaging the device. If you need to vacuum pack moist food, we recommend freezing the bag and wiping it with a paper towel first.
-
Only vacuum pack liquids in containers that are distributed as accessories. Always allow liquids to cool down!
-
Always store perishable food in the refrigerator or freezer after packing them. Vacuum packing prolongs their freshness, but does not prevent them from spoiling.
-
The vacuum packing system can be used not only for food storage, but also for protecting valuable items (e.g. important documents, electronics, medicines, etc.)
-
Make sure that the suction chamber and the opening are clean and free of any dirt before use.
-
If the appliance is damaged by sucking in leftover food from an overfilled suction chamber, this damage is not a warranty defect!
CLEANING AND MAINTENANCE
Before cleaning the appliance always unplug the power cord from the electrical outlet!
Do not immerse the appliance or its parts into water and do not wash them in a dishwasher.
Do not use abrasive agents, solvents or boiling water for cleaning any parts of the appliance. Wipe the appliance with wet cloth and mild detergent. Use a paper towel to remove any food and liquid residue from the inside of the appliance.
Let the device and its accessories to dry thoroughly before using them again.
Cleaning the reusable bags and containers
Wash the bags in warm soapy water and rinse thoroughly before using them again.
Important information:
Do not wash in a dishwasher; bags and containers would be destroyed by too high a temperature.
Do not immerse the lids of the containers into water, keep them clean by using a wet cloth and mild detergent.
The containers are not to be heated in a microwave and stored in a freezer.
Warning:
Do not reuse bags in which raw meat was previously packed, or bags which were heated in boiling water or in the microwave.
EN
concept
concept
EN
TROUBLESHOOTING
1. The appliance does not work
- Check that the power cord is properly connected and not damaged.
- Check that the bag is properly positioned and not outside of the suction chamber.
- Ensure that the lid is properly closed.
2. There is still air inside the bag
- Ensure that the open end of the bag is properly inserted into the suction chamber. If the edge of the bag is behind the sealing of the suction groove, the air will not be extracted, even if the weld is tight.
- Check the tightness of the bag by immersing it in a container filled with water. Bubbles coming out from the bag will reveal potential leaks. If that is the case, use a different bag or cut off the leaking weld and reseal the bag.
- Never make additional welds on the sides of the bag. The bags are equipped with special side welds, which are sealed along the entire length of the outer edge. Attempts to create a side weld can cause the bag to leak and allow air to penetrate.
3. The air was removed from the bag, but it re-entered
- Check the tightness of the bag (see the preceding paragraph).
- If you detect any leaks, cut off the weld and reseal the bag.
- The moisture of the food or the food itself (juices, fats, crumbs, etc.) prevent proper sealing of the bag. Reopen the bag, dry and clean the weld and reseal the bag.
- Packed objects with sharp edges may puncture the bag. Wrap food and sharp-edged objects with a soft material (e.g. a paper towel) and seal the new bag.
4. The bag melts at the joint
The welding element may be overheated after repeated use. Allow the appliance to cool down for 1 minute after each use.
OPTIONAL ACCESSORIES
The following accessories can be purchased for the appliance:
Code Name Barcode
VB2203 Vacuum packing foil set 2 pcs 8594049740314
VB2806 Vacuum packing foil set 2 pcs 8594049740321
VD8100 Vacuum storage container set 3 pcs 8594049740352
VB2023 Vacuum packing ziplock bags 12 pcs 8594049740338
VB2635 Vacuum packing ziplock bags 12 pcs 8594049740345
42393145 Vacuum hose VA0040 8595631010242
FOOD SAFETY
The vacuum packing process extends the life of the food by removing most of the air from the sealed container or bag. It reduces the oxidation of food, which affects their nutritional value, taste and overall quality.
The removal of air also slows down the growth of microorganisms, which can under certain conditions degrade food quality. These microorganisms in particular include:
Fungi - they cannot grow in an environment with low oxygen level and vacuum packing therefore effectively reduces their growth.
Yeast - they require water, sugar and reasonable temperature to multiply and grow. They can survive in the air and also in an airless environment. Their growth is slowed down by cooling. Freezing stops their growth completely.
Bacteria - the growth of these microorganisms can be significantly reduced at temperatures of 4^ and less. Freezing to -17^ does not kill microorganisms, but it stops their growth and multiplication. In the case of long-term storage of perishable food, always freeze while using vacuum packing technology. After defrosting them, keep these foods refrigerated at lower temperatures.
NOTICE
Vacuum packing is not a substitute for a canning process. However, vacuum packing slows down the processes resulting in food spoilage. Perishable food which need be frozen or stored in a refrigerator must be stored at such temperatures even after vacuum packing.
GUIDE FOR FOOD STORAGE
| Storage time | Storage time in a vacuum | |
| Refrigerated food (5 - 2 °C) | ||
| Red meat | 3-4 days | 8-9 days |
| White meat | 2-3 days | 6-9 days |
| Fish (whole) | 1-3 days | 4-5 days |
| Game meat | 1-3 days | 5-7 days |
| Smoked meat | 7-15 days | 25-40 days |
| Sliced charcuterie | 4-6 days | 20-25 days |
| Soft cheeses | 5-7 days | 14-20 days |
| Hard cheeses | 15-20 days | 25-60 days |
| Vegetable products | 1-3 days | 7-10 days |
| Fruits | 5-7 days | 14-20 days |
| Cooked / processed food | ||
| Mashes, vegetable soups | 2-3 days | 6-10 days |
| Pasta, rice | 2-3 days | 6-8 days |
| Cooked / roasted meat | 3-5 days | 10-15 days |
| Bakery products | 2-3 days | 6-8 days |
| Frying oil | 10-15 days | 25-40 days |
| Frozen food (-18 - 2 °C) | ||
| Meat | 4-6 months | 15-20 months |
| Fish | 3-4 months | 10-12 months |
| Vegetables | 8-10 months | 18-24 months |
| Food at room temperature (25 - 2 °C) | ||
| Bread | 1-2 days | 6-8 days |
| Packaged biscuits | 4-6 months | 12 months |
| Pasta | 5-6 months | 12 months |
| Rice | 5-6 months | 12 months |
| Flour | 4-5 months | 12 months |
| Dried fruit | 3-4 months | 12 months |
48
EN
concept
concept
DE
Ground coffee 2-3 months 12 months
Loose tea 5-6 months 12 months
Milk powder 1-2 months 12 months
Food in dried powdered form 1-2 months 12 months
SERVICE CENTRE
Extensive maintenance or repair, which requires access to internal parts of the product, has to be performed by a qualified specialist or the service centre.
ENVIRONMENTAL CONCERNS
- Packaging materials and old appliances should be recycled.
- Packaging materials may be disposed of as sorted waste.
- Dispose the plastic bags made of polyethylene (PE) of as sorted waste.
Recycling of the appliance at the end of its lifespan:

This appliance is labelled in accordance with European Directive 2012/19/EU concerning used electrical and electronic appliances (waste electrical and electronic equipment - WEEE). The symbol on the product or on its packaging indicates that this product may not be treated as household waste. Instead it should be taken to the appropriate collection point for the recycling of electrical and electronic equipment. By ensuring this product is disposed of correctly, you will help prevent potential negative consequences for the environment and human health, which could otherwise be caused by inappropriate waste handling of this product. The disposal of such material has to be done according to the recycling regulations. For more detailed information about recycling of this appliance see the authorized local office or service for household waste disposal or the shop, where you purchased the appliance.

The product meets all the necessary requirements of the EU directives applicable to the specific product.
Changes in text, design, and technical specifications are subject to change without prior notice and we reserve the right to change them.
So
VA0040
DANKSAGUNG
1 Auto Vac / Cancel - Acest buton are 2 functii:
The manufacturer (or Importer) is responsible for ensuring the product complies with the requirements of applicable legal regulations as well as those of the relevant technical standards. Moreover, they are responsible for ensuring the product has the properties the manufacturer described in documents related to the goods or those reasonably expected by the customer with regard to the nature of the goods or based on advertising produced by the manufacturer, and further they are responsible for ensuring the product is fit for the purpose proposed by the manufacturer or that a product of the same type is normally used for.
The quality warranty term is 24 months from product takeover by the customer.
The warranty does not apply to wear and tear caused by regular use. The customer shall not be entitled to any warranty claims if, prior to taking the product over, they knew the product contained a defect or if the defect is attributable to the customer.
The warranty specifically does not apply:
- if the product installation, operation and service conditions stipulated in the product operating manual have not been adhered to,
• to malfunctions caused due to mechanical, heat or chemical damage, short circuit, over voltage or incorrect installation.
• to malfunctions caused by an inexpert third-party intervention,
• to malfunctions caused by natural disaster,
• to malfunctions caused by insufficient or inappropriate maintenance in violation of the operating manual, including malfunctions caused by water and other sediments,
• to changes in colour of the heating surface or to scratching of the surface caused as a result of using the products in an unusual manner,
• to appearance and functional changes caused by exposure to sunlight, thermal radiation of water and other sediments, - if the service life of certain product parts expires, e.g. for accumulators, bulbs, etc.
The warranty does not apply to any products and services provided along with the product (gifts, promotional articles, etc.).
Filing a complaint
A complaint against a product defect must be filed as soon as identified, yet no later than before the end of the warranty term.
The customer must file a product complaint with the dealer from which they have purchased the product, or with any authorised service centre, a list of which is included in the product package, or available at www.my-concept.com.
While filing a product complaint, the product must be duly cleaned and securely packed so as to prevent any damage during its transport to an authorised service centre, where relevant, unless the product is delivered in person.
The customer must submit proof of having concluded a purchase contract for the product by producing the receipt.
While filing their complaint, the customer must indicate the noted defect and identify the preferred complaint application method.
Complaints processing
As long as the noted defect may be removed, the user has the right to have the defect duly removed free of charge on a timely basis.
Where such a procedure is not reasonable with regard to the nature of the defect, the user may require to be supplied a new defect-free product (replacement), or, where the defect applies to a part of the product only, replacement of the part concerned. However, if replacement of the product or any part thereof is not proportionate with regard to the nature of the defect, especially if the defect can be removed without undue delay, the customer has the right to have the defect removed free of charge.
If the noted defect is not removable, or if the customer becomes entitled to replacement of the product or a part thereof, yet the replacement is not possible, for example due to the product having been sold out, the customer has the right to return the product (withdrawal from the contract).
The customer shall have the right to a new product (replacement) or to replacement of a part of the product even if the defect can be removed, provided they cannot properly use the product due to repeated occurrence of the defect or due to a high number of such defects. In such a case, the customer also has the right to return the product (by withdrawing from the contract).
If the product is not returned (the customer does not withdraw from the contract), or if the customer does not apply the right to a new defect-free product (replacement), to replacement of a part thereof or to repair of the product, they may request a reasonable discount. The customer also has a right to a reasonable discount if a new defect-free product cannot be supplied to them, or if a product part cannot be replaced or the product repaired unless the situation is remedied within a reasonable time limit, or if remedying the situation would create major discomfort on the part of the customer.
The seller, authorised service centre or a staff member authorised by them must decide about each complaint immediately or within three business days in complicated cases. This term does not include a reasonable period of time, depending on the type of product concerned,
required for the defect to be assessed by an expert. A complaint, including defect removal, must be dealt with without any undue delay, yet no later than within 30 calendar days of the complaint filing date, unless the seller and the customer agree on a later deadline.
On returning the product (withdrawing from the contract) the customer must return any accessories and documents supplied along with the product.
The customer does not have the right to keep the defective parts and components of the product replaced as part of a repair of the product.
This shall be without prejudice to any other rights the customer may have in relation to the purchase of the product.
Remark: Complaints against products damaged in transport are governed by the carrier's complaints procedure.
Manufacturer
Jindrich Valenta - Concept
Vysokomýtská 1800, 565 01 Choceň
Czech Republic
tel.: +420 465 471 400
fax +420 465 473 304
Company ID No. 13216660
email: servis@my-concept.cz
www: www.my-concept.com
Product data
| Model: | |
| Production number: | |
| Date of purchase: Seal and signature of vendor: | |
concept concept
DEGARANTIEBEDINGUNGEN
Garantie
FR CONDITIONS DE GARANTIE
Garantie
CONCEPT POLSKA sp. z o.o.
Ostrowskiego 30, 53-238 Wroclaw Tel.: +48 713 390 444, Fax: 713 390 414 www.my-concept.pl

ASPICO KFT

- concept
- PODĚKOVÁNÍ
- IMPORTANT SAFETY PRECAUTIONS
- EN
- OPERATING INSTRUCTIONS
- Important notice
- Important safety information:
- Tip:
- CLEANING AND MAINTENANCE
- Cleaning the reusable bags and containers
- Important information:
- Warning:
- TROUBLESHOOTING
- The appliance does not work
- There is still air inside the bag
- The air was removed from the bag, but it re-entered
- The bag melts at the joint
- OPTIONAL ACCESSORIES
- Code Name Barcode
- FOOD SAFETY
- NOTICE
- SERVICE CENTRE
- ENVIRONMENTAL CONCERNS
- Recycling of the appliance at the end of its lifespan:
- DANKSAGUNG
- Filing a complaint
- Complaints processing
- Manufacturer
- concept concept
- DEGARANTIEBEDINGUNGEN
- Garantie
- FR CONDITIONS DE GARANTIE
- CONCEPT POLSKA sp. z o.o.
- ASPICO KFT
Brand : Concept
Model : VA0040
Category : Remplisseuse sous vide