
TBV8106BX - Blender BEKO - Free user manual and instructions
Find the device manual for free TBV8106BX BEKO in PDF.

| Product type | Blender with vacuum / vacuum sealing function |
| Brand | Beko |
| Model | TBV8106BX |
| Power | 1000 W |
| Voltage / Frequency | 220-240 V ~ 50/60 Hz |
| Bowl capacity (blending) | 1.5 L (max), 250 ml (min) |
| Bowl capacity (vacuum) | 1 L (food + milk), 700 ml (dairy products only) |
| Bowl material | Tritan |
| Automatic programs | Smoothie, Crushed Ice, Sauces and Coulis, Vacuum, Vacuum+Blend, Auto Clean |
| Pulse function | Yes |
| Blade type | Stainless steel blades, removable |
| Included accessories | Portable bottle (flask), sport cap, measuring cup / insect-proof cap, washable filter |
| Bowl and accessories care | Dishwasher safe (bowl, bottle, lids) |
| Motor unit care | Wipe with a damp cloth, do not immerse |
| Safety | Thermal protection, automatic shut-off in case of overheating, bowl locking |
| Maximum liquid temperature | 40 °C |
| Continuous operation time | 2 minutes max, then 5 minutes rest |
Frequently Asked Questions - TBV8106BX BEKO
User questions about TBV8106BX BEKO
0 question about this device. Answer the ones you know or ask your own.
Ask a new question about this device
Download the instructions for your Blender in PDF format for free! Find your manual TBV8106BX - BEKO and take your electronic device back in hand. On this page are published all the documents necessary for the use of your device. TBV8106BX by BEKO.
USER MANUAL TBV8106BX BEKO
natural_image
Line drawing of a blender with handle and spout (no text or symbols)TBV8106BX
EN DE TR FR ES RO PL IT AR
Please read this manual first!
Dear Valued Customer,
Thank you for selecting this Beko appliance. We hope that you get the best results from your appliance which has been manufactured with high quality and state-of-the-art technology. For this reason, please read this user manual and all other provided documents carefully before using the appliance and keep it as a reference for future use. If you hand over the appliance to someone else, give the user manual as well. Follow the instructions by paying attention to all the information and warnings in the user manual.
Meanings of the symbols
Following symbols are used in various sections of this manual:

Important information and useful hints about usage.

WARNING:Warnings for dangerous situations concerning the safety of life and property.

Suitable for contact with food.
Do not immerse the appliance, the power cable, or the power plug in water or any other liquid.

This product has been produced in environmentally-friendly, state-of-the-art facilities.
The values which are declared in the markings affixed on your product or the other printed documents supplied with it represent the values which were obtained in the laboratories pursuant to the pertinent standards. These values may vary according to the usage of the appliance and ambient conditions.
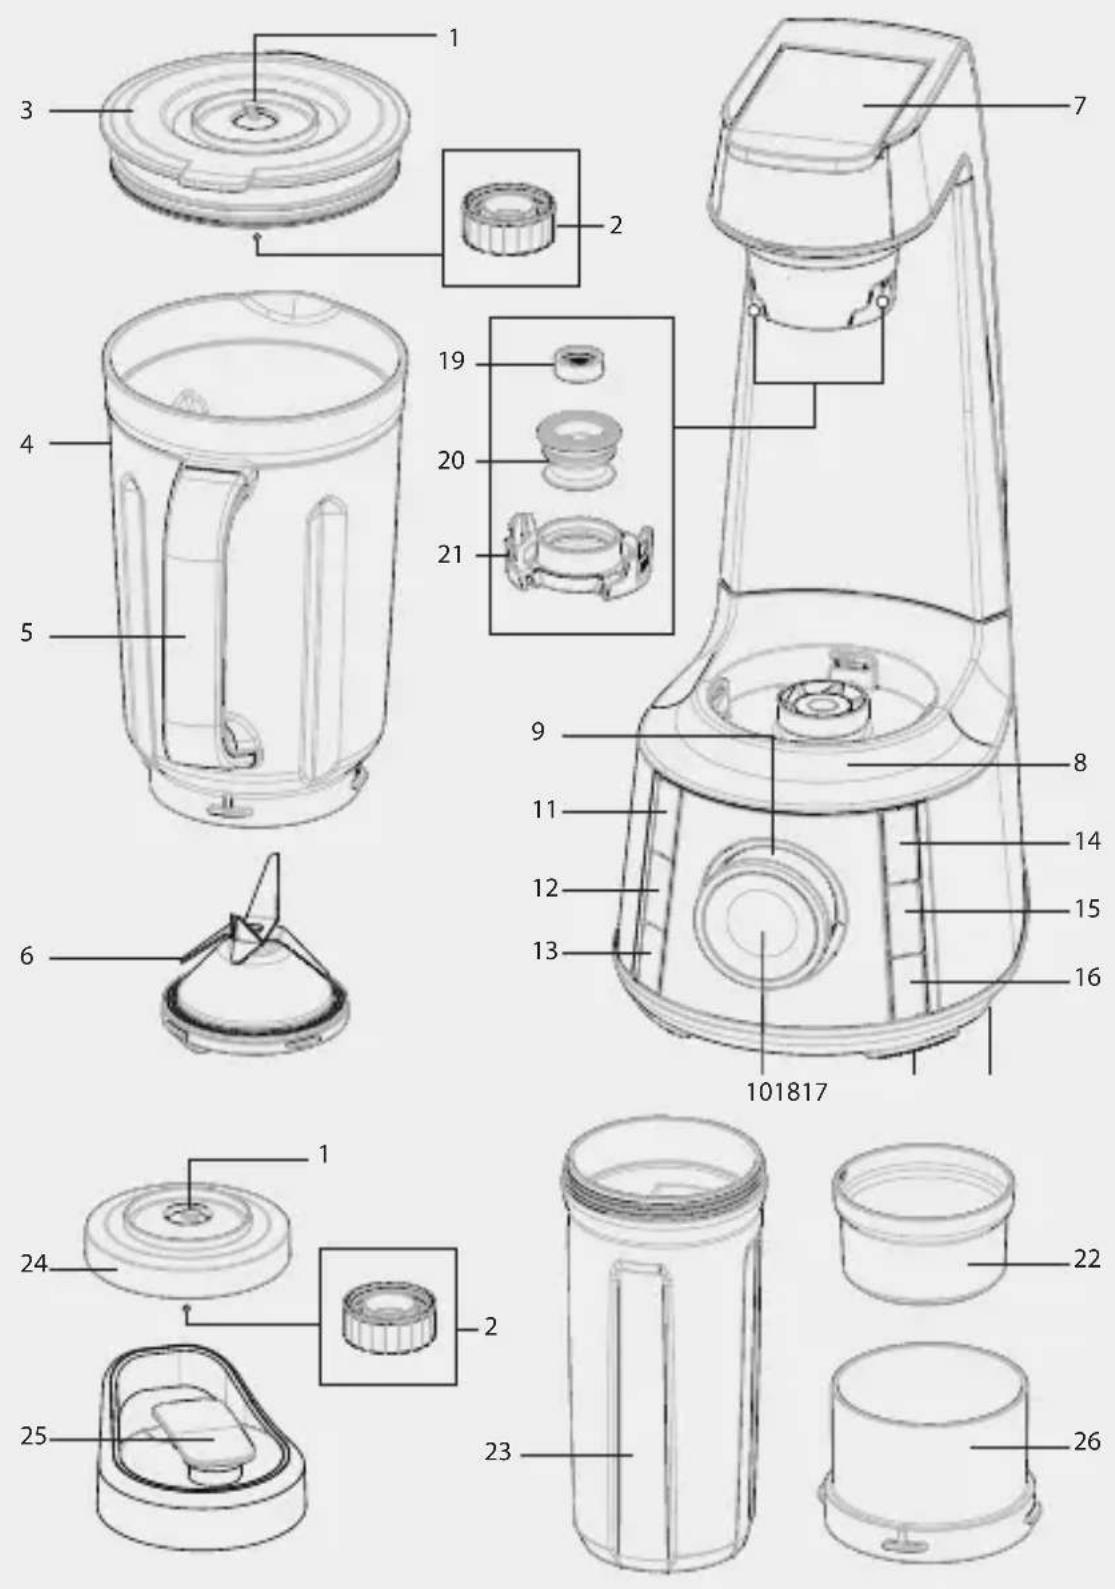
- Vacuum valve
- Backflow prevention cap
- Lid
- Tritan Jug
- Jug handle
- Blade unit
- Lever
- Motor housing
- On-Off / Speed adjustment knob
- Pulse button
- Smoothie button
- Ice button
- Sauce button
- Vacuum button
- Vacuum+Blend button
- Auto-Clean button
- Non-slip feet
- Cable storage compartment
- Filter
- Vacuum seal
- Suction head cover
- Measuring cup / Anti-insect cap
- Portable bottle
- Vacuum lid
- Portable bottle Lid
- Bottle stand
Technical data
Voltage: 220-240V \~ 50-60 Hz
Power consumption:1000W
Rights to make technical and design changes are reserved.
CONTENTS
| ENGLISH | 06-26 |
| DEUTSCH | 27-51 |
| TÜRKÇE | 51-70 |
| FRANÇAIS | 71-94 |
| ESPAÑOL | 95-118 |
| ROMÂNĂ 119-142 | |
| POLSKI | 143-169 |
| ITALIANO | 170-195 |
| 04-20 عربى | |
1 Important safety and environmental instructions
This section contains safety instructions that will help protect from risk of personal injury or material damage.
Failure to follow these instructions voids any grant-ed warranty.
1.1 General safety
- Read all instructions.
- This appliance may be used by people whose physical, perceptive or mental skills are impaired or who are inexperienced or not knowledgeable about the appliance as long as they are supervised or informed and made aware of the safe use of the appliance and the encountered dangers. Children should not play with the appliance.
- Do not operate any appliance with a damaged cord or plug or after the appliance malfunctions, or is dropped or damaged in any manner.
1 Important safety and environmental instructions
Contact the manufacturer at their customer service telephone number for information on examination, repair, or adjustment.
- The use of attachments, including canning jars, not recommended by the manufacturer may cause a risk of injury to persons.
- Do not attempt to dismantle the appliance.
- Do not operate or place any part of this appliance or its parts on or near hot surfaces.
- Do not use the device for hot food.
- Your mains power supply should comply with the information supplied on the rating plate of the appliance.
- Do not use the appliance with an extension cable.
- Do not touch the plug of the appliance with damp or wet hands.
1 Important safety and environmental instructions
- Unplug from outlet when not in use, before putting on or taking off parts, and before cleaning.
- Hold the blending shaft of the appliance carefully during transportation and cleaning.
- Never touch blades while using the appliance. There is the possibility of injury due to incorrect usage.
- Avoid contacting moving parts.
- Do not use outdoors.
- Do not let cord hang over edge of table or counter.
- Keep hands and utensils out of jug while blending to reduce the risk of severe injury to persons or damage to the blender. A scraper may be used but must be used only when the blender is not running.
- Blades are sharp. Handle carefully.
• Always operate blender with cover in place.
1 Important safety and environmental instructions
- Do not blend hot liquids.
- To reduce the risk of electric shock, the plug should only be connected to a proper outlet. If the plug does not fit fully in the outlet, contact a qualified electrician.Do not modify the plug in any way.
• After cleaning, dry the appliance and all parts before connecting it to mains supply and before attaching the parts. - Do not immerse the appliance, the power cable, or the power plug in water or any other liquid.
- If you keep the packaging materials, store them out of the reach of children.
- Children shall not use the appliance. Keep the appliance out of the reach of children.
• Always disconnect the blender from the supply if it is left unattended and before assembling, disassembling.
1 Important safety and environmental instructions
- Switch of the appliance and disconnect from supply before changing accessories or approaching parts that move in use.
- CAUTION: In order to avoid a hazard due to inadvertent resetting of the thermal cut-out, this appliance must not be supplied through an external switching device, such as a timer, or connected to a circuit that is regularly switched on and o by the utility.
- SAVE THESE INSTRUCTIONS
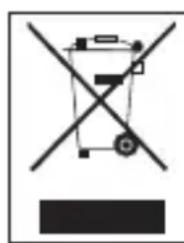
1.2 Compliance with the WEEE Directive and Disposing of the Waste Product:
This product complies with EU WEEE Directive (2012/19/EU). This product bears a classification symbol for waste electrical and electronic equipment (WEEE).
natural_image
Pure electrical circuit lines without any symbolsThis product has been manufactured with high quality parts and materials which can be reused and are suitable for recycling. Do not dispose of the waste product with normal domestic and other wastes at the end of its service life. Take it to the collection center for the recycling of electrical and electronic equipment. Please consult your local authorities to learn about these collection centers.
1 Important safety and environmental instructions
1.3 Compliance with RoHS Directive
The product you have purchased complies with EU RoHS Directive (2011/65/EU). It does not contain harmful and prohibited materials specified in the Directive.
1.4 Package information

Packaging materials of the product are manufactured from recyclable materials in accordance with our National Environment Regulations. Do not dispose of the packaging materials together with the domestic or other wastes. Take them to the packaging
material collection points designated by the local authorities.
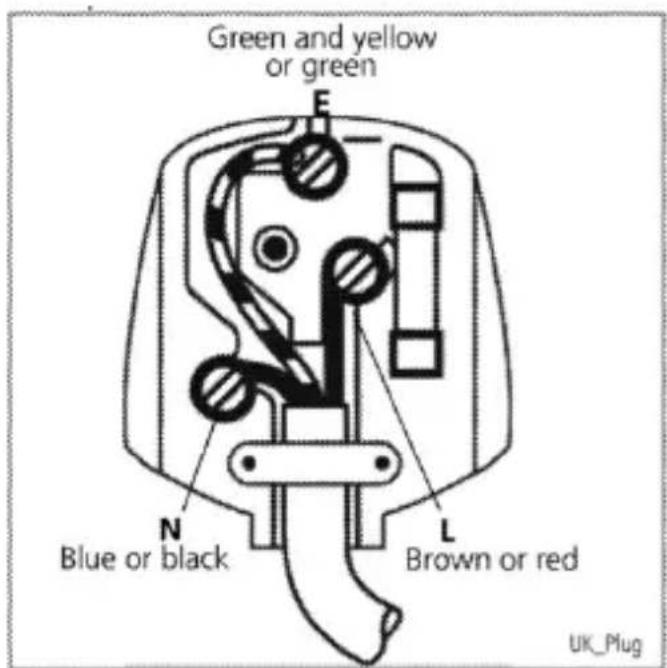
1.5 Plug Wiring
The moulded plug on this appliance incorporates a 13 A fuse. Should the fuse need to be replaced an ASTA approved BS1362 fuse of the same rating must be used. Do not forget to refit the fuse cover. In the event of losing the fuse cover, the plug must not to be used until a replacement fuse cover has been fitted. Colour of the replacement fuse cover must be the same colour as that visible on the pin face of the plug Fuse covers are available from any good electrical store.
- Fiting a different plug
- As the colours of the wires in the mains lead of this appliance may not correspond with the coloured markings identifying the terminals on your plug, proceed as follows:
- Brown cable = L (Live)
- Blue cable = N (Neutral)
1 Important safety and environmental instructions
- Green/yellow cable must be connected to ground (E) line
- With the alternative plugs a 13 A fuse must be fitted either in the plug or adaptore or in the main fuse box. If in doubt contact a qualified electrician.
2 Use
2.1 Intended Use
This appliance is intended only for household use; it is not suitable for professional use. It is designed to chop small amounts of solid foods (onions, potatoes, carrots, etc.) and fruit (strawberries, bananas, etc.).
2.2 Initial Use
Clean the parts of the appliance prior to initial use (see 3.1).
2.3 Removing the Chopping Blade

WARNING: Do not touch the blades with your bare hands.
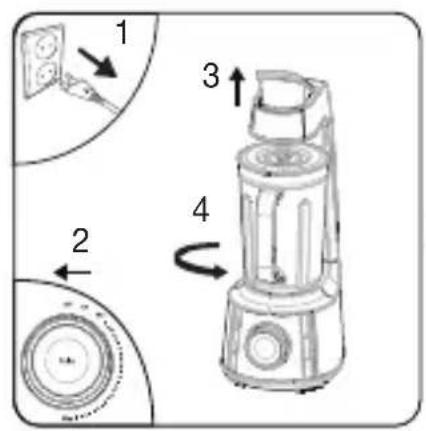
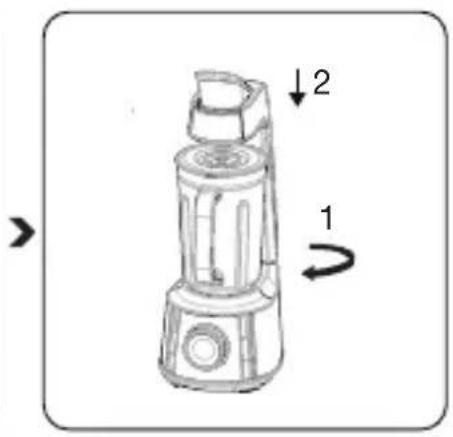
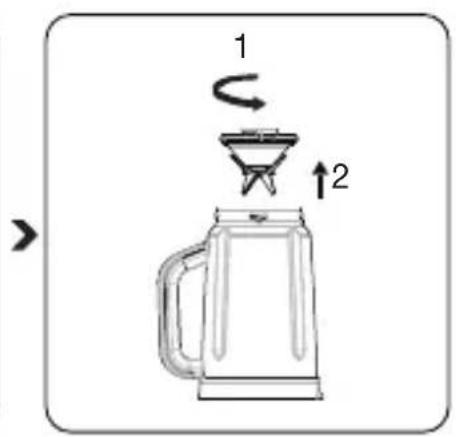
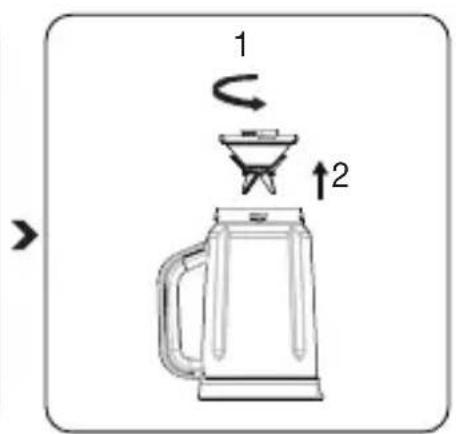
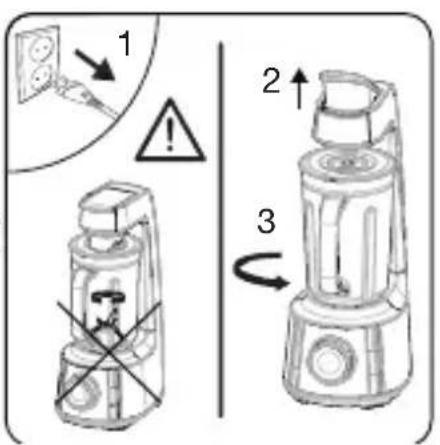
Unplug the appliance and move the speed adjustment knob (9) to "OFF" position. Pull up the lever (7) and unlock the jug (4) anti-clockwise according the "Open" arrow on the motor unit (8).
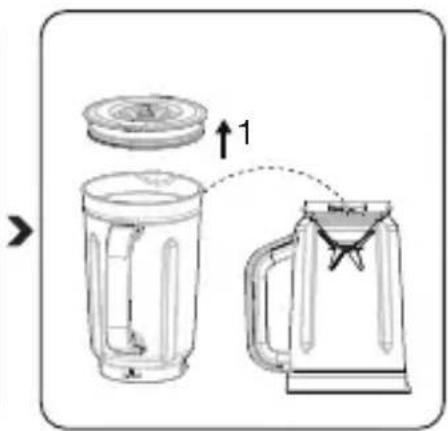
Open the vacuum valve by rotating it and remove the vacuum from (4) the valve. Remove the lid from the jug and turn the jug over (3, 4).
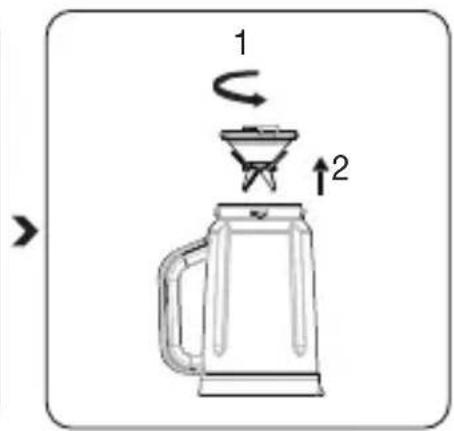
Remove chopping blade unit (6) by turning clockwise.
2 Use
2.4 Installing the Chopping Blade
natural_image
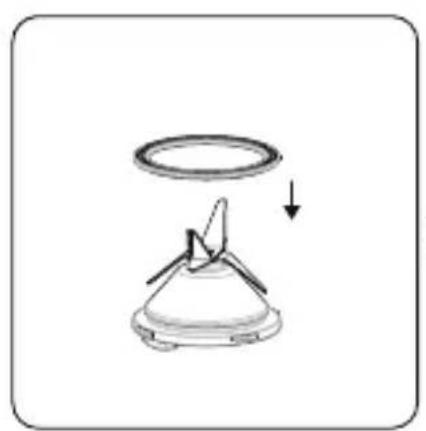
Simple line drawing of a conical object with a ring and a downward arrow, no text or symbols present.Put the silicone ring in its place on the chopping blade (6) and place the chopping blade under the jug (4).
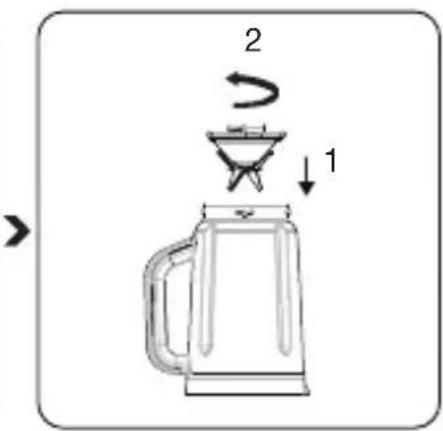
Place it back in the jug (4) by turning anti-clockwise.
Place the jug onto the motor housing (8).
2.5 Operation

WARNING: Do not operate the appliance when empty.

- The maximum temperature of the liquid to be prepared inside the appliance must not exceed 40 C degrees.
- Put soft foods or liquids before adding hard foods or ice.
- Adding some water into the appliance will allow it run smoothly (e.g. 40ml water for 60gr solid food). Add the water before the ingredients.
2 Use
natural_image
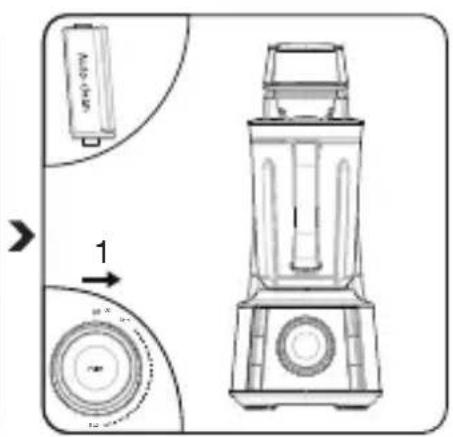
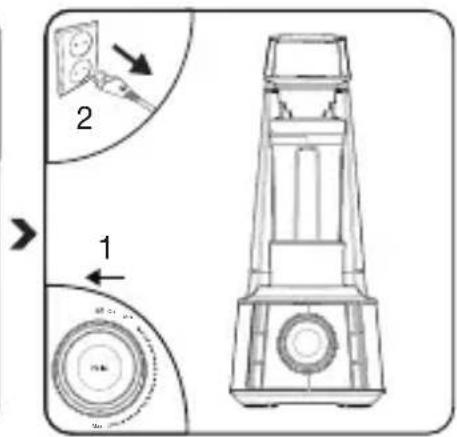
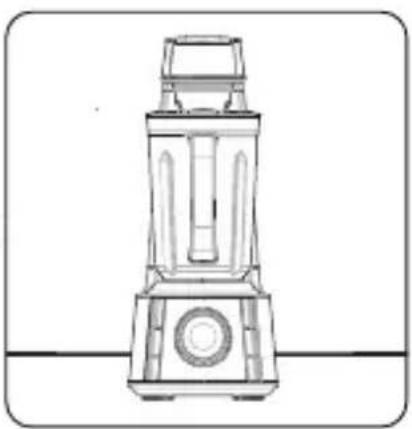
Line drawing of a blender with handle and spout (no text or symbols)Place your appliance on a solid and flat surface.
natural_image
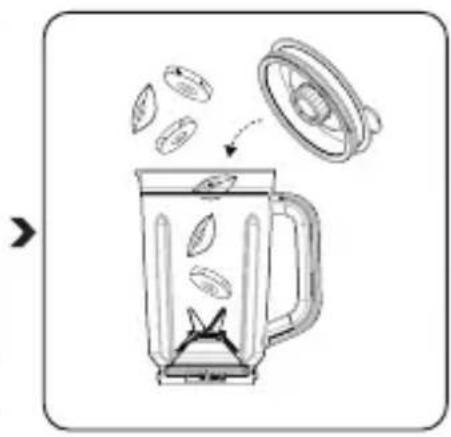
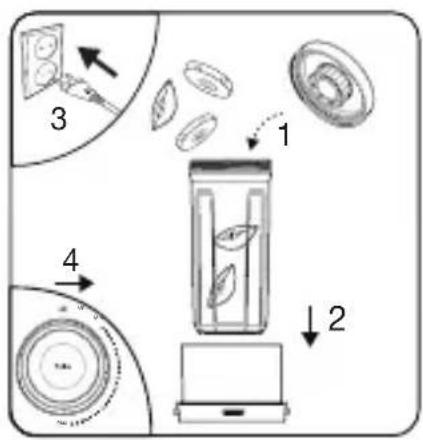
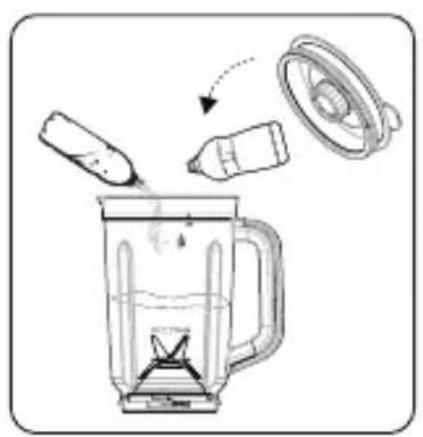
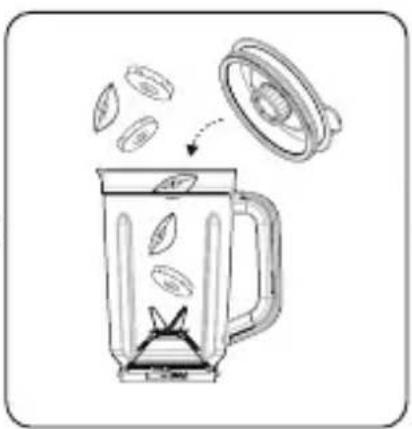
Illustration of a blender with leaves being poured into it (no text or symbols)Put the ingredient you want to process into the jug (4) and place the lid (3) on it.
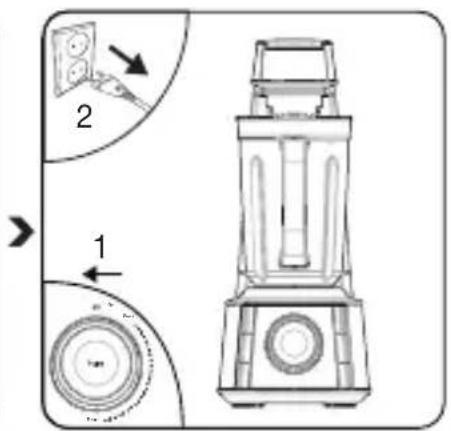
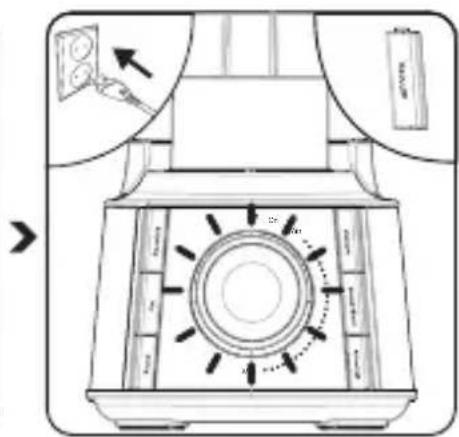
Place the jug onto the motor housing (8) so that the tab on it seats on the slots of the motor housing (8), turn it to the "Lock" position and secure.
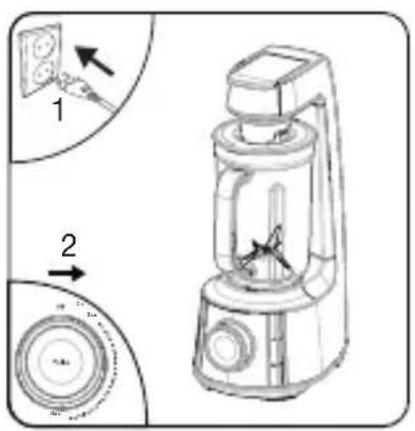
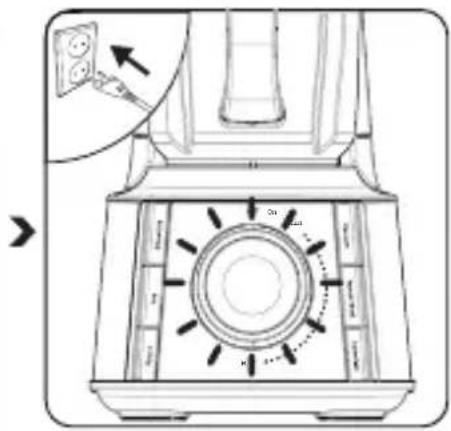
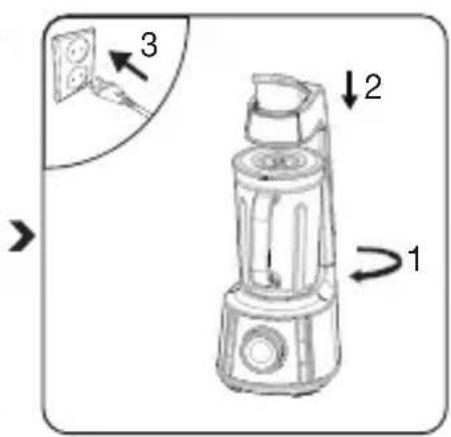
Plug in the appliance and move the speed adjustment knob (9) to "ON" position.
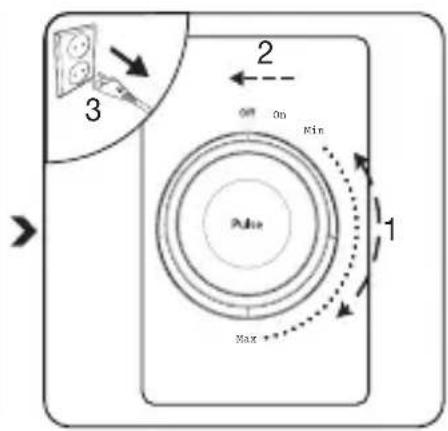
Process the ingredients at the desired speed using the speed adjustment knob (9). When the process is complete, move the speed adjustment knob (9) to "OFF" position and unplug the appliance.

Remove the jug from the motor unit by rotating it counterclockwise (4, 8). Open the lid (3) and take out the food.
2 Use

WARNING:
- Gradually increase the speed of the appliance. Do not operate it at the highest speed suddenly. Otherwise the motor may overheat.
- Do not run the appliance continuously for more than 2 minutes. Let it cool for 5 minute before operating it again.
- Do not insert any foreign objects into the jug (4) when the appliance is in use.
- Do not remove ingredients from the jug (4) before chopping blade (6) has completely stopped.
- Do not use carbonated beverage, crop, frozen food, or sticky food (boiled bean, yam, etc.).

After each use, the jug lid (3, 22) must be washed and remove moisture for next use. Dry it well before use.
2 Use
2.6 Automatic programs with the jug
The appliance is equipped with six automatic programs that you can use: Smoothie (11), Ice (12), Sauce (13), Vacuum (14), Vacuum+Blend (15), and Auto Clean (16).
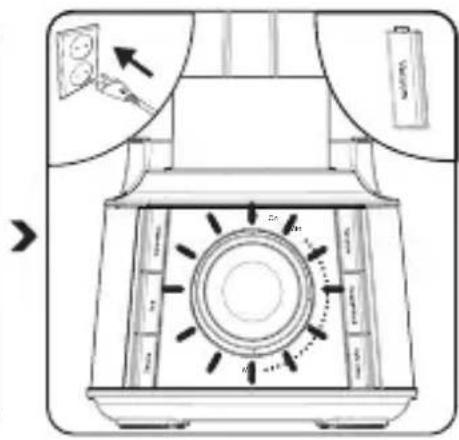
Put the ingredients in the jug (4) and close the lid (3). Plug in the appliance and move the speed adjustment knob (9) to "ON" position.
Select the desired automatic program. The program that you have chosen will turn on and start functioning at various speed settings. If you choose the vacuum program, it will start vacuuming and will stop after 1 minute. If you choose Vacuum+Mixing program, the program will keep on functioning at various speeds after the vacuum has stopped and the program will stop 2 minutes afterwards. The light will flash.
When the process is complete, move the speed adjustment knob (9) to "OFF" position and unplug the appliance.
2 Use
2.7 "Pulse" position
For mixing with high speed short pulses, turn speed adjustment knob (9) to "ON" position and press "pulse" (10). The appliance will stop when you release the button.
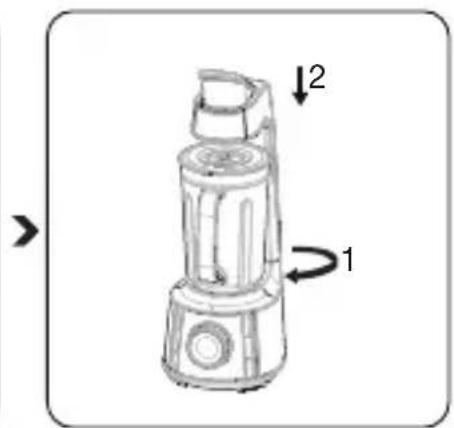
2.8 Vacuum program with the bottle
You can use Vacuum program with the storage bottle by assembled it and the bottle stand accessory onto the appliance.
flowchart
graph TD
    A["Raw Material Input"] --> B["Step 1: preparation"]
    B --> C["Step 2: processing"]
    C --> D["Step 3: drying"]
    D --> E["Output"]
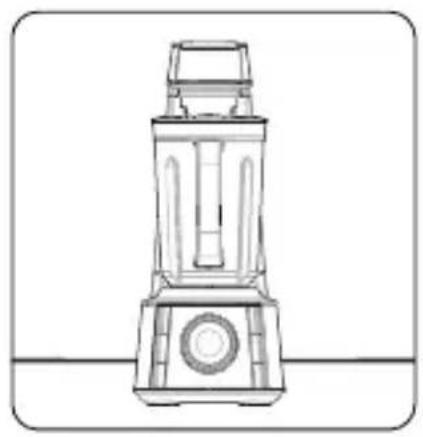
Put the ingredients in the portable bottle (23) and close the vacuum lid (24). Place it into the bottle stand (26) and lock it by turning clockwise on the motor unit (8). Plug in the appliance and move the speed adjustment knob (9) to "ON" position.
Select the Vacuum program. program. The pump will turn on and stop until the sensoris automatic off or about 1 minute later. The light will blink.
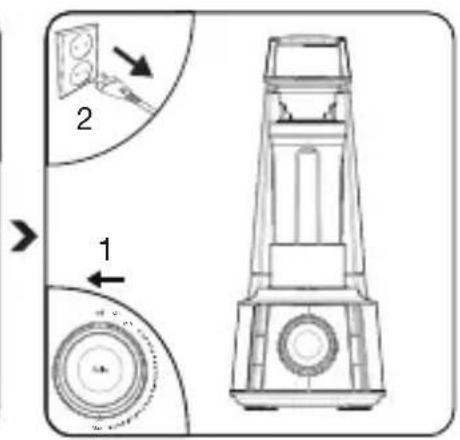
When the process is complete, move the speed adjustment knob (9) to "OFF" position and unplug the appliance.
You can keep blended juice or other foods in vacuum using the storage bottle to keep them fresh for a long time.
2 Use

• Vacuum delays oxidation but does not sterilize the contents. Keep them refrigerated and have them as soon as possible
- If you want to stop the appliance at any time during the operation, move the speed adjustment knob (9) to "OFF" position.

WARNING:
- When you store food in the smoothie bottle by means of vacuum storage, store such in a refrigerator. Do not store this in a freezer.
- When you store food in the smoothie bottle by means of vacuum storage, store such in a refrigerator. Do not store this in a freezer.
- Do not use any jug or part other than those meant for the purpose intended.
2.9 Maximum quantities
Maintain the maximum or the minimum volume for each type of material by the scale on the jug (4).
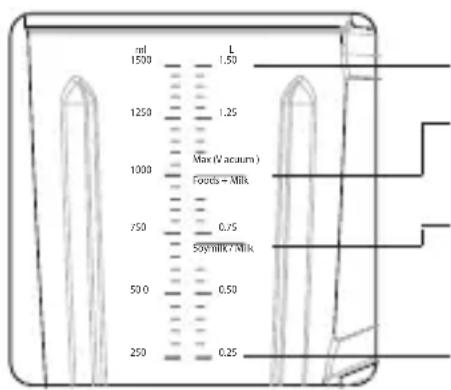
Maximum level for materials to blend (1,500ml)
Maximum level for materials including milk products such as milk and soymilk to vacuum (1,000ml)
Maximum level for milk products such as milk and soymilk to vacuum (700ml)
Minimum level for materials to blend (250ml)
2 Use

WARNING:
- Do not exceed the maximum level for each food material indicated by the scale on the jug (4). Air bubbles or food materials getting into the pump can cause trouble.
- If there are ingredients stuck between the chopping blades (6), please dismount it from the jug (4) and remove the stuck matter using a long slender utensil, etc.
2.10 Anti-insect prevention for vacuum passage
The measuring cup (22) accessory can be used as an anti-insect cap to prevent insects or bacteria breeding in the vaccum passage.

Take out the jug (4) from the motor housing (8) and pull down the lever (7). Place and secure the measuring cup (22) onto the vacuum suction head (21).
If you want to operate the appliance again, remove the measuring cup (22) from the vacuum suction head (21) first before intend to pull up-the lever (7).
2 Use

WARNING: Take cautions to make sure the food material does not go into the safety device. Never directly push the safety switch pin with your finger or a rod, etc.
2.11 Motor Protection
Automatic motor protection will get activated and stop the appliance when the appliance overheats. In this case;
1 Move the speed adjustment knob (9) to "OFF" position.
2. Unplug the appliance.
3. Let it cool for 15-20 minutes.
3 Cleaning and care
3.1 Cleaning
natural_image
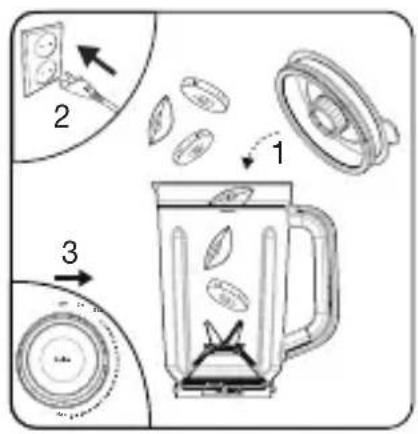
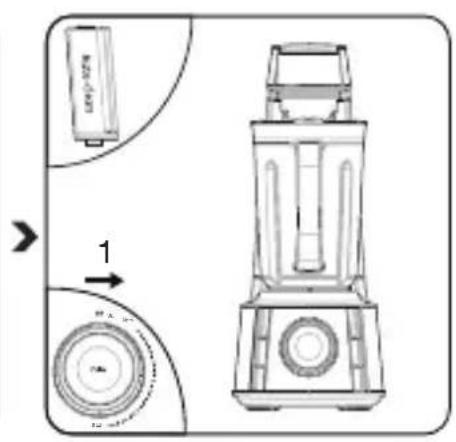
Illustration of a blender with three plastic bottles and a lid, showing liquid being poured into it (no text or symbols)Add 1 or 1 12 cups of luke warm water and some drops of dish-washing liquid into the jug (4) and close the lid (3).
Place the jug (4) into the motor unit (8). Lock the jug (4) clockwise according to the "Lock" arrow on the motor unit (8) and press down the lever (7). Plug in the appliance.
Use Auto Clean program to operate it for 26 seconds.
3 Cleaning and care
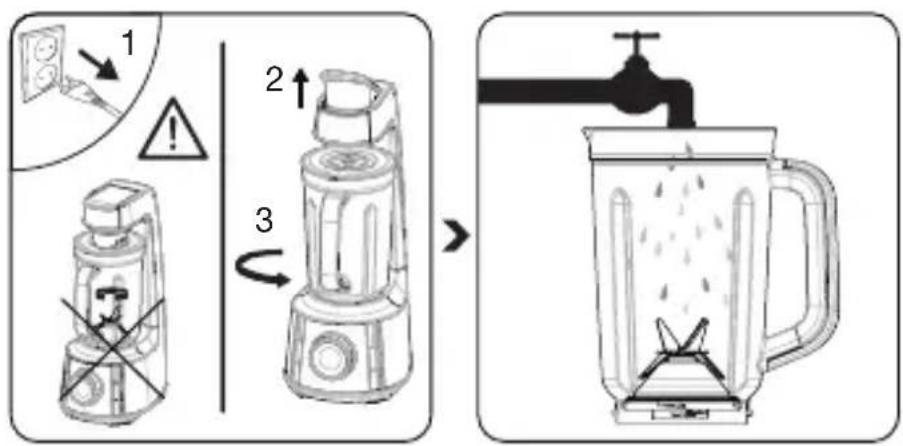
Unplug the appliance before cleaning. Wait for the accessories used to stop completely. Pull up the lever (7) and unlock the jug (4) anticlockwise according to the "Open" arrow on the motor unit (8). Pull up the jug (4) to remove it from the motor unit (8).
Then rinse it.

- You can wash the jug, portable bottle (4, 23) and the caps/lids, portable bottle lid (3, 22, 24, 25) in your dish-washer. It is recommended to clean the appliance immediately after using.

WARNING:
- Do not immerse the motor uni (8) in water. You can wipe it with a damp cloth.
- Chopping blade (6) is sharp. Do not hold the sharp edge or immerse in water while cleaning.
3 Cleaning and care
3.2 Washing or replacing the filter
The vacuum suction head (21) on the appliance is assembled with a washable permanent filter to avoid trouble in case the jug lid (3) is spattered with food, as this can block the vacuum passage and cause trouble.
natural_image
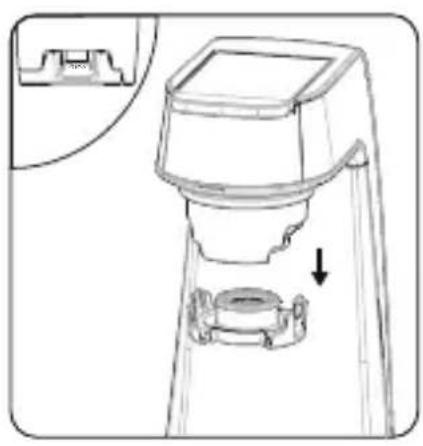
Technical line drawing of a mechanical device with a downward arrow indicating a component (no text or symbols present)Press the latches of suction head cover (21) at both sides to remove it downward.

Take out the filter (19) from the vacuum seal (20) to wash or rinse it, or replace a new one.

natural_image
Line drawing of a mechanical component with a square top and three legs (no text or symbols)Place and secure the suction head cover (21) back before use.
The jug lid (3) is also assembled with a washable permanent filter.
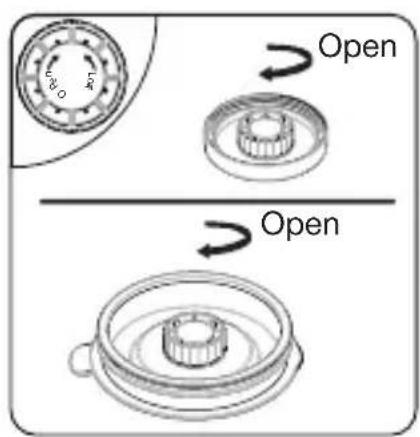
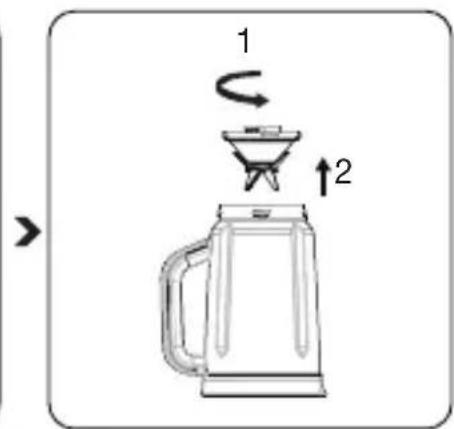
Turn over the lid (3) and open the backflow prevention cap by turning it anti-clockwise to remove it from the lid (3).
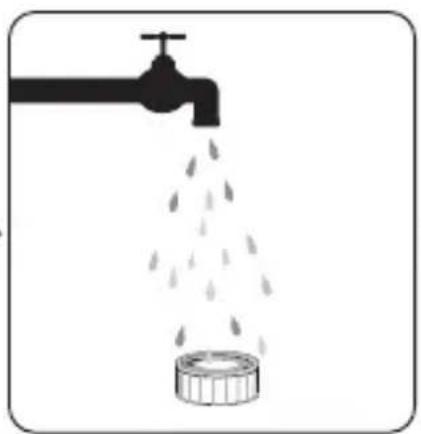
natural_image
Illustration of a faucet releasing water from a container (no text or symbols)Take out the backflow prevention cap to wash or rinse then to dry it. Make sure there is no water or foods blocked venting holes.

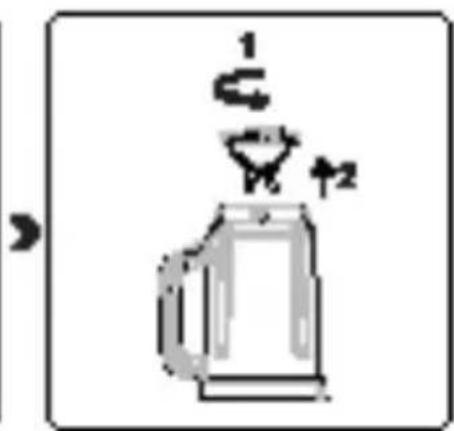
Place and secure the back-flow prevention cap back by turning it clockwise before use.
3 Cleaning and care
3.3 Storage
• If you do not intend to use the appliance for a long time, store it carefully.
• Unplug the appliance and wait for it to cool completely before storing it.
- Keep the appliance and its accessories in their original packages.
- Do not wrap the power cord around the appliance.
• Store it in a cool, dry place.
• Always keep the appliance out of the reach of children.
3.4 Handling and transportation
- During handling and transportation, carry the appliance in its original packaging. The packaging of the appliance protects it against physical damages.
- Do not place heavy loads on the appliance or on the packaging. The appliance may get damaged.
- Dropping the appliance may render it non-operational or cause permanent damage.
12 months breakdown and repair guarantee
Guarantor: Beko plc, 1 Greenhill Crescent, Watford, Hertfordshire. WD18 8UF
The guarantee does not in any way diminish your statutory or legal rights.
Your appliance has the benefit of our manufacturer's guarantee which covers the product for 12 months from the date of original purchase.
This gives you reassurance that if within that time, your appliance is proven to be defective because of either workmanship or materials, we will at our discretion either repair or replace your appliance.
The appliance must be correctly installed, located and operated in accordance with the instructions contained in the user manual. !The guarantor disclaims any liability for accidental or consequential damage.
The Guarantee is subject to the following conditions:
- Documentary proof of the original purchase date is provided.
- The appliance has been installed and operated correctly and in accordance with our operating and maintenance instructions.
■ The appliance is used only on the electricity supply on the rating plate.
■ The appliance has only been used for normal domestic purposes. - The appliance has not been altered, serviced, dismantled or otherwise interfered with by any person.
■ The appliance is used in the United Kingdom or Republic of Ireland. - Any parts removed during repair work or any product that has been replaced becomes our property.
- The guarantee is not transferrable if the product is resold.
The Guarantee does not cover:
- Transit, installation or delivery damage.
■ Accidental damage. - Misuse or abuse.
- Replacement of any consumable item or accessories. These include but are not limited to: plugs, cables, light bulbs, knobs, filters and flaps.
- Repairs or replacements required as a result of unauthorised repairs or inexpert installation that fails to meet the requirements contained in the user guide or instruction book.
■ Repairs to products used in commercial or non-residential household premises.
How to obtain after sales service, help or general advice
Please keep your purchase receipt or other proof of purchase in a safe place as you will need to show us this document if your product requires attention within the guarantee period.
Please also record your product details below, which will allow you to access our services more quickly and help us identify your product. The model number is printed on the front of the user guide and the serial and model number is shown on your products rating plate.
| Model number | Serial number | Purchased from | Date of purchase |
Please call our UK based Customer Service department if you need help or advice from us:
United Kingdom and Northern Ireland: 0333 207 9710
Republic of Ireland: 01 862 3411
You can also contact us through our website: www.beko.co.uk
flowchart
graph LR
    A["Device with downward arrow"] --> B["Reactor with valve and valve"]
    B --> C["Operating valve with step 1"]
    C --> D["Reactor with step 2"]
natural_image
Line drawing of a blender with handle and spout (no text or symbols)natural_image
Illustration of a blender with leafy contents being poured into it, showing a lid and fan (no text or symbols)natural_image
Illustration of a blender with three plastic bottles and a lid, showing liquid being poured into it (no text or symbols)natural_image
Technical illustration of a blender with labeled parts and directional arrows (no text or symbols)natural_image
Technical line drawing of a mechanical device with an inset showing a close-up view of the component (no text or symbols present)natural_image
Line drawing of a mechanical component with a square top and support structure (no text or symbols)natural_image
Symbol of a device crossed with a diagonal line, no text or labels present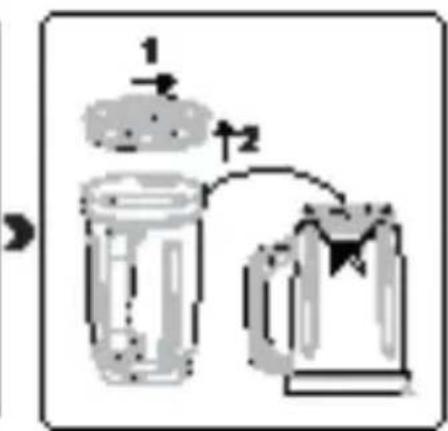
natural_image
Simple line drawing of a car with a circular head and downward arrow, no text or symbols present.natural_image
Line drawing of a blender with no text or symbolsnatural_image
Illustration of a blender with leaves being poured into it, showing the lid and base (no text or symbols)flowchart
graph TD
    A["Raw Material Input"] --> B["Step 1: Stabilized with leaves"]
    B --> C["Step 2: Processed with leaf inside container"]
    C --> D["Step 3: Stabilized with leaves and ring"]
    D --> E["Step 4: Final product packaging"]
natural_image
Illustration of a blender with liquid being poured into it, showing a lid and plastic wrap (no text or symbols)natural_image
Technical line drawing of a mechanical device with a downward arrow indicating motion (no text or symbols)natural_image
Line drawing of a mechanical component with a square top and support structure (no text or symbols)natural_image
Diagram showing a faucet releasing water into a container with raindrops (no text or symbols)natural_image
Simple line drawing of a mechanical component with a circular top and downward arrow, no text or symbols present.natural_image
Line drawing of a blender with handle and spout (no text or symbols)natural_image
Illustration of a blender with leaves being poured into it (no text or symbols)natural_image
Technical diagram of a mechanical device with directional arrows indicating motion or force (no text or symbols)natural_image
Illustration of a blender with three plastic bottles and a lid, showing liquid being poured into it (no text or symbols)flowchart
graph LR
    A["Step 1: Water drop"] --> B["Step 2: Stopping funnel"]
    B --> C["Step 3: Rotation arrow"]
    C --> D["Step 4: Stopping container with water drop"]
natural_image
Technical line drawing of a mechanical device with a downward arrow indicating a component (no text or symbols present)natural_image
Line drawing of a mechanical component with a square top and three legs (no text or symbols)natural_image
Diagram showing a faucet releasing water into a container with droplets falling (no text or symbols)natural_image
Pure electrical circuit lines without any symbols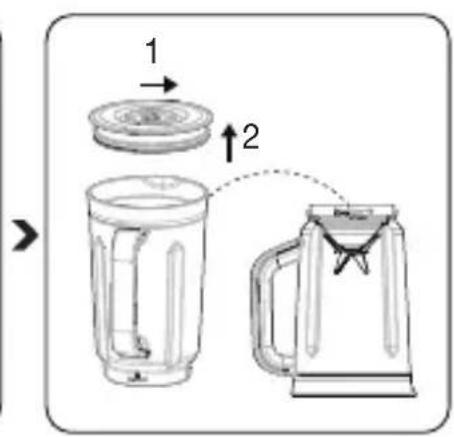
natural_image
Simple line drawing of a mechanical component with a circular top and downward arrow, no text or symbols present.natural_image
Line drawing of a blender with handle and spout (no text or symbols)natural_image
Illustration of a blender with leaves being poured into it, showing the lid and base (no text or symbols)natural_image
Illustration of a blender with a lid and plastic cup, showing liquid being poured into it (no text or symbols)natural_image
Technical line drawing of a mechanical device with a downward arrow indicating a component (no text or symbols present)natural_image
Line drawing of a mechanical device with a square top and tripod base (no text or symbols)natural_image
Diagram showing a faucet releasing water into a cylindrical container (no text or symbols)

natural_image
Simple line drawing of a mechanical component with a circular top and downward arrow indicating motion (no text or symbols)natural_image
Technical line drawing of a blender with no visible text or symbolsnatural_image
Illustration of a blender with leaves being poured into it, showing the lid and base (no text or symbols)flowchart
graph TD
    A["Raw Material Input"] --> B["Step 1: Extracted Seed"]
    B --> C["Step 2: Add to Cover"]
    C --> D["Step 3: Extracted Pea"]
    D --> E["Step 4: Add to Cover"]
natural_image
Illustration of a blender with liquid being poured into it, showing a lid and plastic wrap (no text or symbols)flowchart
graph LR
    A["Step 1: Water drop"] --> B["Step 2: Stopping with water drop"]
    B --> C["Step 3: Rotation with water drop"]
    C --> D["Step 4: Stopping with water drop"]
natural_image
Technical line drawing of a mechanical device with a downward arrow indicating a component (no text or symbols present)natural_image
Line drawing of a mechanical component with a square top and support structure (no text or symbols)natural_image
Diagram showing a faucet releasing water into a container with raindrops (no text or symbols)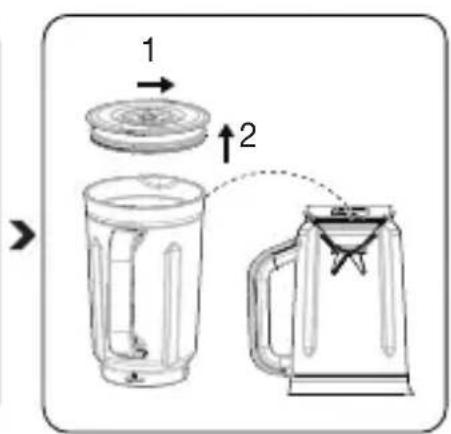
natural_image
Simple line drawing of a mechanical component with a circular top and a triangular base, no text or symbols present.natural_image
Line drawing of a blender with handle and spout (no text or symbols)natural_image
Illustration of a blender with leaves being poured into it, showing the lid and base (no text or symbols)flowchart
graph TD
    A["Raw Material Input"] --> B["Step 1: Initial mixture"]
    B --> C["Step 2: Intermediate processing"]
    C --> D["Step 3: Final product with leafy contents"]
    D --> E["Step 4: Final product with leafy contents"]
natural_image
Illustration of a blender with liquid being poured into it, showing a lid and plastic bottle (no text or symbols)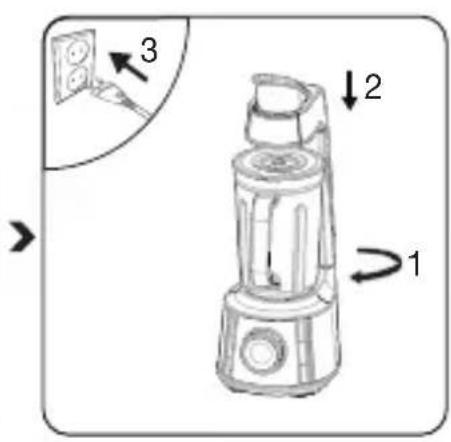
natural_image
Technical line drawing of a mechanical device with a base and top component, showing a downward arrow indicating motion (no text or symbols present)natural_image
Line drawing of a mechanical component with a square top and support structure (no text or symbols)natural_image
Illustration of a faucet releasing water from a container (no text or symbols)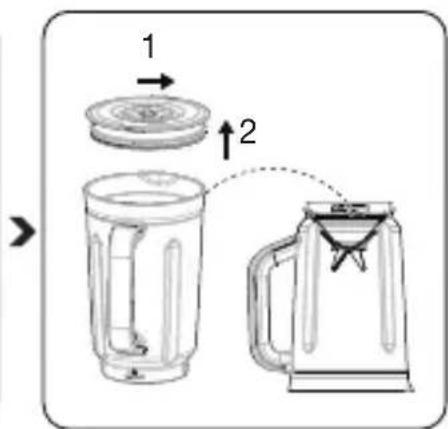
natural_image
Simple line drawing of a conical lamp with a circular top and a downward arrow indicating rotation (no text or symbols)natural_image
Technical line drawing of a blender with no visible text or symbolsnatural_image
Illustration of a blender with leaves being poured into it, showing the lid and side pan (no text or symbols)natural_image
Illustration of a blender with three kitchen utensils and a lid, showing liquid being poured into it (no text or symbols)natural_image
Technical line drawing of a mechanical device with a downward arrow indicating a component (no text or symbols present)natural_image
Line drawing of a mechanical component with a square top and three legs (no text or symbols)natural_image
Diagram showing a faucet releasing water into a cylindrical container (no text or symbols)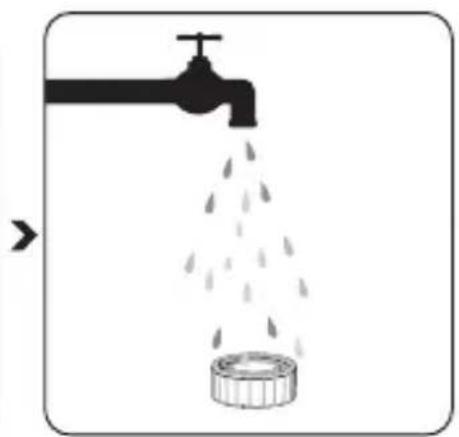
natural_image
Diagram showing a faucet releasing water into a container (no text or symbols)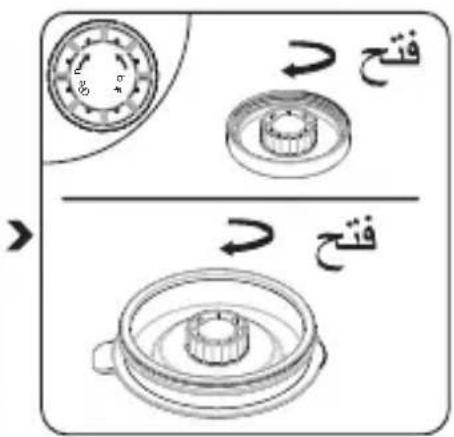
natural_image
Line drawing of a mechanical component with a square top and flanged base (no text or symbols)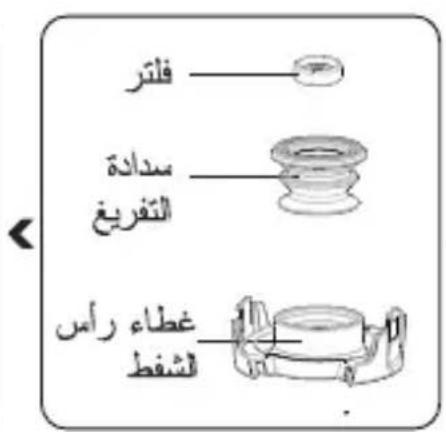
natural_image
Technical line drawing of a mechanical device with a component highlighted (no text or symbols)natural_image
Illustration of a blender with plastic bottle being poured into it, showing liquid and lid (no text or symbols)natural_image
Illustration of a blender with water being poured into it, using a faucet (no text or symbols)<
ثُم اشطفه.
natural_image
Line drawing of a portable electronic device with a cylindrical top and circular base (no text or symbols)<

الحد الأقصى لمستوى [/م] Household (1500) Household (1000) Household (700) Household (250) Household (250) Household (250) Household (250) Household (250) Household (250) Household (250) Household (250) Household (250) Household (250) Household (250) Household (250) Household (250) Household (250) Household (250) Household (250) Household (250) Household(250) Household(250) Household(250) Household(250) Household(250) Household(250) Household(250) Household(250) Household(250) Household(250) Household(250) Household(250) Household(250) Household(250) Household(250) Household(250) Household(250) الحد الأقصى لستوى [/م] Household (1500) Household (1000) Household (700) Household (250) Household (250) Household (250) Household (250) Household (250) Household (250) Household (250) Household (250) Household (250) Household (250) Household (250) Household (250) Household (1500) Household (1000) Household (700) Household (250) Household (250) Household (250) Household (250) Household (250) Household (1500) Household (1000) Household (700) Household (250) Household (250) Household (250) Household (1500) Household (1000) Household (700) Household (250) Household (250) Household (250) Household (1500) Household (1000) Household (700) Household (250) Household (250) Household (250) Household (1800) Household (1000) Household (700) Household (250) Household (250) Household (250) Household (1800) Household (1000) Household (700) Household (250) Household (250) Household (1800) Household (1000) Household (700) Household (250) Household (250) Household (1800) Household (1000) Household (700) Household (250) Household (250) Household (1800) Household (1000) Household (700) Household(700)(700)(700)(700)(700)(700)(700)(700)(700)(743.9999999999999999999999999999999999999999999999999999999999999999999999999999999999999999999999999999
flowchart
graph TD
    A["Raw Material Input"] --> B["Step 3: Inserted with leaves"]
    B --> C["Step 1: Dispersed leaf with leaves"]
    C --> D["Step 2: Process with leaf inside container"]
    D --> E["Step 4: Final packaging with leaf on tray"]
<
natural_image
Illustration of a blender with leaves being poured into it, showing the lid and base (no text or symbols)<
natural_image
Line drawing of a blender with handle and control panel (no text or symbols)natural_image
Simple diagram of a mechanical component with an arrow indicating direction (no text or symbols)الجميع هذه.
natural_image
Line drawing of a blender with handle and control knob (no text or symbols)TBV8106BX
AR
beko
01M-8813893200-2518-01
- Please read this manual first!
- Meanings of the symbols
- Technical data
- CONTENTS
- Important safety and environmental instructions
- General safety
- Compliance with the WEEE Directive and Disposing of the Waste Product:
- Compliance with RoHS Directive
- Package information
- Plug Wiring
- Use
- Intended Use
- Initial Use
- Removing the Chopping Blade
- Installing the Chopping Blade
- Operation
- WARNING:
- Automatic programs with the jug
- "Pulse" position
- Vacuum program with the bottle
- Maximum quantities
- Anti-insect prevention for vacuum passage
- Motor Protection
- Cleaning and care
- Cleaning
- Washing or replacing the filter
- Storage
- Handling and transportation
- months breakdown and repair guarantee
- The Guarantee is subject to the following conditions:
- The Guarantee does not cover:
- How to obtain after sales service, help or general advice
Brand : BEKO
Model : TBV8106BX
Category : Blender