
DR-10X - Dictaphone TASCAM - Free user manual and instructions
Find the device manual for free DR-10X TASCAM in PDF.


| Product type | XLR digital voice recorder |
| Brand | Tascam |
| Model | DR-10X |
| Dimensions | 52 x 94.4 x 28 mm (excluding protrusions) |
| Weight | 68.3 g (with battery) / 56.3 g (without battery) |
| Power | 1 AAA battery (alkaline, NiMH, or lithium) or USB bus power |
| Recording media | microSD card (64 MB to 2 GB) / microSDHC (4 to 32 GB) |
| Recording formats | WAV/BWF 44.1 or 48 kHz, 16 or 24 bit, mono or poly |
| Microphone input | XLR female connector (balanced) with LO/MID/HI gain (29/35/45 dB) |
| Headphone output | 3.5 mm stereo mini-jack with adjustable volume |
| Main features | Direct recording, limiter, dual recording, automatic track increment, low-cut filter |
| Display | OLED 96 x 16 pixels |
| Battery life (alkaline) | Approximately 10 hours (48 kHz/24 bit recording, headphones not connected) |
| Battery life (lithium) | Approximately 15.5 hours (same conditions) |
| Operating temperature | 0 °C to 40 °C |
| Maintenance and cleaning | Wipe with a dry, soft cloth; avoid chemical products |
| Precautions | Do not expose to water; avoid condensation; use headphones at moderate volume |
| Safety | Follow safety instructions; unplug during storms; entrust repairs to a professional |
| Spare parts and repairability | Contact TEAC or an authorized dealer; built-in backup battery not user-replaceable |
| General information | Manual available for download on TEAC website; CE compliance |
Frequently Asked Questions - DR-10X TASCAM
User questions about DR-10X TASCAM
0 question about this device. Answer the ones you know or ask your own.
Ask a new question about this device
Download the instructions for your Dictaphone in PDF format for free! Find your manual DR-10X - TASCAM and take your electronic device back in hand. On this page are published all the documents necessary for the use of your device. DR-10X by TASCAM.
USER MANUAL DR-10X TASCAM
Compact Linear PCM Recorder
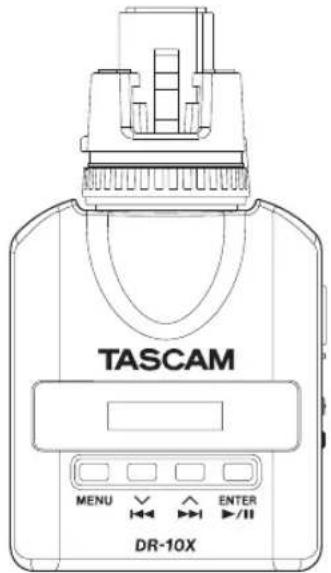
- TASCAM is a trademark of TEAC CORPORATION, registered in the U.S. and other countries.
- microSDHC Logo is a trademark of SD-3C, LLC.

- Other company names, product names and logos in this document are the trademarks or registered trademarks of their respective owners.
ティアック株式会社
http://tascam.jp/
1834 Gage Road, Montebello, California 90640 USA
TEAC MEXICO, S.A. de C.V.
http://teacmexico.net/
Phone: +52-55-5010-6000
2 Huxley Road, Surrey Research Park, Guildford, GU2 7RE,
United Kingdom
TEAC EUROPE GmbH
http://tascam.eu/
Phone: +49-611-71580
Room 817, Block A, Hailrun Complex, 6021 Shennan Blvd.,
Futian District, Shenzhen 518040, China
Owner's Manual
IMPORTANT SAFETY PRECAUTIONS
For U.S.A.
INFORMATION TO THE USER
This equipment has been tested and found to comply with the limits for a Class B digital device, pursuant to Part 15 of the FCC Rules. These limits are designed to provide reasonable protection against harmful interference in a residential installation. This equipment generates, uses, and can radiate radio frequency energy and, if not installed and used in accordance with the instruction manual, may cause harmful interference to radio communications. However, there is no guarantee that interference will not occur in a particular installation. If this equipment does cause harmful interference to radio or television reception, which can be determined by turning the equipment off and on, the user is encouraged to try to correct the interference by one or more of the following measures.
a) Reorient or relocate the receiving antenna.
b) Increase the separation between the equipment and receiver.
c) Connect the equipment into an outlet on a circuit different from that to which the receiver is connected.
d) Consult the dealer or an experienced radio/TV technician for help.
CAUTION
Changes or modifications to this equipment not expressly approved by TEAC CORPORATION for compliance could void the user's authority to operate this equipment.
For Canada
THIS CLASS B DIGITAL APPARATUS COMPLIES WITH CANADIAN ICES-003. CET APPAREIL NUMERIQUE DE LA CLASSE B EST CONFORME A LA NORME NMB-003 DU CANADA.
Declaration of Conformity
Responsible party: TEAC AMERICA, INC.
Address: 1834 Gage Road, Montebello, California, U.S.A.

Telephone number: 1-323-726-0303
This device complies with Part 15 of the FCC Rules. Operation is subject to the following two conditions: (1) this device may not cause harmful interference, and (2) this device must accept any interference received, including interference that may cause undesired operation.
DECLARATION OF CONFORMITY
We, TEAC EUROPE GmbH. Bahnstrasse 12, 65205 Wiesbaden-Erbenheim, Germany declare in own responsibility, the TEAC product described in this manual is in compliance with the corresponding technical standards.

IMPORTANT SAFETY INSTRUCTIONS
1 Read these instructions.
2 Keep these instructions.
3 Heed all warnings.
4 Follow all instructions.
5 Do not use this apparatus near water.
6 Clean only with dry cloth.
7 Do not block any ventilation openings. Install in accordance with the manufacturer's instructions.
8 Do not install near any heat sources such as radiators, heat registers, stoves, or other apparatus (including amplifiers) that produce heat.
9 Do not defeat the safety purpose of the polarized or grounding-type plug. A polarized plug has two blades with one wider than the other. A grounding type plug has two blades and a third grounding prong. The wide blade or the third prong are provided for your safety. If the provided plug does not fit into your outlet, consult an electrician for replacement of the obsolete outlet.
10 Protect the power cord from being walked on or pinched particularly at plugs, convenience receptacles, and the point where they exit from the apparatus.
11 Only use attachments/accessories specified by the manufacturer.
12 Use only with the cart, stand, tripod, bracket, or table specified by the manufacturer, or sold with the apparatus. When a cart is used, use caution when moving the cart/apparatus combination to avoid injury from tip-over.
13 Unplug this apparatus during lightning storms or when unused for long periods of time.
14 Refer all servicing to qualified service personnel. Servicing is required when the apparatus has been damaged in any way, such as power-supply cord or plug is damaged, liquid has been spilled or objects have fallen into the apparatus, the apparatus has been exposed to rain or moisture, does not operate normally, or has been dropped.
• The apparatus draws nominal non-operating power from the AC outlet with its POWER or STANDBY/ON switch not in the ON position.

- The mains plug is used as the disconnect device, the disconnect device shall remain readily operable.
- Caution should be taken when using earphones or headphones with the product because excessive sound pressure (volume) from earphones or headphones can cause hearing loss.
- If you are experiencing problems with this product, contact TEAC for a service referral. Do not use the product until it has been repaired.
CAUTION
- Do not expose this apparatus to drips or splashes.
- Do not place any objects filled with liquids, such as vases, on the apparatus.
- Do not install this apparatus in a confined space such as a book case or similar unit.
- The apparatus should be located close enough to the AC outlet so that you can easily grasp the power cord plug at any time.
- If the product uses batteries (including a battery pack or installed batteries), they should not be exposed to sunshine, fire or excessive heat.
- CAUTION for products that use replaceable lithium batteries: there is danger of explosion if a battery is replaced with an incorrect type of battery. Replace only with the same or equivalent type.
CAUTIONS ABOUT BATTERIES
This product uses batteries. Misuse of batteries could cause a leak, rupture or other trouble. Always abide by the following precautions when using batteries.
- Never recharge non-rechargeable batteries. The batteries could rupture or leak, causing fire or injury.
- When installing batteries, pay attention to the polarity indications (plus/minus (/) orientation), and install them correctly in the battery compartment as indicated. Putting them in backward could make the batteries rupture or leak, causing fire, injury or stains around them.
- When you store or dispose batteries, isolate their terminals with insulation tape or something like that to prevent them from contacting other batteries or metallic objects.
-
When throwing used batteries away, follow the disposal instructions indicated on the batteries and the local disposal laws.
-
Do not use batteries other than those specified. Do not mix and use new and old batteries or different types of batteries together. The batteries could rupture or leak, causing fire, injury or stains around them.
- Do not carry or store batteries together with small metal objects. The batteries could short, causing leak, rupture or other trouble.
- Do not heat or disassemble batteries. Do not put them in fire or water. Batteries could rupture or leak, causing fire, injury or stains around them.
- If the battery fluid leaks, wipe away any fluid on the battery case before inserting new batteries. If the battery fluid gets in an eye, it could cause loss of eyesight. If fluid does enter an eye, wash it out thoroughly with clean water without rubbing the eye and then consult a doctor immediately. If the fluid gets on a person's body or clothing, it could cause skin injuries or burns. If this should happen, wash it off with clean water and then consult a doctor immediately.
- The unit power should be off when you install and replace batteries.
- Remove the batteries if you do not plan to use the unit for a long time. Batteries could rupture or leak, causing fire, injury or stains around them. If the battery fluid leaks, wipe away any fluid on the battery compartment before inserting new batteries.
- Do not disassemble a battery. The acid inside the battery could harm skin or clothing.
■r European Customers
Disposal of electrical and electronic equipment
(a) All electrical and electronic equipment should be disposed of separately from the municipal waste stream via designated collection facilities appointed by the government or the local authorities.
(b) By disposing of the electrical and electronic equipment correctly, you will help save valuable resources and prevent any potential negative effects on human health and the environment.
(c) Improper disposal of waste equipment can have serious effects on the environment and human health as a result of the presence of hazardous substances in electrical and electronic equipment.
(d) The crossed out wheeled dust bin symbol indicates that electrical and electronic equipment must be collected and disposed of separately from household waste.
(e) The return and collection systems are available to the end users. For more detailed information about disposal of old electrical and electronic equipment, please contact your city office, waste disposal service or the shop where you purchased the equipment.
Disposal of batteries and/or accumulators
(a) Waste batteries and/or accumulators should be disposed of separately from the municipal waste stream via designated collection facilities appointed by the government or the local authorities.
(b) By disposing of waste batteries and/or accumulators correctly, you will help save valuable resources and prevent any potential negative effects on human health and the environment.
(c) Improper disposal of waste batteries and/or accumulators can have serious effects on the environment and human health as a result of the presence of hazardous substances in batteries and/or accumulators.
(d) The crossed out wheeled dust bin symbol indicates that batteries and/or accumulators must be collected and disposed of separately from household waste. If the battery or accumulator contains more than the specified values of lead (Pb), mercury (Hg), and/or cadmium (Cd) defined in the Battery Directive (2006/66/EC), then the chemical symbol for lead (Pb), mercury (Hg) and/or cadmium (Cd) will be indicated by the crossed out wheeled dust bin symbol.
(e) The return and collection systems are available to the end users. For more detailed information about disposal of waste batteries and/or accumulators, please contact your city office, waste disposal service or the shop where you purchased them.
Pb, Hg, Cd
Contents
Introduction....7
Features....7
Included items....7
Conventions used in this manual....8
Precautions for placement and use 8
Cleaning the unit 8
Beware of condensation....8
Using the TEAC Global Site....8
User registration 8
Names and functions of parts....9
Front 9
Rear 9
Sides 10
Preparation....11
Power sources....11
Using a AAA battery....11
Power supply status indicator....11
Connecting with a microphone....11
Turning the unit on and off ....11
Turning the unit on....11
Shutting down 12
Turning off automatically....12
Installing a microSD card....12
Handling microSD cards 12
Precautions when handling microSD cards....12
Recording durations when using microSD cards....13
Connecting with a computer.... 13
Starting and stopping recording 14
Playback and searching backward/forward....14
Checking the remaining recording capacity of the microSD card 15
Making menu settings.... 15
Menu structure....16
Messages....20
Making settings using a text file 21
Settings file 21
Settings file format explanation....21
Specifications....23
Ratings....23
Input/output ratings....23
Audio performance 23
General 23
Dimensional drawings....24
Introduction
Thank you very much for purchasing this TASCAM product.
Before using this unit, read this Owner's Manual carefully so that you will be able to use it correctly and enjoy working with it for many years. After you have finished reading this manual, please keep it in a safe place for future reference.
You can also download this Owner's Manual from the TEAC Global Site (http://teac-global.com/).
Features
- Connect directly to mic XLR connectors (support for dynamic mics)
- Uses microSD and micro SDHC cards as recording media
• Recording linear PCM (WAV/BWF) files in 44.1/48kHz 16/24-bit, mono/poly formats possible. - Time track incrementing function allows a recording to be split by creating a new file at regular intervals (about 15 minutes) without interrupting recording.
- Limiter function automatically reduces parts where the input level is too high to suitable levels.
- Low cut filter is useful for reducing low-frequency noise.
- Dual recording function allows two files to be recorded simultaneously at different levels. (Only when file type is set to MONO.)
- Sliding switch for recording operation protects against misoperation.
- File name format can be set to use a user-defined word or the date.
- The built-in clock time and function items can be set using the system file (text file).
- Playback functions allow recorded files to be checked immediately.
• Secondary lithium battery used to save time information.
• A 3.5mm (1/8") headphone jack is built-in. - The 96×16 OLED display has a wide viewing angle and is easy to read.
- Micro-B USB 2.0 port.
Included items
This product includes the following items.
Keep the packing materials for transportation in the future.
Please contact TASCAM Customer Support (see back cover) if any of these items are missing or have been damaged during transportation.
- Main unit....×1
- USB cable....×1
- Owner's Manual (this document) including warranty....×1
Conventions used in this manual
The following conventions are used in this manual.
- When we refer to buttons, connectors and other parts of this unit and other equipment, we use a bold font like this: MENU button.
- When we show messages, for example, that appears on the unit's display, the typeface looks like this: ON
- The area of the display that is shown in inverse (light on dark) is referred to as the cursor or as being highlighted.
- "microSD/microSDHC memory card" is sometimes abbreviated as "microSD card".
• Additional information is provided as necessary as tips, notes and cautions.
TIP
These are tips about how to use the unit.
NOTE
These provide additional explanations and describe special cases.
CAUTION
Failure to follow these instructions could result in injury, damage to equipment or lost recording data, for example.
Precautions for placement and use
- The operating temperature range of this unit is 0–40 °C.
- Do not install this unit in the following types of locations. Doing so could degrade the sound quality and/or cause malfunctions.
Places with significant vibrations Near windows or other places exposed to direct sunlight Near heaters or other extremely hot places Extremely cold places Places with bad ventilation or high humidity Very dusty locations Places exposed directly to rain or other water
- Do not place this unit on top of a power amplifier or other device that generates heat.
Cleaning the unit
Use a dry soft cloth to wipe the unit clean. Do not wipe with chemical cleaning cloths, thinner, alcohol or other chemical agents. Doing so could damage the surface or cause discoloration.
Beware of condensation
If the unit is moved from a cold to a warm place, or used after a sudden temperature change, there is a danger of condensation; vapor in the air could condense on the internal mechanism, making correct operation impossible. To prevent this, or if this occurs, let the unit sit for one or two hours at the new room temperature before using it.
Using the TEAC Global Site
You can download this Owner's Manual necessary for this unit from the TEAC Global Site (http://teac-global.com/).
- Open the TEAC Global Site (http://teac-global.com/).
- In the TASCAM Downloads section, click the desired language to open the Downloads website page for that language.
NOTE
If the desired language does not appear, click Other Languages.
- Click the product name in the "Search by Model Name" section to open the Downloads page for that product.
- Select and download the Owner's Manual that are needed.
User registration
Customers in the USA, please visit the TASCAM website (http://tascam.com/) to register as a user online.
Names and functions of parts
Front
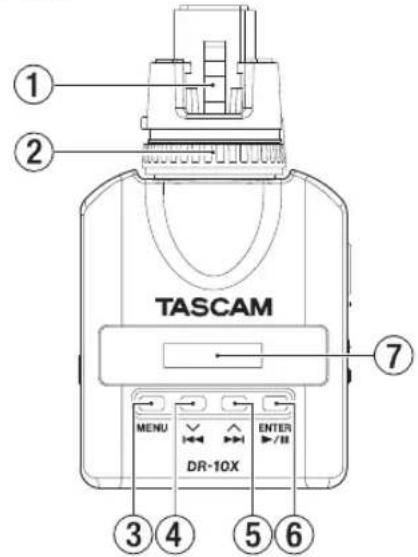
① XLR connector
Connect this to a dynamic mic with an XLR connector.
This can also be used as an external input. In this case, it will be a HOT pin unbalanced input. See the "Input/output ratings" on page 23 for input level specifications. (1: GND, 2: HOT, 3: COLD)
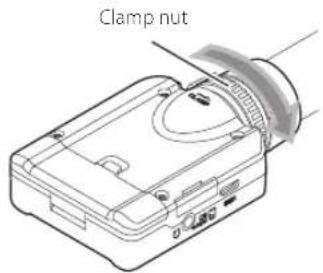
② Clamp nut
Use this to secure an XLR dynamic mic.
③ MENU button
When the Home Screen is open, press the MENU button to open the Menu Screen. When the Menu Screen is open, press the MENU button again to return to the Home Screen.
When a setting item is shown, press the MENU button to return to the Menu Screen.
④ [√] button
During playback or when stopped in the middle of a file, press the ◀◀◀ [∨] button to return to the beginning of the file.
- Press when located at the beginning of a file to skip to the beginning of the previous file. Press and hold this button during playback to search backward.
When the Menu Screen is open, press the [▼] button to open the Menu Screen.
When a setting item is shown, press the ◀◀◀ [∨] button to move the cursor left.
When inputting a file name, use this to select characters.
⑤ ▶▶▶[^]button
During playback or when stopped in the middle of a file, press the ▶▶1 [^] button to skip to the beginning of the next file. Press and hold this button during playback to search forward.
When the Menu Screen is open, press the ▶▶▶ [^] button to select a menu item.
- When a setting item is shown, press the ▶▶▶ [^] button to move the cursor right.
When inputting a file name, use this to select characters.
⑥ ▶ / II [ENTER] button
When the Home Screen is open, press the ▶/Ⅱ [ENTER] button to start file playback.
When the Menu Screen is open or a setting item is shown, press the ▶/II [ENTER] button to confirm the selected item. Use this also to respond to a confirmation message.
⑦ Display
Shows a variety of information.
Rear
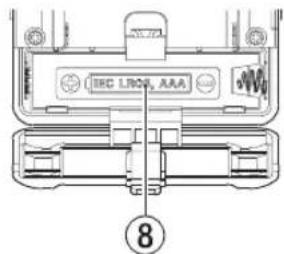
⑧ Battery compartment and cover
Install one AAA battery in this compartment to power the unit.
Sides
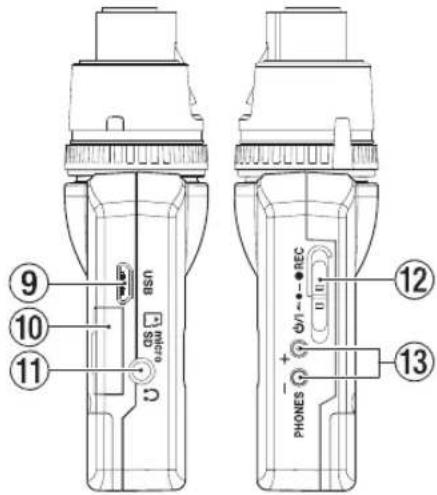
⑨ USB port
Use the included USB cable to connect this Micro-B USB port with a computer. When connected, the USB SELECTscreen appears to allow selection of bus power supply or data transmission by USB.
CAUTION
The unit should be connected directly to the computer, not through a USB hub.
⑩ microSD card slot
Use this slot to insert and remove microSD cards.
Open the microSD card slot cover on the left side. (See "Installing a microSD card" on page 12.)
⑪ Headphones jack
Connect stereo headphones to this stereo mini jack.
⑫ ⏻/| ← ● — ● REC switch
Slide this switch toward ⏻/1 and hold it for about one second to turn the unit on/off.
- Slide and hold this switch toward ● REC for about one second to start recording.
- When recording, slide and hold this switch toward ● REC for about one second to stop recording.
NOTE
The one-second delay is intended to prevent accidental operation.
⑬ PHONES [+] / [-] buttons
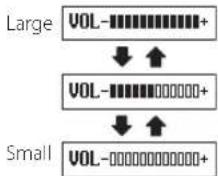
Use the + and - buttons to adjust the volume output from the headphones jack.
During adjustment, a volume indicator will appear on the display.
CAUTION
Before connecting headphones, lower the PHONES volume to the minimum level. Failure to do so might cause sudden loud noises, which
could harm your hearing or result in other trouble.
Do not apply excessive force to the jack when connecting and using headphones. Be careful, because the application of unintended force, particularly when using a mini jack, could damage the equipment.
Preparation
Power sources
This unit can operate on one AAA battery or USB bus power using the included USB cable. This unit can use an alkaline, Ni-MH or lithium AAA battery.
Using a AAA battery
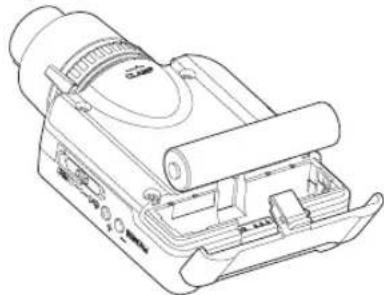
Open the battery compartment cover on the back of the unit. Install 1 AAA battery in the compartment with the ⊕ and ⊖ marks as shown. Then, close the battery compartment cover.
natural_image
Technical line drawing of a mechanical device with no visible text or symbolsWhen using a AAA battery, set the type of battery in order to accurately show the amount of power remaining and allow the unit to accurately determine whether power is available for proper operation. (See "Making menu settings" on page 15.)
CAUTION
• AAA manganese dry cell batteries cannot be used with this unit.
- This unit cannot recharge AAA Ni-MH batteries. Use a commercially-available recharger.
Power supply status indicator
When operating on battery power, a battery icon appears at the top right of the display.
The battery icon shows the amount of power remaining in bars (→ →). The battery is almost dead and the power will soon turn off if the icon with no bars blinks. When operating on USB bus power, the icon appears.
Connecting with a microphone
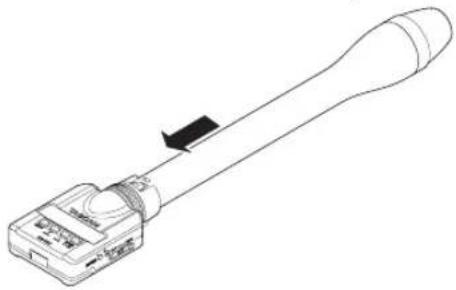
Connect the XLR connector to the microphone.
natural_image
Line drawing of a handheld electronic device with a lever and connector (no text or symbols)NOTE
- Turn the clamp nut in the opposite direction of CLAMP → and then attach the mic to the connector.
- If the connection is loose between this recorder and the mic, turn the clamp nut in the direction of the arrow to secure it.
- Do not hold the DR-10X when it is connected to a mic. (Hold the mic.)
Turning the unit on and off
CAUTION
Do not wear connected headphones when turning the unit on and off. A loud noise could damage to the speakers or harm your ears.
Turning the unit on
When the unit is off, slide the ⏻/I ←●—● REC switch toward ⏻/I and hold it for about one second until the TASCAM DR-1@startup screen appears and the unit starts. The Home Screen shown below appears after the unit starts up.

NOTE
If the unit is not used for a few minutes, the display will appear as below in screensaver mode.

Shutting down
When the unit is on, slide the ⏻/l ← ●—● REC switch toward ⏻/l and hold it for about one second until the display becomes unlit and the unit turns off.
CAUTION
Always use the ⏻/|←●—● REC switch to turn the unit off.
When the unit is on, do not remove the battery or disconnect the USB cable if using USB bus power. Doing so will cause all recordings, settings and other data to be lost. Lost data and settings cannot be restored.
Turning off automatically
When operating on battery power and the AUTO PWR SAVEItem on the Menu Screen is set to ON, if the unit is stopped and no operation has occurred for about 10 minutes, the unit will turn itself off automatically.
NOTE
When the unit is turned on for the first time (or when the built-in clock is reset after being left unused without a battery), the Menu Screen DATE/TIME item appears after the start-up screen to allow the date and time to be set. For details about how to set it, see the DATE/TIME item in "Menu structure" on page 16.
Installing a microSD card
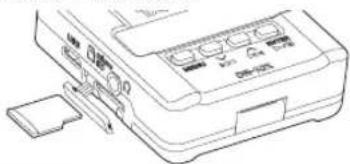
Open the microSD card slot cover on the left side.
- Inserting the microSD card Insert the microSD Card into the slot in the direction of the arrow as shown in the following illustration until it clicks into place.
- Removing the microSD card Press the microSD card in gently and then release it to allow it to come out.
CAUTION
In order to use a microSD card in this unit, you must format it first. (See "Making menu settings" on page 15.)
- After formatting a microSD card, the display will show the following when the unit is turned on.
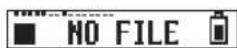
- If no microSD card has been inserted, the display will show the following when the unit is turned on.

See the following section for information about handling microSD cards.
Handling microSD cards
Precautions when handling microSD cards
This unit uses microSD/microSDHC cards for recording and playback.
It supports microSD cards that are 64 MB – 2 GB and microSDHC cards that are 4 GB – 32 GB.
A list of microSD cards that have been confirmed for use with this unit can be found on the TEAC Global Site (http://teac-global.com/). microSD/microSDHC cards are delicate media. In order to avoid damaging a card or the card slot, please take the following precautions when handling them.
- Do not leave them in extremely hot or cold places.
- Do not leave them in extremely humid places, and do not let them become wet.
• Do not put things on top of them or twist them. - Do not hit them.
- Do not remove or insert a card during data transmission or other access.
Recording durations when using microSD cards
The table below shows maximum recording times on microSD/microSDHC cards of different capacities.
| microSD/microSDHCcard capacity(hours:minutes) | 24-bit/48kHz WAVrecording setting | |
| DUAL RECMODE off | DUAL REC MODEon or FILE TYPEPOLY | |
| 1GB 2:04 1:02 | ||
| 2GB 4:08 2:04 | ||
| 4 GB 8:16 4:08 | ||
| 8GB 16:32 8:16 | ||
• The recording times shown above are estimates. They might differ depending on the microSD/microSDHC card in use.
• The recording times shown above are not continuous recording times, but rather they are the total possible recording times for the microSD/microSDHC card.
Connecting with a computer
Connect the unit to a computer using the included USB cable as shown in the illustration.
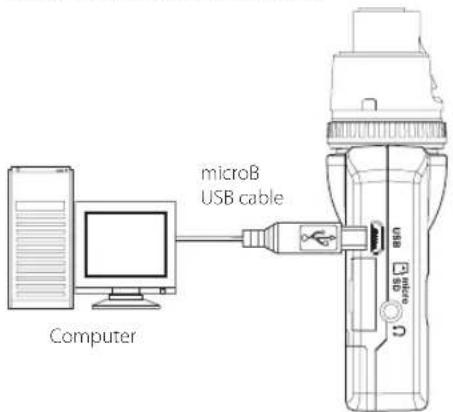
Whether the power is on or off, when connected, the POWER/STORAGE screen appears to allow selection of bus power supply or USB connection with the computer.
Use the ◀◀ [∨] and ▶▶[∧] buttons to select (highlight) the POWER or STORAGE item at the bottom of the display, and press the ▶/Ⅱ [ENTER] button.
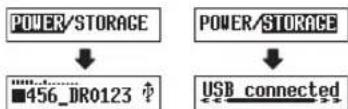
- If POWER is selected, power will be supplied from the USB port and the Home Screen will open.
- If STORAGE is selected, USB connected will appear on the display after the unit connects to the computer without any problems.
The unit will be shown on the computer as a USB device named "DR-10".
Double-click the "DR-10" drive to open it and show a list of the recording files, so you can retrieve the desired files.
Starting and stopping recording
You can use a single operation to start recording with this unit even when it is off.
the touch recording
When the unit is off, slide and hold the ⏻/1 ← ● — ● REC switch toward ● REC for about one second until the TASCAM DR-10 startup message appears and recording starts.
ordinary recording
To start recording when the unit is on, slide the ⏻/I ← ● — ● REC switch toward ● REC for about one second.
■opping recording
Slide the switch toward ● REC during recording for about one second to stop recording.
The following information appears on the display when stopped, when recording starts and during recording.
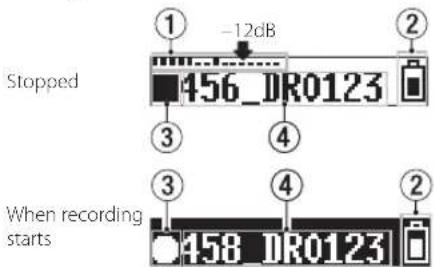
Recording
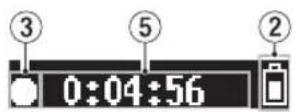
① Level meter
② Remaining battery charge
③ Recorder operation status
④ File name
⑤ Elapsed recording time
NOTE
- The one-second delay is intended to prevent accidental operation.
- Without pausing recording, a new file can be created automatically during recording when the file size reaches 2 GB. (Track incrementing)
- Set the mic input sensitivity with the MIC GAIN item on the Menu Screen so that that activity of the level meters reaches the arrow (at -12 dB) in the illustration. (See "Menu structure" on page 16.)
Playback and searching backward/forward
The Home Screen shown below appears after the unit starts up.

Starting and stopping playback
When the Home Screen is open and playback is stopped, press the ▶ / II [ENTER] button to start playback. Press this button again to stop playback.
■arching backward and forward
During playback, press and hold the ◀◀ [∨] or ▶▶[∧] button to start searching backward or forward. Continue pressing and holding the ◀◀ [∨] or ▶▶[∧] button to accelerate the search speed.
Release the ◀◀◀ [∨] or ▶▶▶ [^] button to resume playback.
The display appears as below when playback starts and during playback.
When playback starts
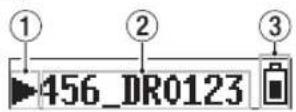
During playback
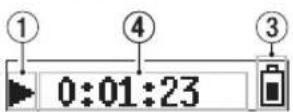
① Recorder operation status
② Playback file name
③ Remaining battery charge
④ Elapsed playback time
NOTE
- During playback, press and hold the MENU button to show the remaining time of the playing file.

- When searching, ◀◀ or ▶▶ will be shown. If the search speed is increased, this will change to ◀◀◀ or ▶▶▶.

Checking the remaining recording capacity of the microSD card
When stopped or recording, press and hold the MENU button to show the remaining recording capacity of the microSD.
Making menu settings
Follow these procedures to change various unit settings.
- When the Home Screen is open, press the MENU button to open the Menu Screen.
- Use the ◀◀ [▽] and ▶▶ [∧] buttons to select the menu item to set and press the ▶/∥ [ENTER] button to show the setting item.
- Use the ◀◀◀ [∨] and ▶▶▶ [∧] buttons to change the setting.
- Press the ▶/II [ENTER] button to confirm the setting and return to the Menu Screen.
- Repeat steps 2 to 4 as necessary to set each item.
- When finished, press the MENU button to return to the Home Screen.
Menu structure
Press the MENU button to open the Menu Screen. This list provides an overview of the various menu items.
| Menu item Summary | Setting items (default value underlined) | Explanation |
| MIC GAIN | External input/ mic gain settings | Use to set external input or the mic input sensitivity.EXT: external input (HOT pin unbalanced input )LO/MID/HI: Mic input sensitivity (balanced input)NOTEIf the AUTO LEVELitem on the menu screen is set to ON, it will be reset to OFF when the MIC GAINsetting is changed. When this happens, AUTO LUL Cancel will appear in a pop-up message. |
| LOW CUT Low cut | filter OFF/ON Turns the mic input low-cut filter on or off. The cutoff frequency is 120 Hz. | |
| LIMITER Input limiter | OFF/ON — | This function prevents distortion when signals that are too loud are input suddenly. Turns this function on or off. Distortion of sounds may occur when signals that are very loud are input even if the LIMITER function is activated. In such a case, use the Menu Screen MIC GAINitem to lower the mic input sensitivity, or increase the distance from the sound source. |
| AUTO LEVEL | Automatic level adjustment | When the input sound level is too low or too high, the recording volume will be increased or decreased automatically to an appropriate level. |
| FS SAMPLE | Sampling frequency | 44.1kHz / 48kHz Use to set the sampling frequency setting. |
| BIT LENGTH | Quantization bit depth | 16bit / 24bit Use to set the quantization bit depth. |
| FILE TYPE | Recording file type | MONO / POLY Use to set the recording file type.MONO: Record mono files.POLY: Record stereo files (with the same data on both left and right channels).NOTEIf the DUAL REC MODE item on the menu screen is set to ON, it will be reset to OFF when the FILE TYPE setting is changed to P O . When this happens, DUAL REC Cancel will appear in a pop-up message. |
| DUAL REC MODE Dual recording OFF/ON | This recorder can simultaneously record a second recording at a different input level along with the regular recording. For example, you can make an ordinary recording with the input level set as high as possible and simultaneously record at a slightly lower input level (-6 dB) for security. Two recorded files (one with higher input level and one with lower input level) are saved individually.Dual recording file namesDual recording will create two files simultaneously.The name of the second file created by dual recording has “_D” added to the file name of the ordinary recording.Ordinary recording file name Dual recording file name002_TASCAM.WAV 002_TASCAM_D.WAV1 2 1 2 31 002 (basic recording file number)2 TASCAM (according to the WORD setting of the FILE NAMEItem on the Menu Screen)3 D (dual recording file with lower input level (-6 dB) setting)NOTEIf the FILE TYPEItem on the menu screen is set to P 0 ,it will be reset to MONO when the DUAL REC MODE setting is changed to ON. When this happens, FILE TYPE Cancel will appear in a pop-up message. | |
| TIME TRK INC | Timed track incrementation OFF/ON | Without pausing recording, a new file can be created automatically during recording after about 15 minutes have elapsed. |
| WARNING BEEP Warning sound OFF/ON | If set to ON, warning sounds (beeping) will be output from the headphone jack every few seconds when the following conditions apply.The battery charge is low (battery icon appears empty)The microSD card has little open-space (when the remaining recording time is about 10 minutes or less)Recording cannot be started (because the number of recorded files exceeds the limit of 1000 or the microSD card has a problem, for example) | |
| AUTO PWR SAVE | Automatic power off setting OFF/ON | Turns this function on or off. When operating on battery power and this function is on, if the unit is stopped when no operation has occurred for about 10 minutes, the unit will turn itself off automatically. |
| FILE NAME TYP | File name type setting | WORD/DATEYou can select the format of names given to files recorded by this unit.WORD: The 6 characters set using the Menu Screen FILE NAMEitem is used for file names.Example: 000_DR0000.wav_DATE: The date is used as the file name (in yymmdd format).Example: 000_110101.wav |
| FILE NAME Set the file name [DR0000] | Press the ▶ / II [ENTER] button to move the cursor from left to right one character at a time.When the cursor is at the character on the far right, press the ▶ / II [ENTER] button to confirm the file name and return to the Menu Screen.Use the ◀◀◀ [▽] and ▶▶▶ | [^] buttons to change the character at the cursor position.In addition to the alphabet and numbers, the following characters can be used:! # $ % & '() + , - ; = @ [] ^ _` {}TIPWhen using more than one of these units, you can set the file name in advance to identify which units were used to record files. This can be convenient when editing files.ExampleUnits: 1st (DR0001), 2nd (DR0002), 3rd (DR0003)... 10th (DR0010)File names: 000_DR0001.wav, 000_DR0002.wav, 000_DR0003.wav... 000_DR0010.wav | |
| FORMAT SD | Format microSD card | Sure? YES/NOUse this to format the microSD card in the unit.YES: Start formatting the card. After formatting completes, the Menu Screen reappears.NO: Return to the Menu Screen. |
| BATTERY TYPE Battery setting ALK/NiMH/LITH | Use this to set the type of battery used.This setting is used to show the amount of remaining battery charge and determine if the unit has enough power for normal operation.ALK: Alkaline AAA batteryLITH: Lithium AAA batteryNiMH: Ni-MH AAA battery | |
| DATE/TIME | Internal clock settingYear/month/date/hour/minute | "YY-MM-DD HH:MM"1 2 3 4 51: YY (year), 2: MM (month), 3: DD (date), 4: HH (hour), 5: MM (minute)Press the ▶ / II [ENTER] button to move the cursor from left to right: 1 → 2 → 3 → 4 → 5.When the cursor is at 5 on the far right, press the ▶ / II [ENTER] button to confirm the date and time and return to the Menu Screen.Use the ◀◀◀ [▽] and ▶▶◆ [^] buttons to change the number at the cursor position. |
| SYSTEM INIT | Restore factory default settings | Use this to restore the various settings of this unit to their default values (factory settings).YES: Initialize the settings. After initializing completes, the Menu Screen reappears.NO: Return to the menu screen. |
| VERSION INFO | Shows the firmware version | This is the firmware version used by the unit.When the version is being shown, press the ▶ / II [ENTER] button to return to the Menu Screen. |
Messages
The following is a list of the pop-up messages.
| Message Meaning and response | |
| Battery Empty The battery is almost out of power. Replace the battery. | |
| Card Error The microSD card could not be recognized properly. Change the microSD card. | |
| Card Full | The microSD card has no remaining capacity. Erase unnecessary files or move them to a computer to make open space. |
| File Full | The total number of recording files exceeds the limit of 1000. Erase unnecessary files or move them to a computer to make open space. |
| Format Error | The microSD card is not formatted properly or the formatting is broken. Use the DR-10X to format the microSD card. |
| Invalid Card The card might be abnormal. Change the microSD card. | |
| No Music File There is no file that can be played back on the microSD card. | |
| Non-Supported The audio file is not a supported format or is broken. | |
| Write Timeout | Writing to the microSD card timed out.Change to a card with faster writing, or backup files on the card to a computer and format the card. |
| Player Error | If any of these errors occurs, turn the unit off once and restart it. |
| Write Failed | If the unit cannot be turned off, remove the battery or disconnect the USB cable if it is being operated on USB bus power.If these error messages continue to appear frequently, please contact a TEAC Service Center (listed on page 2 of this manual). |
Making settings using a text file
When this unit is turned on, it automatically reads a settings file (text format) stored on the microSD card and applies its menu item settings.
NOTE
After applying the settings, the settings file is deleted.
Settings file
- File name: DR-10_SysPara.txt
- File storage location: The settings file is placed in the root directory of the microSD card.
Settings file format explanation
The order that settings are notated does not matter.
There is no need to notate all the settings. You can notate only the settings that you want to set.
NOTE
• If there is an error in notation, that setting will not be applied to the unit.
- If the FILE TYPE setting is POLY and the DUAL REC MODE setting is ON, the menu item setting that comes later in the order written in the setting file will be effective.
g definition
<dr10_syspara> (required)
    These are tags that identify setting statements. All setting elements must be written between <dr10_syspara> and </dr10_syspara> tags.
<mic_gain>
    This indicates the Menu Screen MIC GAIN setting. Notate it as "ext", "low", "mid" or "hi".
    Example: <mic_gain> mid</mic_gain>
<low_cut>
    This indicates the Menu Screen LOW CUT setting. Notate it as "off" or "on".
    Example: <low_cut> off</low_cut>
<climiter>
This indicates the Menu Screen LIMITER setting. Notate it as "off" or "on". Example:
This indicates the Menu Screen AUTO LEVEL setting. Notate it as "off" or "on". Example:
This indicates the Menu Screen FS SAMPLE setting. Notate it as "44.1" or "48". Example:
This indicates the Menu Screen BIT LENGTH setting. Notate it as "16bit" or "24bit".
Example:
This indicates the Menu Screen FILE TYPE setting. Notate it as "MONO" or "POLY".
Example:
This indicates the Menu Screen DUAL REC MODE setting. Notate it as "off" or "on".
Example:
This indicates the Menu Screen TIME TRK INC setting. Notate it as "off" or "on". Example:
This indicates the Menu Screen WARNING BEEPsetting. Notate it as "off" or "on". Example:
This indicates the Menu Screen AUTO PWR SAUBetting. Notate it as "off" or "on".
Example:
This indicates the Menu Screen FILE NAME TYP setting. Notate it as "word" or "date".
Example:
This indicates the Menu Screen FILE NAME setting. Use 6 characters to set the file name.
Example: <file_name>DR0000</file_name>
This indicates the Menu Screen BATTERY TYPE setting. Notate it as "alkali", "ni-mh" or "lithium".
Example: <battery_type>alkali</battery_type>
This indicates the Menu Screen DATE/TIME date setting, which is used for the built-in clock. Notate it with 10 half-width (ordinary) characters including hyphens in a "YYYY-MM-DD" format.
Example: <date>2014-08-27</date>
This indicates the Menu Screen DATE/TIME time setting, which is used for the built-in clock. Notate it with 8 half-width (ordinary) characters including colons in a "HH:MM:SS" format using 24-hour time.
Example: <time>23:59:59</time>
Sample notations
• Example with all menu items
<dr10_syspara>
    <mic_gain>low</mic_gain>
    <low_cut>off</low_cut>
    <limiter>off</limiter>
    <auto_level>off</auto_level>
    <fs_sample>48</fs_sample>
    <bit_length>24bit</bit_length>
    <file_type>MONO</file_type>
    <dual_rec>off</dual_rec>
    <time_track_inc>off</time_track_inc>
    <beep>off</beep>
    <auto_pwr_save>on</auto_pwr_save>
    <file_name_type>date</file_name_type>
    <file_name>DR0000</file_name>
<battery_type>alkali</battery_type>
<date>2014-08-27</date>
<time>23:59:59</time>
</dr10_syspara>
• Example with only the time setting
<dr10_syspara>
    <time>23:59:59</time>
</dr10_syspara>
Specifications
Ratings
■ecording media
microSD card (64 MB-2 GB)
microSDHC card (4 GB–32 GB)
Recording/playback formats
44.1/48kHz 16/24-bit, mono/poly BWF
Input/output ratings
■alog input
Mic jack
Connector
XLR JACK (female) (1: GND, 2: HOT, 3: COLD)
When MIC GAIN external input (EXT) selected (HOT pin unbalanced input)
Maximum input level: -8 dBu
Nominal Input level: -24 dBu
When MIC GAIN mic input (LO/MID/II) selected (balanced input)
Maximum input level: -31 dBu
Minimum input level: -63 dBu
Mic input gain
LO: +29 dB
MID: +35 dB
HI: +45 dB
Input impedance: 10 kΩ or more
Dialog output
Headphones jack
Connector: 1/8" (3.5mm) stereo phone (dual mono audio output)
Audio performance
■ → PHONES (input monitoring output, 10kΩ load)
When MIC GAIN external input (EXT) selected (HOT pin unbalanced input)
Frequency response: 20 Hz – 22 kHz +1/-2 dB
Distortion: 0.05% (1 kHz sine wave, at maximum input level)
S/N ratio: 92 dB or higher (PHONES volume max)
When MIC GAIN mic input (LO/MID/HI) selected (balanced input)
Frequency response: 20 Hz - 22 kHz +1/-2 dB
Distortion: 0.05% (1 kHz sine wave, at maximum input level)
S/N ratio: 80 dB or higher (PHONES volume max, LO selected)
General
Power
1 AAA battery (alkaline, NiMH or lithium)
USB bus power from a computer
Power consumption
0.65 W (maximum)
Current consumption (USB bus power)
0.25A(maximum)
Battery operation time (continuous operation)
Using an alkaline battery (EVOLTA)
| Format | Operation time | Note | |
| Recording | 48kHz/24-bit WAV | About 10.0 hours | Headphones not connectedLimiter: offDual recording: offFile type: mono |
Recording: JEITA recording time
Using NiMH battery (eneloop)
| Format | Operation time | Note | |
| Recording | 48kHz/24-bit WAV | About 8.0 hours | Headphones not connectedLimiter: offDual recording: offFile type: mono |
Recording: JEITA recording time
Using lithium battery (Energizer ULTIMATE LITHIUM)
| Format | Operation time | Note | |
| Recording | 48kHz/24-bit WAV | About 15.5 hours | Headphones not connectedLimiter: offDual recording: offFile type: mono |
Recording: JEITA recording time
Date and time data retention
Secondary lithium battery ×1 (built-in)
■ dimensions
52 x 94.4 x 28 mm (width × height × depth, excluding protrusions)
Weight
68.3 g (including batteries)/56.3 g (not including batteries)

operating temperature range
0^ - 40^ (32^ - 104^)
Dimensional drawings
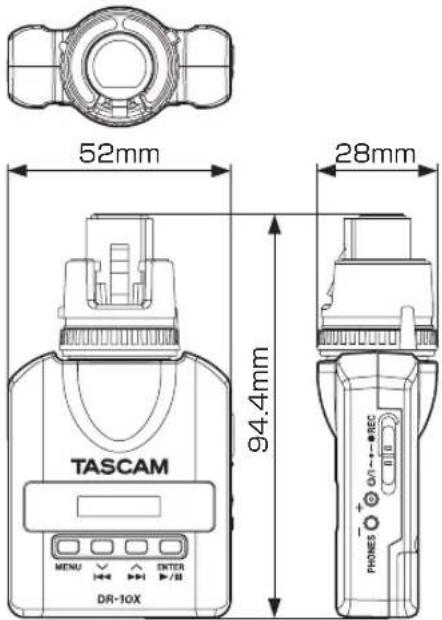
• Illustrations in this manual might differ in part from the actual product.
- Specifications and external appearance might be changed without notification to improve the product.
Mode d'emploi
PRÉCAUTIONS DE SÉCURITÉ IMPORTANTES
Pour le Canada
THIS CLASS B DIGITAL APPARATUS COMPLIES WITH CANADIAN ICES-003. CET APPAREIL NUMÉRIQUE DE LA CLASSE B EST CONFORME À LA NORME NMB-003 DU CANADA.
DÉCLARATION DE CONFORMITÉ
Performances audio....45
Générales 45
natural_image
Technical line drawing of a mechanical device with no visible text or symbolsnatural_image
Line drawing of a handheld electronic device with a black arrow indicating direction (no text or symbols)NOTE
natural_image
Line drawing of a projector with a circular lens and base module (no text or symbols)natural_image
Line drawing of a printer or scanner device with ports and a paper clip (no text or symbols)ATTENTION
Responsible: TEAC AMERICA, INC.
⑫ Interruptor ⏻/I ←● REC
natural_image
Technical line drawing of a mechanical device with no visible text or symbolsnatural_image
Line drawing of a handheld electronic device with a cylindrical shaft and connector (no text or symbols)NOTA
natural_image
Line drawing of a projector with a curved lens and control panel (no text or symbols)Encendido y apagado
CUIDADO
natural_image
Line drawing of a printer or scanner device with ports and connectors (no text or symbols visible)CUIDADO
BWF a 44,1/48 kHz, 16/24 bits, mono/poly
Entradas y salidas
■trada analógica
Toma Mic
Conector
Clavija XLR (hembra) (1: masa, 2: activo, 3: pasivo)
Cuando elija MIC GAIN de entrada externa (EXT) (entrada no balanceada con punta activa)
⑨ USB-Anschluss
natural_image
Technical line drawing of a mechanical device with rollers and housing (no text or symbols)natural_image
Line drawing of a handheld electronic device with a lever and connector (no text or symbols)Wichtig
Lithium-Batterie (Energizer Ultimate Lithium)
This equipment has been tested and found to comply with the limits for a Class B digital device, pursuant to Part 15 of the FCC Rules. These limits are designed to provide reasonable protection against harmful interference in a residential installation. This equipment generates, uses, and can radiate radio frequency energy and, if not installed and used in accordance with the instruction manual, may cause harmful interference to radio communications. However, there is no guarantee that interference will not occur in a particular installation. If this equipment does cause harmful interference to radio or television reception, which can be determined by turning the equipment off and on, the user is encouraged to try to correct the interference by one or more of the following measures.
a) Reorient or relocate the receiving antenna.
b) Increase the separation between the equipment and receiver.
c) Connect the equipment into an outlet on a circuit different from that to which the receiver is connected.
d) Consult the dealer or an experienced radio/TV technician for help.
CAUTELA
Changes or modifications to this equipment not expressly approved by TEAC CORPORATION for compliance could void the user's authority to operate this equipment.
For Canada
THIS CLASS B DIGITAL APPARATUS COMPLIES WITH CANADIAN ICES-003. CET APPAREIL NUMERIQUE DE LA CLASSE B EST CONFORME A LA NORME NMB-003 DU CANADA.
natural_image
Technical line drawing of a mechanical device with no visible text or symbolsnatural_image
Line drawing of a handheld electronic device with a lever and connector (no text or symbols)NOTA
natural_image
Line drawing of a handheld electronic device with ports and buttons (no text or symbols)CAUTELA
⑧ 電池ケース蓋/電池ケース
natural_image
Technical line drawing of a mechanical device with no visible text or symbolsnatural_image
Line drawing of a handheld electronic device with a lever and connector (no text or symbols)メモ
natural_image
Line drawing of a handheld electronic device with control panel and ports (no readable text or symbols)注意
例)<dual_rec>off</dual_rec>
< In the United States >
This warranty gives you specific legal rights and you may also have other rights which vary from state to state. This warranty is only valid within the country the unit was originally purchased.
WHAT IS AND IS NOT COVERED
Except as specified below, this warranty covers all defects in materials and workmanship in this product. The following are not covered by the warranty:
1. Damage to or deterioration of the external cabinet.
2. Damages resulting from accident, misuse, abuse or neglect.
3. Damage resulting from failure to perform basic daily maintenance and/or calibration or otherwise resulting from failure to follow instructions contained in your owner's manual.
4. Damage occurring during shipment of the product. (Claims must be presented to the carrier)
5. Damage resulting from repair or attempted repair by anyone other than TEAC or an authorized TASCAM service station.
6. Damage resulting from causes other than product defects, including lack of technical skill, competence, or experience of the user.
7. Damage to any unit which has been altered or on which the serial number has been defaced, modified or is missing.
WHO MAY ENFORCE THE WARRANTY
This warranty may be enforced only by the original purchaser. This warranty is not valid if the product was purchased through an unauthorized dealer.
LENGTH OF WARRANTY
All parts except heads and disk drives are warranted for one (1) year from the date of original purchase. Heads and disk drives are warranted to ninety (90) days from date of original purchase. Labor is warranted for ninety (90) days from date of original purchase.
WHAT WE WILL PAY FOR
We will pay all labor and material expenses for items covered by the warranty. Payment of shipping charges is discussed in the next section of this warranty.
HOW YOU CAN GET WARRANTY SERVICE
Your unit must be serviced by an authorized TASCAM service station in the United States. (This warranty is not enforceable outside the U.S.) If you are unable to locate an authorized TASCAM service station in your area, please contact us. We either will refer you to an authorized service station or instruct you to return the unit to the factory. Whenever warranty service is required, you must present a copy of the original dated sales receipt from an Authorized TASCAM Dealer.
You must pay any shipping charges if it is necessary to ship the product to service. However, if the necessary repairs are covered by the warranty, we will pay return surface shipping charges to any destination within the United States.
LIMITATION OF IMPLIED WARRANTIES
Any implied warranties, INCLUDING WARRANTIES OF MERCHANTABILITY AND FITNESS FOR A PARTICULAR PURPOSE, are limited in duration to the length of this warranty.
EXCLUSION OF DAMAGES
TEAC's liability for any defective product is limited to repair or replacement of the product, at TEAC's option. TEAC shall not be liable for:
-
Damages based upon inconvenience, loss of use of the product, loss of time interrupted operation or commercial loss; or
-
Any other damages, whether incidental, consequential or otherwise.
Some states do not allow limitations on how long an implied warranty lasts and/or do not allow the exclusion or limitation of incidental or consequential damages, so the above limitations and exclusions may not apply to you.
To locate an Authorized Service Center in Your Area
CALL 1-800-447-8322
This product is subject to the legal warranty regulations of the country of purchase. In case of a defect or a problem, please contact the dealer where you bought the product.
< In other countries/areas >
This warranty gives you specific legal rights, and you may also have other rights that vary by country, state or province.
If you have a warranty claim or request, please contact the dealer where you bought the product.
If you require repair services for your TASCAM equipment, please contact the dealer where the product was purchased from or the TASCAM Distributor in your country. A list of TASCAM Distributors can be found on our website at: http://teac-global.com/
WARRANTY / 保証書
Model / 型名
Owner's name / お名前
DR-10X
Serial No. 機番
Sample 機番

- ティアック株式会社
- Owner's Manual
- IMPORTANT SAFETY PRECAUTIONS
- For U.S.A.
- INFORMATION TO THE USER
- CAUTION
- For Canada
- Declaration of Conformity
- IMPORTANT SAFETY INSTRUCTIONS
- CAUTIONS ABOUT BATTERIES
- ■r European Customers
- Disposal of electrical and electronic equipment
- Disposal of batteries and/or accumulators
- Contents
- Introduction
- Features
- Included items
- Conventions used in this manual
- TIP
- NOTE
- Precautions for placement and use
- Cleaning the unit
- Beware of condensation
- Using the TEAC Global Site
- User registration
- Names and functions of parts
- ① XLR connector
- ② Clamp nut
- ③ MENU button
- ④ [√] button
- ⑤ ▶▶▶[^]button
- ⑥ ▶ / II [ENTER] button
- ⑦ Display
- ⑧ Battery compartment and cover
- Preparation
- Power sources
- Using a AAA battery
- Power supply status indicator
- Connecting with a microphone
- Turning the unit on and off
- Turning the unit on
- Shutting down
- Turning off automatically
- Installing a microSD card
- Handling microSD cards
- Precautions when handling microSD cards
- Recording durations when using microSD cards
- Connecting with a computer
- Starting and stopping recording
- the touch recording
- ordinary recording
- ■opping recording
- Playback and searching backward/forward
- Starting and stopping playback
- ■arching backward and forward
- Checking the remaining recording capacity of the microSD card
- Making menu settings
- Menu structure
- Messages
- Making settings using a text file
- Settings file
- Settings file format explanation
- g definition
- Sample notations
- Specifications
- Ratings
- ■ecording media
- Recording/playback formats
- Input/output ratings
- ■alog input
- Dialog output
- Audio performance
- ■ → PHONES (input monitoring output, 10kΩ load)
- General
- Power
- Power consumption
- Current consumption (USB bus power)
- Battery operation time (continuous operation)
- Date and time data retention
- ■ dimensions
- Weight
- Mode d'emploi
- PRÉCAUTIONS DE SÉCURITÉ IMPORTANTES
- Pour le Canada
- DÉCLARATION DE CONFORMITÉ
- ATTENTION
- ⑫ Interruptor ⏻/I ←● REC
- NOTA
- Encendido y apagado
- CUIDADO
- Entradas y salidas
- ■trada analógica
- ⑨ USB-Anschluss
- Wichtig
- CAUTELA
- ⑧ 電池ケース蓋/電池ケース
- メモ
- 注意
- < In the United States >
- WHAT IS AND IS NOT COVERED
- WHO MAY ENFORCE THE WARRANTY
- LENGTH OF WARRANTY
- WHAT WE WILL PAY FOR
- HOW YOU CAN GET WARRANTY SERVICE
- LIMITATION OF IMPLIED WARRANTIES
- EXCLUSION OF DAMAGES
- To locate an Authorized Service Center in Your Area
- < In other countries/areas >
- WARRANTY / 保証書
- DR-10X
- Sample 機番
Brand : TASCAM
Model : DR-10X
Category : Dictaphone