DECRNN032 - Thermostat Perry - Free user manual and instructions
Find the device manual for free DECRNN032 Perry in PDF.


| Product type | Programmable chronothermostat |
| Brand | Perry |
| Model | DECRNN032 |
| Power supply | 2 alkaline 1.5V AA batteries (LR6) |
| Battery life | About 2 years |
| Display | Backlit display (depending on model) |
| Output type | Relay with changeover contact NO/COM/NC, potential-free, max 8(2)A/250 Vac |
| Telephone remote control input | Terminals 8 and 9, potential-free NO contact |
| Temperature display range | -5 °C to +39 °C |
| Temperature setting range | +5 °C to +39 °C (Comfort, Activity, Economy) |
| Temperature resolution | 0.1 °C |
| Control mode | ON/OFF differential or proportional (cycles 7/10/15/20 min) |
| Adjustable differential | From 0.2 °C to 2 °C (default 0.6 °C) |
| Temperature correction (Offset) | From -1.9 °C to +1.9 °C |
| Frost protection temperature | From 4 °C to 12 °C (default 5 °C) |
| Protection degree | IP30 |
| Insulation class | Class II |
| Dimensions (approximate) | 120 x 82 x 30 mm (estimated) |
| Weight (approximate) | 200 g (with batteries) |
| Pre-installed programs | 4 fixed programs (P01 to P04) + 1 free (P05) + Holiday (P06) |
| Main functions | Weekly programming, Winter/Summer modes, intelligent operation, temperature limitation, cleaning suspension, telephone control, anti-scale cycle, operating hours counter |
| Maintenance and cleaning | Clean with a soft, dry cloth. Do not use abrasive products. Replace worn-out batteries. |
| Safety | Adjustable frost protection function, low battery signal, probe error indication (ERD) |
| Spare parts / Reparability | Batteries easily replaceable. For any repairs, contact a qualified professional. |
| General information | Installation at 1.5 m above floor, away from heat sources. Comply with current electrical standards. |
Frequently Asked Questions - DECRNN032 Perry
User questions about DECRNN032 Perry
0 question about this device. Answer the ones you know or ask your own.
Ask a new question about this device
Download the instructions for your Thermostat in PDF format for free! Find your manual DECRNN032 - Perry and take your electronic device back in hand. On this page are published all the documents necessary for the use of your device. DECRNN032 by Perry.
USER MANUAL DECRNN032 Perry
CRONOTERMOSTATO DIGITALE DA PARETE WALL MOUNTING DIGITAL CHRONOTHERMOSTAT CHRONOTHERMOSTAT DIGITAL POUR MONTAGE EN SAILLIE DIGITAL RAUMTHERMOSTATUHR WANDMONTAGE CRONOTERMOSTATO DIGITAL DE SUPERFICIE

Weekly, Winter / Summer
3 temperature levels + antifreeze
Telephone programmer input
3°
D

2°
fig. 4

fig. 5
t1 = 20,0 °C,t2 = 22,0 °C,t3 = 23,5 °C (per estate)
6.3 - PROGRAMMA HOLIDAY P 06
The weekly-setting wall mounting chronothermostat suitable for heating and/or cooling systems, is equipped with a big, clear display (some models have the backlight function) so as to monitor all functions in real time.
Its principal feature is the ease with which it can be programmed, in fact, despite the number of functions it has, it is very simple to use. Various programmes are already set in its permanent memory, at 3 and 4 temperature levels, designed to provide maximum comfort. However, only a few seconds are needed to set the preferred temperatures to be applied throughout the day (even every 30 minutes!) and also for each day of the week. A standard function of the chronothermostat consists of the automatic adjustment of the temperature in the ON/OFF differential mode, so as to adjust itself to the thermal inertia of your particular system - the temperature can be set between 0.2°C and 2°C. Otherwise, you can choose the function in proportion with the cycles, which can be set to last 7-10-15-20 minutes, thus reducing the operating time of the boiler, which depends upon the difference between the set temperature and that of the room (the smaller the difference in temperature, the less time the boiler functions).
Moreover, the chronothermostat can automatically anticipate ignition (intelligent function), for the room to reach the desired temperature at a particular time. The set temperature scale is in degrees centigrade (Celsius) and you can calibrate the measurement of temperature by setting a correction value (from -1.9 to +1.9 °C). When switched to degrees Fahrenheit, all temperature settings are updated according to the new temperature scale.
Particular attention has been given to the energy saving factor: the Holiday function, the interruption function for domestic cleaning, the option to block the set temperatures, the anti-freeze temperature can be set between 4 and 12 °C, telephonic control (optional telephone programmer). These prevent energy from being wasted, which leads to economic savings (refer to the following pages for the description of these and other functions).
INDEX
| 1 - TECHNICAL SPECIFICATIONS | pag. 29 |
| 2 - GENERAL VIEW AND KEYS FUNCTIONS | pag. 30 |
| 3 - DISPLAY LEGEND | pag. 31 |
| 4 - INSTALLATION | pag. 32 |
| 5 - PROGRAMMING | pag. 36 |
| 6 - ENERGY SAVING FUNCTIONS | pag. 43 |
| 7 - PROGRAMMABLE FUNCTIONS FOR USE WITH DIFFERENT APPLIANCES | pag. 48 |
| 8 - ACTIVATION VIA TELEPHONE PROGRAMMER | pag. 52 |
| 9 - FIXED SET OFF THE PROGRAMS | pag. 128 |
1 - TECHNICAL SPECIFICATIONS
Supply voltage:
Working:
Time remaining from when "Battery Low" symbol:
Backlight display:
Type of action, disconnect and device:
Type of output:
Software:
Nominal pulse voltage:
Wire section to relay terminals:
Input (telephone programmer):
Wire section to telephone programmer input terminals:
Insulation:
Protection degree:
Pollution rating:
Ambient temperature display range:
Ambient temperature indicator resolution:
Adjustment temperature range (t1/t2/t3):
Setting temperature resolution:
Temperature correction (Offset):
Frost protection temperature (t ※ ):
Methods to adjust the temperature:
- DIFFERENTIAL (default)
- PROPORTIONAL
Thermal gradient:
Operating temperature limits:
Storing temperature limits:
Reference standard for CE mark:
N° 2 alkaline 1,5 V type AA (LR6)
2 years
1 month approx.
Only for models with this option
1/ B / U / Electronic
Relay with single-pole changeover contact,
voltage free, NO / COM / NC - max 8(2)A/250 V ac
Class A
4 kV
0,75mm2÷ 2,5mm2
for NO contact, zero potential
0.5mm2÷ 1.5mm2
Class II
IP 30
Normal
5° C ÷ +39° C
0,1 °C
+ 5 °C ÷ +39 °C
0,1 °C
Settable from -1,9 °C to +1,9 °C
Settable from +4 °C to +12 °C (default 5 °C)
Settable from 0,2 °C to 2 °C (default 0,6 °C)
Cycle settings are 7-10-15-20 minutes (default 10')
max 1°K / 15 min
-5°C ÷ +50°C
-10 °C ÷ + 65 °C
LVD / EMC EN60730-2-7 EN60730-2-9
Note: when room temperature flashes, display scale (-5°C or +39°C) has been exceeded.
Err indicates that heat control activity has been suspended due to probe error.
2 - GENERAL VIEW AND KEY FUNCTIONS
Note: more particular button functions are described in the specific paragraphs.


- Select SET temperature: Comfort t1warking, Economy t3; adjustable from +5 °C to +39 °C
- Increase temperature ▲
- Decrease temperature ▼
Note: the keys are also used for many other functions, purposely designed to facilitate setting and using the chronothermostat (e.g. Setting the hour, minutes and day, etc.)
- Suspend program during room cleaning
- Changes the current hour - minutes - day and displays the time or temperature
- Select - display programs P 01 ÷ P 06
-
Half-hour program ( 1/2 h)
-
Operation confirm button
- Select manual mode and deactivate chronothermostat (OFF)
- Set temperature Comfort
- Set temperature working (pre-comfort) and activates/disables the intelligent function
- Set temperature Economy (energy saving)
- Set temperature Antifreeze
- Time or temperature display
- Winter ⚙ (heating) or summer ✱ (cooling) operation
- View total hours operation
3 - DISPLAY LEGEND

- Reference temperature set
- Displays tenths of a degree
- Days of the week
- Current time or temperature
- Telephone programmer operating mode indicator
- Override manual mode indicator
- Smart operation (Auto)
- Heating program active indicator
-
Battery low (replace the batteries within 30 days)
-
Temperature scale over 24 hours
- Cooling programme enabled
- Appliance in operation ( ) ONblinking
- Economy t3 Temperature Setting (energy saving)
- Working t2 Temperature Setting (pre-comfort)
- Comfort t1 Temperature Setting
- Backlight Display only for models with this option( The backlight function is activated by pressing any key and goes off 6 seconds after the last key is released
4 - INSTALLATION
4.1) DIMENSIONS
Z


4.2) INSTALLATION GUIDELINES
Installation of device: indipendent - fixed
- wall mounting - on the back round box - on rectangular flush mounting box (3modules)
- Install the chronothermostat at a height of 1.5 m from the floor, far from heat sources, windows and anything that might modify de standard operational mode.

4.3) FIXING BASE
- Switch off mainspowerto device
- Using screws, fixing the base to the wall at to the back round or rectangular box using holes provided.
- If the chronothermostat base is to be mounted on a metal wall, apply two special insulating washers to the two screws
A fixing holes
B pass wires from back round or rectangular box
C fixing clips of chronothermostat

To ensure the chronothermostat is fitted correctly to the wall mounted base, care must be taken to ensure that the base is not distorted by screwing the rectangular back box too tightly to the wall.
4 - INSTALLATION
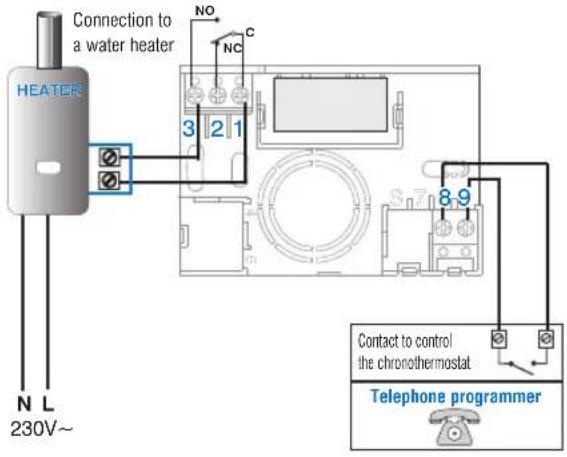
4.4) ELECTRICAL CONNECTIONS
Important: installation and electrical connections of devices and appliances must be carried out by skilled people and in compliance with current regulations. The manufacturer declines any liability in connection with the use of products subject to special environmental and/or installation standards.
• turn off the electrical power to the wiring.
- connect the controlled device to the terminals:
1 - common
2 - normally closed contact
3 - normally open contact
- The telephone programmer can be connected to terminals and to activate the chronothermostat from a distance.
Examples of electrical connections
N.B.: with heavy inductive loads (pumps and solenoid valves) it is recommended to connect an RC filter in parallel to the load

4 - INSTALLATION
4.5) ATTACHING OR REMOVING THE CRONOTHERMOSTAT FROM ITS BASE
1° Attach the cable cover by inserting panel D to special slot E the base, then fasten it to the catches by F pressing lightly.
To remove the cover, use a small screwdriver to prize apart each catch in turn.

3°
In order to remove the chronothermostat from its wall-mounted base, grip as shown in the diagram, then pull outwards from the left-hand side.

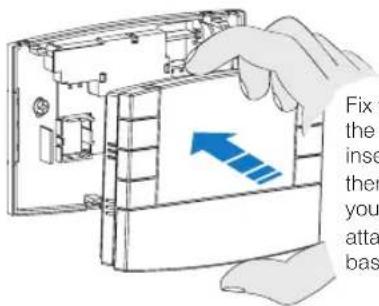
2°
Fix the chronothermostat on the base, taking care to insert the contacts correctly, then exert light pressure until you hear the click of the attachment hooks on the base.
Easy Programming

All the settings can be carried out before securing the chronothermostat to the base on the wall; this allows you to do the programming while being comfortably seated.

Caution!
If the chronothermostat is programmed before it is fixed to the wall-mounted base, it may happen that after installation the 0Mdication (off or blinking) in the display does not correspond to the actualstatusofthe relay.
Within 1 minute (max) of the chronothermostat being fixed to the base, the relay will be activated according to the Off or blinking) indication displayed.
4 - INSTALLATION

4.6) INSERTING OR REPLACING BATTERIES


Dispose of the exhausted batteries by throwing them into the special containers, being careful to comply with environmental protection standards.
Insert or replace with two 1,5V batteries type AA - LR6 taking care to position the poles correctly
USE ONLY HIGH-QUALITY ALKALINE BATTERIES (Duracell and Energizer are recommended)
Note: when changing batteries, the time available to perform the operation is about 1 MIN.
Slide the cover as shown in the figure opposite to reveal the first row of keys (programming keys); then slide again to reveal the battery compartment.


5 - PROGRAMMING THE CHRONOTHERMOSTAT
All settings must be confirmed by pressing OK, otherwise the chronothermostat returns to the previous settings after 2 minutes and the changes will not be saved.
Z
Upon inserting the batteries or following a general reset, (Reset paragraph 5.10, keeping the 6/DAYttons, POGed for 2 sec.): all sections that are on will appear on the display, after which, theblinkingdigitsrelativetothehourandminuteswill appear,asshowninthe figure opposite.
IMPORTANT: For the chronothermostat to work you must set the following: current hour, minutes, day and weekly program.

5.1/A) SETTING THE CURRENT TIME: HOUR - MINUTES
Use the ▲▼ keys to set the current time; pressing the key repeatedly increases and decreases the time by one minute and keeping the key pressed activates the rapid scroll. Press OK to confirm once the time is set (fig. 1).

5.1/B) SETTING THE CURRENT DAY OF THE WEEK
DAY After having set the time, the first day of the week (1: Monday) will blink on the display; select the current day by using the keys (e.g. 3 = Wednesday) and press OK to confirm (example fig.2).
P01 will blink in the display.

5.1/C) SELECTING THE PROGRAM
P04 The chronothermostat has 4 fixed program (see chapter 9 - pag. 128/129).
If one of these programs (P01÷P04) is suitable, press PROG repeatedly until the display shows the particular program, then press OK (example fig.3). The following will appear on the display: the number of the current day, the room temperature and the 24-hour temperature scale as set in the current blinking hour digit; the chronothermostat is running.
If none of these programs happens to be suitable, press PROG repeatedly until program P05 appears, then proceed as indicated in heading 5.2.

fig. 1

fig. 2

fig. 3
5 - PROGRAMMING THE CHRONOTHERMOSTAT

5.2 - FREE PROGRAM P05
Program P.05be programmed freely for every hour of the day on four different temperatures (1, 2, 3) differently for every day of the week.
Press BROG appear 05 the display.
Confirm the selection of program by pressing (fig.4)
The display will show the three digits relative to the time:00 with the day indicator
1 positioned on, Mohidaying. To select the temperatures for the time currently blinking, press the relative button. t1, t2, t3, t*
N.B.: press PROG to exit from P 05 without saving.
Setting the temperatures for Monday.
For each hour of the day, confirm the desired temperature (Comfort, Working, Economy, Antifreeze) by pressing t1, t2, t3, t * (the time is confirmed every time the key is pressed and the hour moves forward by one hour; the corresponding time is shown on the display) until the 24-hour curve for Monday is complete (ex. fig.6).
Note: the buttons t1, t2, t3, t can be pressed momentarily (1h forward at each touch) or pressed and held until the desired hour is reached (moving forward automatically 1h with each blink).
Note: pressing the button t* (Antifreeze) the digit not denoted on the 24-hour temperature scale.
It is also possible to program half-hours ( 1/2 h), as indicated in heading 5.3.
Should you make a mistake whilst setting the temperatures for Monday (the ▲▼ keys can be used to rapidly move to the time that is to be reset on the temperature scale: the corresponding time is shown on the display or press OK to confirm the setting.
When OK is pressed to confirm, the program set for Monday is saved in the memory, the dash will blink under Tuesday (2) and the digits relative to the time 0:00 will blink over the temperature scale for the previous day (fig.7 on the following page).


5 - PROGRAMMING THE CHRONOTHERMOSTAT
Setting the temperatures for Tuesday.
To use the same temperature scale as for Monday, presOK the same scale will be entered for Tuesday Wednesday willblinkunder ( ) and 3 the three digitswillreappear blinking on the time0:00
If the same temperature scale is NOT required, proceed by pressing t1, t2, t3, t* as described for Monday.
Note: the ▲▼ keys can be used to rapidly move to the time that is to be reset of the temperature scale; the corresponding time is shown on the display.
Having set the temperatures for Tuesday, press OK to confirm.
You must complete the daily profile for each day of the week, otherwise the program setting cannot be saved.
Once the temperature scale is entered for (4) days(1) to save and return to the Monday (1) setting, then press OK again for 4 seconds (fig. 9); this operation saves the complete weekly program.
The display will show: the number of the current day, the room temperature and the temperature scale over 24 hours, programmed with the current hour digit blinking: the chronothermostat is now in operation.
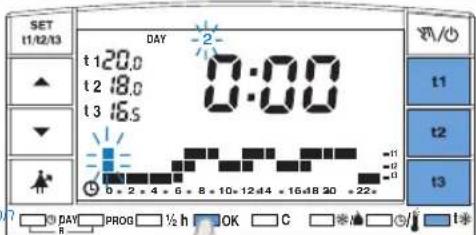
fig. 7
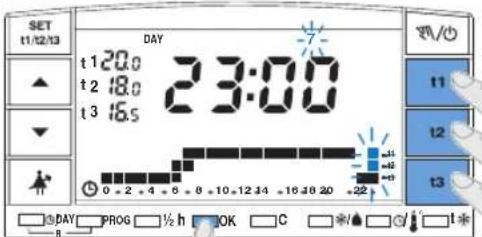
fig. 8

fig. 9
5 - PROGRAMMING THE CHRONOTHERMOSTAT

5.3 - PROGRAMMING HALF-HOUR ( 1/2 h)
For example, P05 setting, to program:
from h 06:00 to h 06:30 with temperature3 (economy)
from h 06:30 to h 07:00 with temperature1 (comfort)
1° Set temperature t3 for h 06:00: press t3 until the three blinking digits are set an hour later (h 07:00).
2° Press the button 1/2 h to return to the previous hour (h 6,30), the two digits for t1, t2 start blinking
3° Press t1to set thet1 temperature forthe second halfhour, for h06:00 the two t1 and t3 digits remain permanently alight, whilst the digits for the next hour (h 07:00) will blink.
5.4 - EDITING THE SET P05 PROGRAM (previously saved)
Press PROG OKess the programming page in order to edit the settings previously saved for the P05 program (fig. 10). If the day that must be changed is not Monday, pressOKtil the desired day is reached.
Use and t2,t3 it the daily profile, as described in heading 5.2.
Use the ▲▼ keys to move to the desired hour, which will be displayed. When the time is h 23:00 and the key ispressed, the time moves forward to 0:00
Press OK to save the daily profile, then move on to another day's profile or keep the OKkey pressed for 4 seconds to save the new weekly program.
Editing the profile of one day will not effect the following days and will be saved forthe day inquestion.
N.B.: PROG to exit from P 05 without saving.


5 - PROGRAMMING THE CHRONOTHERMOSTAT
5.5 - PROGRAMMING SUMMER - WINTER

The chronothermostat is factory-set for "winter" on, displayed as: (heating) fig.12. Under these conditions the appliance (burner) will be activated as described in the example:
Temperaturesetpoints: Burneroperationwithroomtemperature:
| t1 - Comfort = 20.0 °C | lower than 20.0 °C |
| t2 - Working = 18.0 °C | lower than 18.0 °C |
| t3 - Economy = 16.5 °C | lower than 16.5°C |
| t* - Antifreeze = 5 °C (can be set between 4 and 12 °C) | lower than 5.0 °C (or at a set *) |

If the controlled appliance is an air conditioner: press the buttoned "Summer" operation, displayed as these conditions the appliance conditioner) will be activated as described in the example:
Temperaturesetpoints: Airconditioneroperationwithroomtemperature:
| t1 - Comfort C higher than 20,0 °C | higher than |
| t2 - Working 22,0 °C | |
| - Economy t3 higher than 23,5 °C |
In either case, functionality of the device is confirmed when ON blinks.
N.B. If the anti-freeze temperature is set within the 24-hour thermal scale (digit not visible), the chronothermostat will not turn the air conditioner on at the set time.
Note: in either case, the SET temperature can be changed at any point in time, according to your needs (see paragraph 5.7).
5.6 - CHANGING HOUR, MINUTES, DAY OF THE WEEK
(E.g. Standard Time / Daylight Saving Time)
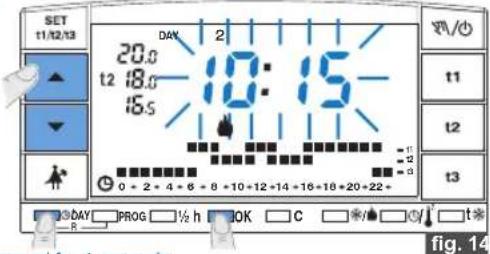
Keep Ⓐ/DAYpressed until the hour and minutes blink on the display (fig.14).
- (If necessary) use the ▲▼ keys to change the hour and minutes.
- In any case press OK to confirm: the hour and minutes will not blink whereas the day of the week will.
- Select the day of the week (if necessary) with the ▼ keys.
• In any case pressOK to confirm.
40 The chronothermostat returns to the program currently active.
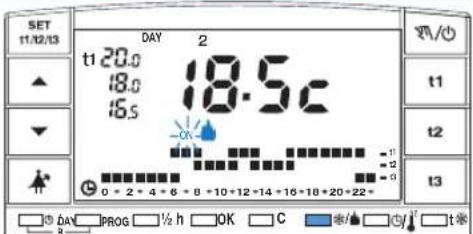
fig. 12

Keep pressed for 4 seconds
5 - PROGRAMMING THE CHRONOTHERMOSTAT

5.7 - CHANGING COMFORT, WORKING AND ECONOMY TEMPERATURES
If the factoryset temperatures:
t1 = 20,0 °C,t2 = 18,0 °C,t3 = 16,5 °C(winter)
t1 = 20,0 °C,t2 = 22,0 °C,t3 = 23,5 °C(summer)
do not happen to be suitable, they can be changed according to preference from +5 °C to +39 °C, bypassing the relative buttons (fig.15).
- Use SET (press repeatedly) to select the temperature set point that needs changing, indicated by the t1 o t2ink30gsymbol.
- Set the current set point by pressing buttons: ▲▼ momentarily. At each touch the value changes by 0,1 °C.
The new temperatures selected in this way will be the new set points (for all programs).
Approximately 8 seconds after the last key press, the screen will revert to displaying the thermostat's regular functions: the temperature SET indicator for the current time(1 or 12) will be displayed.

5.8 - SMART OPERATION (Auto)
In "smart" mode, the chronothermostat anticipates automatic activation of the connected device, so that the desired temperature is already reached at the set time, by a period of time which is automatically adjusted according to the characteristics of the system. Maximum early switch-on: 2 hours. Auto ON (device enabled) will appear and blink on the display when activation is anticipated.
To activate "smart operation" press and hold for at least 4 seconds.
Operation is indicated by: Auto
Keep pressed for 4 seconds to disable the function; the indicator disappears.
This function can be enabled in "Winter" mode as well as in "Summer" mode
Note: the settingwill not beeffected by a reset.

DECREASE TEMPERATURE
Important: the chronothermostat will accept temperature values that satisfy the following conditions: Winter: t1 greater than or equal to t2 greater than or equal to t3 Summer: t3 greater than or equal to t2 greater than or equal to t3
Example: Winter mode (heating)
- the chronothermostat is set to go on at h 8:00
- the comfort temperature is set at 20 °C

Necessary time to
Reach the set Temperature
The necessary time to reach the set temperature is automatically anticipated
5 - PROGRAMMING THE CHRONOTHERMOSTAT
5.9 - READ PROGRAMS
Press PROG: the display will show the program in use. If the program is one of the four fixed programs P01theP04play will automatically show the settings by groups of days (ex. fig.17-18).
Having read the program, press QKg.18) to return to it (if no confirmation is given, after 2 minutes the chronothermostat will revert to the program set initially). If the program in use is P.05 settings for each day will scroll automatically; after 2 minutes, program P.05 will be re-set automatically, otherwise keep OK pressed for at least 4 seconds.
Note: in read mode, programs are selected sequentially by pressing PROG.
With Read Programs activated, it is possible to replace the current program and/or change programP 05
- When you wish to change the current program, press PREGct the new program (P010erP04) OK pressing If you wish to set as the new program, press OK follow its program settings as explained in paragraph 5.2. If the P05 program has been previously set, keep preOKd for at least 4 seconds to confirm the program.
- Follow the instructions explained in paragraph 5.4 to edit program05.
5.10 - RESET
To clear unwanted data that may have been entered (e.g. after a programming test) press: ⑨/DAY and PROG simultaneously (approximately 2 seconds).
All segments of the display light up (general self-test).
Afterwards, the display will appear as in figure in chapter 5.1/A and the chronothermostat is ready to be programmed again.
Warning: the Reset does not affect the following functions, which remain in the memory: fixed temperature set points - pump activation 2 min/day (anti-scale cycle) - antifreeze temperature deselected or changed - smart operation (Auto) - differential setting and its relative value or proportional setting and its relative cycle - temperature correction (OFFSET) - temperature setting: °C or °F and number of seasonal hours of operation.

fig. 17

fig. 18

RESET (Press simultaneously for 2 sec.)
6 - ENERGY SAVING FUNCTIONS

6.1 - LIMITING SETTABLE TEMPERATURE VALUES
In some cases, when the chronothermostat is installed, for instance, in public offices, hotels, etc., it may be useful to limit the maximum and minimum temperature settings to avoid incorrect settings being entered by unauthorised personnel. The (maximum) and/or (t3 economy) temperature setting with the chronothermostat, or both, limited. This limitation can be applied to both winter seasons.
The relativesettings are stored and will not be deleted by a reset. The operation can be executed only with the program activated ( ).P 01÷ P 05 The figures at the side indicate: Winter mode; maximum temperature setting (t1) = 20 °C, minimum temperature setting (t3) =16.5 °C;
Setting a limit for the maximum temperature t1
Press SET 11/12/13 one or more times to select the t1 setting will blink) fig.20. Set the desired temperature with the ▲▼ keys. Press t1 and OK simultaneously within 8 seconds; at1d the set value will blink (fig.21). After a few seconds, the chronothermostat will return to the previously set program.
Setting a limit for the minimum temperature t3
Press SET one or more times to select the t3 setting. Set the desired temperature with the ▲▼ keys. Press t3 and OK simultaneously within 8 seconds; t3 and the set value will blink (fig.22). After a few seconds, the chronothermostat will return to the previously set program.
Unblocking the temperature limits
Press SET to select the value that is to be unblocked (t1 or t3) and the symbol together with the value of the set temperature will blink. Press the relative t key (t1 or t3) together with OK within 8 seconds; the unblocking process is confirmed when the digits showing the temperature stop blinking. After a few seconds, the chronothermostat will return to the previously set program.

fig. 20

fig. 21

fig. 22
6 - ENERGY SAVING FUNCTIONS

There are 2 manual modes, both of which have the effect of suspending the currentprogram:
A) Temporary manual operation
Briefly press: The symbol will blink on the display and the current temperature level will be applied to the remaining hours of the day (fig.23). Set the desired temperature for when inmanual mode by pressing t1, t2, t3; set the desired temperature by pressing the keys.
The temporary manual mode will automatically terminate at midnight of the current day.
A shorter time can be set as follows:
Press OK (fig.24) and the number of hours that the temporary manual mode will be active for will blink on the display. Set the desired duration with the ▲▼ keys, then press OK to confirm. Once the set number of hours passes, it will return to the set program.
To exit from the temporary manual mode and return to the set program, press W/O again: the thermal scale of the current day will show on the display, according to the program in operation before the temporary manual mode was activated.
B) Permanent manual operation
Press and hold the button until the symbol remains on the display permanently (4 seconds approx.); the current temperature level will be applied to all hours of the day (fig.25).
Select the temperature level desired by pressing t1, t2, t3 for * and set the desired temperature by pressing the keys.
Permanent manual operation remains active indefinitely; to deselect manual mode and return to automatic operation, (program) press/√.
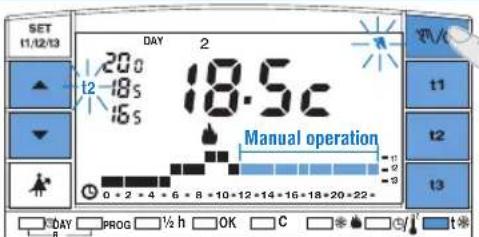
fig. 23

fig. 24
Keep pressed for 4 sec.
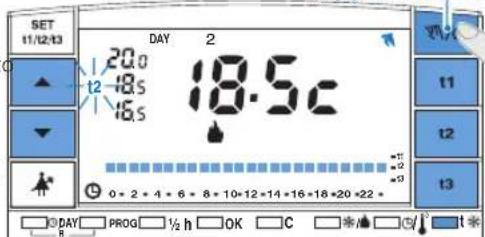
fig. 25
6 - ENERGY SAVING FUNCTIONS

6.3 -- P06 HOLIDAY PROGRAM
If you will be away from home for a few days select the program. P 06 Holiday
- Repeatedly press PROG, then pre06 appears on the display confirm (fig.26). OK to
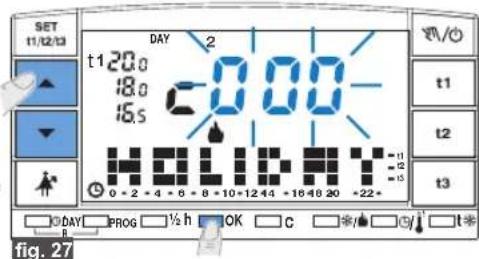
- The following will appear on the display: the day of the week, the symbol c, the word holiday and the digits will blink. 000
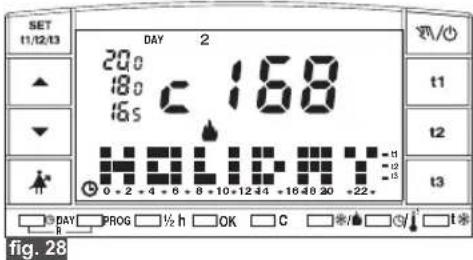
- Calculate the number of hours you will be away for (example: 168 hours = 7 days). The maximum number of hours you can enter Holiday mode a999
- Set the duration of your absence with the ▲▼ keys - pressing repeatedly will increase or decrease by one hour, keeping either key pressed will activate the rapid scroll.
- Press OK to confirm (fig.27).
As from this moment the chronothermostat will begin a countdown and the Holiday program will maintain the set anti-freeze temperature (ranging from 4 to 12 °C) until the countdown reaches zero.
Once the countdown ends, the Holiday program will activate your usual program (P01 ÷ P05), in order for you to find your home at the desired temperature upon your return.
Note: you can exit the HOLIDAY program earlier anyway, by pressing PROG then pressing OK. Use the keys to reset the hours left for your return to c000, then pressOK to confirm and return to your usual program.
Warning: if the antifreeze temperature is deselected permanently see heading 7.5) or in, summer operation will keep the controlled appliance desabled for the full programmed duration.

6 - ENERGY SAVING FUNCTIONS
6.4 - DISPLAYING CONSUMPTION CALCULATED CHECKING THE HOURS OF OPERATION OF THE APPLIANCE
The chronothermostat calculates and memorizes the hours of operation of the burner (and/or air conditioner) both during the 24 hours of the previous day and from the start of the season (total hours operation). This information is useful in monitoring (for indicative purposes) the energy consumption of the system. Total consumption for the system in litres (fuel oil) or cubic metres (natural gas) can be computed simply by multiplying the hourly consumption value (indicated on the data plates of the burner) by the hours operation.
• To display the operating timed during the last24 hours:
Briefly press (Fig.29) and the requested number of hours of operation will appear on the display.
- To display the total hours operating from the beginning of the season: press and hold C for at least 4 seconds (fig.30), and the total hours operation will appear.
- To reset the total hours operation from the beginning of theseason: press and hold for at least 8 seconds (until the temperature scale setting ends within 24 hours), then press OK simultaneously; 0000 will appear on the display for a few seconds (total hours device operation counter reset), release C and OK
Following the reset, the chronothermostat begins anew count of the total hours operation.

6.5 - EXCLUSION OF THE CHRONOTHERMOSTAT (OFF)
Press and hold button √/○ until OFF appears in the display, to indicate
that thechronothermostat isdeactivated (fig.31).
In this condition all functions of the chronothermostat are inactive; only the current hours continues to be displayed.
Pressing button again, the program setpreviously willresume.
Note: in this instance, the chronothermostat disables the anti-freeze function too.

fig. 29

fig. 30 Keep pressed for 4 sec.
Keep pressed for 8 sec.

fig. 31
6 - ENERGY SAVING FUNCTIONS

6.6 - SUSPENSION OF PROGRAM FOR ROOM CLEANING
When operating with programs P01he P05rolled appliance can
be deactivated for 3 hours, by pressing button, during which time the chronothermostat will switch to antifreeze mode (fig.32).
The activation of this function is shown by the absence of the digits denoting the 3 hours, starting from the current hour. Once the 3 hours have elapsed, the chronothermostat will revert to the program interrupted.
To reactivate the program interrupted before the end of the 3 hours, press button the missing digits will reappear.
Warning: if the antifreeze temperature is deselected permanently (see heading 7.5), or in "summer" operation, the controlled appliance will keep disabled for three hours.

6.7 - INDICATION OF SYSTEM TROUBLE
In Winter:
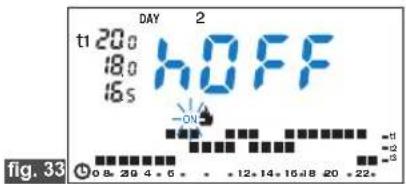
if, during normal operation ONlinking), the chronothermostat does not sense a significant rise in temperature within 2 hours, the display will indicate that the heating system isnotworking HQF5.
In Summer
if, during normal operation ONlinking), the chronothermostat does not sense a significant rise in temperature within 2 hours, the display will indicate that the heating system is not working OFF.
The indication will disappear automatically as soon as a significant rise (winter) or drop (summer) nature has registered.
Note: in both cases, the relay remains ON (device is enabled)


7 - PROGRAMMABLE FUNCTIONS FOR USE WITH DIFFERENT APPLIANCES

7.1 - TEMPERATURE DIFFERENTIAL (ON/OFF)
The chronothermostat operates (factory set) in differential mode ON-OFF with a differential value factory-set to 6 °C
The differential value must be set according to the system's thermal inertia; a low value is recommended for systems with radiators (e.g. in cast iron) and a high value for systems with fan coils.
The differential value may be displayed and changed as follows:
- Ensure that the DIFFERENTIAL ON/OFF mode is selected as shown in paragraph. 7.3.
- Press and hold t1 until the existing differential value blinks on the display, e.g. d0.6c
- Change the value (from 0,2 °C to 2 °C) using the buttons ▲ or ▼ which give increments of 0,1 °C; press OK 3 times once the desired value is reached to return to the set program.

7.2 - PROPORTIONAL OPERATION
As opposed to the differential, the temperature can be adjusted proportionally with adjustable cycles of 7, 10, 15 or 20 minutes. This system maintains the desired temperature more stable by increasing the user's sense of comfort and saving on energy consumption.
The duration of the cycle can be viewed and changed as follows:
- Ensure that the PROPORTIONAL mode is selected as shown in paragraph 7.3.
- Press t1 until the cycle in progress blinks on the display e.g. P 10 (factory set).
- Select the desired cycle by pressing ▲ or ▼ (P 07 = 7 minutes; P 10 = 10 minutes; P 15 = 15 minutes; P 20 = 20 minutes); press OK 3 times to return to the set program.
Note: the setting will not be effected by a reset.

Note: the setting will not be effected by a reset.

Setting example t = 20 °C - Cycle = 10min
t = 20.5 °C Device isalways off
t = 20.4 °C Device is1 min ON-9 minOFF
t = 20.3 °C Device is2 min ON- 8 minOFF
t = 20.2 °C Device is3 min ON-7 minOFF
t = 20.1 °C Device is4 min ON-6 minOFF
t = 20.0 °C Device is5 min ON- 5 minOFF
t = 19.9 °C Device is 6 min ON-4 min OFF
t = 19.8 °C Device is7 min ON-3 minOFF
t = 19.7 °C Device is8 min ON-2 minOFF
t = 19.6 °C Device is9 min ON- 1 minOFF
t = 19.5 °C Device isalways on

Recommended: a long cycle for systems with high thermal inertia (cast iron radiators, floor systems); a short cycle for systems with low thermal inertia(fan coils).
7 - PROGRAMMABLE FUNCTIONS FOR USE WITH DIFFERENT APPLIANCES

7.3 - SELECTING THE TEMPERATURE SETTING MODE (DIFFERENTIAL ON/OFF or PROPORTIONAL)
This procedure allows you to select the temperature setting mode: either DIFFERENTIAL ON/OFF or PROPORTIONAL.
- Keep placeof# either or
DIFFERENTIAL ON/OFF
ProP = PROPORTIONALblinks on the display.
- Select the desired mode via the keys.
- Press OK confirm and return to the set program.
Note: the setting will not be effected by a reset.

7.4 - TEMPERATURE CORRECTION (OFFSET)
If for any reason the chronothermostat must be installed in a position where the detected temperature can be effected (e.g. an external wall, which in winter is generally colder than the rest of the house), a temperature offset value (temperature correction) can be set between -1.9 and 1.9 °C.
- Keep t1g.38) pressed until either the Differential set value (example) d06c the Proportional mode cycle duration (exampleP) links on the display.
- Press OKnoveontosetthetemperaturecorrection(Offset)fig.38.
- Set the desired value by pressing the ▼ keys.
- Press OK twice to confirm and return to the set program.
The room temperature correction implemented, will have effect after a few seconds.
Note: the setting will not be effected by a reset.
Fig.39 - example of temperature correction setting (Offset): -1.2 °C


7 - PROGRAMMABLE FUNCTIONS FOR USE WITH DIFFERENT APPLIANCES
7.5 - TOTAL DESELECTION OF ANTIFREEZE TEMPERATURE
This function allows the thermoregulation to be deactivated when operating with the antifreeze temperature selected.
Function on: when utilizing the antifreeze temperature t*, thermoregulation is activated with a fixed factory set point of 5°Cch can be set between and 12°C.
Function off: when utilizing the antifreeze temperature t*, thermoregulation is deactivated (use only for systems filled with antifreeze fluid in circuit).
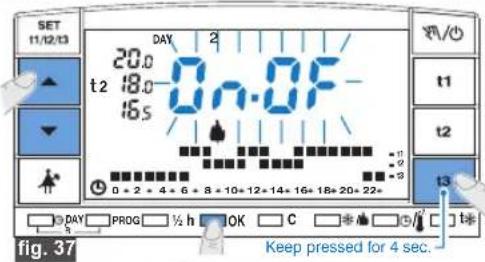
To program the function, press and hold t * (fig.40) until the display shows the caption ON 5.0c (function on)orOFF 5.0c (function off)
- Press ▼ to disable the function, then press OK to confirm and return to the set program.
- Press ▲ to activate the function, then press OK twice to confirm and return to the set program.
Note: this programmed status will not be cleared by a reset.

Note: this function is factory set to "selected" status and can be deactivated only in heating mode (winter
7.6 - SETTING THE ANTI-FREEZE TEMPERATURE
The anti-freeze temperature setting is factory set at 5, however, you can
set a different value between 4°C.12°C
- Keep bimpressed until 5.0c (fig.40).
- If the anti-freeze function is enabled (ON will blink on the display) move on to the next point, otherwise press to activate it.
- Press OK will stop blinking.
- Set the desired value bypassingthe▲▼ keys.
- Press to confirm and return to the set program (fig.41).
Note: the setting will notbeefectedbyareset.

Note: the anti-freeze temperature setting can only be set when in heating mode (). winter
7 - PROGRAMMABLE FUNCTIONS FOR USE WITH DIFFERENT APPLIANCES

7.7 - ANTI-SCALE CYCLE
When this function is selected, the chronothermostat relay will trip every day at 12:00 and activate the controlled appliance (pump, valve) for 2 minutes in order to avoid the formation of scale and prevent seizure that could be caused by prolonged inactivity.
Note: this function is factory set as disabled.
To activate the function, press and hold uQK(function of PU or -
ON PU--(function on) blinks on the display
To activate the functionpress the button.
To deactivate the function press the button.
Press (fig.42) to confirm . and return to the set program
Note: the setting will not be effected by a reset.

7.8 - SETTING THE TEMPERATURE SCALE
The chronothermostat's temperature scale is factory set in degrees Centigrade - to switch to Fahrenheit:
- Keep t1 (fig.43) pressed until either the Differential set value (example d06c) or the Proportional mode cycle duration (example P 10 ) blinks on the display.
- PressOK twice and symbolc will blink on the display.
- Press or to switch from to °C or vice versa.
- Press OK (fig.44) to confirm and return to the set program; all the temperature settings will be updated according to the new scale.
Note: the setting will not be effected by a reset.

fig. 42
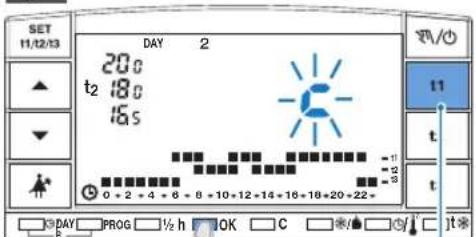
fig. 43
Keep pressed for 4 sec.
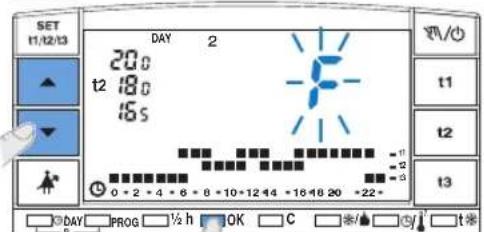
fig. 44
8 - ACTIVATION VIA TELEPHONE PROGRAMMER

8.1 - TELEPHONE PROGRAMMER OPERATING MODE

The telephone programmer allows you to control the chronothermostat from a distance by acting on the contact made at terminals and (see paragraph 4.4 - Electrical Connections).
| Telephone programmer | Chronothermostat function |
| Closed contact | in permanent manual t1 comfort mode |
| Open contact | in permanent manual t* anti-freeze mode |
Closing the contact: When the chronothermostat is set in temporary/permanent manual mode or Holiday mode, it is set in permanent manual mode with temperature settings. will blink and will remain fixed on the display to indicate the contact (fig. 45).
You can return to the previously set program (P01-P02-P03-P04-P05) by pressing on the chronothermostat. will remain fixed on the display to indicate that the programmer's contact is still closed and it can be opened at a later stage (fig.46).
Opening the contact: The chronothermostat is set in permanent manual mode with t and freeze shown in fig.47 (the air conditioner goes off if the chronothermostat functions in cooling mode). 📞 will blink and 📞 will remain fixed on the display to indicate the contact. Press 🐦 on the chronothermostat to return to the set program.
Note: the opening and closing commands are effective within 1 minute.


- 5° C ÷ + 50° C
-10 °C ÷ + 65 °C
LVD / EMC EN60730-2-7 EN60730-2-9
4.5) FIXATION OU DEPOSE DE LA BASE DU CHRONOTHERMOSTAT
3°

5 - PROGRAMMATION DU CHRONOTHERMOSTAT
fig. 1
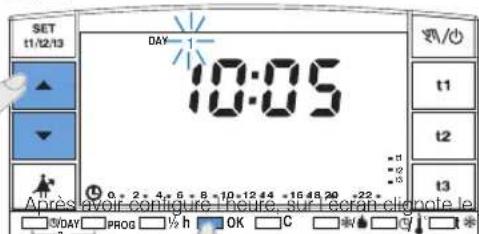
fig. 2
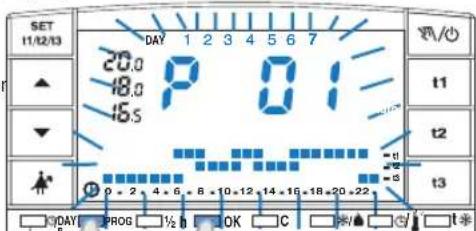
fig. 3
5 - PROGRAMMATION DU CHRONOTHERMOSTAT

5.2 - PROGRAMME LIBRE P 05
5 - PROGRAMMATION DU CHRONOTHERMOSTAT
5 - PROGRAMMATION DU CHRONOTHERMOSTAT

5.3 -PROGRAMMATION DE LA DEMI HEURE
5 - PROGRAMMATION DU CHRONOTHERMOSTAT
5.5 - PROGRAMMATION ÉTÉ - HIVER

5 - PROGRAMMATION DU CHRONOTHERMOSTAT

5.7 - MODIFICATION DES TEMPÉRATURES CONFORT, ACTIVITÉ ET ECONOMIE
t1 = 20,0°C, t2 = 18,0°C, t3 = 16,5°C (hiver)
t1 = 20,0°C, t2 = 22,0°C, t3 = 23,5°C (été)
5 - PROGRAMMATION DU CHRONOTHERMOSTAT
5.9 - LECTURE DES PROGRAMMES INSÉRÉS
6.2 - FONCTIONNEMENT MANUEL
6.5 - EXCLUSION DU CHRONOTHERMOSTAT (OFF)
fig. 47
BESCHREIBUNG
DEUTSCH
- DIFFERENTIAL (Standard)
PROPORTIONAL
Temperaturgradient:
3°


6.3 - PROGRAMM HOLIDAY P 06
3°

2°
fig. 6
t1 t2 23,0 °C, = 18,0 °C, = 16,5°C (invierno)
t1 t2 30,0 °C, = 22.0 °C, =23.5°C(verano)
This symbol on the product or its packaging to indicates that this product shall not be treated as household waste.
Instead, it shall be handed over to the applicable collection point for the recycling of electrical and electronic equipment, such as for example:
- sales points, in case you buy a new and similar product
- local collection points (waste collection centre, local recycling center, etc...).
By ensuring this product is disposed of correctly, you will help prevent potential negative consequence for the environment and human health, which could otherwise be caused by inappropriate waste handing of this product.
The recycling of materials will help to conserve natural resources. For more detailed information about recycling of this product, please contact your local city office, your house hold waste disposal service or the shop where you purchased the product.
Attention: in some countries of the European Union, the product is not included in the field of application of the National Law that applies the European Directive 2002/96/EC and therefore these countries have no obligation to carry out a separate collection at the "end of life" of the product.

TRAITEMENT DES APPAREILSÉLECTRIQUES ET ÉLECTRONIQUES EN FIN DE VIE (directive EU 2002/96/CE)
Please read this instruction booklet carefully and keep it for future reference. The manufacturer reserves the right to make all technical and manufacturing modifications deemed necessary without prior notice.
FR
- CRONOTERMOSTATO DIGITALE DA PARETE WALL MOUNTING DIGITAL CHRONOTHERMOSTAT CHRONOTHERMOSTAT DIGITAL POUR MONTAGE EN SAILLIE DIGITAL RAUMTHERMOSTATUHR WANDMONTAGE CRONOTERMOSTATO DIGITAL DE SUPERFICIE
- 6.3 - PROGRAMMA HOLIDAY P 06
- INDEX
- TECHNICAL SPECIFICATIONS
- GENERAL VIEW AND KEY FUNCTIONS
- INSTALLATION
- INSTALLATION GUIDELINES
- FIXING BASE
- ELECTRICAL CONNECTIONS
- EXAMPLES OF ELECTRICAL CONNECTIONS
- ATTACHING OR REMOVING THE CRONOTHERMOSTAT FROM ITS BASE
- PROGRAMMING THE CHRONOTHERMOSTAT
- Z
- 5.1/A) SETTING THE CURRENT TIME: HOUR - MINUTES
- 5.1/B) SETTING THE CURRENT DAY OF THE WEEK
- 5.1/C) SELECTING THE PROGRAM
- 5.2 - FREE PROGRAM P05
- SETTING THE TEMPERATURES FOR MONDAY
- IT IS ALSO POSSIBLE TO PROGRAM HALF-HOURS ( 1/2 H), AS INDICATED IN HEADING 5.3
- SETTING THE TEMPERATURES FOR TUESDAY
- 5.3 - PROGRAMMING HALF-HOUR ( 1/2 H)
- 5.4 - EDITING THE SET P05 PROGRAM (PREVIOUSLY SAVED)
- 5.5 - PROGRAMMING SUMMER - WINTER
- TEMPERATURESETPOINTS: BURNEROPERATIONWITHROOMTEMPERATURE
- TEMPERATURESETPOINTS: AIRCONDITIONEROPERATIONWITHROOMTEMPERATURE
- IN EITHER CASE, FUNCTIONALITY OF THE DEVICE IS CONFIRMED WHEN ON BLINKS
- 5.6 - CHANGING HOUR, MINUTES, DAY OF THE WEEK
- 5.7 - CHANGING COMFORT, WORKING AND ECONOMY TEMPERATURES
- 5.8 - SMART OPERATION (AUTO)
- 5.9 - READ PROGRAMS
- 5.10 - RESET
- ENERGY SAVING FUNCTIONS
- 6.1 - LIMITING SETTABLE TEMPERATURE VALUES
- SETTING A LIMIT FOR THE MAXIMUM TEMPERATURE T1
- SETTING A LIMIT FOR THE MINIMUM TEMPERATURE T3
- UNBLOCKING THE TEMPERATURE LIMITS
- TEMPORARY MANUAL OPERATION
- PERMANENT MANUAL OPERATION
- 6.3 -- P06 HOLIDAY PROGRAM
- 6.4 - DISPLAYING CONSUMPTION CALCULATED CHECKING THE HOURS OF OPERATION OF THE APPLIANCE
- 6.5 - EXCLUSION OF THE CHRONOTHERMOSTAT (OFF)
- 6.6 - SUSPENSION OF PROGRAM FOR ROOM CLEANING
- 6.7 - INDICATION OF SYSTEM TROUBLE
- IN WINTER
- IN SUMMER
- PROGRAMMABLE FUNCTIONS FOR USE WITH DIFFERENT APPLIANCES
- 7.1 - TEMPERATURE DIFFERENTIAL (ON/OFF)
- 7.2 - PROPORTIONAL OPERATION
- 7.3 - SELECTING THE TEMPERATURE SETTING MODE (DIFFERENTIAL ON/OFF OR PROPORTIONAL)
- 7.4 - TEMPERATURE CORRECTION (OFFSET)
- 7.5 - TOTAL DESELECTION OF ANTIFREEZE TEMPERATURE
- 7.6 - SETTING THE ANTI-FREEZE TEMPERATURE
- 7.7 - ANTI-SCALE CYCLE
- 7.8 - SETTING THE TEMPERATURE SCALE
- ACTIVATION VIA TELEPHONE PROGRAMMER
- FIXATION OU DEPOSE DE LA BASE DU CHRONOTHERMOSTAT
- 3°
- PROGRAMMATION DU CHRONOTHERMOSTAT
- 5.2 - PROGRAMME LIBRE P 05
- 5.3 -PROGRAMMATION DE LA DEMI HEURE
- 5.5 - PROGRAMMATION ÉTÉ - HIVER
- 5.7 - MODIFICATION DES TEMPÉRATURES CONFORT, ACTIVITÉ ET ECONOMIE
- 5.9 - LECTURE DES PROGRAMMES INSÉRÉS
- 6.2 - FONCTIONNEMENT MANUEL
- 6.5 - EXCLUSION DU CHRONOTHERMOSTAT (OFF)
- BESCHREIBUNG
- DEUTSCH
- 6.3 - PROGRAMM HOLIDAY P 06
- TRAITEMENT DES APPAREILSÉLECTRIQUES ET ÉLECTRONIQUES EN FIN DE VIE (DIRECTIVE EU 2002/96/CE)
- FR
Brand : Perry
Model : DECRNN032
Category : Thermostat