VB X001 - Car stereo VoxBox - Free user manual and instructions
Find the device manual for free VB X001 VoxBox in PDF.


| Product Type | Car Stereo |
| Brand | VoxBox |
| Model | VB X001 |
| Display | 3.0" TFT LCD (400x240 pixels) |
| Dimensions (W x H x D) | 178 x 50 x 130 mm |
| Weight | 0.62 kg |
| Power Supply | 12V DC (9-16V), negative ground |
| Amplifier Output | 4 x 45W max |
| Speaker Impedance | 4-8 Ohm |
| Frequency Range | 20 - 20,000 Hz |
| Radio Bands | FM (87.5-108 MHz) and AM (522-1620 kHz) |
| RDS Functions | AF, EON, TA, TP, PTY, PS |
| Preset Stations | 18 FM + 12 AM (30 total) |
| Media Compatibility | USB, SD/SDHC/MMC (up to 32GB, FAT16/32) |
| Audio Settings | Bass, Treble, Balance, Fader, EQ (Flat/Classic/Rock/Pop), Loudness |
| Connectivity | AUX 3.5mm input, 2x RCA video inputs, 2x RCA video outputs, 2x RCA preamp outputs |
| Rear Camera Input | Dedicated RCA input with reverse trigger (+12V) |
| Remote Control | Included with CR2025 battery |
| Operating Temperature | -10°C to +50°C |
| Fuse | F8A / 250V (5x20mm) |
| Cleaning | Soft dry cloth; avoid liquids and abrasives |
| Safety | Disconnect battery before installation; do not disassemble; use only in 12V negative ground vehicles |
| Spare Parts & Repairability | Contact authorized service center; no user-serviceable parts |
Frequently Asked Questions - VB X001 VoxBox
User questions about VB X001 VoxBox
0 question about this device. Answer the ones you know or ask your own.
Ask a new question about this device
Download the instructions for your Car stereo in PDF format for free! Find your manual VB X001 - VoxBox and take your electronic device back in hand. On this page are published all the documents necessary for the use of your device. VB X001 by VoxBox.
USER MANUAL VB X001 VoxBox
text_image
TONE MUTE MENU MOVE PHOTO MUSIC RADIO PTY RST AUX What's the matter cop? USB- SDMPEG

RDS RADIO DATA SYSTEM
MP3
USB : UNIVERSAL SERIAL BUS
SD
SD HC
MMC
natural_image
Illustration of a black electronic device with labeled ports (no text or symbols beyond labels)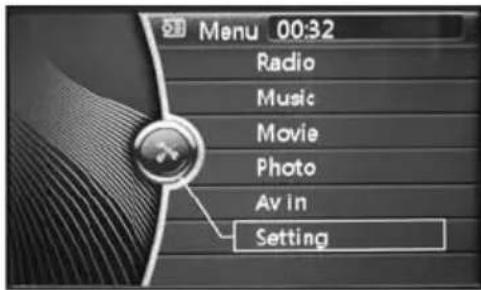
text_image
Menu 00:32 Radio Music Movie Photo Av in Setting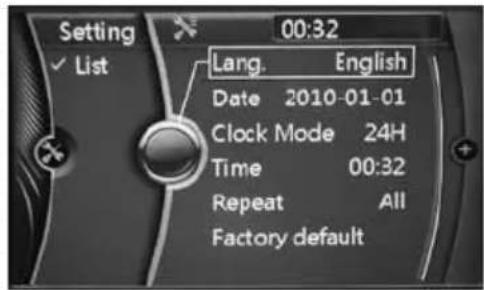
text_image
Setting ✓ List 00:32 Lang. English Date 2010-01-01 Clock Mode 24H Time 00:32 Repeat All Factory default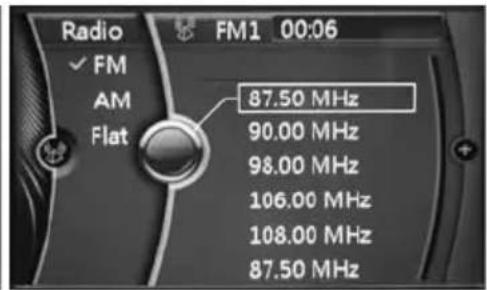
text_image
Radio FM1 00:06 ✓ FM AM 87.50 MHz Flat 90.00 MHz 98.00 MHz 106.00 MHz 108.00 MHz 87.50 MHz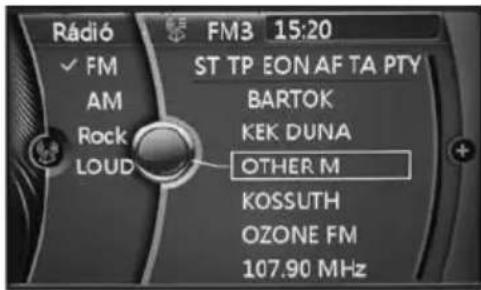
text_image
Rádió FM3 15:20 ✓ FM AM Rock LOUD ST TP EON AF TA PTY BARTOK KEK DUNA OTHER M KOSSUTH OZONE FM 107.90 MHz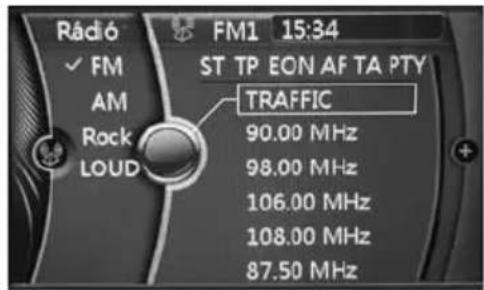
text_image
Rádio FM1 15:34 ✓ FM ST TP EON AF TA PTY AM TRAFFIC Rock 90.00 MHz LOUD 98.00 MHz 106.00 MHz 108.00 MHz 87.50 MHz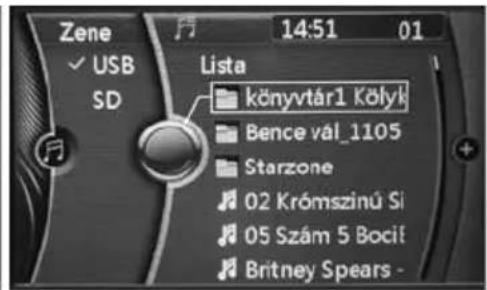
text_image
01:01:10 01:24:10
- multifunctional 3.0" TFT LCD display • 6 language menu (GB/HU/SK/RO/SRB/SL) • radio/music/photo/video playback • AM/FM RDS - EON radio • 30 programmable radio stations • traffic information data reception • display of radio station's name • alternate frequency monitoring • USB/SD/SDHC/MMC compatibility • secure, hidden SD card slot • direct track access • folder management/shifting/quick search • clock and track information • 3.5 mm AUX input for portable devices • 4x 45 W Hi-Fi speaker output • 2x RCA amplifier/subwoofer output • dedicated rear-view camera connector • 2x video inputs & 2x video outputs • 2x rear monitor options for passengers
SetUP
CONtROLS aND CONNeCtORS
Figure 1
| 1. meNU men | u functions / Shifting upward | among directories |
| 2. | power on and off | |
| 3. mOvle selecting video playback mode | ||
| 4. tONe audio settings: VOL / BAS / TRE / BAL / FAD / EQ / LOUD (VOL+/-) | ||
| 5. PHOtO selection of photo viewing mode | ||
| 6. mUte speakers off or on | ||
| 7. SeLeCtOR rotate / press: volume, advance, select, play/pause | ||
| 8. IR IR remote sensor | ||
| 9. CH- track search / advance during playback | ||
| 10. DISPLaY multifunctional colour TFT LCD display | ||
| 11. CH+ track search / advance during playback | ||
| 12. USB/SD USB & SD/SDHC/MMC memory card slot | ||
| 13. mUSIC selecting audio playback mode | ||
| 14. RaDIO radio mode / bands / automatic tuning, storing | ||
| 15. PtY | program type monitor / display | |
| 16. RSt | restore factory settings | |
| 17. aUX | stereo input socket for 3,5 mm jack | |
| 18. | ta | activation of traffic information messages and bulletins |
| 19. | advance and quick search / radio tuning | |
| 20. aF | alternate frequency monitoring and automatic changeover | |
| 21. | advance and quick search / radio tuning | |
Figure 2
| 1. aNt IN DIN | antenna socket | |
| 2. | LINe 0Ut | audio output for connecting external amplifier or active subwoofer |
| 3. vIDe0 0Ut | 2 video outputs for external monitors | |
| 4. m4 | M4 thread screw for mounting the unit | |
| 5. | ISO IN / 0Ut | socket accepting iso connector pair (power and speaker connections) |
| 6. +12 v IN | +12V for triggering rear-view camera input | |
| 7. CameRa IN | video input for rear-view camera | |
| 8. av IN | menu activated video input (AV in) | |
Figure 3
| 1. check mark before the selected radio band (FM / AM) |
| 2. textual indication of operating mode |
| 3. selectable bands (FM / AM) |
| 4. graphic indication of operating mode |
| 5. display of band sections (FM1-FM2-FM3-AM1-AM2) |
| 6. current time display |
| 7. loudness display |
| 8. display of selected EQ preset |
| 9. 5 x 6 radio programs (frequency, RDS name, program type) |
| 10. ST: Illuminates when good quality stereo reception is available |
| 11. TP: Radio stations marked as such transmit traffic information |
| 12. EON: Monitoring of other networks for traffic information |
| 13. AF: Alternate frequency search |
| 14. TA: Allows traffic information messages to be audible |
| 15. PTY: Program type; active program genre display |
Figure 4
USB/SD/SDHC/MMC USB & SD/SDHC/MMC memory card slot
Before using the product for the first time, please read the instructions for use below and retain them for later reference. The original instructions were written in the Hungarian language.
This appliance is not intended for use by persons (including children) with reduced physical, sensory or mental capabilities, or lack of experience and knowledge, unless they have been given supervision or instruction concerning use of the appliance by a person responsible for their safety. Children should be supervised at all times to ensure that they do not play with the appliance.
After unpacking, please, check the device for possible transport damages. Keep the packaging away from children, if it contains bags or other potentially dangerous components.
RESETTING THE UNIT
The microprocessor data requires resetting in situations where the power supply is lost or the unit (including its display) acts erratically. In order to do so, press the RST (RESET) button below the rotating knob using a sharp object. This will clear all stored data and return the unit to factory default condition. This operation is required after installation, before switching on the unit for the first time, and when the vehicle's battery is replaced.
SETUP & SWITCHING ON / OFF
Press the ⏻ button to power the unit on. The unit will switch to RADIO mode after being switched on for the first time.
- Later on, it will automatically switch to the most recently used function after being switched on unless the external storage device has been removed in the meantime.
- Since voltage surges can occur when the vehicle's engine is started, only turn on the unit after the engine has been started. Turn off the unit before stopping the engine. To turn off the unit, press the ⏻ button.
ADJUSTING VOLUME
Use the rotating knob to set the desired volume level.
- If the unit is in any particular setting mode, you will need to exit the mode first.
• The volume can be adjusted in a range of 00 to 40.
BASIC SETTINGS & SELECTING THE DESIRED LANGUAGE
Press the MENU button then use the rotating knob to select the lowest SETTING function then press the rotating knob. The Setup menu appears. The following parameters can be adjusted: menu language, date, 12/24-hour time format, current time, repeat, factory settings.
The desired function can be selected using the rotating knob, which can then be modified by pressing the rotating knob.
Language: With the top row selected, repeatedly press the rotating knob until the desired language is displayed (GB / HU / SK / RO / SRB / SLO)
Date: Selecting the second row, press the rotating knob then rotate it to set the year. Pressing it again will allow you to set the month then pressing it again will allow you to set the day.
Clock mode: Selecting the third row, press the rotating knob to select 12-hour (AM/PM – morning/afternoon) or 24-hour display mode for the clock.
Current time: The fourth row can be used to set the clock just like the date.
Repeat: Setting for playback of tracks on connected external storage (USB/SD): Repeat off / Repeat current track / Repeat all tracks.
Factory default: By selecting this row and pressing the rotating knob will reset the unit to the factory defaults.
After completing the settings, press the MENU button. The menu will appear in the desired language then after a brief moment shift to RADIO mode.
- The CH-/CH+ buttons can be used instead of the rotating knob for adjusting the settings.
SELECTION OF SIGNAL SOURCE
The source to be listened to or viewed can be selected in two ways:
A., Press one of the following buttons: RADIO / MUSIC / PHOTO / MOVIE
B., It can also be selected using the menu by pressing the MENU button and the rotating knob.
- The given signal source cannot be activated unless it is available. For example, if no storage device is connected on which the appropriate files can be found (songs, photos or films).
- Press the MENU button repeatedly to go higher in the directory hierarchy. Any directory can be selected by turning the rotating knob then pressing it.
- On switching on the unit, the previously played track will continue playing unless the device containing it has been removed.
- If there are external devices connected to both the USB and SD sockets, the MUSIC button can be used to select between them. The use of SD cards is preferred on account of their secure and protected location on the unit.
• After connecting, the external unit connected last will be the one that will start playing.
- A check mark appears in front of the symbol corresponding to the selected signal source after USB or SD devices are inserted.
AUDIO SETTINGS & EQ
Repeatedly and briefly press the TONE button to select the parameter to be adjusted: VOL / BAS / TRE / BAL / FAD / EQ / LOUD. Adjustment is possible using the rotating knob.
- Unless an adjustment is made within 4 seconds, the unit will automatically revert to the previous function.
- By default, the rotating knob will adjust the volume.
- The window that appears when adjusting audio settings will show the length of the current track and the elapsed time.
- When listening at high volume, do not set the bass and treble too high, as this may lead to distortion! The recommended setting is FLAT..
| VOLUME volume adjustment (00 – 40) |
| BASS bass level adjustment (-7...0...+7) |
| TREBLE treble level adjustment (-7...0...+7) |
| BALANCE left and right channel balance (L7...0...R7) |
| FADER front and rear channel volume fader (R7...0...F7) |
| EQUALIZATION EQ settings (FLAT / CLASSIC / ROCK / POP) |
| LOUDNESS loudness control (LOUD OFF / LOUD ON) |
LOUDNESS
Human hearing is less sensitive to low and high frequency sound at low volumes. By turning on the LOUD function, the automatic EQ compensates for this phenomenon at lower volumes. It is recommended to be turned off at higher volumes because it can cause the sound to be distorted.
- For the benefit of better sound quality, before using this function, we recommend selecting the setting EQ FLAT and setting the bass and treble controls to "0."
- The higher the volume, the less effect will automatic loudness correction will have on the sound.
USING THE RADIO
After the unit is switched on the radio will turn on if it was being previously listened to – or the USB/SD signal source last played has been removed.
If necessary, use the RADIO button to select the radio function. The FM1-FM2-FM3 and AM1-AM2 bands are accessible by pressing it repeatedly.
MANUAL TUNING & STORING STATIONS
Using the RADIO button, select the FM1 band. You can verify this at the top row of the display. Select the first row using buttons CH-/CH+ (Program position 1) then press the rotating knob for confirmation. Briefly keep pressing the ◀◀ ▶▶ buttons to manually tune in the desired radio station. Keep the same buttons pressed for automatic search (TA SEEK indication). The tuning will stop at the next radio station. Any stations found can be stored under the first preset by pressing the rotating knob. If the radio station has RDS service and the PTY function is active on the unit, the display will alternately show the broadcast frequency, the name of the radio station and the program type (e.g., POP MUSIC). To store a new radio station under the second preset, press the CH+ button then, after selecting the second row, press the rotating knob. Then search for the program to be stored here as described above then save it by pressing the rotating knob and proceed to the third preset.
- Atotal of 18FM and 12 AM radio stations can be stored. By repeatedly pressing the RADIO button select an option from among FM1-FM2-FM3 or AM1-AM2. Six stations can be stored for each band. If for example preset (row) 4 is selected in band FM2, then band FM2 will need to be selected first (RADIO) and then row 4 selected. Be sure to press the rotating knob after selection. Only then will the saved preset be able to be listened to.
- If a given preset is in use, its content will be erased and a new station frequency stored in its place.
- Whenever a station with good reception is being received, the indicator ST (stereo) will illuminate on the display.
- If the unit is being used at a distance from the original tuned location – such as when travelling – the same station might have to be tuned in again on a different frequency. The same program is broadcast on different frequencies in different geographical locations! This inconvenience can be avoided if the station being listened to features RDS and you activate the AF (Alternate frequency) feature on your unit.
AUTOMATIC TUNING AND STORING
Keep the RADIO button pressed for 2 seconds to automatically search for and store the radio stations available in the current area. Tuning and storage progress can be monitored on the display. Each receivable frequency is checked. The better the conditions for reception, the more stations will be found.
- Please remember that the unit may skip stations with weaker reception, and the stations may be stored in a sequence different from what you have defined.
- Select manual tuning and preset storage in order to perform custom settings.
SELECTION OF STORED RADIO STATIONS
Use the RADIO button the select the desired band (e.g., FM1) then using buttons CH-/CH+ go to any of the programs in rows 1 to 6 currently displayed. Then press the rotating knob to listen to the selected program.
- If there is too much delay between operations, the unit will revert to its previous status.
- If the ST stereo indicator does not illuminate when a stereo signal is received, the reception is probably weak or the antenna is inappropriate.
FM RDS FUNCTIONS
The Radio Data System is used to transmit digitalis information in FM radio broadcasts. This textual information is displayed on radio displays if the broadcasting station and the receiver feature RDS and it has been activated. Such information includes for example the name of the radio station, the program type, etc., which varies depending on the station and radio. Apart from the display of textual information extra services are also generally accessible. They include the following in the case of this radio:
- AF – alternate frequency (if the current station can be received on another frequency in better quality, the unit automatically switches over to that frequency; this is useful when travelling because the unit searches for a station broadcasting the same program with a stronger signal)
Press the AF button briefly and check at the top of the display whether the function has been activated.
- PS – program service (displays the radio station's name in up to 8 characters at a time.
Operates continuously a basic RDS function.
- PTY* – program type (radio station identification according to predefined genre)
Pressing the PTY button briefly will display the program types of the RDS stations available in the area such as POP MUSIC, NEWS, etc. When active, not only the broadcasting frequency and the station name will alternate on the display, but the broadcast program type as well. The message NO PTY indicates that no such information is available.
- TP – Radio stations marked TP regularly broadcast traffic information
Operates continuously a basic RDS function
- EON – the unit constantly monitors other networks for traffic information.
Operates continuously a basic RDS function
- TA – The active TA function allows traffic and road information announcements to be heard. When an announcement is received the volume of the radio will increase or unmute if muted, and the text TRAFFIC will appear on the display. If music or a movie is being played back from a USB/SD source, it will pause during the announcement then playback will continue and settings will be restored.
Press the TA button briefly and check at the top of the display whether the function has been activated
- Some characters may occasionally appear incorrectly or not at all. This can affect special and accented characters and is not a malfunction.
* As an option, depending on the reception area, the following PTY program types can be displayed:
| NEWS | News | ROCK MUSIC | Rock music | PHONE IN | Phone-in |
| AFFAIRS | Current affairs | EASY MUSIC | Easy listening | TRAVEL | Travel |
| INFO | Information | LIGHT MUSIC | Light music | LEISURE | Leisure |
| SPORT | Sport | CLASSICS | Classical music | JAZZ | Jazz |
| EDUCATE | Education | OTHER MUSIC | Other music | COUNTRY | Country music |
| DRAMA | Drama | WEATHER | Weather | NATION MUSIC | National music |
| CULTURE | Culture | FINANCE | Financial | OLDIES | Oldies |
| SCIENCE | Science | CHILDREN | Children's programming | FOLK MUSIC | Folk music |
| VARIED | Variable | SOCIAL | Social affairs | DOCUMENT | Documentary |
| POP MUSIC | Pop music | RELIGION | Religion | TEST | Test / Emergency |
PLAYBACK (FROM USB/SD/SDHC/MMC STORAGE)
If you wish to listen to MP3 encoded music from a USB/SD/SDHC/MMC source instead of listening to the radio, simply connect the external storage. The unit will detect this and start playback automatically. The track number, total time and elapsed time of the song will appear on the display, graphically depicted as well. In addition, the artist name, album title and song title is usually displayed. A check mark corresponding to the active signal source appears in front of the active signal source when USB and SD devices are inserted concurrently.
- Recommended memory device file system: FAT32. Do not use NTFS formatted memory devices!
- If the unit emits no sound, or fails to detect the USB/SD/SDHC/MMC memory, remove the memory card then reconnect it again. If this does not solve the problem, try selecting it by using the MENU button. If necessary, switch off the unit then back on, or if all else fails press the RESET button.
- If the unit fails to recognize all or some of the files copied to the inserted signal source, proceed as described in the previous section, or the USB device can be inserted into an already switched on unit, and its contents will be re-scanned and refreshed by the system.
- Remove the external memory card only after switching to a signal source other than USB/SD/SDHC/MMC memory or having switched off the unit. Failure to observe this can lead to data corruption.
- Never disconnect any external unit during playback.
- After inserting the memory, playback will begin from the first track. If it was being previously listened to and not removed, playback will continue from the track selected last, even if the unit was switched off in the meantime.
- The USB unit can be simply pulled out while SD/SDHC/MMC cards can be removed after pressing the card slightly inward. The latter must be pressed firmly when inserting. When properly inserted, the memory card will slightly project from the unit (behind the front panel).
- The SD/SDHC/MMC card's cut-off corner should be forward and facing up, so that the contacts face toward the right. Never touch the contacts by hand.
- The USB connector can be inserted in one direction only. If you encounter difficulty, flip it over and try again but do not force it!
• Make sure that the device projecting from the unit does not affect safe driving, and avoid hitting and breaking it. The use of SD cards is preferred as they are safer to use.
- It is important to keep the USB/SD/SDHC/MMC contacts clean on both the unit and the media. Do not allow hair, dirt or dust to collect on them.
• Leaving the media in the vehicle in extreme heat or cold will damage it.
- The special features of storage device can cause erratic operation, however, this is not a malfunction of the unit!
▶ II
Repeated pressing the rotating knob toggles between playback and pause. The current mode is shown at the top row of the display.
|←→|
Briefly press the buttons to skip to the next or previous track. When kept pressed for a long time, it fast forwards or reverses the current track, with the speakers muted.
CH-/CH+
Briefly press the buttons to skip to the next or previous track. The selected song is played back when the rotating knob is pressed, while the track selected earlier is being played back.
REPEAT
Repeat the current track or all available tracks. This can also be activated in the menu's SETTING function. (Refer to the section entitled Basic settings above.) An indicator representing the current mode is visible in the top row of the display. The remote control (RPT) facilitates control of the unit.
SHIFTING FOLDERS
Shifting folders. Using the MENU button and the CH-button during playback, go to the top of the playlist. This is where the directories found on the device will appear, provided they have been created in advance on the storage media. Using the rotating knob select the desired directory then press the rotating knob to enter it.
Textual information appearing on the display: ID3 Tag
• ID3 Tag: Textual information corresponding to the MP3 track appears on the display and changes continuously. It can include the following: song title, album title, artist name.
- The captions only appear if the MP3 file contains such information. Such textual information can be associated with the given track when the MP3 file is created. If no such auxiliary information is available, or not all displayable details have been saved, nothing will be visible on the display.
- Some characters may occasionally appear incorrectly or not at all. This can affect special and accented characters. The program used to encode the MP3 file and its settings determine the operation of the ID3 Tag function. If the files have been compressed using different compression programs and with different settings, the displayable textual information can even vary from one song to another. The special features of storage device can cause erratic operation, however, this is not a malfunction of the unit.
The unit is capable of playing most popular image and video files from an external storage device. A list of supported file types is included later in this section.
The directories containing images are accessible by pressing the PHOTO button or using the MENU button and rotating knob. Using the rotating knob select a directory (if one has been created on the media) then press the rotating knob to enter it. Then it is possible to scroll among the images and display the desired one by pressing the rotating knob. The automatic slideshow function proceeds to the next image every 3 seconds. If you wish to view the image, press the rotating knob. The slideshow display continues when it is pressed again.
The directories containing movies are accessible by pressing the MOVIE button or using the MENU button and rotating knob. Using the rotating knob select a directory (if one has been created on the media) then press the rotating knob to enter it. Then it is possible to scroll among the films and play the desired one by pressing the rotating knob. Playback can be paused when the button is pressed again. Keep buttons pressed to search for the desired scene. The total and elapsed playing time of the film will appear on the display in the meantime.
• Each press of the MENU button allows you to go one level higher among the directories or menu.
- Briefly press buttons |◀◀▶▶ to proceed forward or backward among the images or films.
- To exit the given mode, press another mode button (e.g., RADIO) or MENU button. The latter can be used to go higher in the directory structure.
DISPLAY OF EXTERNAL SOURCE SIGNAL / REAR-VIEW CAMERA
Two external video signal sources can be connected to the unit using the yellow RCA connectors mounted on short cables on the rear panel.
A., RCA socket on black cable: Suitable for connecting external devices such as TV tuner, DVD/media player, etc. This signal source can be selected from the main menu: MENU / AV IN. After selecting AV IN press the rotating knob. Press the MENU button to exit.
B., RCA socket on yellow cable: Rear-view camera input. The view behind the vehicle automatically appears (CAMERA IN) when the gear shift is shifted to reverse. For this to work the short brown cable next to the video input must be connected to the reverse light circuit so that a voltage of +12V is present on it in addition to the reverse light illumination. After backing up, the unit will return to the previous status. As long as +12 Volts are connected to this cable, the video input will be active and the image of the external signal source connected here will be visible on the screen. The rest of the unit's functions will not work during this time.
VIDEO PLAYBACK ON EXTERNAL MONITORS
Two external video monitors can be connected to the unit at the same time using the yellow RCA connectors on the rear panel. The audio can be heard via the car radio's speakers. An image will appear on the external monitor or television if the PHOTO button is pressed for 2 seconds. The front panel display will go dark. The rear passengers can view their monitors (mounted in the front seat headrests or overhead). The driver should not watch films while driving! This function can be toggled by long pressing the PHOTO button again.
- If the image is black and white on the external monitor, check the monitor's settings and the compatibility of the file being played back.
- Check the interconnect cable if the image appears noisy.
AUX STEREO INPUT
A 3.5mm stereo plug can be used to connect any external units which have a headphone/audio output directly to the AUX socket on the front panel. It is possible to listen to such portable devices in high quality via the car radio's speakers if the AUX IN mode is selected using the MOD button.
A mobile phone, media player, CD/DVD player, GPS etc. can be connected.
- The purchase of an external adapter may be required for connecting products that lack 3.5mm audio output connectors.
- For further information please see the instructions for use of the unit to be connected.
CONNECTING AN EXTERNAL AMPLIFIER
The preamplifier output is located on the rear panel of the head unit. This allows the connection of an external amplifier or active subwoofer featuring low level outputs. Thus the volume output and/or sound quality can be upgraded. White RCA socket: Left channel output; Red RCA socket: Right channel output.
REMOTE CONTROL FUNCTIONS
In order to use the remote control please remove the insulating film extending from the battery compartment if the product is equipped with one. If operation becomes unstable or the range decreases, please replace the battery with a new one: CR 2025; 3V button cell.
- When using the remote control, aim it toward the unit's display from a maximum distance of 2 or 3 meters.
- In order to replace the battery, turn the remote control on its back then pull out the battery tray with the battery. Make sure the positive terminal of the inserted battery faces upward. Follow the directions on the bottom of the remote control.
| In radio mode In media player mode | ||
| × | Speakers off or on | |
| VOL + To increase volume | ||
| VOL - To reduce volume | ||
| TONE Audio settings: VOL / BAS / TRE / BAL / FAD / EQ / LOUD (VOL+/-) | ||
| MENU Menu functions | ||
| II | - Playback / Pause | |
| RPT - Track repeat | ||
| ◀◀ | Auto / Manual tuning Previous and fast reverse | |
| ▶◀ | Auto / Manual tuning Previous and fast reverse | |
| ▲ | program advance (+ENTER) Advance, select (+ENTER) | |
| ▼ | program advance (+ENTER) Advance, select (+ENTER) | |
| ENTER Activating the selected function | ||
| RADIO Radio mode / Bands / Automatic tuning, storing | ||
| MUSIC | Selecting audio playback mode | |
| MOVIE | Selecting video playback mode | |
| PHOTO | Selection of photo viewing mode | |
WARNINGS
- Before starting to use the player, read these instructions carefully, then keep them in an accessible place for future reference.
- Seek professional assistance if necessary to prevent damaging the unit or motor vehicle.
- Depending on the compressed files, the MP3 compression program used, and the quality of the USB/SD memory, anomalies may occur during playback which are not due to the unit malfunctioning.
- The playback of copy protected DRM files is not guaranteed.
- It is also possible to connect MP3/MP4 players using a USB cable but avoid connecting external hard drives this way.
- Do not store any additional files on the USB/SD device other than playable files because they can slow down or prevent playback.
- Do not connect phones, navigation devices or other equipment to the USB port for purposes of recharging.
- Do not store data media in the vehicle if it is exposed to freezing or extremely high temperatures.
- While underway, do not do anything that distracts your attention from driving. Manipulating the player while driving can result in accidents. If needed, stop the car while manipulating the player.
- Spend as little time as possible watching the display. Doing so can distract your attention from the road, and result in accidents.
- Do not listen to the player too loud. Set a volume that allows you hear external sounds while driving. Extreme volumes can also cause permanent damage to your ears.
- Do not disassemble or tamper with the player, as that can cause fire, accidents, or electric shock. Incorrect use or installation renders the warranty void.
- Only for use in cars with a 12 V battery and a negative ground. Using the player for any other purpose can result in electric shock, damage, or fire. The player was designed exclusively for use in vehicles.
- Always use melting fuses with the proper values. When replacing a fuse, make sure that the new fuse has the same nominal value as the one you are replacing. Using a different fuse can cause fire or damage.
- Do not block the player's cooling vents, as that can cause its circuits to overheat, resulting in fire. Install the player properly to ensure adequate ventilation. The air vents around the edge must be left free.
- Make sure to connect the player correctly. Incorrect connections can result in fire or other damage.
- Prior to wiring/installation, be sure to remove the car battery's negative terminal connection. This will prevent any electric shock or malfunction.
- Before connecting/installing the player disconnect the negative pole of the car's battery. Doing so helps you prevent electric shock or short circuits.
-
While installing the player never cut through cables or damage their insulation. Doing so can result in short circuit and fire.
-
Before drilling holes or inserting screws into your vehicle's body make sure you do not damage tubes or electric wires on the other side of the cover.
- Do not connect to any electric systems of your vehicle that operate steering, brakes, or any other safety function. Doing so can result in loss of control over the vehicle, and can cause fire.
- Do not install the player or its accessories in a location where they can prevent you from controlling the vehicle safely, e.g., between the steering wheel and the gear shift.
- Make sure that wires do not coil around neighboring objects. Arrange cables and wires in a way that does not hinder you in driving. Wires that interfere with your movement or hang over the gear shift, the brake etc. can be extremely dangerous. (E.g., the connection cable of a media player connected to the USB port.)
- In case of any malfunction, turn of the player immediately, and consult your distributor. Many malfunctions are very easy to spot (e.g., no sound, bad smell, smoke, an external object inside the product etc.).
- Make sure that no external objects get into the USB socket or the memory card slot, as these can cause fatal damage.
- Protect it from dust, damp, liquids, heat, moisture, frost and impact, as well as direct heat or sunlight!
- When leading the connection cables make sure that their insulation does not get damaged by any sharp metal objects nearby.
- Do not connect any cables when the device is working. Never turn on the system with the volume at the maximum level. The pop or other noise spike which can be heard when switching on can cause irreparable damage to the speakers immediately.
- The warranty is not applicable to damage caused by irresponsible or improper installation or use.
- Keep the remote controller battery out of the reach of children as it can cause death if swallowed.
PRECAUTIONS
CLEANING
Use a soft, dry cloth and a brush for regular cleaning. To remove stronger stains, wet the cloth slightly with water. Avoid scratching the display's surface; never wipe the display when it is dry, and do not use a coarse cloth to clean the display. Do not use detergents. Make sure no liquid gets inside the product or onto the connectors.
TEMPERATURE
Before turning on the player make sure that the temperature inside the car is between -10°C and +50°C, as the product is only guaranteed to operate properly within this temperature range. Extreme weather conditions can damage the product.
FINDING THE RIGHT LOCATION AND INSTALLATION
When installing the product, make sure it will not be exposed to any of the following: - direct sunlight or heat (e.g. from the heating system), - wetness, high humidity, - a significant amount of dust, - strong vibration
USING THE USB/SD CONNECTOR
It is possible to connect USB memory, MP3/MP4 players and media players to the unit's USB port. SD/SDHC/MMC memory cards can be inserted into the memory card slot.
- In certain cases the flawless operation of external USB/SD products is not guaranteed. Manufacturers may, without advance warning, alter the internal design of their products (e.g., chip replacement), which might not modify the main technical parameters, but can interfere with the operation of similar, albeit legacy units. Therefore even identical models of connected products might operate differently. Do not use USB hubs, but extension cables may be used.
- The use of USB/SD memory cards greater than 16GB in size is not recommended because access times might increase and playback may become unstable. Only playable files should be stored on the external memory card because the presence of extraneous data/files can slow down operation or cause malfunction. External storage up to 32GB in size can be used and up to 16 subdirectories can be managed.
- Although not recommended, it is possible to charge a mobile phone from the USB port (5VDC/1,5Amax.).
- For the benefit of preserving the precision contacts it is important to always plug in and remove the USB/SD/SDHC/MMC devices perpendicularly. The connector socket can be damaged if the cards are not inserted straight.
- The use of an SD memory card is recommended instead of USB memory as it can be connected more stably and securely by nature. It also does not project from the unit so there is less of a risk of damaging the unit if it is struck accidentally. Such damage attributed to the user's fault are not considered manufacturing defects, therefore, they are not repairable under warranty.
Warnings! The manufacturer takes no responsibility for lost or damaged data, even if such loss or damage occurs while using the player. Before connecting the storage device, it is recommended to create a backup of the data and tracks on it on your personal computer.
PROPER USAGE OF USB STICKS / SD CARDS
To avoid malfunction and errors, please observe the following:
- Carefully read the instructions of the USB/SD storage device or media player.
- Do not touch the connectors with your hand or any object; keep the connectors clean.
- Protect the USB/SD device from strong shocks.
- Do not bend, drop, disassemble or modify these devices, and protect them from humidity.
Do not use or store the devices in the following locations:
- Anywhere inside the vehicle where they are exposed to direct sunlight or high temperature.
- Any place with a high humidity or where corrosive materials are present.
- Place the devices in a location where they do not hinder you in driving.
Further important notes:
- USB/SD memory devices may not function properly at extremely high or low temperatures.
- Only use high-quality UDB/SD devices. Depending on their type and condition, even such high-quality products may not always work properly. The proper operation of these devices is not always guaranteed.
- Depending on the type and condition of the USB/SD device and the settings used in the software that encoded the MP3 files, the player may not detect or play back certain files.
- The player is not guaranteed to play copy-protected files (legal copyright protection).
- The USB/SD memory device may need a certain amount of time before playback can start. If the device also includes non-audio files, the time needed for playback to start may be significant.
- The unit can play back files with the extension MP3 and WMA. Do not use this extension on files that do not contain pure audio data. The player cannot process such non-audio data. The noise emitted when playing such files can damage the speakers and/or amplifiers.
- Do not remove the USB/SD device while playback is in progress. In order to protect it from potential damage, first switch to a different signal source by pressing the MODE button, and only then remove the USB/SD device.
- If you connect a portable audio player instead of a USB/SD memory through the USB port, and the device has an MSC/MTP setting, choose the MTP option.
INSTALLATION
- Slide the mounting frame off the unit then mount it in the vehicle's dashboard.
If the mounting frame does not fit tightly in the dashboard, the perforated tabs can be bent outward using a screwdriver to ensure a tight fit. The tabs to be bent should be selected according to the thickness of the dashboard. - Carefully slide the unit all the way into the securely fitted frame. If the vehicle has a console, fasten the head unit's rear M4 screw to the vehicle. Along with the mounting frame, this provides for a stable fit.
- Depending on the vehicle's design, additional metal straps or other means of fastening may be required. The manner of installation may differ from the instructions depending on the vehicle model.
- When removing the unit – as well as when mounting it – snap off plastic frame around the front panel. Slide a flat metal plate approximately 8 x 1cm in size into the central guide rail on both sides of the unit. This will allow the unit to be removed from the metal mounting frame. (If the unit has been fastened at the rear, the bolt must also be unscrewed along with disconnecting the electrical connectors.)
- Connect the unit's wiring according to the instructions. Inspect the connectors in the vehicle for suitability according to the wiring instructions in this manual. Make sure that the connections are properly made and free of short circuits. The speaker wiring should be conducted properly. Seek the help of a specialist if necessary.
- DO NOT connect any of the speaker wires to the vehicle's or battery's negative terminal/grounding point! (e.g. black power cable or metal point on the vehicle)
- Switch on the unit and perform the settings described above. We wish you a pleasant and safe journey!
SPEAKER CONNECTIONS / FAULTY CONNECTION
In some cases, increasing the volume will not proportionally increase the bass level. This is dependent on the number of speakers used and their positioning, moreover, a speaker in the vehicle might also be wired out of phase.
- When two front speakers are used:
- Reverse the +/- polarity of either the right or left front speaker (the wires leading to either speaker should be reversed anywhere between the head unit and the speaker).
- When four speakers are used:
• A., If both the front and rear speakers are built into the doors (or otherwise isolated from each other, such as in an enclosure), then the polarity of either speaker in both the front and rear should be reversed. - B., If the front speakers are built into the doors but the rear speakers are built into the hat rack panel, then only the polarity of either front speaker should be reversed. The rear speakers' wires should remain unaltered.

To prevent hearing loss, do not listen to the device at high volumes for extensive periods of time!

Do not discard with communal waste. At the end of its life, dispose of product at a facility specializing in the collection of electronic waste. If you have any question or remark in connection with this, contact the seller or local waste management organization. By doing so, you will protect the environment as well as the health of others and yourself. Do not dispose of used batteries with normal communal waste. The user is obliged under law to take any used or dead batteries to the local collection facility or point of original purchase. This allows the environmentally friendly disposal of batteries.

SOMOGYI ELEKTRONIC
• Supported video subtitle files: TXT, SRT, SSA, SUB
• Unsupported video: WMV1, WMV2, WMV3, VC1, VP6, MS MPEG-4 1/2...
- For unsupported or corrupted files, the "wrong file" message is displayed.
- The playback of even supported files is not guaranteed in all cases because it may be affected by software and hardware conditions out of the manufacturer's control.
- In ideal cases the playback of images and videos corresponding to the native resolution of the built-in screen is recommended, however, this is not usually a requirement. Upscaling may be necessary in some cases.
- Opening or storing image/video files of unreasonably high resolution on connected media is not recommended.
- Due to differing parameters, there may be a difference in volume between various audio and video files.
SK
| FM frequency range 87,5 - 108,0 MHz / 522-1620 kHz |
| Usable sensitivity 1,6 μV |
| Channel separation >40 dB |
| Signal/noise level >56 dB |
USB/SD/SDHC/MMC
| USB system USB 1.1/2.0 |
| Max. current 1500 mA |
| File system FAT 16/32, max.32 GB/16 subdir. |
| MP3 decoder MPEG-1/2 AUDIO Layer-3 |
| Channel separation >76 dB |
| Signal/noise level >86 dB |
GENERAL PARAMETERS
| Car Voltage system 12 Volt Negative GND chassis |
| Operation Voltage 13,8 V DC (9 - 16 V) |
| Type of display (16:9) 400 x 240p / TFT LCD / 3" |
| Channels of amplifier 4 csatorna |
| Power output 4 x 45 W |
| Speaker impedance 4 – 8 Ohm |
| Frequency range 20 - 20.000 Hz |
| Pre-amp output | 2 V max. (2 x RCA) |
| Fuse, red/yellow wire F8A / 250 V, F8A / 250 V (∅5 x 20 mm) |
| T operation | -10°C ... +50°C |
| Weight | 0,62 kg |
| Chassis dimensions | 178 x 50 x 130 mm |
A/1. No connection
A/2. No connection
A/3. No connection
A/4. Battery direct connection for memory, +12V (yellow)
A/5. Remote only for motor car antenne, +12V (purple)
A/6. No connection
A/7. Ignition switch, +12V (red)
A/8. Battery / Chassis GND (black)
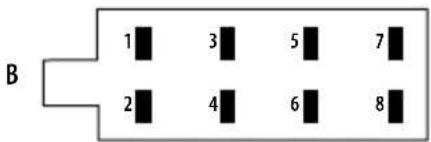
B/1. Speaker Out Right Rear +
B/2. Speaker Out Right Rear
B/3. Speaker Out Right Front +
B/4. Speaker Out Right Front
B/5. Speaker out Left Front +
B/6. Speaker Out Left Front -
B/7. Speaker out Left Rear +
B/8. Speaker out Left Rear
Do not connect any speaker cable to the GND of the car or the battery (with the black cable or chassis)!
text_image
B 1 3 5 7 2 4 6 8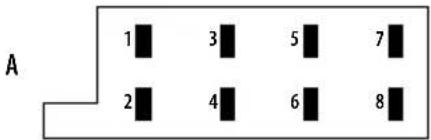
text_image
A 1 3 5 7 2 4 6 8
SOMOGYI ELEKTRONIC