
HOP455 X - Oven HOOVER - Free user manual and instructions
Find the device manual for free HOP455 X HOOVER in PDF.

| Product Type | Built-in Electronic Oven |
| Model | HOP455 X |
| Brand | Hoover |
| Energy Source | Electric |
| Cooking Functions | Natural Convection, Fan Oven, Fan-assisted Lower Element, Keeping Warm, Defrost at Room Temperature, Defrost, Pastry Function, Traditional Grilling, Fan Grilling, Fan Oven with Upper/Lower Elements |
| Temperature Range | 50°C - 240°C (depending on function) |
| Programmable Timer | Yes, with cooking time and end of cooking, alarm, child safety lock |
| Shelf Safety System | Yes, prevents accidental shelf dislodgement |
| Telescopic Shelf Kit | Available (optional accessory) |
| Interior Light | Replaceable, high-temperature bulb |
| Self-Cleaning | Catalytic lining (optional, approx. 300 hours lifespan) |
| Installation | Built-in under worktop or in upright cupboard; ventilation requirements: rear gap ≥45 mm for hob |
| Power Supply Connection | Plug with earthing; cable type HO5RR-F, H05VV-F, H05V2V2-F |
| Compliance | EEC Directives 89/336, 73/23, 2002/96/EC (WEEE) |
| Net Weight | Approx. 35 kg (estimated, typical for built-in ovens) |
| Dimensions (HxWxD) | 595 x 595 x 570 mm (estimated, standard built-in size) |
| Energy Class | Not specified, but typical for similar models: A |
Frequently Asked Questions - HOP455 X HOOVER
User questions about HOP455 X HOOVER
0 question about this device. Answer the ones you know or ask your own.
Ask a new question about this device
Download the instructions for your Oven in PDF format for free! Find your manual HOP455 X - HOOVER and take your electronic device back in hand. On this page are published all the documents necessary for the use of your device. HOP455 X by HOOVER.
USER MANUAL HOP455 X HOOVER
BUILT-IN ELECTRONIC OVEN
INSTRUCTION FOR USE
GB
HORNO EMPOTRABLE ELCTRÓNICO
INSTRUCCIONES DE USO
ES
ELCTRONISCHE INBOUWOVEN
GEBRUIKSAANWIJZING
NL
MULTIFUNKTIONSBACKOFEN MIT
natural_image
Illustration of a closed storage unit with two panels and a lid, rendered in white line art (no text or symbols)AVVERTENZE GENERALI
natural_image
Diagram of a ceiling structure with grid lines and an arrow indicating direction (no text or symbols)Thank you for choosing one of our products. To get the most out of your oven we recommend that you:
- Read the notes in this manual carefully: they contain important instructions on how to install, use and service this oven safely.
- Keep this booklet in a safe place for easy, future reference.
When the oven is first switched on it may give out acrid smelling fumes. This is because the bonding agent for insulating panels around the oven has been heated up for the first time.
This is a completely normal, if it does occur you merely have to wait for the fumes to clear before putting the food into the oven. An oven by its very nature becomes very hot. Especially the glass of the oven door.
Do not allow children to go near the oven when it is hot, especially when the grill is on.
A specially designed protector shield (some models only) which reduces considerably the surface temperature of the oven door can be obtained through our service organization. This shield is recommended for households with young children.
DECLARATION OF COMPLIANCE
- The parts of this appliance that may come into contact with foodstuffs comply with the provisions of EEC Directive 89/109.
CE This appliances complies with Directives 89/336/EEC, 73/23/EEC and following changes.
When you have unpacked the oven, make sure that it has not been damaged in any way. If you have any doubts at all, do not use it: contact a professionally qualified person. Keep packing materials such as plastic bags, polystyrene, or nails out of the reach of children because they are dangerous for children.
SAFETY HINTS
- The oven must be used only for the purpose for which it was designed: it must only be used for cooking food. Any other use, e.g. as a form of heating, is an improper use of the oven and is therefore dangerous.
- The manufacturers cannot be held responsible for any damage caused by improper, incorrect or unreasonable use. When using any electrical appliance you must follow a few basic rules.
- Do not pull on the power cable to remove the plug from the socket.
- Do not touch the oven with wet or damp hands or feet.
- Do not use the oven unless you are wearing something on your feet.
- Do not allow children or irresponsible people to use the oven unless they are carefully supervised.
- It is not generally a good idea to use adapters, multiple sockets for several plugs and cable extensions.
- If the oven breaks down or develops a fault switch it off at the mains and do not touch it.
- If the cable is at all damaged it must be replaced promptly. When replacing the cable, follow these instructions. Remove the power cable and replace it with one of the HO5RR-F, H05VV-F, H05V2V2-F type. The cable must be able to bear the electrical current required by the oven. Cable replacement must be carried out by properly qualified technicians. The earthing cable (yellow-green) must be 10 mm longer than the power cable.
Use only an approved service centre for repairs and ensure that only original parts are used. If the above instructions are not adhered to the manufacturers cannot guarantee the safety of the oven.
INSTALLATION
Installation is the customer's responsibility. The manufacturers have no obligation to carry this out. If the assistance of the manufacturer is required to rectify faults arising from incorrect installation, this assistance is not covered by the guarantee. The installation instructions for professionally qualified personnel must be followed. Incorrect installation may cause harm or injury to people, animals or belongings. The manufacturer cannot be held responsible for such harm or injury.
FITTING THE OVEN INTO THE KITCHEN UNIT
Fit the oven into the space provided in the kitchen unit; it may be fitted underneath a work top or into an upright cupboard. Fix the oven in position by screwing into place, using the four fixing holes in the frame.
To locate the fixing holes, open the oven door and look inside. To allow adequate ventilation, the measurements and distances indicated in the diagram on last page must be adhered to when fixing the oven.
Note: For ovens that are combined with a hob unit the instructions contained in the manual for the hob unit must be followed.
IMPORTANT
If the oven is to work properly, the kitchen housing must be suitable. The panels of the kitchen unit that are next to the oven must be made of a heat resistant material. Ensure that the glues of units made of veneered wood can withstand temperatures of at least 120 °C. Plastics or glues that cannot withstand such temperatures will melt and deform the unit. Once the oven has been lodged inside the unit, the electrical parts must be completely insulated. This is a legal safety requirement. All guards must be firmly fixed into place so that it is impossible to remove them without using special tools.
Remove the back of the kitchen unit to ensure an adequate current of air circulates around the oven. The hob must have a rear gap of at least 45 mm.
CONNECTING TO THE POWER SUPPLY
Plug into the power supply. Ensure first that there is a third contact that acts as earthing for the oven. The oven must be properly earthed.
If the model of oven is not fitted with a plug, fit a standard plug to the power cable. It must be able to bear the power supply indicated on the specifications plate. The earthing cable is yellow-green. The plug must be fitted by a properly qualified person. If the socket and the plug are incompatible the socket must be changed by a properly qualified person. A properly qualified person must also ensure that the power cables can carry the current required to operate the oven.
An ON/OFF switch with a minimum distance of 3 mm between contacts may also be connected to the power supply. The connections must take account of the current supplied and must comply with current legal requirements. The yellow-green earthing cable must not be governed by the ON/OFF switch. The socket or the ON/OFF switch used for connecting to the power supply must be easily accessible when the oven has been installed. Important: During installation, position the power cable in such a way that it will not be subjected to temperatures of above 50°C at any point.
The oven complies with safety standards set by the regulatory bodies. The oven is safe to use only if it has been adequately earthed in compliance with current legal requirements on wiring safety. You must ensure that the oven has been adequately earthed.
The manufacturers cannot be held responsible for any harm or injury to persons, animals or belongings caused by failure to properly earth the oven.
WARNING: the voltage and the supply frequency are showed on the rating plate (fig. on last page).
The cabling and wiring system must be able to bear the maximum electric power required by the oven. This is indicated on the specifications plate.
If you are in any doubt at all, use the services of a professionally qualified person.
USEFUL TIPS
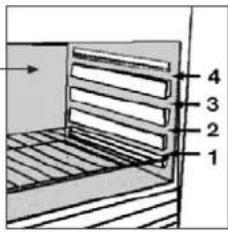
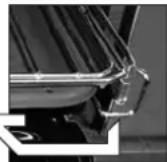
SHELF SAFETY SYSTEM

natural_image
Architectural line drawing of a building facade with grid lines and a black arrow indicating direction (no text or symbols)The oven features a new shelf safety system.
This allows you to pull out the oven shelves when inspecting the food without danger of food spillages or shelves falling accidentally out of the oven. To remove the shelves pull out and lift.
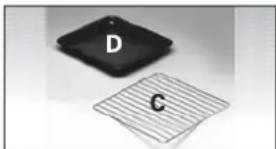
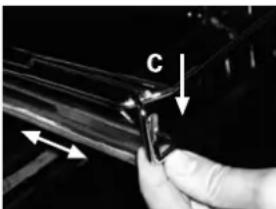
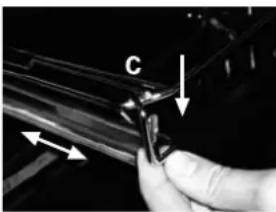
TELESCOPIC SHELF KIT
Slide out the runners and position the shelf support C behind the shelf stop located at the front side of the kit. Complete assembly by inserting drip tray D
natural_image
Two electronic components: a black square plate labeled D and a striped grid plate labeled C, both placed on a plain surface (no text or symbols beyond labels)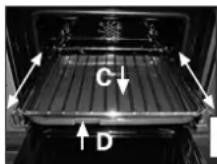

natural_image
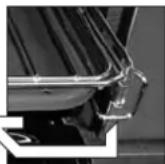
Close-up of a hand holding a tool with arrows indicating movement or force (no text or symbols visible)GRILLING
Grilling makes it possible to give food a rich brown colour quickly. For browning we recommend that you insert the grill onto the fourth level, depending on the proportions of the food (see fig. page 11).
Almost all food can be cooked under the grill except for very lean game and meat rolls.
Meat and fish that are going to be grilled should first be lightly doused with oil.
COOKING TIME
For recommended cooking times and temperatures the first time you use the oven, refer to the tables on pages 11, 12. You may then wish to vary these times and settings in the light of your own experience.
CLEANING AND MAINTENANCE
Clean the stainless steel and enamelled surfaces with warm, soapy water or with suitable brand products. On no account use abrasive powders that may damage surfaces and ruin the oven's appearance. It is very important to clean the oven each time that it is used. Melted fat is deposited on the sides of the oven during cooking. The next time the oven is used this fat could cause unpleasant odours and might even jeopardise the success of the cooking. Use hot water and detergent to clean; rinse out thoroughly. To make this chore unnecessary all models can be lined with catalytic self-cleaning panels: these are supplied as an optional extra (see the section SELF-CLEANING OVEN WITH CATALYTIC LINING).
Use detergents and abrasive metal pads like «brillo pads» for the stainless steel grills.
The glass surfaces as the top, oven door and warming compartment door must be cleaned when they are cold. Damage that occurs to them because this rule was not adhered to are not covered by the guarantee.
To replace the interior light: switch off the mains power supply and unscrew bulb. Replace with an identical bulb that can withstand very high temperatures.
SELF-CLEANING OVEN WITH CATALYTIC
Special self-cleaning panels covered in a micro-porous coating are available as optional extras for all models. If they are fitted, the oven no longer needs to be cleaned by hand. The fat that is splattered onto the sides of the oven during roasting is eliminated by the microporous coating which breaks the fat down by catalysis and transforms it into gas.
Excessive splattering may nevertheless block the pores and therefore hinder self-cleaning. The self-cleaning capacity may be restored by switching on the empty oven to maximum for about 10-20 minutes.
Do not use abrasive products, metal cleaning wads, sharp objects, rough cloths, or chemical products and detergents that may permanently damage the catalytic lining.
It is a good idea to use deep roasting trays to roast fatty foods such as joints of meat etc. and to put a tray underneath the grill to catch surplus fat.
If the walls of the oven are so thickly coated in grease that the catalytic lining is no longer effective remove surplus grease with a soft cloth or sponge soaked in hot water.
The lining must be porous for self-cleaning to be effective.
N.B.: All catalytic linings currently on the market have a working life of about 300 hours. They should therefore be replaced after about 300 hours.
SERVICE CENTRE
Before calling the Service Centre
If the oven is not working, we recommend that:
- you check that the oven is properly plugged into the power supply.
If the cause of the fault cannot be detected:
disconnect the oven from the mains, do not touch the oven and call the after sales service.
Before calling the Service Centre remember to make a note of the serial number on the serial number specifications plate (see fig. on last page).
The oven is supplied with a guarantee certificate that ensures that it will be repaired free of charge by the Service Centre.
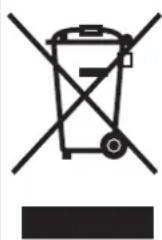
This appliance is marked according to the European directive 2002/96/EC on Waste Electrical and Electronic Equipment (WEEE). By ensuring this product is disposed of correctly, you will help prevent potential negative consequences for the environment and human health, which could otherwise be caused by inappropriate waste handling of this product. The symbol on the product indicates that this product may not be treated as household waste.
Instead it shall be handed over to the applicable collection point for the recycling of electrical and electronic equipment. Disposal must be carried out in accordance with local environmental regulations for waste disposal.
For more detailed information about treatment, recovery and recycling of this product, please contact your local city office, your household waste disposal service or the shop where you purchased the product.
| FUNCTION HOW TO ACTIVATE ITHOW TO SWITCH IT OFF WHAT IT DOES WAT IT IS FOR | ||||
OVEN  LIGH LIGH | When knob (1) is turned to the symbol, the light comes on | This function is useful for checking that the oven is fully operational. | ||
CLOCK  | Turn the selector knob (1) to the symbol.Using the and buttons, set the time of day (while setting, the numbers on the display will flash) | Turn the selector knob to the position | Allows you to regulate the time shown on the oven clock | Using the and buttons, set the time of day (while setting, the numbers on the display will flash)NB: Set the clock immediately after installing the appliance or after an interruption to the power supply (this is shown by 12:00 flashing on the display). |
ALARM  | Turn selector knob 1 to the symbol.Set the cooking time using the and buttons (while setting, the numbers on the display will flash) | When the set cooking time is up, the oven will automatically switch itself off. If you need to stop it before then, you must turn the set time to 0 (selector knob 1 on and then use the and buttons) | Provides an audible alarm signal (for a few seconds) at the end of cooking time. | Useful as a reminderThis function works independently of the oven (it can be used even when the oven is not working) |
CHILD SAFETY  | Turn the selector knob 1 to the symbol. The indicator light will flash.Press the and buttons at the same time, for three seconds.The setting is confirmed when the light stops flashing. | Press buttons and together for three seconds. The light flashes. | The oven settings cannot be altered (even when the knobs are accidentally adjusted) | Operates even when the oven is not on preventing it from being inadvertently switched on.Is operational when the oven is on and prevents any alterations to the settings (through accidental turning of the knobs)NB: the oven can still be switched off by turning selector knob 2 to position 0. |
COOKING TIME  | To select a cooking function use (selector knob 2)Turn selector knob 1 to the symbolSet the cooking time using the and buttons (while setting, the numbers on the display will flash) | When the cooking time is up, the oven will switch itself off.If you need to stop it before then, the oven must be switched off, or the cooking time must be turned to 00:00. (selector 1 to symbol , and use the and buttons) | Allows the end of cooking time to be stored in the memory.When the cooking time has been set, turn selector knob 1 to the symbol to display the time of day.To display the programmed time turn selector knob 1 to the symbol. | When the set cooking time is up the oven switches itself off automatically and for a few seconds an alarm sounds. |
END OF COOKING  | Select a cooking function (selector knob 2)Turn the selector knob to the symbol.Set the end of cooking time using the and buttons (while setting, the numbers on the display will flash) | At the pre-set time the oven automatically switches itself off. If you need to stop it before then, switch the oven off by turning the selector knob 2 to the symbol. | Allows the end of cooking time to be stored in the memory.When the cooking time has been set, turn selector knob 1 to the symbol to display the time of day.To display the programmed time turn selector knob 1 to the symbol. | This function is used typically used with 'cooking time' function. For example if the dish has to be cooked for 45 minutes and needs to be ready by 12:30, simply select the required function, set the cooking time to 45 minutes and the end of cooking time to 12:30.Cooking will start automatically at 11:45 (12:30 minus 45 mins) and will continue until the pre-set end-of-cooking-time, when the oven will switch itself off automatically. |
THE PROGRAMMER
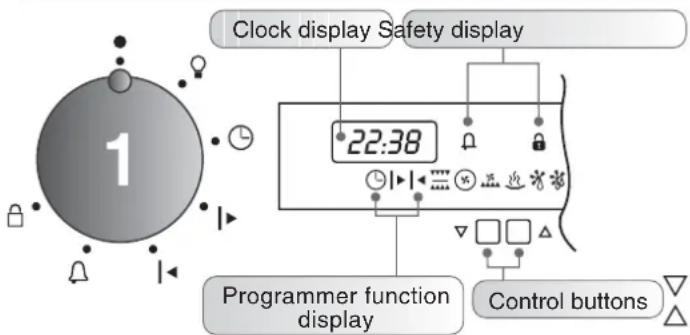

WARNING
The first operation to carry out after the oven has been installed or following the interruption of power supply (this is recognizable the display pulsating and showing 12:00) is setting the correct time.
A slight delay will occur when setting a programme, while the oven carries out internal diagnostics.
OPERATING INSTRUCTIONS
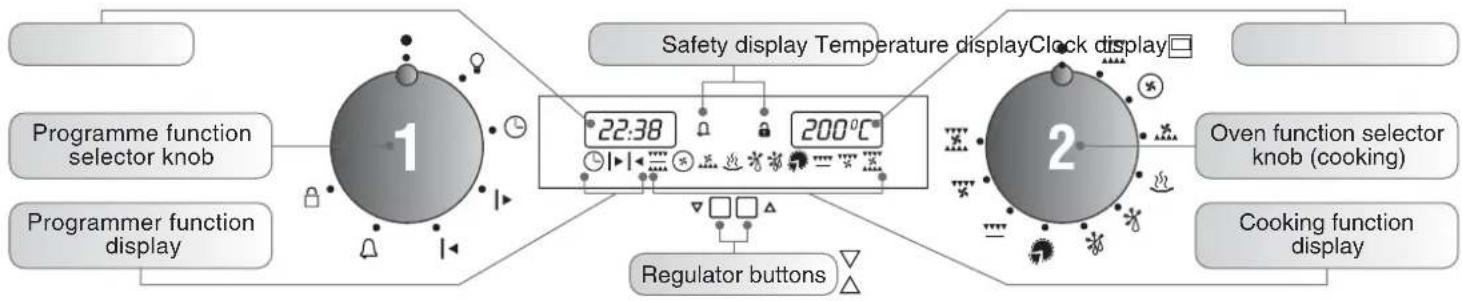
flowchart
graph TD
    A["Programme function selector knob"] --> B["1"]
    C["Programmer function display"] --> B
    B --> D["22:38"]
    D --> E["200°C"]
    E --> F["Safety display Temperature display"]
    F --> G["Regulator buttons"]
    G --> H["2"]
    H --> I["Oven function selector knob (cooking)"]
    H --> J["Cooking function display"]
    K["Regulator buttons"] --> H
- If the clock is not set the oven will not work and 12:00 will flash on the display.
To start cooking a function must be selected using knob (2). The corresponding symbol will appear on the display and the automatically pre-set temperature will flash. If you wish to alter that temperature, press the ▽ or △ buttons.
After a few seconds the oven will start working, but the programme selector can be regulated so that the start is delayed until the required time (see chapter "The Programmer"). The cooking function symbol will flash until the oven reaches the temperature shown on the display. When that temperature is reached it will stop flashing and an audible signal sounds.
The oven can be switched off at any stage by simply turning the selector knob (2) to “●”.
| Symbol | Pre-set temperature | Temperature range setting | Function |
 220°C 50°C-240°C Tested in accordance with the CENELEC EN 50304 used for definition of energy class. 220°C 50°C-240°C Tested in accordance with the CENELEC EN 50304 used for definition of energy class. | Natural convection Both upper and lower elements are working. Traditional cooking, best for roasting a leg of lamb or game. Ideal for biscuits and baked apples, and for crisping foods. Best results are obtained by placing on a shelf and regulating the temperature between 50 and 240°C. | ||
 | 180°C | 50°C-230°C | Fan oven An internal fan ensures that the hot air is evenly distributed to all levels in the oven. Ideal for cooking different types of food at the same time (fish, meat, without mixing flavours or aromas). Delicate cooking - recommended for sponge cakes, puff pastry, etc. |
 | 160°C | 50°C-220°C | Lower element & fan Recommended for delicate cooking (soufflés) |
 | 60°C | — | Keeping food warm The upper and lower elements work intermittently with fan assistance. The temperature is pre-set at a constant 60°C (this function does not allow the working temperature to be regulated). Ideal for keeping food hot that has just been cooked, without overcooking it. It is also useful for warming dishes. |
 | 20°C | — | Defrosting at room temperature This function allows air at room temperature to be circulated round the item. In this way the food defrosts in just a few minutes without affecting the content. |
 | 40°C | — | Defrosting The upper and lower elements work intermittently with fan assistance. The temperature is pre-set at a constant 40°C (this function does not allow the operating temperature to be regulated). This function allows rapid defrosting prior to cooking. |
 | 200°C | — | Pastry function The intense heat generated when using this function is similar to that produced in traditional wood-fired pizza ovens. |
 | 210°C | 180°C-240°C | Traditional grilling with closed door In this position, the infrared grill element comes on. Excellent for cooking thin or medium slices of meat (sausages, chops, bacon) |
 | 190°C | 50°C-200°C | Fan grilling with closed door Hot air from the grill element is circulated around the food by the fan at the required temperature, between 50 and 200°C. The fan is an excellent substitute for the rotisserie and ensures excellent results with poultry, sausages and red meats, also in large quantities. |
| [WASC] 200°C 50°C-230°C Tested in accordance with the CENELEC EN 50304. | Fan oven Both the upper and lower elements are working, assisted by the internal oven fan. This function is recommended for cooking poultry, fish, bread etc. This system ensures an even distribution of heat, making it possible to cook any dish on a large tray. | ||
TABLES OF COOKING TIMES
The overall suggested cooking times set out below are intended as a rough guide only. They may in fact vary according to the quality, the freshness, the size and the thickness of the food cooked and of course cooking time is also partly a matter of taste. Let the food stand for a few minutes before serving because the ingredients continue cooking after they have been removed from the oven.
HANDY TIP: Lower the temperature so as to avoid the surface of the food becoming hard and dry.
Shelf position
Static electric oven Electric fan oven
| Food Quantity Shelf Oven | Time of cooking in minutes | temperature | Shelf | Time of cooking in minutes | Oven temperature | Remarks | |
| • Pasta | |||||||
| Lasagne Kg 3,5 2 | 70 ÷ 75 220 2 | 60 ÷ 65 200 | Put the lasagne into an unheated oven | ||||
| Cannelloni Kg 1,8 | 2 50 ÷ 60 220 | 2 40 ÷ 50 200 | Put the cannelloni into an unheated oven | ||||
| Oven baked pasta | Kg 2,5 2 55 ÷ | 60 220 2 | 45 ÷ 50 200 | Put the oven baked pasta into an unheated oven | |||
| • Baking (not cakes) | |||||||
| Bread | Kg 1 di pasta | 2 | 35 10 (pre-heating) | 200 2 | 30 ÷ 35 10 (pre-heating) | 180 Form the dough into a loaf and make a cross with a knife on top of the dough leave the dough to rise for at least 2 hours. Grease the baking tin and put the dough in the middle of it. | |
| Pizza Kg 1 1 190 1 | 19025 ÷ 35 | 20 ÷ 25 | Warm the oven for 15 minutes and place the pizzas on the greased baking tray. Garnish them with tomatoes, mozzarella, ham, oil, salt and origano. | ||||
| Pastry (frozen) vol au vents | n° 24 | 1 | 30 ÷ 35 | 220 | 2 | 25 ÷ 30 | 200 Place 24 vol au vents in the oven and bake. |
| Focaccia (n° 4) | gr. 200 of dough each | 2 200 | 2 18025 ÷ 30 | 20 ÷ 25 | Warm the oven for 15 minutes, grease the baking tray, season the 4 focaccia with oil and salt and leave them to rise at room temperature for at least 2 hours before putting them in the oven. | ||
| • Meat | |||||||
| All meats can be roasted in shallow or deep roasting trays.It is advisable to cover the shallow trays to avoid splattering the sides of the oven with grease.The roasting times are the same whether the meat has been covered up or not. | |||||||
| Whole joint of beef | Kg 1 3 220 | 0 3 2007 | 0 ÷ 80 | 50 ÷ 60 | Put the meat into a deep Pyrex dish and season with salt and pepper; turn the meat half way through cooking. | ||
| Joint of deboned | Kg 1 | 2 | 100 ÷ 110 | 220 | 2 | 80 ÷ 90 | 200 Cook the meat in a covered Pyrex dish with herbs, spice, oil and butter. |
| Joint of deboned veal | Kg 1,3 | 1 | 90 ÷ 110 | 220 | 2 | 90 ÷ 100 | 200 Cook as indicated above. |
| Joint of fillet of beef | Kg 1 2 220 | 0 2 2008 | 0 ÷ 90 | 80 ÷ 90 | Cook as indicated above. | ||
| • Fish | |||||||
| Trout | 3 whole trout or / Kg 1 | 2 | 40 ÷ 45 | 220 | 2 | 35 ÷ 40 | 200 Cover the trout with salt, oil and onions and cook in a Pyrex dish. |
| Salmon | 700 g 2,5 cm slice | 2 | 30 ÷ 35 | 220 | 2 | 30 ÷ 25 | 200 Cook the salmon in an open Pyrex dish with salt, pepper and oil. |
| Sole | Kg 1 | 2 | 40 ÷ 45 | 220 | 2 | 35 ÷ 40 | 200 Cook the sole with salt and a spoonful of oil. |
| Bream | 2 whole ones | 2 | 40 ÷ 45 | 220 | 2 | 35 ÷ 40 | 200 Cook the bream in oil and salt in a covered dish. |
| Static electric oven | Electric fan oven | |||||||
| Food Quantity | Shelf | TimOven of cooking in minutes | tempe-rature | Shelf | Time of cooking in minutes | Oven tempe-rature | Remarks | |
| Rabbits and Poultry | ||||||||
| Guinea fowl Kg 1-1 | 3 2 60 ÷ 80 | 20 2 60 | ÷ 70 200 | Place the guinea fowl in a deep Pyrex or pottery dish with very little oil and season with herbs and spices. | ||||
| chicken Kg 1,5-1,7 | 2 110 ÷ 120 | 20 2 100 | ÷ 110 200 | Follow the procedure for cooking the guinea fowl. | ||||
| Rabbit pieces Kg 1 | -1,2 2 55 ÷ 65 | 220 2 50 | ÷ 60 200 | Put all the pieces of the same size in the glazed tray. Season with herbs and spices. Turn the pieces as and when required. | ||||
| Cakes | ||||||||
| Coconut cake baked in a tin | 1 55 | 180 1 50 160 | Use a tin that is 22 cm deep. Pre-heat for 10 mins. | |||||
| Sponge cake | 1 55 | 175 1 40 ÷ 45 | 160 | Use a tin that is 22 cm deep. Pre-heat for 10 mins. | ||||
| Carrot cake baked in a tin | 1 65 | 180 1 50 ÷ 60 | 160 | Use a tin that is 22 cm deep. Pre-heat for 10 mins. | ||||
| Apricot pie | 700 gr 1 | 40 200 2 | 30 ÷ 35 180 | Use a tin that is 22 cm deep. Pre-heat for 10 mins. | ||||
| Vegetable | ||||||||
| Fennel | 800 gr | 1 | 70 ÷ 80 | 220 | 1 | 60 ÷ 70 | 200 | Cut the fennel into four pieces, add butter, salt and potatoes if required and place in a Pyrex face up. Cover the dish. |
| Courgettes | 800 gr 1 | 70 220 1 | 60 ÷ 70 | 200 | Slice the courgettes, place in a Pyrex dish and add butter and salt. | |||
| Potatoes | 800 gr | 2 | 60 ÷ 65 | 220 | 2 | 60 ÷ 65 | 200 | Cut the potatoes into equal parts and place in a Pyrex dish. Season with salt, origano and rosemary. Cook in oil. |
| Carrots | 800 gr | 1 | 80 ÷ 85 | 220 | 1 | 70 ÷ 80 | 200 | Slice the carrots, place in a Pyrex dish and cook. |
| Fruit | ||||||||
| Whole apples | Kg 1 | 1 | 45 ÷ 55 | 220 | 2 | 45 ÷ 55 | 200 | Bake the fruit in an open Pyrex or earthen-ware dish. Leave it to cool inside the oven. |
| Pears | Kg 1 | 1 | 45 ÷ 55 | 220 | 2 | 45 ÷ 55 | 200 | Follow procedure above. |
| Peaches | Kg 1 | 1 | 45 ÷ 55 | 220 | 2 | 45 ÷ 55 | 200 | Follow procedure above. |
| Grilling | ||||||||
| Place the food to be grilled underneath the infra-red grill. Warning: When the grill is on it takes on a bright red colour. Place the tray underneath the grill to collect juices and fat from the food being grilled. | ||||||||
| Squares of bread for toasting | 4 pieces 4 | 5(5 to heat up grill) | grill | 4 | 5(10 to heat up grill) | grill | Lay the bread on the grill tray. When one side of the bread has been toasted, turn over and toast the other side. Remember: keep the toast warm at the bottom of the oven until you are ready to serve it. | |
| Toasted sandwiches | 4 | 3 | 10(10 to heat up grill) | grill | 3 | 5/8(10 to heat up grill) | grill | Lay the bread on the grill tray. When one side of the sandwich has been toasted, turn over and toast the other side. |
| Sausages | n°6 / Kg 0,9 | 4 | 25/30(5 to heat up grill) | grill | 4 | 15/20(10 to heat up grill) | grill | Cut the sausages in half and lay them face down on the grill. Half way through grilling turn them over. Every so often, check that they are being cooked equally all over. (If this is not happening, turn and reposition the ones being cooked ether less or more than the others. |
| Ribs of beef | n°4 / Kg 1,5 | 4 | 25(5 to heat up grill) | grill | 4 | 15/20(10 to heat up grill) | grill | Make sure that the ribs of beef are exposed to the full effect on the main grill. |
| Chicken legs | n°4 / Kg 1,5 | 3 | 50/60(5 to heat up grill) | grill | 3 | 50/60(10 to heat up grill) | grill | Turn them over twice during grilling. |
INSTRUCCIONES GENERALES
natural_image
Technical line drawing of a ceiling grating with an arrow indicating direction (no text or symbols)natural_image
Two electronic components: a black square labeled D and a wire mesh labeled C, shown against a plain background (no text or symbols beyond labels)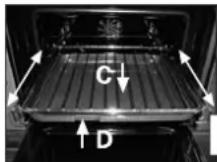
natural_image
Close-up of a hand holding a tool with arrows indicating direction (no text or symbols visible)LA COCCIÓN AL GRILL
natural_image
Technical line drawing of a ceiling grating with an arrow indicating direction (no text or symbols)natural_image
Two labeled geometric shapes: a black square with 'D' and a white grid-like pattern with 'C' (no text or symbols on the shapes themselves)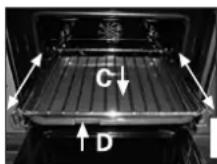

natural_image
Close-up of a hand holding a small object with arrows indicating direction (no visible text or symbols)GRILLEREN
natural_image
Diagram of a ceiling structure with an arrow indicating direction, no text or symbols presentnatural_image
Two labeled geometric shapes: a black square with 'D' and a gray grid-like pattern with 'C' (no text or symbols on the shapes themselves)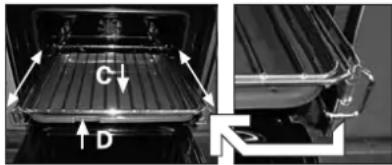
natural_image
Interior view of a vehicle showing a rectangular tray with labeled dimensions C and D, and a side view of the tray with arrows indicating direction (no text or symbols beyond labels)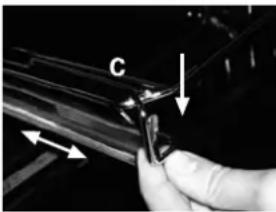
natural_image
Close-up of a hand holding a small object with arrows indicating direction (no text or symbols visible)GRILLEN
natural_image
Architectural line drawing of a building facade with grid lines and a directional arrow (no text or symbols)Para remover as prateleiras
natural_image
Two labeled geometric shapes: a black square with 'D' and a gray grid with 'C', both without any text or symbols.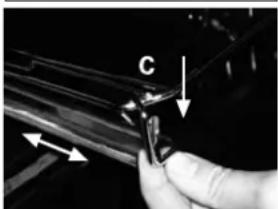
natural_image
Close-up of a hand holding a tool with arrows indicating direction (no text or symbols visible)GRELHAR

GBAFICA
communication and service
IT
The manufacturer will not be responsible for any inaccuracy resulting from printing or transcript errors contained in this brochure. We reserve the right to carry out modifications to products as required, including the interests of consumption, without prejudice to the characteristics relating to safety or function.
ES
- BUILT-IN ELECTRONIC OVEN
- HORNO EMPOTRABLE ELCTRÓNICO
- ELCTRONISCHE INBOUWOVEN
- MULTIFUNKTIONSBACKOFEN MIT
- AVVERTENZE GENERALI
- DECLARATION OF COMPLIANCE
- SAFETY HINTS
- INSTALLATION
- FITTING THE OVEN INTO THE KITCHEN UNIT
- IMPORTANT
- CONNECTING TO THE POWER SUPPLY
- USEFUL TIPS
- SHELF SAFETY SYSTEM
- TELESCOPIC SHELF KIT
- GRILLING
- COOKING TIME
- CLEANING AND MAINTENANCE
- SELF-CLEANING OVEN WITH CATALYTIC
- SERVICE CENTRE
- THE PROGRAMMER
- WARNING
- OPERATING INSTRUCTIONS
- - If the clock is not set the oven will not work and 12:00 will flash on the display.
- TABLES OF COOKING TIMES
- INSTRUCCIONES GENERALES
- LA COCCIÓN AL GRILL
- GRILLEREN
- GRILLEN
- GRELHAR
- IT
- ES
Brand : HOOVER
Model : HOP455 X
Category : Oven