CHDD 12010 RC X - Range hood Fulgor Milano - Free user manual and instructions
Find the device manual for free CHDD 12010 RC X Fulgor Milano in PDF.


| Product Type | Downdraft Range Hood |
| Brand | Fulgor Milano |
| Model | CHDD 12010 RC X |
| Dimensions (W x D x H) | Approx. 1090 x 500 x 250 mm |
| Weight | Approx. 25 kg |
| Power Supply | 230 V ~ 50/60 Hz |
| Motor Power | 250 W |
| Exhaust Diameter | 150 mm (round) or 220x90 / 230x80 mm (rectangular) |
| Modes | Extraction (ducted) or Recirculation (with carbon filters) |
| Controls | Electronic touch buttons A, B, C, D, E, F; remote control |
| Speed Settings | Multiple speeds (adjustable via + and - buttons) |
| Timer | Automatic shut-off after 10 minutes (via button B long press) |
| Safety Features | Micro-switches to stop movement if cover obstructed; automatic stop on obstacle |
| Filters | Metal grease filters (washable) and optional carbon filters for recirculation |
| Filter Cleaning | Metal filters every 2-3 months with hot water and mild detergent |
| Carbon Filter Replacement | Every 4 months (if used 2 hours daily) |
| Material | Stainless steel (satin finish) |
| Installation | Built-in countertop; requires hole in worktop (dimensions per manual) |
| Compliance | EU Directive 2002/96/EC (WEEE) |
Frequently Asked Questions - CHDD 12010 RC X Fulgor Milano
User questions about CHDD 12010 RC X Fulgor Milano
0 question about this device. Answer the ones you know or ask your own.
Ask a new question about this device
Download the instructions for your Range hood in PDF format for free! Find your manual CHDD 12010 RC X - Fulgor Milano and take your electronic device back in hand. On this page are published all the documents necessary for the use of your device. CHDD 12010 RC X by Fulgor Milano.
USER MANUAL CHDD 12010 RC X Fulgor Milano
natural_image
Symbol of a trash bin crossed with no text or labelsGB This product complies with EU Directive 2002/96/EC.
The crossed bin symbol on the appliance indicates that the product, at the end of its life, must be disposed of separately from domestic waste, either by taking it to a separate waste disposal site for electric and electronic appliances or by returning it to your dealer when you buy another similar appliance. The user is responsible for taking the appliance to a special waste disposal site at the end of its life. If the disused appliance is collected correctly as separate waste, it can be recycled, treated and disposed of ecologically; this avoids a negative impact on both the environment and health, and contributes towards the recycling of the product's materials. For further information regarding the waste disposal services available, contact your local waste disposal agency or the shop where you bought the appliance.
natural_image
Technical line drawing showing a door panel installation and internal components, including a close-up of the base panel (no text or symbols present)natural_image
Close-up of a mechanical clamp or bracket assembly with two white arrows pointing to a component, no visible text or symbols.ALLACCIAMENTO ELETTRICO
natural_image
Exterior view of a device with labeled components (F) and cable, no readable text or symbols beyond labelsnatural_image
Metallic industrial cabinet with open lid and internal structure (no visible text or symbols)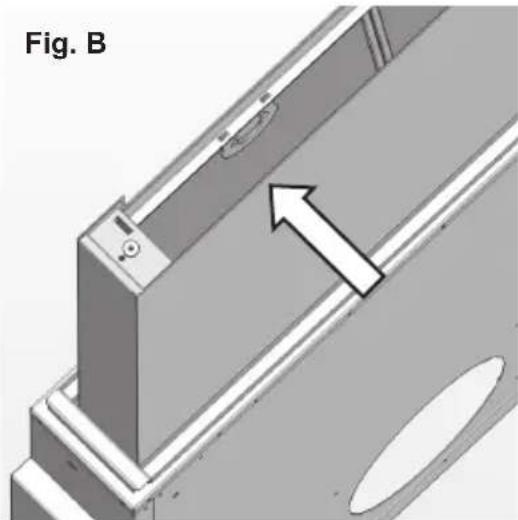
natural_image
3D mechanical assembly diagram showing a component with an arrow indicating direction (no text or symbols)natural_image
Exterior view of a modern office building (no signage)Filtri carbone
ATTENTION: The downdraft must only be installed from a qualified technician. Every responsibility regarding installations from unauthorized persons will be declined.
Before proceeding with the downdraft installation, please read carefully these instructions.
Keep this booklet together with the downdraft.
WARNING
ATTENTION: When the downdraft is closed, do not put pots or other containers on it, in order to avoid eventual spills in phase of opening.
The downdraft is equipped of a security system of micro-switches that blocks the movement of the downdraft in case the cover would raise. In phase of closure of the downdraft, if some object is between the cover and the work top, the raising of the cover will block the movement. In order to reactivate the movement it will be sufficient to replace the cover and activate the desired command.
Do not let children or disabled people use the downdraft if not in presence of adults.
Before cleaning or performing any periodic maintenance of the downdraft always ensure the electric power is turned off by removing the plug from the socket and turning the main switch to position 0 (OFF).
Do not connect the downdraft to any piping used for combustion appliances, such as burners, boilers or fireplaces.
Check that the main power supply corresponds to the voltage required by the downdraft (see silver label on the electric box).
Ensure that the electric system is correctly earthed and that the earth discharge works correctly.
When cooking do not use materials that could form high or unusual flames. Oil and fat used twice are particularly dangerous and could easily catch on fire.
Do not prepare flambé dishes under the hood.
Respect local legislation and regulations issued by the relative authorities regarding the exhaust air when the suction is operating.
Failure to respect and perform all the maintenance operations described in this booklet could cause a fire hazard.
INSTALLATION
The suction of the downdrafts, regarding the traditional hoods, is penalized in the suction of the cooking vapors of the front pots. For this reason the use of a panoramic glass ceramic top is suggested.
The downdraft can be used for both filtering and suction.
When the filtering function is operating, with air recycle, carbon filters must be used.
When the downdraft is used in the filtering function, there must be a suitable section for spillage of the air suction on the base of the kitchen.
When the suction function is operating, exhausting the filtered air on the outside, a suitable compensation system must be used according to current standards in force. The diameter of the fume exhaust pipe must be the same or greater than the diameter of the downdraft pipe union.
There must be sufficient ventilation in the room where the downdraft is installed, to allow the simultaneous use of other appliances that use gas or other fuels.
ASSEMBLY INSTRUCTIONS
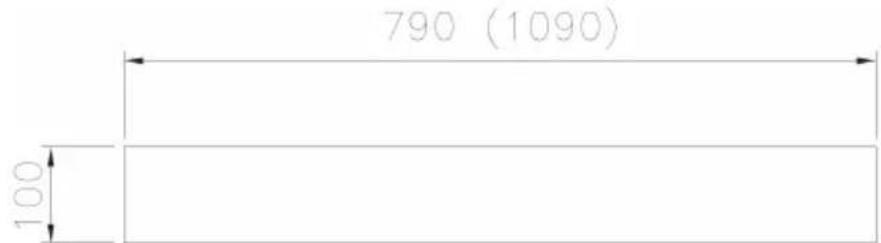
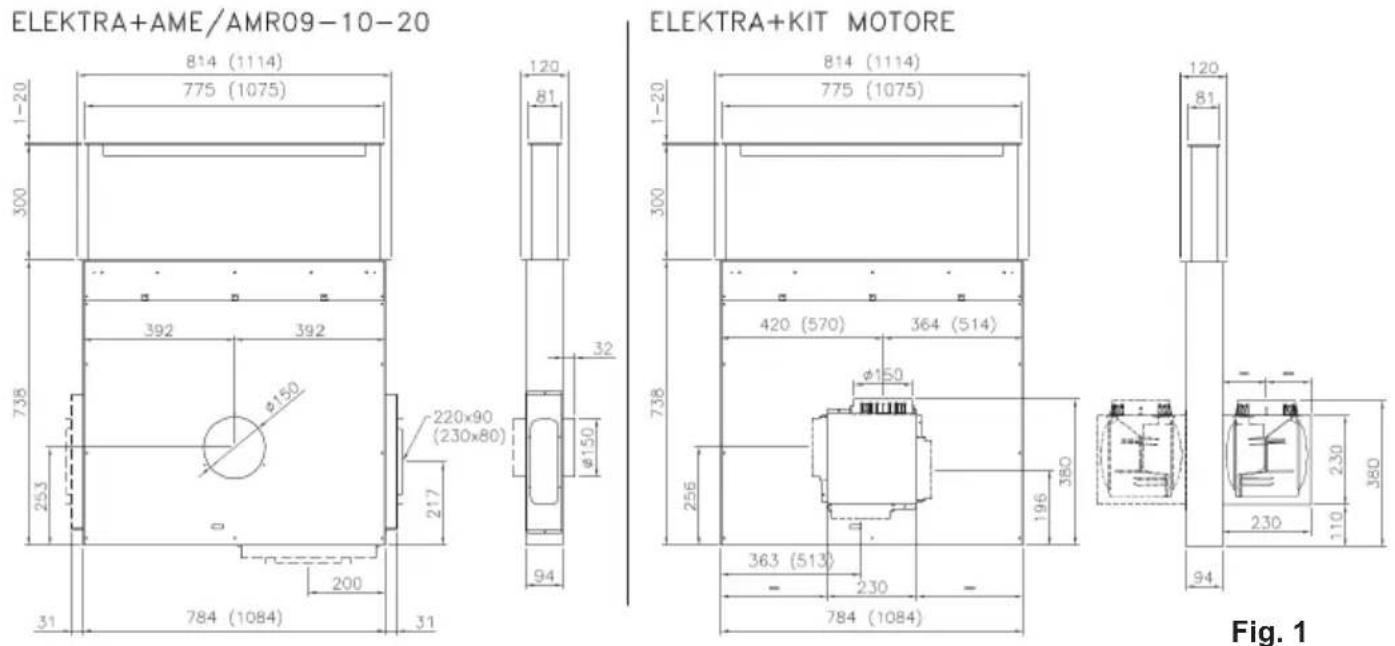
Make a hole in the downdraft approximately 50mm from the work top hole.
For the dimensions of the hole, see drawing here below.
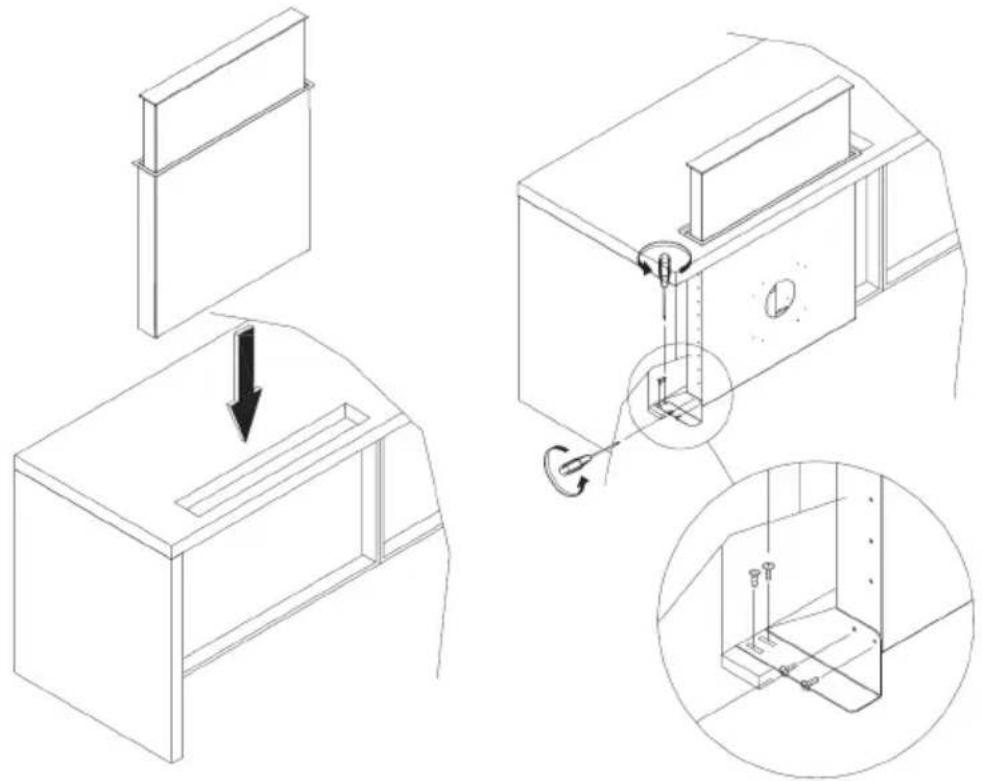
In the INOX version, the gluing of the cover (as rule, use the same material of the work top) of the downdraft, must be performed in the same place after finishing the assembly of the downdraft.
The support for the gluing of the cover is supplied with the downdraft.
natural_image
Technical line drawing showing a door frame installation and internal components, with no visible text or symbols.The controls must be assembled in order to guarantee an eventual attendance of technical assistance.
In the kitchen furniture, provide in front of the downdraft a removable wall.
It is possible to connect on the front or on the back part of the downdraft a tube of diameter 150. It is possible to connect on the side of the downdraft a tube 220x90 or 230x80 on both sides.
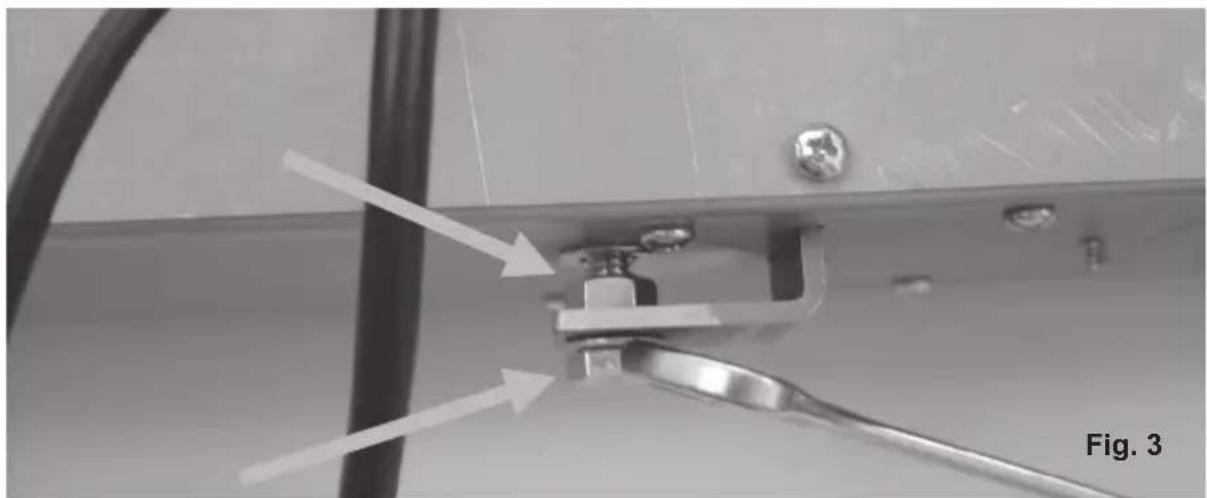
As for the height adjustment of the moving part of the downdraft, see Fig. 2. According to the thickness of the cover, it is possible to adjust of 20mm.
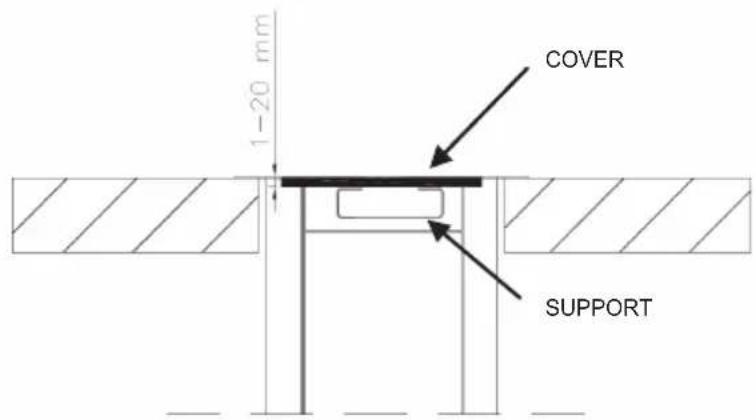
Fig. 2
This adjustment is possible by acting on the two nuts that secure the central pivot of the actuator Fig.3
natural_image
Close-up of a mechanical assembly with arrows pointing to a component, labeled 'Fig. 3' (no readable text or symbols beyond label)ELECTRIC WIRING
Safety Instructions:
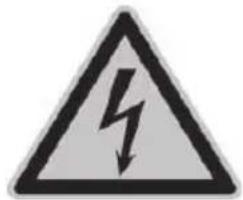
- Before any manipulation of the controller power cord (230 volt)
- Before each operation, all devices connected
• Electrical connections must be performed by professionals
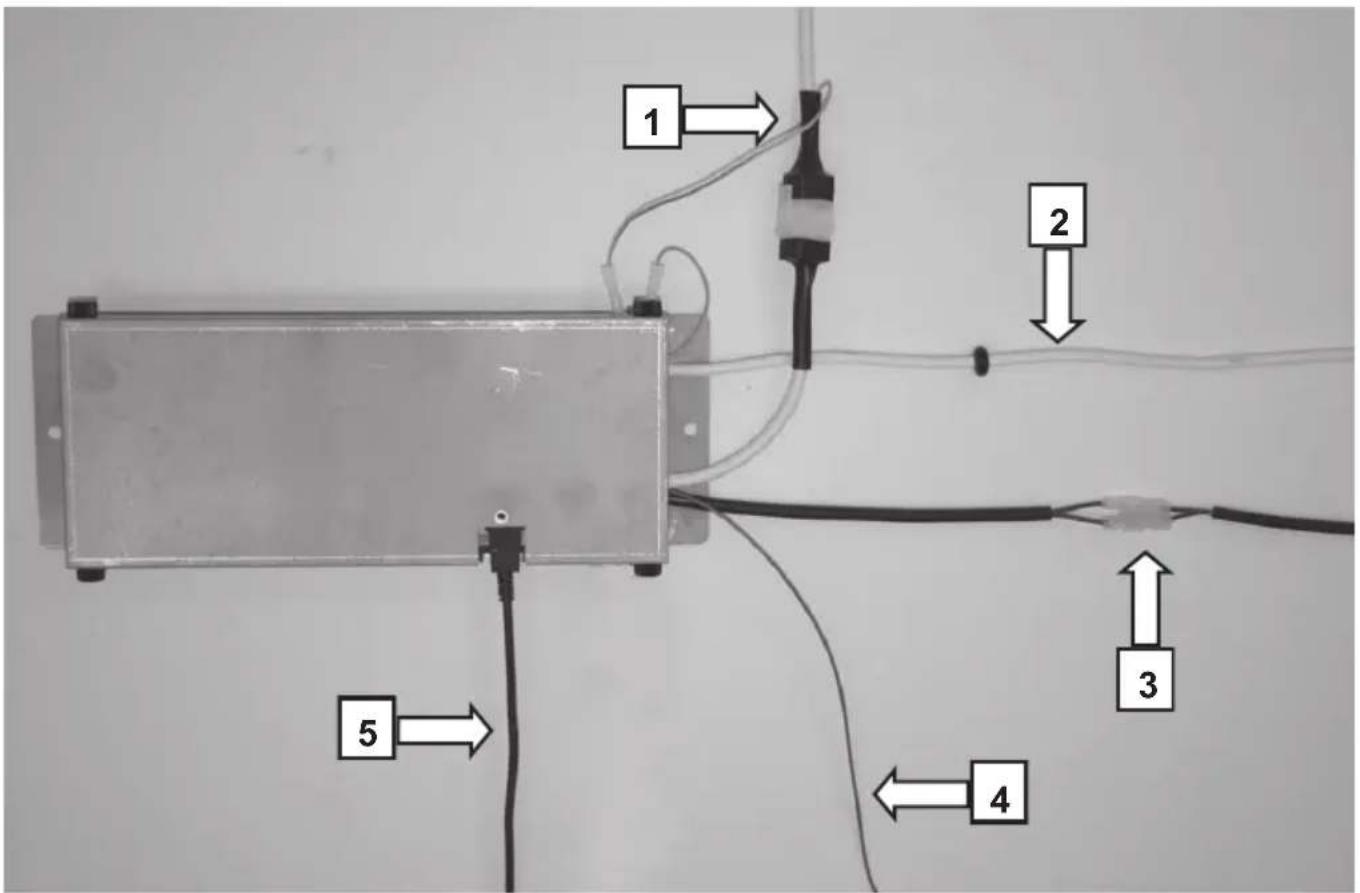
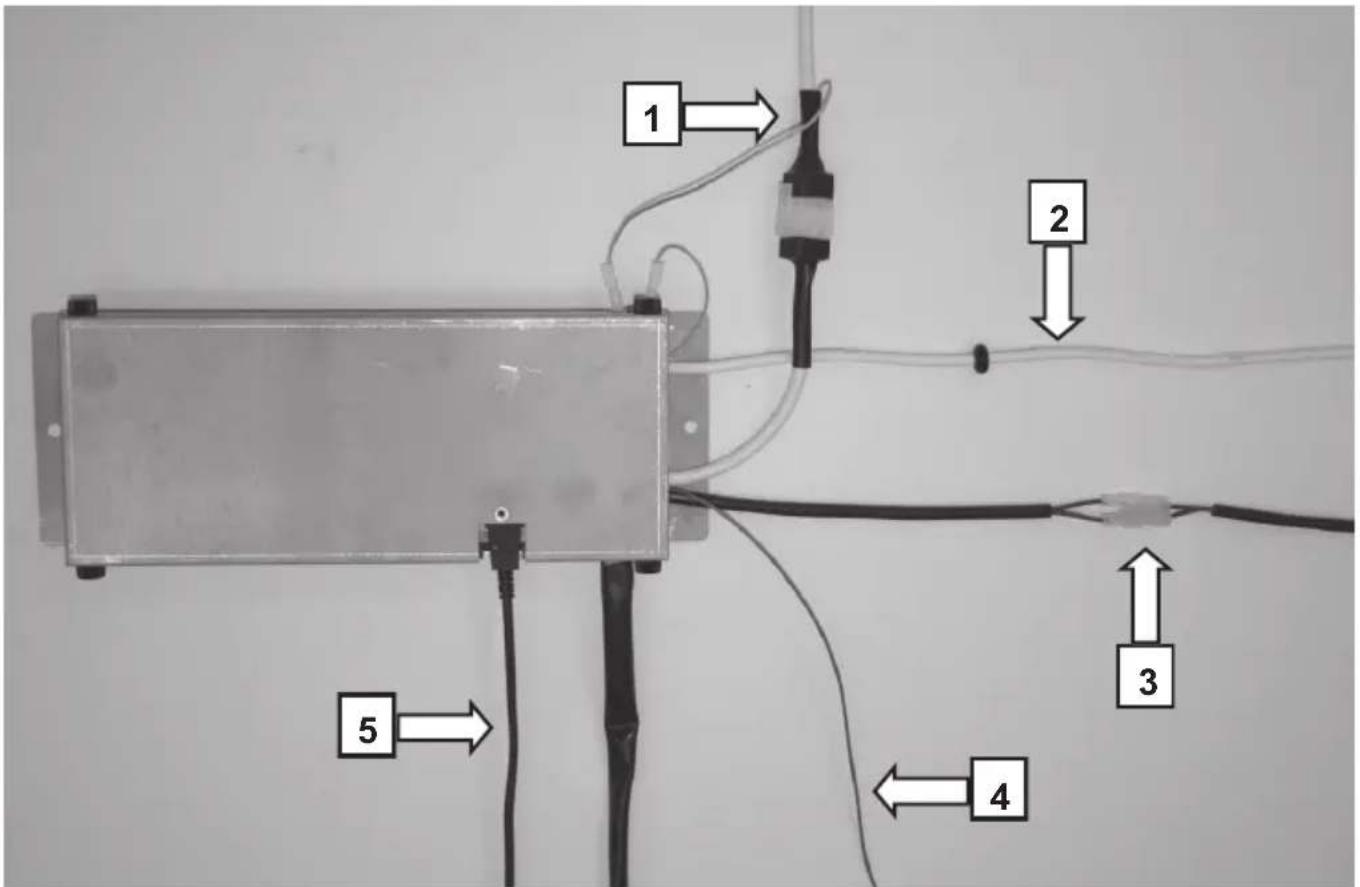
1 - External motor connector
2 - Power supply 230V
3 - Cable with faston for microswich hood
4 - Remote control antenna cable (has to remain free)
5 - Hood activator cable
ELEKTRA CONTROL FUNCTIONS
PLEASE NOTE : THE SUCTION OF THE DOWNDRAFT CAN BE STARTED ONLY WHEN THE DOWNDRFT IS COMPLETELY EXTRACTED.
flowchart
graph TD
    A["A"] --> B["-"]
    B --> C["○"]
    C --> D["D"]
    C --> E["E"]
    C --> F["+"]
    F --> C
    style A fill:#f9f,stroke:#333
    style B fill:#f9f,stroke:#333
    style C fill:#ccf,stroke:#333
    style D fill:#cff,stroke:#333
    style E fill:#cff,stroke:#333
    style F fill:#cfc,stroke:#333
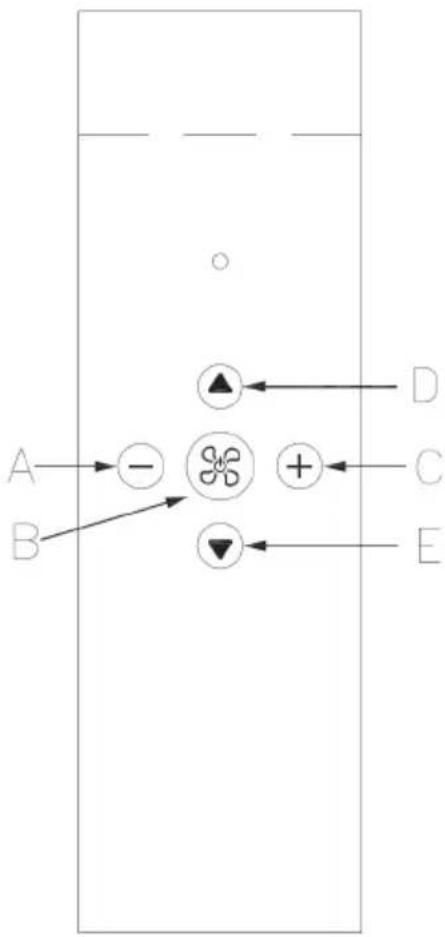
BUTTON "A"
With suction motor turned on, every time the button is pressed the motor speed will be reduced of one step.
BUTTON "B"
With the downdraft completely removed, the suction motor can be turned on and/or off.
While pressing the button long enough, the suction motor turns off automatically.
The activation of the timer is signaled by the blue flashing led and the suction motor turns off after 10 minutes.
BUTTON "C"
With suction motor turned on, every time the button is pressed the motor speed will be increased of one step.
BUTTON "D"
By pressing the button once, the downdraft is completely extracted.
If the button is pressed while the downdraft is moving, the downdraft automatically stops.
To restart the movement, it is necessary to press button "D" or "E".
BUTTON "E"
By pressing the button once, the downdraft returns in completely.
If the button is pressed while the downdraft is moving, the downdraft automatically stops.
To restart the movement, it is necessary to press button "D" or "E".
If the button is pressed when the suction motor is on, the motor automatically turns off.
NOTES:
natural_image
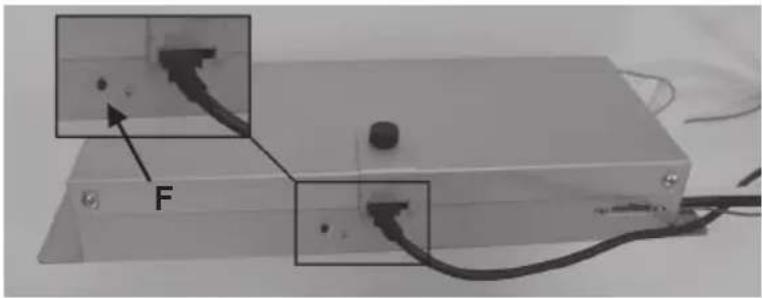
Exterior view of a server rack with cable and connector, labeled 'F' (no readable text or symbols beyond labels)- At first use it is necessary to start the remote control learning.
When the downdraft is turned off, keep button "F" pressed for a long time.
The remote control learning is indicated with the flashing led.
If, within one minute there is a valid remote control code (sent by pressing any button of the remote control), the led will be on
continuously for 3 seconds and then it will turn off, indicating the proper learning.
USE AND MAINTENANCE
Before beginning any sort of cleaning and maintenance work, turn off the power of the downdraft by turning the main switch to 0 (OFF).
Cleaning the metal filters
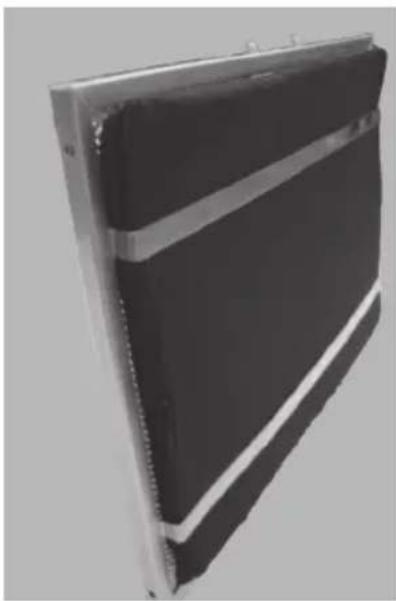
The metal filters fitted in the downdraft should be washed every 2-3 months depending on how much they are used, using hot water and a non aggressive liquid detergent.
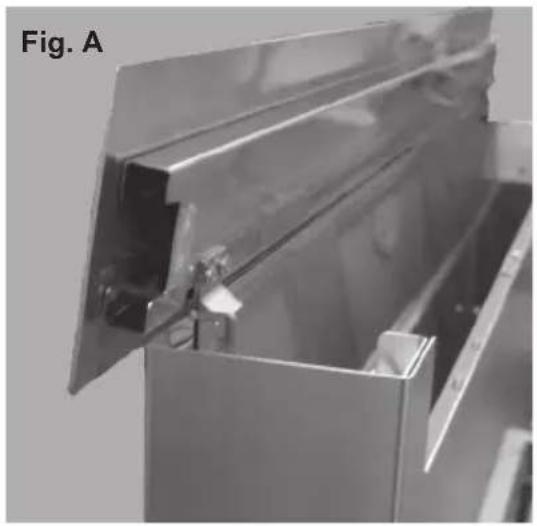
To access the metal filters, you must open the cover from the downdraft. In order to open the cover,
take the cover out from the downdraft and open the cover lifting it upwards. (Fig.A)
The metal filters can be removed using the special handle unhooking first the filter in the front part and pulling up. (Fig.B)
natural_image
Close-up of a metallic industrial component with internal structure and mounting bracket (no visible text or symbols)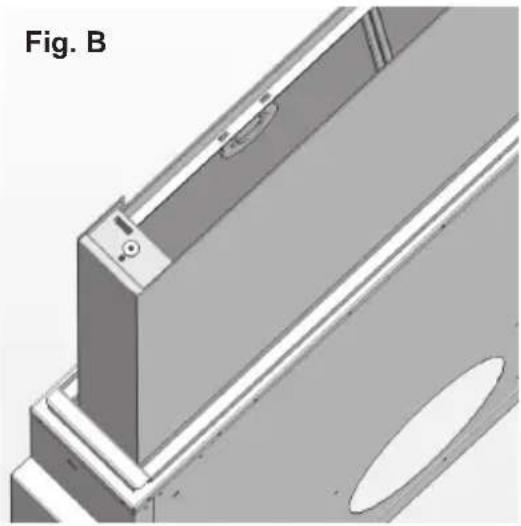
natural_image
3D CAD model of a mechanical component with mounting holes and a circular cutout (no text or symbols)After washing the filters, they must be thoroughly dried and reassembled correctly.
natural_image
Exterior view of a dark rectangular electronic device with metallic frame and visible internal structure (no text or symbols)Carbon filters
If the downdraft is used with the internal recycle filtering system, then active carbon filters must be used.
The active carbon in the filters traps the cooking smells.
Warning: The carbon filters can not be reused or washed and should be changed periodically (every 4 months if the hood is used for two hours every day). Saturated filters cause fire hazards.
The carbon filters are placed underneath the metal filters.
Cleaning the hood
If the downdraft is stainless steel, use specific products and rags for satin stainless steel (non-abrasive and / or corrosive detergents free of chlorine), ensuring to clean in the same direction as the satin finish.
Do not use aggressive products, chemical solvents or derivatives of oil distillates that could leave oily traces which could cause oxidation and polymerization.
The manufacturer is not responsible for damage to the surface of the downdraft due to failure to respect these instructions.
natural_image
Technical line drawing showing a door panel installation and internal components, including a close-up of the interior panel (no text or symbols present)natural_image
Close-up of a mechanical component with two white arrows pointing to a central bolt and a metallic bracket (no text or symbols visible)STROMANSCHLUSS
natural_image
Exterior view of a mechanical device with labeled components (no readable text or symbols)natural_image
Exterior view of a modern office building (no signage)Aktivkohlefilter
natural_image
Technical line drawing showing a door panel installation and internal components, including a close-up of the base panel (no text or symbols present)natural_image
Close-up of a metal bracket with screws and bolts, showing a mechanical assembly with two directional arrows indicating alignment (no text or symbols)LIGAÇÃO ELÉCTRICA
natural_image
Warning sign depicting a lightning bolt symbol (no text or numbers present)natural_image
Exterior view of a server or electronic device with cables and a labeled component 'F' (no readable text or symbols beyond labels)natural_image
Interior view of a metallic industrial cabinet or enclosure with metal panels and internal components (no visible text or symbols)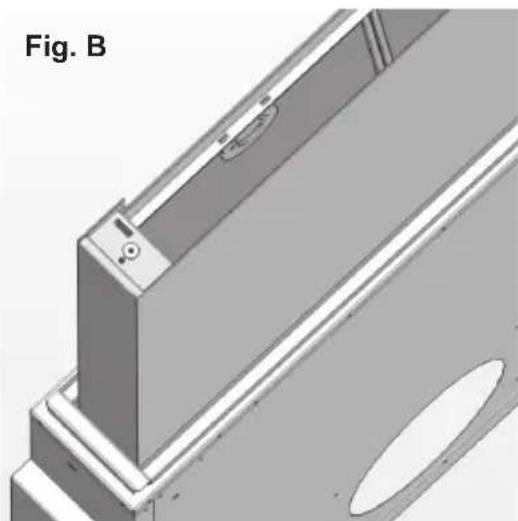
natural_image
3D CAD model of a mechanical assembly with mounting brackets and cutouts (no text or symbols)natural_image
Exterior view of a modern office building (no signage)Filtros carvão
www.fulgor-milano.com - info@fulgor-milano.com
- GB This product complies with EU Directive 2002/96/EC.
- ALLACCIAMENTO ELETTRICO
- Filtri carbone
- WARNING
- INSTALLATION
- ASSEMBLY INSTRUCTIONS
- ELECTRIC WIRING
- Safety Instructions:
- ELEKTRA CONTROL FUNCTIONS
- BUTTON "A"
- BUTTON "B"
- BUTTON "C"
- BUTTON "D"
- BUTTON "E"
- USE AND MAINTENANCE
- Cleaning the metal filters
- Carbon filters
- Cleaning the hood
- STROMANSCHLUSS
- Aktivkohlefilter
- LIGAÇÃO ELÉCTRICA
- Filtros carvão
Brand : Fulgor Milano
Model : CHDD 12010 RC X
Category : Range hood