
IAN 68756 - Uncategorized AURIOL - Free user manual and instructions
Find the device manual for free IAN 68756 AURIOL in PDF.


| Product Type | Radio-Controlled Weather Station |
| Brand | Auriol |
| Model | IAN 68756 |
| Dimensions (Weather Station) | 230 x 150 x 30 mm (B x H x D) |
| Power Supply (Weather Station) | 3 x AA 1.5 V batteries (included) |
| Power Supply (Outdoor Sensor) | 2 x AAA 1.5 V batteries (included) |
| Temperature Range (Indoor) | 0 °C to +50 °C (32 °F to 122 °F) |
| Temperature Range (Outdoor) | -20 °C to +50 °C (-4 °F to 122 °F) |
| Humidity Range (Indoor) | 20% to 99% RH |
| Radio Signal | DCF (time signal) |
| Transmission Frequency (Sensor) | 433 MHz |
| Transmission Range | Approx. 30 m in open space |
| Features | Weather forecast, barometric pressure trend, moon phases, sunrise/sunset times, dual alarm, 12/24h time, calendar, comfort indicator |
| Backlight | Yes, illuminates for 3 seconds on button press |
| Mounting | Wall-mountable or table stand |
| Cleaning | Wipe with a soft, dry cloth; do not use liquids or detergents |
| Safety | Keep away from children; do not swallow batteries; proper disposal of batteries |
| Spare Parts / Repairability | Batteries replaceable; no user-serviceable parts; professional repair only |
| General Information | CE certified; complies with 1999/5/EC; manufacturer: Milomex Ltd. |
Frequently Asked Questions - IAN 68756 AURIOL
User questions about IAN 68756 AURIOL
0 question about this device. Answer the ones you know or ask your own.
Ask a new question about this device
Download the instructions for your Uncategorized in PDF format for free! Find your manual IAN 68756 - AURIOL and take your electronic device back in hand. On this page are published all the documents necessary for the use of your device. IAN 68756 by AURIOL.
USER MANUAL IAN 68756 AURIOL
Operation and Safety Notes
DE AT CH
FUNK-WETTERSTATION
GB / MT Operation and safety notes Page 34
$$ (M i g n o n, L R O 6, $$
$$ \text { contenida en } $$
$$ (M i c r o, L R O 3, $$
Intended use Page 35
Description of parts and features....Page 35
Technical data......Page 35
Scope of supply Page 35
Safety Page 35
General safety information....Page 36
Safety instructions for batteries....Page 36
Before initial use
Setting up devices....Page 36
Putting the outdoor sensor into operation....Page 36
Putting the weather station into operation....Page 37
Operation
DCF radio signal reception Page 37
Setting the date/language/location/clock/time zone manually....Page 38
Using the 12/24 hour display....Page 39
Setting the alarm time....Page 39
Activating/deactivating the alarm function....Page 39
Displaying the sun and moon rising/setting times Page 39
Moon phases....Page 40
Preparing to use the weather forecasting function....Page 40
Reading the barometric pressure....Page 40
Reading the barometric pressure for the last 12 hours Page 40
Setting the channel....Page 41
Displaying the outdoor temperature....Page 41
Displaying the temperature trend (outdoor)......Page 41
Displaying the indoor temperature....Page 41
Displaying temperatures in °C/°F Page 41
Displaying the air humidity (indoor) Page 41
Displaying the maximum / minimum temperature / humidity ......Page 41
Backlight Page 42
Battery state display....Page 42
Replacing the batteries....Page 42
Troubleshooting Page 42
Cleaning and maintenance Page 42
Disposal Page 42
Information
Declaration of conformity....Page 42
Radio-controlled weather station
- Intended use
The weather station displays the indoor and outdoor temperatures in Celsius (°C) or Fahrenheit (°F), the indoor air humidity in percent (% RH) and their maximum and minimum values. The weather station also displays the weather forecast, the time in 12 / 24-hour clock modes and the date. The weather station also displays the sunrise and sunset times for that day and the phase of the moon. In addition, the weather station has an alarm and calendar function. The device is not intended for commercial use.
● Description of parts and features
Weather station
| 1 | Weather symbol |
| 2 | Barometric pressure bar display |
| 3 | Indoor air temperature |
| 4 | Comfort indicator |
| 5 | Air humidity (%RH) (indoor) |
| 6 | Moon phase |
| 7 | Moon rise/set |
| 8 | Location |
| 9 | Sunrise/sunset |
| 10 | ALARM button |
| 11 | ▼ button |
| 12 | SNOOZE/LIGHT button |
| 13 | Alarm icon |
| 14 | ▲12/24 button |
| 15 | MODE button |
| 16 | Date (year, month, day) |
| 17 | Time display |
| 18 | Radio tower symbol |
| 19 | Barometric pressure of previous hour |
| 20 | Absolute/ relative barometric pressure |
| 21 | Temperature trend (outdoor) |
| 22 | Selected channel |
| 23 | Battery state indicator |
| 24 | Outdoor temperature |
| 25 | Barometric pressure trend |
| 26 | Channel button (CHANNEL) |
| 27 | HISTORY/WEATHER button(Weather data memory) |
| 28 | “+”/ °C/ °F button |
| 29 | “-”/ MAX/MIN button |
| 30 | Relative / absolute barometric pressure button |
| 31 | SUN/MOON button (Sun/moon) |
| 32 | Wall mounting hole |
| 33 | Reset button |
| 34 | Battery compartment |
| 35 | Stand |
Sensor
| 36 | Control LED |
| 37 | Outdoor temperature / outdoor sensor channel |
| 38 | Wall mounting hole |
| 39 | Channel selector switch |
| 40 | Battery compartment |
41 °C/°F button
42 TX button ("Channel setting button")
43 Stand
- Technical data
Weather Station:
| Temperature range: 0 - +50 °C | |
| +32 - +122 °F | |
| Temperature resolution: 0.1 °C | |
| Humidity | |
| measurement range: | 20%-99% |
| Humidity resolution: | 1 % |
| Radio signal: | DCF |
| Battery: | 3 x AA 1.5 V(Mignon, LR06, includedin scope of supply) |
| Dimensions: | 230 x 150 x 30 mm(B x H x D) |
Outdoor Sensor:
| Temperature measurement range: | -20 - +50 °C |
| -4 - +122 °F | |
| HF transmission signal: | 433 MHz |
| HF transmission range: | approx. 30 m in open spaces |
| Battery: | 2 x AAA 1.5 V (Micro, LR03, included in scope of supply) |
- Scope of supply
Please check the supplied items immediately after unpacking the device to ensure that there is nothing missing and that the product and all of its parts are in perfect condition.
1 x weather station
1 x outdoor sensor
3 x battery AA 1.5 V (Mignon, LRO6, pre-installed)
2 x dowel
2x screw
2 x battery AAA 1.5 V (Micro, LRO3 pre-installed)
1 x operating instructions

Safety
Please read all safety information and instructions. Failure to comply with the safety information and instructions may result in an electric shock, fire and/or severe injuries.
YOU SHOULD STORE ALL SAFETY INFORMATION AND INSTRUCTIONS IN A SAFE PLACE IN CASE YOU NEED TO REFER TO THEM AGAIN IN THE FUTURE!


● General safety information


DANG WARNING!
TO LIFE AND ACCIDENT HAZARD FOR TODDLERS
AND SMALL CHILDREN! Never allow children to play unsupervised with the packaging material. There is a danger of suffocation from the packaging material. Children frequently underestimate the dangers. Children should be kept away from the product at all times.

DANGER TO LIFE! Batteries can be swallowed, which may represent a danger to life. If a battery has been swallowed, medical help is required immediately.
Children or persons who lack the knowledge or experience to use the device or whose physical, sensory or intellectual capacities are limited must never be allowed to use the device without supervision or instruction by a person responsible for their safety. Children must never be allowed to play with the device.
Do not use the device if it is damaged. Damaged devices represent a danger of death from electric shock!
Please note that the guarantee does not cover damage caused by incorrect handling, non-compliance with the operating instructions or interference with the device by unauthorised individuals.
■ Under no circumstances should you take the device apart. Improper repairs may place the user in considerable danger. Repairs should only be carried out by specialist personnel.

Safety instructions for batteries
■ Remove the batteries from the device if they are not going to be used for a prolonged period.

CAUTION! DANGER OF EXPLOSION!
The batteries must never be recharged!
When inserting the batteries, ensure the correct polarity! This is shown in the battery compartments.
If necessary, clean the batteries and device contacts before inserting the batteries.
■ Remove spent batteries immediately from the device. There is an increased danger of leaks!
■ Batteries must not be disposed of in the normal domestic waste!
■ Every consumer is legally obliged to dispose of batteries in the proper manner!
- Keep batteries away from children. Do not throw batteries into a fire. Never short-circuit them or take them apart.
■ Always replace all the batteries at once.
■ Use batteries of the same type only.
If the above instructions are not complied with, the batteries may discharge themselves beyond their end voltage. There is a danger of leaking. If the batteries have leaked inside your device, you should remove them immediately in order to prevent damage to the device!
Avoid contact with the skin, eyes and mucous membranes. Any parts of the body coming into contact with battery acid should be rinsed off with copious amounts of water and/or a doctor contacted if necessary!
- Before initial use
- Setting up devices
⚠️ CAUTION! When selecting a location to set up the devices, please ensure that they are not exposed to any direct sunlight, vibrations, dust, heat, cold or moisture. Do not place the
devices close to sources of heat, e.g. radiators. Otherwise they may be damaged.
Place the weather station on the accompanying base 35.
Note: Please ensure that the pins in the stand 35 are inserted into the corresponding recesses on the weather station.
Do not place the devices on valuable or sensitive surfaces unless these are appropriately protected. Otherwise they may be damaged.
Do not place the devices near sources of interference such as television sets, computers, thick walls, thermopane windows etc. Otherwise the transmission of radio waves between the devices may be impaired.
☐ Please ensure that neighbouring devices are not operated at the same frequency of 433 MHz. Such devices may cause interference to the radio connection.
☐ Do not place the devices next to or on metal plates. Otherwise the quality of radio wave transmission may be reduced.
Do not install the devices in buildings made of reinforced concrete, e.g. airports, high-rise buildings, factories or cellars. Otherwise the transmission of the radio waves between the devices may be severely impaired.
☐ In open spaces do not place the devices more than 30 metres apart, as otherwise transmission of the radio waves may be interrupted.
- Putting the outdoor sensor into operation
Removing the battery safety strip:
☐ Remove the battery compartment cover from the back of the outdoor sensor.
☐ Remove the battery safety strip. The outdoor sensor is now ready for operation and the control LED 36 lights up briefly.
☐ Close the battery compartment cover.
Installing the Outdoor Sensor:
Note: For this step you need a drill.
☐ Find an appropriate place for the outdoor sensor.
Note: Please ensure that you install the outdoor sensor within a radius of 30 m from
the weather station. Check that there are no obstacles between the outdoor sensor and the weather station. Otherwise there may be interference of the transmission of data.
For wall mounting:
☐ Hang the outdoor sensor with the mount on one screw.
- Putting the weather station into operation
Removing the battery safety strip:
Open the battery compartment on the back of the weather station.
☐ Pull out the battery safety strip.
Then close the battery compartment.
Press the RESET button. All of the symbols light up briefly.
As soon as the battery safety strip has been removed, the weather station starts to receive the radio signal.
Note: Do not change the location of the weather station during reception. Otherwise there may be interference.
For wall mounting:
- Hang the weather station with the mount 32 on one screw.
For free standing:
Turn the stand out from the bottom of the weather station.
Connecting the weather station with the outdoor sensor and the DCF radio signal:
After removal of the battery safety strip the weather station attempts to establish a connection with the outdoor sensor. This process may take a few minutes. When the connection with the outdoor sensor has been successfully established, the selected channel symbol 22 is shown the channel of the outdoor sensor (To change the channel of the sensor, see "Setting the channel"). If the connection with the outdoor sensor is not established automatically, this can be done manually by pressing TX button 42 of the sensor".
As soon as the weather station has established a connection with the outdoor sensor it automatically begins to receive the DCF radio signal. This procedure takes a few minutes and is shown in the LC display by the flashing radio tower symbol 18.
When the DCF radio signal is being successfully received, the radio tower symbol 18 is shown permanently in the display. If at the time of putting the device into operation it is not possible to synchronise with the atomic clock, you can also carry out the clock adjustments manually (see "Setting the Date/Language/Time/Time Zone Manually").
Radio Signal (DCF):
The DCF signal (time signal transmitter) consists of time pulses emitted by one of the most accurate
clocks in the world close to Frankfurt / Main, Germany - this varies by 1 second in a million years.
Your weather station receives these signals under ideal conditions up to a distance of approximately 1,500 km around Frankfurt / Main. Reception of the radio signal usually takes about 3–10 minutes.
If your weather station is not working correctly, please perform a new start by pressing the RESET button 33.
Reception can be considerably impaired by obstacles (e.g. concrete walls) or sources of interference (e.g. other electrical devices). If necessary, change the location of the radio clock (e.g. by putting it near a window) if you have problems with reception.
Operation
- DCF radio signal reception
After the establishment of a connection with the outdoor sensor the weather station automatically begins to search for the DCF radio signal. The search is shown in the LC display by the radio tower symbol 18 flashing.
Note: During the search for the signal, all function buttons except for the SNOOZE / LIGHT button 12 are blocked on the weather station.
Note: In buildings made of reinforced concrete the reception of the radio signal may be severely impaired (see "Setting up devices").
In order to correct any deviations from the exact time, the clock is automatically synchronised with the DCF radio signal every day at 01:00, 02:00 and 03:00. If the synchronisation with the DCF signal does not succeed, the radio tower signal goes out [18]. In this case, the weather station attempts to conduct a synchronisation with the DCF radio tower at 04:00 and 05:00. Reception of the DCF radio signal can also be started manually on the weather station.
☐ Press and hold down the ▼/↑ button 11 for 3 seconds. The weather station attempts to receive the DCF radio signal. This process takes several minutes and is indicated in the LC display by a flashing radio tower symbol 18.
If the connection with the DCF radio signal cannot be established, the search is stopped. A further attempt to establish a connection is made automatically on the next full hour.
Note: If the clock of the weather station cannot receive the DCF radio signal due to errors, too great a distance from the transmitter or similar reasons, it is possible to set the time manually. As soon as the DCF radio signal is successfully received, the values that have been set manually are overwritten.


Operation
- Setting the date/language/location/clock/time zone manually
At the location site of the weather station, reception of the DCF radio signal may be impaired or interrupted. In this case it is possible to adjust the device manually.
Follow these steps:
-
Press and hold down the MODE button 15 for about 3 seconds. The time zone display flashes. Press the ▼/button 11 and the ▲/12/24 button 14 to set the desired value. Note: The standard setting for the time zone is GMT+1. Set the weather station to correspond to your time zone. Confirm your setting by pressing the MODE button 15.
-
The hour value of the time display [17] flashes. Press the ▼/button [11] and the ▲/12/24 button [14] to set it to the desired value.
Tip: By keeping the ▼/button 11 and the ▲/12/24 button 14 pressed, you accelerate the process and reach the desired value more quickly. This quicker method can also be used for making the other settings. If during a period of 30 seconds no buttons are pressed, the LC display returns automatically to the default display.
-
Confirm your settings by pressing the MODE button 15. The minute value of the time display 17 flashes. Press the ▼ button 11 and the ▲/12/24 button 14 to set it to the desired value.
-
Confirm your settings by pressing the MODE button 15. The second value of the time display 17 flashes. Press the ▼ button 11 or the ▲/12/24 button 14 to set the second value to 0.
-
Confirm your settings by pressing the MODE button 15. The year value flashes in the time display 17. Press the ▼ button 11 and the ▲/12/24 button 14 to set it to the desired value.
-
Confirm your settings by pressing the MODE button 15. The month value of the date display 16 flashes. Press the ▼ button 11 and the ▲ 12/24 button 14 to set it to the desired value.
-
Confirm your settings by pressing the MODE button 15. The day value of the date display 16 flashes. Press the ▼ button 11 and the ▲/12/24 button 14 to set it to the desired value.
-
Confirm your settings by pressing the MODE button 15. The language field for the name of the day of the week of the date display 16 flashes. Press the ▼/button 11 and the ▲/12/24 button 14 to set it to the desired language.
Note: You have the choice of German, English, Russian, Danish, Dutch, Italian, Spanish and French.
Note: The weather station is supplied in the default setting of German (GER).
-
Confirm your settings by pressing the MODE button 15. The location display for country 8 flashes. Press the ▼/button 11 and the ▲/12/24 button 14 to set it to the desired country. Confirm your setting by pressing the MODE button 15. The location display for city 8 flashes. Press the ▼ button 11 and the ▲/12/24 button 14 to set it to the desired city.
-
Confirm your settings by pressing the MODE button 15.
You can choose from the following countries and cities:
| Germany GER | Nürnberg | NUE | La Corogna | LAC | Metz MET | Manchester | MAN | ||
| Aachen AAC | Regensburg | REG | Leon | LEO | Nantes | NAN | Plymouth | PLY | |
| Berlin BER | Stuttgart STU | Las Palmas | LPA | Nice | NIC | Hungary | HUN | ||
| Düsseldorf DUS | Saarbruecken | SAA | Madrid | MAD | Orléans | ORL | Budapest | BUD | |
| Dresden DRE | Schwerin | SCH | Malaga | MAL | Paris | PAR | Croatia | CRO | |
| Erfurt ERF | Danmark DAN | Palma de Mallorca | PDM | Perpignan | PER | Zagreb | ZAG | ||
| Frankfurt FRA | Albørg | ALB | Lille | LIL | Italy ITA | ||||
| Flensburg FLE | Arhus ARH | Salamanca | SAL | Rouen | ROU | Ancona ANC | |||
| Freiburg | FRE | Copenhagen | COP | Sevilla | SEV | Strasbourg | STR | Bari | BAI |
| Hannover | HAN | Odense | ODE | Valencia VAL | Toulouse TOU | Bologna | BOL | ||
| Bremen | BRE | Spain, Andorra | ESP | Zaragossa | ZAR | Finland | FIN | Cagliari | CAG |
| Hamburg | HAM | France | FRA | Helsinki HEL | Catania | CAT | |||
| Rostock | ROS | Alicante | ALI | Besançon BES | Great Britain | GB | Firenze | FIR | |
| Stralsund | STR | Andorra AND | Biarritz | BIA | Aberdeen | ABD | Foggia | FOG | |
| Köln | KOE | Badajoz | BAD | Bordeaux BOR | Belfast | BEL | Genova | GEN | |
| Kiel | KIE | Barcelona | BAR | Brest | BRE | Birmingham | BIR | Lecce LEC | |
| Kassel | KAS | Bilbao | BIL | Cherbourg | CHE | Bristol | BRI | Messina | MES |
| Leipzig | LEI | Cadix | CAD | Lyon | LYO | Edinburgh | EDI | Milano | MIL |
| München | MUE | Cordoba | COR | Marseille | MAR | Glasgow | GLA | Napoli | NAP |
| Magdeburg | MAG | Ibiza | IBI | Monaco MON | London | LON | Palermo | PAL | |
| Parma PAR | Enschede | ENS | St.Petersburg | PET | Brugges | BRU | Czech Republic | CZR | |
| Perugia PER | Groningen | GRO | Sweden | SWE | Bruxelles | BRL | |||
| Roma ROM | Den Haag | DHA | Gothenburg | GOT | Charleroi | CHA | Prague | PRA | |
| Torino TOR | Rotterdam | ROT | Stockholm | STO | Lioga | LIE | Greece | GR | |
| Trieste TRI | Portugal | POR | Slovakia | SLK | Switzerland, Liechtenstein | SWI | |||
| Venezia | VEN | Evora EVO | Bratislave | BRA | Athens | AT | |||
| Verona | VER | Coimbra | COI | Slovenia | SLO | Basel | BAS | Cyprus | CY |
| Ventimiglia | VTG | Faro | FAR | Ljubljana | LJU | Bern | BER | Nicosia | NI |
| Ireland | IRL | Leiria | LEI | Serbia | SRB | Chur | CHU | Romania | RO |
| Dublin | DUB | Lisbon LIS | Belgrade | BER | Geneva | GEN | Bucharest | BU | |
| Luxembourg | LUX | Porto | POR | Austria | AUS | Locamo | LOC | Bulgaria | BG |
| Norway | NOR | Poland | POL | Graz | GRA | Luceme | LUC | Sofia | SO |
| Bergen | BER | Gdansk | GDA | Innsbruck | INN | St Moritz | MOR | ||
| Oslo | OSL | Krakow KRA | Linz | LIN | St Gallen | GAL | |||
| Stavanger | STA | Poznan | POZ | Salzburg | SAL | Sion | SIO | ||
| Netherlands | NET | Szczecin | SZC | Vienna | VIE | Vaduz | VAD | ||
| Amsterdam | AMS | Warsaw | WAR | Belgium | BEL | Zuerich | ZUE | ||
| Eindhoven | EIN | Russia | RUS | Antwerpen | ANT | ||||
If you cannot find your country in the table, please orient yourself to the local time zone.
● Using the 12 / 24 hour display
Press the /12/24 button ^14 to switch between the 12 and 24 hour time formats.
Note: The AM symbol in the time display stands for before noon in the 12 hour format. The PM symbol in the time display 17 stands for after noon in the 12 hour format.
- Setting the alarm time
Note: You can set two different alarms separately.
Press the MODE button to select either Alarm 1 or Alarm 2. The currently set alarm time and the selected alarm symbol appear in the time display.
Press and hold down the MODE button for about 3 seconds. The hour value flashes. Press the ▼/button 11 or the ▲/12/24 button 14 to set it to the desired value.
Tip: By keeping ▼/Button 11 or the ▲/12/24 button 14 pressed, you accelerate the process and reach the desired value more quickly. This quicker method can also be used for making the other settings. If during a period of 30 seconds no buttons are pressed, the LC display returns automatically to the default display.
Press the MODE button. The minute value flashes. Press the ▼/button 11 or the ▲/12/24 button 14 to set it to the desired value.
Confirm your settings by pressing the MODE button 15.
- Activating/deactivating the alarm function
Press the MODE button to access the activate or deactivate the alarm mode.
Press the ALARM button to activate the alarm function. The Alarm symbol 13 appears in the LC display.
☐ Press the ALARM button 10 again to deactivate the alarm function. The Alarm symbol 13 disappears from the LC display.
The alarm will sound when it reaches to the set time. Press the MODE button 15, the ▼▲ button 11, the ▲12/24 button 14 or the SNOOZE/LIGHT button 12 to switch off the alarm signal. Otherwise the alarm signal sounds for about 2 minutes then stops automatically.
☐ Press the SNOOZE / LIGHT button 12, to switch off the alarm. The alarm automatically switches back on after 5 minutes.
□ When you press the ▼ button 11 or the ▲/12/24 button 14, the alarm switches off and only switches on again on the next day in the previously set time.
- Displaying the sun and moon rising / setting times
Note: The calculated times of setting and rising of the sun and moon are intended for orientation only. You should contact your local weather forecasting service for the exact times.
Note: After you have completed all the settings (see "setting the date/language/clock/time zone), the weather station calculates the rising and setting times of the sun and moon. The setting / rising time of the sun or moon flashes during this operation.
Press the SUN / MOON button to display the calculated sunshine hours of the selected day.
Operation
To check the setting / rising time for other location & date, press and hold down the SUN/MOON button 31 for about 3 seconds to access the setting / rising time of the sun or moon quick control mode. The location 8 flashes.
Set the country, city, year, month and the day for which you wish the information to be displayed by pressing the SUN / MOON button 31 or the ▼ button 11 or the ▲/12/24 button 14.
Press the SUN / MOON button to confirm your settings.
Note: The sun and moon setting or rising time flashes while the values are being calculated.
Note: If the next moon rising or setting is on the following day, the display shows MOONRISE+1 or MOONSET+1.
Moon phases
The following moon phases are shown by the moon phase symbol 6:
| New moon Waxing half-moon | Half-moon Waxing full moon | ||
| Full moon Waning full moon | Half-moon Waning half-moon | ||
● Preparing to use the weather forecasting function
Note: Please take the weather forecast from your local weather forecasting service into account as well as the forecast from your weather station. If there are discrepancies between the information from your device and from the local weather forecasting service, please take the advice of the latter as authoritative.
Press the HISTORY / WEATHER but for about 3 seconds. The weather symbol 1 flashes.
Set the current weather by pressing the "+" / °C / °F button 28 or the "-" / MAX / MIN button 29.
You can choose between the following weather symbols:
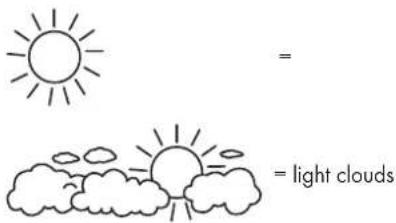
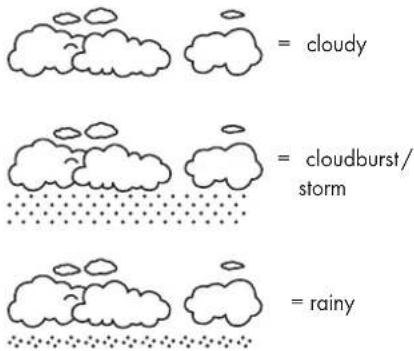
Press the HISTORY / WEATHER button to confirm your settings.
Note: Ensure that you have set the current weather correctly, otherwise the weather forecast will not be correctly displayed.
☐ The weather station starts with the weather forecast approximately 6 hours after you enter the current weather.
The weather station can display the barometric pressure trend [25]. You may see the following displays:
= the barometric pressure will rise.
= the barometric pressure will remain constant.
= the barometric pressure will fall.
- Reading the barometric pressure
Press the Relative / absolute barometric pressure button 30 to switch between the relative and absolute barometric pressure display.
Note: The display shows "Abs" if you have selected absolute pressure. The display shows "Rel" if you have selected relative pressure.
Note: The absolute barometric pressure is measured by the weather station.
☐ Set the relative barometric pressure to the barometric pressure relative to that at sea level. Ask your local weather forecast service for the barometric pressure at sea level.
Press and hold down the Relative / absolute barometric pressure button 30 for about 3 seconds.
Set the current barometric pressure by pressing the "+" / °C/ °F button 28 or the "-" / MAX/ MIN button 29.
Press the Relative / absolute barometric pressure button 30 to confirm your settings.
sunny
- Reading the barometric pressure for the last 12 hours
Press the HISTORY / WEATHER button to read the barometric pressure values for the last 12 hours.
OHR = present barometric pressure
- 1HR = barometric pressure an hour earlier
- 2HR = barometric pressure two hours earlier, etc.
Press and hold down the "+" / °C / °F button the LC display.
28 for about 3 seconds to switch between displaying the barometric pressure units in inHg or mb / hPa.
- Displaying the indoor temperature
The current Indoor temperature 3 is shown in
- Displaying temperatures in °C/°F
- Setting the channel
To do this open the battery compartment on the back of the outdoor sensor and take it off.
Set the channel by means of the Channel selection switch 39.
☐ Press the channel button 26 for approx. 3 seconds until a signal is sounded. The weather station has now received one signal.
Press the TX button to transmit the measured temperature to the weather station manually.
Then close the battery compartment.
- Displaying the outdoor temperature
Press the Channel button to display the outdoor temperature of each outdoor sensor.
- Press the Channel button 26 1 x to display channel 1.
- Press the Channel button 26 2 x to display channel 2.
- Press the Channel button 26 3 x to display channel 3.
- Press the Channel button 26 4 x to display all the channels one after the other in a loop. Only the outdoor sensors which can be addressed are displayed.
Press and hold down the Channel button to remove unused channels. If a further outdoor sensor and channel are added later, the weather station will receive the signal automatically. Alternatively, you can also transmit the initial signal from the outdoor sensor manually by pressing the TX button. 42
- Displaying the temperature trend (outdoor)
After successfully connecting with the outdoor sensor, the weather station can display the Temperature trend 21.
You may see the following displays:

= The outdoor temperature is rising.

= The outdoor temperature is remaining constant.

= The outdoor temperature is falling.
Note: °C is the legally required temperature unit.
Note: The weather station is supplied in the default setting of °Celsius.
Press the "+" / °C / °F button 28 to switch between the Celsius and Fahrenheit temperature scales.
● Displaying the air humidity (indoor)
The current air humidity 5 is shown in the LC display. The Comfort indicator 4 displays the air humidity in three categories.
The following categories are available:
“Dry” = Air humidity 5 < 45 %
😊 "Comfort" = Air humidity 5 45-75 %,
$$ \text { indoor temperature } \boxed {3} $$
$$ 2 4 ^ {\circ} \mathrm{C} - 2 7. 9 ^ {\circ} \mathrm{C} $$
😊 "Wet" = Air humidity 5 > 75 %
- Displaying the maximum / minimum temperature / humidity
The minimum/maximum temperature/humidity is measured for the first time after the batteries have been inserted and stored in the weather station.
Press the " / MAX / MIN button 29 briefly. The maximum indoor 3 and outdoor temperature 24 measured and the maximum humidity 5 measured are shown.
Press the " / MAX/ MIN button 29 again briefly. The minimum indoor 3 and outdoor temperature 24 measured and the minimum humidity 5 measured are shown.
Press the " / MAX/ MIN button 29 again briefly to return to the current values. Note: If no button is pressed within 5 seconds, the displays automatically return to the standard display.
Hold the" / MAX/MIN button 29 down for approx. 3 seconds in order to delete the stored maximum and minimum values when you hear a beep sound. The values measured from the time of deletion of the old values until the next time the memory is called up can be called up again.
.../Troubleshooting/Cleaning and maintenance/Disposal/Information
Backlight
Press the SNOOZE / LIGHT button. The backlight illuminates for 3 seconds.
● Battery state display
The Battery state indicator 23 appears in the weather station's LC display if the batteries are weak. Make sure you replace the batteries at the earliest opportunity (see "Replacing the batteries").
● Replacing the batteries
Weather station:
☐ Remove the battery compartment cover on the back of the weather station.
☐ Remove the used batteries.
☐ Insert 3 new batteries type AA 1.5 V (Mignon, LRO6).
Note: Make sure you fit the batteries the right way round (polarity). The correct polarity is shown inside the battery compartment 34.
☐ Close the battery compartment.
Press the RESET button. All the symbols light up briefly.
Outdoor sensor:
☐ Remove the battery compartment cover from the back of the outdoor sensor.
☐ Insert 2 new batteries of type AAA 1.5 V (Micro, LRO3).
Note: Ensure the correct polarity. This is shown in the battery compartment 40.
☐ Close the battery compartment cover.
- Troubleshooting
Note: This appliance has delicate electronic components. This means that if it is placed near an object that transmits radio signals, it could cause interference. This could be, for example, mobile telephones, walkie talkies, CB radios, remote controls and microwaves.
☐ If the display indicates a problem, move such objects away from it or remove the batteries for a short while and then replace them.
● Cleaning and maintenance
■ Under no circumstances should you use liquids or detergents, as these will damage the device.
☐ The device should only be cleaned on the outside with a soft dry cloth.
Under no circumstances should you spray the outdoor sensor, e.g. with a garden hose. The outdoor sensor is only protected against rain from above.
- Disposal

The packaging is made entirely of recyclable materials, which you may dispose of at local recycling facilities.
Contact your local refuse disposal authority for more details of how to dispose of your worn-out product.

To help protect the environment, please dispose of the product properly when it has reached the end of its useful life and not in the household waste. Information on collection points and their opening hours can be obtained from your local authority.
Faulty or used batteries must be recycled in accordance with Directive 2006/66/EC. Please return the batteries and / or the device to the available collection points.

Environmental damage through incorrect disposal of the batteries!
Batteries may not be disposed of with the usual domestic waste. They may contain toxic heavy metals and are subject to hazardous waste treatment rules and regulations. The chemical symbols for heavy metals are as follows: Cd = cadmium, Hg = mercury, Pb = lead. That is why you should dispose of used batteries at a local collection point.
Information
- Declaration of conformity
Herewith Milomex Ltd., c/o Milomex Services, Hilltop Cottage, Barton Road, Pulloxhill, Bedfordshire, MK45 5HP, UK, declares that the article Radio-controlled Weather Station, model number Z31092, version 11 / 2011 fulfills the basic requirement and the other relevant requirements of 1999/5/EC. The declaration of conformity can be found under www.milomex.com.
Heavenersfirling
EMC CE
c/o Milomex Services
Hilltop Cottage
Barton Road
Pulloxhill
Bedfordshire
MK45 5HP
UK
Model no.: Z31092
Version: 11/2011
© by ORFGEN Marketing
- FUNK-WETTERSTATION
- Before initial use
- Operation
- Information
- Radio-controlled weather station
- - Intended use
- ● Description of parts and features
- - Technical data
- - Scope of supply
- Safety
- ● General safety information
- DANG WARNING!
- TO LIFE AND ACCIDENT HAZARD FOR TODDLERS
- Safety instructions for batteries
- CAUTION! DANGER OF EXPLOSION!
- - Before initial use
- - Setting up devices
- - Putting the outdoor sensor into operation
- Removing the battery safety strip:
- Installing the Outdoor Sensor:
- For wall mounting:
- - Putting the weather station into operation
- For free standing:
- Connecting the weather station with the outdoor sensor and the DCF radio signal:
- Radio Signal (DCF):
- - DCF radio signal reception
- - Setting the date/language/location/clock/time zone manually
- Follow these steps:
- ● Using the 12 / 24 hour display
- - Setting the alarm time
- - Activating/deactivating the alarm function
- - Displaying the sun and moon rising / setting times
- Moon phases
- ● Preparing to use the weather forecasting function
- - Reading the barometric pressure
- sunny
- - Displaying the indoor temperature
- - Displaying temperatures in °C/°F
- - Setting the channel
- - Displaying the outdoor temperature
- - Displaying the temperature trend (outdoor)
- ● Displaying the air humidity (indoor)
- - Displaying the maximum / minimum temperature / humidity
- Backlight
- ● Battery state display
- ● Replacing the batteries
- Weather station:
- Outdoor sensor:
- - Troubleshooting
- ● Cleaning and maintenance
- - Disposal
- - Declaration of conformity
- EMC CE
Brand : AURIOL
Model : IAN 68756
Category : Uncategorized