R 153S - Robotic mower HUSQVARNA - Free user manual and instructions
Find the device manual for free R 153S HUSQVARNA in PDF.
| Brand | HUSQVARNA |
| Model | R 153S |
| Product type | Walk-behind gasoline lawn mower |
| Category | Lawn mower |
| Engine type | 4-stroke gasoline engine |
| Starting method | Manual (recoil) and electric (optional) |
| Cutting width | Not specified |
| Cutting height | Adjustable via levers |
| Grass catcher | Included |
| Drive | Self-propelled with clutch |
| Guaranteed sound level | Compliant with directive 2000/14/EC |
| Safety | Engine brake, safety device on handlebar |
| Maintenance | Under-deck cleaning with water connection, blade inspection and sharpening, oil change |
| Wear parts | Blade, belt, electric cable |
| Warranty | Manufacturer's warranty under conditions (see manual) |
| Country of manufacture | Italy (Husqvarna Outdoor Product Italia S.p.A.) |
Frequently Asked Questions - R 153S HUSQVARNA
User questions about R 153S HUSQVARNA
0 question about this device. Answer the ones you know or ask your own.
Ask a new question about this device
Download the instructions for your Robotic mower in PDF format for free! Find your manual R 153S - HUSQVARNA and take your electronic device back in hand. On this page are published all the documents necessary for the use of your device. R 153S by HUSQVARNA.
USER MANUAL R 153S HUSQVARNA
natural_image
Icon of an open book inside a circular frame (no text or symbols)mod. R146S
mod. R147
mod. R147S
mod. R147SE
mod. R151S
mod. R151SH
mod. R151SV
mod. R150S
mod. R150SH
mod. R150SV
mod. R150SVH
mod. R153S
mod. R153SV

natural_image
Simple line icon of a forklift inside a circle (no text or symbols)| [BYYW] | INSTRUCTION MANUALIMPORTANT INFORMATION: Please read these instructions carefully and make sure you understand them before using this unit. Retain these instructions for future reference. | IT | LIBRETTO D'ISTRUZIONIINFORMAZIONI IMPORTANTI: Leggere le istruzioni attenta-mente e capirle bene prima di usare l'utensile. Conservare per ulteriore consultazione. |
| [6767] | BETRIEBSANWEISUNGWICHTIG INFORMATION: Lesen Sie diese Hinweise zur Handha-bung des Geräts aufmerksam durch. Verwenden Sie es erst, wenn Sie sicher sind, daß Sie alle Anweisungen verstanden haben und gut aufbewahren. | HU | HASZNÁLATI ÚTMUTATÓJótállást vállalni csak rendeltetésszerüen használatba vett gépekre tudunk. Kérj ú hogy a gép használatba vétele előtt gondosan olvassa el a kezelési utasításokat. |
 | MANUEL D'INSTRUCTIONSRENSEIGNEMENTS IMPORTANTS: Avant d'utiliser cet appareil, veuillez lire atentivement les instructions et assurez-vous de les avoir comprises. Conservez les instructions pour référence ultérieure. | GR | ΕΓΧΕΙΡΙΔΙΟ ΧΕΙΡΙΣΜΟΕΣΗΜΑΝΤΙΚΕΣ ΠΛΗΡΟΦΟΡΙΕΣ: Διαβάστε προσεκτικά αντές τις οδηγίες και Φροντίστε να τις κατανοήσετε αντό το μηχάνημα και Φιλάξτε το για να το συμβυλεύεστε στ μέλλον. |
 | HANDLEIDINGBELANGRIJKE IMPORTANTS: Lees deze handleiding aan-dachtig en zorg dat u ailes begrijpt alvorens de kettingzaag te gebruiken en be-waar ze voor toekomstige raadpleging. | CZ | NÁVOD K POUŽÍVÁNÍDŮLEŽITÁ INFORMACE! Než začnete stroj použivat přečtěte si prosím velmi pozorně tyto instrukce a ujištěte se, že jste jim porozuměli. Uschovejte si tento návod pro použití i v budoucnu. |
| [∅4DZ] | BRUKERHÄNDBOKVIKTIG INFORMASJON: Les disse anvisningene nøye og forsikre deg om at du forstår dem før du bruker enheten og oppbevar dem for sen-ere bruk. | SK | PRÍRUČKAIMPORTANT INFORMATION: Please read these instructions carefully and make sure you understand them before using this unit. Retain these instructions for future reference. |
 | OHJEKIRJATÄRKEÄÄ TIETOA: Lue nämä ohjeet huolellisesti ja varmista, että olet ymmärtänyt ne, ennen kuin alat käyttää tätä laitetta ja säilytä myöhempää tarvetta varten. | PL | INSTRUKCJA OBSŁUGIGwarancja traci ważność w przypadku używania urządzenia do celów innych niż wymienione w instrukcji obsługi. Prosimy o uważne przeczytanie instrukcji oraz o stoowanie się do zaleceń i wskazówek w niej zawartych. |
 | BRUKSANVISNINGVIKTIG INFORMATION: Läs instruktionerna noggrant och för-säkra dig om att du förstår dem innan du använder utrustningen och spara dem för framtida behov. | RU | ИНСТРУКЦИИВАЖНЫЕ СВЕДЕНИЯ: Внимательно прочитать инструкции и хорошо их понять, перед тем как пользоваться блоком. Хранить инструкции для дальнейших консультаций. |
| [B0KH] | BRUGERHÄNDBOGVIKTIGE OPLYSNINGER: Læs instruktionerne omhyggeligt, før du bruger enheden og gemme til senere henvisning. | EE | KASUTUSJUHENDTÄHTIS INFORMATSIOON: Lugege kasutusjuhend enne seadme kasutamist kindlasti pôhjalikult läbi ning veenduge, et olete köigest täpselt aru saanud. |
 | MANUAL DE INSTRUCCIONESINFORMACIÓN IMPORTANTE: Lea atentamente las instruccio-nes y asegúrese de entenderlas antes de utilizar esta aparato. Conserve las instrucciones para la referencia en el futuro. | LT | NAUDOJIMOSI INSTRUKCIJASVARBI INFORMACIJA: prieš pradedant dirbti įrenginiu, prašome atidžiaiperskaityti šią instrukciją ir jsitikinti, kad viską supratote. Išsaugokite ją tolimesniam naudojimui. |
| [KTWO] | MANUAL DO OPERADORINFORMAÇÕES IMPORTANTES: Queira ler cuidadosamente estas instruções e tenha certeza de entendê las antes de usar a serra e guarde para consulta futura. | SL | KNJÍŽICA Z NAVODILIPOMEMBNA NAVODILA: Pozorno preberite navodila. Dobro jih morate razumeti, preden začnete uporabljati to orodje. |
GB Due to a constant product improvement programme, the factory reserves the right to modify technical details mentioned in this manual without prior notice.
This manual has been prepared for use with different models of lawn mowers having different shapes and equipment.
We wish to thank you for choosing our lawn mower. We are confident that the high quality of our machine will meet with your satisfaction and appreciation and that your lawn mower will give you long-lasting service. Before starting to use your machine, make sure to read with care this manual, which has been purposely drawn up to provide you with all the necessary information for proper use, in compliance with basic safety requirements.
text_image
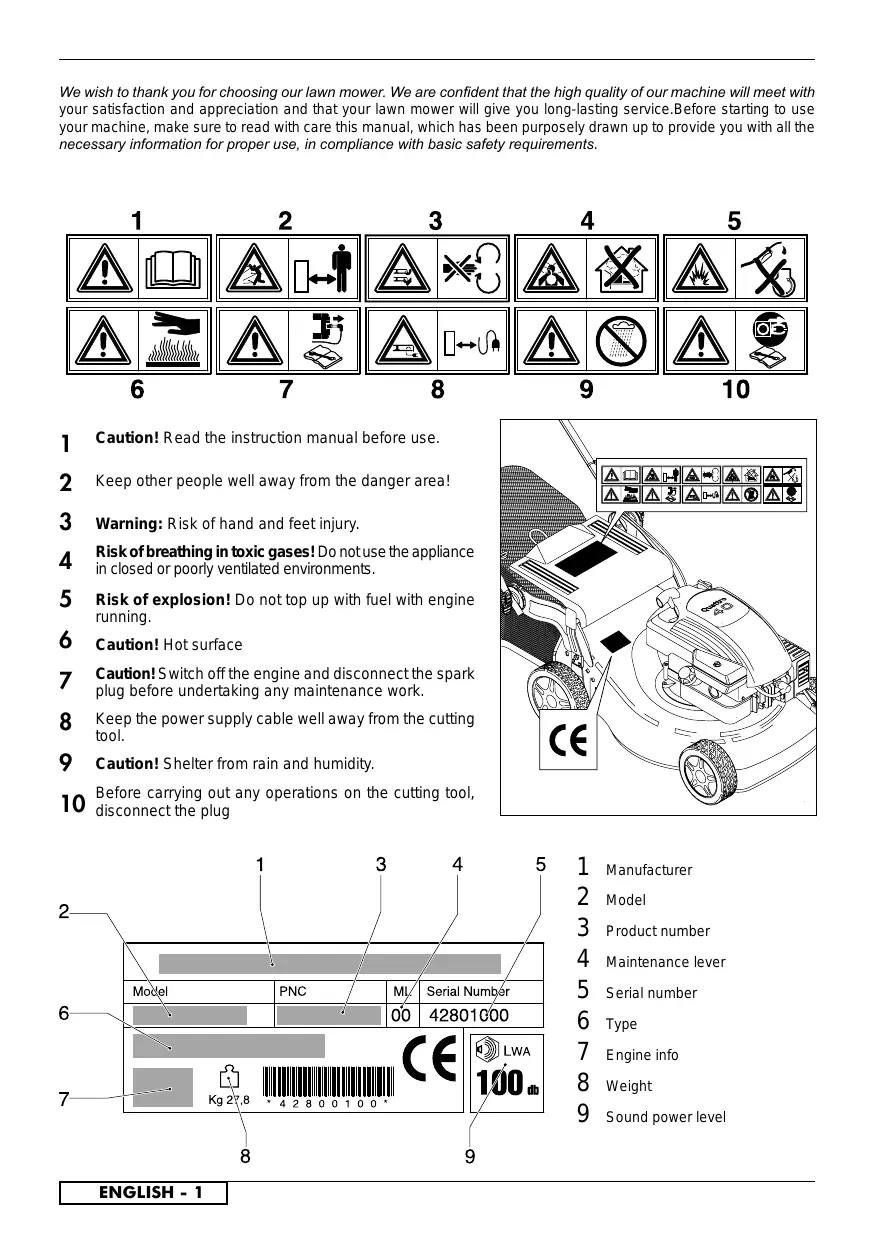
1 2 3 4 5 6 7 8 9 101 Caution! Read the instruction manual before use.
2 Keep other people well away from the danger area!
3 Warning: Risk of hand and feet injury.
4 Risk of breathing in toxic gases! Do not use the appliance in closed or poorly ventilated environments.
5 Risk of explosion! Do not top up with fuel with engine running.
6 Caution! Hot surface
7 Caution! Switch off the engine and disconnect the spark plug before undertaking any maintenance work.
8 Keep the power supply cable well away from the cutting tool.
9 Caution! Shelter from rain and humidity.
10 Before carrying out any operations on the cutting tool, disconnect the plug
text_image
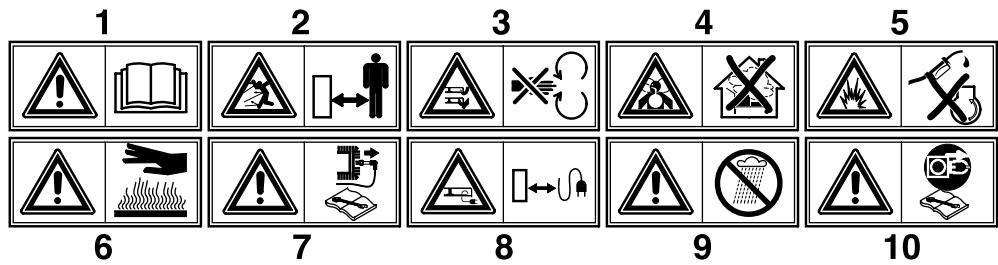
Technical diagram of a lawn mower with labeled components and warning symbols
text_image
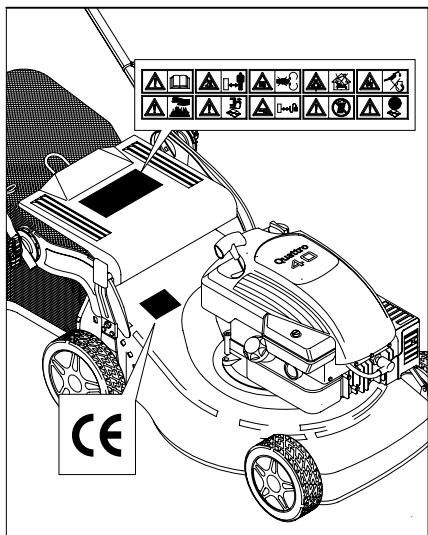
1 2 3 4 5 Model PNC ML Serial Number 6 00 42801000 7 Kg 27.8 * 4 2 8 0 0 1 0 0 * CE LWA 100 db 8 91 Manufacturer
2 Model
3 Product number
4 Maintenance lever
5 Serial number
6 Type
7 Engine info
8 Weight
9 Sound power level
SAFETY RULES
Safe Operation Practices for Pedestrian-Controlled Rotary Lawnmowers
IMPORTANT: This cutting machine is ca pa ble of amputat ng hands and feet and throwing objects. Failure to observe the following safety instructions could result in serious injury or death.
I. Training
- Read the instructions carefully. Be familiar with the controls and the proper use of the equipment.
- Never allow children or people unfamiliar with the instructions to use the lawnmower. Local regulations may restrict the age of the operator.
- Never mow while people, especially children, or pets are nearby.
- Keep in mind that the operator or user is responsible for accidents or hazards occurring to other people or their property.
II. Preparation
- While mowing, always wear substantial footwear and long trousers. Do not operate the equipment when barefoot or wearing open sandals.
-
Thoroughly inspect the area where the equipment is to be used and remove all objects which may be thrown by the machine.
● WARNING - Petrol is highly flammable. -
Store fuel in containers specifically de signed for this purpose.
- Refuel outdoors only and do not smoke while refueling.
- Add fuel before starting the engine. Never remove the cap of the fuel tank or add petrol while the engine is running or when the engine is hot.
- If petrol is spilled, do not attempt to start the engine but move the machine away from the area of spillage and avoid creating any source of ignition until petrol vapors have dissipated.
-
Replace all fuel tanks and container caps securely.
-
Replace faulty silencers.
- Before using, always visually inspect to see that the blades, blade bolts and cutter assembly are not worn or damaged. Replace worn or damaged blades and bolts in sets to pre serve balance.
- On multibladed machines, take care as rotating one blade can cause other blades to rotate.
III. Operation
- Do not operate the engine in a confined space where dangerous carbon mon ox ide fumes can collect.
● Mow only in daylight or in good artificial light. - Avoid operating the equipment in wet grass, where feasible.
● Always be sure of your footing on slopes. - Walk, never run.
- For wheeled rotary machines, mow across the face of slopes, never up and down.
- Exercise extreme caution when changing direction on slopes.
- Do not mow excessively steep slopes.
-
Use extreme caution when reversing or pulling the lawnmower towards you.
-
Stop the blade if the lawnmower has to be tilted for transportation when crossing surfaces other than grass, and when transporting the lawnmower to and from the area to be mowed.
- Never operate the lawnmower with defective guards, or without safety de vic es, for example defl ectors and/or grass catchers, in place.
- Do not change the engine governor settings or over-speed the engine. Operating the engine at excessive speed may increase the hazard of personal injury.
- Disengage all blade and drive clutches before starting the engine.
- Start the engine or switch on the motor carefully according to instructions and with feet well away from the blade.
- Do not tilt the lawnmower when starting the engine or switching on the motor, except if the lawnmower has to be tilted for starting. In this case, do not tilt more than absolutely nec es sary and lift only the part which is away from the op er a tor.
- Do not start the engine when standing in front of the discharge chute.
- Do not put hands or feet near or under rotating parts. Keep clear of the discharge opening at all times.
- Never pick up or carry lawnmower while the engine is running.
- Stop the engine and disconnect the spark plug wire:
- before cleaning blockages or un clog ging chute;
- before checking, cleaning or working on the lawnmower;
- after striking a foreign object. Inspect the lawnmower for damage and make repairs before re starting and operating the lawnmower;
- if the lawnmower starts to vibrate abnormally (check immediately).
- Stop the engine:
- whenever you leave the lawnmower;
-
before refuelling.
-
Reduce the throttle setting during en gine shut down and, if the engine is provided with a shut-off valve, turn the fuel off at the conclusion of mowing.
- Go slow when using a trailing seat.
IV. Maintenance and Storage
- Keep all nuts, bolts and screws tight to be sure the equipment is in safe working condition.
- Never store the equipment with petrol in the tank inside a building where fumes may reach an open flame or spark.
- Allow the engine to cool before storing in any enclosure.
- To reduce the fire hazard, keep the engine, silencer, battery compartment and petrol storage area free of grass, leaves, or excessive grease.
- Check the grass catcher frequently for wear or deterioration.
- Replace worn or damaged parts for safety.
- If the fuel tank has to be drained, this should be done outdoors.

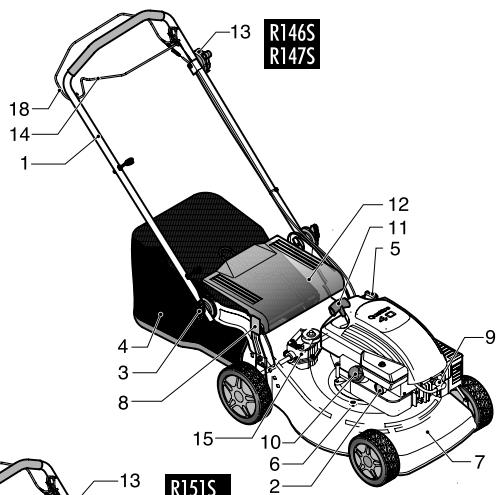
DESCRIPTION
| 1 | Upper handles | 12 | Rear deflector |
| 2 | Fuel-enrichment pump | 13 | Throttle lever |
| 3 | Fastening knobs for upper handles | 14 | Engine stop lever |
| 4 | Grass catcher | 15 | Reduction gear |
| 5 | Oil filler cap | 16 | Ignition key |
| 6 | Oil drain plug | 17 | Handle advance speed |
| 7 | Deck | 18 | Clutch lever |
| 8 | Adjusting levers for cutting height | ||
| 9 | Spark plug | ||
| 10 | Fuel cap | ||
| 11 | Engine start-grip |

ASSEMBLY OF GRASS CATCHER

ASSEMBLY DEFLECTOR (if not already assembly)

ASSEMBLY HANDLES (lower)

ASSEMBLY HANDLES (upper)

ADJUSTMENT OF HANDLES

MULCHING CAP INSERTION (for the models where it is included only)
To cut the grass with the mulching system (no grass collection), lift the rear deflector panel and insert the cap by fixing it with the spring as shown in the figure.

ADJUSTMENT OF CUTTING HEIGHT

SAFETY PRECAUTIONS

● Always operate with the deflector or grasscatcher in the correct position.
● Always stop the engine before removing the grasscatcher or adjusting the height of cut.
- Never place your hands or feet underneath the deck or into the grass discharge chute while the engine is running.
Before mowing, remove all foreign objects from the lawn which may be thrown by the machine. While mowing, stay alert for any foreign objects which may have been missed.
Never lift the rear of the mower while starting the engine or during normal operation.
Never place your hands or feet underneath the deck or into the rear discharge chute while the engine is running.

OPERATION
ENGINE ADJUSTMENTS (Fig. J1)
Refer to the engine manufacturer's maintenance manual.

CAUTION:- 0.6l Oil must be added to the engine before use
STARTING THE ENGINE (Fig. JII)
Once the machine has been set up properly, start the engine as follows:
a) Engines with choke system:
when the engine is cold, position the accelerator lever (13) on START
b) Operate the engine stop lever (14) to prepare the engine for start, keep lever pressed against handle while starting and using the machine (it operates the engine brake).
c) Engines with primer system:
Press the fuel-enrichment pump (2) located on the carburettor 3 or 4 times position the accelerator lever (13) on MAX.
For further information and explanations, read carefully the user instruction manual of the engine.
d) Start engine.
MANUAL STARTING: (While holding the engine stop lever (14)).
☐ Hold the engine start-grip (11) and pull the starter rope gently until you feel the resistance caused by compression. Return the starter rope slowly then pull the handle firmly towards you to its full extent.
ELECTRICAL STARTING: (While holding the engine stop lever (14)).
☐ Insert the plug (G) in the socket (H) on the engine. Turn the ignition key (16).

CAUTION: The blade starts turning as soon as the engine is started.
Keep the engine stop lever (14) depressed during machine operation. When the lever is released, the engine stops.
MOWING
To cut the grass, push the lawn mower manually or insert the automatic advance gear.
How to insert automatic advance (Fig. JIII): Lift up the clutch handle (17 - 18) and keep it pressed in position.

CAUTION: Engage the gear only when the engine is running.
How to disengage advance: Release the clutch handle.

ADJUSTMENT OF CLUTCH CABLE (for self-propelled versions only)
Important: If, when you press the clutch lever, the automatic advance gear does not engage, the clutch cable should be adjusted by inserting the spring (P) in one of the subsequent holes in the plate (R) or in the hole "S".

MAINTENANCE

text_image
Warning sign and electrical circuit diagram with warning symbol and circuit symbolCaution! Switch off the motor and disconnect the spark plug before undertaking any maintenance work.
- For a four stroke engine, check the oil level and change the oil when dirty. For further explanation, see ENGINE INSTRUCTION BOOK.
- Frequently check the mower and ensure that all grass deposits are removed from beneath the deck.
- Never clean the mower by pouring water over it: this may seriously damage the electric start system.
● Take care, the exhaust muffler may be very hot. - Frequently check the blade for damage.
● The lawn mower must be checked by a SERVICE DEALER.
- Cleaning under the bodywork
With machine at a standstill and off.
- Attach fitting (22) on the deck to the water supply tap. Turn on the tap.
- start up the motor (blade in rotation), allowing it to warm up for a few minutes.
- at the end of cleaning switch off the motor, turn off the tap, detach the tube from the deck connection.

BLADE
- To remove the blade (23) unscrew the screw (24).
- Check the conditions of the blade-support (25), the washer (26), the key (27) and the washer (28) and replace any parts which are damaged.
- When reassembling, make sure that the key (271) is correctly seated in the shaft and that the cutting edges face in the direction of the engine rotation. The blade screw (24) must be torqued to 5,34 Kgm (52,4 Nm).

KIT ELECTRIC STARTING
● Before starting the motor for the first time, you are advised to keep the battery on charge for 2
to 3 hours.
If the battery proves to be low during starting, charge it for 24 hours.
When starting, don't keep trying to start for more than 5 seconds.
BATTERY MAINTENANCE

IMPORTANT
For correct battery maintenance (29), especially in preparation for a long period of inactivity, and for recharging, it is not necessary to remove it from its casing, but to simply proceed as follows:
1) Remove contact (30
2) Store the battery in a fresh and dry place.
3) Recharge the battery before use at room temperature for 24-36 hours.
4) Restore the contact (30) before use
BATTERY DISPOSAL

Those batteries marked with a “crossed out waste disposal bin” and bearing the chemical symbol Pb (battery containing lead) are not to be disposed in domestic waste bins.

The user is legally obliged to take the used batteries to special collection points or to return them to the retailer.
GUARANTEE AND GUARANTEE POLICY
If any part is found to be defective due to faulty manufacture within the guarantee period, Husqvarna Outdoor Products, through its Authorised Service Repairers will effect the repair or replacement to the customer free of charge providing:
a) The fault is reported directly to the Authorised Repairer.
b) Proof of purchase is provided.
c) The fault is not caused by misuse, neglect or faulty adjustment by the user.
d) The failure has not occurred through fair wear and tear.
e) The machine has not been serviced or repaired, taken apart or tampered with by any person not authorised by Husqvarna Outdoor Products.
f) The machine has not been used for hire.
g) The machine is owned by the original purchaser.
h) The machine has not been used commercially.
- This guarantee is additional to, and in no way diminishes the customers statutory rights.
Failures due to the following are not covered, therefore it is important that you read the instructions contained in this Operator's Manual and understand how to operate and maintain your machine:
Failures not covered by guarantee
- Replacing worn or damaged blades
- Failures as a result of not reporting an initial fault.
- Failures as a result of sudden impact.
- Failures as a result of not using the product in accordance with the instructions and recommendations contained in this Operator's Manual.
- Machines used for hire are not covered by this guarantee.
- The following items listed are considered as wearing parts and their life is dependent on regular maintenance and are, therefore not normally subject to a valid warranty claim: Blades, Electric Mains cable, Belt
- CAUTION!
Husqvarna Outdoor Products does not accept liability under the warranty for defects caused in whole or part, directly or indirectly by the fitting of replacement parts or additional parts that are not either manufactured or approved by Husqvarna Outdoor Products, or by the machine having been modified in any way.
EC DECLARATION OF CONFORMITY
I, the undersigned Bengt Ahlund, of Husqvarna Outdoor Products Italia Spa, Via Como 72, 23868 Valmadrera (LC). Certify that the Lawnmower:-
Category....Petrol Wheeled Rotary
Make....Husqvarna Outdoor Products
Conforms to the specifications of Directive 2000/14/EEC
Type....A
Version......B
Width of cut....C
Guaranteed sound power level.....D
Measured sound power level.....E
Sound pressure livel at the ear....F
Vibration of the handle......G
(See the last page for references)
Type of Cutting Device ....Rotary Blade
Identification of Series......See Product Rating Label
Conformity Assessment Procedure....ANNEX VI
Notified Body. ....Nr. 0470 - NEMKO AS
Gaustadalleen 30 - PO Box 73 Blindern
0314 OSLO - Norway
Other Directives ....98/37/EC, 93/68/EEC, 2002/88/EC, 2004/108/EC
& applicable standards normative ...... EN836,EN ISO14982,EN1033,EN ISO 3744,EN ISO11201
Bengt Ablund Technical Manager Husqvarna Outdoor Product Italia S.p.A. Via Como 72 - 23868 Valmadrera (LC) 3/08/2006
text_image
Technical diagram of a lawn mower with labeled components and safety symbols
text_image
1 2 3 4 5 Model PNC ML Serial Number 00 42801600 6 7 Kg 27.8 4 2 8 0 0 1 0 0 * CE LWA 100 dbtext_image
Warning symbol and electrical hazard symbol with warning triangle, circuit diagram, and notebooktext_image
Technical diagram of a lawn mower with warning symbols and a 'CE' label, showing various hazard icons.
text_image
1 2 3 4 5 Model PNC ML Serial Number 00 42801600 6 7 Kg 27.8 * 4 2 8 0 0 1 0 0 * CE LWA 100 dbtext_image
Warning symbol and electrical hazard symbol with warning triangle, circuit diagram, and switchEC DÉCLARATION DE CONFORMITÉ
Je soussigné Bengt Ahlund, Husqvarna Outdoor Products Italia Spa, Via Como 72, 23868 Valmadrera (LC) certifie que la tondeuse:--
Marque ......Husqvarna Outdoor Products
text_image
Technical diagram of a lawn mower with labeled components and safety symbols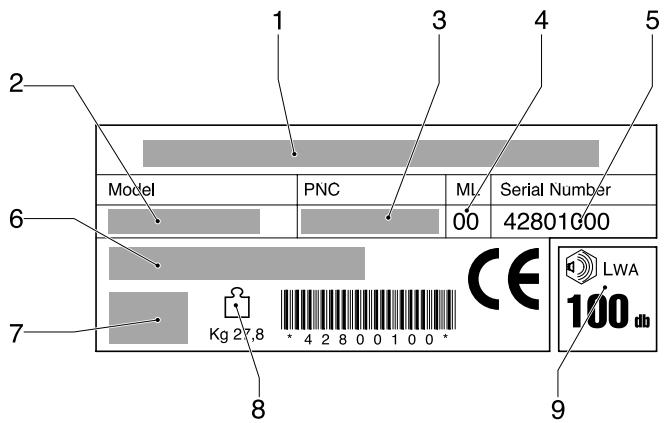
text_image
1 2 3 4 5 Model PNC ML Serial Number 00 42801600 6 7 Kg 27.8 4 2 8 0 0 1 0 0 CE LWA 100 dbWERKEN MET DE MAAIMACHINE
VOORBEREIDING VAN DE MOTOR (Fig.Jl)
text_image
Warning symbols and electrical circuit diagram showing warning triangle, switch, and batterytext_image
Warning sign and electrical hazard symbol with warning triangle and circuit diagramMerke....Husqvarna Outdoor Products
text_image
Diagram of a lawn mower with labeled parts and safety symbols, including warning icons and certification mark 'CE'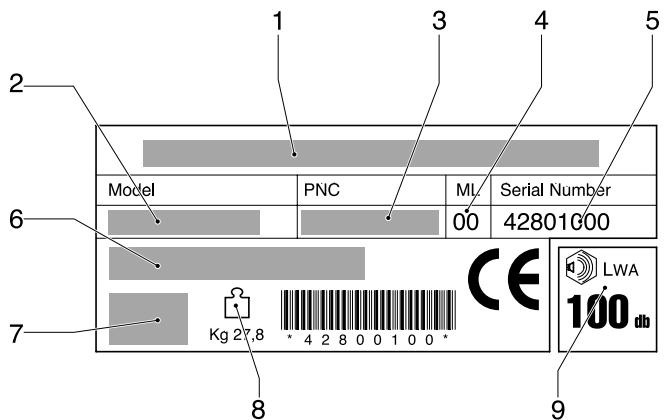
text_image
1 2 3 4 5 Model PNC ML Serial Number 6 00 42801600 7 Kg 27,8 * 4 2 8 0 0 1 0 0 * CE LWA 100 dbValmistaja
Malli
Tuotteen koodi
Muutosluettelo
text_image
Warning sign and electrical circuit diagram with warning symbol and circuit symboltext_image
Warning symbol and electrical hazard symbol with warning triangle, circuit diagram, and notebooktext_image
Technical diagram of a lawn mower with labeled components and safety symbols
text_image
1 2 3 4 5 Model PNC ML Serial Number 00 42801600 6 7 Kg 27.8 * 4 2 8 0 0 1 0 0 * CE LWA 100 dbFabrikant
Model
Produktnummer
ML-nummer
Serienummer
Type
Motor info
Vægt
Lydeffektniveau
SIKKERHEDSNORMER
text_image
Warning sign and electrical circuit symbols with warning triangle and circuit diagramtext_image
Technical diagram of a lawn mower with labeled components and warning symbols
text_image
1 2 3 4 5 Model PNC ML Serial Number 00 42801600 6 7 Kg 27.8 * 4 2 8 0 0 1 0 0 * CE LWA 100 dbtext_image
Warning sign and electrical hazard symbol with accompanying circuit diagramMarca......Husqvarna Outdoor Products
text_image
Bengt Ahland Director TecnicoHusqvarná Outdoor Product Italia S.p.A.
Via Como 72 - 23868 Valmadrera (LC)
3/08/2006
c) Arrancar o motor:
ARRANQUE MANUAL (Segurar a alavanca de stop do motor (14)).
text_image
Warning sign and electrical circuit diagram with warning symbol, circuit symbol, and switchMarca......Husqvarna Outdoor Products
e com as normas ......EN836,EN ISO14982,EN1033,EN ISO 3744,EN ISO11201

text_image
Bengt Ahland Director tecnicoHusqvarná Outdoor Product Italia S.p.A.
Via Como 72 - 23868 Valmadrera (LC)
3/08/2006
text_image
Warning sign and electrical hazard symbol with warning triangle and circuit diagramMarca......Husqvarna Outdoor Products
text_image
Technical diagram of a lawn mower with labeled components and safety symbols
text_image
1 2 3 4 5 Model PNC ML Serial Number 00 42801600 6 7 Kg 27.8 * 4 2 8 0 0 1 0 0 * CE LWA 100 dbtext_image
Warning sign and electrical circuit diagram with warning symbol and component symbolsELEKTROMOS INDITÓ KIT
EKKINHΣH KINHTHPA (Fig.JII)
text_image
Warning symbols and electrical circuit diagrams showing warning triangle, switch, and toolbar iconsMáoxa Husqvarna Outdoor Products
text_image
Warning symbol and electrical hazard symbol with warning triangle, circuit diagram, and switchtext_image
Technical diagram of a lawn mower with labeled components and safety symbols
text_image
1 2 3 4 5 Model PNC ML Serial Number 6 00 42801600 7 Kg 27,8 * 4 2 8 0 0 1 0 0 * CE LWA 100 dbtext_image
Warning symbol and electrical hazard symbol with warning triangle and circuit diagramtext_image
Bengt/Ahlund technicky naditeltext_image
Warning symbols and electrical circuit diagram with warning triangle and circuit elementsGWARANCJA I WARUNKI GWARANCJI
Wykonanie....Husqvarna Outdoor Products
text_image
Technical diagram of a lawn mower with labeled components and safety symbols in the legend
text_image
1 2 3 4 5 Model PNC ML Serial Number 00 42801600 6 7 Kg 27.8 * 4 2 8 0 0 1 0 0 * CE LWA 100 dbtext_image
Warning sign and electrical circuit symbols with warning triangle and switch iconMarca....Husqvarna Outdoor Products
text_image
Warning sign and electrical circuit symbols including a warning triangle, circuit diagram with switch, and notebook with penMark....Husqvarna Outdoor Products
text_image
Bengt Ahland Technical ManagerHusqvarná Outdoor Product Italia S.p.A.
Via Como 72 - 23868 Valmadrera (LC)
3/08/2006
text_image
Warning sign and electrical circuit symbols including warning triangle, circuit diagram with arrow, and notebook with pentext_image
Technical diagram of a lawn mower with labeled components and safety symbols
text_image
1 2 3 4 5 Model PNC ML Serial Number 00 42801600 6 7 Kg 27,8 4 2 8 0 0 1 0 0 * CE LWA 100 dbtext_image
Warning sign and electrical hazard symbol with warning triangle and circuit diagramtext_image
Bengt/Ahlund Technical ManagerHusqvarna Outdoor Product Italia S.p.A.
Via Como 72 - 23868 Valmadrera (LC)
3/08/2006
A
text_image
R146S R147S 13 18 14 1 12 11 5 9 4 3 8 15 10 6 2 7 R151S 13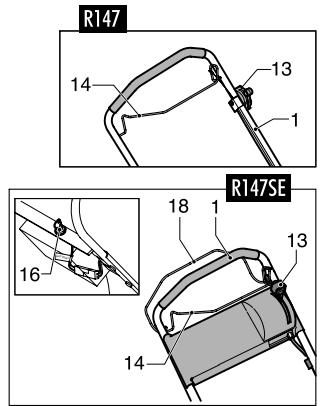
text_image
R147 14 13 1 R147SE 16 18 1 13 14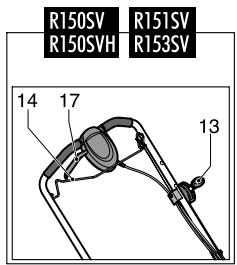
text_image
R150SV R150SVH R151SV R153SV 14 17 13
text_image
R151S R151SH 13 1 6 2 18 14 11 12 5 18 9 14 4 3 8 15 10 7 13 6 2 R153S 1 11 4 8 3 12 5 2 9 15 10 6 7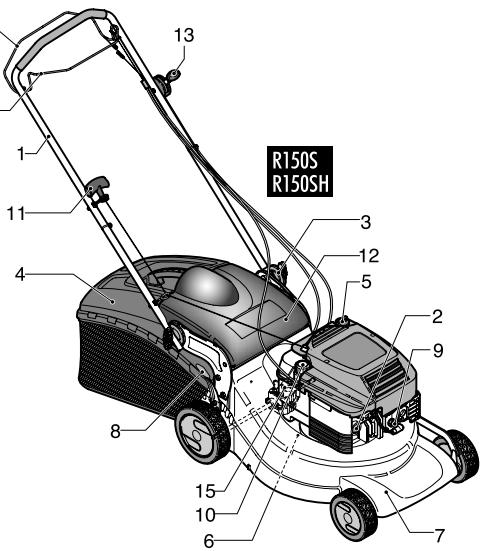
text_image
R150S R150SH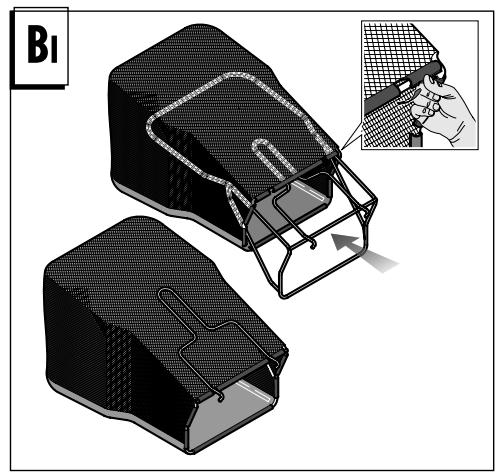
text_image
B1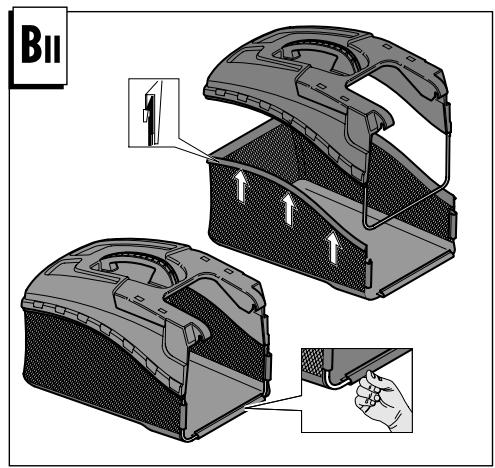
text_image
B11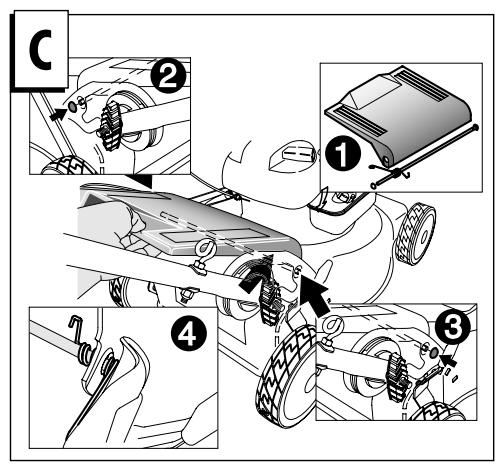
text_image
Technical diagram showing mechanical assembly steps with numbered annotations for each step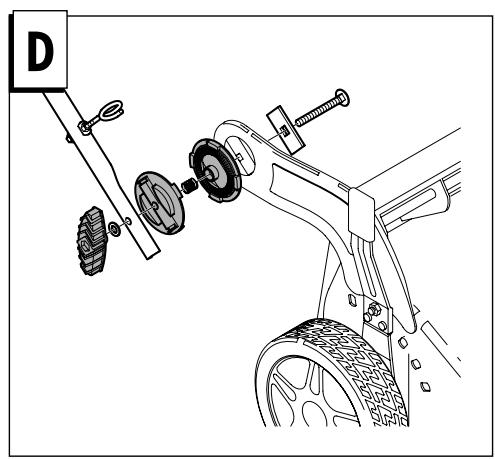
natural_image
Mechanical assembly diagram showing a motor with gears and levers, no text or symbols present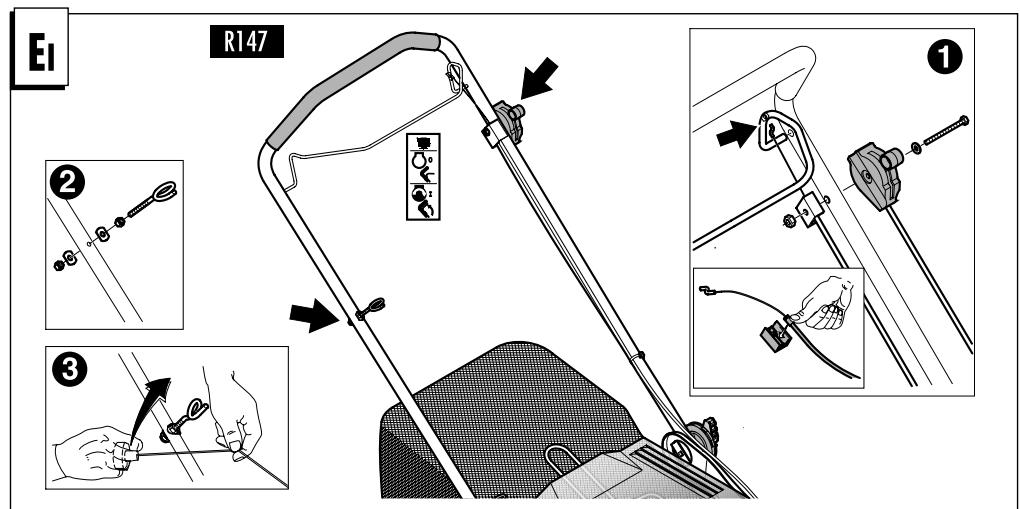
text_image
E1 R147 ② ③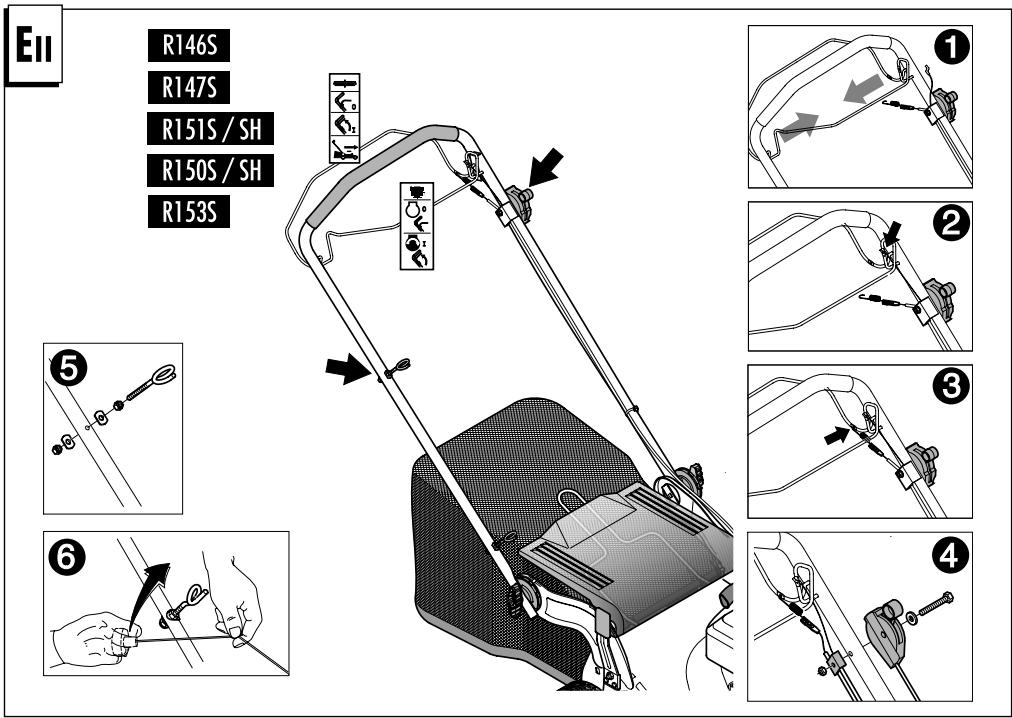
text_image
E11 R146S R147S R151S / SH R150S / SH R153S ① ② ③ ④ ⑤ ⑥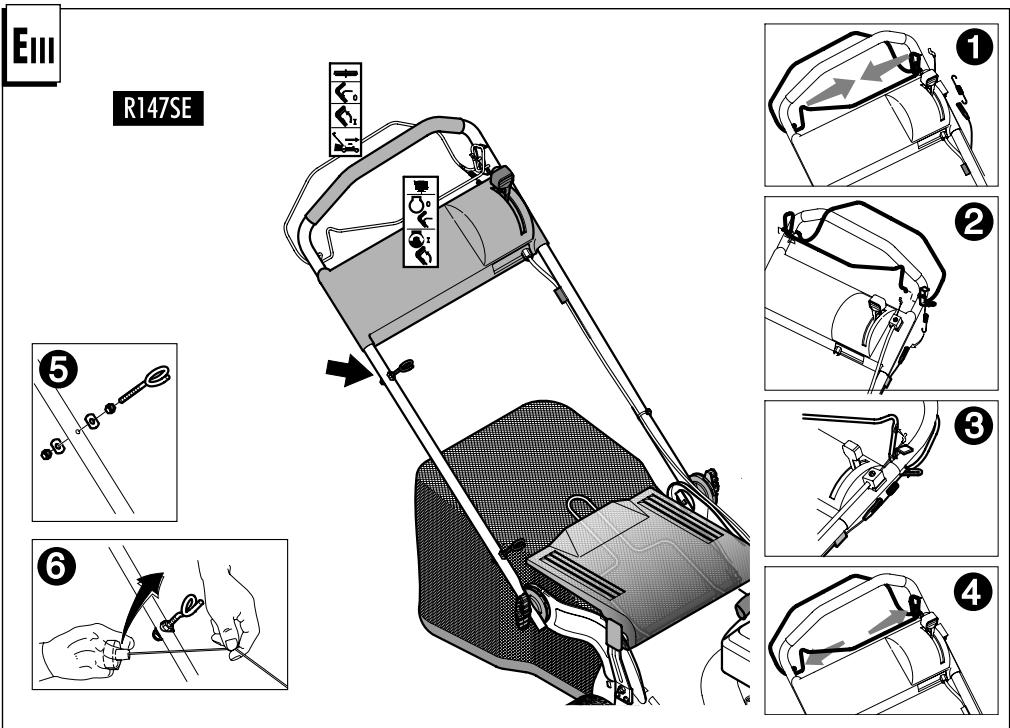
text_image
Eiii R147SE ① ② ③ ④ ⑤ ⑥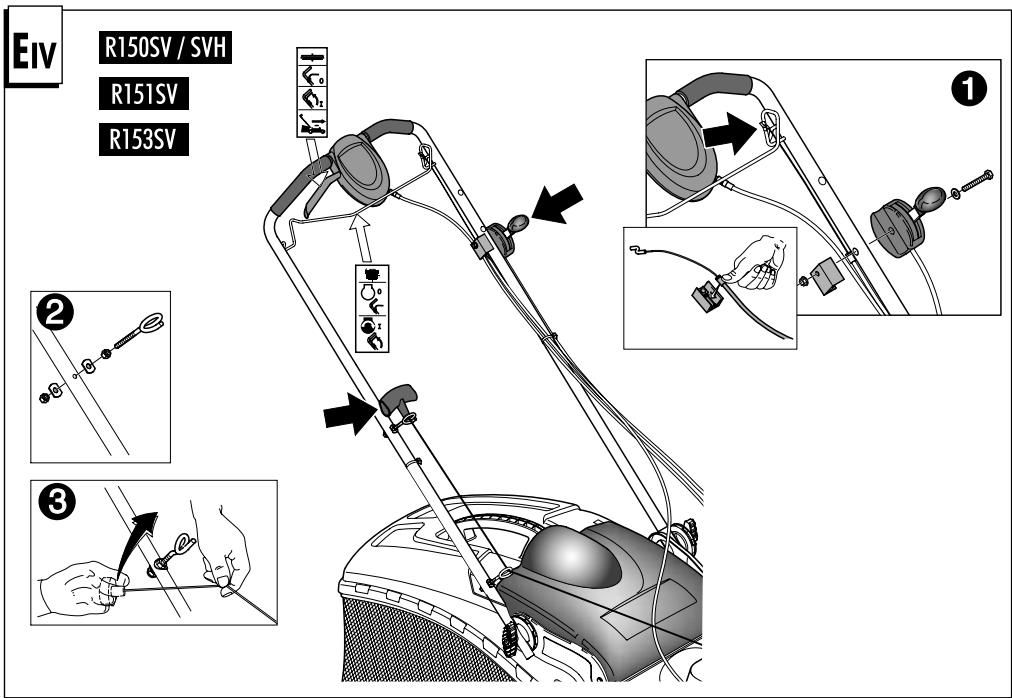
text_image
Eiv R150SV / SVH R151SV R153SV ① ② ③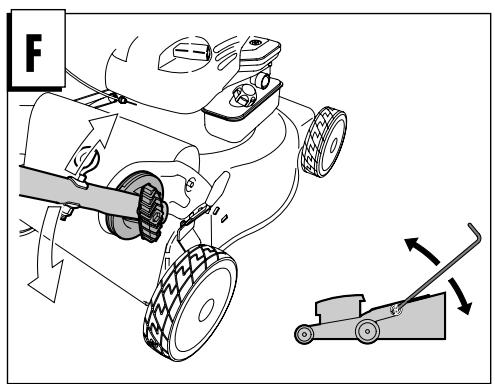
text_image
F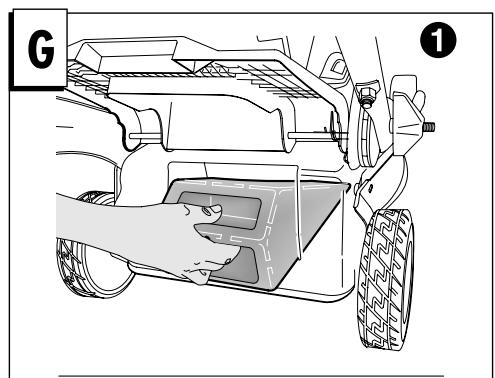
natural_image
Technical line drawing of a vehicle's front wheel assembly with a hand inserting a component (no text or symbols)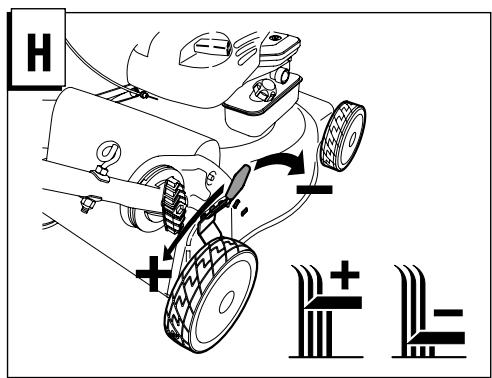
text_image
H + + -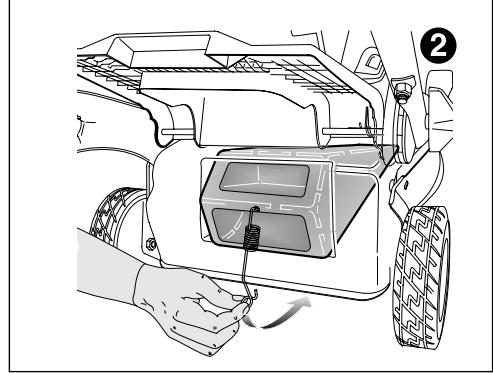
natural_image
Diagram of a vehicle's engine compartment showing hand positioning and tire assembly (no text or symbols)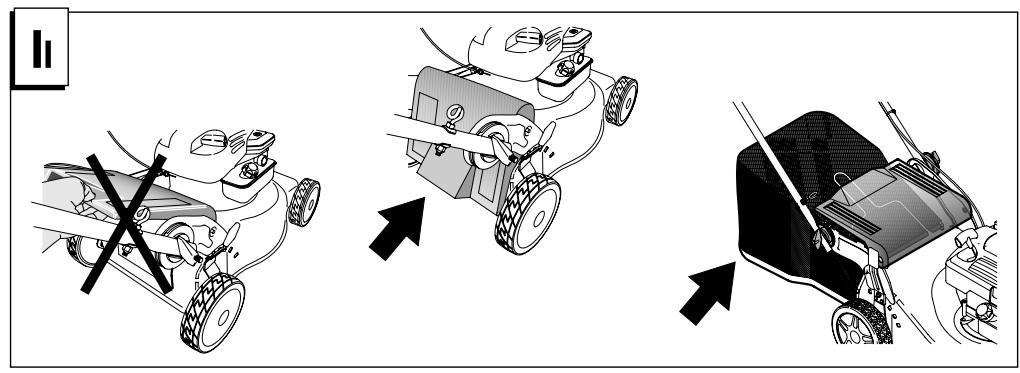
text_image
Diagram illustrating three stages of a motorcycle steering system: wheel press, tire maneuvering, and off-road gear assembly.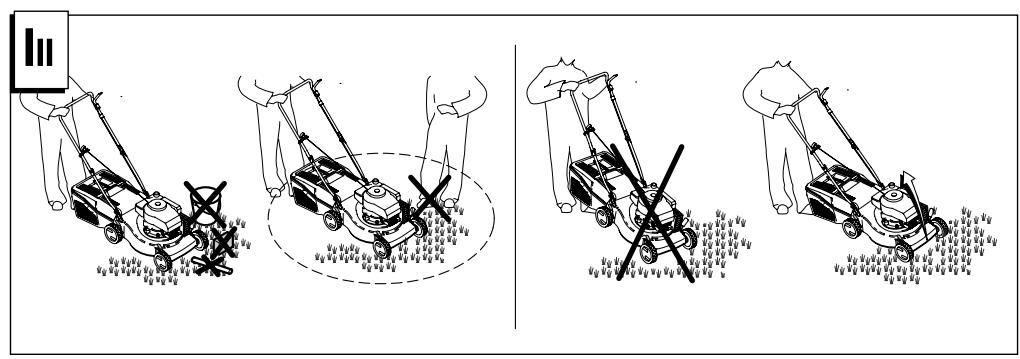
text_image
Illustration showing four different manual lawn law tools for crop manipulation, with one tool using a power switch and others on the ground.
text_image
Safety warning illustration showing three robot car stop symbols with crosshair indicators and hazard symbols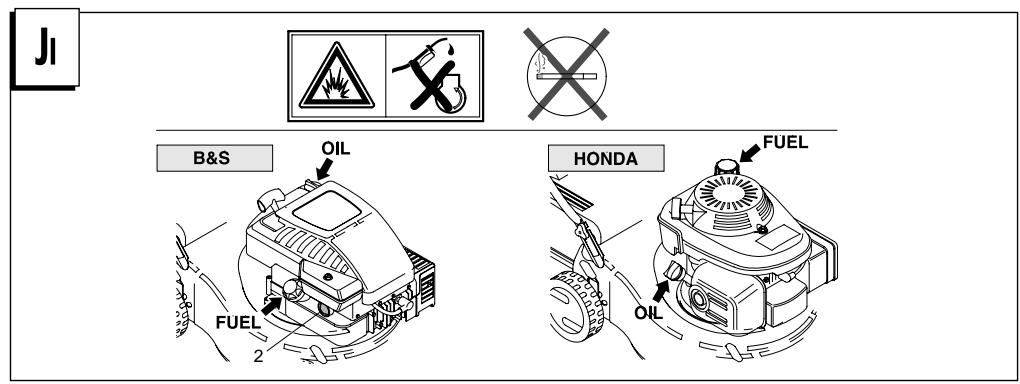
text_image
B&S OIL FUEL 2 HONDA FUEL OIL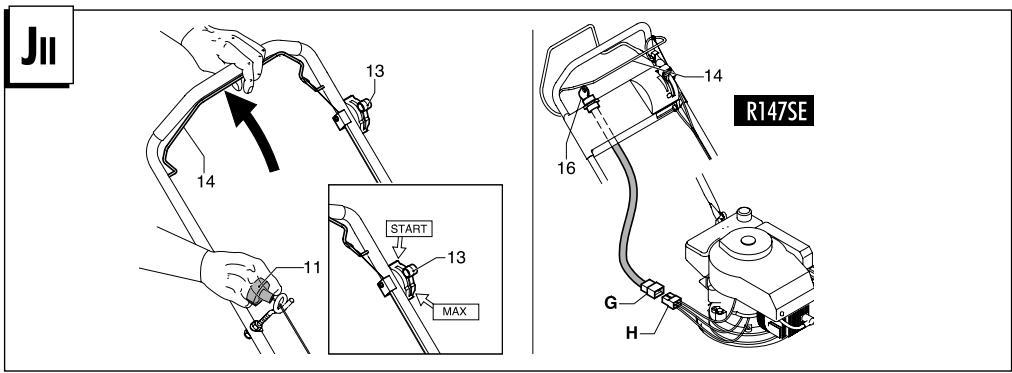
text_image
JII 13 14 16 14 R147SE START 13 MAX G H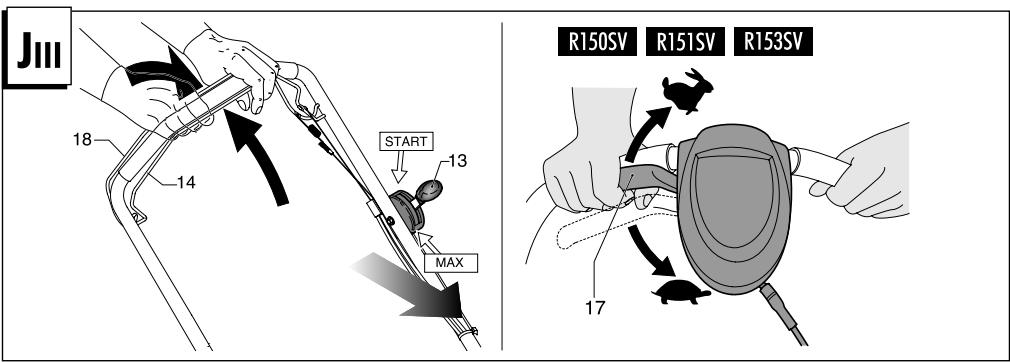
text_image
JIII 18 14 START 13 MAX R150SV R151SV R153SV 17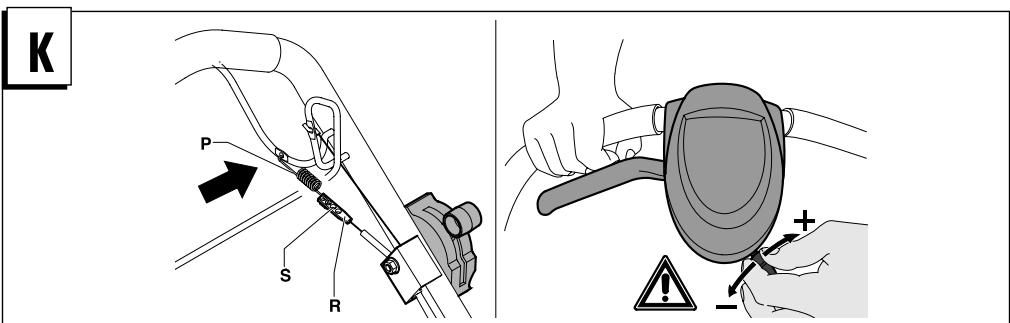
text_image
K P S R + -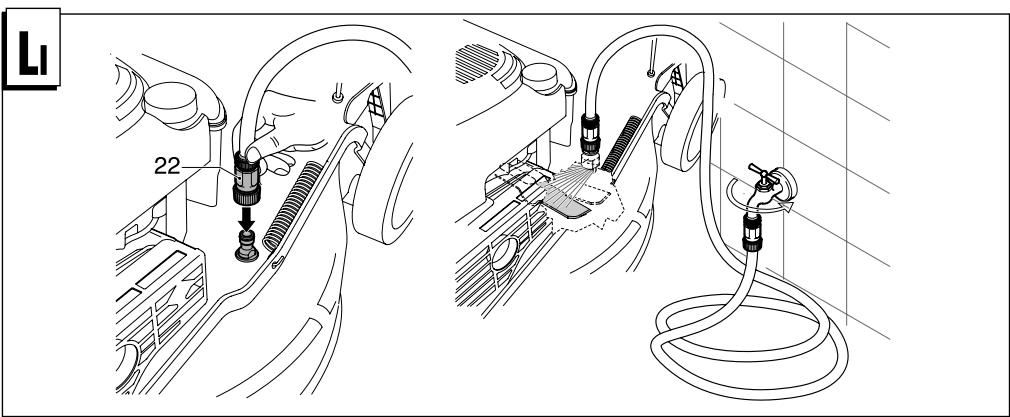
text_image
22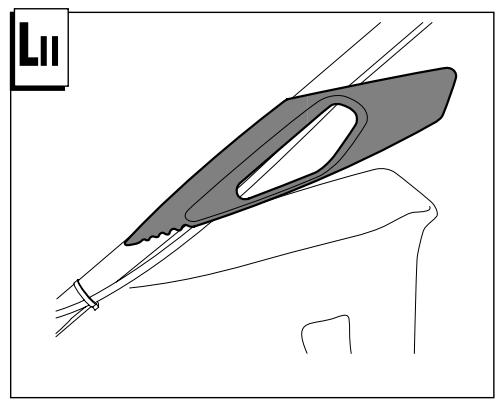
natural_image
Technical line drawing of a mechanical component with no visible text or symbols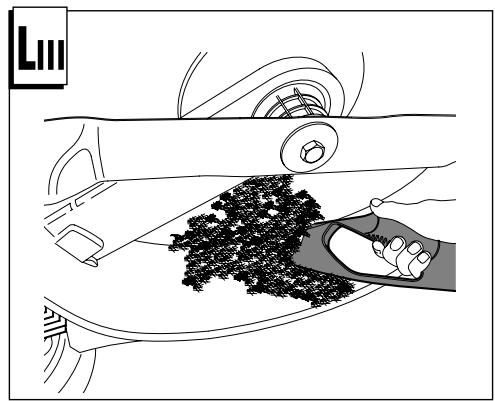
natural_image
Diagram showing a car interior with a hand holding a car, and a pile of black granular material inside (no text or symbols)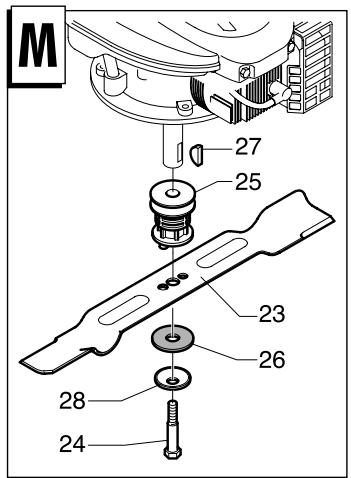
text_image
M 27 25 23 26 28 24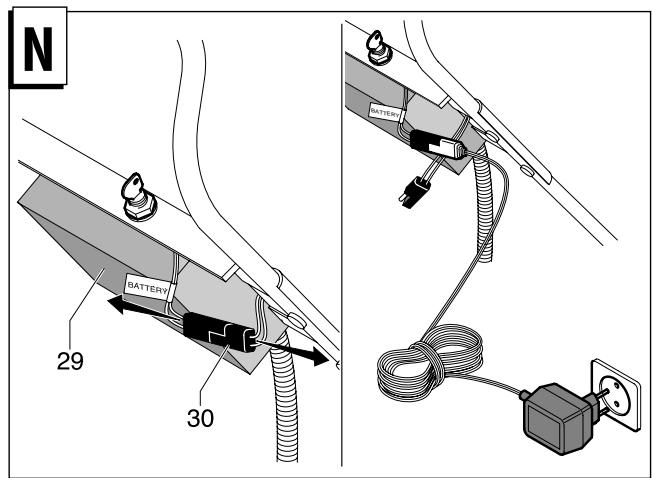
text_image
N BATTERY 29 30| A | R146 |
| B | CV-CC-SP-SC-SL-CL-SK |
| C | 46 cm |
| D | 96 dB (A) |
| E | 95 dB (A) |
| F | 84 dB (A) |
| G | 5 m/s ^2 |
| A | R147 |
| B | |
| C | 46 cm |
| D | 96 dB (A) |
| E | 95 dB (A) |
| F | 84 dB (A) |
| G | 5 m/s ^2 |
| A | R151 |
| B | |
| C | 53 cm |
| D | 98 dB (A) |
| E | 97 dB (A) |
| F | 84 dB (A) |
| G | 5 m/s ^2 |
| A | R150 |
| B | |
| C | 50,2 cm |
| D | 98dB (A) |
| E | 97 dB (A) |
| F | 84 dB (A) |
| G | 5 m/s ^2 |
| A | R153 |
| B | |
| C | 50,2 cm |
| D | 98 dB (A) |
| E | 97 dB (A) |
| F | 88 dB (A) |
| G | 5 m/s ^2 |