58G519 - Drill Graphite - Free user manual and instructions
Find the device manual for free 58G519 Graphite in PDF.


| Product Type | Corded Drill |
| Brand | Graphite |
| Model | 58G519 |
| Power Supply | 230 V / 50 Hz |
| Power Consumption | 650 W |
| No-Load Speed | 0 - 2800 rpm |
| Chuck Capacity | 1.5 - 13 mm |
| Max Drilling Diameter (Wood) | 32 mm |
| Max Drilling Diameter (Steel) | 13 mm |
| Max Drilling Diameter (Concrete) | 16 mm (with hammer action) |
| Impact Rate | 0 - 44800 bpm |
| Weight | 1.8 kg |
| Dimensions (L x W x H) | 265 x 65 x 185 mm |
| Cable Length | 2 m |
| Protection Class | II (double insulated) |
| Handle Type | Side handle (auxiliary) |
| Keyless Chuck | Yes |
| Variable Speed Trigger | Yes |
| Reversing Function | Yes |
| Maintenance | Clean vents regularly, lubricate chuck as needed |
| Safety Features | Lock-on button, safety guard, double insulation |
| Spare Parts Available | Carbon brushes, chuck, switch, cable |
| Repairability | Repairable with common tools; spare parts widely available |
| Included Accessories | Side handle, depth gauge, chuck key |
Frequently Asked Questions - 58G519 Graphite
User questions about 58G519 Graphite
0 question about this device. Answer the ones you know or ask your own.
Ask a new question about this device
Download the instructions for your Drill in PDF format for free! Find your manual 58G519 - Graphite and take your electronic device back in hand. On this page are published all the documents necessary for the use of your device. 58G519 by Graphite.
USER MANUAL 58G519 Graphite
natural_image
Line drawing of a GRAPHITE drill bit with handle and control panel (no text or symbols on the device itself)PL MŁOTOWIERTARKA
GB ROTARY HAMMER DRILL
DE HAMMERBOHRMASCHINE
RU ПЕРФОРАТОР
UA ПЕРФОРАТОР
HU FÚRÓKALAPÁCS
RO BORMASINA PERCUTANTA
©Z VRTACÍKLADIVO
SK VRTACIE KLADIVO
SI VRTALNO KLADIVO
LT PERFORATORIUS
LV PERFORATORS
EE LÖÖKTRELL
BG БОРМАШИНА УДАРНА
HR ČEKIĆ-BUŠILICA
SR BUŠILICA SA ČEKIĆEM
GR ΣΦΥΡΑ
ES MARTILLO-TALADRO
IT MARTELLO PERFORATORE
58G519

PL INSTRUKCJA OBSŁUGI 5
GB INSTRUCTION MANUAL 11
DE BETRIEBSANLEITUNG. 16
RU РУКОВОДСТВО ПО ЭКСПЛУАТАЦИИ ..... 21
UA ІНСТРУКЦІЯ З ЕКСПЛУАТАЦІЇ ..... 26
HU HASZNÁLATI UTASÍTÁS. 31
RO INSTRUCTIUNI DE DESERVIRE ..... 36
© INSTRUKCE K OBSLUZE. 41
SK NÁVOD NA OBSLUHU 46
⑤ NAVODILA ZA UPORABO 51
LT APTARNAVIMO INSTRUKCIJA. 56
LV LIETOŠANAS INSTRUKCIJA 61
EE KASUTUSJUHEND 66
BG ИНСТРУКЦИЯ ЗА ОБСЛУЖВАНЕ ..... 71
HR UPUTE ZA UPOTREBU....76
SR UPUTSTVO ZA UPOTREBU 81
GR OΔΗΓΙΕΣ ΧΡΗΣΗΣ 86
ES INSTRUCCIONES DE USO. 92
IT MANUALE PER L'USO 97
INSTRUKCJA ORYGINALNA (OBSŁUGI)

MŁOTOWIERTARKA
58G519
UWAGA: PRZED PRZYSTĄPIENIEM DO UŻYTKOWANIA ELEKTRONARZĘDZIA NALEŻY UWAŻNIE PRZECZYTAĆ NINIEJSZĄ INSTRUKCJĘ I ZACHOWAĆ JĄ DO DALSZEGO WYKORZYSTANIA.
SZCZEGÓŁOWE PRZEPISY BEZPIECZEŃSTWA
/ Rotary hammer drill /
/Vesőkalapacs/
Model
/Model./
/Modell/
58G519
Numer seryjny
/Serial number/
/Sorszám/
00001 ÷ 99999
/The above listed product is in conformity with the following UE Directives:/
/Machinery Directive 2006/42/EC/
/ 2006/42/EK Gépek /
/EMC Directive 2004/108/EC /
/and fulfi Is requirements of the following Standards:/
/Last two figures of CE marking year:/
/Name and address of the person who established in the Community and authorized to compile the technical file/
/GRUPA TOPEX Quality Agent /
CAUTION: BEFORE USING THE POWER TOOL READ THIS MANUAL CAREFULLY AND KEEP IT FOR FUTURE REFERENCE.
DETAILED SAFETY REGULATIONS
- Use ear protection when operating the rotary hammer drill. Noise hazards may cause hearing loss.
- Use protection measures for respiratory system when operating the rotary hammer drill. Dust hazards may cause respiratory system illness.
- Use dust extraction systems whenever required by the nature of the work performed.
- Use additional handles supplied with the tool. Loss of control may cause operator personal injury.
CAUTION! This device is designed to operate indoors.
The design is assumed to be safe, protection measures and additional safety systems are used, nevertheless there is always a small risk of operational injuries.
CONSTRUCTION AND USE
Rotary hammer is a hand-operated power tool with insulation class II. The tool is driven by single-phase commutator motor with rotational speed reduced with gear transmission. Rotary hammer can be used for drilling holes in working modes: with impact, rotation only, digging channels or surface processing of materials such as concrete, stone, brick etc. Range of use covers repair and building works, woodworking and any work from the scope of individual, amateur activities (tinkering).

Use the power tool according to the manufacturer's instructions only.
DESCRIPTION OF DRAWING PAGES
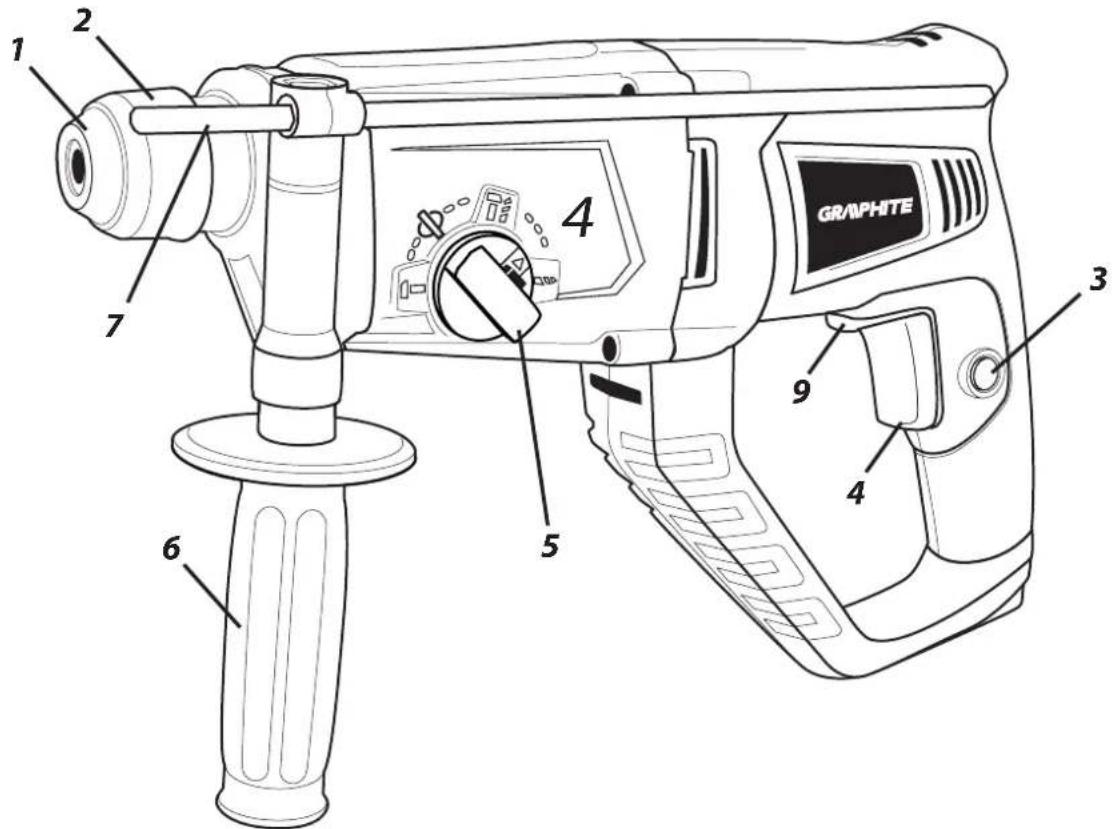
Below enumeration refers to the device elements depicted on the drawing pages of this manual.
SDS-PLUS chuck1.
Fixing sleeve2.
Switch lock button3.
- Switch
- Operation mode switch
- Additional handle
- Depth gauge rod
- Direction selector switch
* Differences may appear between the product and drawing
MEANING OF SYMBOLS


CAUTION
WARNING
ASSEMBLY/SETTINGS
INFORMATION
EQUIPMENT AND ACCESSORIES
Drills - 1 pce1.
Depth gauge rod - 1 pce2.
Additional handle - 1 pce3.
Transport case - 1 pce4.
Drill chuck + key - 1 pce5.
Chuck adapter - 1 pce6.
INSTALLATION OF ADDITIONAL HANDLE

Due to safety issues, always use additional handle (6) when operating the rotary hammer drill. It can be fixed in any position.

- Turn left the wheel lock that locks handle collar (6) to loosen it.
- Slide the handle collar over cylindrical part of the rotary hammer drill body.
Turn for the most comfortable position. ●
Turn the wheel lock tight to the right to clamp the handle. ●
INSTALLATION OF DEPTH GAUGE ROD

Depth gauge rod (7) serves to limit the depth of drill penetration of material. Loosen the wheel lock, which blocks collar of the additional handle (6).
- Slide depth gauge rod (7) into the hole in the additional handle collar.
- Set desired drilling depth.
Fix by tightening the wheel lock.
INSTALLATION AND REPLACEMENT OF WORKING TOOLS

Rotary hammer drill is designed to operate with working tools with SDS-PLUS shanks. Prior to operation clean the rotary hammer drill and working tools. Use lubricant and apply thin layer onto shank of the working tool.

Disconnect the power tool from power supply.
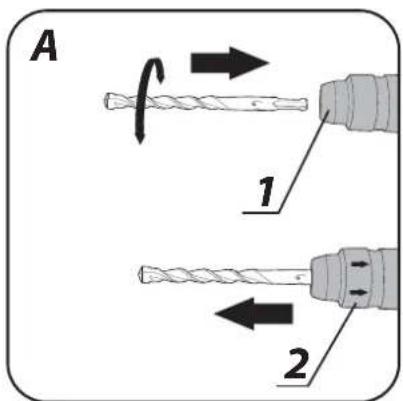
Rotary hammer drill features clic-clic system (which does not require to pull off the fixing sleeve (2) when installing a working tool).
- Put the rotary hammer against stable surface.
- Insert working tool shank into chuck (1) and slide it to mechanical stop (it may be necessary to turn the working tool so it can reach appropriate position) (fig. A).
- Working tool is properly seated if it cannot be removed without pulling off the fixing sleeve.
- If the sleeve (2) does not return to its default position, remove the working tool and repeat the whole operation.

High efficiency of the rotary hammer drill operation can be achieved by using sharp and undamaged working tools.
DEINSTALLATION OF WORKING TOOL

Just after the operation is finished, the working tool may be hot. Avoid direct contact and use appropriate protective gloves. Clean the working tool after removal.

Disconnect the power tool from power supply.
- Pull the fixing sleeve (2) to the back and hold.
- Remove the working tool with your second hand by pulling it to the front.
OVERLOAD CLUTCH

Rotary hammer drill features overload clutch with factory setting. Spindle of the rotary hammer stops immediately after working tool jams, what might overload the power tool.

Always use glasses or anti-splinter goggles, especially when drilling a hole above your head.
SWITCHING ON / SWITCHING OFF

The mains voltage must match the voltage on the rating plate of the rotary hammer drill.

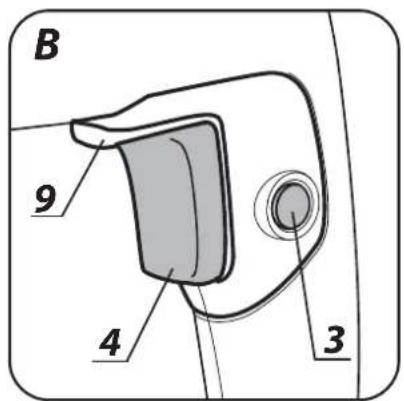
Switching on - press the switch button (4) and hold in this position (fig. B).
Switching off - release pressure on the switch (4).
Locking the switch (continuous operation)
Switching on:
- Press the switch button (4) and hold in this position.
Press the switch lock button (● 3).
- Release pressure on the switch button (4).
Switching off:
Press and release the switch button (● 4).

Rotational speed of the spindle is controlled with pressure on the switch button (4).
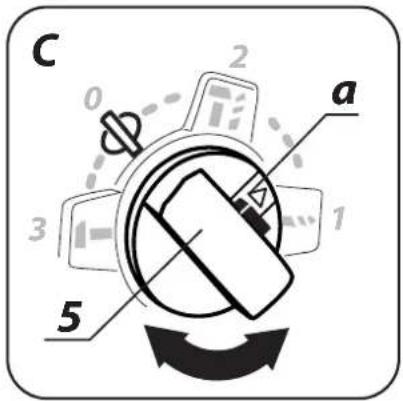
Rotary hammer drill features 3-function switch of the working mode (5). Depending on its setting, a drilling only, impact drilling or chiselling is possible (fig. C).
Impact drilling and chiselling requires to slightly press the rotary hammer. Too great pressure would cause unnecessary, excessive load of the motor. Check technical condition of the working tools regularly. Sharpen or replace working tools when needed.

Press the switch lock button (a) prior to change of position of the working mode switch (5) (fig. C).
Pos0 • = position for setting chisel in desired position (chiselling)
Pos1 ● = regular drilling/screwing (symbol of a drill)
Pos2 • = impact drilling (symbol of a drill and a hammer)
Pos3 • = chiselling (symbol of a hammer)

Do not try to change position of the working mode switch when the motor of rotary hammer drill is operating. Such action may lead to serious damage of the rotary hammer drill or even injury of the user. Do not use three-jaw drill chuck, when the rotary hammer drill is set to impact drilling. This chuck is designed for regular drilling only (in wood or steel).
LEFT - RIGHT DIRECTION OF ROTATION

Choose direction of rotary hammer drill spindle rotation with the selector switch (9).
Right rotation - set the switch (9) in the centreline of the switch (fig. B).
Left rotation - move the switch (9) to the extreme right position.
* The possibility is reserved that in certain cases position of the switch relating to rotation direction may be different than specified. Please refer to graphic signs placed on the switch or tool body.

Do not change direction of rotation when the spindle of the rotary hammer drill is rotating. Ensure the position of the selector switch is correct before starting the tool. Do not use left direction of rotation when impact function is on.
DRILLING HOLES

- When drilling a hole with large diameter, it is recommended to drill smaller hole and then ream it to desired diameter. It prevents overloading the rotary hammer drill.
- When drilling deep holes drill gradually to smaller depths, then slide the drill out of the hole to remove borings and dust.
- If a drill jam occurs during drilling, the overload clutch will work. Turn off the rotary hammer immediately to prevent its damage. Remove jammed drill from the hole.
- Keep the rotary hammer drill in the axis of the hole. Keeping the drill perpendicular to the surface of the processed material ensures the most effective operation. If a drill is not kept perpendicular to the surface during operation, it may get jammed or broken in the hole, and injure the user.

Long lasting drilling at low rotational speed of the spindle may cause motor overheating. Make periodic breaks during operation or let the tool operate at maximum speed with no load for approximately 3 minutes. Do not cover holes for motor ventilation in the rotary hammer body.
DRILLING WITHOUT IMPACT

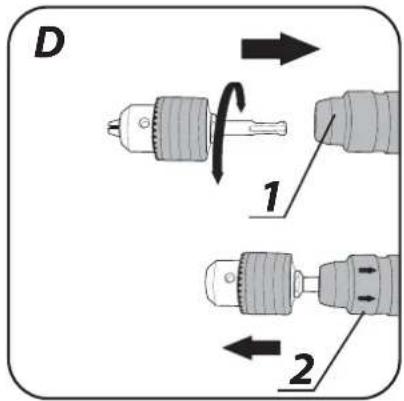
Materials like steel, wood and plastics can be drilled with rotary hammer with the use of three jaw chuck with intermediate adapter. Assemble together three jaw chuck and adapter by twisting and then place it in the rotary hammer chuck (proceed like with SDS-PLUS drills) (fig. D).
Use drills made of high speed steel or carbon steels (only for wood and wood-like materials).

Do not use three jaw drill chuck when the rotary hammer drill is set to impact drilling. This chuck is designed for regular drilling only (in wood or steel).
IMPACT DRILLING

- Choose appropriate mode of drilling, impact drilling in this case.
- Insert appropriate drill with SDS-PLUS shank into the chuck (1).
- To get the best results use high quality drills with sintered carbide inserts.
Press the drill against processed material. ●
- Switch on the rotary hammer by pressing the switch button (4), the rotary hammer drill mechanism should operate smoothly and the tool should not bounce on the processed material surface.
- Increase speed when needed by pressing the switch button (4).
Unplug the power cord from the mains socket before commencing any activities related to installation, adjustment, repair or maintenance.
Always keep the rotary hammer drill clean. ●
Never use any caustic agents for cleaning plastic parts of the rotary hammer drill. ●
- After operation use compressed air to blow through the rotary hammer drill to remove dust deposit, especially to keep ventilation slots pervious.
- It is necessary to regularly check technical condition of carbon brushes of the electrical motor (dirty or used up brushes can cause excessive sparking and loss of spindle speed of the rotary hammer drill).
REPLACEMENT OF CARBON BRUSHES

Replace immediately worn out (shorter than 5 mm), burnt or cracked motor carbon brushes. Always replace both brushes at a time.
Entrust replacement of carbon brushes only to a qualified person. Only original parts should be used.
ADDITIONAL HINTS FOR USING ROTARY HAMMER DRILL
To achieve the best possible efficiency when working in concrete, apply moderate (not excessive) pressure on the rotary hammer. Excessive pressure would lead to efficiency loss. Rotary hammer filled with solid lubricant requires some time to heat up, depending on the surrounding temperature. New rotary hammer requires some time to work before it achieves full working efficiency.

All faults should be repaired by service workshop authorized by the manufacturer.
TECHNICAL PARAMETERS
RATED PARAMETERS
| Rotary Hammer Drill | ||
| Parameter Value | ||
| Supply voltage 230 V AC | ||
| Frequency | 50 | |
| Rated power 900 W | ||
| No load rotational speed 0-950 min | -1 | |
| Impact rate 0-4500 min | -1 | |
| Maximum drilling diameter | concrete 26 mm | |
| steel 13 mm | ||
| wood 30 mm | ||
| Chuck SDS-PLUS | ||
| Impact energy 2,3 J | ||
| Protection class II | ||
| Weight 3,6 kg | ||
| Year of production | 2014 | |
NOISE LEVEL AND VIBRATION PARAMETERS
Sound pressure Lp_A=92.5 dB(A) K=3 dB(A)
Sound power Lw_A=103,5 dB(A) K=3 dB(A)
Weighted value of vibration acceleration a_h=18,024 m/s^2 K=1,5 m/s ^2
ENVIRONMENT PROTECTION
Do not dispose of electrically powered products with household wastes, they should be utilized in proper plants. Obtain information on wastes utilization from your seller or local authorities. Used up electric and electronic equipment contains substances active in natural environment. Unrecycled equipment constitutes a potential risk for environment and human health.
* Right to introduce changes is reserved.
"Grupa Topex Spółka z ograniczoną odpowiedzialnością" Spółka komandytowa with seat in Warsaw at ul. Pograniczna 2/4 (hereinafter Grupa Topex) informs, that all copyrights to this instruction (hereinafter Instruction), including, but not limited to, text, photographs, schemes, drawings and layout of the instruction, belong to Grupa Topex exclusively and are protected by laws accordingly to Copyright and Related Rights Act of 4 February 2004 (ustawa o prawie autorskim i prawach pokrewnych, Dz. U. 2006 No 90 item 631 with later amendments). Copying, processing, publishing, modifications for commercial purposes of the entire Instruction or its parts without written permission of Grupa Topex are strictly forbidden and may cause civil and legal liability.

DODATNA NAVODILA ZA UPORABO VRTALNEGA KLADIVA
GRAFISKÄS DALAS APRAKSTS
DARBA REŽIMA PĀRSLĒDZĒJS

Padruni adapter - 1 tk6.
ETTEVALMISTUS TÖÖKS
LISAKÄEPIDEME PAIGALDAMINE

POSEBNI PROPISI O SIGURNOSTI
- Koristite štitnike sluha za vrijeme rada s čekićem- bušilicom. Ako se izlažete buci, to može dovesti do gubitka sluha.
- Koristite sredstva za zaštitu dišnih putova za vrijeme rada sa čekićem-bušilicom. Osjetljivost na prašinu može dovesti do bolesti dišnog sustava.
Ako način rada zahtijeva, koristite sustave za odvod prašine. - Uređaj koristite sa dodatnim drškama koje ste dobili u kompletu. Gubitak kontrole nad uređajem može dovesti do ozljeda djelatnika.
POZOR! Uređaj služi za korištenje u zatvorenom prostoru.
- INSTRUKCJA ORYGINALNA (OBSŁUGI)
- MŁOTOWIERTARKA
- 58G519
- SZCZEGÓŁOWE PRZEPISY BEZPIECZEŃSTWA
- Model
- Numer seryjny
- DETAILED SAFETY REGULATIONS
- CONSTRUCTION AND USE
- DESCRIPTION OF DRAWING PAGES
- MEANING OF SYMBOLS
- EQUIPMENT AND ACCESSORIES
- INSTALLATION OF ADDITIONAL HANDLE
- INSTALLATION OF DEPTH GAUGE ROD
- INSTALLATION AND REPLACEMENT OF WORKING TOOLS
- Disconnect the power tool from power supply.
- DEINSTALLATION OF WORKING TOOL
- OVERLOAD CLUTCH
- SWITCHING ON / SWITCHING OFF
- Switching on:
- Switching off:
- LEFT - RIGHT DIRECTION OF ROTATION
- DRILLING HOLES
- DRILLING WITHOUT IMPACT
- IMPACT DRILLING
- REPLACEMENT OF CARBON BRUSHES
- ADDITIONAL HINTS FOR USING ROTARY HAMMER DRILL
- TECHNICAL PARAMETERS
- NOISE LEVEL AND VIBRATION PARAMETERS
- ENVIRONMENT PROTECTION
- DODATNA NAVODILA ZA UPORABO VRTALNEGA KLADIVA
- GRAFISKÄS DALAS APRAKSTS
- DARBA REŽIMA PĀRSLĒDZĒJS
- ETTEVALMISTUS TÖÖKS
- LISAKÄEPIDEME PAIGALDAMINE
- POSEBNI PROPISI O SIGURNOSTI
Brand : Graphite
Model : 58G519
Category : Drill