CW1949 - Blender Coline - Free user manual and instructions
Find the device manual for free CW1949 Coline in PDF.


| Product Type | Blender |
| Model | CW1949 |
| Brand | Coline |
| Power | 500 W |
| Capacity | 1.5 L |
| Dimensions (H x W x D) | 40 x 18 x 18 cm |
| Weight | 2.2 kg |
| Jug Material | Plastic (BPA-free) |
| Blade Material | Stainless steel |
| Speed Settings | 2 speeds + pulse |
| Functions | Blending, crushing ice, smoothies, milkshakes |
| Safety Features | Non-slip feet, lid lock, overload protection |
| Cleaning | Removable jug, dishwasher safe parts |
| Spare Parts Available | Replacement jug, blade assembly, lid |
| Warranty | 2 years |
| Color | White / Silver |
| Voltage | 220-240 V, 50 Hz |
| Cord Length | 1.2 m |
Frequently Asked Questions - CW1949 Coline
User questions about CW1949 Coline
0 question about this device. Answer the ones you know or ask your own.
Ask a new question about this device
Download the instructions for your Blender in PDF format for free! Find your manual CW1949 - Coline and take your electronic device back in hand. On this page are published all the documents necessary for the use of your device. CW1949 by Coline.
USER MANUAL CW1949 Coline
natural_image
Black and white photo of a coline blender with visible control knob and speedometer (no text or symbols on body)Multi-Blender
Art.no 18-4699 Model HL-2575
44-1949
HL-2575
Please read the entire instruction manual before using the product and then save it for future reference. We reserve the right for any errors in text or images and any necessary changes made to technical data. In the event of technical problems or other queries, please contact our Customer Services (see address details on the back).
Safety
- Incorrect handling of this product could result in personal injury.
- Never let children use, play or clean the product.
- The product must only be connected to a standard domestic 220–240 V, 50 Hz electrical supply.
- The product must not be used by children. Ensure that the product and its mains lead are kept out of children's reach. Be extra careful and keep children under continuous supervision if they are in the vicinity while the product is being used.
- The product is designed exclusively for private domestic use. It is not designed for commercial use.
- This product is only intended for indoor use.
- Never leave the product unsupervised while in use, especially if children or pets are in the vicinity.
- Never move the product while it is switched on.
- Always disconnect the product from the power supply by holding and pulling the plug. Do not pull the mains lead.
- Never lay the mains lead over hot surfaces, sharp edges or corners.
- If an extension lead is used, ensure that it is suitable for the intended use.
- Never have the blade assembly attached to the motor unit without also having the jug or any other container mounted.
-
Never plug or unplug the mains lead into the mains with damp or wet hands.
-
Never use the product if it has been dropped on the floor, if the mains lead has any damage or if the product is in any way not functioning normally.
- The product must only be repaired by qualified service technicians and only using genuine spare parts.
- Never try to open the housing or modify the product in any way.
- This product contains no parts that you can repair yourself.
- The product may be used by persons with reduced physical, sensory or mental capability, lack of experience or knowledge which could jeopardise their safety, provided they have been given supervision or instruction concerning the safe use of the product and understand the hazards involved.
Responsible disposal
This symbol indicates that this product should not be disposed of with general household waste. This applies throughout the entire EU. In order to prevent any harm to the environment or health hazards caused by incorrect waste disposal, the product must be handed in for recycling so that the material can be disposed of in a responsible manner. When recycling your product, take it to your local collection facility or contact the place of purchase. They will ensure that the product is disposed of in an environmentally sound manner.

natural_image
Symbol of a trash bin crossed with no text or numbers, representing waste sorting or disposal (no text present)Product description
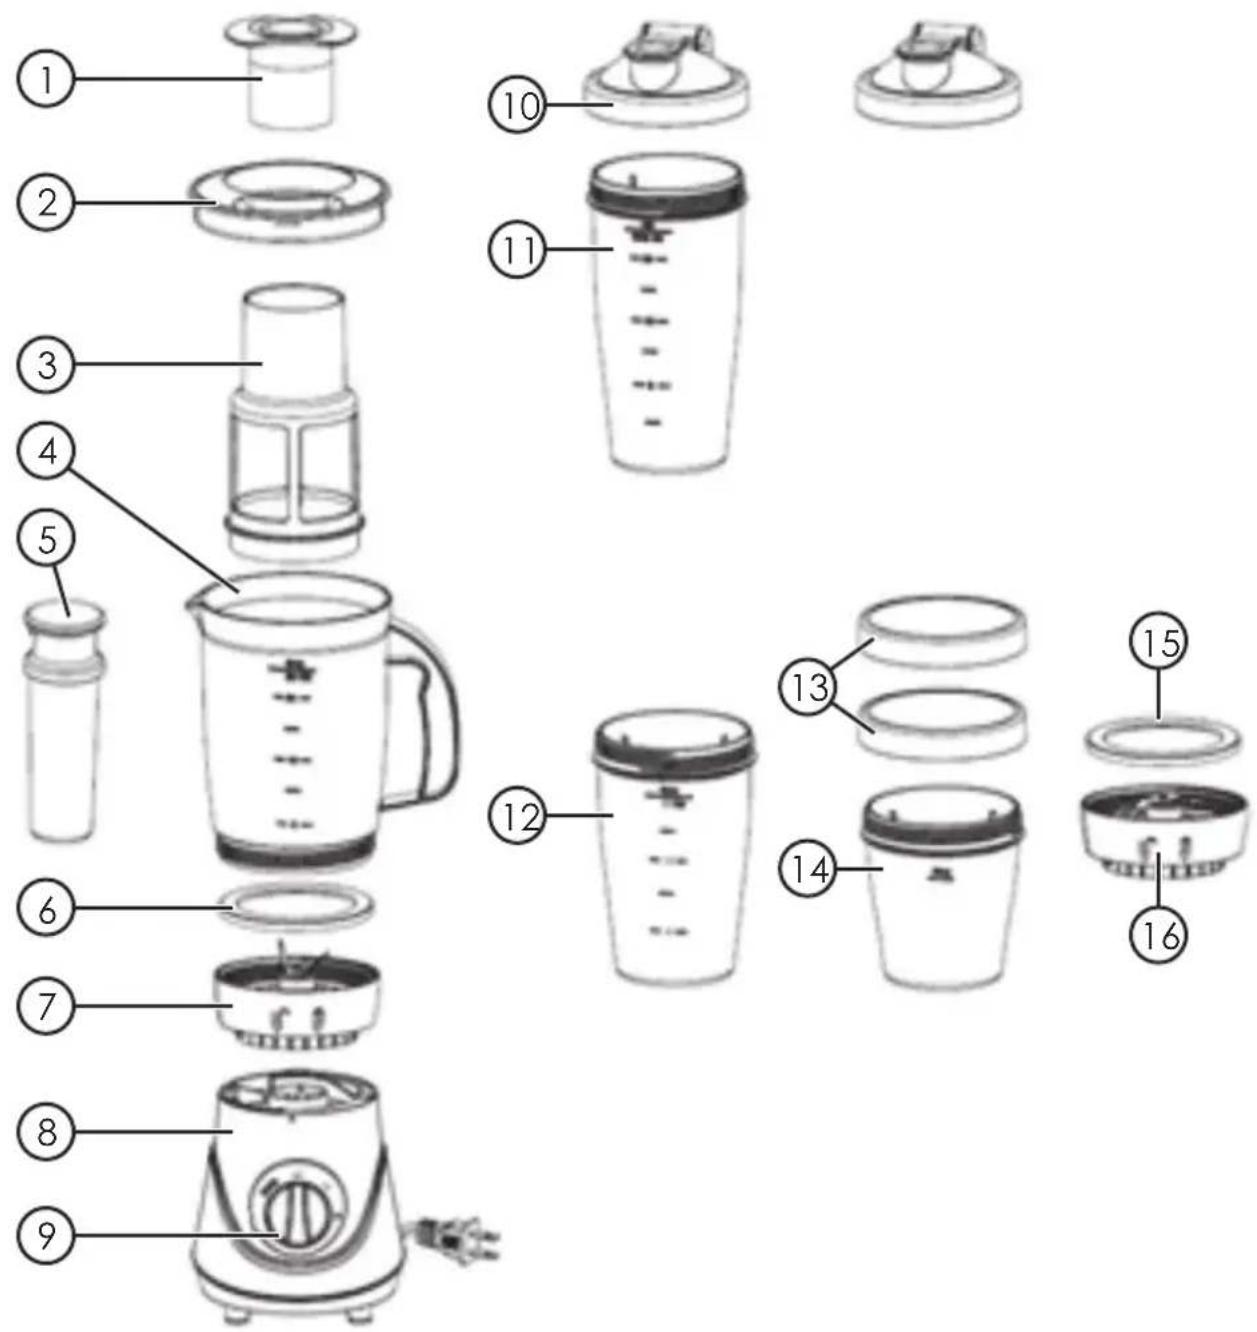
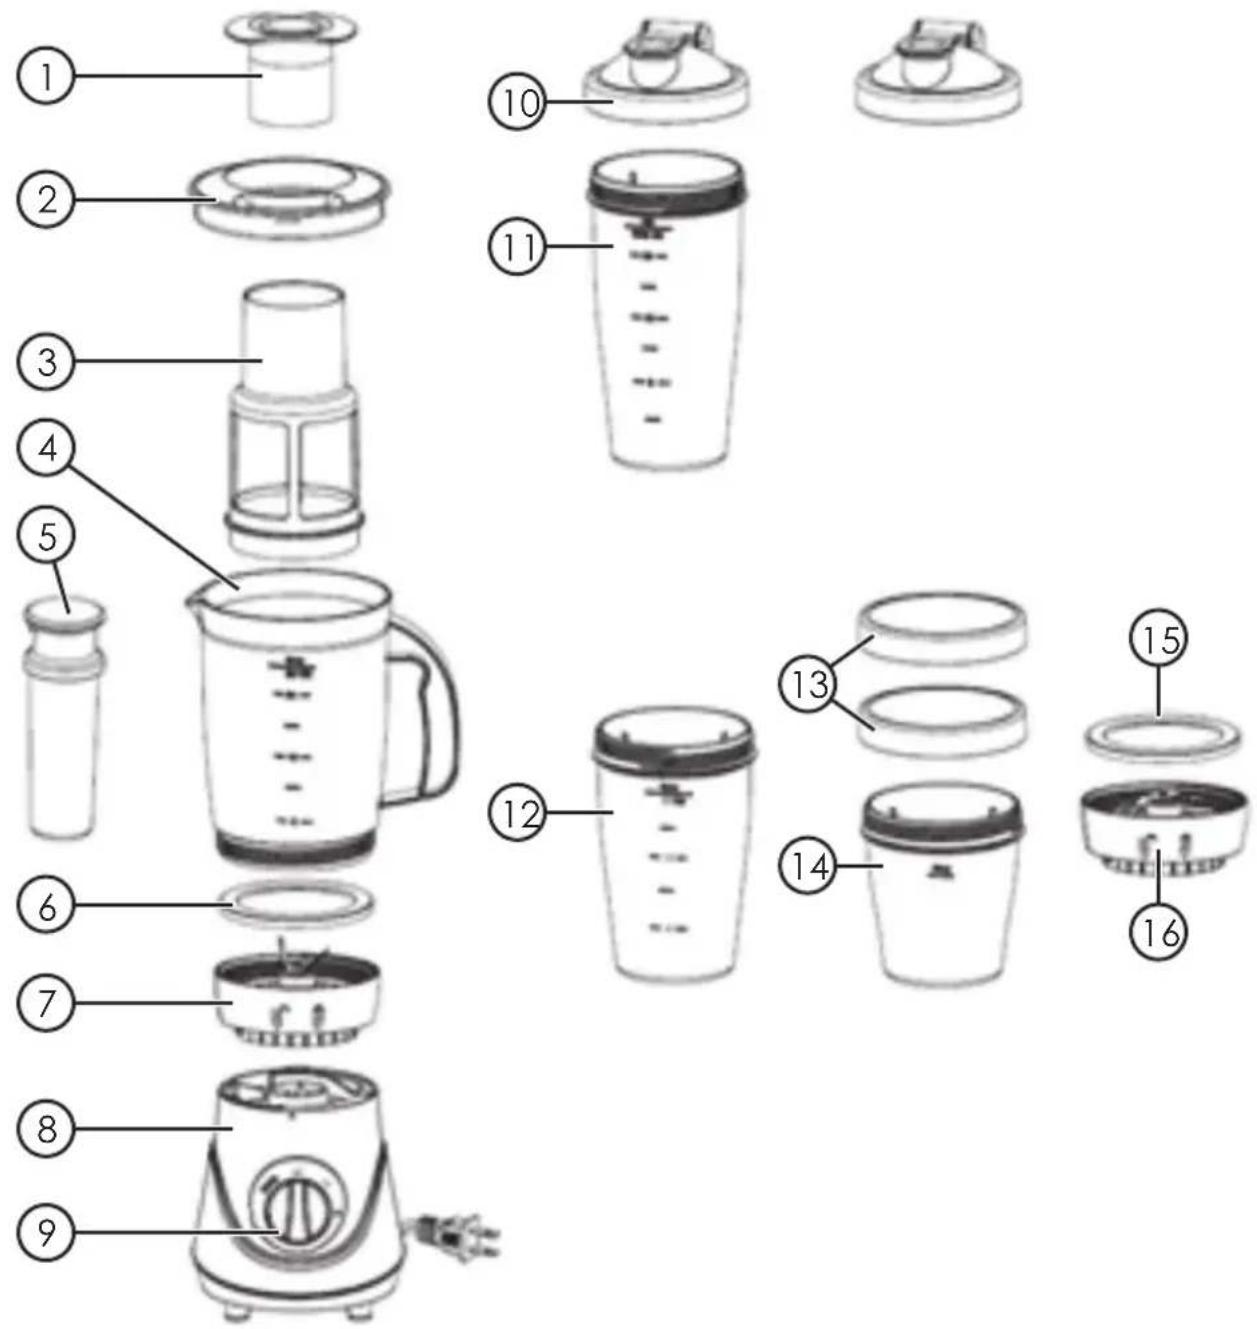
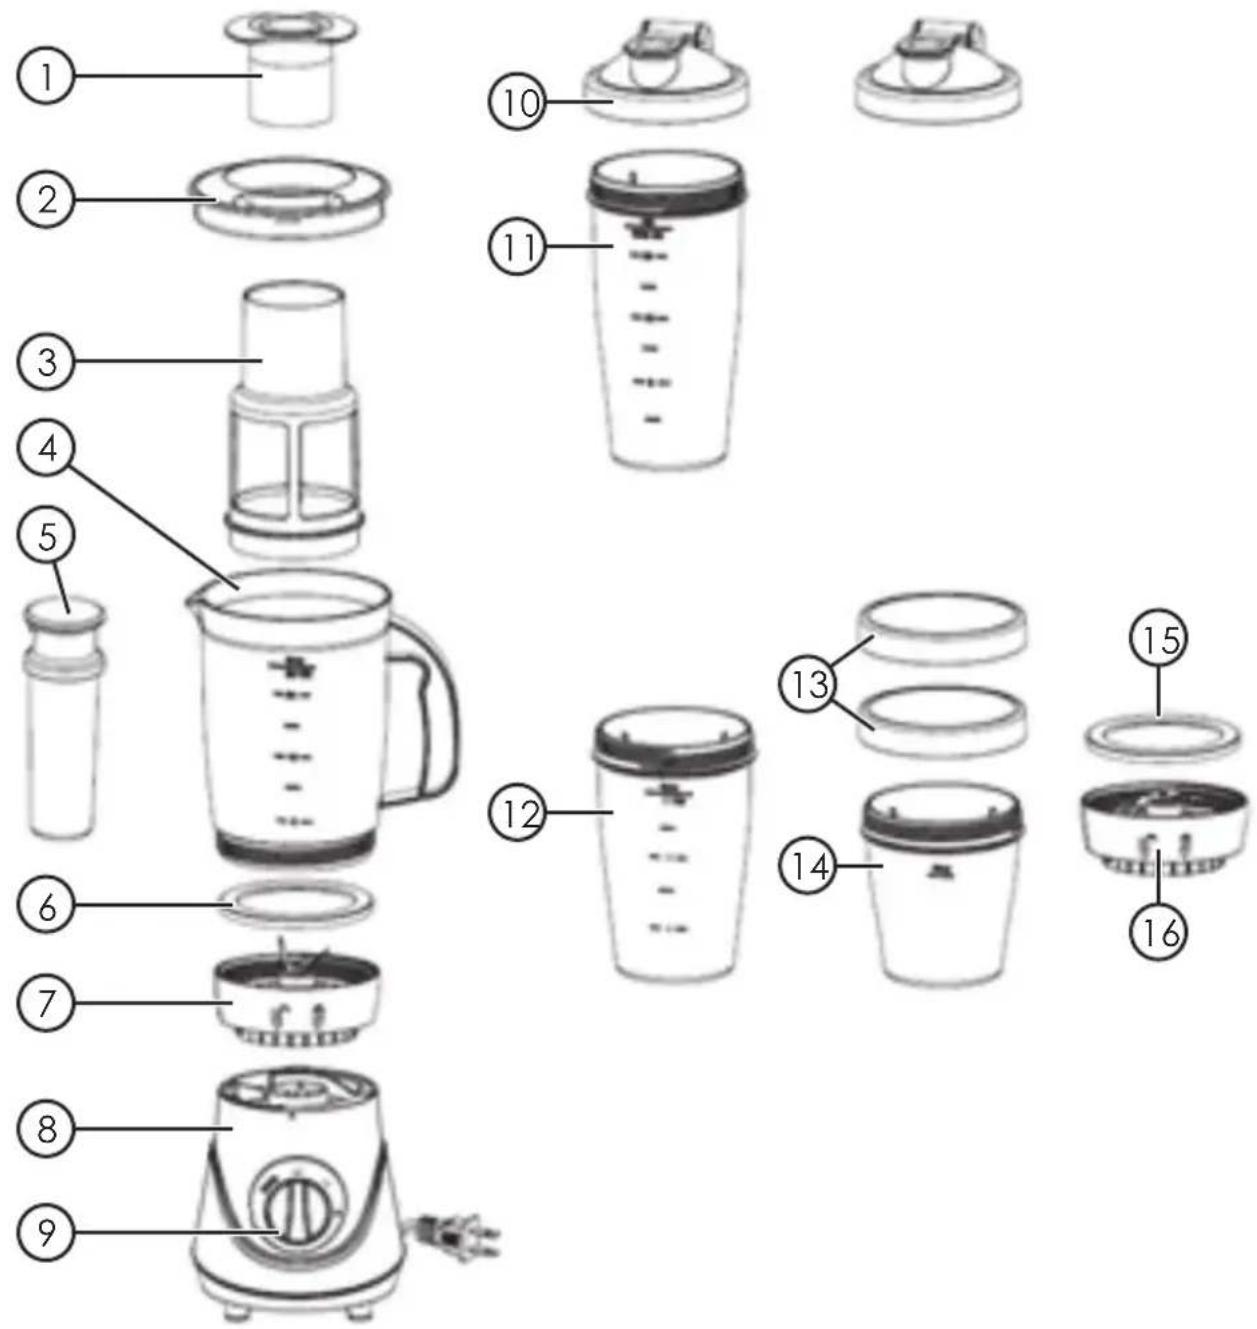
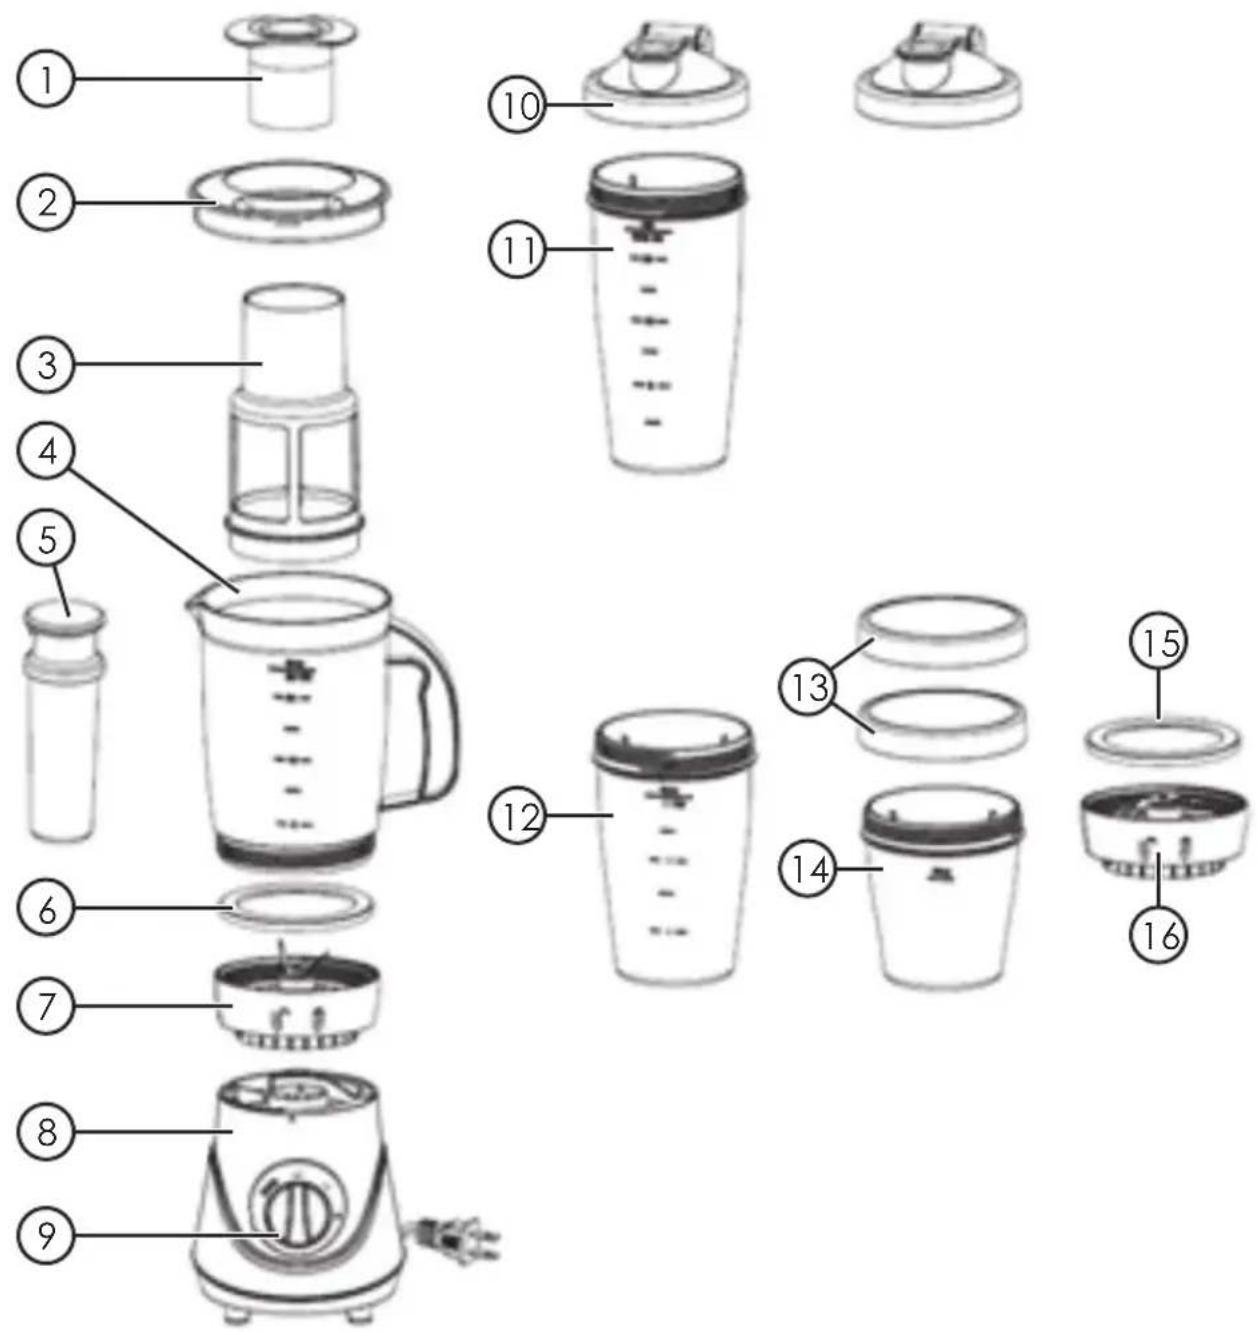
- Jug lid cap
- Jug lid
- Juice extractor screen
- Jug
- Food pusher
- Rubber gasket
- Cross-blade assembly
- Motor unit
-
Function selector
-
Drink lid
- Large beaker
- Small beaker
- Storage lid
- Grinding beaker
- Rubber gasket
- Flat-blade assembly
Before initial use
- Wipe the motor unit with a slightly damp cloth. Never immerse the motor unit in water.
- Wash all other parts in warm water with washing-up liquid. The jug, beakers and lids are dishwasher safe if washed in top rack of the dishwasher. Do not wash any of the blade assemblies in the dishwasher.
- Rinse and dry the parts carefully.
Operating instructions
Note:
- The blade assemblies are very sharp and should be handled with extreme care.
- Hot ingredients must only be blended in the jug (1) with the lid cap removed.
- Place the blender on a firm, level surface.
- Never fill the jug or beakers over the MAX mark.
- Never use the blender on uncooked root vegetables, potatoes, large pieces of meat, etc.
- Never use the blender for mixing dough.
- Never use the blender for longer than 2 minutes at a time. Switch the motor off and let it cool down for a few minutes before using it again.
- Never turn on the blender without any of the blade assemblies and containers attached.
- Never attach other types of blade assemblies or containers onto the motor unit.
- Never use the blade assemblies, jug or beakers on another blender motor.
- Never remove the jug or any other of the containers from the motor unit while the blender is turned on.
- Never attempt to attach the jug or any other of the containers to the motor unit while the blender is turned on.
- Do not operate the blender when any of the attached containers is empty.
Using the large and small sized beakers
Note: Never fill any of the containers with hot foods or liquids.
- Make sure that the mains lead is unplugged.
- Fill the beaker (11 or 12) with ingredients.
- Screw the cross-blade assembly (7) onto the beaker (making sure that the blade assembly gasket is in place). Tighten properly, but do not overtighten.
- Place the assembled container with blade assembly onto the motor unit by aligning the unlock symbol 📋 on the blade assembly with the ▲ symbol on the motor unit.
- Turn the container until the lock symbol is aligned with the ▲ symbol on the motor unit. Note: The blender will not start unless all the parts are assembled correctly.
-
Plug the mains lead into a wall socket.
-
Turn the blender on by turning the function knob to LO, HI or PULSE. The pulse setting is spring loaded and must be held in place in order for the motor to start. Never run the blender for more than 2 minutes at a time. Let the motor cool down a little before using it again.
- Turn the function knob to the OFF position once you have finished blending.
- Unscrew the container with blade assembly from the motor unit and unscrew the blade assembly from the container and pour the ingredients into another container or use the included lid to close the container for storage.
Using the grinding beaker
Note: Never fill the grinding beaker with hot foods or liquids. The grinding beaker is designed for cutting onions, garlic, spices, nuts, cheese, coffee beans, bread crumbs, etc.
- Make sure that the mains lead is unplugged.
- Fill the beaker with ingredients.
- Screw the flat-blade assembly (16) onto the beaker (making sure that the blade assembly gasket is in place). Tighten properly, but do not overtighten.
- Place the assembled container (14) with blade assembly onto the motor unit by aligning the unlock symbol 📁 on the blade assembly with the ▲ symbol on the motor unit.
- Turn the container until the lock symbol 🔒 is aligned with the ▲ symbol on the motor unit. Note: The blender will not start unless all the parts are assembled correctly.
- Plug the mains lead into a wall socket.
- Turn the blender on by turning the function knob to LO or HI. Never run the blender for more than 30 seconds at a time. Let the motor cool down for 30 seconds before using it again.
- Turn the function knob to the OFF position once you have finished blending.
- Unscrew the container with blade assembly from the motor unit and unscrew the blade assembly from the container and pour the ingredients into another container or use the included lid to close the container for storage.
Using the juice extractor screen
Note:
- Use the juice extractor screen (3) and only soft fruits for the best results.
-
Never remove the lid of the jug while the blender is on.
-
Cut the fruits into 2 cm pieces.
- Make sure that the mains lead is unplugged.
- Screw the cross-blade assembly (7) onto the jug (making sure that the blade assembly gasket is in place). Tighten properly, but do not overtighten.
natural_image
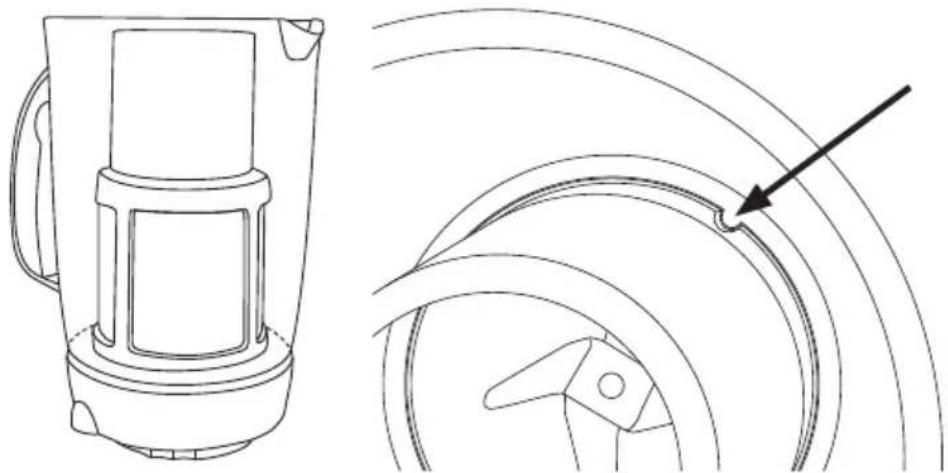
Technical line drawing of a portable device and its internal components, showing no text or symbols.- Place the juice extractor screen so that the wider end covers the blades on the bottom of the jug. Turn the screen assembly until its cut-outs fall over the lugs in the jug and locks into place.
- Place the lid (2) onto the jug and turn it clockwise until it locks into place.
- Place the assembled jug with blade assembly onto the motor unit by aligning the unlock symbol on the blade assembly with the ▲ symbol on the motor unit.
- Turn the container until the lock symbol is aligned with the ▲ symbol on the motor unit. Note: The blender will not start unless all the parts are assembled correctly.
- Plug the mains lead into a wall socket.
- Turn the blender on by turning the function knob to HI.
- Drop the pieces of fruit through the hole in the centre of the lid and insert the food pusher (5) into the hole. Gently push down the food pusher when needed.
- Turn the function knob to the OFF position once you have finished blending.
- Unscrew the jug with blade assembly from the motor unit and pour the ingredients into another container.
Using the jug without the juice extractor screen
Note: Never remove the lid of the jug while the blender is on.
-
Make sure that the mains lead plug is completely unplugged.
-
Screw the cross-blade assembly (7) onto the jug (making sure that the blade assembly gasket is in place). Tighten properly, but do not overtighten.
-
Fill with ingredients. Make sure that you do not fill over the MAX mark.
-
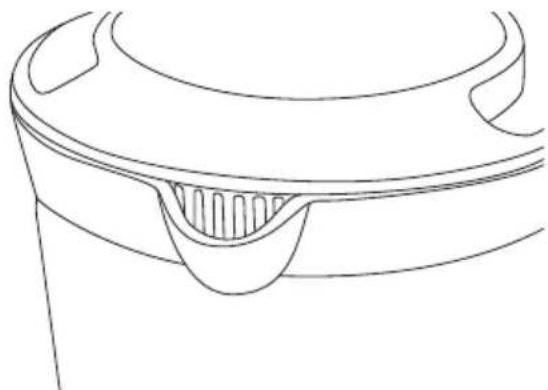
Place the lid (2) onto the jug and turn it clockwise until it locks into place. Make sure that the pour openings in the lid are in line with the spout.
natural_image
Line drawing of a mechanical component with a curved handle and central slot (no text or symbols)- Insert the lid cap (1) into the jug lid and turn it anticlockwise until it locks into place. Note: Do not insert the lid cap (1) back into the jug lid if you are planning to blend hot ingredients.
- Place the assembled jug with blade assembly onto the motor unit by aligning the unlock symbol 📁 on the blade assembly with the ▲ symbol on the motor unit.
- Turn the container until the lock symbol 🔒 is aligned with the ▲ symbol on the motor unit. Note: The blender will not start unless all the parts are assembled correctly.
- Plug the mains lead into a wall socket.
- Turn the blender on by turning the function knob to HI or LO. Never run the blender for more than 2 minutes at a time. Let the motor cool down a little before using it again.
- If you want to add more ingredients, remove the lid cap (1) and add them through the hole in the jug lid.
- Turn the function knob to the OFF position once you have finished blending.
- Unscrew the jug with blade assembly from the motor unit and pour the ingredients into another container.
Care and maintenance
- Note: Always unplug the blender and make sure that the function selector is set to OFF before cleaning.
- Never immerse the motor unit in water. Clean the blender using a damp cloth. Use only mild cleaning agents, never solvents or corrosive chemicals.
- Great care should be exercised when handling and cleaning the blade assembly. The blades are very sharp.
- Wash all other parts in warm water with washing-up liquid. The containers and lids are dishwasher safe if washed in the top rack of the dishwasher. Do not wash any of the blade assemblies in the dishwasher.
- An alternative way of cleaning the containers is to fill them with water, attach the knife assembly to be cleaned and attach it to the motor unit. Turn the function knob to PULSE mode several times to agitate the water and clean the container.
- The rubber gaskets (6 and 15) can be removed for cleaning. Be careful when you remove and refit the gaskets as the blades are very sharp.
- Rinse and dry the parts carefully.
Specifications
Rated voltage 220–240 V AC, 50 Hz, Class II
Wattage 300 W
Jug 750 ml
Max operating time 2 minutes continuously, then the motor should be allowed to cool
Multiblender
Art.nr 18-4699 Modell HL-2575 44-1949 HL-2575
natural_image
Symbol of a trash bin crossed with no visible text or labelsProduktbeskrivning
text_image
Exploded view diagram of a blender with numbered parts for identificationnatural_image
Technical line drawing of a portable device and its internal fan blade assembly (no text or symbols)natural_image
Line drawing of a mechanical component with a curved base and central slot (no text or symbols)natural_image
Symbol of a trash bin crossed with no visible text or labelsProduktbeskrivelse
natural_image
Technical line drawing of a mechanical device and its internal components (no text or symbols)natural_image
Symbol of a trash bin crossed with no visible text or labelsTuotekuvaus
natural_image
Technical line drawing of a portable device and its internal components, showing no text or symbols.natural_image
Line drawing of a mechanical component with curved surfaces and a central cavity (no text or symbols)natural_image
Symbol of a trash bin crossed with no text or labels, accompanied by a solid black rectangle below (no text or symbols present)Produktbeschreibung
natural_image
Technical line drawing of a mechanical device and its internal components (no text or symbols)natural_image
Line drawing of a mechanical component with a curved base and internal cavity (no text or symbols)10 - 13 Market Place
Kingston Upon Thames
Surrey
KT1 1JZ
DEUTSCHLAND
KUNDENSERVICE