20 Piece Number Cut Haircut Kit HC4ALD - Kit de coiffure Visage - Free user manual and instructions
Find the device manual for free 20 Piece Number Cut Haircut Kit HC4ALD Visage in PDF.


User questions about 20 Piece Number Cut Haircut Kit HC4ALD Visage
0 question about this device. Answer the ones you know or ask your own.
Ask a new question about this device
Download the instructions for your Kit de coiffure in PDF format for free! Find your manual 20 Piece Number Cut Haircut Kit HC4ALD - Visage and take your electronic device back in hand. On this page are published all the documents necessary for the use of your device. 20 Piece Number Cut Haircut Kit HC4ALD by Visage.
USER MANUAL 20 Piece Number Cut Haircut Kit HC4ALD Visage
IMPORTANT SAFETY INSTRUCTIONS
When using electrical appliances, especially when children are present, basic safety precautions should always be taken, including the following:
READ ALL INSTRUCTIONS BEFORE USING
KEEP AWAY FROM WATER
▲ DANGER
Any appliance is electrically live, even when the switch is off. To reduce the risk of electric shock:
- Do not reach for an appliance that has fallen into water. Unplug immediately.
- Do not use while bathing or in the shower.
- Do not place or store appliance where it can fall or be pulled into a tub or sink. Do not place in, or drop into water or other liquids.
- Always unplug this appliance from the electrical outlet immediately after using.
- Unplug this appliance before cleaning.
DO NOT REACH INTO THE WATER
▲ WARNING
To reduce the risk of burns, electric shock, fire, or injury to persons:
- This appliance should never be left unattended when plugged in.
- This appliance should not be used by, on, or near children or individuals with certain disabilities.
- Use this appliance only for its intended use as described in this manual. Do not use attachments not recommended by the manufacturer.
- Never operate this appliance if it has a damaged cord or plug, if it is not working properly, if it has been dropped, damaged, or dropped into water.
5
Safety
- Keep the cord away from heated surfaces.
- Never operate the appliance with the air openings blocked or while on a soft surface, such as a bed or couch, where the air openings may be blocked. Keep the air openings free of lint, hair and the like.
- Never drop or insert any object into any opening.
- Do not use outdoors or operate where aerosol (spray) products are being used or where oxygen is being administered.
- To disconnect, turn all controls to OFF, then remove plug from outlet.
- Do not place appliance on any surface while it is operating.
- Do not use this appliance with a damaged or broken comb or with teeth missing from the blades, as injury may occur.
- Avoid skin contact with moving blades.
- If the cord becomes tangled during use, turn the unit off and straighten cord before operating again.
SAVE THESE INSTRUCTIONS
Operations
OPERATING INSTRUCTIONS
This appliance is used on Alternating Current 120V AC 60 hertz only.
To reduce the risk of electric shock, this appliance has a polarized plug (one blade is wider than the other). As a safety feature, this plug will fit in the outlet only one way. If the plug does not fit fully in the outlet, reverse the plug. If it still does not fit, contact a qualified electrician to install the proper outlet. Do not change the plug in any way.
Your new haircut kit has everything you need to achieve professional haircuts at home. It features a powerful clipper with cutting precision and adjustable taper control. Also included are 10 number-coded comb attachments for different hair lengths. It also comes with 2 styling clips to assist you in cutting longer hairstyles, a storage case, barber comb, barber scissors, barber cape, cleaning brush, lubricating oil and a blade guard for easy maintenance of the clipper blades.
Guide to cutting hair at home
Before you start:
- Inspect your clipper. Make sure it's free of hair and dirt, is properly oiled, and running smoothly.
- Place a towel or cape around the neck of the person whose hair is being cut.
- Seat the person so that his or her head is at your eye level. This gives you greater visibility and control.
- First, comb hair until it's tangle free. Then hold clipper in a comfortable grip. Now you're ready to cut.
Please note your 20-Piece Haircutting Kit comes with easy-to-use number-coded combs, so you can easily remember your favorite comb once you start to use the kit on a regular basis.
Operations
Medium to long cut
To begin with, cut only a small amount of hair until you become used to the length each attachment leaves the hair. Try the longest attachment on the clipper first. If you want a shorter cut, you can then use shorter combs.
- Short comb attachment (number 1) cuts hair to 1/8" .
- Medium-Short comb attachment (number 2) cuts hair to 1/4".
- Medium-Long comb attachment (number 3) cuts hair to 3/8".
- Long comb attachment (number 4) cuts hair to 1/2" .
- Long comb attachment (number 5) cuts hair to 5/8".
- Long comb attachment (number 6) cuts hair to 3/4".
- Long comb attachment (number 7) cuts hair to 7/8".
- Long comb attachment (number 8) cuts hair to 1".
- Left ear comb attachment lightly tapers over left ear.
- Right ear comb attachment lightly tapers over right ear.
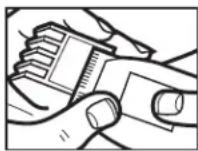
Attach combs by holding them teeth up, then snapping onto the bottom of the clipper blade.
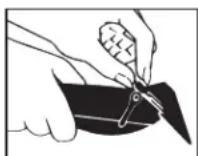
To remove comb attachments, place index finger and thumb as illustrated; then pull out and up.
NOTE: Never push or shove the clipper through the hair to make it move more quickly. Professional experience shows that the clipper works most efficiently when it cuts through the hair at its own speed.
8
Operations
To begin cutting hair:
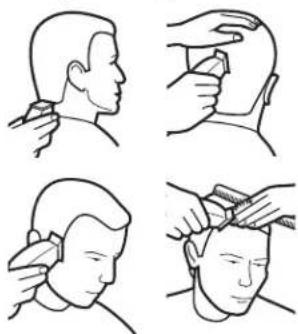
- The hair should be combed in its natural direction.
- Using the longest comb attachment, trim sides from the bottom upward. Hold clipper lightly against the hair with teeth of the comb attachment pointing upward, yet flat against the head. Gradually lift the clipper upward and outward through the hair, trimming just a little at a time. Repeat around sides and back of head.
If you want hair to be even shorter:
A) Apply more pressure to the head with the comb attachment that is in place. This takes a little practice, of course.
OR
B) Just switch to a shorter comb attachment.
Remember, it's better to leave too much hair than too little. For longer hair on top, use the barber comb and lift hair on the top of the head, cutting over the comb. Or, hold the hair between the fingers and cut to desired length. Always working from the front to the back of the head, gradually cut the hair shorter by reducing the space between the comb or fingers and the head. Comb often to check for uneven strands, and to get rid of trimmed hair.
Outlining
Outlining requires no attachments. Comb hair into the desired style. Position the clipper between the sideburns and the ear, making sure the corner edge of the blade is against the hairline. With the outline of the hair as your guide, slowly move the clipper over, around and behind the ears. For the back of the neck and the sideburns, hold the clipper upside down (see Fig. 1) and, holding it against the skin at the length desired, move the clipper
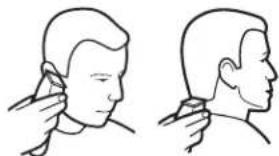
Fig. 1
Stop. Comb. Check
For best results, do as the professionals do: Comb hair often, and check clipping results as you comb. This way you avoid uneven sides, bangs, neckline, etc.
Operations
Shortcuts to perfect flattops, crew cuts, etc.
Always cut from the back of the neck to the crown, using the longest comb setting. Hold the comb attachment flat against the head and slowly move the clipper up through the hair. Use the same technique for the sides, cutting from the bottom to the upper side of the head.
For the front to the crown, cut the hair against the direction in which it grows. Then even it up with the sides.
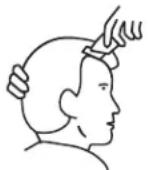
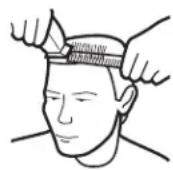
Fig. 2
For a flattop, use the flat comb, not the comb attachment. Just cut hair on top of the head over the flat comb (see Fig. 2).
To taper hair down to the neckline, use comb attachment #1. Comb hair and check for uneven spots. Outline sideburns and neck areas (see "Outlining").
USER-MAINTENANCE INSTRUCTIONS
Maintenance of the blade
Always apply oil to the blades before, during and after use. This will ensure maximum cutting performance. Hold clipper away from your body in a downward position and apply oil on the front and sides of the cutter blade. Wipe excess oil off with a soft, dry cloth.
Our hair clippers are carefully inspected to ensure that the blades are in perfect alignment. You will need to realign the blades if they should be knocked out of alignment. How can you tell if the blades need realigning? Simply match them up, point for point, to conform with the drawing at right.
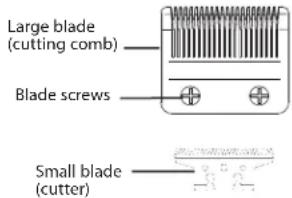
To replace cutting comb and cutter after removal for cleaning, replacement or because they are out of alignment, slide the cutter back onto the black plastic oscillating head. Next, you must make sure that the cutter (small blade) and the cutting comb (large blade) are properly aligned. Line up the new or existing cutting comb with the two screw holes. Place the original screws, one in each hole, and lightly tighten with a Phillips head screwdriver (see Fig. 3).
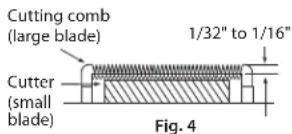
Then, match the two blades up, point to point, conforming with the illustration below in Fig. 4.
* The top edge of the cutting comb should be 1/32" to 1/16" (0.79mm to 1.59mm) higher than the top edge of the cutter. This is important so that the clipper does not cut too close or come in contact with the skin.
text_image
Large blade (cutting comb) Blade screws Small blade (cutter)Fig. 3
text_image
Cutting comb (large blade) 1/32" to 1/16" Cutter (small blade) Fig. 4* The extreme left tooth of the cutting comb must cover or be to the extreme left of the first small tooth of the cutter.
* Be sure that the extreme right big tooth of the cutter touches the extreme right tooth of the cutting comb.
Maintenance
Storage
When not in use, your clipper should be disconnected, allowed to cool and stored in a safe, dry location, out of reach of children. Any other servicing should be performed by an authorized service representative. This appliance has no user-serviceable parts. The product is for household use.
Special oil
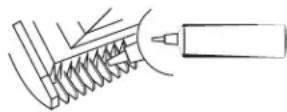
To maintain the blades of your clipper, always apply oil to the blades before, during and after use. Gently place a few drops of oil on the teeth of the blades, using the special oil included with your set. Turn the clipper on for a minute, then turn off. This light, natural oil was formulated specifically for the high-speed clipper. Because it is the right oil to use, it will not slow down the blades. Never use any other product. There is no substitute for this oil.
Power screw
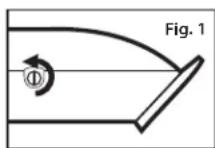
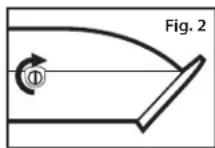
The power screw permits you to adjust power to your clipper. You may need to make this adjustment if the power in your house is low. (The Visage ^® clipper was designed for household use.)
-
With a screwdriver or a dime, turn the power screw counterclockwise until the arm strikes a coil, making a clacking noise (Fig. 1).
-
Turn the screw clockwise until the noise stops, then turn about 45 degrees more. This is the maximum power setting (Fig. 2).
Maintenance
Adjustable taper lever
Just like professional clippers, the taper lever is positioned at your thumb. You can hold the clipper in your hand and adjust the lever at the same time... while you're clipping.
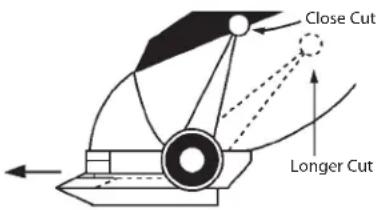
This taper lever eliminates the need for a comb attachment because it lets you gradually adjust the closeness of the cut. For the closest cut and the shortest hair, push taper lever up as far as it will go. To increase
cutting length, slowly push lever down. If you push to the lowest position, it will leave hair about the same length as the short comb attachment. Because a different cutting edge is used in each setting, the taper lever lengthens the life of your blades.
text_image
Close Cut Longer CutPacked-in hair can slow down any clipper. To remove hair without removing the blades, use your cleaning brush to brush hair out of the blades or do what the professionals do: Keeping the clipper on, quickly push the taper lever back and forth from "close" to "longer" cut a few times.
If you do this after every clipping, especially with heavy hair cutting, the blades should remain free of cut hair and in good working condition. If clipper stops cutting and this action doesn't help, check the blades.
▲CAUTION
Never pull on the clipper cord. Never twist or wrap the cord around the clipper. Lay it flat with the cord coiled up when not in use.