
SC-745 - CD Player SuperSonic - Free user manual and instructions
Find the device manual for free SC-745 SuperSonic in PDF.


| Product Type | Portable CD Player with Cassette and Radio |
| Brand | SuperSonic |
| Model | SC-745 |
| Power Source | AC 110-220V ~60/50Hz or DC 12V (8 x UM-1/D batteries, not included) |
| Power Consumption | 18 Watts |
| Operating Temperature | +5°C to +35°C |
| Radio Bands | AM (530-1600 KHz), FM (88-108 MHz), FM Stereo |
| CD Playback | CD, CD-R, CD-RW, MP3 |
| Cassette Deck | Stereo playback and recording (2 tracks, 2 channels) |
| Audio Output Power | 1.8W x 2 |
| AUX Input | 3.5mm jack |
| USB Port | Playback of MP3 files from USB flash drives |
| CD Program Memory | Up to 20 tracks for CD, 99 tracks for MP3 |
| Playback Modes | Repeat (1/all/folder), Random, Intro scan, Program |
| Bass Boost | Yes (On/Off button) |
| FM Antenna | Telescopic |
| Cassette Recording | From built-in radio, CD/MP3, or AUX source |
| Auto Stop | Yes (cassette mechanism) |
| Safety | Do not expose to rain or moisture; no user-serviceable parts inside |
| Maintenance | Clean tape head and pinch roller after every 10 hours of use |
| Accessories Included | Instruction booklet, AC power cord |
Frequently Asked Questions - SC-745 SuperSonic
User questions about SC-745 SuperSonic
0 question about this device. Answer the ones you know or ask your own.
Ask a new question about this device
Download the instructions for your CD Player in PDF format for free! Find your manual SC-745 - SuperSonic and take your electronic device back in hand. On this page are published all the documents necessary for the use of your device. SC-745 by SuperSonic.
USER MANUAL SC-745 SuperSonic
natural_image
Line drawing of a vehicle front view with dashboard and control panel (no text or symbols)IMPORTANT SAFETY INSTRUCTIONS
WARNING:
TO PREVENT FIRE OR SHOCK HAZARD DO NOT USE THIS PLUG WITH AN EXTENSION CORD, RECEPTACLE OR OTHER OUTLET UNLESS THE BLADES CAN BE FULLY INSERTED TO PREVENT BLADE EXPOSURE. TO PREVENT FIRE OR SHOCK HAZARD. DO NOT EXPOSE THIS APPLIANCE TO RAIN OR MOISTURE.
 |  |  |
| This lightning flash with arrowhead symbol, within an equilateral triangle, is intended to alert the user to the presence of insulated dangerous voltage within the products enclosure that may be of sufficient magnitude to constitute a risk of electric shock presents. | Warning: to reduce the risk of electric shock, do not remove cover (or back) no user - serviceable part inside. Refer servicing to qualified service personnel. | The exclamation point within an equilateral triangle is intended to alert the user to the presence of important operating and maintenance (servicing) instructions in the literature accompanying the appliance. |
- Read these instructions.
- Keep these instructions.
- Heed all warnings.
- Follow all instructions.
- Do not use this apparatus near water.
- Clean only with dry cloth.
- Do not block any ventilation openings.
-
Refer all servicing to qualified personnel.
-
Do not install near any heat sources such as radiators, heat registers, stoves, or other apparatus (including amplifiers) that produce heat.
-
Protect the power cord from being walked on or pinched particularly at the plugs, convenience receptacles, and at the point where it exits from the apparatus.
-
Unplug the apparatus during lightening sorts or when unused for long periods of time.
-
This appliance should not be exposed to dripping or splashing water and no objects filled with liquids such as vases should be placed on apparatus.
-
The AC socket it is used to unplug the unit power cord and it must be easily accessible every time it is necessary.
-
No flames objects, like candles, must be placed on the unit.
Dripping warning: The products should not be exposed to dripping or splashing and that no objects filled with liquids, such as vases, shall be placed on the product.
Plug warning: The main plug is used as the disconnect device, the disconnect device shall remain readily operate.
Ventilation warning: The normal ventilation of the product shall not be impeded for intended use. Make sure there is enough space above and besides the holes. Install the unit in a place with suitable ventilation openings (around 7cm).
LOCATION OF CONTROLS

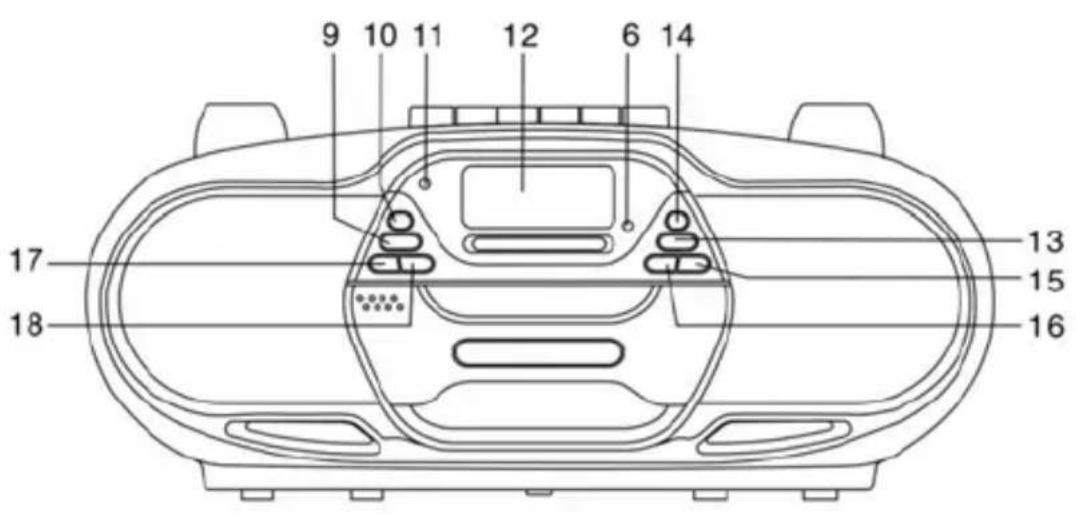
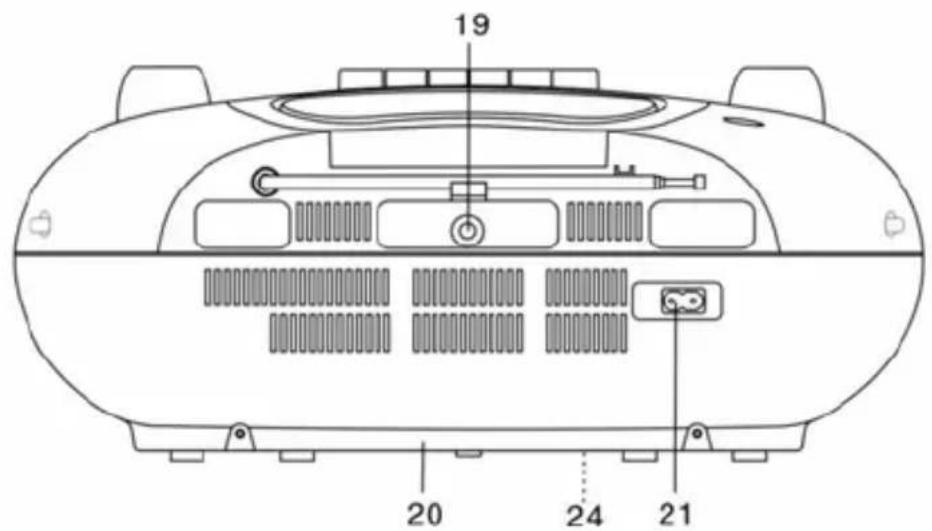
FEATURES AND CONTROLS
- FM ANTENNA
- HANDLE
- TUNING KNOB
- CD DOOR OPEN/CLOSE
- CASSETTE FUNCTION KEYS
- FM STEREO INDICATOR
- VOLUME CONTROL
- POWER BUTTON
- CD PROG./P-MODE BUTTON
- BASS BOOST BUTTON
- POWER INDICATOR
- LCD DISPLAY
- FOLD-/ -10 BUTTON
- FOLD+/+10 BUTTON
- CD PLAY/PAUSE/USB BUTTON
- CD STOP BUTTON
- CD SKIP/SEARCH BACKWARD BUTTON
- CD SKIP/SEARCH FORWARD BUTTON
- AUX IN JACK
- BATTERY DOOR
- AC SOCKET
- FUNCTION SWITCH
- BAND SELECTOR
- AC VOLTAGE SELECTOR
- USB PORT
IMPORTANT FOR LASER PRODUCTS
REPRODUCTION OF LABELS
- CLASSIFICATION LABEL, PLACED ON REAR ENCLOSURE.
CLASS 1 LASER PRODUCT
LUOKAN 1 LASERLAITE
KLASS 1 LASERAPPARAT
- WARNING LABEL, PLACED INSIDE THE UNIT.
CAUTION: Do not open the unit. There are no user serviceable parts inside the unit; consult all servicing to qualified service personnel.
Discs for Playback
This system can playback all digital audio CD, MP3, finalized digital audio CD-Recordable (CD-R) discs, finalized digital audio CD-Rewritable (CD-RW) discs and CD-DA format digital audio CD/CD-R/CD-RW discs.
POWER SOURCE
This unit is designed to be operated on AC/DC.
AC OPERATION
Plug the smaller end of AC power cord into AC jack on unit and the other bigger end into AC wall outlet. The batteries will be automatically disconnected. For dual voltage version, make sure that the AC VOLTAGE SELECTOR is switched to your local voltage.
DC OPERATION
Open the BATTERY COMPARTMENT DOOR. Install 8 pcs UM-1/D size batteries (not included) into compartment. Please follow correct polarities as indicated.
CAUTION
- Remove batteries if they are flat or not being used for a long period of time.
● Batteries contain chemical substances, so they should be disposed of properly.
- Remove batteries if they are flat or not being used for a long period of time. - Batteries contain chemical substances, so they should be disposed of properly.
BASIC FUNCTION
SWITCHING ON THE UNIT
Set the FUNCTION SWITCH to CD/MP3/USB/AUX or RADIO or TAPE position.
TO ADJUST VOLUME
Rotate the VOLUME CONTROL towards right or left to increase and decrease volume.
BASS BOOST SYSTEM
The BASS BUTTON controls the bass of the unit. Bass sound is the lower frequency ranges of sound. The BUTTON can be press to OFF or ON, When the BASS is on, the unit boosts (increases) the sound output of the bass frequencies.
AUX-IN OPERATION
This unit has provided special AUX jack, through this jack other audio sources can be connected to this unit and be amplified.
- Set the FUNCTION switch to CD/MP3/USB/AUX position.
- Connect the audio cable into the AUX-IN jack and the other end connect to the AUDIO OUT jack of the external audio source. The unit will change to AUX mode automatically.
- Adjust the volume of the main unit to your desired level. Press PLAY of the external audio source to start playback.
USING THE RADIO
TUNING IN RADIO STATIONS
- Slide the FUNCTION switch to "RADIO" position.
- Slide the BAND switch to select the desired wave band: AM/FM/FM ST.
- Tune to required station by rotating the TUNING KNOB.
- Rotate the VOLUME CONTROL to comfortable volume level.
- Extend the TELESCOPIC ANTENNA to its full length if you are listening to FM broadcasting. Gently rock the unit back and forth to get the best reception when you are listening to AM program, or place the unit in an open place.
Note: If the broadcasting program is too noisy when you are listening to FM stereo station, please slide the FUNCTION switch to FM. The FM STEREO indicator will be on if you are receiving FM stereo program. - Turn off the radio by switching the FUNCTION switch to "TAPE" position.
CASSETTE OPERATION
PLAYBACK OF CASSETTE
Be sure to tighten any slack tape in the cassette before use, using either a pencil or a ball-point pen, simply insert the pen or pencil into the centre of spool and rotate to remove slackness. Depress the STOP/EJECT button to open the cassette door.
Insert the cassette into the compartment with the open end facing upwards and the full reel on the left hand side, push the cassette well down and close the door, be sure not to touch the tape surface. Set the Function switch to "TAPE" position and press the cassette play button. To stop playback, press the STOP/EJECT button once. To release the cassette, press the STOP/EJECT button again.
AUTO STOP
When the tape reaches the end during playback or recording, the built-in auto stop system will release the depressed play, record keys. The auto stop system operates while recording from the built-in radio or CD player, only the cassette function is brought automatically to stop mode and the radio or CD Player will continue to play.
RADIO RECORDING
- Install a cassette tape.
- Set FUNCTION SWITCH to "RADIO" position. After selecting the desired band and tune the TUNING KNOB to desired broadcast station. Then push down RECORD BUTTON and PLAY BUTTON simultaneously.
- After recording the desired broadcast, depress the STOP/EJECT BUTTON lightly, and then set FUNCTION SWITCH to "TAPE" position in order to listen to the recorded broadcast.
- If you desire to play recorded broadcast, please follow the instructions explained in playback section.
ERASURE: When you record over previously recorded tape, the original recording is automatically erased and replaced by this newly recording materials.
CD/MP3 RECORDING
- Insert a blank cassette tape into the tape compartment.
- Slide the FUNCTION switch to CD/MP3/USB/AUX position.
- Load a CD and select the desired track you want to record.
- Press CD PLAY/PAUSE button to start playback. Press RECORD key to begin recording. RECORD key and PLAY key go down simultaneously.
- Press PAUSE key to interrupt or edit recording. Press it again to resume recording.
- Press STOP/EJ. Key to end recording. To hear what you recorded, follow instructions in PLAYING A CASSETTE TAPE.
RECORDING FROM AUX
- Insert a blank cassette tape into the tape compartment.
- Slide the FUNCTION switch to CD/MP3/USB/AUX position.
- Connect the audio cable into the AUX IN jack and select the desired track you want to record.
- Press RECORD key to begin recording. RECORD key and PLAY key go down simultaneously.
- Press PAUSE key to interrupt or edit recording. Press it again to resume recording.
- Press STOP/EJ. Key to end recording.
- To hear what you recorded, follow instructions in PLAYING A CASSETTE TAPE.
TYPES OF CASSETTE
Use only good quality cassettes (IEC TYPE 1) for making recordings. May be used to replay other types of cassette but is unable to make proper recording on these more specialized tapes. The use of C120 cassettes is NOT recommended in this machine.
PROTECTING RECORDING
Normally, anything recorded on the tape is automatically erased when new recording is made. It is possible to protect your recording from accidental erasure by removing the tabs found on the rear of the cassette.
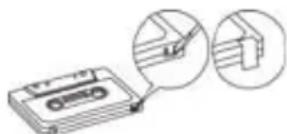
ERASE TAB
FOR SIDE "A"
When the cassette is held with the recorded side upper-most and exposed tape facing the front, the protective tab will be found on the left rear of the cassette.
All pre-recorded cassette are protected in this way to prevent accidental erasure of the commercial recording. “Protected” cassette will prevent the record button from being operated. If at any time you attempt to record and find that this button will not depress, never force the mechanism or it may be damaged. Check that a cassette has been loaded and that tab has not been removed. Recording on a cassette from which the tabs have been removed can be done by covering the tab openings with a piece of adhesive tape.
CARE OF CASSETTE MECHANISM
Gently clean the tape head and pinch wheel/capstan assemblies after every 10 hours of using the unit. A range of cassette care products are available.
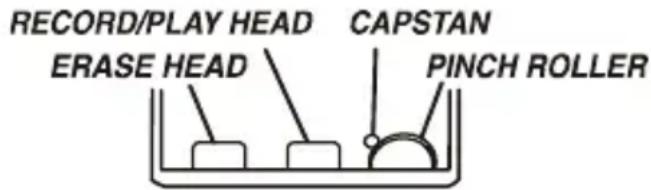
The erase head and record/play head and the surface of the pinch roller are delicate and must not be touched with metal objects such as screwdrivers. You may find it easier to clean the assembly by pressing the PLAY button to bright head and pinch roller into view. Be sure to press the STOP button after cleaning the mechanism.
Damage to the pinch wheel can occur if the unit is left in PLAY mode with the power switch off. Under no circumstances should you attempt to lubricate any part of the machine.
USING THE CD/MP3
LOADING A DISC
- Set the FUNCTION switch to CD/MP3/USB/AUX position.
- Open the CD door.
- Place an audio CD into the tray with the label side facing up.
- Close the CD door.
The total number of tracks will appear on the display after several seconds.
- To remove the CD, press to open CD compartment lid, grasp the CD by its edges, and carefully take it out.
Note:
- To ensure good system performance, wait until the disc tray completely reads the disc before proceeding.
- If no disc is loaded into the compartment, or the disc is placed upside down, the display will show N Od.
PLAYING A DISC
- Press the PLAY/PAUSE/USB button to start playback.
The playback starts from track 1, the “▶” indicator is shown on the display.
To interrupt playback, press the PLAY/PAUSE/USB button. The “▶” indicator will flash on the display.
To resume playback, press the PLAY/PAUSE/USB button again.
- To stop playback, press the STOP button, the total number of tracks appears on the display.
SELECTING A DESIRED TRACK/PASSAGE
To select a desired track
- Press the CD NEXT or BACK button repeatedly in the stop mode or during play until the desired track appears on the display.
- Press the PLAY/PAUSE/USB button to start play.
To search for a particular passage during playback (track scanning at high speed)
Press and hold the CD NEXT or BACK button to scan the current playing track at high speed until desired point passage, and then release the button. Playback will start again from this point.
To select a song which track number exceeds 10 (for MP3 disc only)
To select a song/track which number exceeds 10, Press the FOLD+/+10 button each time to skip forward/backward 10 tracks, then press the NEXT or BACK button to select desired track.
For example: to select the 17th track, press FOLD+/+10 button, and then the NEXT button six times immediately.
To Select A Desired Folder (for MP3 disc only)
Note:(if the MP3 disc contains more than one folder)
Press and hold the FOLD+/+10 or FOLD-/-10 button more than 1 second to skip next/previous folder. Until the desired folder number appears on the LCD display, then release the button,
PROGRAM TRACKS
Programming tracks of disc are possible when playback is stopped. Up to CD 20 tracks /MP3 99 tracks can be stored in the memory in any order.
-
In the stop mode, press the PROG./P-MODE button, the PROGRAM will flash and the P01 will be show on the display.
-
Press the CD NEXT or BACK button to select the first desired track to be programmed.
-
Press the PROG./P-MODE button to enter. The display changes to show P02.
-
With MP3 disc, keep pressed FOLD-/-10 or FOLD+/+10 button to select the desired album.
-
Repeat steps 2 & 3 to store other desired tracks for CD until all tracks are programmed. Repeat steps 2,3 & 4 for MP3.
-
Press the PLAY/PAUSE/USB button to start playback from the first programmed track.
-
Press the STOP button to stop program playback.
To Erase the Memory (Program)
To clear the program, you have two options:
-
Press the STOP button when the disc is stopped, or
-
Open the CD compartment lid, program will be erased.
REPEAT PLAY
To Repeat a Single Track
-
Press the PROG./P-MODE button once in the play mode, "REPEAT" will flash on the display. The current track will be played repeatedly until the STOP button is pressed
-
Press the PROG./P-MODE button until the "REPEAT" disappear.
To repeat all the Tracks
-
Press PROG./P-MODE button twice in the play mode, "REPEAT" shows steady on the display, all tracks on the disc will be played repeatedly until the STOP button is pressed.
-
To cancel repeat play, press the PROG./P-MODE button till the "REPEAT" disappear.
To repeat current Directory (for MP3 only)
-
Press PROG./P-MODE button third in play mode, "REPEAT FOLDER" shows steady on the display, The current directory will be played repeatedly until the STOP button is pressed.
-
Press the PROG./P-MODE button till the "REPEAT FOLDER" disappear.
RANDOM PLAY
Press the PROG./P-MODE button in the play mode till the "RANDOM" shows steady on the display, the random play will start from next track automatically (or press CD skip forward button), until all tracks are played over and then stop. Press the PROG./P-MODE button once to cancel.
INTROSCAN PLAY (for CD disc only)
Press the PROG./P-MODE button in the play mode till the "INTRO" shows steady on the display, the unit will start to play the first 10 seconds of music of each track, until all tracks are played over and then stop. Press the PROG./P-MODE button once to cancel.
LISTENING TO USB FLASH DISK DEVICE
-
Set the FUNCTION switch to CD/MP3/USB/AUX position.
-
Connect the USB Flash Disk Device into the USB PORT.
-
If the audio CD in the tray, please press and hold the PLAY/PAUSE/USB button to select the USB function.
-
If the USB is readable, the display will show USB and The total number of tracks after several seconds.
-
Press the PLAY/PAUSE/USB button to start playback.
-
Press the STOP button to stop playing. The display will show total number of tracks.
-
You may proceed repeat play (repeat-1/repeat-folder/repeat-all)/program/program play/random play/skip up and down operation as the same described in above "USING THE CD/MP3".
Note: To exit USB operation, press and hold PLAY/PAUSE/USB button to return the CD mode.
CAUTION:
- Do not use any USB extension cable for connecting the USB stick which may cause harmful interference
- In case of malfunction due to electrostatic discharge, just reset the product (reconnect of power source may be required) to resume normal operation.
SPECIFICATIONS
GENERAL
Power Requirement
AC 110/220\~60/50 Hz
DC 12V UM-1 x 8 PCS
Power consumption
18 Watts
+5 °C - + 35 °C
Operation Temperature
REVEIVER SECTION
Receiving Bands AM / FM
Tuning Range
AM 530 - 1600 KHz
FM 88 - 108 MHz
COMPACT DISC SECTION
Optical Pickup 3-Beam Laser
Frequency Response 100Hz – 16 KHz
CASSETTE SECTION
Recording System
2 Tracks 2 channel (Stereo)
Biasing System
DC Bias
Frequency Response
125 - 6.3 KHz
Wow and Flutter
0.35 % WRMS (JIS)
AUDIO SECTION
Power Output
1.8 W x 2
Aux in jack
3.5 mm
ACCESSORIES
Instruction Booklet
1
AC Cord
1
Specifications are subject to change for continuous improvement without prior notice.
SPANISH
To select a desired track

- IMPORTANT SAFETY INSTRUCTIONS
- WARNING:
- FEATURES AND CONTROLS
- IMPORTANT FOR LASER PRODUCTS
- REPRODUCTION OF LABELS
- Discs for Playback
- POWER SOURCE
- AC OPERATION
- DC OPERATION
- CAUTION
- BASIC FUNCTION
- SWITCHING ON THE UNIT
- TO ADJUST VOLUME
- BASS BOOST SYSTEM
- AUX-IN OPERATION
- USING THE RADIO
- TUNING IN RADIO STATIONS
- CASSETTE OPERATION
- PLAYBACK OF CASSETTE
- AUTO STOP
- RADIO RECORDING
- CD/MP3 RECORDING
- RECORDING FROM AUX
- TYPES OF CASSETTE
- PROTECTING RECORDING
- CARE OF CASSETTE MECHANISM
- USING THE CD/MP3
- LOADING A DISC
- Note:
- PLAYING A DISC
- SELECTING A DESIRED TRACK/PASSAGE
- To select a desired track
- To search for a particular passage during playback (track scanning at high speed)
- To select a song which track number exceeds 10 (for MP3 disc only)
- To Select A Desired Folder (for MP3 disc only)
- PROGRAM TRACKS
- To Erase the Memory (Program)
- REPEAT PLAY
- To Repeat a Single Track
- To repeat all the Tracks
- To repeat current Directory (for MP3 only)
- RANDOM PLAY
- INTROSCAN PLAY (for CD disc only)
- LISTENING TO USB FLASH DISK DEVICE
- CAUTION:
- SPECIFICATIONS
- GENERAL
- REVEIVER SECTION
- COMPACT DISC SECTION
- CASSETTE SECTION
- AUDIO SECTION
- ACCESSORIES
- SPANISH
Brand : SuperSonic
Model : SC-745
Category : CD Player