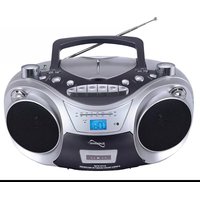
SC-709 - CD Player SuperSonic - Free user manual and instructions
Find the device manual for free SC-709 SuperSonic in PDF.


| Product Type | Portable CD Player |
| Brand | SuperSonic |
| Model | SC-709 |
| Dimensions (W x H x D) | Approx. 5.1 x 1.2 x 5.5 inches (130 x 30 x 140 mm) |
| Weight | Approx. 8.8 oz (250 g) without batteries |
| Power Source | 2x AA batteries or AC adapter (DC 4.5V, 500mA) |
| Playback Media | CD, CD-R, CD-RW |
| Anti-Shock Protection | 30 seconds (approx.) |
| Playback Modes | Play/Pause, Skip Forward/Back, Repeat (1/All), Random/Shuffle, Program |
| Audio Output | 3.5 mm headphone jack, stereo |
| Frequency Response | 20 Hz – 20 kHz |
| Signal-to-Noise Ratio | >85 dB |
| Battery Life | Approx. 8 hours (alkaline) |
| Controls | Buttons on unit: Play/Pause, Stop, Skip, Volume, Hold switch |
| Display | LCD with track number, time, and mode indicators |
| Accessories Included | Stereo earphones, AC adapter, user manual |
| Maintenance | Clean with soft, dry cloth; use lens cleaning disc if needed; avoid moisture and extreme temperatures |
| Safety | Class 1 laser product; do not stare into laser beam; keep out of reach of children; use only recommended power source |
| Repairability | Contact SuperSonic service center or authorized repair shop; no user-serviceable parts inside |
Frequently Asked Questions - SC-709 SuperSonic
User questions about SC-709 SuperSonic
0 question about this device. Answer the ones you know or ask your own.
Ask a new question about this device
Download the instructions for your CD Player in PDF format for free! Find your manual SC-709 - SuperSonic and take your electronic device back in hand. On this page are published all the documents necessary for the use of your device. SC-709 by SuperSonic.
USER MANUAL SC-709 SuperSonic
natural_image
Exterior view of a silver and black portable radio with a remote control (no visible text or symbols)SC-709CD
Before connection operating or adjusting this product
Please read these instructions completely
Please keep this manual.
Know these
safety symbols

For Customer Use
Enter below the Serial No. which is located On the bottom of the cabin et. Retain this Information for future reference.
Mode No.: ____ Serial No.: ____

This "bolt of lightning" indicates uninsulated material within your unit which may cause an electrical shock. For the safety of everyone in your household, please do not remove product covering.

The 'exclamation point' calls attention to features for which you should read the enclosed literature closely to prevent operating and maintenance problems.
Dripping warning:
The product shall not be exposed to dripping or splashing liquids and objects filled with liquids. such as vases, cups shall not be placed on the product.
WARNING: TO PREVENT
FIRE OR SHOCK HAZARD, DO NOT EXPOSE THIS EQUIPMENT TO RAIN OR MOISTURE.
CAUTION: TO PREVENT ELECTRIC SHOCK, MATCH WIDE BLADE OF PLUG TO WIDE SLOT AND FULLY INSERT.
Ventilation warning:
The normal ventilation of the product shall not be impeded for intended use.

PREPARATION FOR USE
Unpacking and Setup
* Carefully remove the unit from the display carton and remove all packing material from the unit itself.
* Remove any descriptive labels that may be found on either the front or top cabinet of the unit. Do not Remove any labels located on either the back or in front cabinet of the unit.
^a Press the CD door OPEN Button to open the CD compartment door. There is a white card in the CD Compartment which is intended to prevent the Laser pickup from moving during shipment of the product,
Power Supply
Using AC power
- Check if the power voltage, as shown on the type plate located on the bottom of the set, corresponds to your local AC power supply. If it does not, consult your dealer or service centre.
- Connect the power cord to the AC socket and then plug it into the socket. the power supply is now connected and ready for use.
- To switch off completely, unplug the power cord from the wall socket.
- Unplug the power cord from the wall outlet to protect your set during heavy thunderstorms.
Batteries (not included)
Open the battery compartment and insert eight batteries, type LR14, UM-2 or C-cells, (preferably Alkaline) with the correct polarity as indicated by the + and - symbols inside the compartment. The Batteries contains chemical substances, so they should be disposed of properly.
Incorrect use of batteries can cause electrolyte leakage and will corrode the compartment and cause the batteries to burst. Therefore:
• Do not mix battery types: e.g. alkaline with carbon Zinc. Only use batteries of the same type for the set.
• When inserting new batteries, do not try to mix old batteries with new ones.
Remove the batteries if the set is not being used for a long time.
1

1.VOLUME CONTROL
2.EQ BUTTON
3.PRE-DN BUTTON
4.FUNCTION BUTTON
5.PRE-UP BUTTON
6.POWER BUTTON
7.CASSETTE RECORDERS KEYS
8.CD LID
9.LCD DISPLAY
10.STANDBY INDICATOR
11.FM ANTENNA
12.REPEAT BUTTON
13.STOP BUTTON
14.TIME/PROG. BUTTON
15. PLAY/ PAUSE BUTTON
16. MUTE BUTTON
17. TUNING/SKIP/SKIP BUTTON
18.USB JACK
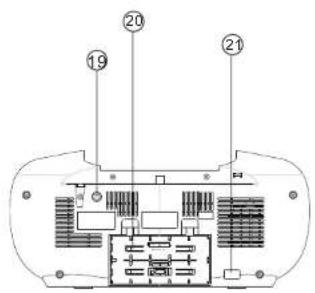
19.AUX JACK
20.BATTERIES COMPARTMENT
21.AC SOCKET
Remote Control

- POWER BUTTON
2.BAND BUTTON - INTRO BUTTON
- MUTE BUTTON
- RANDOM BUTTON
6.P-UP BUTTON - REPEAT/MOST BUTTON
- TIME/PROGRAM BUTTON
- BACK BUTTON
- FUNCTION BUTTON
- NEXT BUTTON
12.EQ BUTTON 13.PLAYONURE - P-DOWN BUTTON
- BBS BUTTON
16.STOP BUTTON - NUMBER KEY
- VOL-BUTTON
* Please pull out the plastic paper from the battery door before use the remote control.
* When the remote control operation becomes unstable or the distance from which the
remote control works is shorter. Replace the batteries with new ones.
* Using the remote control unit
To use the remote unit, point at the REMOTE SENSOR and press the buttons gently and firmly.
Remote control operation is possible within approximate 18ft(6m). However, since the remote
control range is less when the unit is used at an angle, use directly in front of the REMOTE
SENSOR, for maximum distance.
Do not expose the REMOTE SENSOR to strong light (direct sunlight or artificial lighting) and
make sure that there are no obstacles between the REMOTE SENSOR and the remote
control unit.
English
CONTROLS
POWER SUPPLY
Top and front panels(see 1)
1. VOLUME BUTTON
- Press the VOLUME button mark place adjust volume level...
2.EQ BUTTON
-Press the button to change EQ CD/MP3/USB/AUX/RADIO's music style.
-When playing the music, Press this button
is in the popular-jazz-FLR-classica-rock.
- PRE-DN BUTTON
- In the radio mode, press PRE-DN button mark to choose the back channel.
- In the mp3 mode, press PRE-DN button mark to enter the back folder.
- FUNCTION SELECT
- Select source of sound CD/USB/AUX/TAPE/RADIO.
5.PRE-UP BUTTON
-In the radio mode, press PRE-UP button mark to choose the next channel.
-In the mp3 mode, press PRE-UP button mark place enter into the next folder.
6.POWER BUTTON
-Press POWER button to turn on/off power.
7.CASSETTE RECORDERS KEYS
RECORD ( ● ) - start recording
PLAY (◀) - start playback
F.FWD (◀) -rewind the tape toward the beginning.
F.REW (▶) -advance the tape toward the end.
STOP/EJECT ( ■ ) - stop the tape
- open the cassette compartment
PAUSE (▶) - interrupt recording or playback
8. CD DOOR OPEN/CLOSE BUTTON
- Press here to open/close the CD door.
- LCD DISPLAY
- Show the FM dial frequency.
- Show the number of tracks.
- Show the time.
10. STANDBY INDICATOR
11.FM ANTENNA
- To improve FM reception.
12.REPEAT BUTTON
- Repeat a track CD/MP3/USB program.
- Repeat mode : repeat ->repeat all->
repeat album ->normal
13.STOP BUTTON
- Stop CD/MP3/USB playback; erase a CD program.
14.TIME/PROGRAM BUTTON
-In standby mode, to setup the time of the unit.
-Program and review programmed track numbers.
-In the working mode, press this button can for
CD/MP3/USB/RADIO for programming.
15.PLAY/PAUSE BUTTON
- Start or pause MP3/CD/USB playback.
- In the radio mode, press this button you will enter in
the low end of the manual channel scan mode.
16.MUTE BUTTON
Press the mute button allows CD/MP3/USB
AUX/the RADIO to enter the mute state.
17.TUNING/SKIP-/SKIP+ BUTTON
BACK KNOB
-BACK track selection.
-Rotate and hold more than 1.5 sec BACK
search intra track.
-In the radio mode, rotate BACK will enter
the low end of the manual channel scan mode.
NEXT KNOB
-NEXT track selection.
-Rotate and hold more than 1.5 sec
forward search intra track.
-In the radio mode, rotate NEXT will enter
the high-end manual channel scan mode.
18.USB JACK
-To listen to your USB with Mp3 music files.
19.AUX JACK
-Press FUNCTION button, select AUX station.
Play Mp3, DISCMAN,WALKMAN AUX
insert when no disc.
NOTE: please take out the CD disc.
20.BATTERY DOOR
-To open battery compartment.
21. AC SOCKET
- Inlet for power cord.
RADIO
Radio reception
-
Press FUNCTION button select RADIO mode.
-
Tune to required station by press BACK、NEXT or PRE-UP、PRE-DN button.
Manual Tuning: Press BACK or NEXT button and then release within 1 sec.
Auto Tuning: Press the PLAY/PAUSE button enter the automatic channel surfing mode, and to be put automatically sets.
reset Channel:(FM 30 Preset memories)
(1) Press BACK or NEXT button to select desired station.
(2) Press PROGRAM button once, The MEMORY number indicator begins fixed in the display.
(3) Press PRESET-UP OR PRESET DOWN buttons to select the desired number.
(4) Press PROGRAM button to save that station.
(5) Repeat steps (1) to (4) procedures for other stations.
-
After end of program, Press PRE-UP or PRE-DN to start play the frequency that you selected or Press number key on the remote control.
-
Press [VOL-] or [VOL+] to adjust the volume.
-
Extend TELESCOPIC ANTENNA to its full length if you are listening to FM broadcasting.
-
Turn off the radio by pressing the FUNCTION button select another mode or press the power button to turn off the unit.
-
The memory frequency still exists, after switching back on the unit.
USE AUX
To listen to music with a mp3, discman, walkman.
-
Connect to the AUX
-
Press function button selector to AUX, the sound source of the mp3 or discman or walkman will output through the unit.
-Press the volume control to adjust the volume.
-The external unit not can control the player.
USING THE CASSETTE
UNDERSTANDING THE BUTTONS
RECORD - Press to record from the radio or CD play.
PLAY - Press to play cassettes.
REW - From stop mode, press to rewind the tape toward the beginning.
F.FWD - From stop mode, press to advance the tape toward the end.
STOP/EJ. - Press to stop current tape activity or to open the cassette compartment door when no buttons are active.
PAUSE - Press to interrupt tape play or record mode, press the second time to resume tape play or tape record mode.
HOW TO PLAY A CASSETTE TAPE
-
Press FUNC button select TAPE mode.
-
Press STOP/EJ.key to open the cassette compartment door.
-
Insert a recorded cassette and close the cassette compartment door.
-
Press PLAY to start playback.
-
To interrupt playback, press PAUSE, To resume, press the key again.
-
Press REW/F.FWD to move tape to the desired starting point.
-
Adjust the volume to your desired listening level.
-
To stop the tape, press STOP/EJ.
- The keys are automatically released at the end of the tape, except if PAUSE has been activated.
-
Tune to the desired radio station.
-
Press STOP/EJ. To open the cassette door.
-
Insert a suitable cassette into the cassette deck and close the cassette door.
-
Press RECORD to start recording. RECORD key and PLAY key go down simultaneously.
-
For brief interruptions, press PAUSE. To resume recording, press PAUSE again.
-
To stop recording, press STOP/EJ.
-
To hear what you have recorded, follow the instructions in how to PLAYING a cassette tape.
RECORDING FROM CD
-
Insert a blank tape into the tape deck.
-
Press CD button on.
-
Load a CD disc into disc compartment and select the desire track you want to record.
-
Press DISC PLAY/PAUSE button to play the desired track(passage)
-
Press RECORD key and the PLAY key will automatically engage.
-
Press PAUSE key to interrupt or edit recording. Press it again to resume recording.
-
Press STOP/EJ. Key to end recording.
-
To hear what you have recorded, follow the instructions in how to PLAY A CASSETTE TAPE
PROGRAM METHOD
(1) Press the [PROGRAM] key at STOP mode, system will go to PROGRAM mode.
-The PRG Icon and P01 will blink. This prompts the user to enter the first songs in the program PLAY list.
(2)The user can select the desire tracks by using [NEXT], [BACK] keys.
Once these keys are pressed, the Display will show the selected track.
(3) After select the desired track, press [PROGRAM] key again and it will be stored in the memory.
Mp3 Maximum 99 and CD Maximum 20 tracks can be programmed when Repeat
steps (2) to (3) procedures.
(4) If press the [STOP] key during the program mode, then the selected TRACKS will be stored
in the memory and return to STOP mode (Continuous Play mode)
(5) If press the [PLAY] key during the program mode, it will start the program PLAY mode.
PLAY start from PD1 Track
Erasing a program
You can erase the content of the memory by:
- While playing, press STOP button twice.
- Opening the CD door
-Select the other mode.
CD/MP3 PLAYER
CD/MP3 Player
Playing a CD/MP3
This CD-player can play Audio Discs, MP3 CD-R. Do not try to play CD-ROM, CDI, VCD, DVD or computer CD.
-
Press function button to CD state.
-
To open the cd door, press cd open button.
- Insert a mp3/cd or cd-r, with the printed side
facing up and press cd door gently to close. 4. Press play/pause on the set to start playback. 5. Press the pause button to pause play, press the play button back playing.
6.To stop cd playback, press stop. note: cd/mp3 play will also stop when: -you open the cd compartment; -you select radio sound source;
the cd/mp3 has reached to the end. Selecting a different track.
During playback you can use back or next to select a particular track.
If you have selected a track number in the stop or pause position, press play to start playback.
Press next once briefly for the next track, or press repeatedly until the desired track number appears in the display.
Press back once briefly to return to the beginning of a current track.
Press back more than once briefly for a previous track,
-Finding a song within a track 1. Press and key hold down back or next. the cd is played at high speed.
- When you recognize the song you want release back or next, normal playback resumes, different play modes repeat
- Repeat-play the current track continuously. Repeat all plays the entire cd continuously. Playing tracks in random order after press the random button, the tracks will be played in random order.
Playing a USB
Playing a USB
USB Audio functions
1) Press function button or stop usb button to
choose the usb state.
2) PLAY/PAUSE
3) NEXT, BACK Skip search
4) Program Track(MP3 99 Track CD 20 Track )
5) REPEAT MODE: repeat 1->repeat all->
repeat album ->normal
6) Maximum Folder: 99 Folders
7) Maximum File : 999 Files
Notice:
-When the unit has not the disc, and plug a
usb card in the unit. The unit will automatically play the usb card,
-The unit don't support the HDD all and the
portion usb with mp3 player.
Note: at the mode of CD/MP3 / USB, the Icd will
Show display the number of song or the song playing time.
RECORDING
GENERAL INFORMATION ON RECORDING
*Recording is permissible in so far as copyright or other rights of third parties are not infringed.
*This deck is not suitable for recording on CHROME(IEC II) or METAL (IEC IV) type cassette. For
Recording, use NORMAL type cassettes (IEC) on which the tabs have not been broken.
The best recoding level is set automatically, Altering the VOLUME controls will not
affect the recording in progress.
*To protect a tape from accidental erasure, have the tape in front of you and break out the left tab.
Recoding on this side is no longer possible. To record over this side again, cover the tabs with
a piece of adhesive tape.

MAINTENANCE
Tape deck maintenance
To ensure quality recording and playback of the tape deck, clean parts A,B
and C shown in the diagram below, after approx. 50 hours of operation,
or on average once a month, use a cotton bud slightly my alcohol as a special head cleaning fluid to clean the dish.
alcohol of a special head cleaning tool to clean the
- Open the cassette door by pressing STOP-EJECT.
- Press PLAY and clean the rubber pressure rollers (
2.Press FLAT and clean the rubber pressure rollers C. 3. Press PAUSE and clean the magnetic heads A and also the Capstan B
- After cleaning press STOP*EJECT
Note: Cleaning of the heads can also be done by playing a cleaning
cassette through once.

Precautions & General Maintenance
- Place the set on a hard and flat surface so that the system does on tilt.
- Do not expose the set, batteries or CDs to humidity, rain, sand or excessive heat caused by heating equipment or direct sunlight.
- Do not cover the set. Adequate ventilation with a minimum gap of 6 inches between the ventilation holes and surrounding surfaces is necessary to prevent heat build-up.
• The mechanical parts of the set contain self-lubricating bearings and must not be oiled or lubricated.
• To clean the set, use a soft dry cloth. Do not use any cleaning agents containing alcohol, ammonia, benzene or abrasives as these may harm the housing.

CD player and CD handling
• The lens of the CD player should never be touched!
- Sudden changes in the surrounding temperature can cause condensation to form and the lens of your CD player to cloud over. Playing a CD is then not possible. Do not attempt to clean the lens but leave the set in a warm
environment until the moisture evaporates.
- Always close the CD door to keep the CD compartment dust-free. To clean, dust the compartment with a soft dry cloth.
- To clean the CD, wipe in a straight line from the centre towards the edge using a soft, lint-free cloth. Do not use cleaning agents as they may damage the disc.
- Never write on a CD or attach any stickers to it.

natural_image
Illustration of hands performing a manual tool on a circular object, with a magnified view showing the same tool (no text or symbols present)EN-11
TROUBLESHOOTING
TROUBLESHOOTING
Troubleshooting
If a fault occurs, first check the points listed below before taking the set for repair.
Do not open the unit as there is a risk of electric shock.
If you are unable to remedy a problem by following these hints. Consult your dealer or service center.
WARNING: Under no circumstances should you try to repair the set yourself, as this will invalidate the warranty.
—Problem and Solution:
No sound.
Volume not adjusted
No Power
-Power cord not securely connected -Connect the AC power cord properly Batteries dead/incorrectly inserted -Insert (fresh) batteries correctly
Display does not function properly
Any reaction to operation of any of the controls:
--Electrostatic discharge
- Switch off and unplug the set. Reconnect after a few seconds n
Poor cassette sound quality
-Dust and dirt on the heads,etc.
*Clean deck parts etc, see Maintenance
-Use of incompatible cassette types (METAL or CHROME)
*Only use NORMAL (IEC I) for recoding
Recording does not work
-Cassette tabs may be broken
*Apply a piece of adhesive tape over the missing tab space
CD/MP3/USB playback does not work
-CD/MP3/USB badly scratched/dirty
-Replace/clean CD/MP3/USB (see maintenance)
The CD/MP3 skips tracks
-CD/MP3 damaged or dirty
-Replace or clean CD/MP3
-Program is active, quit program mode.
CD badly scratched or dirty
- Replace/clean CD, see Maintenance
no disc indication
CD-R, is blank or the
disc is not finalized
-Use a finalized CD-R.
Environmental information
We have done our best to reduce the packaging and make it easy to separate into 3 materials: Cardboard, paper pulp and expandable polyethylene.
Your set consists of materials which can be recycled if disassembled by a specialized company. Please observe the local regulations regarding the disposal of packaging, dead batteries and old equipment..
EN-12


- Know these
- safety symbols
- Dripping warning:
- WARNING: TO PREVENT
- Ventilation warning:
- PREPARATION FOR USE
- Unpacking and Setup
- Power Supply
- Using AC power
- Batteries (not included)
- English
- CONTROLS
- Top and front panels(see 1)
- VOLUME BUTTON
- 2.EQ BUTTON
- 5.PRE-UP BUTTON
- 6.POWER BUTTON
- 7.CASSETTE RECORDERS KEYS
- CD DOOR OPEN/CLOSE BUTTON
- STANDBY INDICATOR
- 12.REPEAT BUTTON
- 13.STOP BUTTON
- 14.TIME/PROGRAM BUTTON
- 15.PLAY/PAUSE BUTTON
- 16.MUTE BUTTON
- NEXT KNOB
- 18.USB JACK
- 19.AUX JACK
- 20.BATTERY DOOR
- AC SOCKET
- RADIO
- Radio reception
- USE AUX
- USING THE CASSETTE
- HOW TO PLAY A CASSETTE TAPE
- RECORDING FROM CD
- PROGRAM METHOD
- Erasing a program
- CD/MP3 PLAYER
- Playing a CD/MP3
- Playing a USB
- Notice:
- RECORDING
- GENERAL INFORMATION ON RECORDING
- MAINTENANCE
- TROUBLESHOOTING
- No sound.
- No Power
- Display does not function properly
- Any reaction to operation of any of the controls:
- Poor cassette sound quality
- Recording does not work
- CD/MP3/USB playback does not work
- The CD/MP3 skips tracks
- CD badly scratched or dirty
- no disc indication
- Environmental information
Brand : SuperSonic
Model : SC-709
Category : CD Player