
Duetta C3-100 - Electric broom IMETEC - Free user manual and instructions
Find the device manual for free Duetta C3-100 IMETEC in PDF.


| Product Type | Electric broom stick vacuum with detachable mini-vacuum |
| Brand | Imetec |
| Model | Duetta C3-100 |
| Category | Electric broom |
| Annual Energy Consumption | Based on 50 cleaning tasks (conforms to EU regulation 665/2013) |
| Accessories Included | Combination brush, dusting nozzle, crevice nozzle, upholstery nozzle, accessory support |
| Filter Type | Cyclone filter, motor filter, protective filter mesh |
| Dust Collection | Detachable dust compartment with release key |
| Suction Mode | Stick vacuum or manual mini-vacuum |
| Power Supply | Mains powered with cable winding system |
| Cable Length | Approximately 5 m (estimation based on typical design) |
| Safety Features | Motor thermal protection, automatic shut-off on overheating |
| Warranty | 2 years from date of purchase |
| Intended Use | Household vacuum cleaning of hard floors and other surfaces |
| Maintenance | Empty dust container and clean filters after every use; replace filters if damaged or at least once a year |
Frequently Asked Questions - Duetta C3-100 IMETEC
User questions about Duetta C3-100 IMETEC
0 question about this device. Answer the ones you know or ask your own.
Ask a new question about this device
Download the instructions for your Electric broom in PDF format for free! Find your manual Duetta C3-100 - IMETEC and take your electronic device back in hand. On this page are published all the documents necessary for the use of your device. Duetta C3-100 by IMETEC.
USER MANUAL Duetta C3-100 IMETEC
Instructions for use
SCHEDA PRODOTTO / PRODUCT DATA SHEET / FICHA DEL PRODUCTO / FICHA DO PRODUTO / POPIS PRODUKTU / TERMÉKJELLEMZÖK / POPIS PRODUKTU / KARTICA IZDELKA / KAPTA İPÖİONTOŞ
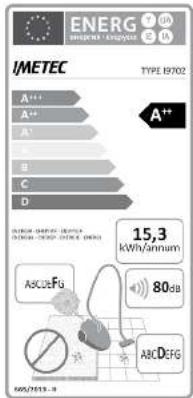
Indicative annual energy consumption (kWh per year), based on 50 cleaning tasks. Actual annual energy consumption will depend on how the appliance is used.
Tests of energy consumption carried out in conformity with EU regulation 665/2013.
Accessory 6 was used to determine the cleaning efficiency class for hard floors.
DATI TECNICI / TECHNICAL DATA / DATOS TÉCNICOS / DADOS TÉCNICOS / TECHNICKÉ ÚDAJE / MÜSZAKI ADATOK / TECHNICKÉ ÚDAJE / TEHNIČNI PODATKI / TEXNIKA ŠTOIXEIA
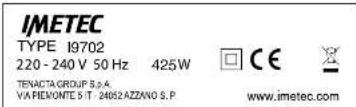
III II
INTRODUZIONE
IT
Dear customer, thank you for choosing our product. We feel certain you will appreciate its quality and reliability as it was designed and manufactured with customer satisfaction in mind. These instructions for use are compliant with the European Standard EN 82079.
EN

WARNING! Instructions and warnings for safe use.
Before using this appliance, carefully read the instructions for use and in particular the safety notes and warnings, which must be complied with. Keep this manual together with its illustrative guide for future consultation. Should you transfer the appliance to another user, make sure you hand over this documentation as well.
NOTE: Should any part of this manual be difficult to understand or any doubt arise, contact the company at the address indicated on the last page before using the product.
NOTE: Persons with impaired vision may consult these instructions for use in digital format at the website www.tenactagroup.com
INDEX
Introduction....pag. 9 Storing and caring for the product....pag. 14
Safety notes....pag. 9 Troubleshooting....pag. 14
Symbols....pag. 11 Disposal....pag. 15
Description of the appliance Assistance and warranty....pag. 15
and its accessories....pag. 11 Illustrative guide....I-II
Assembly....pag.12Technical data....III
Accessories....pag. 12
Use....pag. 12
Cleaning and maintenance....pag. 13
SAFETY NOTES
- After unpacking, make sure the appliance is intact, complete with all its parts as shown in the illustrative guide and with no sign of damage due to transportation. If in any doubt, do not use the appliance and contact an authorised service centre.

CAUTION! Remove any communication material such as labels, tags etc. from the appliance before use.

WARNING! Risk of suffocation.
Children shall not play with the packaging. Keep the plastic bag out of the reach of children.
- This appliance must be used only for the purpose for which it was designed, namely as a vacuum cleaner for home use. Any other use is considered not compliant with the intended use and therefore dangerous.

WARNING! Any misuse of the appliance may lead to injuries.
- Before connecting the appliance to the mains supply, make sure that the voltage and frequency indicated on the technical data of the appliance correspond to those of the mains supply. The rating is on the appliance or on the power supply unit, if any (see illustrative guide).
- This appliance can be used by children aged from 8 years and above and persons with reduced physical, sensory or mental capabilities or lack of experience and knowledge if they have been given supervision or instruction concerning use of the appliance in a safe way and understand the hazards involved. Children shall not play with the appliance. Cleaning and user maintenance shall not be made by children without supervision.
• ⊗ DO NOT use the appliance with wet hands, damp feet or barefoot. - DO NOT pull the supply cord or the appliance itself to remove the plug from the socket.
- DO NOT pull or lift the appliance by the supply cord.
- DO NOT expose the appliance to humidity, to the weather (rain, sun, etc.) or to extreme temperatures.
• DO NOT leave the appliance unattended while in operation.
• Always disconnect the appliance from the mains supply before cleaning or performing maintenance and when the appliance is not in use. - If the appliance is faulty or malfunctions, switch it off and do not
tamper with it. Contact an authorised technical service centre for any repairs.
- If the supply cord is damaged it must be replaced by an authorised technical service centre, so as to prevent all risks.
- This appliance shall not come into contact with water, other liquids, spray, steam. For any cleaning and maintenance operation refer to the instructions in the relevant chapter.
• See the external packaging for the characteristics of the appliance. - Use the appliance only with the supplied accessories that are an essential part of the appliance.
- DO NOT use the vacuum cleaner without inserting the dust bag, dust container or filter.
- DO NOT use the appliance without the motor protection filter to prevent damaging the motor and the vacuum cleaner.
SYMBOLS
| Warning Caution | Prohibited | ||
| Note ON/OFF switch | |||
| Protection class II | Bristles retracted for other surfaces | ||
| Bristles lowered for hard floors |
DESCRIPTION OF THE APPLIANCE AND ITS ACCESSORIES
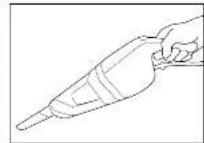
Refer to Figure in the illustrative guide to verify your appliance equipment. All the figures are on the cover pages of these instructions for use All the figures are on the cover pages of these instructions for use.
-
Handle
-
Cable winding system
2A Turning upper cable hook
2B Fixed lower cable hook
-
Fastening screw
-
Power cable with plug
-
Manual mini-vacuum release buttons
-
Suction inlet
-
Combination brush
7A Switch button
7B Connector
- Manual MINI-VACUUM
8A Dust compartment release key
8B Dust collection compartment
8C Protective filter mesh
8D Cyclone filter
8E Motor filter
8F Technical data
-
ON/OFF switch
-
Set of accessories
10A Accessory support
10B Dusting nozzle
10C Crevice nozzle
10D Upholstery nozzle
ASSEMBLY
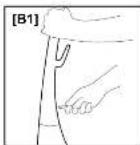
- Loosen the fastening screw (3) of the handle (1) and remove it.
- Attach the handle (1) to the body of the appliance, taking care to assemble it correctly [Fig. B1].
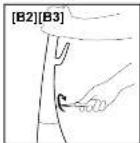
- Insert the fastening screw (3) and tighten it clockwise [Fig. B2] using a screwdriver.
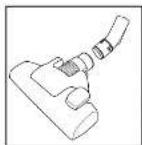
- Insert the connector (7B) in the combination brush (7). It will click into place when it is assembled correctly [Fig. B3].
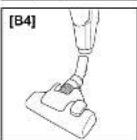
- Attach the combination brush (7) to the suction connection (6) [Fig. B4].
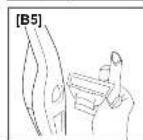
- Put the various accessories (10B+10C+10D) on the accessory support 10A [Fig. B5].
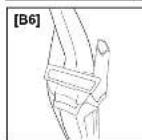
- Secure the accessory support (10A) by pressing it gently into place on the back of the stick body [Fig. B6].
ACCESSORIES
Your appliance is equipped with the following attachments:
- Combination brush (7): The combination brush (7) is suitable for all of the following surfaces: hard in position composition it is suitable for all other surfaces.
- SET OF ACCESSORIES (10):
- Accessory Support (10A): to store the accessories and attach them to the body of the stick.
- Dusting nozzle (10B).
- Nozzle for crevices (10C): to clean corners and slots, such as radiators, skirting boards and blinds.
- Upholstery nozzle (10D): to clean sofas, armchairs, upholstered chairs and curtains.
USE
USING IT AS A STICK VACUUM CLEANER
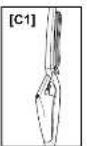
Fully unwind the power cable (4). To do so, turn the upper cable hook (2A) downwards [FIG. C1].

WARNING! DO NOT use this appliance if there are visible signs of damage.

WARNING! DO NOT use this applause to vacuum:
- burning ashes, cigarette butts, etc.;
- liquids, such as carpet cleaners;
- sharp or hard objects, such as nails or large glass shards;
- fine powder, such as cement;
- toner powder (for laser printers, copy machines, etc.).
NOTE: Using the vacuum cleaner with the cable fully or partly wound involves an overheating hazard!
NOTE:
-
Bear in mind that a new appliance can develop odours the first few times it is used. These odours are harmless and disappear shortly afterwards. Ventilate the room.
-
Transparent parts can become opaque, due to use.
-
Insert the plug into the socket, while holding the appliance by the handle to prevent it from falling in the event that it was not stored in the OFF position.
- Press the ON/OFF button (9) once to switch the vacuum cleaner on or off.
- Switch the appliance off after use, by pressing the ON/OFF button (9) and disconnect the plug from the socket.
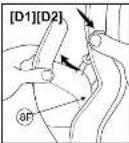
- Wind the cable (4) round the two hooks (2A and 2B) [Fig. D1]. With the clamp on the plug, it is possible to secure it to the cable.
USING IT AS A MANUAL MINI-VACUUM
• Fully unwind the power cable (4). To do so, turn the upper cable hook (2A) downwards [Fig. C1].
- Detach the mini-vacuum (8) from the body of the stick by pressing the release buttons (5) [Fig. D1].
- Attach the suitable accessory (10) for the surface requiring cleaning and connect it to the mini-vacuum [Fig. D2].
- Press the ON/OFF switch (9) once to turn the vacuum cleaner on, and start cleaning.
- When you have finished, press the ON/OFF switch (9) to turn it off and take the plug out of the power socket.
- Put the mini-vacuum (8) back on the body of the stick vacuum and press the handle of the mini-vacuum until the click tells you that it is correctly in place [Fig. D1].
- Wind the cable (4) round the two hooks (2A and 2B) [FIG. C1]. With the clamp on the plug, it is possible to secure it to the cable.
CLEANING AND MAINTENANCE

WARNING! Always disconnect the appliance from the mains supply before cleaning or performing maintenance.

CAUTION! Periodically verify that filters and the inlet opening are not clogged.

CAUTION! DO NOT use solvents or other aggressive or abrasive detergents in order not to damage the appliance surfaces.

WARNING! Make sure all cleaned parts are completely dry before reusing the appliance.
CLEANING THE APPLIANCE
- When necessary, clean the appliance with a damp cloth.
CLEANING THE COMBINATION BRUSH (7)
With the motor ON, rub the lower part of the brush with your hand to remove the dust and fluff, which will be drawn.
EN CLEANING THE DUST COLLECTION SYSTEM (8)

CAUTION! Empty the dust container and clean the filters after every use in order not to damage the appliance.
Clean the dust collection system following the instructions below and paying attention to the figures in the illustrative guide.
- Detach the mini-vacuum (8) from the body of the stick by pressing the release buttons (5) [Fig. D1].
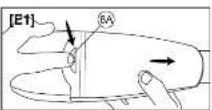
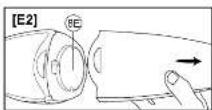
- Press the release button (8A) [Fig. E1] and take down the dust container (8B+8C+8D) [Fig. E2].
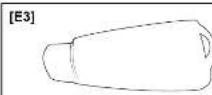
- Take out filtering system 8C and 8D [Fig. E3] and empty out the contents of the dust container (8B).
- Separate the filter protection mesh (8C) from the cyclone filter (8D), and clean them by carefully shaking and brushing away the dust. To do so, use a soft brush to prevent any damage.
• Take out the motor filter (8E) and clean it. - If necessary, rinse the parts of the dust collection system under running water. Before putting them back in place, make sure they are completely dry.

WARNING! Let the filters dry completely after washing them for at least 24 hours before reassembly.
NOTE:
- Replace the filter in the event it is damaged or impossible to clean.
- Replace the filter at least once a year.
- Failure to clean or replace the filter will make the manufacturer's warranty null and void.
Put the filtering system back inside (8C+8D) the dust compartment (8B) and attach it back on the mini-vacuum (8), being careful to hook it onto the bottom fitting and making the release button click (8A).
STORING AND CARING FOR THE PRODUCT
When the appliance is not used, unplug the appliance from the socket and store it in a dry and dust-free place.
TROUBLESHOOTING
| PROBLEM SOLUTION | |
| The appliance does not go on. | • Ensure that the plug is connected to the socket. Make sure the ON/OFF button has been pressed (9). |
| The appliance switches off during use and does not switch back on again. | · The vacuum cleaner is equipped with a protective motor thermostat that shuts off the appliance in the event of overheating! (caused by obstructing objects or a clogged dust collection system). If triggered, switch the appliance off by pressing the ON/OFF switch (9) and let it cool down completely for a few hours. Remove any dust or the obstructing object before restarting the appliance. |
| The vacuum cleaner does not suction well. | · The dust collection system is full: empty the dust collection compartment (8B).· The filter is clogged: clean or replace the filter (8D).· The filter is not fastened correctly: make sure that the filter (8D) is fitted correctly. |
DISPOSAL

The packaging of the appliance is made of recyclable materials. Dispose of it in accordance with the environmental protection regulations.

Pursuant to Directive 2012/19/EU on waste electrical and electronic equipment (WEEE), the crossed bin symbol on the appliance or its packaging indicates that the appliance must be disposed of separately from other waste at the end of its useful life.
The user must therefore take the appliance to an appropriate recycling centre for electrical and electronic equipment. Alternatively, instead of handling the disposal, the user can hand over the appliance to the retailer when a new, equivalent one is purchased. The user can hand over electronic products measuring less than 25 cm to retailers of electronic products having a sales area of at least 400 m ^2 free of charge and with no obligation to buy. Appropriate separate collection for the subsequent procedure for the decommissioned appliance for recycling, which includes treatment and environmentally friendly disposal helps prevent adverse effects on the environment and health and promotes reusing and/or recycling materials that the appliance consists of.
ASSISTANCE AND WARRANTY
The appliance is guaranteed for a period of 2 years from the date of purchase. Evidence shall be taken as the date indicated on the receipt/invoice (provided it is legible), unless the buyer can prove that the delivery occurred later. In the event of a defect in the product which existed prior to the date of delivery, appliance repair or replacement is guaranteed free of charge, unless one of the two solutions is disproportionate to the other. The buyer has the obligation to notify an authorised Service Centre of the non-conformity within two months from discovering the defect.
The warranty does not cover any part that may be defective due to:
a) damage from transport or accidental drops,
b) incorrect installation or inadequate electrical system,
c) repairs or alterations made by unauthorised personnel,
d) poor or incorrect maintenance and cleaning,
e) product and/or product parts subject to wear and/or consumables,
f) failure to comply with the appliance's operating instructions, negligent or careless use,
g) vacuum materials that can damage the appliance (ex. ashes, liquids, fine dust, toner...),
h) missed cleaning of the dust bin and the filter (for all models with cyclonic technology),
i) non substitution of a full dust bag and filters (for bagged models),
j) obstruction of the suction inlet,
k) recharge of the battery not compliant to the instruction's chapter preparation/use (for products with batteries),
I) use of the appliance without the filters/dust bag,
m) using the appliance without pulling out the cable completely (for appliances with cable winding),
n) winded, bent or damaged cable due to negligence.
The list above is purely indicative and not exhaustive and in any case, this warranty shall not cover all circumstances that cannot be attributed to manufacturing defects of the appliance. In addition, the warranty does not cover any case of improper use of the appliance and professional use.
All liability is disclaimed for any damage that may directly or indirectly be caused to persons, property and pets as a result of failure to comply with all the instructions provided in the “Instructions and Warnings Booklet” regarding appliance installation, use and maintenance.
This is without prejudice to any contractual warranty claims against the seller.
Methods of support
Appliance repairs must be carried out by an authorised Service Centre. If the faulty appliance is under warranty, it must be sent to the Service Centre together with a fiscal document evidencing the date of sale or delivery.
INTRODUCCIÓN
PROBLEMAS E SOLUÇÕES
ASSISTÊNCIA E GARANTIA
POPIS PŘÍSTROJE A PŘÍSLUŠENSTVÍ

- INTRODUZIONE
- WARNING! Instructions and warnings for safe use.
- INDEX
- SAFETY NOTES
- DESCRIPTION OF THE APPLIANCE AND ITS ACCESSORIES
- ASSEMBLY
- ACCESSORIES
- USE
- USING IT AS A STICK VACUUM CLEANER
- NOTE:
- USING IT AS A MANUAL MINI-VACUUM
- CLEANING AND MAINTENANCE
- CLEANING THE APPLIANCE
- CLEANING THE COMBINATION BRUSH (7)
- EN CLEANING THE DUST COLLECTION SYSTEM (8)
- CAUTION! Empty the dust container and clean the filters after every use in order not to damage the appliance.
- WARNING! Let the filters dry completely after washing them for at least 24 hours before reassembly.
- STORING AND CARING FOR THE PRODUCT
- TROUBLESHOOTING
- DISPOSAL
- ASSISTANCE AND WARRANTY
- Methods of support
- INTRODUCCIÓN
- PROBLEMAS E SOLUÇÕES
- ASSISTÊNCIA E GARANTIA
- POPIS PŘÍSTROJE A PŘÍSLUŠENSTVÍ
Brand : IMETEC
Model : Duetta C3-100
Category : Electric broom