009-121 - Hand tool Hamron - Free user manual and instructions
Find the device manual for free 009-121 Hamron in PDF.


| Brand | Hamron |
| Model | 009-121 |
| Product Type | Cordless Impact Wrench |
| Battery Voltage | 18 V |
| Battery Capacity | 1.5 Ah (Li-Ion) |
| Charger Input | 230 VAC / 50 Hz / 20 W |
| Charger Output | 18 VDC / 550 mA |
| Charging Time | 3–5 hours |
| No-Load Speed | 0–2200 rpm |
| Stroke Rate | 0–2900 spm |
| Max Torque | 300 Nm |
| Square Drive Size | 1/2 inch |
| Weight (without battery) | 1.73 kg |
| Sound Pressure Level (LpA) | 93 dB(A), K=3 dB |
| Sound Power Level (LwA) | 104 dB(A), K=3 dB |
| Vibration Level | 12.154 m/s², K=1.5 m/s² |
| Variable Speed Control | Yes (via power switch) |
| Rotation Selector | Left/right drive |
| Battery Status Indicator | 3 LEDs (red, orange, green) |
| Safety Features | Double insulation, ear protection required, safety glasses, gloves |
| Maintenance | Keep clean, dry, free from oil/grease; do not use solvents |
| Storage | Dry place, out of reach of children, in supplied case |
| Included Accessories | Battery, charger, case |
| Intended Use | Loosening and tightening nuts, especially wheel nuts |
| Compliance | CE, RoHS 2011/65/EU |
Frequently Asked Questions - 009-121 Hamron
User questions about 009-121 Hamron
0 question about this device. Answer the ones you know or ask your own.
Ask a new question about this device
Download the instructions for your Hand tool in PDF format for free! Find your manual 009-121 - Hamron and take your electronic device back in hand. On this page are published all the documents necessary for the use of your device. 009-121 by Hamron.
USER MANUAL 009-121 Hamron
natural_image
Red and black HAMRON Li-Ion battery pack tool (no visible text or symbols on body)SE Bruksanvisning för 18 V mutterdragare
NO Bruksanvisning for 18 V muttertrekker
PL Instrukcja obsługi klucz udarowy 18 V
EN User instructions for 18 V impact wrench
SE - Bruksanvisning i original
EN - Operating instructions (Translation of the original instructions)
Date of production: 2015-04-23
© Jula AB
SVENSKA....4
SÄKERHETSANVISNINGAR....4
TEKNISKA DATA 8
BESKRIVNING 9
HANDHAVANDE 9
UNDERHÅLL 12
NORSK 14
SIKKERHETSANVISNINGER 14
TEKNISKE DATA 18
BESKRIVELSE....19
BRUK....19
VEDLIKEHOLD ....22
POLSKI 24
ZASADY BEZPIECZEŃSTWA .....24
DANE TECHNICZNE 29
OPIS 30
OBSŁUGA 30
KONSERWACJA 33
ENGLISH 35
SAFETY INSTRUCTIONS....35
TECHNICAL DATA 39
DESCRIPTION 40
USE 40
MAINTENANCE 43
SÄKERHETSANVISNINGAR
natural_image
Simple line drawing of a trash bin with no text or symbolsVärna om miljön!
natural_image
Symbol of a trash bin with no visible text or labelsVerne om miljøet!
natural_image
Pure electrical circuit lines without any symbolsDBAJ O ŚRODOWISKO!
Read the Operating Instructions carefully before use.
Save them for future reference.
The term "power tool" in the safety instructions refers to your mains-powered (corded) or battery-powered (cordless) power tool.
Safety in the work area
- Keep the work area clean and well lit. Dark and cluttered work areas increase the risk of accidents and injuries.
- Do not use power tools in explosive environments, such as in the vicinity of flammable liquids, gases or dust. Power tools produce sparks that can ignite dust and fumes.
- Keep children and onlookers at a safe distance when working with a power tool. You can lose control of the tool if you are distracted.
Electrical safety
- The mains plug on the power tool must match the mains socket. Never modify the plug in any way. Never use adapters with earthed power tools. Intact plugs and matching outlets reduce the risk of electric shock.
- Avoid body contact with earthed surfaces such as pipes, radiators, cookers and refrigerators. There is an increased risk of electric shock if your body is earthed.
- Do not expose power tools to rain or moisture. There is a greater risk of electric shock if water gets into a power tool.
- Be careful with the power cord. Never use the power cord to carry or pull the power tool, or to pull out the plug from the mains. Keep the power cord away from heat, oil, sharp edges and moving parts. Damaged or tangled power cords increase the risk of electric shock.
- When you use a power tool outdoors, use an extension cord intended for outdoor use. Using cords intended for outdoor use reduces the risk of electric shock.
- If you have to use a power tool in damp conditions, use a mains connection protected by a residual current device RCD. Using an RCD reduces the risk of electric shock.
Personal safety
- Stay alert, pay attention to what you are doing, and use your common sense when working with power tools. Never use power tools if you are tired or under the influence of drugs, alcohol or medication. A moment of inattention when using a power tool can result in serious personal injury.
- Use safety equipment. Always wear safety glasses.
-
The correct use of safety equipment such as a dust filter mask, non-slip safety shoes, helmets and ear protection, reduces the risk of personal injury.
-
Avoid accidental starting. Check that the power switch is in the OFF position before connecting to the mains and/or the battery, or lifting/carrying the tool. Carrying a power tool with your finger on the switch, or connecting a tool to the mains supply when the switch is in the ON position, increases the risk of accidents and injuries.
- Remove all Allan keys/spanners etc. before switching on the power tool.
- A forgotten spanner in a rotating part of the power tool can result in personal injury.
- Do not overreach. Always maintain a firm footing and good balance. This will ensure you have better control over the tool in unexpected situations.
- Wear suitable clothing. Do not wear loose-fitting clothing or jewellery. Keep your hair, clothing and gloves away from moving parts. Loose-fitting clothing, jewellery and long hair can get caught in moving parts.
- If dust extraction and dust collection equipment is available, this should be connected and used correctly. The use of such devices can reduce the risk of dust-related problems.
Using and looking after power tools
- Do not force the power tool. Use the correct power tool for the planned work. The correct power tool functions better and more safely when used with the load for which it was designed.
- Do not use the power tool if it cannot be switched on and off with the power switch. Power tools that cannot be controlled with the power switch are dangerous and must be repaired.
- Unplug the plug from the mains and/or remove the battery from the power tool before making any adjustments, replacing accessories or putting the tool away. These safety precautions reduce the risk of accidentally starting the power tool.
- Store power tools out of the reach of children when not in use. Never allow anyone who is unfamiliar with the power tool and these instructions to use the tool. Power tools are dangerous in the hands of inexperienced users.
- Keep the power tool properly maintained. Check that moving parts are not misaligned, jammed or loose, and that there are no other factors that could affect the safe use of the tool. If the power tool is damaged, it must be repaired before being used again. Many accidents are caused by poorly maintained power tools.
- Make sure that cutting tools are sharp and clean. Properly maintained cutting tools with sharp cutting edges are less likely to jam and are easier to control.
- Use the power tool, accessories and bits etc., in accordance with these instructions, taking into account the actual working conditions and the work that is to be done. Using the power tool for anything other than its intended purpose can lead to dangerous situations.
Battery-powered tool use and care
- The battery must only be charged with the charger specified by the manufacturer. A charger that is suitable for one type of battery can result in a fire risk if used with other types of batteries.
-
Only use the type of battery intended for the actual power tool. The use of any other type of battery can result in a risk of personal injury and fire.
-
When the battery is not in use keep it away from other metal objects such as paperclips, coins, keys, nails, screws and other small metal objects that can short circuit the two terminals. If the battery terminals are short-circuited this can result in burn injuries or a fire.
- Incorrect use of the product can cause fluid to leak from the battery; avoid contact. Rinse immediately with plenty of water if you get fluid on your skin. Seek medical attention if you get fluid in your eyes. Fluids from the battery can cause skin irritation or burns.
Service
Make sure that the power tool is serviced by qualified technicians that only use identical spare parts. This will ensure that the power tool remains safe to use.
Special safety instructions
WARNING: Maintain the tool in good order. Read these instructions carefully to understand the applications for the tool, its limitations and potential risks. Always take basic safety precautions when using power tools to safeguard against the risk of fire, electric shock and personal injury.
- Wear approved safety glasses. The tool can eject objects that can cause permanent eye injuries.
- Wear ear protection.
- Only use accessories intended to be used with impact wrenches. Do not use sockets and accessories intended for hand tools. Such sockets and accessories are often chromium-plated and must not be used with impact wrenches. They can burst and cause serious personal injury.
- Always check sockets and accessories for cracks and other damage before using them. Damaged sockets and accessories can burst or come loose and cause serious personal injury.
- Always finish tightening wheel nuts/screws with a torque wrench in order to tighten to the torque recommended by the manufacturer.
- Keep the tool clean, dry and free from oil and grease. Always use clean rags for cleaning. Do not use petrol, solvents or detergents that can damage the plastic parts.
- Do not wear gloves, ties or loose-fitting clothing.
- Use safety gloves that fit properly and ensure a good grip.
- Hold the tool with one hand on the handle and the other on the front of the casing.
- Never allow your hands to touch the socket or accessories when the tool is working – risk of serious personal injury.
- Remove the battery from the tool before changing accessories.
- Be prepared for components to start moving when nuts/screws are loosened.
Battery and charger
- Do not attempt to charge the battery with any other charger than the one supplied. Do not attempt to charge other types of batteries with this charger – risk of explosion, personal injury and or material damage.
-
When the battery is not in use keep it away from other metal objects such as paperclips, coins, keys, nails, screws and other small metal objects that can short circuit the terminals. Short circuiting can damage the battery or cause personal injury, burns and/or fire.
-
Never attempt to open the battery. Never use a battery if the casing has opened or cracked, and do not attempt to charge it.
- Do not charge the battery if it is wet or shows signs of corrosion.
- A small amount of fluid can leak from the battery during extreme use, or in extreme temperatures. This is quite normal. Follow the instructions below if you get battery fluid on your skin. NOTE: Battery fluid is caustic.
– Wash immediately with soap and water.
- Neutralise with a weak acid, such as lemon juice or vinegar.
- If you get battery fluid in your eyes, rinse your eyes with clean water for at least 10 minutes and then seek medical attention immediately.
- The battery can explode if it is burned or exposed to a naked flame.
- Do not use an extension cord. Connect the charger directly to a mains outlet.
- The charger must be connected to the mains (230 VAC / 50 Hz).
- Do not use the charger in damp or wet areas. The charger is only intended for indoor use. Do not use the charger near water, e.g. bath tubs, wash basins or sink units etc. Do not immerse the charger in water. Do not allow the power cord to hang over the edge of a table or worktop. Do not place the charger on, or near hot surfaces.
- Do not attempt to charge other types of batteries with this charger – risk of explosion, personal injury and/or material damage.
- Do not use the charger if the power cord or plug are damaged. Replace damaged power cords immediately.
- Do not use the charger if it has received a heavy knock, been dropped, or otherwise damaged. Allow qualified personnel to check and/or repair the charger. Do not dismantle the charger.
- Charging temperature: 0 to 45^ C .
- Unplug the power cord before cleaning and when the charger is not in use.
Symbols

Important:

Read the instructions.

Wear ear protection.

Wear safety glasses.

Wear safety gloves.
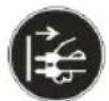
Switch off the tool, unplug the power cord and wait until all moving parts have completely stopped before cleaning, maintenance, storage and/or transport.

The tool has double insulation.
TECHNICAL DATA
| Battery 18 V / 1.5 Ah / Li-Ion |
| Charger, electrical input data 230 VAC / 50 Hz / 20 W |
| Charger, electrical output data 18 VDC / 550 mA |
| Charging time 3–5 h |
| Speed (no load) 0–2200 rpm |
| Stroke rate 0–2900 spm |
| Torque 300 Nm |
| Square drive 1/2'' |
| Weight: 1.73 kg (without battery) |
| Sound pressure level LpA 93 dB(A), K=3 dB |
| Sound power level, LwA 104 dB(A), K=3 dB |
| Vibration level 12.154 m/s2, K=1.5 m/s2 |
Always wear ear protection!
The declared vibration value, which has been measured by a standardised test method, can be used to compare different tools with each other and for a preliminary assessment of exposure.
WARNING: The actual vibration level when using power tools may differ from the specified maximum value, depending on how the tool is used. It is therefore necessary to determine which safety precautions are required to protect the user, based on an estimate of exposure in actual operating conditions (taking into account all stages of the work cycle, e.g. the time when the tool is switched off and when it is idling, in addition to the start-up time).
DESCRIPTION
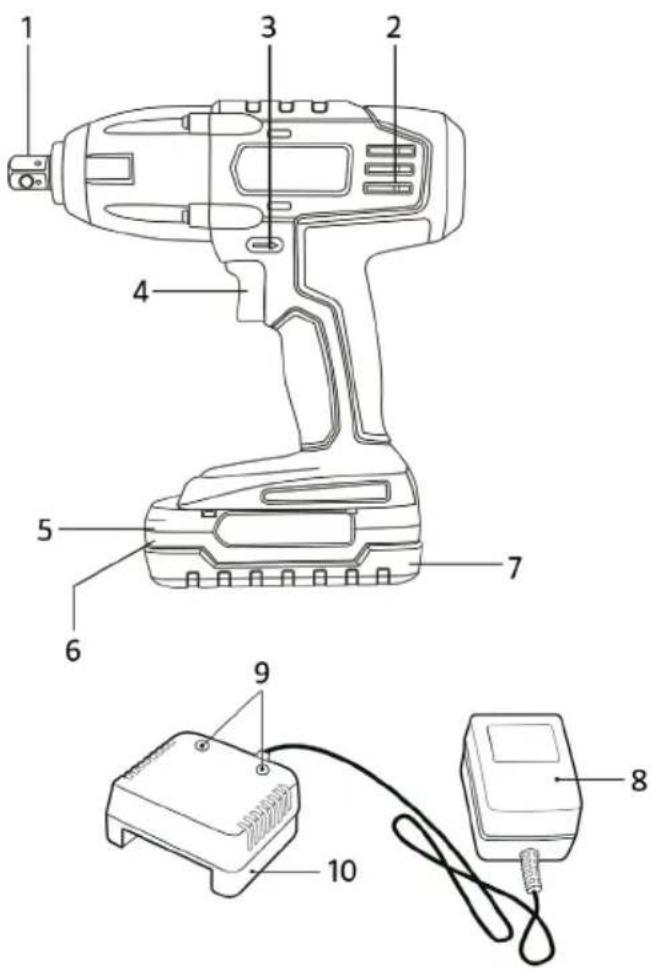
- 1/2" square drive
- Ventilation openings
- Rotation selector
- Power switch with variable speed control
-
Battery status
-
Battery test button
- Battery
- Mains adapter
- Charging status light
- Battery charger
USE
Charge the battery
- Put the battery charger in a dry place, near a power point.
- Turn the battery upside down and put it in the charger.
NOTE: Check that the battery is correctly inserted in the charger.
- Plug the battery charger power cord into the mains.
Checking the battery charging
The battery charge status can be checked with the status lights on the short side of the battery.
- Keep the button for battery status (1) on the short side of the battery pressed in.
- One or more of the three status lights go on to show the residual battery charge.
- Red + orange + green (2, 3 and 4) - 2/3 to full charge. Red + orange (2 and 3) - 1/3 to 2/3 charge. Red (2) - less than 1/3 charge.
- Release the button. The status lights go off.
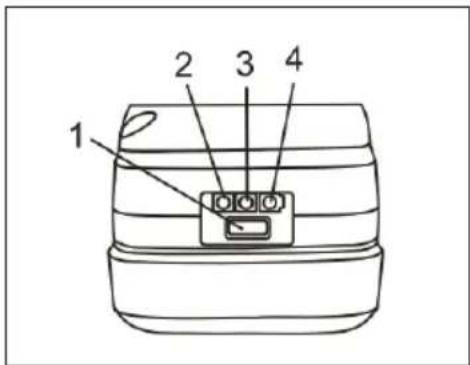
NOTE: The battery charge can be checked when the battery is loose, or when it is connected to the tool and the tool is switched off. Do NOT attempt to check the battery charge when the battery is inserted in the charger. The charge status will be misleading and the status system can be damaged.
Inserting the battery
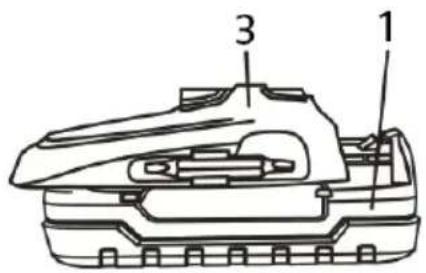
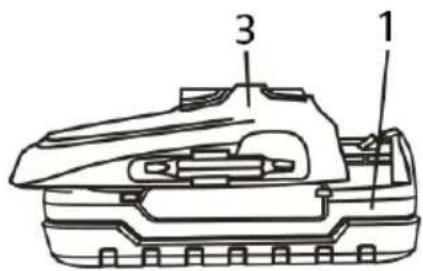
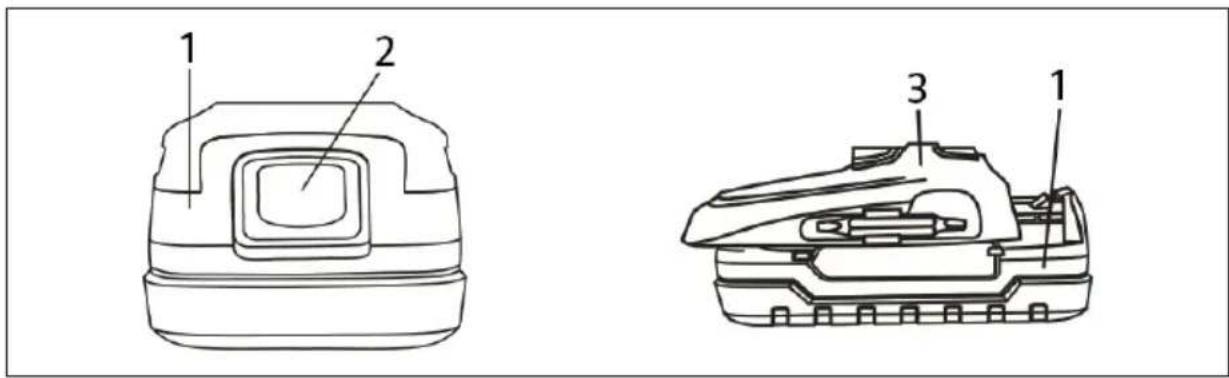
- Remove the discharged battery (1) from the tool by pressing down the battery lock (2) on the back of the battery and pulling the battery out from the handle (3) on the tool. See diagram below.
- Fit the fully charged battery in the slot on the back of the handle.
NOTE: The battery lock clicks when the battery is properly inserted.
WARNING: Do not expose the battery to water or other liquids. Rapid cooling can cause a hot battery to explode or start leaking.
Fitting sockets
NOTE:
- Only use accessories intended to be used with impact wrenches.
-
Do not use sockets and accessories intended for hand tools. Such sockets and accessories are often chromium-plated and must not be used with impact wrenches. They can burst and cause serious personal injury.
-
Remove the battery from the tool before replacing sockets or accessories to make sure the tool cannot be started accidentally and cause personal injury.
-
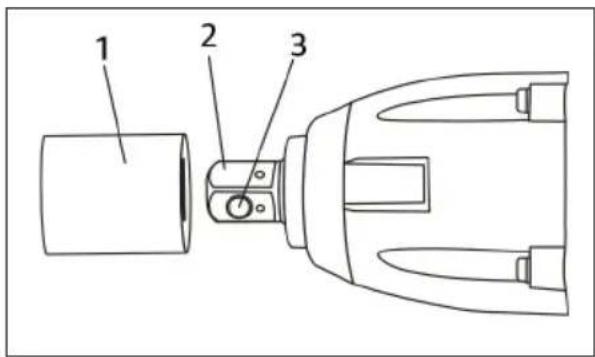
Press the square hole (1) in the socket onto the tool's square drive (2).
-
Push the socket in as far as it will go, so that the catch (3) engages.
Rotation selector
The tool has a rotation selector.
-
Move the rotation selector to the right for left drive.
-
Move the rotation selector to the left for right drive.
NOTE: Do not touch the rotation selector when the tool is moving. This can damage the tool.
Loosening nuts
-
Insert the battery.
-
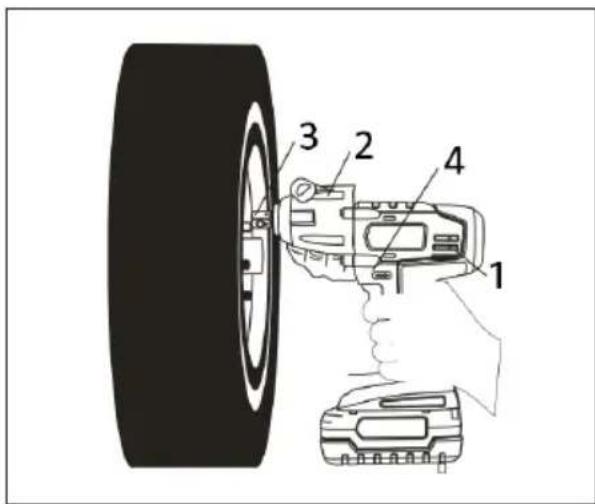
Hold the tool with one hand on the handle (1) and the other on the front of the casing (2) (g. 6).
-
Put the socket (3) on the nut. NOTE: Check that the socket sits properly on the nut, otherwise the socket and/nut can be damaged.
-
Hold the tool in a rm horizontal position and press the power switch (4).
When loosening, do not press the power switch for more than 15 seconds if the nut does not start to move. If the nut does not start to move within 15 seconds, change the direction of rotation to right drive with the rotation selector and run for a few seconds. Now switch back to left drive to loosen the nut. This procedure usually gets stubborn nuts to loosen.
WARNING: Do not run the tool for more than 15 seconds if the nut does not start to move, this could damage the tool and/or the nut.
MAINTENANCE
Always check the tool, sockets and accessories for damage before and after use. Replace any damaged parts with new ones with the same technical data in accordance with these instructions.
Repairs
The tool does not contain any parts that can be repaired by the user. Take the tool to an authorised service centre or other qualified person for inspection and repair.
Storage
- When not in use, store the tool in a dry place out of the reach of children.
- Store the tool and accessories in the supplied case.
Jula reserves the right to make changes. In the event of problems, please contact our service department. www.jula.com
natural_image
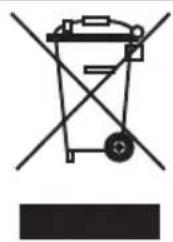
Pure electrical circuit lines without any symbolsCare for the environment!
Must not be discarded with household waste!
This product contains electrical or electronic components that should be recycled.
Leave the product for recycling at the designated station e.g. the clocal authority's recycling station.
CE
EC DECLARATION OF CONFORMITY EG FÖRSÄKRAN OM ÖVERENSSTÄMMELSE EF SAMSVARSERKLÆRING DEKLARACJA ZGODNOŚCI WE

Jula AB, Box 363, SE-532 24 SKARA, SWEDEN
RoHS Directive 2011/65/EU
This product was CE marked in year -15
Name and address of the person authorised to compile the technical file.
Skara 2015-01-12
Tobias Hammer PRODUCT MANAGER
- SVENSKA....4
- SÄKERHETSANVISNINGAR....4
- TEKNISKA DATA 8
- BESKRIVNING 9
- HANDHAVANDE 9
- UNDERHÅLL 12
- NORSK 14
- SIKKERHETSANVISNINGER 14
- TEKNISKE DATA 18
- BESKRIVELSE....19
- BRUK....19
- VEDLIKEHOLD ....22
- POLSKI 24
- ZASADY BEZPIECZEŃSTWA .....24
- DANE TECHNICZNE 29
- OPIS 30
- OBSŁUGA 30
- KONSERWACJA 33
- ENGLISH 35
- SAFETY INSTRUCTIONS....35
- TECHNICAL DATA 39
- DESCRIPTION 40
- USE 40
- MAINTENANCE 43
- SÄKERHETSANVISNINGAR
- Värna om miljön!
- Verne om miljøet!
- DBAJ O ŚRODOWISKO!
- Read the Operating Instructions carefully before use.
- Safety in the work area
- Electrical safety
- Personal safety
- Using and looking after power tools
- Battery-powered tool use and care
- Service
- Special safety instructions
- Battery and charger
- Symbols
- TECHNICAL DATA
- Always wear ear protection!
- DESCRIPTION
- USE
- Charge the battery
- Checking the battery charging
- Inserting the battery
- Fitting sockets
- NOTE:
- Rotation selector
- Loosening nuts
- MAINTENANCE
- Repairs
- Storage
- Care for the environment!
- CE
- EC DECLARATION OF CONFORMITY EG FÖRSÄKRAN OM ÖVERENSSTÄMMELSE EF SAMSVARSERKLÆRING DEKLARACJA ZGODNOŚCI WE
Brand : Hamron
Model : 009-121
Category : Hand tool