
A4 All - Smartphone Allview - Free user manual and instructions
Find the device manual for free A4 All Allview in PDF.


| Product Type | Smartphone |
| Brand | Allview |
| Model | A4 All |
| Operating System | Android 2.3.6 |
| Processor | Cortex-A9, 1 GHz |
| Display | 3.5" TFT-LCD, 480x320 px, capacitive multitouch |
| RAM | 256 MB |
| Internal Storage | 512 MB |
| Expandable Storage | microSD up to 32 GB |
| Main Camera | 2 MP |
| Front Camera | 0.3 MP |
| Battery | Li-Polymer 1500 mAh |
| Standby Time | Up to 200 hours |
| Talk Time | Up to 300 minutes |
| Dimensions | 115 x 61.5 x 12.3 mm |
| Weight | 122.7 g |
| Network | 2G/3G Dual SIM Dual Standby |
| Connectivity | WiFi 802.11 b/g/n, Bluetooth 4.0, USB 2.0, 3.5mm jack |
| Sensors | G-sensor, Proximity, Light, Compass |
| GPS | Yes, with A-GPS |
| Safety Precautions | Follow driving, aircraft, hospital guidelines; use approved accessories; avoid battery temperatures above 40°C |
| Cleaning | Use a soft dry cloth; avoid liquids and abrasives |
| User-Replaceable Parts | Battery, SIM cards, memory card |
| Box Contents | Phone, earphones, data cable, charger, user manual, warranty card |
Frequently Asked Questions - A4 All Allview
User questions about A4 All Allview
0 question about this device. Answer the ones you know or ask your own.
Ask a new question about this device
Download the instructions for your Smartphone in PDF format for free! Find your manual A4 All - Allview and take your electronic device back in hand. On this page are published all the documents necessary for the use of your device. A4 All by Allview.
USER MANUAL A4 All Allview
natural_image
Front view of a black smartphone with blank screen and buttons (no visible text or symbols)ALLVIEW®
A4ALL
RO MANUAL DE UTILIZARE....1
EN USER MANUAL....14
HU FELHASZNALOI KEZIKONYV....25
BG РЪКОВОДСТВО ЗА УПОТРЕБА....36
PL PODRE CZNIK DLA UŻYTKOWNIKA....47
DE BETRIEBSANLEITUNG....58
MASURI DE SIGURANTA
natural_image
Diagram of a smartphone showing internal components with red arrows pointing to specific areas (no text or symbols present)natural_image
3D illustration of a smartphone showing the internal circuit board and an open lid, with a red arrow pointing to a component (no text or symbols present)- Ultimul pas este asezarea capacului de protectie a bateriei:
Pornire/oprire si standby dispozitiv
CAUTION! Please read carefully this instructions and follow them, in the case of dagerous situations.
Driving safety: It is recommended not to use the phone while driving. If you use it however, turn on the Handsfree mode.
Turn off your phone while in an aircraft
Interference caused by mobile phones affects aviation safety, and thus is illegal to use it on the plane. Please make sure that your mobile phone is turned off when you are on the plane.
In hospital: When using the phone in a hospital must submit to the relevant rules specified by the hospital. Any interference caused by wireless devices may affect the performance of the phone.
Approved service: Only approved repair shops can repair mobile phones. If you open the phone and try to fix it yourself you will void the warranty of the product.
Accesories and batteries: Only accessories and batteries approved by the producer can be used.
Emergency calls: Make sure the phone is turned on and enabled if you wish to make an emergency call, press the call key and confirm the location, explain what happened and do not close the call.
The battery and charging the battery: It is recommended to fully charge before first use of the device. Do not expose the battery to temperatures above 40 ° C. Do not dispose the battery in fire or drop anywhere. Return defective batteries in special centers or to the supplier center.
Warning: We take no responsibility for situations where the phone is used other than as provided in the manual. Our company reserves the right to make changes in the content of the manual without making this public. These changes will be posted on the company website to the product it amends.
The contents of this manual may be different from that in the product. In this last case will be considered.
FIRST USAGE
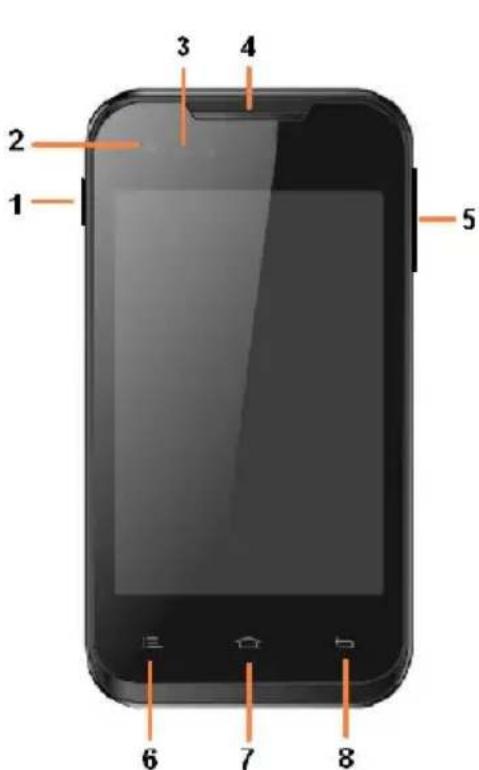
- Power button
2.Front camera - Proximity sensor
- Receiver
5.Volume buttons - Options button
7.Home button - Back button
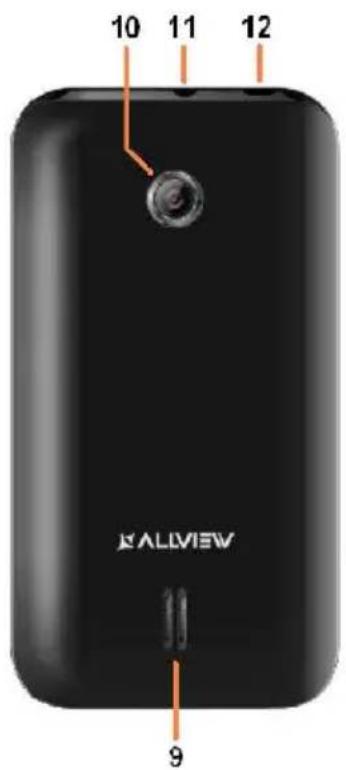
9.Speaker - Back camera
- Earphone jack
- MicroUSB plug
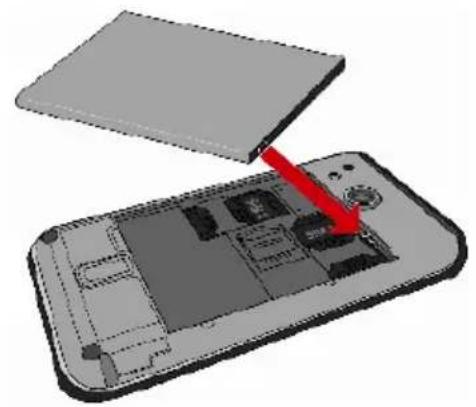
Placing the SIM cards, the memory card and the battery
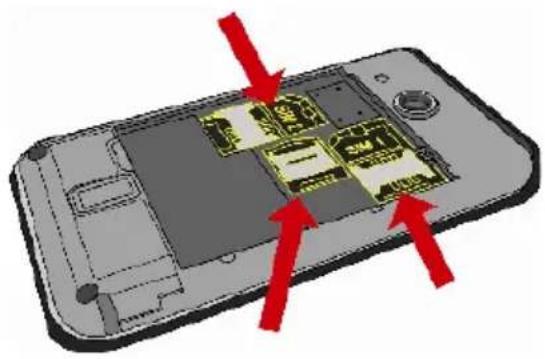
- Place the SIM card and the memory card, as shown in the image bellow:
natural_image
Diagram of a smartphone showing internal circuitry with red arrows pointing to components (no text or symbols)- After placing the SIM cards and the memory card, place the battery as shown below:
natural_image
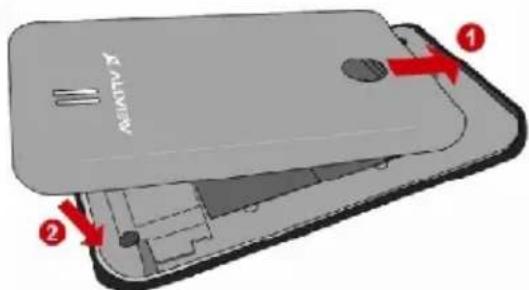
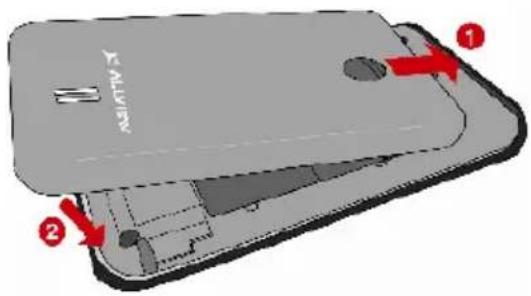
3D illustration of a smartphone showing the internal circuit board and a lid, with a red arrow pointing to the component (no text or symbols present)- The last step is placing the battery cover:
Device power on/off and standby
After inserting the SIM card, memory card and battery, start the phone by holding down the Power button for 3 seconds. To power off, press and hold the same button and confirm. If you press the Power button you will set phone in standby mode, to return shortly press the same button.
Unlocking, idle screen and applications menu
To unlock the screen when resuming from standby, press and hold the lock icon and drag up or down. The main screen will be displayed.
Home screen pages can be customized with shortcuts and widgets. At the top of the screen is placed the notification bar that contains information about the mobile network signal, WiFi, Bluetooth, battery level, time and events.
To display the applications menu, touch the Menu icon in the bottom-right side of the main screen. Slide the screen to left to scroll main menu. Touch the desired application icon to access it. Use the Back button to return to the main screen.
PHONE SETTINGS
To set the phone go to applications menu and touch Settings. The settings menu is organized in 4 categories, such as shown bellow:
A. Communication:
-
Dual SIM settings: manage the GSM and 3G services.
-
Voice call: choose the predefined SIM card to use when making a voice call or to ask before every call;
- Video call: choose the predefined SIM card to use when making a video call (it must be the same with the SIM card chosen for data connection);
- Messaging: choose the predefined SIM card to use when sending text messages or ask before you send;
-
Data connection: enable for a particular SIM card or disable the mobile network data connection.
-
Call settings: particular settings for voice calling, video calling and VoIP.
-
Wireless & networks: settings to manage the mobile networks, WiFi, Bluetooth.
-
Airplane mode: check the box to disable all the wireless connections;
- WiFi: check the box to enable the WiFi network;
- WiFi settings: open the menu to search, connect and disconnect from WiFi networks;
Note! To connect with secured networks you need to type the password;
- WiFi Direct settings;
- Bluetooth: check the box to turn on the Bluetooth connection;
- Bluetooth settings: open the menu to search, connect and disconnect from Bluettoh devices;
- Tethering and portable hotspot: open to set your phone as a portable internet access point; you can share your internet connection by WiFi or USB;
- VPN settings;
- Mobile networks:
- Data rate: count your mobile network data traffic;
- 3G services: enable/disable the 3G connection for a particular SIM or choose the preferred mobile network: GSM/WCDMA or Only WCDMA;
- Access points name: edit the configurations of the access points;
- Network operators.
B. System:
-
Audio profiles: add, delete and edit the audio profiles. You can customize the audio profiles by choosing the ringtone for calls, the notification sound, the volume and vibrations, lockscreen sounds, vibration feedback;
-
Display: set the screen brightness, the screen timeout period, interface animations and screen auto-rotation;
- Language and keyboard: choose the system language and the text input method;
- Date & time: open to set the time and date, the time zone and the display format;
- Schedule power on/off: you can set the device to auto-power-on or auto-power-off on a specified time;
- Schedule airplane on/off: the airplane mode can me be scheduled to enable or disable on a specified time.
C. Application:
1. Applications:
- Unknown sources: check the box to allow installation of applications from other sources than official application market;
- Preferred install location: you can select the SD card, the internal memory or let the system decide;
- Manage applications: view, delete or move the installed applications;
- Running services: you can view the background applications!
- Storage usage: the menu shows a list of all applications installed;
- Battery usage;
2. Accounts & sync
- Background data: check the box to allow applications to send and receive data any time;
- Auto-sync: check the box to allow the data auto-sync;
-
Manage the accounts: add or delete accounts; configure the data sync(contacts, agenda, calendar etc.).
-
Privacy: make a backup or reset to factoy settings of the device.
4. Security:
- Screen lock: set the unlocking method: pattern, PIN, password or disabled;
- SIM card lock: enable/disable Sim card lock;
- Parole: bifati pentru a afisa parolele in timp ce le tastati;
- Device administrators: add or remove device administrators;
- Install from SD card: install encrypted certificates from SD card;
5. Location:
- Use wireless networks: check the box to allow the system to determine your location by WiFi and/or mobile networks;
- Use GPS satellites: check the box to determine the precise location using the GPS receiver;
-
EPO assistance: use GPS assistance data to speed up GPS positioning;
-
A-GPS: use assistant data to speed up the GPS fixing time (additional data costs may occur);
- Storage: view informations about total memory and the used memory of microSD card.
- Voice input & output: settings for voice input;
- About phone: informations about the status and the battery usage, legal informations, phone model and software version.
D. Others:
1. Accessibility
INSTRUMENTS
CONTACTS
Access the Contacts from menu applications. Default will be displayed contacts from your SIM card and phone.
Add new contact:
- Open Contacts from main menu;
- Tap the + symbol from the top-right side of the screen;
- Select the memory where you will store: account or phone entry;
- Enter contact information;
- Finally, tap Done.
Add new contact from call log:
- From the applications menu, open the call log;
- Tap the phone number you want to save;
- Tap New contact button;
- Select the memory where you will store: account or phone entry;
- Enter contact information;
- Finally, tap Done.
Import/export contacts
You can import or export contacts between memories and accounts available, as follows:
- Open Contacts;
- Press the Options button and select Import / Export;
- Choose memory from which to copy contacts;
- Choose in which memory to copy the contacts;
- Select contacts to copy;
- Press the Copy button;
Synchronize contacts with an account
Note: If you don't have an account, you can create one which is also necessary for the Google virtual applications market.
You can synchronize the contacts of an account by following the next steps:
- Open the applications menu -> Settings -> Applications -> Accounts & Sync;
- Touch the desired account; if you don't have allready set, you can add a new one by touching the button Add new account;
- Tick the option Sync contact;
- Tap the button Sync now.
Customize contacts with photo and ringtone
Note: The contacts from SIM card cannot be customized with photo or ringtone.
To add a photo to one contacts follow the steps:
- Open Contacts;
- Touch the desired contact name;
- On the top-right of the screen touch the contact editing symbol;
- In the left corner of the screen touch the symbol to add image;
- Select the input method of image: photo shoot or from gallery.
To assign a specific ringtone to a contact, do the following:
- Open Contacts;
- Touch the desired contact name;
- Press the options button and Options ;
- Tap Ringtone and select the desired ringer.
CALLING
To call a number, from the main screen open the dialer, dial the number and press the call key.
To answer a call drag down the icon, and to reject the call drag the icon up.
You can call numbers directly from Call log, touch the desired phone number and press the call button at the bottom of the screen.
MESSAGING
To create and send an SMS, proceed as follows:
- Open the applications menu;
- Open the Messaging application;
- From the bottom of the screen touch Compose new message;
- Write the message;
Note: You create an MMS by touching the attach symbol and adding media content: images, sound or movies.
- In the top text box add the number or the name of the recipient;
- Tap the arrow -> symbol from the right side of the text box to send the message.
Applications market provides a multitude of applications from various categories: games, business, communication, shopping, travel, entertainment, books, education, finance, photography, tools, media, social, sports, news.
The first time you open the market, you will be prompted to authenticate. If you already have a Google account, enter the data. If not, click the Create button to create a new account and follow the steps on the screen.
SPECIFICATIONS
| General | Language | Romanian, English, German, Spanish, French, Dutch, Russian, Italian etc |
| Network | 2G: 900/1800/1900 MHz Sim1 and Sim23G: UMTS 900/2100 MHz Sim1 and Sim2 | |
| Dual SIM. Dual Stand-by | Yes | |
| DimensiONS | Dimensions | 115*61,5*12,3 mm |
| Weight | 122,7g | |
| Display | Type | TFT-LCD, 3,5", 480x320px |
| Touchscreen | Capacitive touchscreen, multitouch | |
| Characteristics | OS | Android 2.3.6 |
| CPU | Cortex-A9, 1GHz | |
| GPU | PowerVR SGX531 OpenGL ES 2.0 | |
| GPS | Yes | |
| AGPS | Yes | |
| 3G video calling | Yes | |
| Flash memory | 512 MB | |
| RAM memory | 256 MB | |
| External memory | Up to 32GB with microSD card | |
| Sound | 3.5mm jack | Yes |
| Video | Render | HD video formats with 720x576p resolution |
| Camera | Main camera resolution | 2 MP |
| Front camera resolution | 0,3 MP | |
| Video recording | 480p@25fps | |
| Geotagging | Yes | |
| Data | Data | HSDPA, EDGE, GPRS |
| Bluetooth | 4.0 with A2DP and EDR | |
| WLAN | WiFi 802.11 b/g/n | |
| WiFi Direct | Yes | |
| USB | Yes, 2.0 micro USB | |
| Sensors | G-senzor | Yes |
| Proximity sensor | Yes | |
| Light sensor | Yes | |
| Compass | Yes | |
| Internet | Hotspot | WiFi Thetering |
| Battery | Capacity | Li-Polimer 1500 mAh |
| Stand by | Up to 200 hours | |
| Talk time | Up to 300 minutes | |
| Box content | Phone, earphones, data cable, charger, user manual, warranty certificate. | |
DECLARATION OF CONFORMITY
no.1248
We, SC VISUAL FAN SRL, importer located in Brasov, 16 Liliacului STR., registered at the Commerce Chamber Brasov no. J08/818/2002, CUI 14724950, assures, guarantee and declare on our own responsibility, in accordance with art.5 from HG nr. 1.022/2002 regarding the statute of the products and services that can jeopardize life, health, work security and environmental protection, that:
The product A4ALL – mobile phone ALLVIEW brand - and the accessories that came with the product: 220V charger, headphones and battery don't jeopardize life, health, work security and environmental protection and they are according to:
- The Stipulations of HG nr.982/2007 witch transpose the essential requirements specified in Direction 2004/108/CE, regarding electromagnetically compatibility;
- The Direction regarding the low voltage equipment users assurance 73/32/CEE, modified by Direction 93/68/CEE (HG 457/2003) and tests EN 55013:2001+A1:2003+A2:2006, EN 55020:2007, EN 610000-3-2:2006, EN 61000-3-3:1995+A1:2001+A2:2005;
- The Direction regarding the radio and telecommunication equipments R&TTE 1999/5/CE (HG 88/303).
- The safety requirements of the European Directive 2001/95/EC and of EN standards 60065:2002/A12:2011 and EN 60950-1:2006/A12:2011, of the decibels level emitted by the sold devices.
The Product described upstairs in this Declaration and all the accessories are according to the next standards:
- Health EN 50360, EN 50361;
- Safety EN 6095-1;
- EMC EN 301 489-1-7/17;
- Radio spectrum EN 301511 EN 300328;
After the performed tests emerge that the samples comply with the upstairs specification, as the test results show. Documentation is stored on VISUAL FAN LTD - Brasov, 61 Brazilor STR.
Also available on web:"http://allview.ro"
CE 0678 Director
SAR value: 0,600W/kg Gheorghe Cotuna

BIZTONSAG
SIM, memoria kartya es akkumulator behelyezese
natural_image
3D illustration of a smartphone showing the internal components and an open lid, with a red arrow pointing to a component (no text or symbols present)natural_image
Diagram of a smartphone showing internal circuitry with red arrows pointing to components (no text or symbols)natural_image
3D illustration of a smartphone showing the internal circuit board and a lid, with a red arrow pointing to the component (no text or symbols present)natural_image
Diagram of a smartphone showing internal components with red arrows indicating movement or flow (no text or symbols present)natural_image
3D illustration of a smartphone showing the internal circuit board with a red arrow pointing to one panel (no text or symbols present)natural_image
3D illustration of a smartphone showing internal components with a red arrow pointing to one part (no text or symbols present)- ALLVIEW®
- A4ALL
- MASURI DE SIGURANTA
- Pornire/oprire si standby dispozitiv
- Turn off your phone while in an aircraft
- FIRST USAGE
- Placing the SIM cards, the memory card and the battery
- Device power on/off and standby
- Unlocking, idle screen and applications menu
- PHONE SETTINGS
- Communication:
- System:
- Application:
- Applications:
- Accounts & sync
- Security:
- Location:
- Others:
- Accessibility
- INSTRUMENTS
- CONTACTS
- Add new contact:
- Add new contact from call log:
- Import/export contacts
- Synchronize contacts with an account
- Customize contacts with photo and ringtone
- CALLING
- MESSAGING
- DECLARATION OF CONFORMITY
- BIZTONSAG
- SIM, memoria kartya es akkumulator behelyezese
Brand : Allview
Model : A4 All
Category : Smartphone