
BSE12 - Drill Luxor - Free user manual and instructions
Find the device manual for free BSE12 Luxor in PDF.


| Product Type | Cordless Drill |
| Brand | Luxor |
| Model | BSE12 |
| Power Source | Rechargeable Lithium-ion Battery (DC 12V) |
| Battery Capacity | 1.3 Ah (1300 mAh) |
| No-Load Speed | 0 – 550 rpm |
| Chuck Type | Keyless Chuck, 10 mm capacity |
| Torque Settings | 11 positions (1-11) plus drill mode |
| Charger Input | 100-240 V, 50/60 Hz, 22 W |
| Charger Output | DC 13.6 V, 1 A |
| Charging Time | Initial: 7 hours; Standard: 1-2 hours |
| Weight | Approx. 1.1 kg (with battery) |
| Dimensions | Approx. 21 x 6 x 18 cm |
| Variable Speed Trigger | Yes, pressure-sensitive |
| Forward/Reverse Rotation | Yes, with lockable center position |
| Electric Brake | Yes, chuck stops when trigger released |
| LED Work Light | Yes, activates with motor |
| Included Accessories | Screwdriver, Battery, Charger, Double-ended bit (PH2 + S5.5), User Manual |
| Maintenance | Clean with dry cloth or compressed air; keep ventilation slots clean |
| Safety Features | Double insulation, lock switch, overheat protection (battery charger) |
Frequently Asked Questions - BSE12 Luxor
User questions about BSE12 Luxor
0 question about this device. Answer the ones you know or ask your own.
Ask a new question about this device
Download the instructions for your Drill in PDF format for free! Find your manual BSE12 - Luxor and take your electronic device back in hand. On this page are published all the documents necessary for the use of your device. BSE12 by Luxor.
USER MANUAL BSE12 Luxor
☆☆☆☆☆☆☆☆☆☆☆☆☆☆☆☆☆☆☆☆☆☆☆☆☆☆☆☆☆☆☆☆☆☆☆☆☆☆☆☆☆☆☆☆☆☆☆☆☆☆☆☆☆☆☆☆☆☆☆☆☆☆☆☆☆☆☆☆☆☆☆☆☆☆☆☆☆☆☆☆☆☆☆☆☆☆☆☆☆☆☆☆☆☆☆☆☆☆☆☆

natural_image
Luxor electric drill putter with black handle and orange grip against a perforated grid background (no text or symbols visible)INSTRUCTION MANUAL
SVENSKA / NORSK / ENGLISH
INNEHÅLLSFÖRTECKNING / REGISTER / TABLE OF CONTENT
SVENSKA
Safety Instructions....21-25
Parts....26
Operation 27-29
Maintenance 30
Specifications....30
Information 31
SÄKERHETSFÖRESKRIFTER

SÄKERHETSFÖRESKRIFTER FÖR ELVERKTYG
ANVÄNDNING
LADDA BATTERIET:
natural_image
Technical line drawing of a mechanical device with a cylindrical top and base (no text or symbols)LADDNINGSINDIKATOR:
natural_image
Line drawing of a hand holding a device with a double-headed arrow indicating left motion (no text or symbols)ANVÄNDNING
ROTATIONSREGLAGE:
flowchart
graph TD
    A["Circle Node"] --> B["Arrow 1"]
    A --> C["Arrow 2"]
    A --> D["Arrow 3"]

Medurs
Waste of Electrical and Electronic Equipment (WEEE)
- WEEE-direktivet 2012/19/EU
BRUK
LADE BATTERIPAKKEN:
natural_image
Technical line drawing of a mechanical device with no visible text or symbolsLADEINDIKATOR:
natural_image
Line drawing of a hand holding a device with a double-headed arrow indicating left motion (no text or symbols)BRYTERNE:
VEDLIKEHOLD SPESIFIKASJONER
Waste of Electrical and Electronic Equipment (WEEE)
- WEEE-direktivet 2012/19/EU
WARNING: Read all safety warnings
and all instructions. Failure to follow the warnings and instructions may result in electric shock, fire and/or serious injury.
Save all warnings and instructions for future reference.
The term "power tool" in the warnings refers to your mains-operated (corded) power tool or battery-operated (cordless) power tool.
WORK AREA SAFETY
- Keep work area clean and well lit. Cluttered or dark areas invite accidents.
- Do not operate power tools in explosive atmospheres, such as in the presence of flammable liquids, gases or dust. Power tools create sparks which may ignite the dust or fumes.
- Keep children and bystanders away while operating a power tool. Distractions can cause you to lose control.
ELECTRICAL SAFETY
- Power tool plugs must match the outlet. Never modify the plug in any way. Do not use any adapter plugs with earthed (grounded) power tools. Unmodified plugs and matching outlets will reduce risk of electric shock.
- Avoid body contact with earthed or grounded surfaces, such as pipes, radiators, ranges and refrigerators. There is an increased risk of electric shock if your body is earthed or grounded.
- Do not expose power tools to rain or wet conditions. Water entering a power tool will increase the risk of electric shock.
- Do not abuse the cord. Never use the cord for carrying, pulling or unplugging the power tool. Keep cord away from heat, oil, sharp edges or moving parts. Damaged or entangled cords increase the risk of electric shock.
- When operating a power tool outdoors, use an extension cord suitable for outdoor use. Use of a cord suitable for outdoor use reduces the risk of electric shock.
- If operating a power tool in a damp location is unavoidable, use a residual current device (RCD)
protected supply. Use of an RCD reduces the risk of electric shock.
NOTE: The term residual current device (RCD) may be replaced by the term ground fault circuit Interrupter (GFCI) or earth leakage circuit breaker (ELCB).
PERSONAL SAFETY
- Stay alert, watch what you are doing and use common sense when operating a power tool. Do not use a power tool while you are tired or under the influence of drugs, alcohol or medication.
A moment of inattention while operating power tools may result in serious personal injury.
- Use personal protective equipment. Always wear eye protection. Protective equipment such as dust mask, non-skid safety shoes, hard hat, or hearing protection used for appropriate conditions will reduce personal injuries.
- Prevent unintentional starting. Ensure the switch is in the OFF-position before connecting to power source and/or battery pack, picking up or carrying the tool. Carrying power tools with your finger on the switch or energizing power tools that have the switch on invites accidents.
- Remove any adjusting key or wrench before turning the power tool on. A wrench or a key left attached to a rotating part of the power tool may result in personal injury.
- Do not overreach. Keep proper footing and balance at all times. This enables better control of the power tool in unexpected situations.
- Dress properly. Do not wear loose clothing or jewellery. Keep your hair, clothing and gloves away from moving parts. Loose clothes, jewellery or long hair can be caught in moving parts.
- If devices are provided for the connection of dust extraction and collection facilities, ensure these are connected and properly used. Use of dust collection can reduce dust-related hazards.
POWER TOOL USE AND CARE
- Do not force the power tool. Use the correct power tool for your application. The correct power tool will do the job better and safer at the rate for which it was designed.
- Do not use the power tool if the switch does not turn it on and off. Any power tool that cannot be controlled with the switch is dangerous and must be repaired.
- Disconnect the plug from the power source and/
or the battery pack from the power tool before making any adjustments, changing accessories, or storing power tools. Such preventive safety measures reduce the risk of starting the power tool accidentally.
- Store idle power tools out of the reach of children and do not allow persons unfamiliar with the power tool or these instructions to operate the power tool. Power tools are dangerous in the hands of untrained users.
- Maintain power tools. Check for misalignment or binding of moving parts, breakage of parts and any other condition that may affect the power tools operation. If damaged, have the power tool repaired before use. Many accidents are caused by poorly maintained power tools.
- Keep cutting tools sharp and clean. Properly maintained cutting tools with sharp cutting edges are less likely to bind and are easier to control.
- Use the power tool, accessories and tool bits etc. in accordance with these instructions, taking into account the working conditions and the work to be performed. Use of the power tool for operations different from those intended could result in a hazardous situation.
BATTERY TOOL USE AND CARE
- Recharge only with the charger specified by the manufacturer. A charger that is suitable for one type of battery pack may create a risk of fire when used with another battery pack.
- Use power tools only with specifically designated battery packs. Use of any other battery packs may create a risk of injury and fire.
- When battery pack is not in use, keep it away from other metal objects, like paper clips, coins, keys, nails, screws or other small metal objects, that can make a connection from one terminal to another. Shorting the battery terminals together may cause burns or a fire.
- Under abusive conditions, liquid may be ejected from the battery; avoid contact. If contact accidentally occurs, flush with water. If liquid contacts eyes, additionally seek medical help. Liquid ejected from the battery may cause irritation or burns.
SERVICE
- Have your power tool serviced by a qualified repair person using only identical replacement parts. This will ensure that the safety of the power tool is maintained.
ADDITIONAL SAFETY INSTRUCTIONS FOR BATTERIES AND CHARGERS
Batteries
- Never attempt to open for any reason.
- Do not store in locations where the temperature may exceed 40°C.
- Charge only at ambient temperatures between 4°C and 40°C.
- Charge only using the charger provided with the tool.
- When disposing of batteries, follow the instructions given in the section "ENVIRONMENT" at the end of each language in this manual.
- Do not cause short circuits. If connection is made between the positive (+) and negative (-) terminal directly or via accidental contact with metallic objects, the battery is short circuited and an intense current will flow causing heat generation which may lead to casing rupture or fire.
-
Do not heat. If batteries are heated to above 100°C, sealing and insulating separators and other polymer components may be damaged resulting in electrolyte leakage and/or internal short circuiting leading to heat generation causing rupture or fire. Moreover do not dispose of the batteries in fire, explosion and/or intense burning may result.
-
Under extreme conditions, battery leakage may occur. When you notice liquid on the battery, proceed as follows:
Carefully wipe the liquid off using a cloth. Avoid skin contact. - In case of skin or eye contact, follow the instructions below:
Immediately rinse with water. Neutralize with a mild acid such as lemon juice or vinegar.
In case of eye contact, rinse abundantly with clean water for at least 10 minutes. Consult a physician.

Fire hazard! Avoid short-circuiting the s of a detached battery. Do not te the battery.
Chargers
- Use the charger provided with the tool only to charge the battery.
- Never attempt to charge non-rechargeable batteries.
- Have defective cords replaced immediately.
- Do not expose to water.
- Do not open the charger.
- Do not probe the charger.
- The charger is intended for indoor use only.
SAFETY INSTRUCTIONS
Risk of injury
Do not rivet or screw any nameplates or nights onto the power tool. The protective insulation can thereby be rendered ineffective. Adhesive labels are recommended. Only use an undamaged plug and cable. Do not treat any materials that produce any particles that are detrimental to health (e.g. asbestos).

Damage to property/material
voltage must correspond with the
specifications on the power tool.
Only use original accessories.
PERSONAL PROTECTIVE EQUIPMENT
- When using this power tool, wear the following protective items: Protective glasses, ear protection, breathing mask.
USAGE INSTRUCTIONS:
- Hold the tool by its insulated rubber surfaces.
- Never place your hand near the rotating accessory.
- Never use broken bits.
- Never re-start the tool in a hole in the material.
• Support the material.
- Always make sure that the tool is switched off and unplugged before attempting to perform inspection or maintenance.
EXPLANATION OF SYMBOLS
 | To reduce the risk of injury, user must read the instruction manual. |
 | Always use protective glasses. |
 | Always use ear protection. |
 | Ambient temperature must be max. 40°C. |
 | Double insulation (only for charger). |
 | Only use indoors. |
 | Do not throw into water. |
 | Do not throw into fire. |
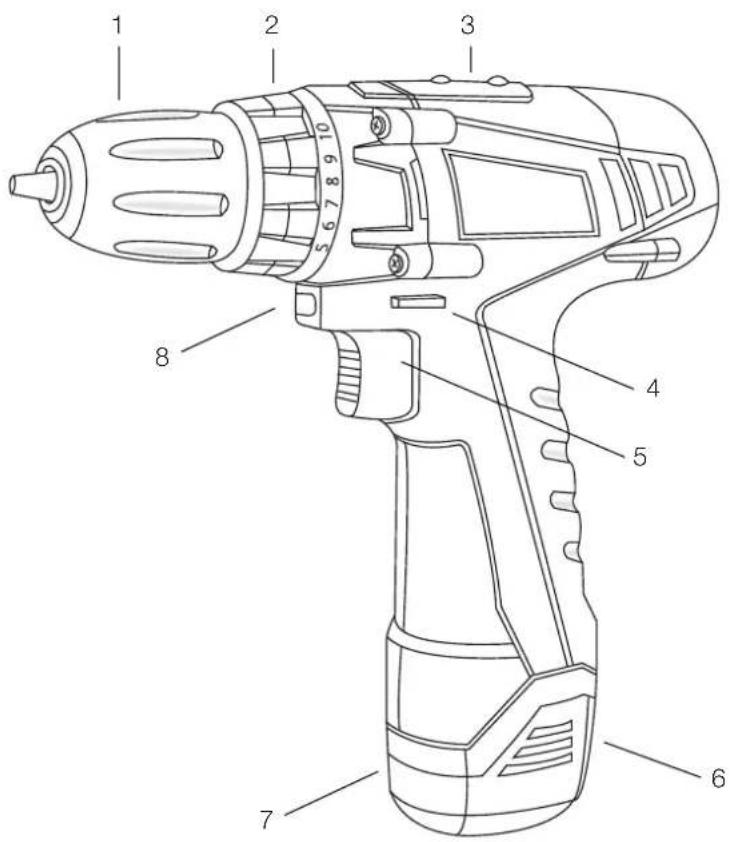
PARTS
- Keyless chuck
- Torque setting (1-11)
- Level bubble
- Direction of rotation
- ON/OFF switch trigger
- Release latch for battery pack
- Battery pack
- LED light
OPERATION
CHARGING THE BATTERY PACK:
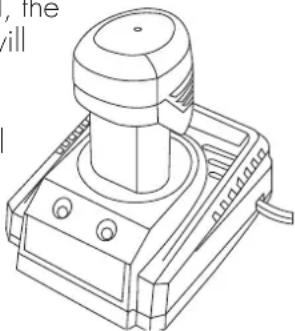
- Place the battery pack into the charger as indicated.
- When properly connected, the red light and green light will be lighted.
- Let the tool charge initially for 7 hours. After the initial charge, under normal usage, your tool should be fully charged in 1 to 2 hours.
- The battery pack will become slightly warm to the touch while charging, this is normal and does not indicate a problem.
natural_image
Technical line drawing of a mechanical device with a cylindrical top and base (no text or symbols)CHARGING INDICATOR:
- When the charger is plugged in, the green light will light up. When the battery is properly connected in the charger the green light will extinguish and the red light will light up. When the battery is loaded, the red light is extinguished and the green light will light up again.
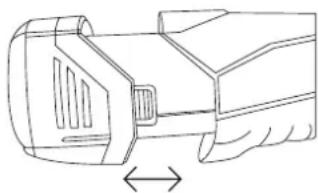
REMOVAL/INSERTION OF BATTERY:
- Make sure the tool is turned off.
- Hold the drill with one hand and the battery pack with the other. Press the release latches to release the battery.
SWITCHES:
- This tool is started and stopped by pressing and releasing the ON/OFF switch trigger.
- This tool is equipped with an electric brake, when the ON/OFF switch is released completely the chuck stops immediately.
LOCK SWITCH:
- To lock the switch trigger, place the Direction of rotation selector in the center position.
natural_image
Line drawing of a hand holding a device with a double-headed arrow indicating rotation (no text or symbols)OPERATION
ROTATION SWITCH:
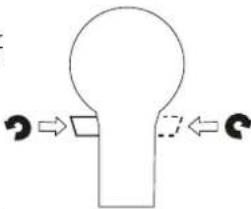
- Direction of rotation is controlled by the Direction of rotation selector (4) located above the switch trigger.
flowchart
graph TD
    A["Circle Node"] --> B["Arrow 1"]
    A --> C["Arrow 2"]
    A -.-> D["Arrow 3"]
    D -.-> E["Arrow 4"]
• To select forward rotation, release the ON/OFF switch and push the forward/reverse lever to right side of the tool.

Clockwise rotation
- To select reverse rotation, push the lever to left side of the tool. When the selector is in center position, the switch trigger is locked and the machine cannot be switched on.

Anticlockwise rotation
VARIABLE SPEED:
- The speed is controlled by the amount of switch trigger depression.
INSTALLING AND REMOVING A BIT AND A DRILL:
- Hold the tool firmly with one hand.
- Turn the chuck ring clockwise with the other hand until the chuck opening is large enough for the bit/drill.
- Insert the drill or the screwdriver bit into the drill chuck.
- Turn the chuck ring anticlockwise until the tool is clamped tightly.
- Remove the tool in the opposite way.
ADJUSTING THE TORQUE:
- The torque is adjusted by rotating the Torque Setting Ring. The torque is higher when the torque setting is set on a higher number. The torque is lower when the torque setting is set on a low number. 1 is the lowest and "a" is the highest.
LED WORK LIGHT:
- The LED light will start when the motor is running. Press the ON/OFF switch lightly to get the motor running and turn on the LED light.
OPERATION
DRILLING:
- Before you start drilling, the torque setting should be set on the drill position "2".
- When drilling a hard and smooth surface, use a center punch to mark the desired hole location. This will prevent the drill bit from slipping off center as the hole is started.
- Hold the tool firmly and place the tip of the drill or bit into the work piece, applying only enough pressure to keep the bit cutting.
- Do not force or apply side pressure to extend the hole.
WOOD DRILLING:
- To maximize the performance, use high speed steel bits for wood drilling.
- Begin the drilling at a very slow speed to prevent the bit from slipping off. Increase the speed as the bit bites into the material.
METAL DRILLING:
- To maximize the performance, use the high speed bits for metal or steel drilling.
- Mark the location of the hole on the metal.
- Begin the drilling at a very slow speed to prevent the bit from slipping off. Increase the speed as the bit bites into the material.
MAINTENANCE SPECIFICATIONS
- The tool can be cleaned by wiping its exterior parts with a dry cloth.
- Filings and dust can be removed using compressed air.
- Do not use water for cleaning.
- Ensure the ventilation slots are free of dust and dirt.
- Never use corrosive or abrasive detergents, as they may distort the plastic parts of the machine.
| Battery DC 12V, 1 | 300mAh, Li-ion |
| No-load speed 0~ | 550 /min |
| Chuck 10 mm | |
| Charger input 100 | -240V, 50/60Hz, 22W |
| Charger output DC | 13.6V, 1A |
| Charging time 1 hours |
BOX CONTENT
- Screwdriver
- Battery
- Battery charger
- Two head bit (PH2 + S5.5)
- User manual
ENVIRONMENT
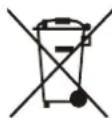
Waste of Electrical and Electronic Equipment (WEEE) - WEEE Directive 2012/19/EU
This symbol on the product or in the instructions means that the electrical and electronic equipment must be disposed of separately from other household waste when it does not work anymore. The EU has separate waste collection systems, contact your local dealer or authority for more information.
Batteries must be disposed of in special containers for battery disposal. They must not be disposed of as household waste.
LAW AND SAFETY
This product has been manufactured according to current regulations for electromagnetic fields (EMF), which means that it is safe to use if used according to safety instructions.
The product is manufactured according to current regulations within the EU legislation, limiting the use of hazardous substances in electrical and electronic equipment (RoHS Directive 2011/65/EU).
RESERVATIONS
We reserve the right to correct any typographical errors, and reserve the right to make ongoing changes and improvements to the product and related materials.


Li-ion


- INSTRUCTION MANUAL
- INNEHÅLLSFÖRTECKNING / REGISTER / TABLE OF CONTENT
- SVENSKA
- SÄKERHETSFÖRESKRIFTER
- SÄKERHETSFÖRESKRIFTER FÖR ELVERKTYG
- ANVÄNDNING
- LADDA BATTERIET:
- LADDNINGSINDIKATOR:
- ROTATIONSREGLAGE:
- BRUK
- LADE BATTERIPAKKEN:
- LADEINDIKATOR:
- BRYTERNE:
- VEDLIKEHOLD SPESIFIKASJONER
- WORK AREA SAFETY
- ELECTRICAL SAFETY
- PERSONAL SAFETY
- POWER TOOL USE AND CARE
- BATTERY TOOL USE AND CARE
- SERVICE
- ADDITIONAL SAFETY INSTRUCTIONS FOR BATTERIES AND CHARGERS
- Batteries
- Chargers
- SAFETY INSTRUCTIONS
- Risk of injury
- Damage to property/material
- PERSONAL PROTECTIVE EQUIPMENT
- USAGE INSTRUCTIONS:
- EXPLANATION OF SYMBOLS
- PARTS
- OPERATION
- CHARGING THE BATTERY PACK:
- CHARGING INDICATOR:
- REMOVAL/INSERTION OF BATTERY:
- SWITCHES:
- LOCK SWITCH:
- ROTATION SWITCH:
- VARIABLE SPEED:
- INSTALLING AND REMOVING A BIT AND A DRILL:
- ADJUSTING THE TORQUE:
- LED WORK LIGHT:
- DRILLING:
- WOOD DRILLING:
- METAL DRILLING:
- MAINTENANCE SPECIFICATIONS
- BOX CONTENT
- ENVIRONMENT
- LAW AND SAFETY
- RESERVATIONS
Brand : Luxor
Model : BSE12
Category : Drill