Mansion - Tent Zempire - Free user manual and instructions
Find the device manual for free Mansion Zempire in PDF.


User questions about Mansion Zempire
0 question about this device. Answer the ones you know or ask your own.
Ask a new question about this device
Download the instructions for your Tent in PDF format for free! Find your manual Mansion - Zempire and take your electronic device back in hand. On this page are published all the documents necessary for the use of your device. Mansion by Zempire.
USER MANUAL Mansion Zempire
1) Open up all windows and close all doors.
2) Remove the RED awning poles
3) Remove the YELLOW Support poles.
4) Remove the BLACK Ridge poles.
5) Remove the BLUE & GREEN Eve poles.
6) Remove all pegs, clean and place in peg bag.
7) Lay tent as flat as possible and fold the awning over main body of the tent.
8) Fold both sides into the centre of the tent
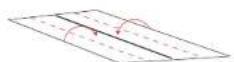
9) Fold in half. Ensure the width is the same as the length of your carry bag. Adjust if necessary.
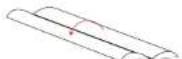
10) Expel as much air as possible by walking down the tent towards the door
11) Roll the tent from the rear towards the door. Ensure that you wipe off any condensation and dirt as you roll.
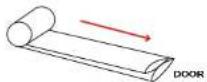
Freedom zempire
Freedom Zempire is proud to be a 100% owned and operated business.
For more information about this and other great products we offer please visit our website.
WWW.FREEDOMCAMPING.COM

text_image
Freedom zempire Mansion polycraftschaften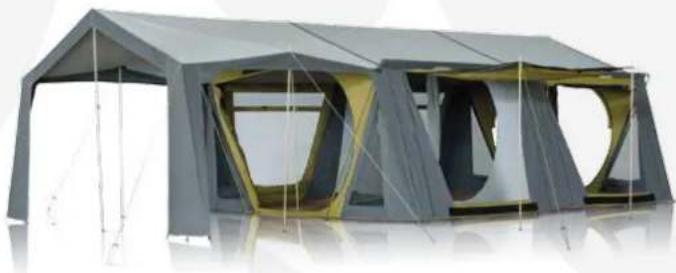
natural_image
Exterior view of a modern architectural structure with geometric cutouts and ventilation grilles (no text or symbols visible)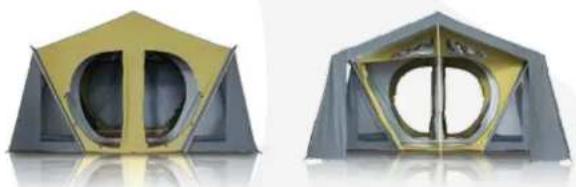
natural_image
Two identical 3D geometric models of a tent-like structure with internal circular cutouts, shown from different angles (no text or symbols)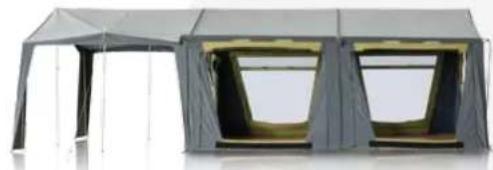
natural_image
Exterior view of a modern tent structure with two windows and a flat roof (no text or symbols visible)PITCHING INSTRUCTIONS - MANSION
flowchart
graph TD
    subgraph Left_Chromen_0
        A1 --> A2
        A1 --> A3
        A1 --> A4
        A1 --> A5
        A1 --> A6
        A1 --> A7
    end

    subgraph Right_Chromen_1
        R1 --> E1
        R1 --> E2
        R1 --> E3
        R1 --> E4
        R1 --> E5
        R1 --> E6
        R1 --> E7
        R2 --> E1
        R2 --> E2
        R2 --> E3
        R2 --> E4
        R2 --> E5
        R3 --> E1
        R3 --> E2
        R3 --> E3
        R3 --> E4
        R3 --> E5
        R4 --> E1
        R4 --> E2
        R4 --> E3
        R4 --> E4
        R4 --> E5
        R5 --> E1
        R5 --> E2
        R5 --> E3
        R5 --> E4
        R5 --> E5
        R6 --> E1
        R6 --> E2
        R6 --> E3
        R6 --> E4
        R6 --> E5
        R7 --> E1
        R7 --> E2
        R7 --> E3
        R7 --> E4
        R7 --> E5
        S1 --> EA
        S2 --> EA
        S3 --> EA
        S4 --> EA
        S5 --> EA
        S6 --> EA
        S7 --> EA
    end

    style Left_Chromen_0 fill:#f9f,stroke:#333
    style Right_Chromen_1 fill:#bbf,stroke:#333
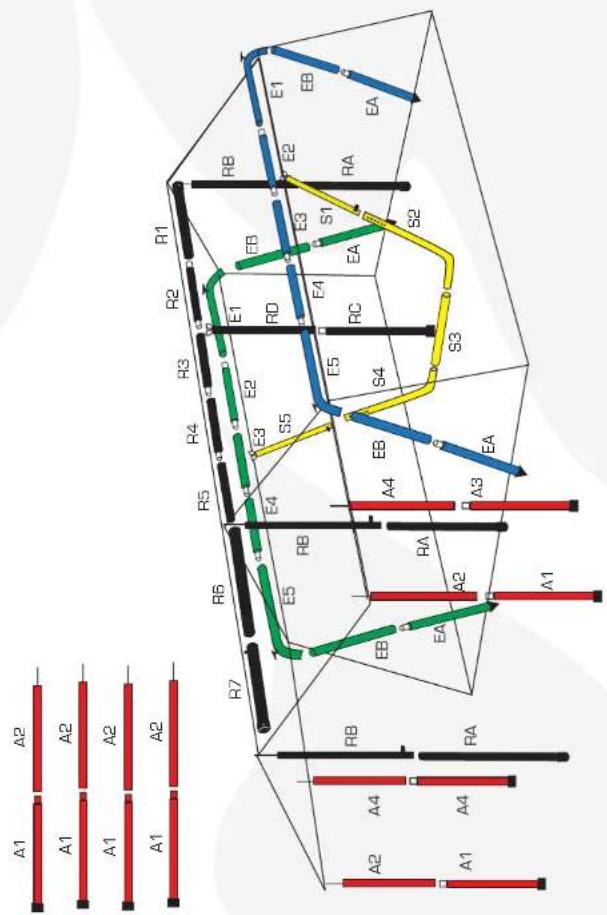
POLE CHART
Ridge Pole (BLACK)
Line 1 - R1, R2, R3, R4, R5
Line 2 - R6, R7,
Line 3 - RA, RB
Line 3 - RA, RB
Line 3 - RA, RB
Line 4 - RC, RD
LH Eve Pole (GREEN)
Line 1 - E1, E2, E3, E4.
Line 2 - E5
Line 3 - EA, EB
Line 4 - EA, EB
RH Eve Pole (BLUE)
Line 1 - E1 , E2, E3, E4,
Line 2 - E5
Line 3 - EA, EB
Line 4 - EA, EB
Support Pole (YELLOW)
Line 1 - S2, S3, S4
Line 2 - S1
Line 3 - S5
Awning Pole (RED)
Line 1 - A1, A2
Line 2 - A1, A2
Line 3 - A3, A4
Line 4 - A3, A4
Side Awning Poles (RED)
Line 1 - A1, A2
Line 2 - A1, A2
Line 3 - A1, A2
Line 4 - A1, A2
Pegs 52
Rock Stakes 4
Spike Washers 7
Pole Feet 3
Guy Rope 4m 2
Guy Rope 3m 6
WEATHERING YOUR TENT
When you first get your new tent you will need to weather it. This is a process of soaking the fabric to ensure that all the thread swells up filling stitch holes and creating a watertight surface.
When you pitch your tent for the first time soak the fabric with a garden hose until the fabric looks visibly damp. Allow to dry and repeat for two or three times.
Your tent will get more watertight the more you use it. Do not be concerned if you have a small amount of water coming through the seams on the first few times you get heavy rain.
NATURAL FIBRE
Freedom Canvas is made of a combination of Natural Cotton for breathability and water fastness and Polyester for strength.
Please note that as Cotton is a natural fibre you will notice variances of both colour and thickness of the thread. This is normal and is a characteristic of a natural and breathable fibre.
FIRE RETARDANT
Freedom Canvas Tents are treated with a fire retardant solution. While this significantly reduces the risk of the fabric catching in fire, it is by no means fireproof. Ensure open flames are kept well away from your tent at all limes.
1) Clear your site making sure there are no sharp objects. Try to choose a site that is flat and clear.
2) Sort the poles into their matching colour. Once sorted, connect each colour pole length together as per the pole chart.
3) Spread your tent out with floor facing down. The front is the end with the large awning roof attached.
4) Using the Gold Rock Stakes, peg out the four corners of the tent. Pull the floor as tight as possible. To ensure the floor sits flat if may be easier to peg in the following Sequence. Pegs should be at a 45^ angle away from the tent for greatest hold.
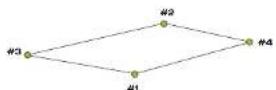
5) Peg out the remaining peg points ensuring the floor sits flat.
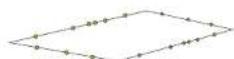
6) Open all doors and windows. This allows air to enter the lent and makes pitching easier
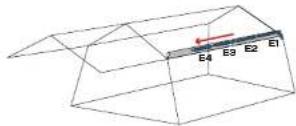
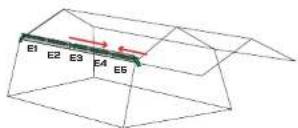
7) Thread the BLUE poles (E1 to E4) through the pole sleeve that runs along the RHS of the tent. Thread the poles from the rear of the tent inserting the pole through the Black webbing loop before threading through the pole sleeve.
8) At the front of the tent thread the BLUE E5 pole up through the pole sock on the side of the front awning from the inside to the outside. Thread through the Black webbing loop before inserting into the pole sleeve and connecting to the E4 pole.
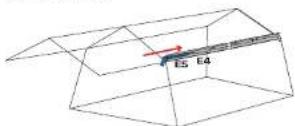
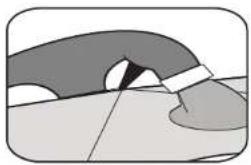
9) Cover the pole by wrapping the end of the pole sleeve over the pole sock and attach the Velcro.
natural_image
Abstract diagram with curved and angular shapes, no text or symbols present10) Repeat with the GREEN pole
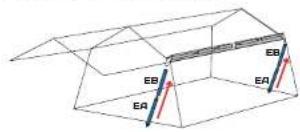
11) Insert the remaining BLUE EA and EB poles into the end of each section and raise the pole so that the outside wall sits taught. You will need two people to do this.
text_image
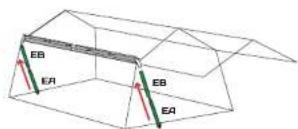
EB EA EB EA12) Repeal with the GREEN EA and EB poles.
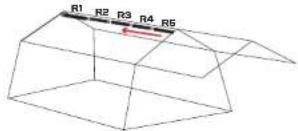
13) Thread the BLACK R1 to R5 poles inside the tent by threading through the pole sock at the top of the Front wall and opening at the top of centre dividing wall.
text_image
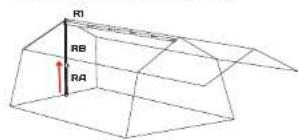
R1 R2 R3 R4 R514) Insert the BLACK RB/RA pole into the hole at the end of the R1 pole and then through the eyelet at the rear of the roof and extend until the wall sits tight and close the flip lock. Attach the Veicro strips on the rear wall.
text_image
R0 RB RA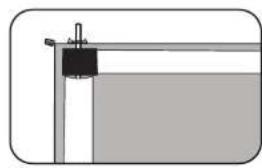
natural_image
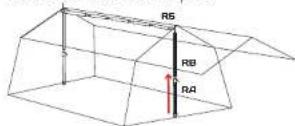
Simple line drawing of a mechanical assembly or structural component (no text or symbols)15) Repeat with the second BLACK RA/RB pole at the front of the tent. Thread the RB pole through the outermost of the 3 holes on the BLACK R5 pole. If the roof is too tight move back one hole before threading through the eyelet in the roof. Ensure the end of the BLACK R5 pole extends out the pocket on the front wall. Attached the Velcro strips on the front wall around the pole
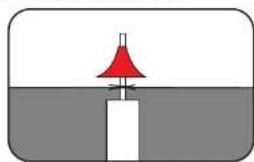
16) Place white "Witch Hat" washers onto pole spikes of bothe RB poles to prevent water running down during heavy rain.
natural_image
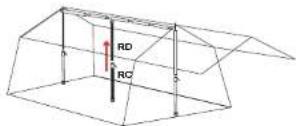
Simple diagram of a red lamp above a white rectangular block, with no text or symbols present.17) Connect the C Clip at the top of the BLACK RC/RD pole to the BLACK ridge pole directly behind the centre dividing wall and extend until the wall is taught. Close the fliplock. Attach the Velcro strips on the Dividing wall around the pole.
Freedom zempire Mansion
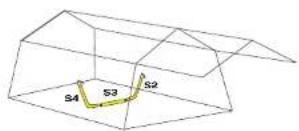
18) Place the YELLOW pole sections S2 to S4 behind the centre dividing wall.
text_image
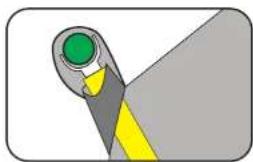
S2 S3 S419) Insert open end of the YELLOW SI pole through the pole sock half way along the RH outside wall. Attach the C Clip to the BLUE eve pole and lift the pole sock so it sits under the pole sleeve
Repeat with the YELLOW S5 pole attaching to the GREEN eve pole.

natural_image
Simple diagram of a mechanical component with green and yellow parts, no text or symbols present20) Insert the YELLOW S1 pole into the end of the S2 pole. Repeat with S5 into S4. Extend both sides and close the fliplocks.
21) Insert BLACK R6 / R7 pole into the end of the R5 pole that extends through the pole sock at the front of the tent.
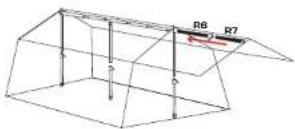
22) Insert the BLACK RB/RA pole into the hole at the end of the BLACK R7 pole and then through the eyelet at the end of the awning. Extend and close the Flip Lock.
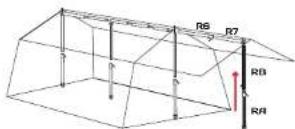
23) Extend the BLACK R6/R7 pole until the awning is tight. Close the Flip Lock. You may need to lower the pole by moving the support poles to the side.
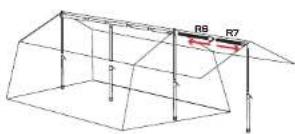
text_image
R8 R724) Insert the RED A1/A2 poles into the eyelets at the front corners of the awning.
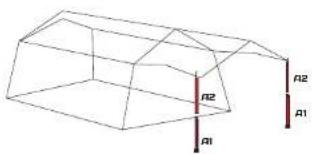
natural_image
3D wireframe diagram of a geometric structure with labeled points A1, A2, and A3 (no text or symbols beyond labels)25) Guy out the front awning by attaching the short guy ropes over top of awning pole spikes. Line up the guy rope with the pole spike and the top ridgepole spike (indicated by the -- Line). Ensure the guy rope is at a 45° angle and pegs are also inserted at a 45° angle.
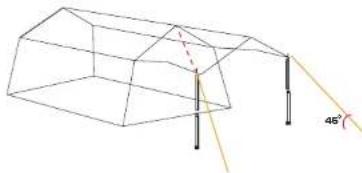
natural_image
3D wireframe diagram of a geometric structure with labeled angle 48° (no text or symbols beyond measurement annotation)26) Insert the longer RED A3/A4 pole into centre of the side of the awning. Guy out at a 45^ angle with the longer guy rope sections.

text_image
A4 A3 A4 A3 46°27) Peg out front valance, the bottom of the valance should sit level with the ground. The outside of the valance should align with the outside of the lenl. The inside of the valance should be vertical.
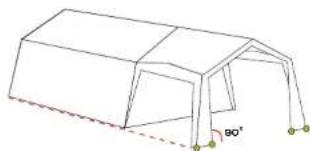
natural_image
Line drawing of a simple 3D structure resembling a tent or enclosure with supports and a marked angle (80°), no text or symbols present.28) Place rubber pole feet under support pole (BLACK RA & RC)
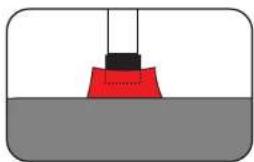
natural_image
Simple diagram of a red object partially submerged in a gray liquid, with no text or symbols present.CARING FOR YOUR TENT
- Never store your tent wet.
- If you must pack your tent down while still wet, hang to dry as soon as possible to prevent mildew damage.
- Remove dirt, tree sap, and bird droppings with a soft brush and warm water before packing down.
- Do not use detergents to clean your tent. This will damage the waterproofing of the tent fabric.
- When rolling up your tent ensure there is no condensation on the floor.
- If you do get mildew forming on your tent, remove the pours with warm water and a soft brush to prevent further growth.
- It is not advisable to re-coat your canvas as a precautionary measure. This will reduce the breathability and durability of your tent. Freedom Canvases are pre-coated and will stay waterproof and breathable for many years.
- When Storing your tent over the winter, do not store directly on concrete floors.