NAV-PNV 43 EU - Gps A-Rival - Free user manual and instructions
Find the device manual for free NAV-PNV 43 EU A-Rival in PDF.


User questions about NAV-PNV 43 EU A-Rival
0 question about this device. Answer the ones you know or ask your own.
Ask a new question about this device
Download the instructions for your Gps in PDF format for free! Find your manual NAV-PNV 43 EU - A-Rival and take your electronic device back in hand. On this page are published all the documents necessary for the use of your device. NAV-PNV 43 EU by A-Rival.
USER MANUAL NAV-PNV 43 EU A-Rival
2.2 Navigation....11
2.3 Empfang....11
Kapitel III – GPS Info....12
3.1 Funktionen 12
English Version....23
text_image
Technical diagram of a device with labeled parts, showing exploded and assembled viewsFirst Service Center
Kleine Düwelstr. 21
DE-30171 Hannover
User's Manual Hardware
Thank you for buying the a-rival navigation system.
Good choice. We wish you a lot of fun and congestion-free kilometres with your new a-rival navigation system. In the worst case we will help you.
For technical questions and / or problems, please contact us by phone at +49 (0)511 / 123 83 506 or via E-Mail to
support@first-servicecenter.de
If you need additional accessories, e.g. a 220V power supply and / or a bag? Please order via our website www.a-rival.de
Manuals for other languages can be downloaded also on www.a-rival.de
Updates and additional maps, you can also order over our website www.a-rival.de
Thanks for using a navigation system of a-rival!
● a-rival reserves the rights of final interpretation of the manual.
- The product is subject to change without notice. Please accept our apology for your inconvenience.
- Please back up your information in the GPS navigator. a-rival assumes no responsibility for any loss caused by material loss.
- The manual might contain a few mistakes though it has been checked. If any mistake is found, please contact the a-rival customer service center. Please read the instructions in this manual and use only accessories of a-rival to avoid unpredicted damage. Failure to follow the instructions will invalidate warranty and might endanger personnel safety, for which a-rival assumes no responsibility.
- Data of navigation electronic maps might be inconsistent with actual traffic signals due to transportation development. Please follow traffic regulations and signs and drive according to road situation. Operating the GPS navigator device while driving might cause serious accidents. a-rival assumes no responsibility for accidents and loss due to improper use.
- For information of software update and upgrade, please go to our website www.a-rival.de.
● The pictures in the manual are subject to the material object.
In case that your navigation-system contains a built-in TMC-receiver for reception of traffic-information, it's antenna is integrated into the car-charger-cable. For correct reception of traffic-information the car-charger needs to be connected to the USB-port of the navigation-system!
- For your own safety, do not operate the controls of the product while driving.
- Use this product prudently. The product is intended to be used only as a
- navigation aid. It is not for precise measurement of direction, distance,
- location or topography.
- The calculated route is for reference only. It is the user's responsibility to follow the traffic signs and local regulations along the roads.
- When you get off the car, do not leave your device on the dashboard that is subject to direct sunlight. The overheating of the battery can cause malfunction and/or danger.
- GPS is operated by the United States government, which is solely responsible for the performance of GPS. Any change to the GPS system can affect the accuracy of all GPS equipments.
• GPS satellite signals cannot pass through solid materials (except glass). - When you are inside a tunnel or building, GPS positioning is not available.
- A minimum of 4 GPS satellite signals is needed to determine current GPS position. Signal reception can be affected by situations such as bad weather or dense overhead obstacles (e.g. trees and tall buildings).
- Other wireless devices in the vehicle might interfere with the reception of satellite signals and cause the reception to be unstable.
- A car holder is needed when using the device in a car. Be sure to place the device in an appropriate place, so as not to obstruct the driver's view.
Content
Welcome / Read me....27
Chapter I Beginning Use 28
1.1 Appearance....28
1.2 Power Supply & Charging....29
1.3 Basic Use....30
1.4 System Main Interface and Major Functions....32
Chapter II GPS....33
2.1 Map....33
2.2 Navigation....33
2.3 Reception....33
Chapter III Photo Browser....34
3.1 Features....34
3.2 Interface and Operation....34
Chapter IV System Settings....34
4.2 Volume....36
4.3 Backlight....37
4.4 Date& Time....38
4.5 Language....39
4.6 System info....39
Chapter V Troubleshooting....43
Declaration of conformity....43
Guarantee / User information – Contact....44
Welcome
Thanks for using the a-rival PNV-43 navigation system. With navigation as the major function, it supports audio play, video play, photo browsing and e-book reading.
√ SiRF Atlas-V, dual-core CPU with high performance and low power consumption
√ Friendly user interface for simple operation
√ Power management for longer and more stable operation
√ Data transmission with computers via Mini USB
√ Quality reception for accurate positioning and satisfactory navigation service
√ Leisure partner with audio/video amusement functions
You may use the GPS navigator anytime anywhere, for example while driving, walking or cycling. Its navigation and amusement functions will enrich your life and work!
To fully exert the functions of the a-rival PNV-43 navigation system and to understand the operation details, please read the manual carefully.
You may see the following supplemental information in the manual.
[Note]: Explanation of relevant subjects
[Relevant Information]: Extra information of relevant subjects
[Attention]: Precautions or warnings of relevant subjects. Please pay attention to this information and follow the instructions to avoid devastating influence on yourself and others.
[*]: Optional function
This manual is applicable only to the a-rival PNV-43 navigation system.
Chapter I Beginning Use
This chapter introduces the appearance, components and basic operations of the a-rival PNV-43 navigation system.
1.1 Appearance
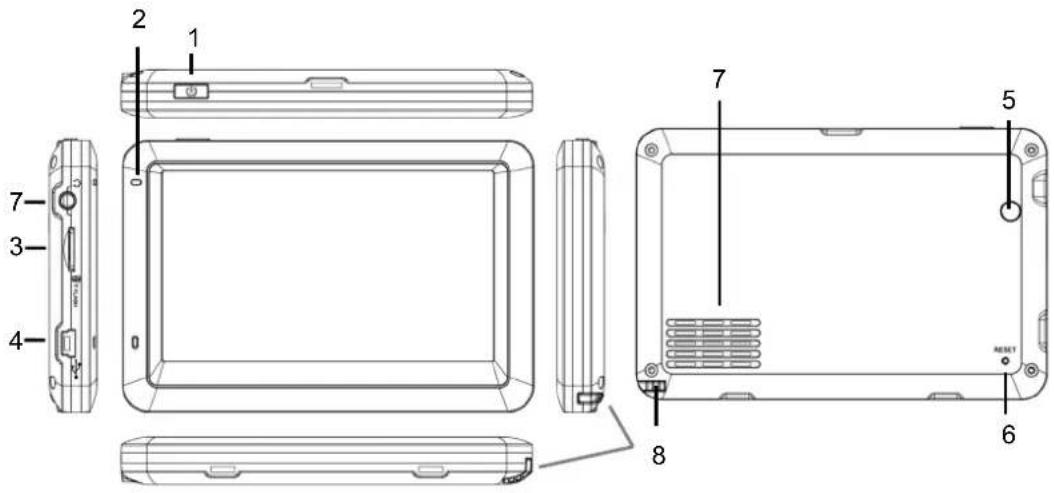
The effect figure below is subject to the material object and may change within the models of the PNT-series.
text_image
Technical diagram of a device rear panel with labeled components and internal structureSN Component Explanation
| 1 Power key Powering on/ off the device or enter sleep mode | |
| 2 Indicator light | In power-off state, it is red while being charged. It is green in operation. |
| 3 Micro-SD-card slot For inserting an optional flash-memory-card | |
| 4 MINI USB port Charging port and connector of TMC-antenna | |
| 5 Light sensor (optional) For automatic backlight adjustment | |
| 6 Reset key Press to restart the system | |
| 7 Speaker | Playing sounds (such as navigation prompt tones, music, etc.) |
| 8 Stylus Removable pin for taping on the screen | |
1.2 Power Supply & Charging
Charge the GPS navigator fully with the charger before first use.
1.2.1 Power Supply
The a-rival PNV-43 navigation system can be powered by the built-in battery or external power supply.
When the GPS navigator is unconnected to the charger, it is powered by the Li-polymer
battery. The battery capacity icon 📄 in the system main interface shows current residual battery capacity.
When the GPS navigator is connected to the charger, it is powered by external power and the battery is charged.
[Attention] The GPS navigator adopts non-removable Li-polymer battery. To avoid battery rupture, explosion, release of hazardous substance or burn, do not unpack, pierce, strike on or discard the battery in fire or water.
1.2.2 Charge by Charger
The GPS navigator must be charged with the charger before first use.
Plug the USB terminal of the charger into the USB port on the left side of the GPS navigator and the other to the power socket to supply power and charge the GPS navigator.
[Note]: The charging indicator light is red during charging. Do not unplug the charge until the battery is fully charged and the indicator light turns green. Please charge the GPS navigator when the battery is low or used up in succeeding use.
1.2.3 Charge by Car Charger
Plug one terminal of the car charger into the USB port on the left side of the GPS navigator and the other to the charging port to supply power and charge the GPS navigator.
[Note]: Plug in the car charger after the automobile is started to avoid damage due to current surge.
1.3 Basic Use
1.3.1 Power on/off
2.3.1.1 Power on
Press the power key on the top side of the GPS navigator for at least two seconds to power it on.
[Note]: Great humidity fluctuation may lead to short circuit of the GPS navigator. Power on the navigator after it has accommodated to new environment.
2.3.1.2. Power off
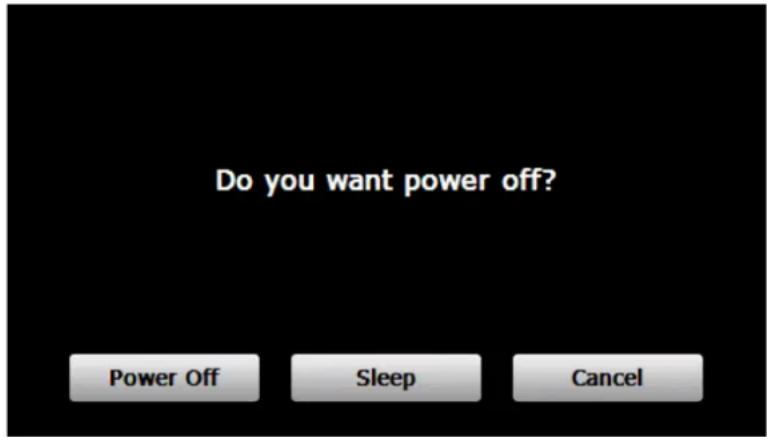
Press the power key and let go after two seconds to power off the GPS navigator. The following interface will be prompted. If no operation on the interface in 20 seconds, the
system will be powered off automatically. If Sleep is selected, the navigator will automatically resume the state before entering sleep mode when powered on again.
text_image
Do you want power off? Power Off Sleep Cancel1.3.2 Restart the System
When the system does not response, press the reset key on the right side of the GPS navigator to restart the system.
[Relevant Information] The following situations might lead to no response of the system.
- Delay or stagnancy in interface switching;
- Failure of function activation with overlong execution;
- Failure to power on/off the GPS navigator by pressing the power key
[Note]: Restarting the system by pressing the reset key will result in loss of unsaved data. Please backup your data regularly.
In case that your navigation-system contains a built-in TMC-receiver for reception of traffic-information, it's antenna is integrated into the car-charger-cable. For correct reception of traffic-information the car-charger needs to be connected to the USB-port of the navigation-system!
1.3.3 Fix the GPS Navigator with Mounting Kit
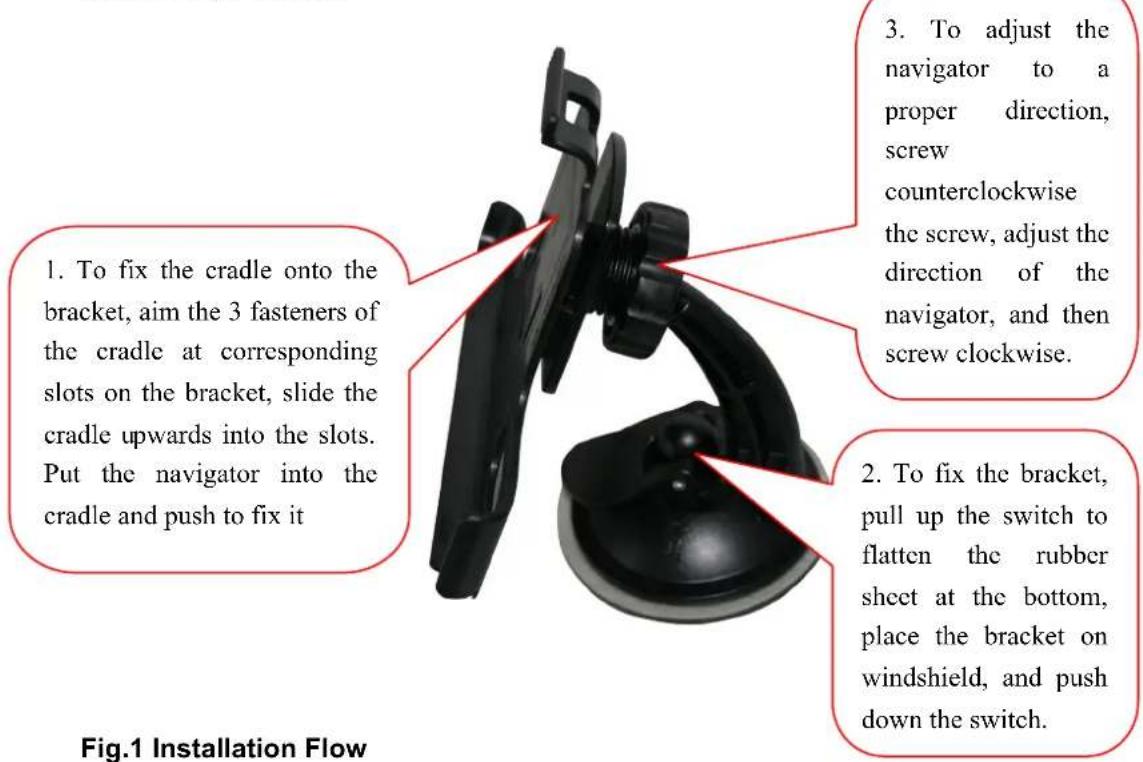
The mounting kit is composed of a back splint and a bracket. To use the GPS navigator in an automobile, fix it on the dashboard under the front windshield. The installation flow
refers to Fig. 1 below.
text_image
1. To fix the cradle onto the bracket, aim the 3 fasteners of the cradle at corresponding slots on the bracket, slide the cradle upwards into the slots. Put the navigator into the cradle and push to fix it 2. To fix the bracket, pull up the switch to flatten the rubber sheet at the bottom, place the bracket on windshield, and push down the switch. 3. To adjust the navigator to a proper direction, screw counterclockwise the screw, adjust the direction of the navigator, and then screw clockwise. Fig.1 Installation Flow[Note]: Do not place the GPS navigator in positions obstructing the driver's vision. Do not place it without fixing it or in the place of air bag or the area after the air bag is inflated.
[Note]: The mount may diversify from the illustration above.
1.4 System Main Interface and Major Functions
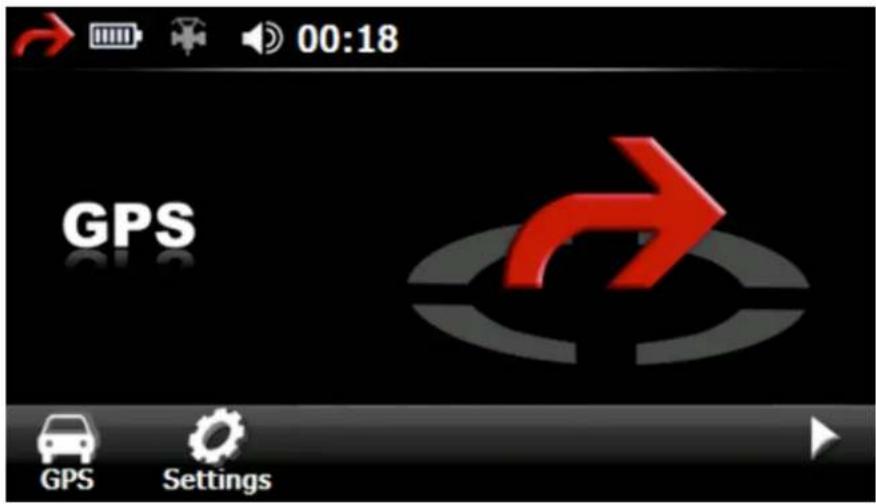
Press the power key on the top side of the GPS navigator and let go after two seconds to enter the system main interface as follows.
text_image
00:18 GPS GPS SettingsThe main functions are listed as follows.
| Function | Explanation |
| Navigation | Tap to enable navigation function |
| System Setting | Volume, power, backlight, date& time, language, system information, system info, USB setting and calibration |
| Tools | Calculator and more |
Chapter II GPS
The navigation software is already installed on the GPS navigation systems, which position the navigator via the satellite receiver and display it on the map. Set a destination, and the system will automatically work out the best path to help the user reach the destination safely and quickly.
2.1 Map
Due to transportation development, inconformity between products and real traffic information will occur a period after product release. Please drive according to road condition and abide by traffic regulations.
2.2 Navigation
Navigation paths are for reference only, and the user may decide whether to follow them. Please also note that the system does not support "rat runs", or similar abbreviations as they do not meet most of the program logic.
2.3 Reception
High and crowded structures (such as inside of tunnels, space between high buildings, underground car parks and under viaducts), weather change or satellite signals turnoff may influence signal reception, resulting in positioning failure, inaccurate positioning, navigation failure or system function abnormality.
With stereoscopic maps, instant animation, voice prompt and text prompt of the navigation system, you will appreciate its unique charm and enjoy a great trip.
Different navigation maps may have different operation methods. Please follow instructions of corresponding navigation mapping applications.
[Note]: Before using the GPS navigator, please purchase and install mapping applications and appoint file paths.
Chapter III GPS Info
3.1 Features
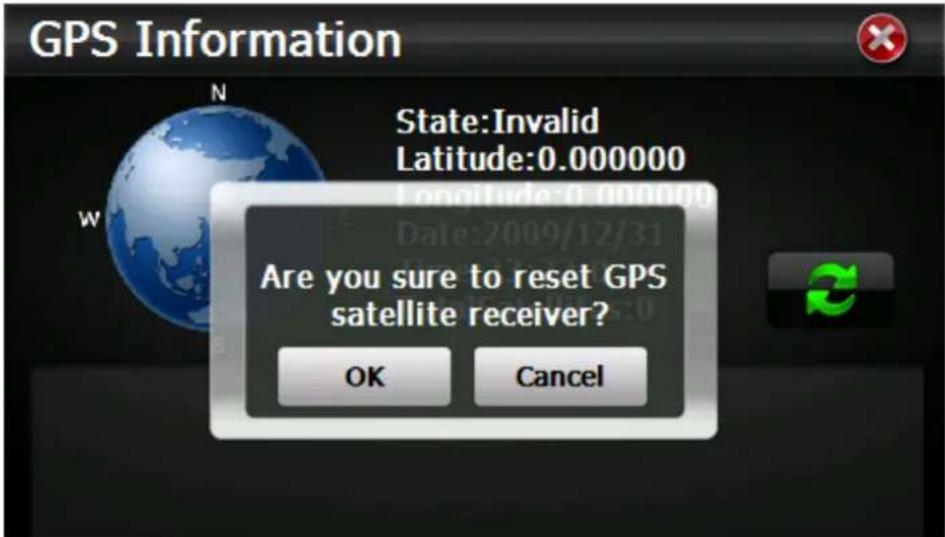
Tap the GPS Icon in the system main interface to enter the GPS Info interface as follows:
text_image
GPS Information State:Invalid Latitude:0.000000 Are you sure to reset GPS satellite receiver? OK CancelTap the Reset Icon to reset the GPS Receiver.
Chapter IV System Settings
4.1 Summary
This chapter introduces the system settings of the GPS navigator.
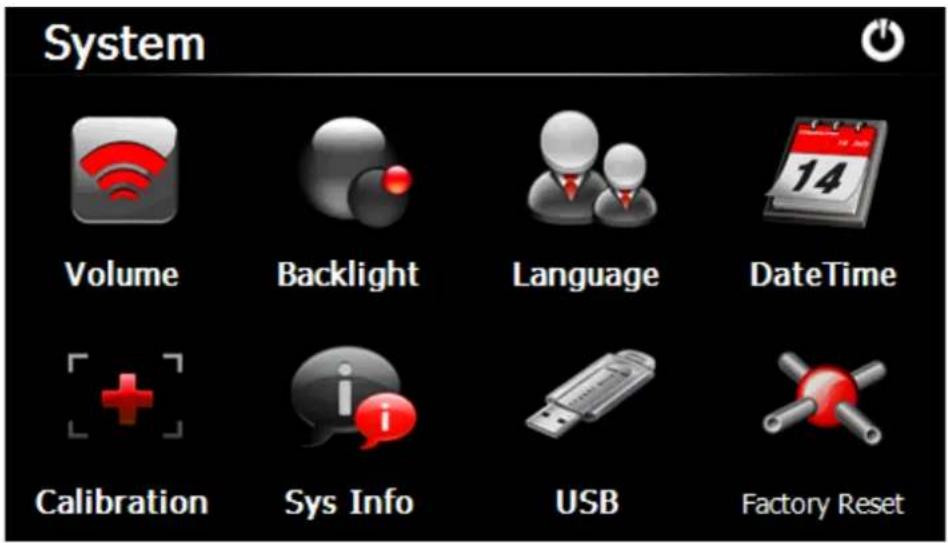
Tap the icon in the system main interface to enter the system interface as follows to set volume, backlight, language, date & time, system info, USB setting and calibration
text_image
System Volume Backlight Language DateTime Calibration Sys Info USB Factory ResetFunction Explanation
| Volume Adjust the speaker volume; |
| Enable sounds for taps |
| Power View the residual battery capacity |
| Backlight Adjust the brightness of touch screen backlight; |
| Supports auto backlight. |
| Date & time System date setting; |
| System time setting; |
| System time zone setting; |
| Language System language selection |
| System Info Display system information including ROM version, software version, OEM version, platform ID and device ID; |
| USB USB setting |
| Calibration Calibration |
| Factory Reset Factory Reset |






4.2 Volume
Tap in the system setting interface to enter the volume setting interface as shown below.
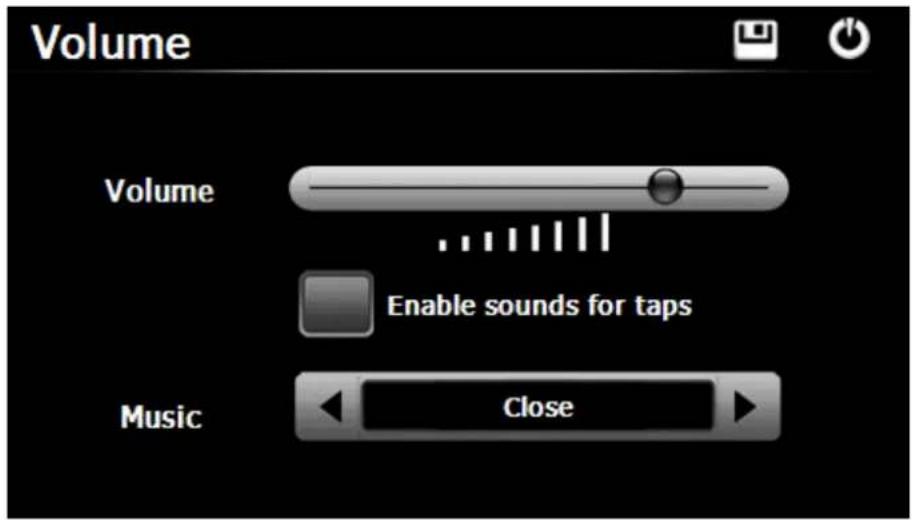
text_image
Volume Volume Enable sounds for taps Music Close
Close Save the settings and exit the volume setting interface.

Volume Ten volume grades (from mute to maximum) available.

Sounds for taps Tap it to enable the function. Tap it again to disable the function.
4.3 Backlight
Backlight setting includes backlight brightness adjustment and auto backlight.
Tap in the system setting interface to enter the Backlight Setting interface as follows:
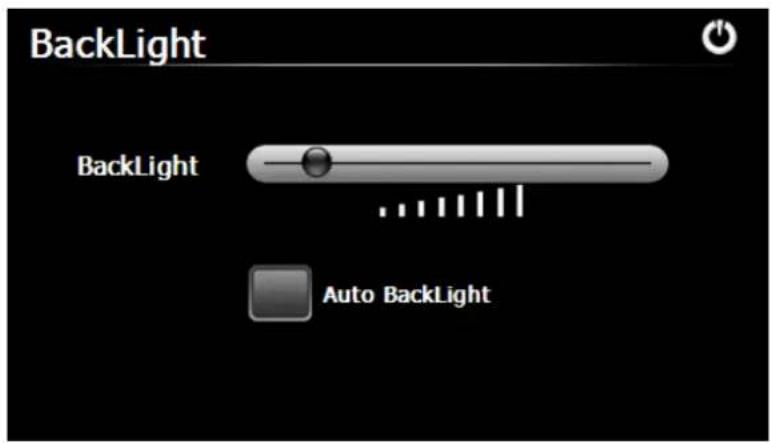
text_image
BackLight BackLight Auto BackLight
Close Save the settings and exit the backlight setting interface
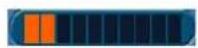
Backlight adjustment
Drag leftward (or tap the icon) to turn down or rightward (or tap the icon) to turn up the backlight.

Auto When this column is ticked, the backlight will be backlight automatically adjusted according to the environment brightness.
4.4 Date& Time
Note: The GPS system updates the date and time automatically as soon as there is sufficient reception.
Tap in the system setting interface to enter the Date &Time Setting interface as shown below.
Date & Time setting includes system date setting, time setting and time zone setting.
Select a time zone of your usually starting point.
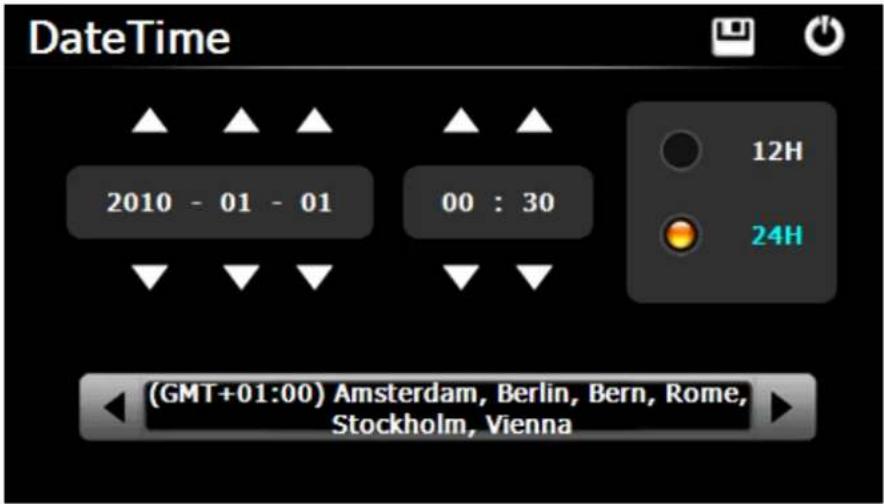
text_image
DateTime 2010 - 01 - 01 00 : 30 12H 24H (GMT+01:00) Amsterdam, Berlin, Bern, Rome, Stockholm, Vienna4.4.1 Setting the system date
In the above interface, tap the icon < or > to set the Year, Month and Day, Date
&Time Setting and then tap the icon ✗ to save the selection.
[Note]: Time format option is 24-hour.
[Note]: Date and time are set automatically by GPS.
[Note]: You may also tick the column to adjust clock for daylight saving.
4.5 Language
Tap in the system setting interface to enter the language setting interface as follows.

text_image
Language Language EnglishTap the icon < or > to select a system language and skin (the blue and yellow skins
are provided.), and tap the icon ✗ to save the selection and return to the System Setting interface.
4.6 System info
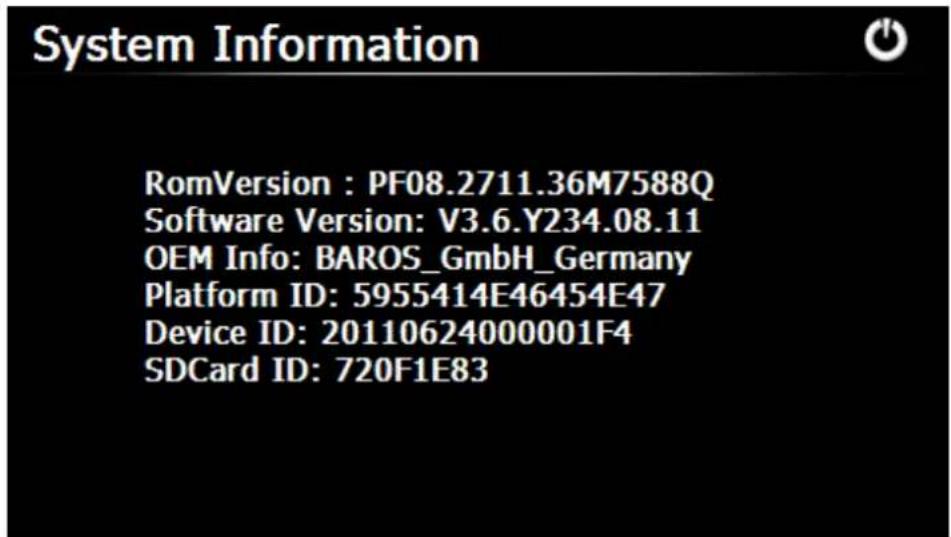
Tap the system setting interface to enter the system info interface as follows:
text_image
System Information RomVersion : PF08.2711.36M7588Q Software Version: V3.6.Y234.08.11 OEM Info: BAROS_GmbH_Germany Platform ID: 5955414E46454E47 Device ID: 20110624000001F4 SDCard ID: 720F1E83The interface displays information on ROM version, software version, OEM version, platform ID and device ID.
4.6.1 USB Setting
Connect the GPS navigator to PC via the MINI USB port to transmit data, or back up data from the navigator data to PC.
The GPS navigator provides MASS STORAGE and MS STORAGE modes. Select one in the settings
NOTE ! For normal navigation this setting MUST be set to MS Active Sync ! In other case the device will stop operating when connected to a cherger and change into data-transmission-mode.
- Have the GPS navigator in operation status and the SD card plugged in the slot;
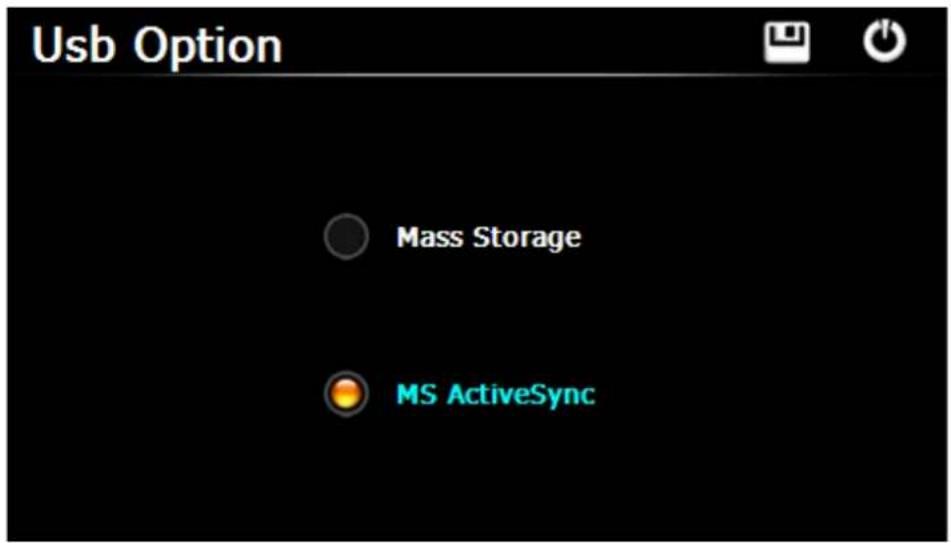
- Tap the icon USB in the System Info interface to enter the following interface:
text_image
Usb Option Mass Storage MS ActiveSyncSelect MASS STORAGE and tap to save the selection.
- Connect the MINI USB terminal of the USB cord to the MINI USB port of the GPS navigator and the standard USB terminal to the USB Host port of PC. Then, the navigator stops the current program and switch to the following interface.
- After communication, unplug the MINI USB cable.
MS ACTIVESYNC
- Tap the icon

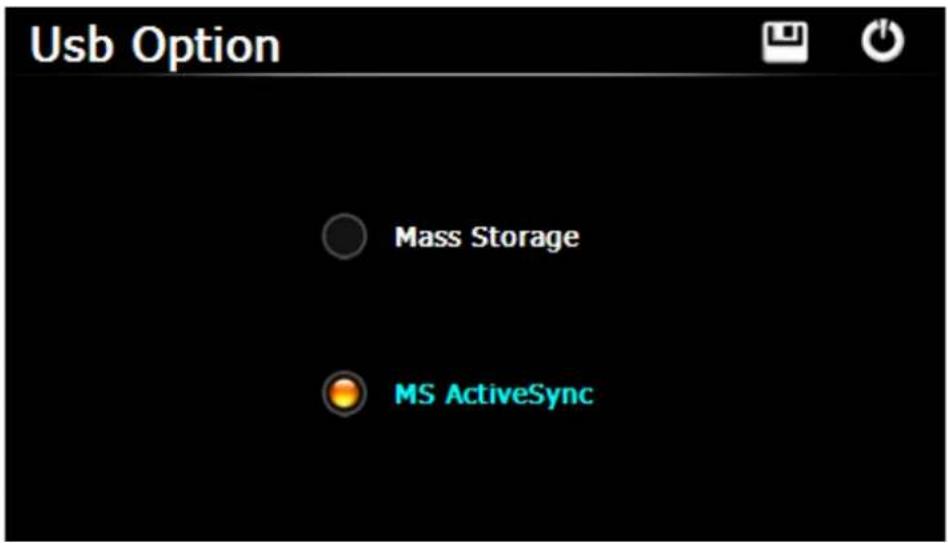
in the System Info interface to enter the following interface:
text_image
Usb Option Mass Storage MS ActiveSyncSelect MS ACTIVESYNC and tap

to save the setting.
- Connect the MINI USB terminal of the USB cord to the MINI USB port of the GPS navigator and the standard USB terminal to the USB Host port of PC. Then, the navigator stops the current program and switch to the following interface.
- After communication, unplug the MINI USB cable.
4.7.2 Calibration of the Touchscreen
Tap the icon Calibration in the system info interface to enter the following interface: Normally not necessary. Carry out only if you have the impression that there is no pressure on the screen when pressing the right "key". The calibration should not be done in any case with the fingers, please use the operating pin carry.
Please tap on the crosslines firmly The crosslines will continue to move until the screen is aligned.

Click the center of cross cursor and the cursor shifts from the center, upper left, lower left, upper right and lower right to finish the calibration and the interface will be closed automatically to go back to the system info interface.
Chapter V Troubleshooting
Please carry out the following operations in case of abnormal operation of the GPS navigator. For further problems, please contact our customer service center.
| Fault Reason Solution | ||
| Startup failure | Low battery Supply | external power and charge the battery. |
| System down Reset | the GPS navigator. | |
| Sudden power cut Low battery | Supply external power and charge the battery. | |
| No/ vague display | Low backlight Turn up the backlight. | |
| Backlight off Tap the screen with the touch pen. | ||
| Incorrect tapping response | Touch screen not calibrated | Recalibrate the screen. |
| No sounds | Low volume Turn up the volume. | |
| Poor contact of earphone | Connect the earphone. | |
| Communication with PC | Poor USB connection | Connect the USB cable. |
| GPS signals reception failure | Weak satellite GPS signal | About 3 minutes are needed for low intensity of local GPS satellite signal. |
| Loss of map data Accidental deletion | Contact your agent or distributor. | |
Note: This document is for guidance only and the content is subject to change without notice
Declaration of Conformity
Hereby Baros GmbH, declares, that the device is in compliance with the essential requirements and other relevant regulations of Directive 1999/5/EC.
The Declaration of Conformity can be found at: www.a-rival.de
Guarantee
Please keep the proof of purchase for this device for the entire duration of the guarantee period, as it must be produced in the event of any claim.
You (as the end user) receive a 36-month guarantee from the date of sale. The article has been manufactured using the most modern production methods and subjected to strict quality controls.
Please contact only the manufacturer (not the dealer where you purchased it) in the event of any defects during the guarantee period.
Hotline: +49(0)511 - 123 83 506 or: support@first-servicecenter.de
The guarantee does not cover damage caused by improper use or external influence (water, falling, sunlight, breakage or impact).
Userinformation/Contact
If your device has a defect or you have problems with it, please contact our Service & Support Centre. If you need to send your device to us, please attend to the following points:
- Use only the original packaging
- Add a detailed error description
- Add your full name and address and a copy of your purchase receipt
- Stamp and send the package to us (sufficient postage)
Address of our Service Center:
First Service Center
Kleine Düwelstr 21
DE-30171 Hannover/Germany
You can call also our hotline: +49 (0)511 - 123 83 506 or you can send a
Fax to: +49 (0) 511-161253 6 or you can contact us by support@first-servicecenter.de