
SpoQ HR - Sports Watch A-Rival - Free user manual and instructions
Find the device manual for free SpoQ HR A-Rival in PDF.


| Product Type | GPS Sports Watch with Optical Heart Rate Monitor |
| Brand | A-Rival |
| Model | SpoQ HR |
| Water Resistance | 3 ATM (splash and rain resistant, not for swimming) |
| Display | LCD with EL backlight |
| Battery Type | Built-in rechargeable lithium-ion |
| Charging Time | Approximately 4-5 hours |
| Battery Life (Typical) | Up to 8 hours (GPS and HR active) |
| Connectivity | Bluetooth 4.0 (BLE) |
| GPS | Yes, with satellite acquisition |
| Heart Rate Monitor | Optical (electro-optical sensor) |
| Step Counter | Yes (3D accelerometer) |
| Main Modes | Time, Run, HRM, Chronograph, Timer, Data, Alarm, Settings |
| Memory Capacity | Up to 50 data files, up to 300 laps per file |
| Languages Supported | English, French, Spanish, Italian, German, Dutch, Portuguese |
| Time Format | 12h / 24h |
| Alarm | 5 alarms with chime |
| Timer | Interval timer with up to 6 segments, 50 loops |
| Auto Lap | Yes, selectable distances (0.4, 1, 2, 3, 4, 5 km or OFF) |
| Target Pace / Speed | Yes, with visual and audible alerts |
| Auto Pause | Yes, when motion stops |
| Night Mode | EL backlight: 10 sec, 20 sec, or scheduled (5PM-7AM default) |
| Sleep Monitoring | Yes, via smartphone app |
| Smartphone Notifications | Incoming call and message alerts |
| App Compatibility | a-rival app (iOS and Android) |
| Warranty | 24 months |
| Cleaning | Wipe with damp cloth, mild detergent; avoid chemical cleaners |
| Safety | Consult doctor before exercise; not a medical device; may affect pacemakers |
| Spare Parts / Repairability | Battery not user-replaceable; service by authorized personnel |
Frequently Asked Questions - SpoQ HR A-Rival
User questions about SpoQ HR A-Rival
0 question about this device. Answer the ones you know or ask your own.
Ask a new question about this device
Download the instructions for your Sports Watch in PDF format for free! Find your manual SpoQ HR - A-Rival and take your electronic device back in hand. On this page are published all the documents necessary for the use of your device. SpoQ HR by A-Rival.
USER MANUAL SpoQ HR A-Rival
SpoQ ^HR
User Manual
Thank you for choosing an a-rival product. A good choice. Just in case that you are facing any problems with your Device. Please visit us at a-rival.de or contact our support:
- Mail: support@first-servicecenter.de
- Facebook:https://www.facebook.com/arivalpoweryourlife
- a-rival.de
You'll find Updates or actual information at our webpage: www.a-rival.de
Introduction
Thank you for purchasing the GPS+ Bluetooth (BLE 4.0) Optic HRM watch. This product uses an Electro-optical technology to sense the heart beat. It has an electro-optical sensor to detect the volume of blood under your skin.
Know your Watch
- This product has also a GPS function with the following main modes as you press S3: TIME, RUN, HRM, CHRONO, TIMER, DATA, ALARM and SET.
Push button main function:

Switching on and off your Watch:
To turn off the clock completely, pressed simultaneously S4 and S2 until the display turns off. Press any button (approx. 3 seconds) to turn on the clock.
WARNING:
- Consult your doctor before you begin a new exercise program. This is important for persons with pre-existing health problems or persons who have taking medication regularly.
• This watch provides heart rate measurements. However, this is not a medical device. - This watch may affect pacemakers. If you have any concerns, consult your doctor before using this watch.
• Over exercising may result in serious injury or death. If you feel faint, if you become short of breath, or if you experience pain while doing an exercise, stop immediately and cool down.
Wear the watch properly in your forearm:
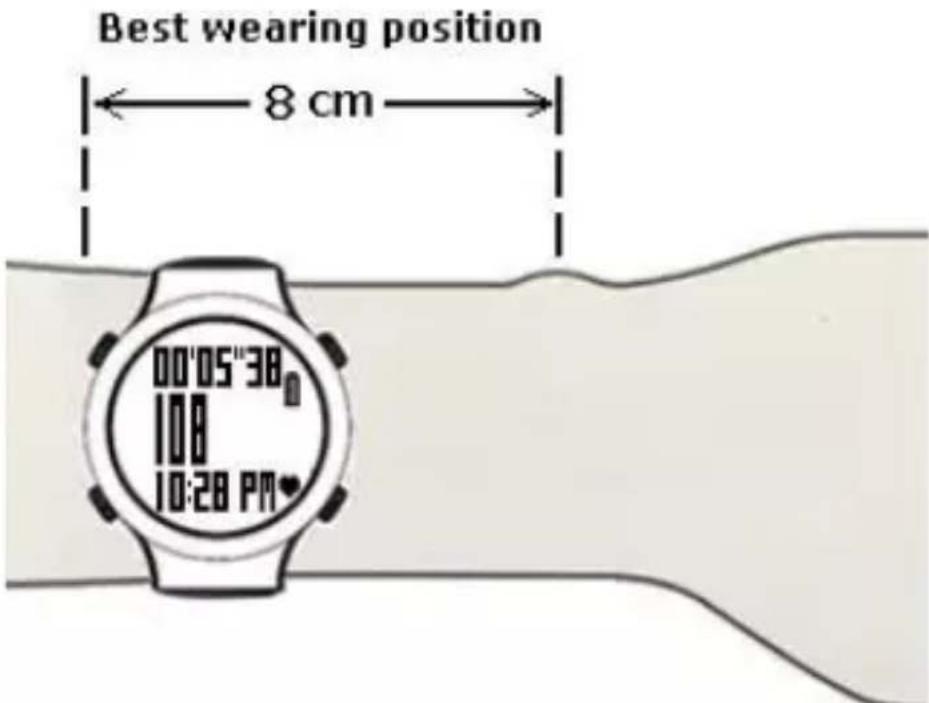
- Fasten the watch snugly so that the optical sensor makes a tight contact with your skin. The tighter you can wear the watch the better.
- Wear the watch not on your wrist bone but higher on your forearm.
• If the Heart rate data displayed in the device is not stable or erratic, try to move the device along your forearm within the best wearing position as illustrated.
Important note:
Before starting your exercise
• You may need to tighten the strap.
- After sweating, you have to tighten the watch again for accurate measurement.
• Make sure the heart rate reading is already stable.
- Minimize excessive wrist movement while the HR is in use.
Caring for your Watch:
Clean your Watch with a dampened cloth preferably with mild detergent solution. Wipe dry using a dry cloth. Do not use chemical cleaners and solvents that may damage plastic components.
Do not store your Watch to prolonged exposure to extreme temperatures as this may result to permanent damage to your unit.
Charging the Battery:
It is recommended to fully charge the watch before first use and never to hit empty. Please immediately charge when the battery level is at 20% to maximize the battery life and must be charged once a month even if it is not used.
- Plug your USB cable to your PC.
- Align the charging clip with the contacts on the back of the Watch.
- Connect the charging clip securely to the watch.
Note: Please thoroughly dry the charging contacts and surrounding area to ensure proper electrical contact and prevent corrosion.
Battery low condition:
You cannot turn ON the GPS when the battery is low. You need to recharge the battery in order to use the GPS again. The watch will display "BATTERY LOW".
Water immersion:
This GPS Optic HRM watch, is designed to be water resistant up to 3 ATM.
After submersion to water, please make sure to wipe dry and air dry the unit before using or charging.
Water damage may occur if the buttons are pressed underwater.
Language
- This watch supports seven Languages including English, French, Spanish, Italian, German, Dutch and Portuguese
• English is the default language by default and after reset
• You can change the language in the settings of the mobile phone APP
How to pair the watch with Smartphone:
1) Press and hold S4 while in Time mode. The “HOLD TO PAIR” appears followed by pairing ID screen.

flowchart
graph LR
    A["TIME mode"] -->|press & hold S4| B["HOLD TO PAIR 8632"]
    B -->|auto| C["Pairing ID screen"]
    C -->|auto| D["8632 PAIR OK"]
    C -->|OR after 1 minute| E["8632 PAIR FAIL"]
    D --> F["Bluetooth not paired"]
    E --> F
Notes:
• If pairing is successful, the watch will display "PAIR OK".
• If pairing is not successful, the watch will display "PAIR FAIL" after 1 minute.
• In any TIME screen, press and hold S4 button to turn off the Bluetooth.
2) Open the App on your Smartph one to pair.

3) Tap "LINK DEVICE".
4) Select Bluetooth ID (ex. SpoQ HR 8632) and tap "Done".

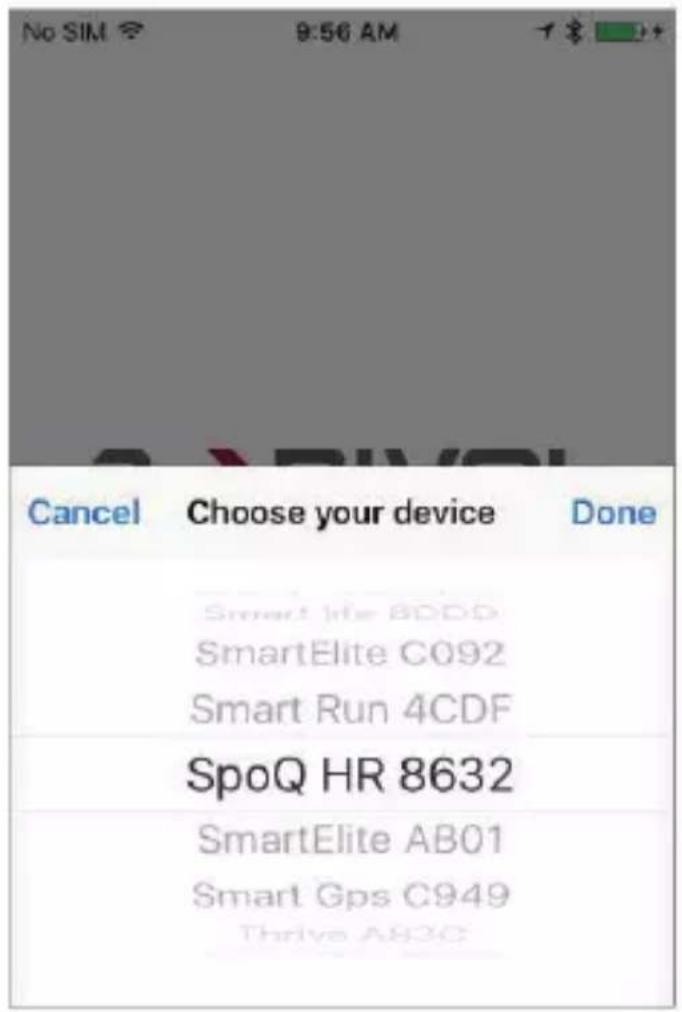
5) Tap "Pair".

6) Fill-in the User Name. Then tap "NEXT". The APP will then display the SETTINGS screen. In this setting screen you can set your UNIT, USER details, SLEEP mode, GOALS, HEART RATE, Phone Alerts, and Display FORMAT of the watch, Hourly CHIME, AUTO LAP, LANGUAGE, and Devise Orientation. Scroll down to see also the parameters to set. Tap the Sync icon after you finished setting to sync the APP with the watch.


NOTE: When you tap the SYNC icon, the APP will start the SYNC operation and all the settings in the APP will be in sync with the watch including the time. Likewise, the data in the watch will be in sync with the APP.
7) Tap the MENU icon on the upper right side of the Setting MENU screen Tap HOME to go to the HOME screen.
8) The HOME screen has the SYNC icon 🕒 on the top left portion. It also has the MENU icon 📄 on the TOP right portion.

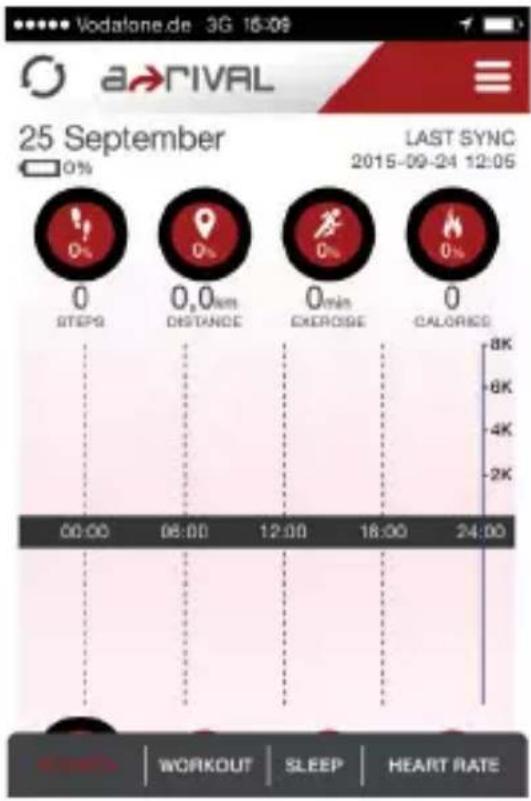
9) On the bottom of the Home screen, you have 4 TABS, namely ACTIVITY, WORKOUT, SLEEP, and HEART RATE. You can tap on any of these tabs to go directly to that screen.

10) The ACTIVITY screen displays your STEPS, DISTANCE, EXERCISE TIME, and CALORIES burned. At the bottom of the screen, it displays your SLEEP data.
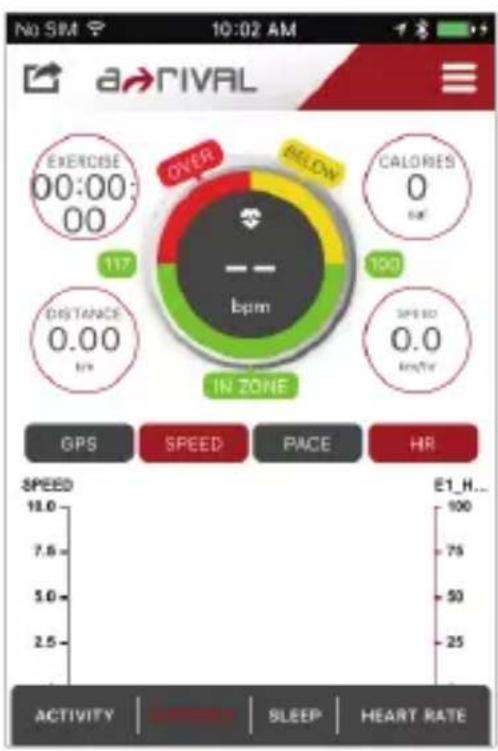
11) The WORKOUT Screen. Scroll down to view more information. You can START or STOP your workout by simply tapping on the START / STOP tab. After Stopping, you can tap SAVE and the APP will auto SYNC with the watch.

12) The SLEEP screen. This screen will display your SLEEP data.

13) HEART RATE screen: You can tap on the screen to detect your Heart rate.


How to Disconnect the Smartphone and the watch:
1) Tap the „MENU“ icon
while in the Home screen.
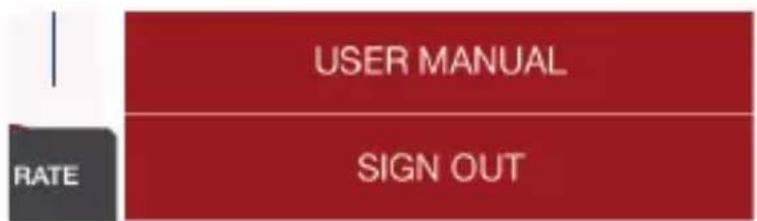
The APP will display the Main MENU. Scroll down to find the SIGN OUT tab.
2) Tap the "SIGN OUT" on the bottom part of the screen.

flowchart
graph TD
    A["USER MANUAL"] --> B["SIGN OUT"]
    C["RATE"] --> B
3) Tap "Yes" to confirm and sign out.

4) Go to "SETTINGS" on your Smartphone.
6) Tap "Connected or Not Connected".

7) Tap "Forget This Device".

8) Tap "Forget Device" to confirm.

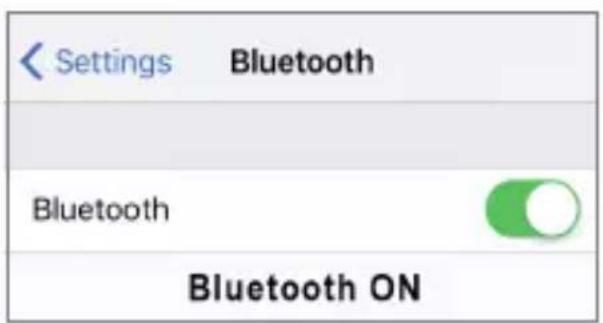
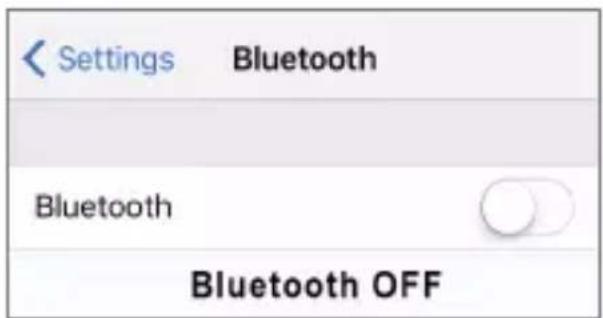
9) Tap to turn Off the Bluetooth.
Incoming Call or message notification function:
When your watch is paired with the smart phone APP, you can receive phone call and message notifications on you watch.
Incoming Call notification:
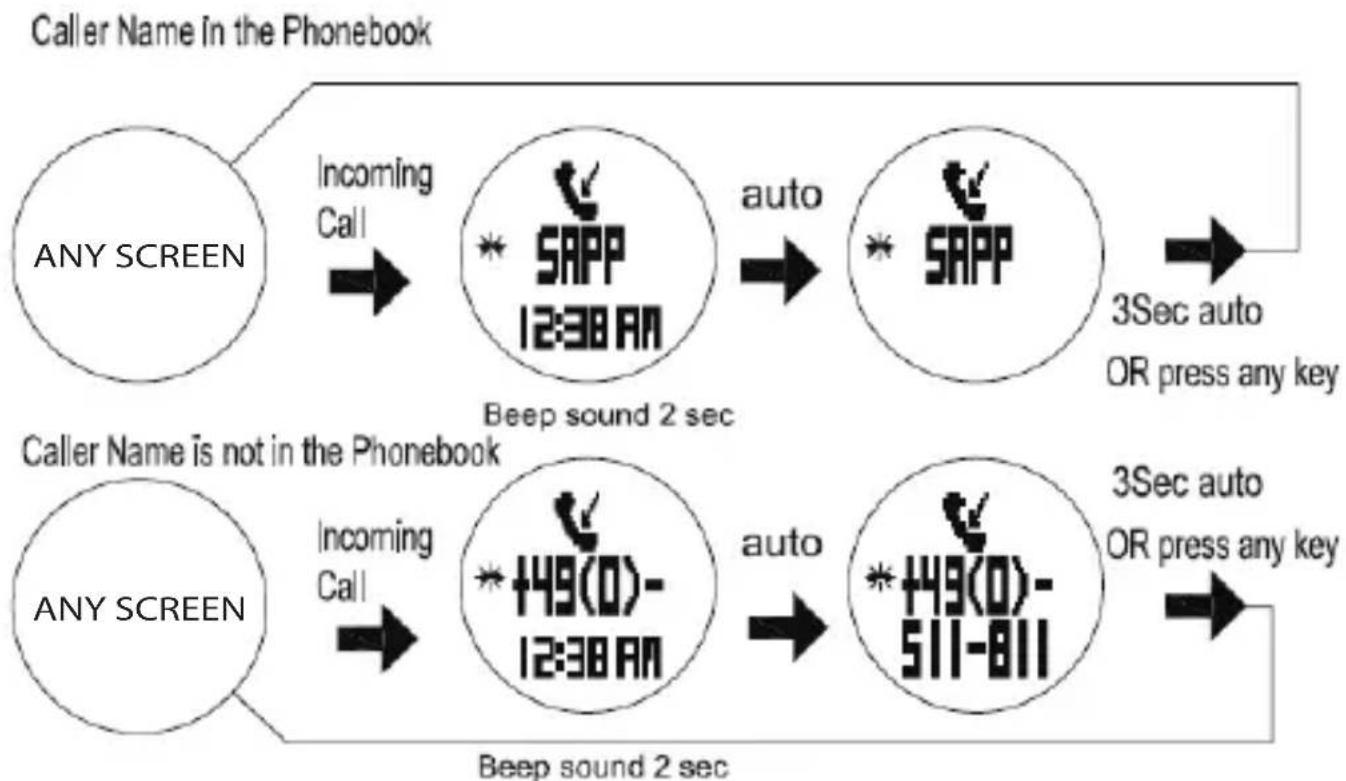
1) When you receive an incoming call, the watch will beep for 2 seconds and display the name of the caller or just the mobile number if it is not registered in your phonebook.
2) Press any key or 20 seconds auto; the watch will go back to previous screen.
flowchart
graph TD
    A["ANY SCREEN"] -->|Incoming Call| B["SAPP 12:38 AM"]
    B -->|auto| C["SAPP"]
    C -->|3Sec auto OR press any key| D["3Sec auto OR press any key"]
    E["ANY SCREEN"] -->|Incoming Call| F["SAPP 12:38 AM"]
    F -->|auto| G["SAPP 511-811"]
    G -->|3Sec auto OR press any key| H["3Sec auto OR press any key"]
    style A fill:#fff,stroke:#000
    style E fill:#fff,stroke:#000
    style B fill:#fff,stroke:#000
    style C fill:#fff,stroke:#000
    style F fill:#fff,stroke:#000
    style G fill:#fff,stroke:#000
    style H fill:#fff,stroke:#000
Incoming Message notification:
1) When you receive an incoming message, the watch will beep for 2 seconds and display the name of sender and two line of the message. The watch can only display two lines of the message.
2) If the sender is not registered in your phone book, the watch will just display the mobile phone number.
3) Press any key or 20 seconds auto; the watch will go back to previous screen.
Sender Name is in the Phonebook

flowchart
graph TD
    A["ANY SCREEN"] -->|Incoming Message| B["SAPP:HI 12:38 AM"]
    B -->|auto| C["SAPP:HI SPOD HR"]
    D["ANY SCREEN"] -->|Incoming Message| E["+49(0)-12:38 AM"]
    E -->|auto| F["+49(0)-511-811"]
    style A fill:#fff,stroke:#000
    style D fill:#fff,stroke:#000
    style B fill:#fff,stroke:#000
    style C fill:#fff,stroke:#000
    style E fill:#fff,stroke:#000
    style F fill:#fff,stroke:#000
Sleep notification function:
When you set the sleep function in the Smart phone App, you will also receive sleep and Wake up notification in your watch.
Sleep notification:
- The watch will display GOOD NIGHT for 10 seconds and beep or 5 seconds. It will then go to Time mode with the Sleep icon "ZZ".
• During Sleep mode, The GPS, HRM, and Exercise modes are disabled.

Wake up notification:
- When it is time to wake up, the watch will display GOOD MORNING and beep for 20 seconds.
- It will then go back to Time mode after 20 seconds or after pressing any button.

Configure your Watch:
Users can opt to manually set the Watch using the procedure below. Another faster way to set the watch is by using the Phone APP. When you SYNC the watch using the Phone APP, the watch will be set based on the settings in the Phone APP including the time.
- While in TIME mode, press S3 to go to SET mode and set the following parameters: AUTO LAP, TARGET PACE/SPEED, AUTO PAUSE, TIME, UNIT, USER, HRM, VIEW, NIGHT, CONTRAST, CHIME, ALARM, and TIMER.
- Press S1 or S4 to change the blinking parameter to set.
- Press S3 to go back to TIME mode.

flowchart
graph TD
    A["SET"] --> B["1.5 sec"]
    C["TIME"] --> D["S3"]
    E["SET AUTO LAP"] --> F["S1"]
    F --> G["SET TARGET SPEED"]
    G --> H["S1"]
    H --> I["SET AUTO PAUSE"]
    I --> J["S1"]
    J --> K["SET TIME"]
    K --> L["S1"]
    L --> M["SET UNITS"]
    M --> N["S1"]
    N --> O["SET USER"]
    O --> P["S1"]
    P --> Q["SET HRA"]
    R["S4"] --> S["SET TIMER"]
    S --> T["S4"]
    T --> U["SET ALARM"]
    U --> V["S4"]
    V --> W["SET CHIME"]
    W --> X["S4"]
    X --> Y["SET CONTRAST"]
    Y --> Z["S4"]
    Z --> AA["SET NIGHT"]
    AA --> AB["S4"]
    AB --> AC["SET VIEW"]
How to set the AUTOLAP:
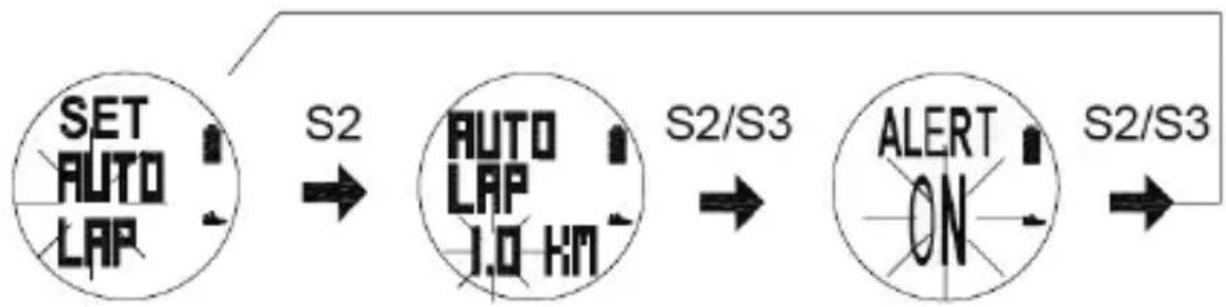
- Press S2 while "AUTO LAP" is blinking. The digit will start to blink.
- Press S1/S4 to change the setting.
(Auto lap preset settings: 0.4, 1, 2, 3, 4, 5 & OFF)
- Press S2/S3 to confirm and set ALERT ON or OFF.
- Press S1/S4 to change the setting.
- Press S2/S3 to confirm.
flowchart
graph LR
    A["SET AUTO LAP"] -->|S2| B["AUTO LAP 1.0 km"]
    B -->|S2/S3| C["ALERT ON"]
    C -->|S2/S3| D["End"]
The watch will take Auto Lap based on your Auto Lap preset settings.
How to set Target SPEED or Target PACE
- Press S2 while TARGET SPEED or TARGET PACE is blinking. The watch will display either SPEED or PACE.
- Press S1/S4 to choose either SPEED or PACE.
- Press S2 to confirm selection.
If you select SPEED, target SPEED will start to blink:
- Press S1/S4 to change the SPEED value.
- Press S2/S3 to confirm. Target Speed ON / OFF will start to blink.
- Press S1/S4 to change selection ON or OFF.
- Press S2/S3 to confirm. Alert ON / OFF will start to blink.
- Press S1/S4 to change. ALERT ON / OFF.
- Press S2/S3 to confirm and go back to Target SPEED/PACE setting screen.
If you select PACE, target PACE will start to blink:
- Press S1/S 4 to change the PACE value.
- Press S2/S3 to confirm. Target Pace ON / OFF will start to blink.
• Succeeding setting screens are similar to TARGET SPEED setting above.

flowchart
graph LR
    A["SET TARGET SPEED"] -->|S2| B["TARGET SPEED"]
    B -->|S2/S3| C["TARGET SPEED 8.0"]
    C -->|S2/S3| D["ON/OFF TARGET SPEED ON"]
    D -->|S2/S3| E["ON/OFF ALERT ON"]
    E -->|S2/S3| F["End"]
NOTES:
When Target SPEED/ PACE is ON, ALERT ON:
- If the Actual speed is greater than the Target Speed, the watch will display a flashing UP arrow in the PACE screens in RUN, CHRONO, and HRM modes. You will also hear 5 long beeps.
- If the Actual speed is lower than the Target Speed, the watch will display a flashing DOWN arrow in the PACE screens in RUN, CHRONO, and HRMmodes. You will also hear 10 short beeps.
When Target SPEED/ PACE is ON, ALERT OFF:
- If the Actual speed is greater than the Target Speed, the watch will display a flashing UP arrow in the PACE screen in RUN, CHRONO, and HRM modes. No beep sound.
- If the Actual speed is lower than the Target Speed, the watch will display a flashing DOWN arrow in the PACE screens in RUN, CHRONO, and HRM modes. No beep sound.
When Target SPEED/ PACE is OFF:
• TARGET screen will not be shown in RUN mode.
• No UP or DOWN arrows in the PACE screen.
How to set AUTO PAUSE
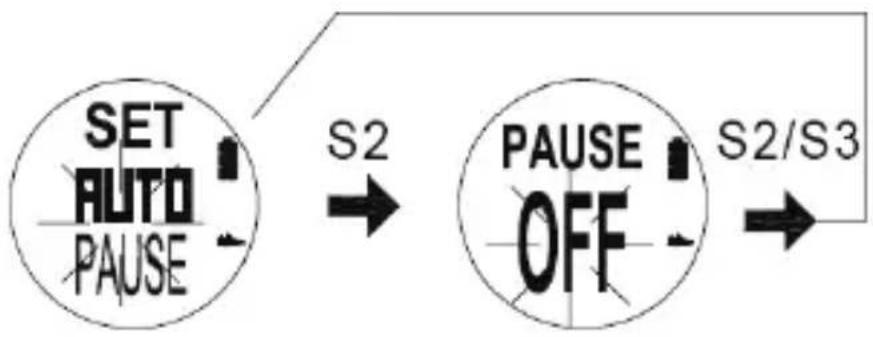
- Press S2 while AUTO PAUSE is blinking. The watch will display PAUSE ON or OFF.
- Press S1/S4 to choose ON or OFF.
- Press S2/S3 to confirm and go back to AUTO PAUSE setting screen.
flowchart
graph LR
    A["SET AUTO PAUSE"] -->|S2| B["PAUSE OFF"]
    B -->|S2/S3| C["End"]
AUTO PAUSE Function in RUN Mode:
- When AUTO PAUSE is ON, the watch will automatically PAUSE if you stop running.
• It will also automatically START when you move again.
How to set the TIME:
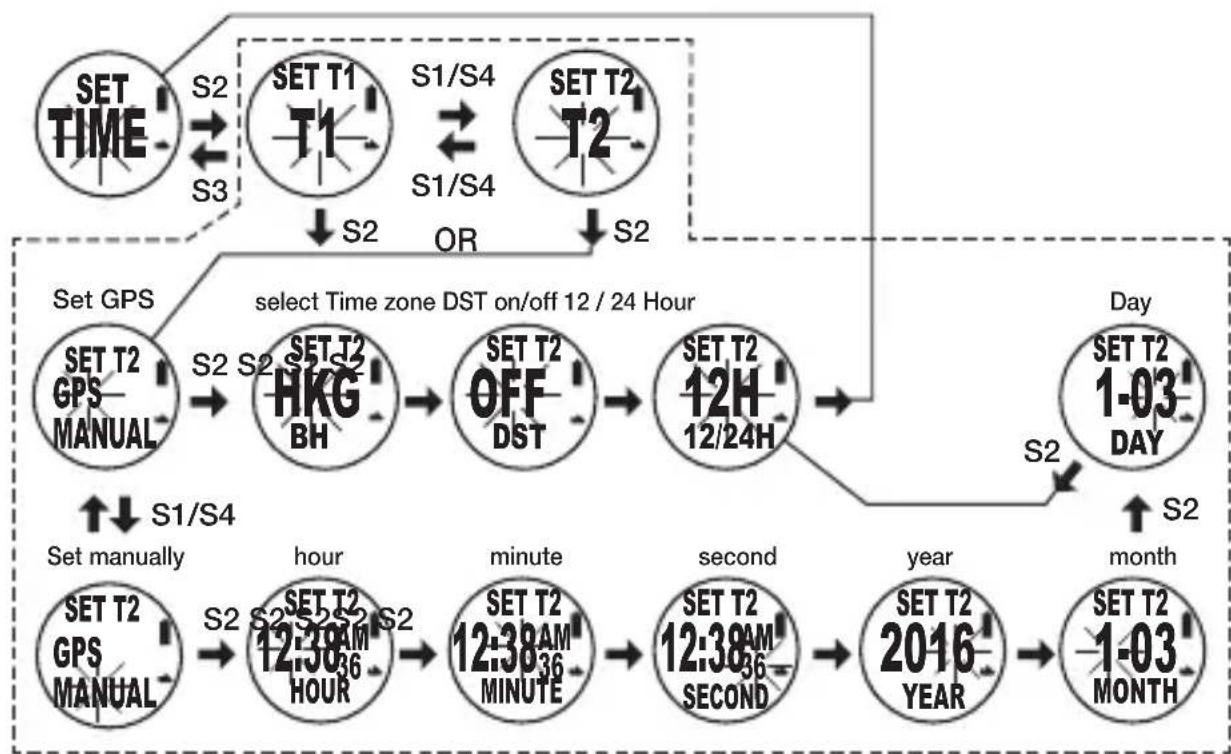
- Press S2 while "TIME" is blinking. The watch will display SET T1 blinking.
- Press S1 or S4 to select T1 or T2.
- Press S2 to confirm. The watch will display SET GPS or MANUAL.
- Press S1/S4 to select GPS or MANUAL. In MANUAL setting, you can manually set the time. If you select the GPS, the watch will be automatically set based on the data and time data from GPS satellites.
GPS setting:
- While "GPS" is blinking. Press S2 to set the TIME ZONE.
• Press S1 or S4 to change the time zone (there are 106 city codes to choose). - Press S2 to confirm and set DST ON/OFF.
- Press S1/S4 to change setting.
- Press S2 to confirm and set 12H/ 24H format setting.
- Press S1/S4 to chang e 12H/24H format setting.
- Press S2 to confirm.
NOTE: After GPS setting, you have to connect to the GPS signal in order to sync the GPS time to the watch.
MANUAL setting: (Default)
- While "MANUAL" is blinking. Press S2 to confirm.
- Set the Hour by pressing S1/S4 and then press S2 to confirm.
- Set the Minute by pressing S1/S4 and then press S2 to confirm.
- Set the Second by pressing S1/S4 and then press S2 to confirm.
- Set the Year by pressing S1/S4 and then press S2 to confirm.
- Set the Month by pressing S1/ S4 and then press S2 to confirm.
- Set the Day by pressing S1/ S4 and then press S2 to confirm.
- Set the 12/24H by pressing S1/S4 and then press S2 to confirm.
flowchart
graph TD
    A["SET TIME"] -->|S2 S3| B["SET T1 T1"]
    B -->|S1/S4 OR| C["SET T2 T2"]
    C -->|S2| D["Set GPS MANUAL"]
    D -->|S2 S2 S3| E["SET T2 HKG BH"]
    E --> F["SET T2 OFF DST"]
    F --> G["SET T2 12H 12/24H"]
    G --> H["Day SET T2 1-03 DAY"]
    H -->|S2| I["set manually"]
    I --> J["SET T2 GPS MANUAL"]
    J --> K["SET T2 12:38 AM 36 HOUR"]
    K --> L["SET T2 12:38 AM 36 MINUTE"]
    L --> M["SET T2 12:38 AM 36 SECOND"]
    M --> N["SET T2 2016 YEAR"]
    N --> O["SET T2 1-03 MONTH"]
    style A fill:#f9f,stroke:#333
    style B fill:#f9f,stroke:#333
    style C fill:#f9f,stroke:#333
    style D fill:#ccf,stroke:#333
    style E fill:#ccf,stroke:#333
    style F fill:#ccf,stroke:#333
    style G fill:#ccf,stroke:#333
    style H fill:#ccf,stroke:#333
    style I fill:#ccf,stroke:#333
    style J fill:#ccf,stroke:#333
    style K fill:#ccf,stroke:#333
    style L fill:#ccf,stroke:#333
    style M fill:#ccf,stroke:#333
    style N fill:#ccf,stroke:#333
    style O fill:#ccf,stroke:#333
Note: When you sync the watch with the Smartphone App, the watch time will sync with the Smartphone time.
How to set the UNIT:
- Press S2 while "UNITS" is blinking.
- Press S1/S4 to change the unit (KM or Mi).
- Press S2/S3 to confirm.

How to set USER details:
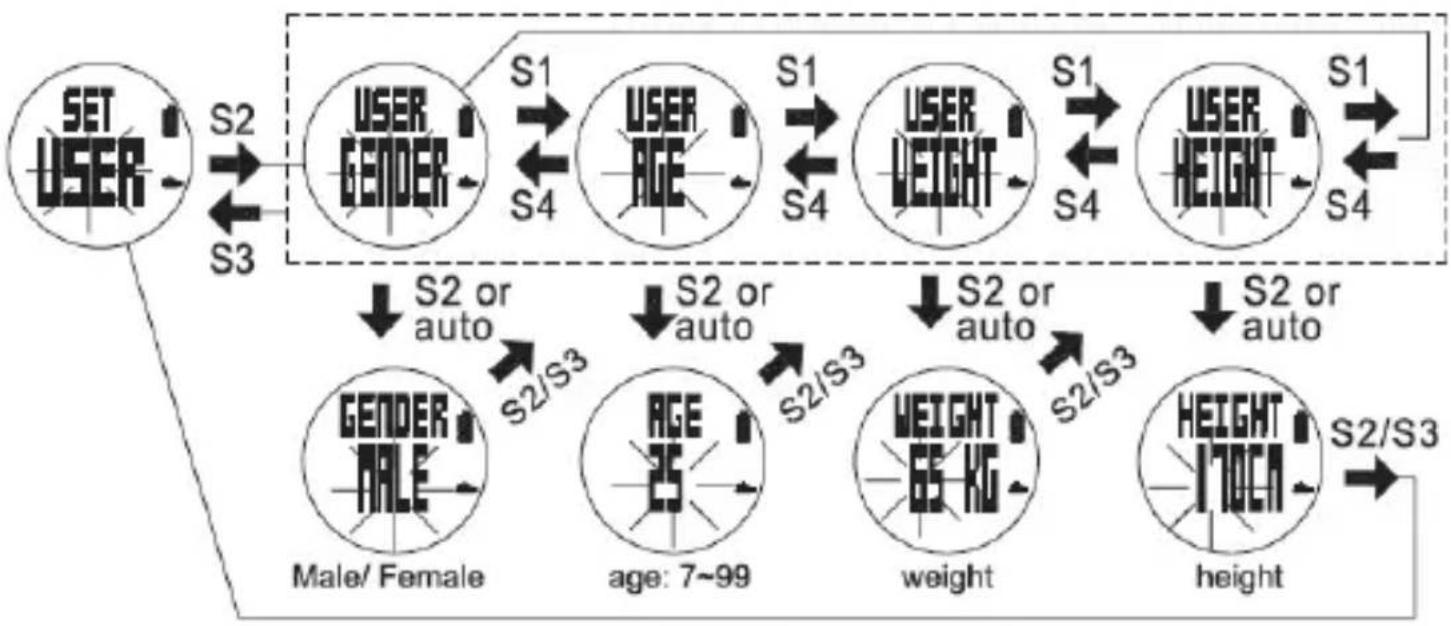
- Press S2 while "USER" is blinking. "GENDER" will start to blink.
- Press S2 or wait for few seconds. "MALE" will start to blink.
- Press S1/S4 to change the gender.
- Press S2/S3 to confirm and set the "AGE".
- Press S2 or wait for few seconds. Age digits will start to blink.
- Press S1/S4 to change the age digits.
- Press S2/S3 to confirm and set the "WEIGHT".
- Press S2 or wait for few seconds. Weight digits will start to blink.
- Press S1/S4 to change the weight digits.
- Press S2/S3 to confirm and set the "HEIGHT".
- Press S2 or wait for few seconds. Height digits will start to blink.
- Press S1/S4 t o change the height digits.
- Press S2/S3 to confirm.
Note: User has the option to press S1/S4 to select/set while the blinking Gender, Age, Weight or Height.
flowchart
graph TD
    A["SET USER"] -->|S2| B["USER GENDER"]
    B -->|S1| C["USER AGE"]
    C -->|S1| D["USER WEIGHT"]
    D -->|S1| E["USER HEIGHT"]
    E -->|S1| F["Gender MALE"]
    F -->|S2 or auto| G["age: 7~99"]
    G -->|S2 or auto| H["weight"]
    H -->|S2 or auto| I["HEIGHT"]
    I -->|S2/S3| J["Height"]
    style A fill:#f9f,stroke:#333
    style B fill:#ccf,stroke:#333
    style C fill:#ccf,stroke:#333
    style D fill:#ccf,stroke:#333
    style E fill:#ccf,stroke:#333
    style F fill:#ccf,stroke:#333
    style G fill:#ccf,stroke:#333
    style H fill:#ccf,stroke:#333
    style I fill:#ccf,stroke:#333
    style J fill:#ccf,stroke:#333
How to set the HRM:
- Press S2 while "HRM" is blinking. ZONE 1 will start to blink.
- Press S1/S4 to change the zone. There are 3 preset zones.
- Press S2/S3 and the watch will display the LOWER limits of the selected zone. LOW limit digit will start to blink.
- Press S1/S4 to change the low limit value.
- Press S2/S3 to confirm. High limit digit will start to blink.
- Press S1/S4 to change the high limit value.
- Press S2/S3 to confirm. The watch will display ZONE ALERTON or OFF.
- Press S1/S4 to change ON to OFF or vice versa.
- Press S2/S3 to confirm.

flowchart
graph LR
    A["SET/HAM"] -->|S2| B["SET ZONEI"]
    B -->|3s auto or S2| C["Lower limit"]
    C -->|S2/S3| D["Higher limit"]
    D -->|S2/S3| E["Zone alert ON/OFF"]
    E -->|S2/S3| F["End"]
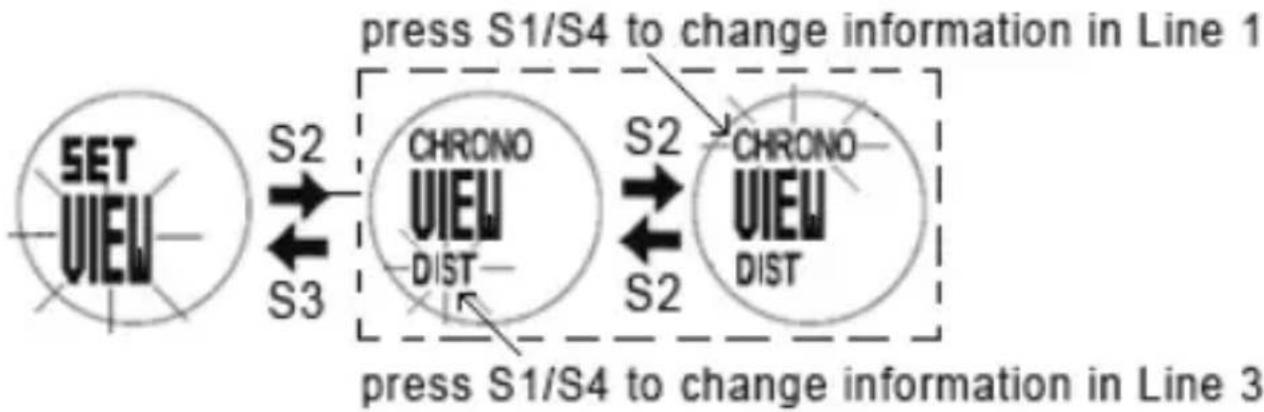
How to set the VIEW
You can change Line 1 and Line 3 display information for RUN mode.
- Press S2 while VIEW is blinking.
- Press S2 to select between Line 3 or Line 1.
- Press S2 to confirm selection.
- While Line 3 is blinking, Press S1/S4 to change the information displayed in Line 3.
- You can select from the following: Distance, Pace, Speed, Calorie, Clock, HRM and Chronograph.
- Press S2 to confirm and Line 1 will start to blink.
- Press S1/S4 to change the information to be displayed in Line 1. You can select from the following: Chronograph, Distance, Pace, Speed, Calorie, Clock and HRM.
- Press S2 to go back to Line 3 setting.
- Press S3 to exit.
- When you return back to RUN mode, the watch will now display the information in Lines1 &3 you have selected.
flowchart
graph LR
    A["SET VIEW"] -->|S2| B["CHRONO VIEW DIST"]
    B -->|S2| C["CHRONO VIEW DIST"]
    D["S3"] <----> B
    E["press S1/S4 to change information in Line 1"] --> B
    F["press S1/S4 to change information in Line 3"] --> C
How to set the NIGHT mode function:
- Press S2 while "NIGHT" is blinking. The watch will display 10 seconds blinking.
- Press S1/S4 to change to 20 sec or NIGHT ON.
- While on 10 SEC or 20 SEC setting, Press S2/S3 to accept the setting and go back to NIGHT setting screen.
- While on NIGHT ON setting screen Press S2 to accept the ON setting. The watch will display the START TIME.
- Press S1/S4 to toggle between START TIME and END TIME.
- Press S2 or wait for few seconds to set the START TIME. Hour digit will start to blink.
- Press S1/S4 to change the hour setting.
- Press S2 to change the MINUTE. Minute digits will start to blink.
- Press S1/S4 to change the minute setting.
• Press S2 to go back to START TIME setting screen. - Press S1/S4 to set the END TIME. Hour digit will start to blink.
Note: Follow the above procedure in setting the END TIME.

flowchart
graph TD
    A["SET NIGHT"] -->|S2| B["NIGHT 10SEC"]
    B -->|S1| C["NIGHT 20SEC"]
    C -->|S1| D["NIGHT ON"]
    D -->|S3| E["NIGHT STTM"]
    E -->|S3| F["NIGHT 5:00PM"]
    F -->|S2| G["NIGHT 5:00PM"]
    G -->|S2| H["NIGHT 7:00PM"]
    H -->|S2| I["NIGHT 7:00PM"]
    I -->|S2| J["End Time"]
    J --> K["NIGHT END TM"]
    K -->|S3| L["NIGHT 7:00PM"]
    L -->|S2| M["NIGHT 7:00PM"]
    M -->|S2| N["Start Time"]
    style A fill:#f9f,stroke:#333
    style B fill:#f9f,stroke:#333
    style C fill:#f9f,stroke:#333
    style D fill:#f9f,stroke:#333
    style E fill:#f9f,stroke:#333
    style F fill:#f9f,stroke:#333
    style G fill:#f9f,stroke:#333
    style H fill:#f9f,stroke:#333
    style I fill:#f9f,stroke:#333
    style J fill:#f9f,stroke:#333
    style K fill:#f9f,stroke:#333
    style L fill:#f9f,stroke:#333
    style M fill:#f9f,stroke:#333
    style N fill:#f9f,stroke:#333
Night mode settings:
• 10 SECONDS – Press S4 will turn ON the Light for 10 seconds.
• 20 SECONDS – Press S4 will turn ON the Light for 20 seconds.
- NIGHT ON – Default Start Time / End Time for NIGHT ON setting is 5 PM to 7 AM.
Following are the characteristics of NIGHT ON setting:
- Start Time and END TIME for NIGHT ON setting can be changed in SET mode/ NIGHT.
- When the Night setting is ON, pressing any button within the Start Time / End Time will turn ON the EL for 10 seconds.
- When CHRONO is running EL is always ON. When you stop the CHRONO, the light will turn OFF after 10 seconds.
- When CRONO is running and BLE is also ON and connected to a smart phone, the EL light will alternately ON and OFF.
ON for 2 seconds and OFF for 1 sec. This will allow the watch to transmit data to the Smart Pone through BLE. If you do not want the light to turn ON and OFF, turn OFF the BLE by press and HOLD S4.
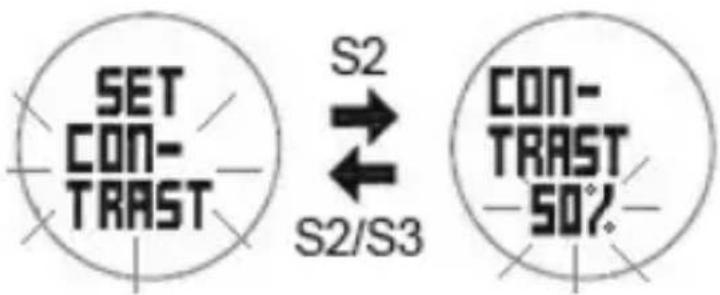
How to set the LCD display CONTRAST:
- Press S2 while "CON-TRAST" is blinking. Contrast percentage will start to blink.
- Press S1/S4 to change to your desired value. LCD Contrast range is from 10 to 100% .
- Press S2/S3 to confirm.
How to set the CHIME:
- Press S2 while "CHIME" is blinking.
- Press S1/S4 to change ON or OFF.
- Press S2/S3 to confirm.

How to set the ALARM:
- Pr ess S2 while "ALARM" is blinking. AL-1 will start to blink.
- Press S1/S1 to toggle through Alarm 1 to alarm 5.
- Press S2 to set the selected Alarm number. The HOUR digit will start to blink.
- Press S1/S4 to change the hour digit.
- Press S2 to confirm and set the MINUTE digit.
- Press S1/S4 to change the minute digit.
- Press S2 to confirm and set the Daily Alarm "ON" or "OFF".
- Press S1/S4 to change the setting.
- Press S2 to confirm and set the Chime" ON" or "OFF".
- Press S1/S4 to change setting.
- Press S2 to confirm.
- Press S3 to exit.

flowchart
graph LR
    A["alarm"] --> B["AL-1 OFF"]
    B --> C["AL-1 AM T1"]
    C --> D["AL-1 OFF"]
    D --> E["AL-1 AM T1"]
    E --> F["minute"]
    F --> G["AL-1 OFF"]
    G --> H["AL-1 AM T1"]
    H --> I["CHIME ON"]
    I --> J["S2"]
    J --> K["S3"]
    K --> L["S2"]
    L --> M["S2"]
    M --> N["S2"]
    N --> O["S2"]
    O --> P["S2"]
    P --> Q["S2"]
    Q --> R["S2"]
    R --> S["S2"]
    S --> T["S2"]
    T --> U["S2"]
    U --> V["S2"]
    V --> W["S2"]
    W --> X["S2"]
    X --> Y["S2"]
    Y --> Z["S2"]
How to set the TIMER:
- Press S2 while "TIMER" is blinking. The segment number 1 (SG-1) will start to blink.
- Press S1/S4 to change the segment number.
- Press S2 to set the HOUR. The hour digit starts to blink.
- Press S1/S4 to change the digit.
- Press S2 to set the MINUTE. The minute digit starts to blink.
- Press S1/S4 to change the digit.
- Press S2 to set the SECONDS. The second digit starts to blink.
- Press S1/S4 to change the digit.
- Press S2 to confirm.

flowchart
graph LR
    A["SET1/TIMER"] -->|S2 S3| B["timer 1 to 5"]
    B -->|S2| C["SG-I 0:01:00"]
    C -->|S2| D["SG-I 0:01:00"]
    D -->|S2| E["SG-I 0:01:00"]
    E -->|S2| F["minute"]
    F -->|S2| G["SG-I 0:01:00"]
    G -->|S2| H["second"]
    H -->|S2| I["SG-I 0:01:00"]
Acquire Satellite signals:
In order to get the correct time of day and begin using your watch, you have to acquire the Satellite signals. It may take a few minutes to get the signals. Press S1/S3 to search signal.
- Go outside to an open area away from tall buildings and trees. Orient the GPS antenna towards the sky for best reception. The antenna is located at the 12 o'clock position of the watch.
- Stand still and do not begin moving while locating the Satellites until the GPS signals are already received.
• If no Satellite signal is received, after approx. 10 minutes, the watch will go to Time mode.
How to Turn ON the GPS:
Following are the possible ways to turn On the GPS.
- Press S3 from Time mode to go to RUN mode. The watch will automatically search for GPS signal and once signal is received, it will go to "GPS GO" screen.
- Press S3 from Time mode to go to TIMER mode. The Watch will display the "GPS/INDOOR" selection screen. Select "GPS" by pressing S1 and press S2 to confirm. The watch will start searching for GPS signal and once signal is received, it will go to "GPS GO" screen.
- Press and hold S3 from any mode while GPS is initially OFF. The watch will display "GPS ON" and it will then automatically search for GPS signal. And once signal is received, it will go to "GPS GO" screen.
How to turn OFF the GPS:
- Press and hold S3 from any mode while GPS is initially ON. The watch will display "GPS OFF".
GPS signals and its meaning:
| searching GPS signal |  |
| GPS signal received |  |
| No GPS signal |
How to turn ON the HRM:
- Press S3 TIME mode to go to HRM mode. Or press and hold S2 to turn ON the HRM in any mode.
How to turn OFF the HRM:
• In any mode press and hold S2 button to turn Off the HRM.
Go for an Activity:
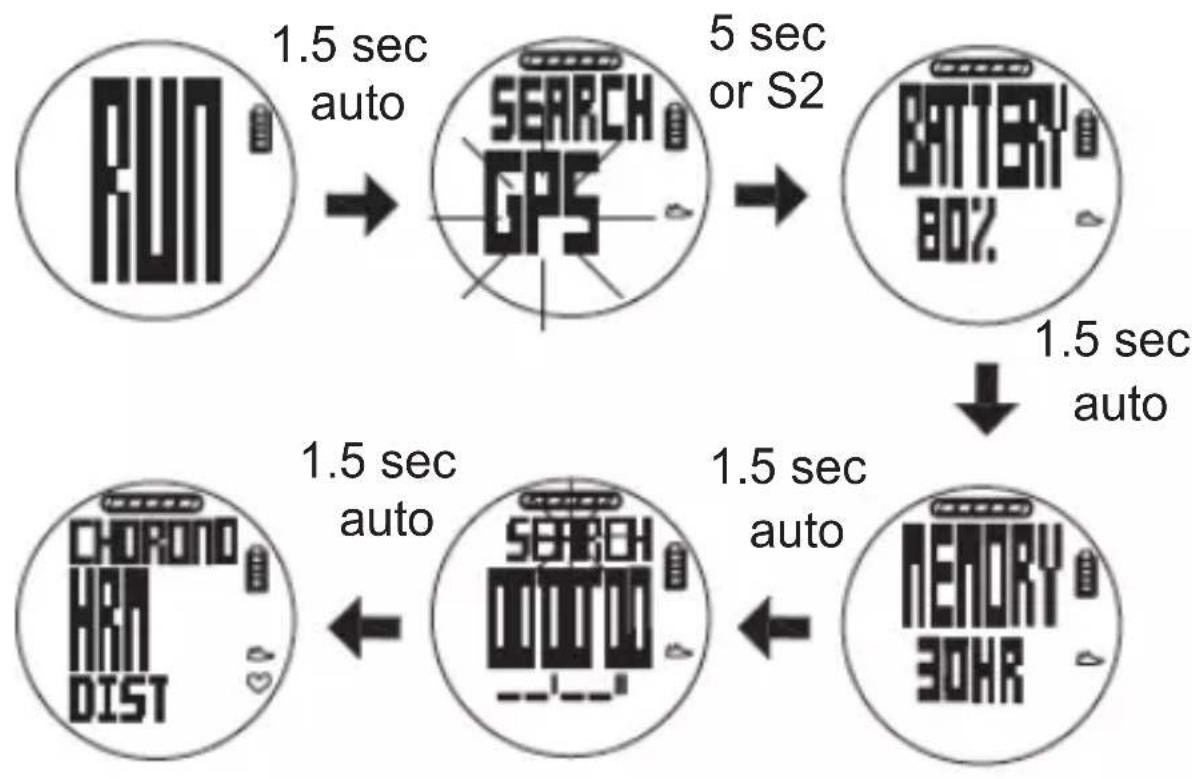
Using RUN mode:
- Press S3 to go to RUN mode.
• The watch will prompt you to GPS GO screen (if Satellite signal is received). - If GPS signal is already received, the watch will skip the SEARCH screens.
flowchart
graph TD
    A["RUN"] -->|1.5 sec auto| B["SEARCH GPS"]
    B -->|5 sec or S2| C["BATTERY 80%"]
    C -->|1.5 sec auto| D["MEMORY 30HR"]
    D -->|1.5 sec auto| E["SEARCH DIST"]
How to START, take LAP, STOP, and SAVE:
- Press S1 to start, or re-start.
- Press S4 to take lap. The display will freeze for 10 seconds.
• The watch can take up to 300 Laps per data file. - Press S1 to stop.
- Press and hold S1 or press S4 to save your data.
• Maximum of 50 data files can be saved (total files for all modes).

flowchart
graph TD
    A["STOP\nSTOP\n5.62\n55'20"68"] -->|press & hold S1| B["HOLD TO SAVE"]
    B -->|2-3 secs auto| C["SAVE/TRK DATA\n1208207"]
    C -->|2 sec auto| D["TIME mode"]
    E["S1 (start)"] --> F["S1 (restart)"]
    F --> G["55'20"68\n5.62"]
    G --> H["S4 (LAP)"]
    H --> I["take LAP\nLAP 01\n55'20"68\n55'20"68"]
    I --> J["10 sec auto"]
    J --> K["Running\n55'20"68\n5.62"]
    K --> L["lap time\nsplit time"]
    L --> M["LAP 01\n55'20"68\n55'20"68\nauto lap"]
    M --> N["OR"]
    N --> O["Start"]
NOTES:
• After saving your exercise, the watch will go back to Time mode, the HRM and GPS will stay ON or another 5 minutes.
- If you will STOP but will not save your exercise, then go to TIME mode by pressing S3, the HRM and GPS will auto OFF.
How to change views in RUN mode:
- Press S2 to change the information displayed in Line2 (middle row).
- Following are the information that you can display in line 2: HRM, Chrono, Distance, Pace, Speed, Target, Step, Calorie, and Clock.
• If HRM is OFF, the HRM value in the first screen will be replaced by PACE.

flowchart
graph TD
    A["CHRONO\n00'00"00\nHRM"] -->|S2| B["CHRONO\nHRM\nDIST"]
    B -->|S2| C["CLOCK\n0.00"]
    C -->|S2| D["10:28\n0.00"]
    D -->|S2| E["120\n0.00"]
    E -->|S2| F["00'00"00\n00'00"00\n120"]
    F -->|2 sec auto| G["->"]
    G --> H["->"]
    H --> I["->"]
    I --> J["->"]
    J --> K["->"]
    K --> L["->"]
    L --> M["->"]
    M --> N["->"]
    N --> O["->"]
    O --> P["->"]
    P --> Q["->"]
    Q --> R["->"]
    R --> S["->"]
    S --> T["->"]
    T --> U["->"]
    U --> V["->"]
    V --> W["->"]
    W --> X["->"]
    X --> Y["->"]
    Y --> Z["->"]
    Z --> A
Using HRM mode:
- Press S3 to go to HRM mode.
- The watch will display the Battery level, remaining Memory and then the reset screen of HRM mode. The reset screen view is the last view you have previously selected.

flowchart
graph LR
    A["HRM"] -->|1.5 sec auto| B["BATTERY 80%"]
    B -->|1.5 sec auto| C["MEMORY 30H"]
    C -->|1.5 sec auto| D["CHRONO HRM CAL"]
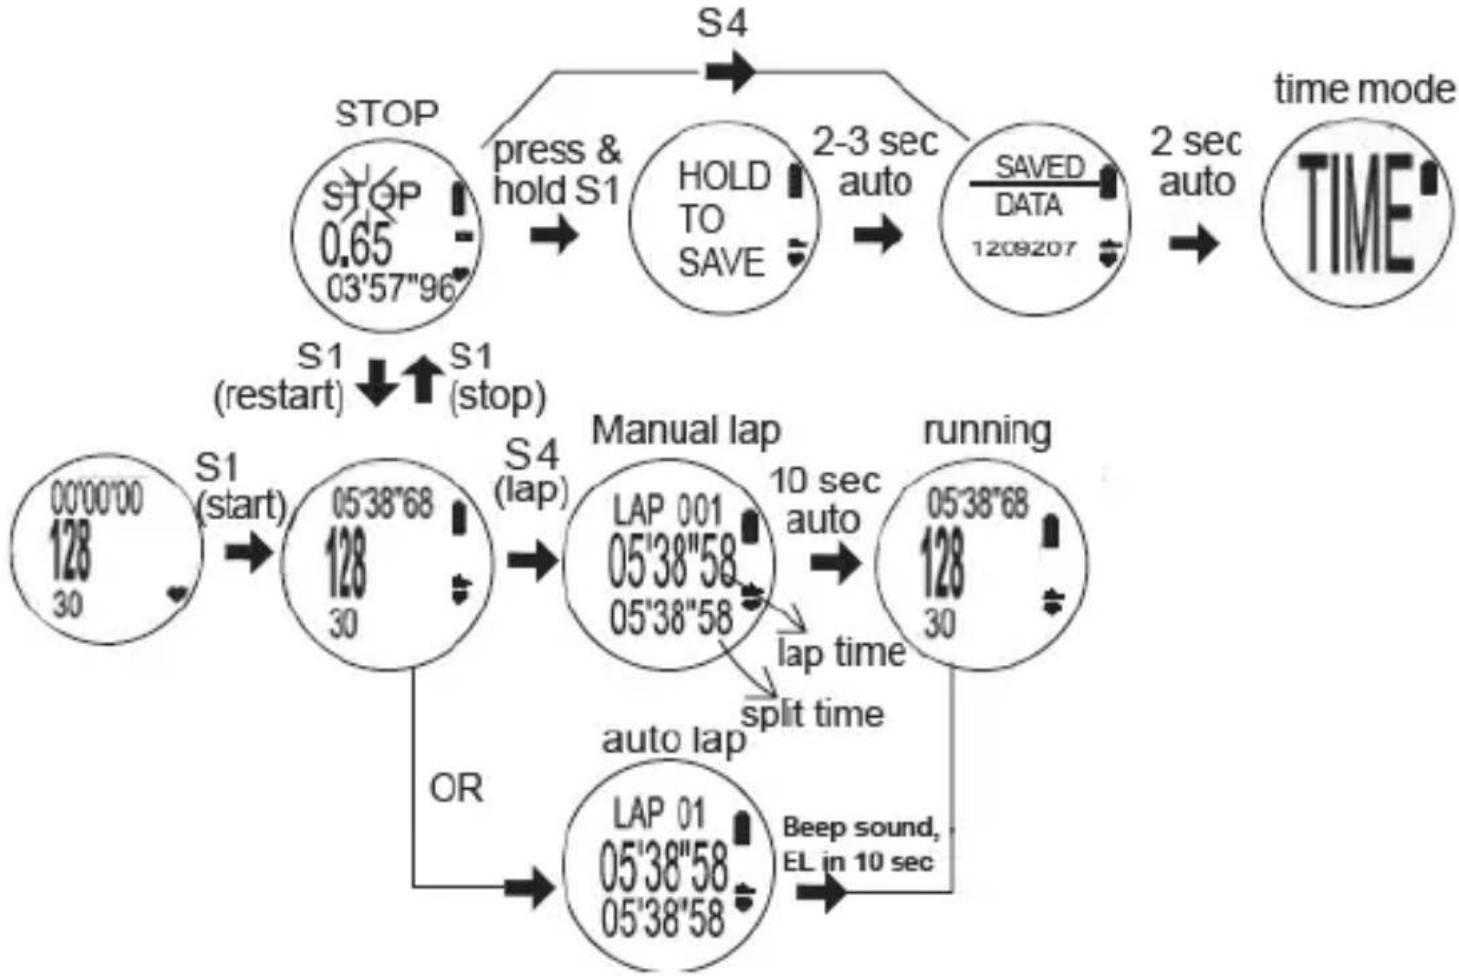
How to START, STOP, and SAVE:
- Press S1 to start, or re-start.
- Press S4 to take lap. The display will freeze for 10 seconds.
• The watch can take up to 300 laps per data file. - Press S1 to stop.
- Press and hold S1 or press S4 to save your data.
• Maximum of 50 data files can be saved (total files for all modes).
flowchart
graph TD
A["STOP<br>0.65<br>03'57"96""] --> B["HOLD TO SAVE"]
B --> C["2-3 sec auto"]
C --> D["SAVED DATA<br>1208207"]
D --> E["time mode TIME"]
F["S1 (start)<br>00'00'00<br>30"] --> G["Manual lap<br>05'38"68<br>128<br>30"]
G --> H["LAP 001<br>05'38"58<br>05'38"58"]
H --> I["running<br>05'38"68<br>128<br>30"]
I --> J["Auto lap<br>LAP 01<br>05'38"58<br>05'38"58"]
J --> K["OR"]
K --> L["Auto lap<br>LAP 01<br>05'38"58<br>05'38"58"]
L --> M["Split time"]
M --> N["lap time"]
N --> O["10 sec auto"]
O --> P["Manual lap"]
P --> Q["S4 (lap)"]
Q --> R["S1 (restart)"]
R --> S["S1 (stop)"]
S --> T["S4"]
T --> U["S4"]
U --> V["S4"]
V --> W["S4"]
W --> X["S4"]
X --> Y["S4"]
Y --> Z["S4"]
Z --> AA["S4"]
AA --> AB["S4"]
AB --> AC["S4"]
AC --> AD["S4"]
AD --> AE["S4"]
AE --> AF["S4"]
AF --> AG["S4"]
AG --> AH["S4"]
AH --> AI["S4"]
NOTES:
• After saving your exercise, the watch will go back to Time mode, the HRM will stay ON or another 5 minutes.
- If you will STOP but will not save your exercise, then go to TIME mode by pressing S3, the HRM will auto OFF.
How to change views in HRM mode:
- Press S2 to change the information displayed in Line 3 (bottom row).
- Following are the information you can display in line 3: Calorie, In Zone, Distance, Pace, Speed, Step, and Clock.

flowchart
Automotive status flow diagram showing S2 and 2 sec auto transitions between CHRONO, HRM CAL, INZONE, CLOCK, and 128 time slots with timestamps.Using CHRONO mode:
- Press S3 to go to CHRONO mode.
- Battery status will be shown

flowchart
graph LR
    A["CHRON"] -->|1.5 sec. auto| B["BATTERY 80%"]
    B -->|1.5 sec. auto| C["MEMORY 30H"]
    C -->|1.5 sec. auto| D["CHRONOLAP HRM"]
    D -->|1.5 sec. auto| E["05'38"68 05'38"68 108"]
How to START, take LAP, STOP, and SAVE:
- Press S1 to start, or re-start.
- Press S4 to take lap. The display will freeze for 10 seconds.
• The watch can take up to 300 laps per data file. - Press S1 to stop.
- Press and hold S1 or press S4 to save your data.
• Maximum of 50 data files can be saved (total files for all modes).

flowchart
graph TD
    A["S4"] --> B["HOLD TO SAVE"]
    B --> C["2-3s auto"]
    C --> D["SAVED DATA 1209207"]
    D --> E["time mode TIME"]
    F["S1 (start)"] --> G["05'38"68 108"]
    G --> H["S1 (restart)"]
    H --> I["05'38"68 108"]
    I --> J["S4 (lap)"]
    J --> K["manual lap LAP 001 05'38"68 05'38"68"]
    K --> L["lap time split time"]
    L --> M["running 05'48"68 00'10"00 108"]
    M --> N["beep sound, EL on 10s"]
    O["OR"] --> P["auto lap LAP 01 05'38"68 05'38"68"]
    P --> Q["run"]
NOTES:
• After saving your exercise, the watch will go back to Time mode, the HRM will stay ON or another 5 minutes.
- If you will STOP but will not save your exercise, then go to TIME mode by pressing S3, the HRM will auto OFF.
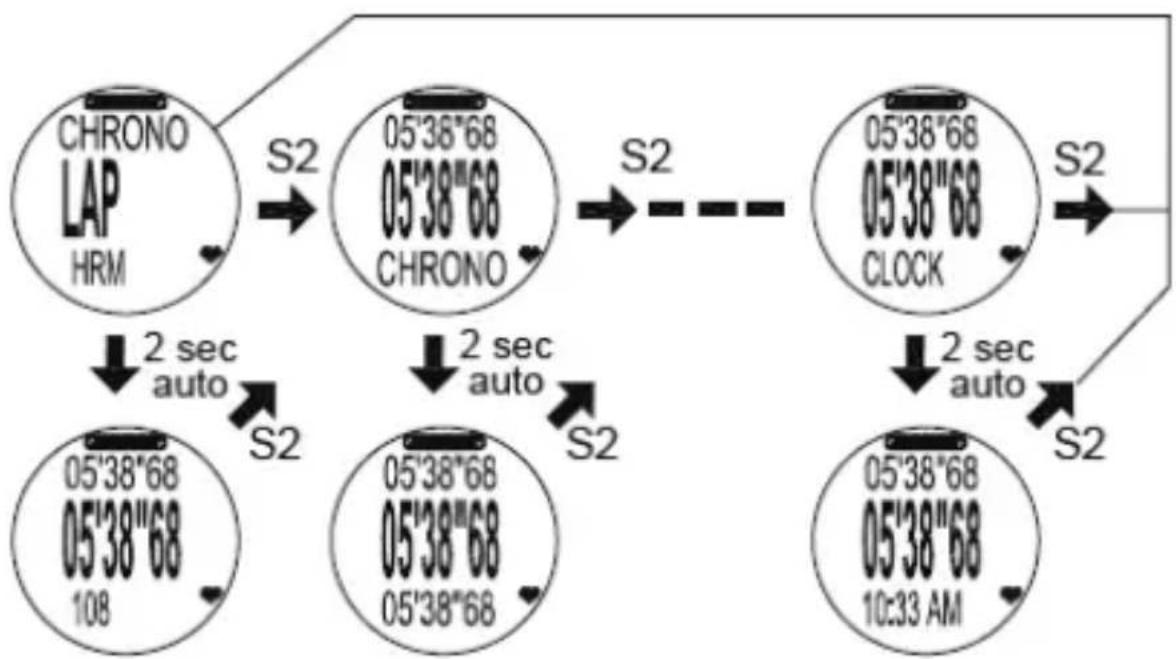
How to change views in CHRONO mode
- Press S2 to change the information displayed in Line 3 (bottom row).
- Following are the information you can display in line 3: HRM, Chrono, Distance, Pace, Speed, Step, Calorie, and Clock.
flowchart
graph TD
    A["CHRONO LAP HRM"] -->|S2| B["05'38"68 CHRONO"]
    B -->|S2| C["05'38"68 CLOCK"]
    C -->|S2| D["05'38"68 10:33 AM"]
    D -->|S2| E["05'38"68 108"]
    E -->|S2| F["2 sec auto"]
    F --> G["05'38"68 05'38"68"]
    G -->|S2| H["2 sec auto"]
    H --> I["05'38"68 05'38"68"]
    I -->|S2| J["2 sec auto"]
    J --> K["05'38"68 05'38"68"]
    K -->|S2| L["2 sec auto"]
Using TIMER mode:
- Press S3 to go to TIMER mode.
- The Watch will display the "GPS / INDOOR" selection screen. Press S1 to select either GPS or INDOOR" and press S2 to confirm.
- Please set the TIMERS (in SET mode) first before using this mode.
• The watch has 6 interval timers (SG-1 to SG-6) segment 1 to segment 6.
• The default values for all segments are 0:00:00. - When a segment reaches zero, there will be a beep sound. The cycle will loop for 50 loops (LO1 to L50) and stop.
If only 1 segment timer is set and the other segments are set to zero, only that segment will countdown and loop up to 50 loops.


flowchart
graph TD
    A["GPS ON"] --> B["S 2"]
    B --> C["SEARCH GPS"]
    C --> D["BATTERY 80%"]
    D --> E["MEMORY 30H"]
    E --> F["SEARCH 00 00 00"]
    F --> G["1:00:00 S1-L01"]
    H["GPS OFF"] --> I["S 2"]
    I --> J["BATTERY 80%"]
    J --> K["MEMORY 30H"]
    K --> L["1:00:00 S1-L01"]
    M["1.5 sec. auto"] --> N["GPS ON"]
    N --> O["GPS ON"]
    P["1.5 sec. auto"] --> Q["5 sec. auto"]
    R["1.5 sec. auto"] --> S["1.5 sec. auto"]
    T["1.5 sec. auto"] --> U["1.5 sec. auto"]
    V["1.5 sec. auto"] --> W["1:00:00 S1-L01"]
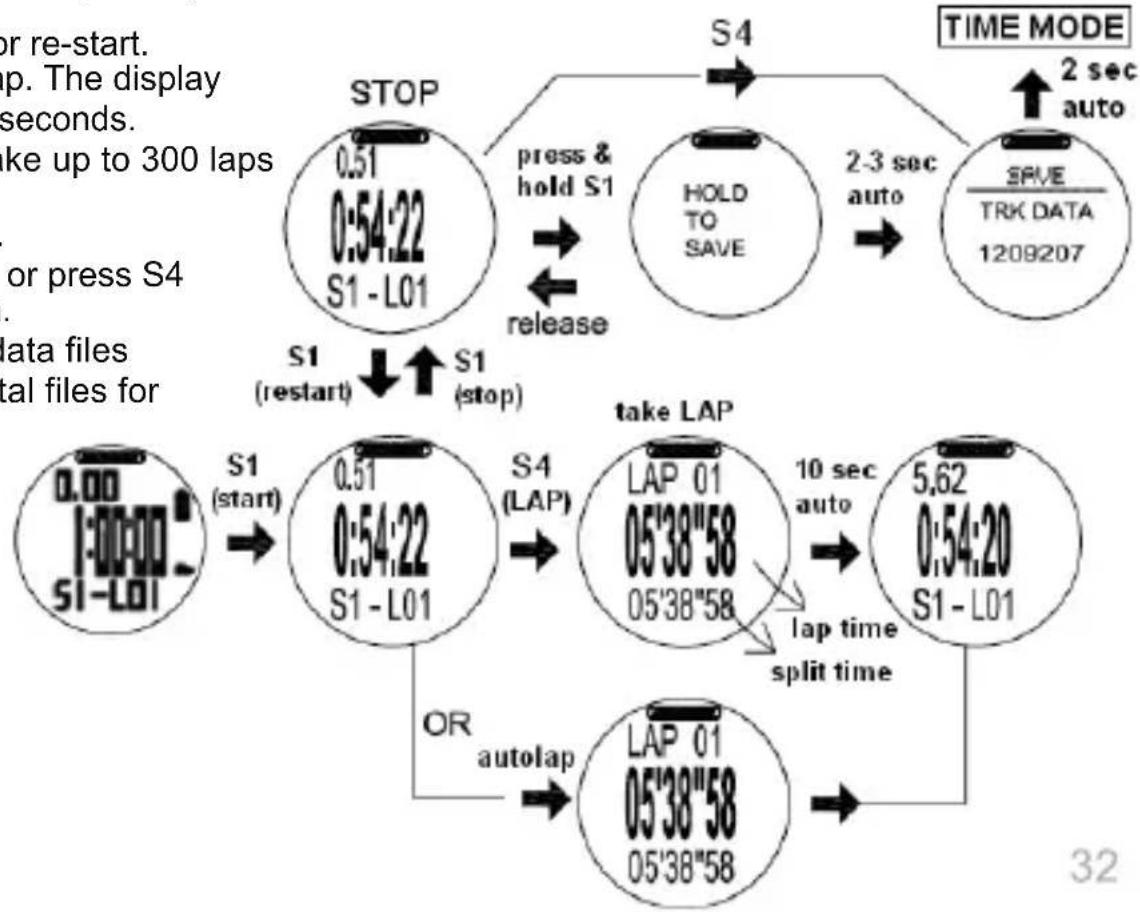
How to START, take LAP, STOP, and SAVE:
- Press S1 to start, or re-start.
- Press S4 to take lap. The display will freeze for 10 seconds.
• The watch can take up to 300 laps per data file. - Press S1 to stop.
- Press and hold S1 or press S4 to save your data.
• Maximum of 50 data files can be saved (total files for all modes).
flowchart
graph TD
    A["STOP 0.51 0:54:22 S1 - L01"] -->|press & hold S1| B["HOLD TO SAVE"]
    B -->|2-3 sec auto| C["SAVE/TRK DATA 1209207"]
    C -->|TIME MODE 2 sec auto| D[">"]
    E["S1 (restart) S1 (stop)"] --> F["S1 (start)"]
    F --> G["0:54:22 S1 - L01"]
    G --> H["S4 (LAP)"]
    H --> I["take LAP 05'38"58 05'38"58"]
    I --> J["10 sec auto"]
    J --> K["5.62 0:54:20 S1 - L01"]
    K --> L["LAP 01 05'38"58 05'38"58"]
    L --> M[">"]
    N["OR autolap"] --> O["LAP 01 05'38"58 05'38"58"]
    O --> P[">"]
NOTES:
• After saving your exercise, the watch will go back to Time mode, the HRM will stay ON or another 5 minutes.
- If you will STOP but will not save your exercise, then go to TIME mode by pressing S3, the HRM and GPS will auto OFF.
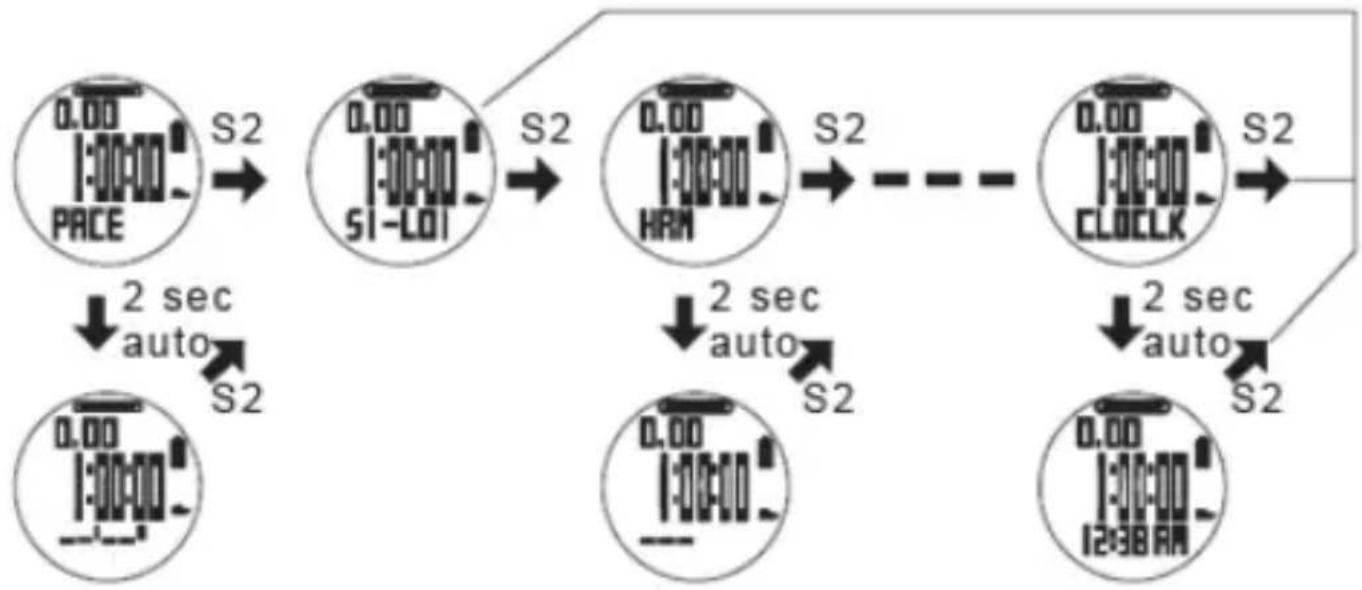
How to change views in TIMER mode:
- Press S2 to change the information displayed in Line 3 (bottom row).
• Following are the information you can display in line 3: HRM, Chrono, Distance, Pace, Speed, Step, Calorie, and Clock.
flowchart
graph TD
    A["0.00 PACE"] -->|S2| B["0.00 SI-LOI"]
    B -->|S2| C["0.00 HRM"]
    C -->|S2| D["0.00 CLOCK"]
    D -->|S2| E["0.00 12:38AM"]
    E -->|S2| F["2 sec auto"]
    F -->|S2| G["2 sec auto"]
    G --> H["0.00"]
    H --> I["2 sec auto"]
General Operations
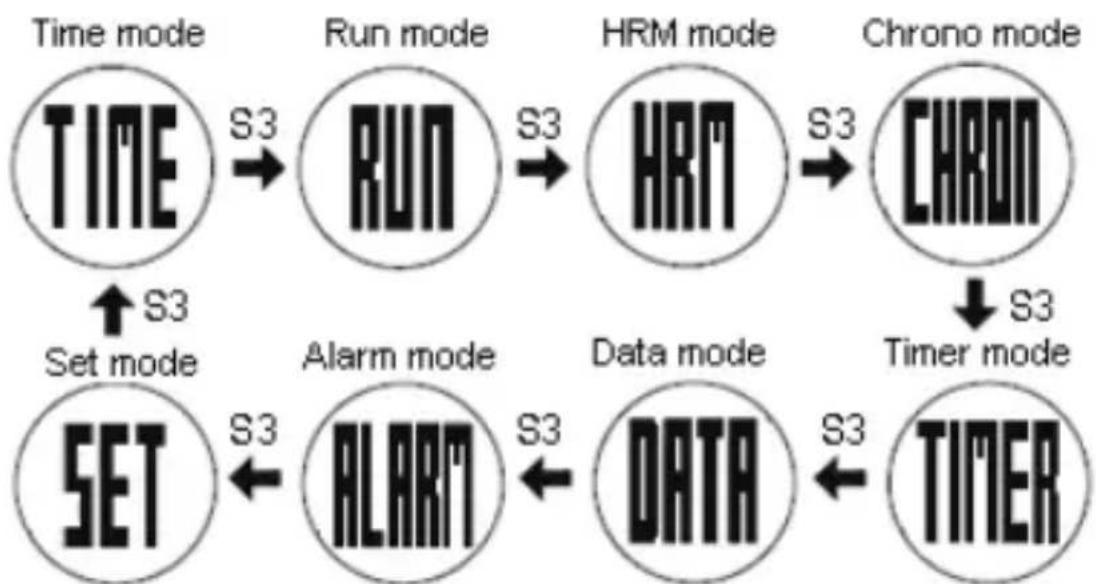
• The Watch has the following main modes: Time, Run, HRM, Chronograph, Timer, Data, Alarm and Set modes. Press S3 to scroll through these modes.
flowchart
graph TD
    A["TIME"] -->|S3| B["RUN"]
    B -->|S3| C["HRM"]
    C -->|S3| D["CHRON"]
    D -->|S3| E["TIMER"]
    F["SET"] -->|S3| G["ALARM"]
    G -->|S3| H["DATA"]
    H -->|S3| I["TIMER"]
    style A fill:#f9f,stroke:#333
    style B fill:#f9f,stroke:#333
    style C fill:#f9f,stroke:#333
    style D fill:#f9f,stroke:#333
    style E fill:#f9f,stroke:#333
    style F fill:#f9f,stroke:#333
    style G fill:#f9f,stroke:#333
    style H fill:#f9f,stroke:#333
    style I fill:#f9f,stroke:#333
NOTES:
- IF RUN, CHRONO, HRM, or TIMER has already started, not all modes will be displayed as you press S3. Some modes will be hidden or skipped.
- When the watch is in SLEEP mode, RUN, HRM, CHRONO, and TIMER modes will also be hidden or skipped as you press S3.
• See table below to summarize the conditions:
| SLEEP | RUN | HRM | CHRONO | TIMER(00:00:00) | TIMER(NON 00:00:00) |
| √ | X X X X X | ||||
| X | √ | X X X | √ (GPS ON) | ||
| X X | √ | √ | X | √ (GPS OFF) |
Legend:
X - This mode will be hidden as you press S3
√ - This mode is shown as you press S3
TIME mode and Daily Activity
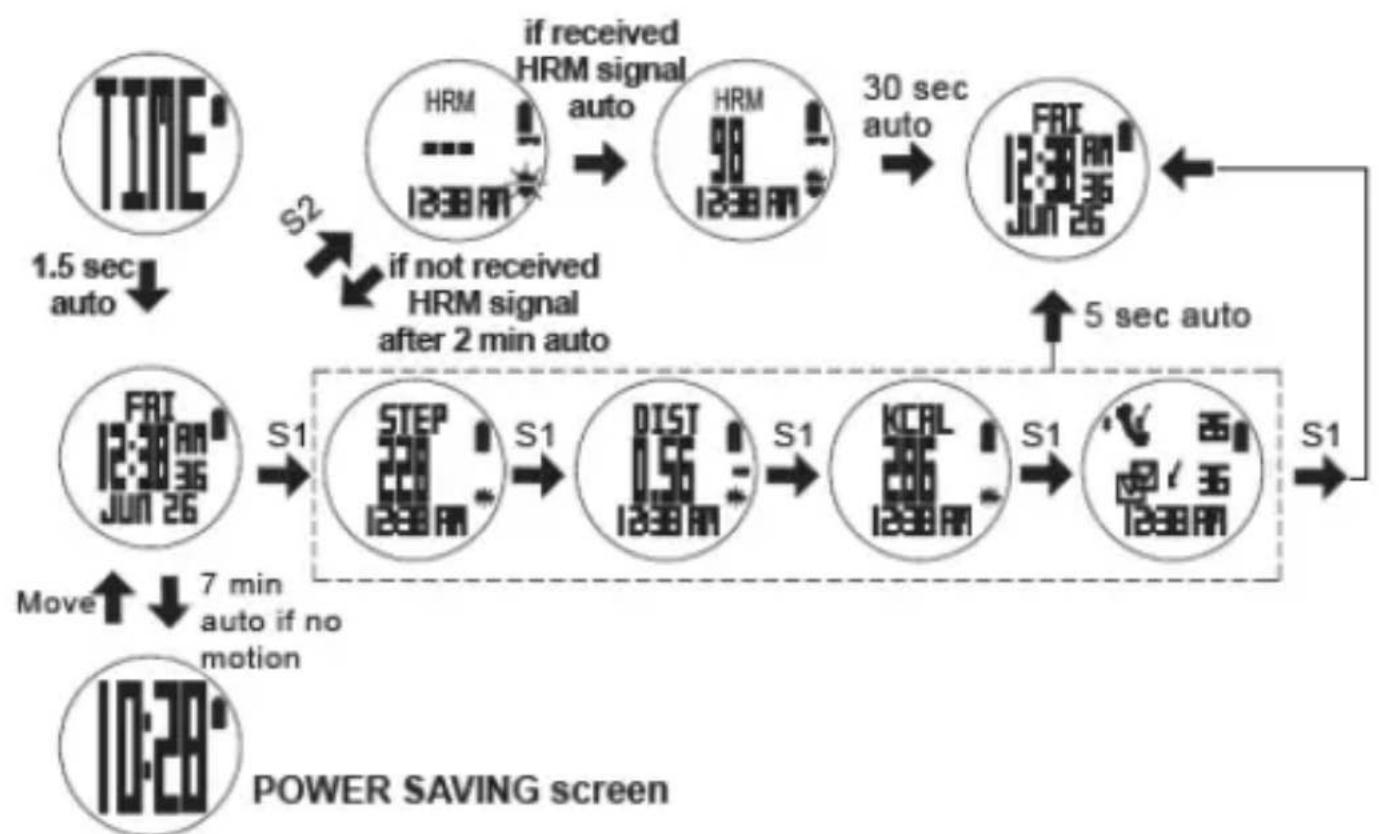
- Press S3 from SET mode to TIME mode. The watch will momentarily display TIME and then display Time 1.
• Press S2 to view your Heart rate for 30 seconds. - Press S1 to view your activities for the day. You can view your Daily STEPS, DISTANCE, CALORIES, and Call & Message notifications. These screen will display for 5 seconds and auto go back to TIME screen.
- If the 3D sensor becomes inactive (Shoe icon is OFF) and there is no activity for a total of approximately 7 minutes, the watch will auto go to Power saving screen.
- Move the watch to activate the 3D sensor (Shoe icon blinking) and the watch will go back to TIME screen.
flowchart
graph TD
    A["TIME"] -->|1.5 sec auto| B["HRM"]
    B --> C{if received HRM signal auto}
    C -->|30 sec auto| D["FRI"]
    D --> E["5 sec auto"]
    E --> F["S1"]
    F --> G["STEP"]
    G --> H["S1"]
    H --> I["DIST"]
    I --> J["S1"]
    J --> K["KCFL"]
    K --> L["S1"]
    L --> M["FRI"]
    M --> N["S2"]
    N --> O{if not received HRM signal after 2 min auto}
    O -->|7 min auto if no motion| P["POWER SAVING screen"]
    P --> Q["Move"]
Note: Your Daily Data (Steps, Distance, and Calories) will reset to zero every 12 midnight
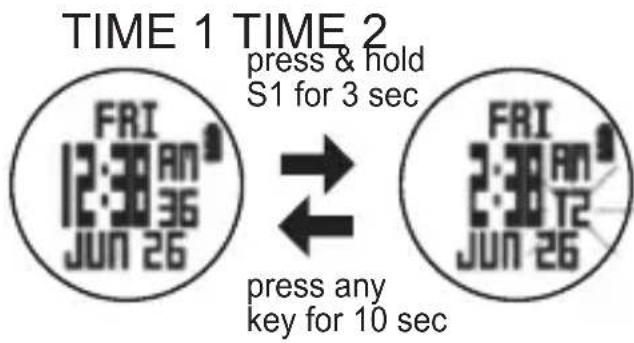
How to view Time 2:
- Press and hold S1 for 3 sec to view Time 2.
- T2 will start to blink and the watch will display Time 2 for 10 seconds and auto go back to Time 1.
DATA mode
How to enter DATA mode, view details, and delete Data:
- Press S3 to go to Data mode. The watch will momentarily display "DATA" and then the latest data file. If there is no data available, it will display "NO DATA".
- Press S1 to scroll through the various data files.
- Press S2 to enter the selected data file.
- Press S1/S2 to forward view the details.
• Start Time / End Time / Distance
• CHRONO / Distance / Calorie
• CHRONO / Ave Pace / Max Pace
• STEP / Ave Speed / Max Speed
• Ave HRM/ Max HRM / In-Zone
- Lap 1 up to last lap view
- Timer data
• VIEW / DEL / DELETE ALL sub menus (press S1 to select).
- Press S3 to exit.
Note: Timer data views will not be shown if no Timer data.
Deleting Data/ All Data:
- Enter data mode.
- Press S1 to select data to be deleted
• Press S2 repeatedly until the VIEW / DELETE / DEL ALL screen appears. - Press S1 to select VIEW / DELETE / DELETE ALL.
• Press and hold S2 to delete selected data if you select DELETE. - Press and hold S2 again to delete all data if you select DEL ALL.

flowchart
graph TD
    A["DATA mode"] -->|OR| B["NO DATA"]
    B --> C["DATA mode"]
    C --> D["03 G"]
    D --> E["D03-03 1210-1"]
    E --> F["S1"]
    F --> G["D03-02 1210-1"]
    G --> H["S1"]
    H --> I["D03-01 1210-1"]
    I --> J["S1"]
    J --> K["1210103 VIEW DELETE DEL ALL VIEW"]
    K --> L["S1"]
    L --> M["1210103 VIEW DELETE DEL ALL"]
    M --> N["S1"]
    N --> O["1210103 VIEW DELETE DEL ALL"]
    O --> P["S4"]
    P --> Q["START END DIST"]
    Q --> R["S1/S2"]
    R --> S["S4"]
    S --> T["CHRONO DIST CAL"]
    T --> U["S1/S2"]
    U --> V["S4"]
    V --> W["CHRONO AV PACEMIX PACE"]
    W --> X["S1/S2"]
    X --> Y["S4"]
    Y --> Z["STEP AV SPD MAX SPD"]
    Z --> AA["S1/S2"]
    AA --> AB["S4"]
    AB --> AC["AV HRM MAX HRM IN ZONE"]
    AC --> AD["S1/S2"]
    AD --> AE["S4"]
    AE --> AF["90 119 2:03:50"]
    AF --> AG["S1/S2"]
    AG --> AH["LAP 1"]
    AH --> AI["S1/S2"]
    AI --> AJ["LAP 1 TM 13°12'56" DST 5.00 SPD 10.5 CAL 127"]
    AJ --> AK["S4"]
    AK --> AL["LAP X TM 13°12'56" DST 5.00 SPD 10.5 CAL 127"]
    AL --> AM["S2"]
    AM --> AN["TMPX TM 13°12'56" DST 5.00 SPD 10.5 CAL 127"]
    AN --> AO["S4"]
    AO --> AP["LAP 1 00:20:00 1.85"]
    AP --> AQ["Timer data"]
    AQ --> AR["S1-01 00:10:00 1.05"]
    AR --> AS["S2-01 00:20:00 1.85"]
    AS --> AT["Last loop"]
    AT --> AU["S1"]
    AU --> AV["last loop"]
Note: Timer views won't appear if there are no Timer data.

Sample data number: D03-03 1031-1 02 G
| D | Data |
| 03 | Total number of files |
| 03 | File number counter |
| 10 | Month |
| 31 | Date |
| 1 | Refer to Time 1 |
| 02 | File number of the day |
| G | GPS workout, H -for INDOOR workout |
ALARM mode
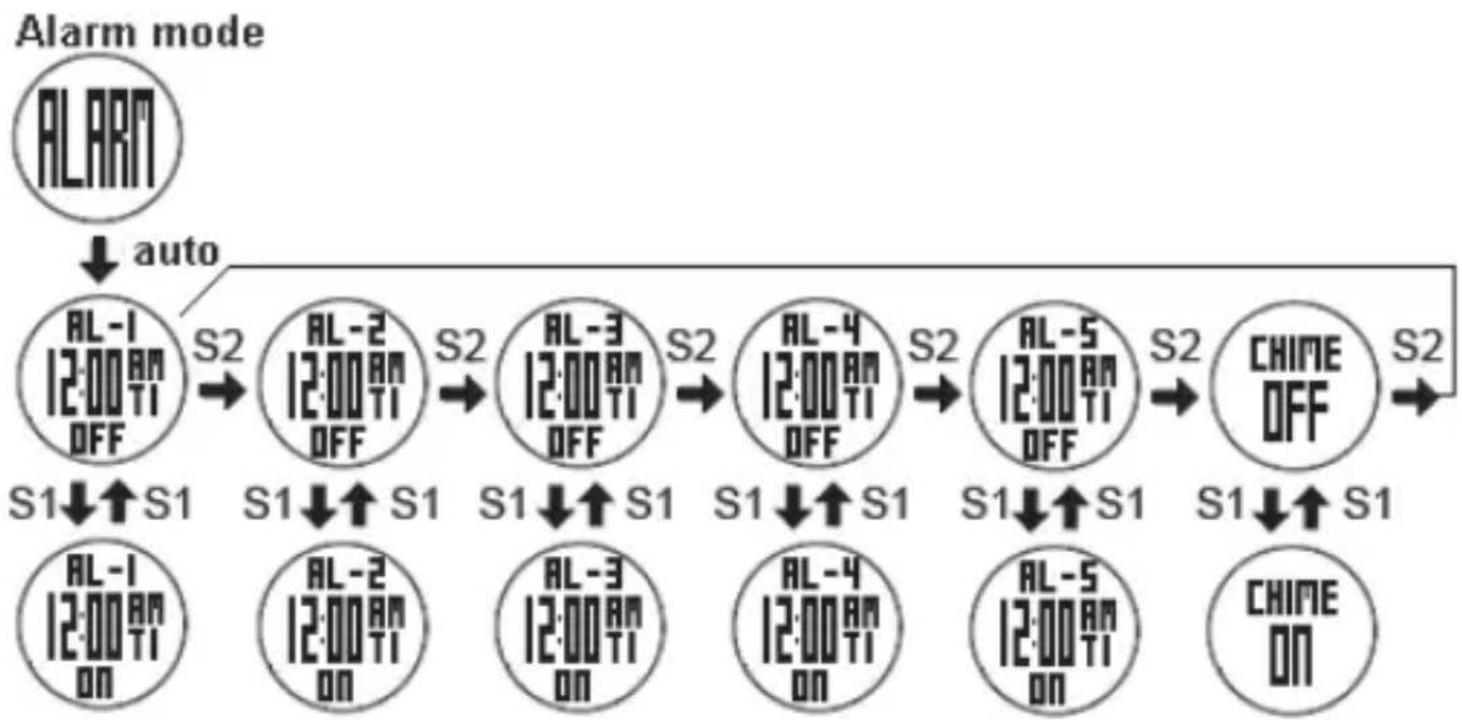
How to enter Alarm mode
- Press S3 to go to ALARM mode.
- Press S2 to view Alarm 1 to Alarm 5 and Chime.
- Press S1 to turn ON or OFF the Alarm and Chime.
- Press S3 to exit.
flowchart
graph TD
    A["ALARM"] --> B["AL-1 12:00 AM OFF"]
    B --> C["S2"]
    C --> D["AL-2 12:00 AM OFF"]
    D --> E["S2"]
    E --> F["AL-3 12:00 AM OFF"]
    F --> G["S2"]
    G --> H["AL-4 12:00 AM OFF"]
    H --> I["S2"]
    I --> J["AL-5 12:00 AM OFF"]
    J --> K["S2"]
    K --> L["CHIME OFF"]
    L --> M["S2"]

    N["AL-1 12:00 AM ON"] --> O["S1↓↑S1"]
    P["AL-2 12:00 AM ON"] --> Q["S1↓↑S1"]
    R["AL-3 12:00 AM ON"] --> S["S1↓↑S1"]
    T["AL-4 12:00 AM ON"] --> U["S1↓↑S1"]
    V["AL-5 12:00 AM ON"] --> W["S1↓↑S1"]
    X["CHIME ON"] --> Y["S1↓↑S1"]
Battery:
The Watch is powered by a built-in lithium-ion battery that will require approximately 4-5 hours charging time using the USB cable. Please read above (Step 2) battery charging for details.
Battery Life:
The battery will last for 8.0 hrs typical in a single charge. But this will vary depending on Customer's use.
Battery Replacement:
The battery on this watch is not User replaceable and it is highly recommended to be done by an authorized service personnel only.
Troubleshooting guide
| PROBLEM/ QUESTION | SOLUTION/ ANSWER |
| I cannot get a GPS signal | Take your GPS Watch outdoors and away from trees and tall buildings. Remain stationary and try acquiring the Satellite signal again. Be sure that the antenna (6 o'clock position) is pointing towards the sky for better signal reception. |
| Can I reset the Watch? | You can reset the Watch by pressing S1, S2, S3, and S4 together. The date and time will be reset to default values. You can set it again manually or automatically thru GPS. |
| Will my data and personal settings be lost after Watch reset? | Your data and personal settings are saved in the flash memory and will not be lost after Watch reset. |
| My heart rate data seems inaccurate. | - If the Heart rate data displayed in the watch is not stable or erratic, try to move the watch along your forearm within the best wearing position as illustrated in page 1.- Your skin should be no SCARS or any other object in your skin that will interfere with the sensor.- The heart rate is taken directly through your skin to the watch sensor, so it is very important that there are no obstructions that will interfere with the transmission of the Heart rate data.- Tryto wear the watch on your other wrist. |
Guarantee
Please keep the proof of purchase for this device for the entire duration of the guarantee period, as it must be produced in the event of any claim.
You (as the end user) receive a 24-month guarantee from the date of sale. The article has been manufactured using the most modern production methods and subjected to strict quality controls.
Please contact only the manufacturer (not the dealer where you purchased it) in the event of any defects during the guarantee period.
Please contact us: support@first-servicecenter.de or facebook.com/a-rivalpoweryourlife
The guarantee does not cover damage caused by improper use or external influence (water, falling, sunlight, breakage or impact).
User information/Contact
If your device has a defect or you have problems with it, please contact our Service Center: eMail: support@first-servicecenter.de
If you need to send your device to us, please attend to the following points:
- Use only the original packaging
- Add a detailed error description
- Add your full name and address and a copy of your purchase receipt
- Stamp and send the package to us (sufficient postage)
Address of our Service Center:
First Service Center. Kleine Düwelstr 21. DE-30171 Hannover/Germany
Please contact us: eMail: support@first-servicecenter.de Facebook: facebook.com/a-rivalpoweryourlife Webpage: a-rival.de
Declaration of Conformity
Hereby Baros GmbH, declares, that the device SpoQ HR / SQ-200, is in compliance with the essential requirements and other relevant regulations of Directive 1999/5/EC.
The Declaration of Conformity can be found at: www.a-rival.de
GPS-Laufuhr
Herzfrequenz-Sensor
Schrittzähler
FITNESS-ARMBAND
GPS-Golfuhr
Şauerstoffmessgerät
Blutdruckmessgerät
Körperanalysewaage
Ernährungswaage
CarCam aQtionCam

natural_image
Woman in dynamic pose mid-air, wearing pink top and blue pants, with colorful sneakers (no text or symbols visible)Notes
- User Manual
- Introduction
- Know your Watch
- Switching on and off your Watch:
- WARNING:
- Wear the watch properly in your forearm:
- Important note:
- Caring for your Watch:
- Charging the Battery:
- Battery low condition:
- Water immersion:
- Language
- How to pair the watch with Smartphone:
- Notes:
- How to Disconnect the Smartphone and the watch:
- Incoming Call or message notification function:
- Incoming Call notification:
- Incoming Message notification:
- Sleep notification function:
- Sleep notification:
- Wake up notification:
- Configure your Watch:
- How to set the AUTOLAP:
- How to set Target SPEED or Target PACE
- When Target SPEED/ PACE is ON, ALERT ON:
- When Target SPEED/ PACE is ON, ALERT OFF:
- When Target SPEED/ PACE is OFF:
- How to set AUTO PAUSE
- AUTO PAUSE Function in RUN Mode:
- How to set the TIME:
- GPS setting:
- MANUAL setting: (Default)
- How to set the UNIT:
- How to set USER details:
- How to set the HRM:
- How to set the VIEW
- How to set the NIGHT mode function:
- Night mode settings:
- How to set the LCD display CONTRAST:
- How to set the CHIME:
- How to set the ALARM:
- How to set the TIMER:
- Acquire Satellite signals:
- How to Turn ON the GPS:
- How to turn OFF the GPS:
- How to turn ON the HRM:
- How to turn OFF the HRM:
- Go for an Activity:
- Using RUN mode:
- How to START, take LAP, STOP, and SAVE:
- How to change views in RUN mode:
- Using HRM mode:
- How to START, STOP, and SAVE:
- How to change views in HRM mode:
- Using CHRONO mode:
- How to change views in CHRONO mode
- Using TIMER mode:
- How to change views in TIMER mode:
- General Operations
- TIME mode and Daily Activity
- How to view Time 2:
- DATA mode
- How to enter DATA mode, view details, and delete Data:
- Deleting Data/ All Data:
- ALARM mode
- How to enter Alarm mode
- Battery:
- Battery Life:
- Battery Replacement:
- Guarantee
- User information/Contact
- Address of our Service Center:
- Declaration of Conformity
- GPS-Laufuhr
- GPS-Golfuhr
- Notes
Brand : A-Rival
Model : SpoQ HR
Category : Sports Watch