NAV-PA83 - Gps A-Rival - Free user manual and instructions
Find the device manual for free NAV-PA83 A-Rival in PDF.

User questions about NAV-PA83 A-Rival
0 question about this device. Answer the ones you know or ask your own.
Ask a new question about this device
Download the instructions for your Gps in PDF format for free! Find your manual NAV-PA83 - A-Rival and take your electronic device back in hand. On this page are published all the documents necessary for the use of your device. NAV-PA83 by A-Rival.
USER MANUAL NAV-PA83 A-Rival
natural_image
Blank tablet device interface with control buttons at bottom (no text or symbols on screen)a→rIVAL PAD
Usermanual
Hotline +49 (0) 511 - 270 496 90
www.a-rival.de * support@a-rival.de
Dear Customer :
Firstly, we really appreciate we can provide our best service to you!
Please kindly read this instruction before you start using the product.
This Instruction manual can explain product basic feature, can help you to well operate the product and understand all functions, corresponding operation message, suggestion, and cautions. Please also make sure Warranty card are attached with the product, it stated all regulations or additional services providing.
Please read it carefully to avoid any un-necessary problems happen. You will find this powerful product have many advance feature. You will enjoy much fun with internet surfing and multi-media entertainment.
Notice : The content of this instruction manual is correct when publishing. And you may find minor difference with actual product, because we are always keep improving on the product, includes hardware, software, features, specification or outlook design.
(Our company reserves the right to modify, change or improve the product features, design or specification, etc. without further notice!)
- Technical Specification....4
- Outlook Preview......5
3.1 Outlook Diagram 5
3.2 TF Card Plug and Unplug....6
3.3 Battery Charging....6
3.4 Connection Adaptor....7
- First attempt....7
4.1 Open MID....7
4.2 Power Off the MID 8
4.3 Key Lock Power Saving Mode 8
4.4 Main Menu Description....9
4.5 The real operating 10
4.6 Add icons to the main menu....12
4.7 Switching the wallpaper....14
4.8 Arrange Shortcuts....15
4.9 Install Software .... 15
4.10 USB connection.... 16
4.11 Reset....16
5.1 Network connection....17
5.2 UMTS connection 19
5.3 Internet Function ...... 19
6.1 Opening Sound & display function menu....23
6.2 Safety and Location – to set up my location and password selections: 24
6.3 Applications: manage application, set up shortcut directly....24
6.4 CD card and MID Save: 25
6.5 Date and Time: Set up date, time, time zone and formality....25
6.6 Area and Text....27
6.7 About MID 27
6.7 Calibrate....28
7 Software Installation and Management....28
7.1 Source Management....28
7.2 Email 29
7.3 Internet Browser 29
7.4 Additional Applications ...... 29
1. Reminder
...Please do not disassemble the product personally, and avoid cleaning the product with ethyl alcohol, thinner, or benzene. Please contact us if any problem.
...Minimum 12 hours charging for first three times charging.
...Please do not place the product in hot, wet or dusty environment. Especially in summer, do not place it in a car with all windows closed.
...Avoid dropping or clashing the product and not shake the TFT screen voilently, or it may cause a damage or adnormal display to the screen.
...Please select a suitale volume and avoid loud sound while using earphones. Please turn down the volume or stop using if you get a roaring in your ears.
...For following situations, please charge the product:
AThe icon of the battery shows without power.
BSystem automatically shut down, and it turns off soon after restart. (System will shut down automatically under the status of low battery.)
C□Operation key shows no reation.
Caution: Please charge your device by the provided adaptor, it will cause damage if you use other adaptor.
...Please do not disconnect the device while formatting, downloading and uploading, or it may cause application errors.
...System will scan and repair disc automatically when restarted after illegal shutdown, and the interface will stay in the image of progress bar for a while.
...We are not responsible for any memory erase loss caused by damage or maintain the product, or other personal reasons.
...Do not use this product in the areas which prohibit use of electronic devices, for example, on an airplane.
...Please do not use this product while driving or walking in the street, or it might cause a car accident.
...USD can only used for data transmission.
...This device do not support waterproof function.
2. Technical Specification
1
| MID | CPU Processor | 800mHz Telechip |
| Operation System | Android 2.1 | |
| Harddisk | 8GB | |
| Build in Memory | 256MB | |
| Expansion Slot | Micro-sd card | |
| Display | 8.0 TFT Resistive Color Touch Panel | |
| Operation | Touch Operation | |
| Pixel | 800x600 | |
| Input Method | Touch Panel Soft Keyboard Input | |
| Speaker | Built-in | |
| Headphone Socket | 3.5mm Plug (Adaptor) | |
| USB | USB 2.0 | |
| Battery | Rechargeable Li-Ion Battery 4500mAh | |
| Product Dimension | 210mm×159mm×14.7mm | |
| Weight | 0.487kg | |
| Voltage | USB 5.5V | |
| Operating Temperature | -10 °C/ +65 °C |
3. Outlook Preview
3.1 Outlook Diagram
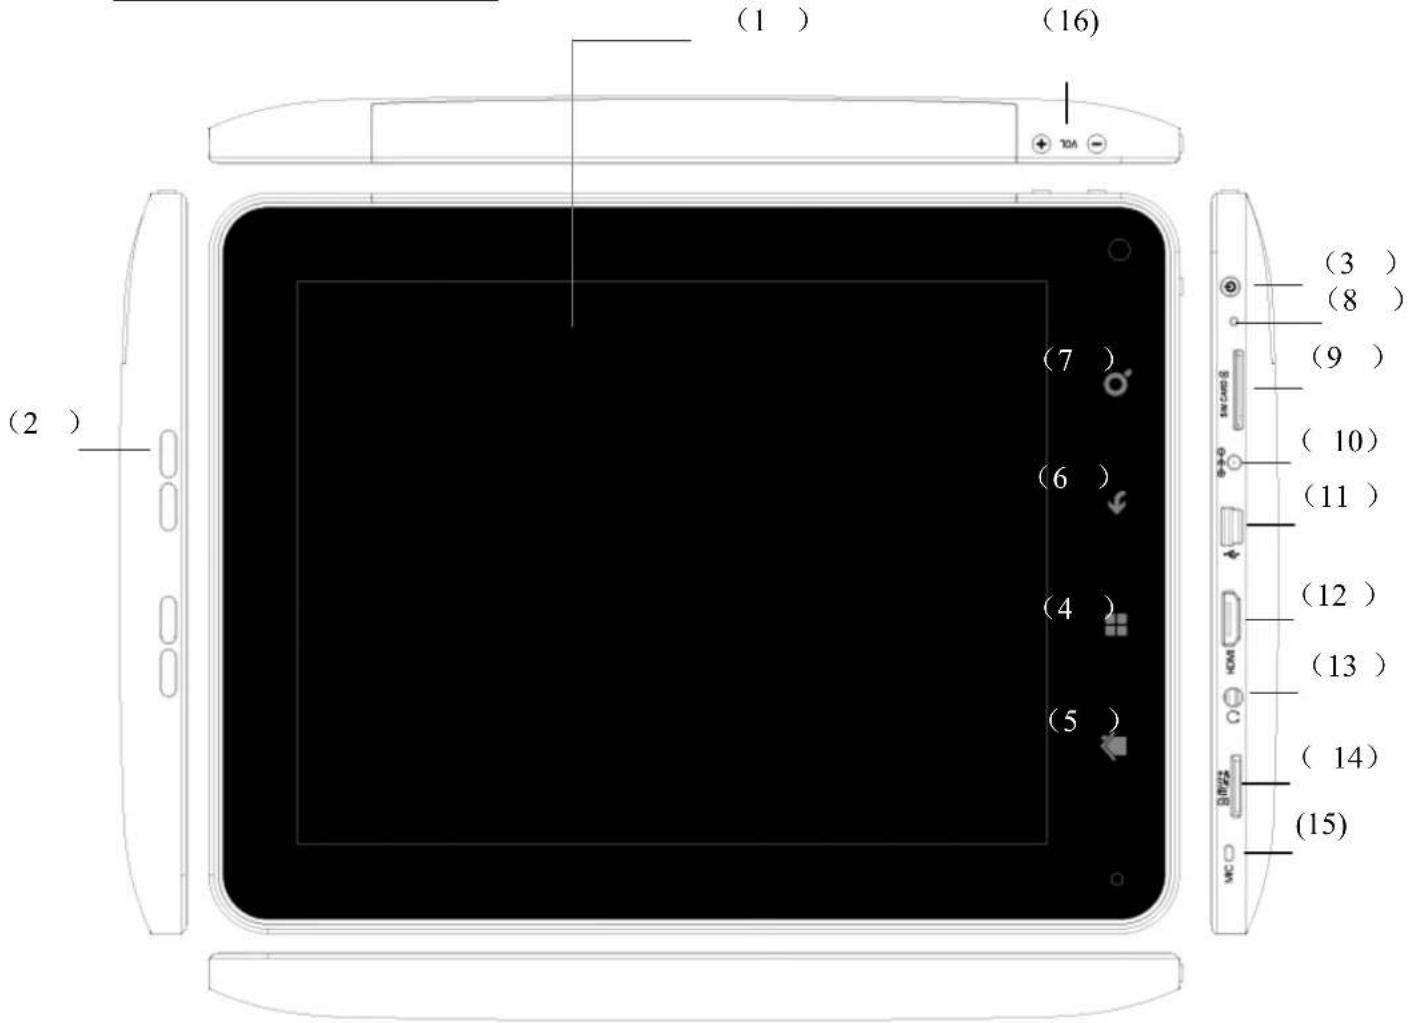
(11) Connection Socket
(12) HDMI
(13) Earphone
(14) SD Card Slot
(16) Volume
Remark :
(1) LCD is Touch Panel, can operate click and drag function, Please do not use pen, pencil or other sharp tools to operate, it will damage LCD Touch Panel.
(2) Please keep speaker hole clean, dust or others will block the sound.
(3) MID back have installed WIFI Antenna under the BLACK cover, please DO NOT cover by Metal, it will affect the reception performance.
3.2 TF Card Plug and Unplug
Please see below diagram, please make sure the insert direction is same. (Unplug TF Card, use thumb press the TF card and release, TF card will
pop out.)

natural_image
Black tablet with a small 3D card labeled '80 k USB' on the right side (no text or symbols on the device body)Caution: DO NOT insert Non-TF card (Preventing dust or moisture, please pack the TF card when not use.)
3.3 Battery Charging
The product charge by 5.5V, 2A Standard Voltage, plug in the power adaptor into power socket and the USB plug connect to the device.
The device can only charge by supplied power adaptor, it will cause dangerous and problems if use other power adaptor, DO NOT charge the device under high moisture environment, DO NOT touch the power adaptor when you are wet.
Make sure free ventilation near the device when charging.
DO NOT cover by paper or any other materials.
3.4 Connection Adaptor
Plug in the Connection Adaptor to Device Connection Socket, then you can plug in corresponding signal cable.
4. First attempt
Button Definition -- Short pressPressing time less than 1.2 sec.
-- Long press Pressing time more than 3 sec.
Without specify mention in manual, means Short Press
4.1 Open MID
- Long Press the Power Button, MID will start, LCD display will the opening screen and video, Key lock screen will appear after several second, press "Menu" to un-lock and enter main menu, as diagram:

text_image
5:14 PM Google 2 Player Rea Camera Twidroyd Note Everyti Calendar A-RIVAL Mar Email GRave Defer Mini Golf'oid Calculator Gallery Music Browser Settings Shoot U!- Click function button, you can start using the MID.
4.2 Power Off the MID
During MID is working, Long Press the Power Button, display will show
Power Off Interface.
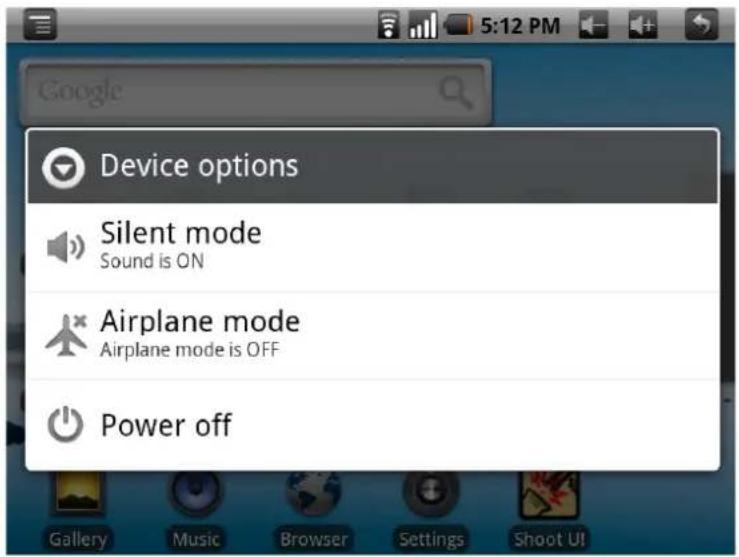
text_image
Device options Silent mode Sound is ON Airplane mode Airplane mode is OFF Power offClick "Power Off" button, will pop up another dialog (top right picture),
Click "Normal" button, MID will shut down, several second later, device will power off.
**** System will auto power off if the device is low battery
4.3 Key Lock Power Saving Mode
During device is working, press the power off button, MID will key lock and screen lock power saving mode. MID is keep running but screen will turn off.
Once you activate the display or press buttons, MID screen lock interface will appear again, drag the arrow button, MID will resume normal mode.
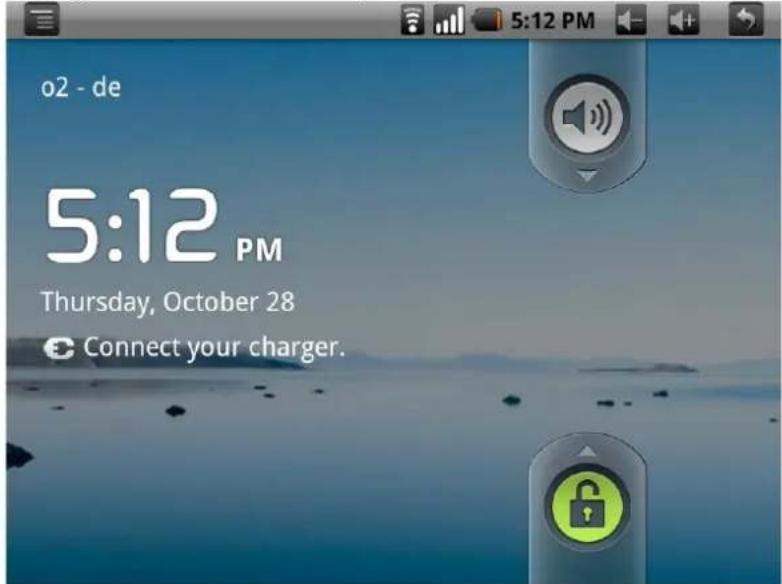
text_image
o2 - de 5:12 PM Thursday, October 28 Connect your charger.4.4 Main Menu Description

text_image
(1) (3) (8) (4) (2) 5:14 PM Google (5) (6) (7) 2 Player Rea Camera Twidroyd Note Everytl Calendar A-RIVAL Mar Email GRave Defer Mini Golf'oid Calculator Gallery Music Browser Settings Shoot U!3
(1)

Internet
(5)

Back
(2)

Main menu button
(6)

Battery icon
(3)

Network icon
(7) Applications
(4)

Time button
(8) 3G (depends on equipment)
While in charging, the Battery icon will be flashing and will become still & green once full charged.

Back button" is equal to "Back button" of the machine. While in the application menu, clicking it to back the front menu.
MID connects to the internet with the WIFI and will Show in the up corner when connecting successfully.
4.5 The real operating
1 In the main menu, you can switch the different main menu freely through sliding left and right by tapping and drawing on the screen. MID has been set 3 main menu and you can install different icons in each the main menu.

text_image
5:14 PM Google 2 Player Real Camera Twidroyd Note Everytl Calendar A-RIVAL Mar Email GRave Defer Mini Golf'oid Calculator Gallery Music Browser Settings Shoot U!Click icon and the menu screen will be turned up from the bottom.

text_image
5:16 PM Google Add Wallpaper Search Notifications SettingsTapping other part of the screen, the menu screen will disappear.
Click

icon MID will get the Application Menu as below.
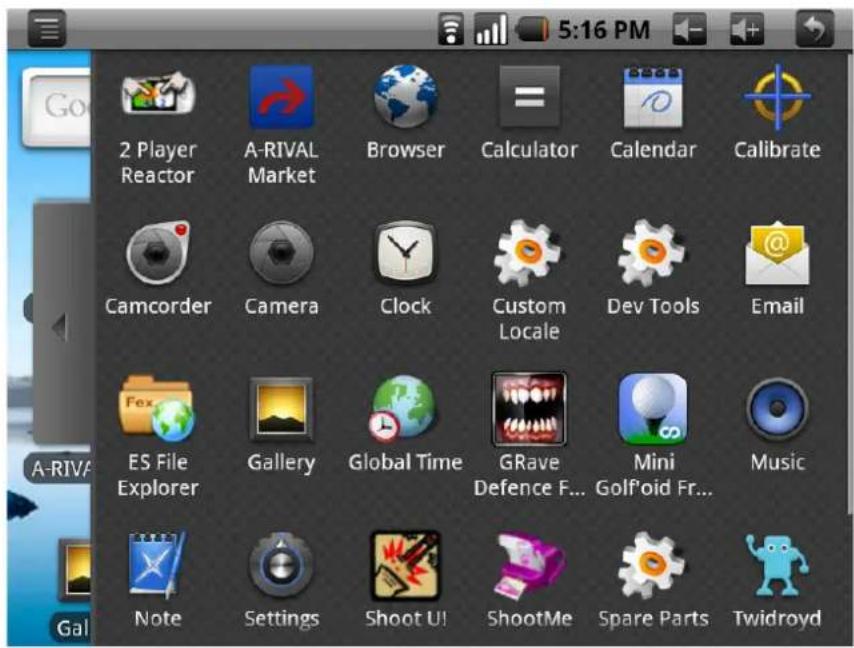
text_image
5:16 PM 2 Player Reactor A-RIVAL Market Browser Calculator Calendar Calibrate Camcorder Camera Clock Custom Locale Dev Tools Email ES File Explorer Gallery Global Time GRave Defence F... Mini Golfoid Fr... Music Note Settings Shoot U! ShootMe Spare Parts TwidroydFlapping the screen up and down, you can scan all application icon.
Click icon again the Application Menu will be hidden.
4.6 Add icons to the main menu
To meet different requirements, user can add or delete any common software icon freely in the main menu, and below will guide you how to do it:
A. Press the icon long or pull it from the Application Menu to the main menu.
B. Click + icon of the menu window, MID will display the next menu.
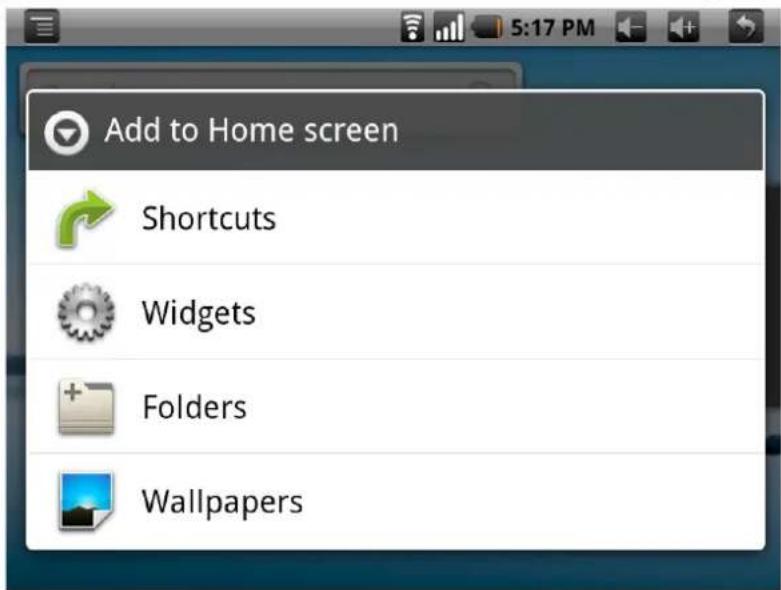
text_image
Add to Home screen Shortcuts Widgets Folders WallpapersSelect Shortcuts to enter into the next menu. See picture
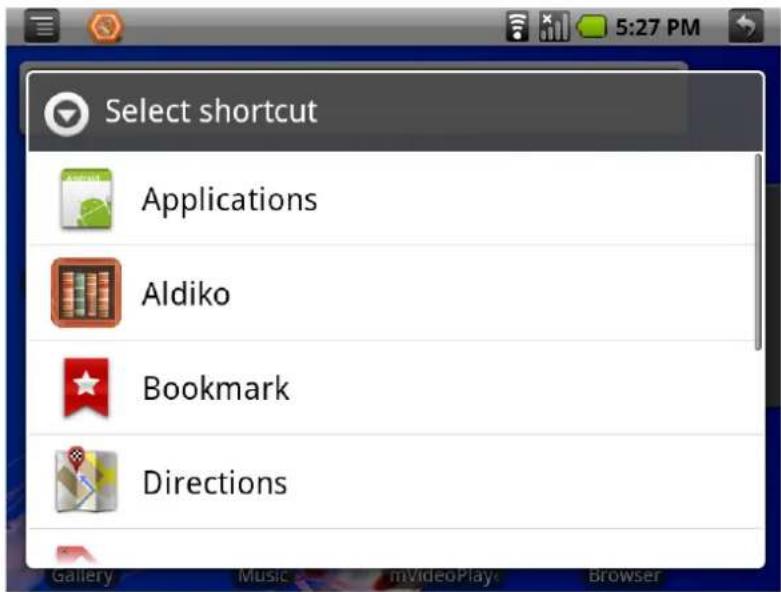
text_image
Select shortcut Applications Aldiko Bookmark Directions
text_image
Choose widget Analog clock Calendar Facebook MarketSelect and press icon from menu, the icon will add to the main menu. Click icon to enter into the next menu.

text_image
Select wallpaper from Live wallpapers Pictures Wallpaper gallerySelect and press icon from menu, the icon will add to the main menu.
4.7 Switching the wallpaper
As personalized feature, user can set their favourite graph, photos as the wallpaper.
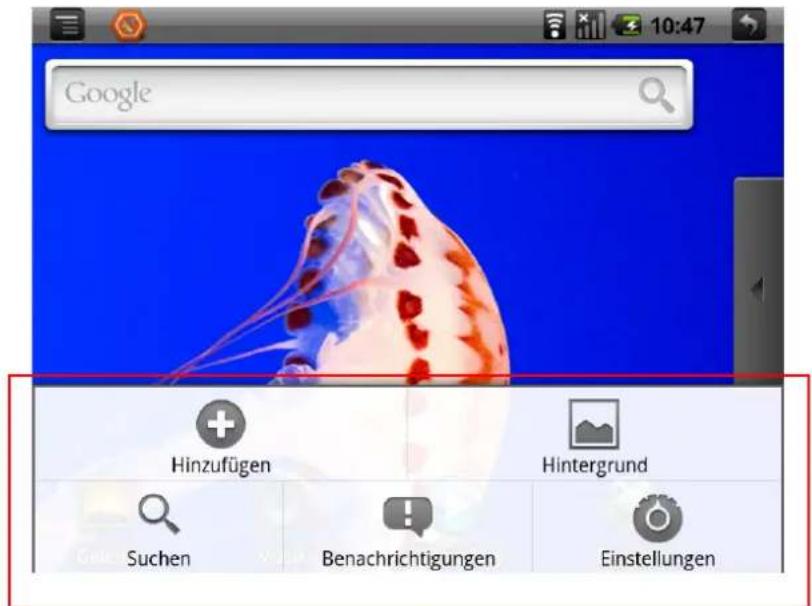
Click

Hinzufügen
icon of the menu window, MID will display the left-down menu.
Click

Hintergrundbilder
icon and go to it is sub-menu (see graph R+U),

Flapping the screen, select the best picture and click Set wallpaper icon, MID will go to the main menu and show the very wallpaper selected.
*** in the sub-menu, click upper or last menu.

, MID will close the sub and go back to
4.8 Arrange Shortcuts
4.9 Install Software
4.10 USB connection
When connect the MID to the PC with USB, user will meet below Menu.

Clicking “mount”, MID and PC can be operated synchronously. User can find the content of the MID and Micro card, copy and transmit.
*** But after being mounted, part applications of MID will be effected; some of them will be unable to operate normally.
4.11 Reset
While crashed or run unwell, user can reset the MID. Please use stylus and insert the nib to the reset hole.

text_image
MC DDR SIMCOS S5.0 Internet and Wifi Function
5.1 Network connection
MID access to the internet with the WiFi built-in.
In the main menu click

icon or click the menu button of the machine to open it menu.
text_image
Settings Wireless & networks Sound & display Location & security Applications Privacy
text_image
Wireless & network settings Airplane mode Disable all wireless connections Wi-Fi Connected to homenet Wi-Fi settings Set up & manage wireless access points 3G 3G Disabled Mobile networks Set options for roaming, networks, APNsThe right icon shows √, it means that the option is in close position. The right icon shows √, it means that the option is in open position.
Click "Wi-Fi settings" to enter into the next menu.
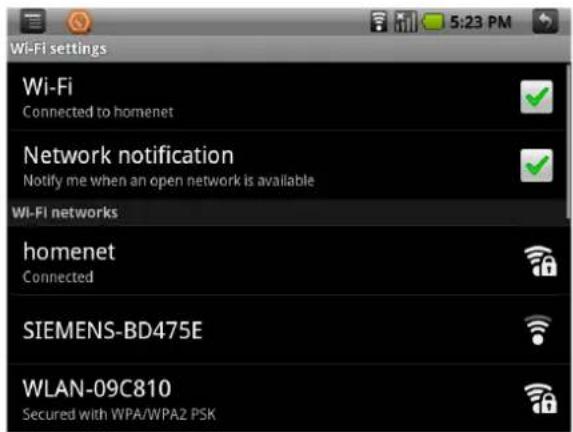
text_image
Wi-Fi settings Wi-Fi Connected to homenet Network notification Notify me when an open network is available Wi-Fi networks homenet Connected SIEMENS-BD475E WLAN-09C810 Secured with WPA/WPA2 PSK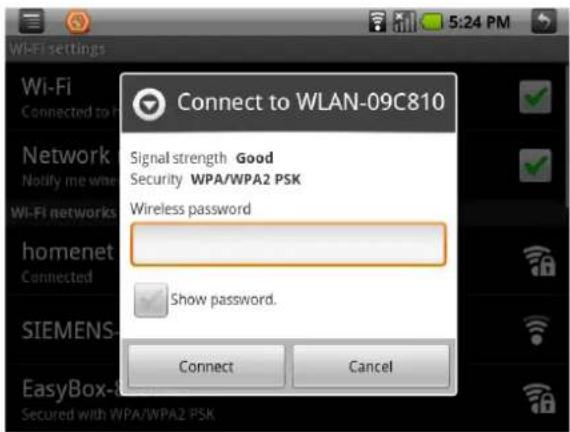
text_image
Connect to WLAN-09C810 Signal strength Good Security WPA/WPA2 PSK Wireless password Show password. Connect CancelNetwork notice that the right icon is √, it means that automatic scanning is in the close position.
Click Network notice, the right icon shows ✅, it means that scanner is in the open position, the deve will seach automatically and add the nearby WiFi network which can be connected.
(3)Click one Network MID open the info menu (see the right-up picture). Click the blank and fill the password, click Verbinden to connect.
After connectiong successful, the WiFi set-up icon will show have connected to ....., it means that the device have connected to network successfully, and 📄 icon will display on the top of the screen.

As to the WiFi router which have been connected before, this machine will keep record automatically, if you need to connect again in the future,
5.2 UMTS connection
The device can be connected via UMTS to the internet.
You need a sim card . Turn the device off and slide the sim card in to the slot. Turn the device on.

text_image
Click to enter the settings Google Add Wallpaper Search Notifications SettingsClick on „Settings“
Select „Wireless & networks“

text_image
Settings Wireless & networks Sound & display Location & security Applications Privacy
text_image
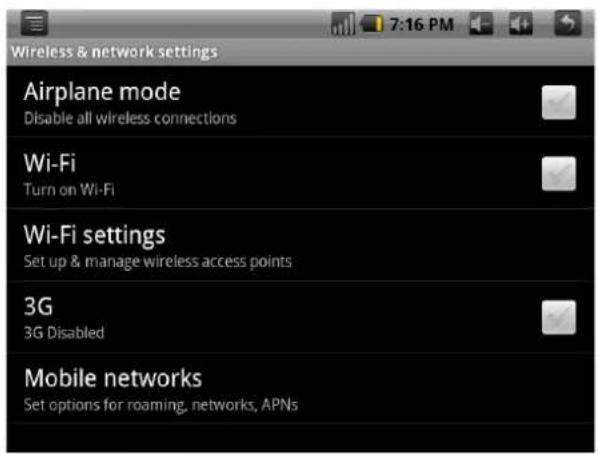
Wireless & network settings Airplane mode Disable all wireless connections Wi-Fi Turn on Wi-Fi Wi-Fi settings Set up & manage wireless access points 3G 3G Disabled Mobile networks Set options for roaming, networks, APNsTurn the WLAN connection off.
The icon shows that the WLAN is turned off.
Select „Mobile networks“ and then „Access Point Names“
text_image
Wireless & network settings Airplane mode Disable all wireless connections Wi-Fi Turn on Wi-Fi Wi-Fi settings Set up & manage wireless access points 3G 3G Disabled Mobile networks Set options for roaming, networks, APNs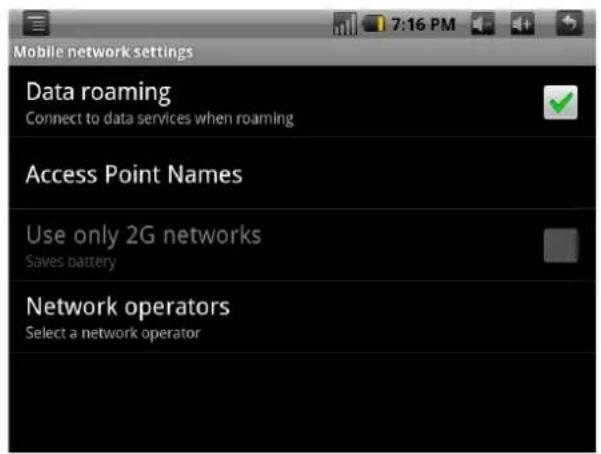
text_image
Mobile network settings Data roaming Connect to data services when roaming Access Point Names Use only 2G networks Saves battery Network operators Select a network operatorClick

and then select „New APN“

text_image
APNs 19:12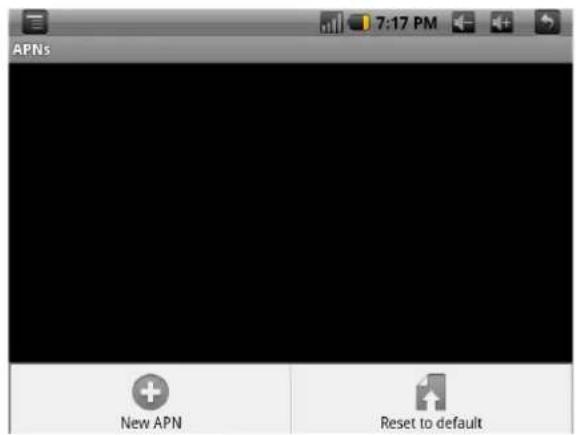
text_image
APNs 7:17 PM New APN Reset to defaultEnter the provider name.

text_image
Edit access point Name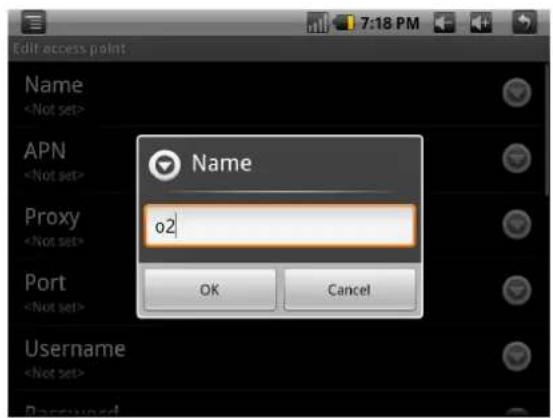
text_image
Edit access point NameEnter the access point name and then click

and select „Save“
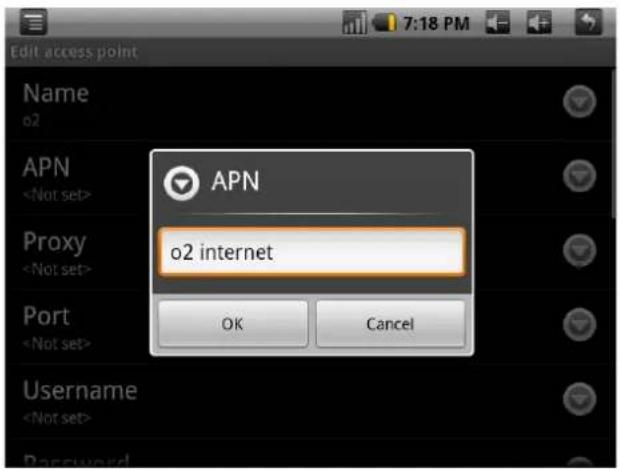
text_image
Edit access point Name o2 APN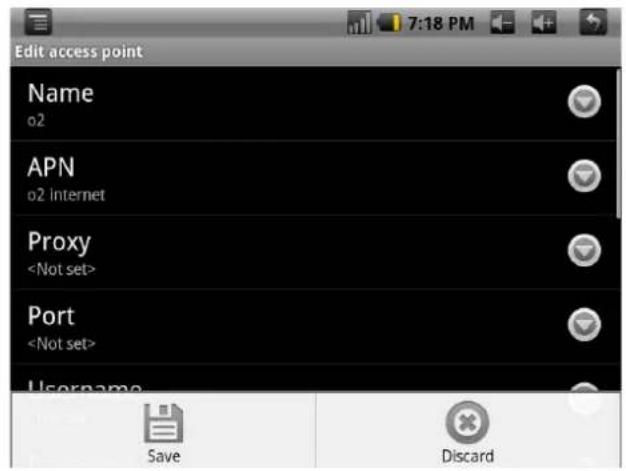
text_image
Edit access point Name o2 APN o2 Internet ProxyIn most cases, these two items are sufficient. Please ask your provider about any additional required information such as user, proxy or other.

text_image
Edit access point MMS proxy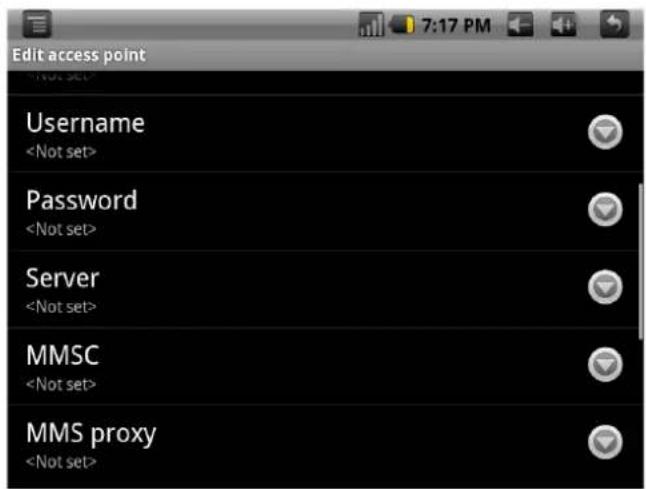
text_image
Edit access point UsernameAfter that, you should see the left picture. Activate this connection by tap on the gray circle. This should be green

text_image
APNs o2 o2 internet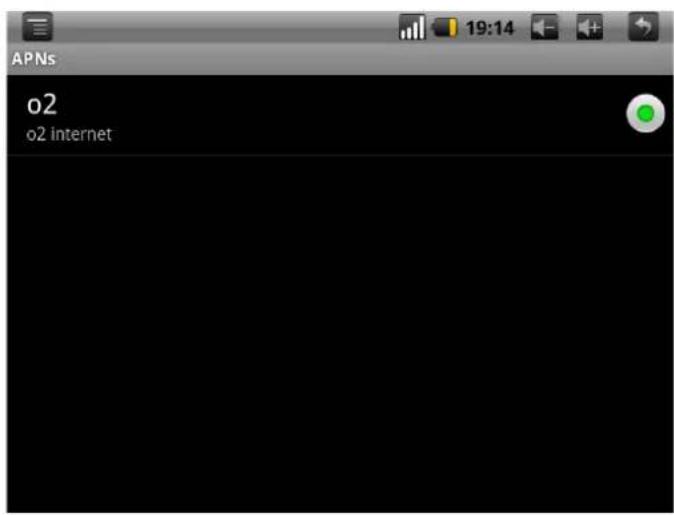
text_image
APNs o2 o2 internetYou can enabled the 3G option now and should see a icon with 3G and signal strength (right picture)
5.3 Internet Function
You just need to turn on WiFi in the WiFi set-up, or choose this WiFi Router then connect it. When the status of WiFi set-up is open (showing turn off WiFi), the machine will search the WiFi router automatically and then connect to it when the device is started up each time.
Click the
from the main menu to get the keyboard.
Note: if don't see the
icon in the screen, you can find on as
Below:
a. click the

in the menu window to enter into the next menu.
(1) Start: click and input the address.
(3) Window: click and minimize all opened web page.
(4) Refresh: refresh the very opened page.
(5) Next/Previous: move forward or backward.
(6) More: Click more setting.
(2) Bookmark: click and set the web address as bookmark.
6. Basic Setting
Clicking

icon of the "Menu Window" into setting menu.

text_image
Settings Wireless & networks Sound & display Location & security Applications Privacy6.1 Opening Sound & display function menu.

text_image
Sound & display settings Sound settings Silent mode All sounds except media & alarms are silenced Ringer volume Set volume for incoming calls and notifications Media volume Set volume for music and videos Device ringtone Set your default incoming call ringtone Notification ringtone Set your default notification ringtone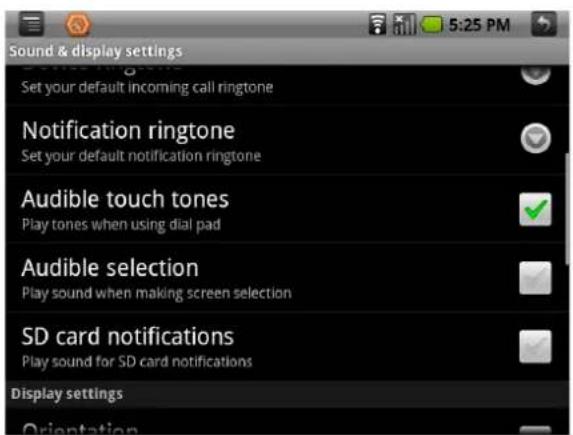
text_image
Sound & display settings Set your default incoming call ringtone Notification ringtone Set your default notification ringtone Audible touch tones Play tones when using dial pad Audible selection Play sound when making screen selection SD card notifications Play sound for SD card notifications Display settings Orientation- Silent mode: All sound will become silent except for Media and alarm.
- Loudspeaker mode: you can use loudspeaker.
•The volume of ring: you can set up the volume of ring.
•The volume of media :
•Brightness: Adjust the brightness of screen - Screen timeout: before turn off the machine automatically, it will adjust to delay the turning off. There are 6 kind of time for your choose such as 15 seconds, 30 seconds, 1 minute, 2 minutes, 10 minutes.
6.2 Safety and Location – to set up my location and password selections:
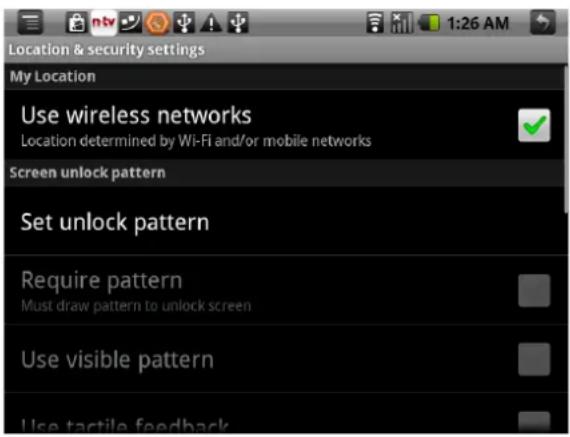
text_image
Location & security settings My Location Use wireless networks Location determined by Wi-Fi and/or mobile networks Screen unlock pattern Set unlock pattern Require pattern Must draw pattern to unlock screen Use visible pattern Use tactile feedback- Use of wireless network: you can check the location of application by using wireless network.
- Visible password: it will show your password when you typing them
6.3 Applications: manage application, set up shortcut directly.
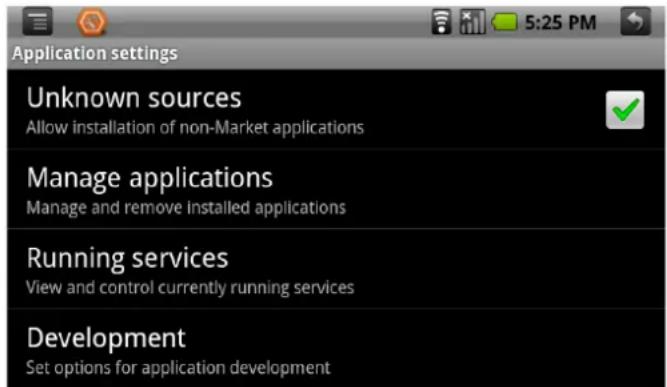
text_image
Application settings Unknown sources Allow installation of non-Market applications Manage applications Manage and remove installed applications Running services View and control currently running services Development Set options for application development- Unknown source: you can choose whether it is allowed to install non-market applications.
- Quick start-up: set-up the keyboard shortcut in the running applications
- Manage applications: Managing and deleting the installed applications
- Explore: set up the explore option in the applications.
6.4 CD card and MID Save:
Remove SD card to see the available memory space.
Notes: please removing the SD card by the option delete the SD card safely in case of damaging the device by remove it directly.
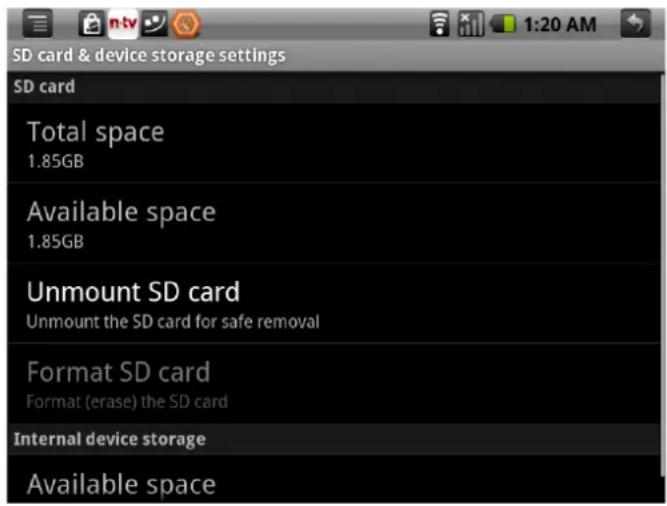
text_image
SD card & device storage settings SD card Total space 1.85GB Available space 1.85GB Unmount SD card Unmount the SD card for safe removal Format SD card Format (erase) the SD card Internal device storage Available space6.5 Date and Time: Set up date, time, time zone and formality.

text_image
Date & time settings Automatic Use network-provided values Set date 10/28/2010 Select time zone GMT+02:00, Central European Summer Time Set time 5:26 PM Use 24-hour format 1:00 pm Select date format- Set up date and time: Enter into the interface of date settings to set up the date.
- Select time zone : enter into the interface of choosing time zone to set up the time zone.
- Set up time: Enter into the interface of time settings to set up the time.
- Set up 24 hour formality : set up the formality of displaying time
- Select the formality of showing date: you can choose different formality to show date.
6.6 Area and Text
Set up the option area (language and are), text typing and correct automatically.

text_image
Language & keyboard settings Select locale Select language and region Text settings 谷歌拼音输入法 谷歌拼音输入法 settings Android keyboard Android keyboard settings User dictionary Add & remove words from user dictionary- Select area : 54 kinds of language for your choose
Android keyboard : Android keyboard settings
--make sound when click
-- Show capital letters automatically
--Show suggestions: show the suggestive word and type it out
-- Auto-complete: complete space, point and insert focus words automatically.
- Dictionary of user : Add or delete words and sentences to the dictionary of user.
6.7 About MID
You can look up the relative law information and the status of MID and the edition of software.
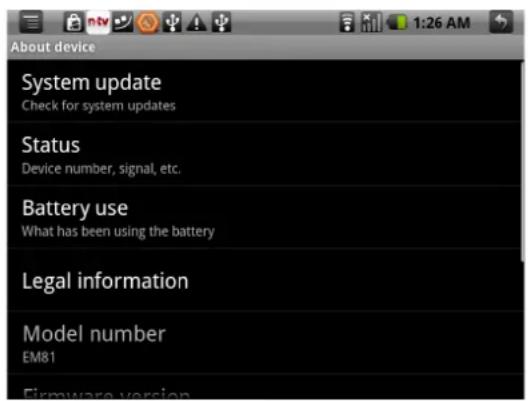
text_image
About device System update Check for system updates Status Device number, signal, etc. Battery use What has been using the battery Legal information Model number EM81 Firmware version6.7 Calibrate
You can calibrate the touch screen if it is not responding accurately to your Taps.
Tap and hold the centre of the target, the target moves to the position of left-up. When again tap and hold the centre of the target, the target moves the Next position of left-down.
The target moves to five position (Left-up' left-down' right-up' right-down' Center) in order, forming a period. If nicetily tap and hold the target each time, after a period, the target is Disappear, the device completes the calibration process and backs to the Device Settings menu.
7 Software Installation and Management
This device supports the third party's applications on the basis of android platform. Most of the applications can be downloaded from the website, and copied into SD card.
7.1 Source Management
Clicking

icon of the "Applicant Function Menu" to enter into
Source Management menu, you can browse files of the machine and TF card. You can copy, delete, move, rename file.
7.2 Email
Clicking

icon of the “applicant function menu” to enter into Email function.
After entering the Email address and password, you can login and send or receive Email messages.
icon of the “applicant function menu” to enter into Internet browser to browse web page.
Under the status, click

icon to shoot out it menu:
-- Go: enter website by inputting address.
-- Bookmark: add bookmark for the website.
-- New window: open new web page.
7.4 Additional Applications
You can download more applications from the a-rival market