
Neptune - Satellite receiver TrekStor - Free user manual and instructions
Find the device manual for free Neptune TrekStor in PDF.


User questions about Neptune TrekStor
0 question about this device. Answer the ones you know or ask your own.
Ask a new question about this device
Download the instructions for your Satellite receiver in PDF format for free! Find your manual Neptune - TrekStor and take your electronic device back in hand. On this page are published all the documents necessary for the use of your device. Neptune by TrekStor.
USER MANUAL Neptune TrekStor
10 Conditional Access System 31
INDEX
Important Information 33
Safety Notices 33
1 Controls and Connections 34
1.1 Controls on the Front Side of the TrekStor SatCorder neptune Full-HD 1080i 34
1.2 Connections on the Rear Side of the TrekStor SatCorder neptune Full-HD 1080i 34
1.3 The Remote Control of the TrekStor SatCorder neptune Full-HD 1080i 35
2 Connecting your TrekStor SatCorder neptune Full-HD 1080i 36
2.1 Installation of a Satellite Antenna 36
2.2 Connecting the Satellite Antenna 37
2.3 Connection to the Television 38
2.4 Connection to a Stereo System 38
2.5 Connecting an External USB 2.0 Mass Storage Device 39
2.6 Connecting a Video Recorder.... 39
2.7 Connection to the Power Supply 39
3 Basic Settings of your TrekStor SatCorder neptune Full-HD 1080i 39
3.1 User Settings 39
3.2 Antenna Settings 40
3.3 Channel Search 42
4 Operation of the TrekStor SatCorder neptune Full-HD 1080i 44
4.1 Channel Selection 44
4.2 Setting the Volume 44
4.3 Resolution 44
4.4 Program Information (Information Display) 44
4.5 Messages 45
4.6 Teletext 45
4.7 Audio and Subtitle Languages 45
4.8 Standby Mode 46
4.9 Recording and Playback of Programs 46
4.10 Channel Lists 47
4.11 Favorite List Manager 48
5 The Main Menu of the TrekStor SatCorder neptune Full-HD 1080i 49
6 Settings 49
7 Program Preview (EPG) 53
7.1 Program Information (Current and Upcoming Program) 53
7.2 EPG Grid View 54
7.3 EPG Channel View 54
8 Personal Planner....55
8.1 Adding and Editing Events in the Personal Planner 55
8.2 Deleting an Event 56
9 Parental Lock 56
9.1 Setting the Access Right 56
9.2 Change PIN Code 57
10 Conditional Access System 57
DE
Note: If you have problems with this product, you can quickly get assistance. Only in extremely rare cases will you need to bring this product to your distributor. You can find answers to the most frequently asked questions at our website, www.trekstor.de, under "SERVICE"→ "SUPPORT". You can of course also contact our award-winning support team by filling out the support form on our website, or by e-mail or telephone (see the back of these instructions). You will be surprised at how quickly we can help you.
FR
text_image
1 2 REPLAY 5 7 3 4 6 8natural_image
Simple line drawing of a house, tree, and satellite with a light beam projecting onto the roof (no text or symbols)text_image
90° 30° Elevation Azimut Süd 180° Ost 90° West 270° al.10 Conditional Access System
natural_image
Diagram showing a device with an arrow pointing to a component, no text or symbols presentDiSEqC™ is a trademark of EUTELSAT
DVB is a registered trademark of the DVB Project
Dolby is a registered trademark of Dolby Laboratories
Unicable™ is a registered trademark of FTA Communication Technologies
Since we are constantly refining the SatCorder software for you, the menus of your SatCorder and the possible functions may differ from those in these instructions. In case of a software update, you should download the latest version of the operating instructions from our Website, http://www.trekstor.de. On our Website, you will also find further information regarding your SatCorder and answers to the most frequently asked questions.
Prevention of "Burn-in"
A long-lasting display of still images (e.g. a paused recording, a screen menu, or a displayed photo) can damage your television permanently. Plasma screens, rear projection televisions, and CRT televisions are particularly affected by this problem. You should thus avoid displaying still images on such appliances for long periods of time.
Copyrights
Television programs, films, and other media may be subject to copyright. To avoid copyright violations, you should inform yourself about the laws that apply in your country.
Safety Notices
For your own safety, read the following notices carefully and follow them when operating your SatCorder neptune Full-HD 1080i.
Setting Up Your SatCorder
- Only operate your SatCorder indoors.
- Place your SatCorder on an even, stable surface. It may not be near heaters or in direct sunlight.
- Make sure your SatCorder is sufficiently ventilated. Never cover the vent holes in the housing of the SatCorder. Provide sufficient air circulation at the location of your SatCorder by leaving enough clearance around it.
- Do not place any objects on your SatCorder. Large objects interrupt the air circulation and small objects could fall through the vent holes into the SatCorder and damage it.
- Your SatCorder must be protected from moisture, steam, and liquids. Do not place any containers with liquids near your SatCorder. To clean your SatCorder, do not use a liquid cleaning agent. Liquid cleaning agents can damage your SatCorder or even cause an electric shock!
Connecting your SatCorder
- Switch off your SatCorder before connecting it to an LNB (low noise block converter) or a multiswitch for multiple subscriber systems.
- The SatCorder must also be switched off when you connect it to a television or another device.
Power Connection
- Operate your SatCorder only on a mains power with 230 V AC, 50-60 Hz.
Protecting your SatCorder
- In case of thunderstorms, you should switch off your SatCorder and remove the plug and antenna cable. Please note: Make sure that both the satellite antenna and the LNB are connected to the building lightning protection system or with a suitable ground connection.
- In case of a longer absence (e.g. when you are on vacation), disconnect the SatCorder from the mains and your antenna system as a precaution.
Maintenance
- Never open your SatCorder yourself. Otherwise there is a danger of an electric shock.
- Have repairs carried out only by qualified experts since otherwise the warranty may be voided.
- Please keep the original packaging for the safe transport of your SatCorder.
1 Controls and Connections
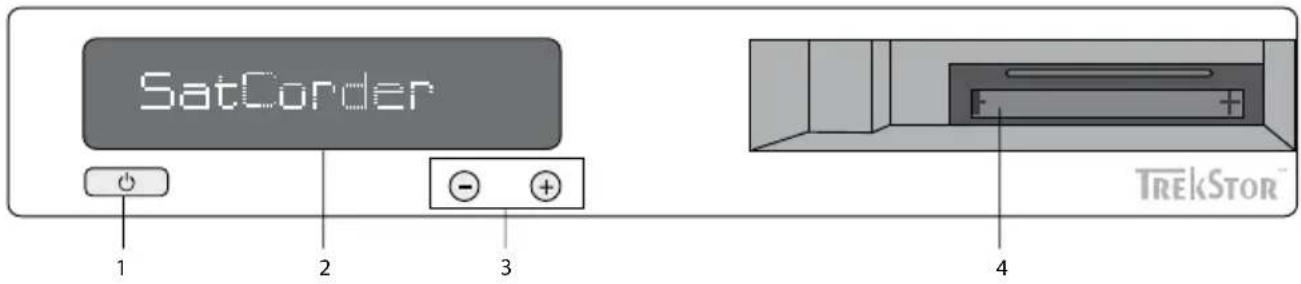
1.1 Controls on the Front Side of the TrekStor SatCorder neptune Full-HD 1080i
text_image
SatCorder 1 2 3 TrekStor1) Standby key: Switches between operation and standby mode.
2) Dot-matrix VFD: Displays the set channel or further information during operation. The current time is displayed in standby mode.
3) Program change keys: With these keys, switch to the next or previous channel on the current channel list.
4) Common Interface: Two slots for a Conditional Access Module (CI-CAM) for smartcards of pay TV and other encrypted channels.
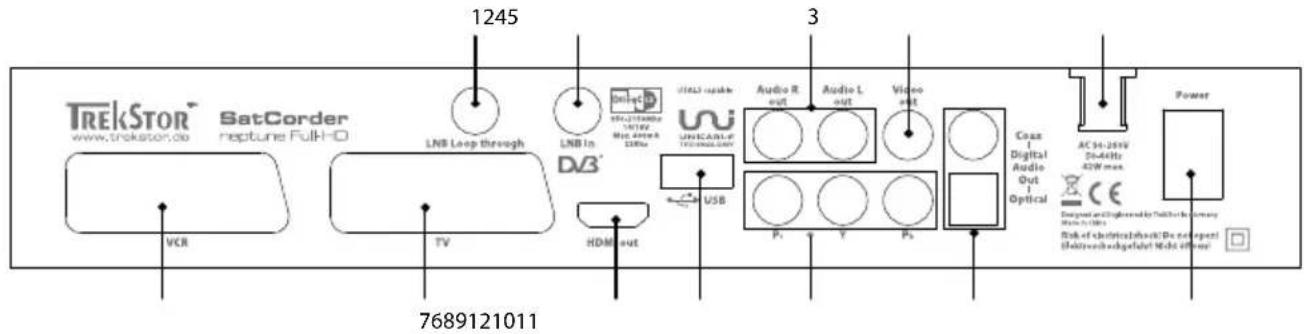
1.2 Connections on the Rear Side of the TrekStor SatCorder neptune Full-HD 1080i
text_image
1245 LNB Loop through DN3 TV HDMI out USB 3 Audio R out Audio L out Video out Coax Digital Audio Out Optical AC 34-26W 20-44Hz 42W max Power 7689121011 TREkSTOR® SatCorder www.trekstor.co neptune-FulH-D VCR1) LNB Loop through: Output port for connecting an additional satellite receiver.
2) LNB In: Input for the cable of your satellite antenna.
3) Audio L/R: Stereo audio output.
4) Composite video output: Video output for television or video recorder. This output only supports SD (i.e. Standard Definition) signals.
5) Mains cable
6) VCR SCART port: For video recorders.
7) TV SCART port: For SD televisions.
8) Digital audio/video port (HDMI out): For the connection of an HD television.
9) USB port: Connect a USB 2.0 mass storage device (e.g. an external hard disk or USB stick) to this port in order to use the USB-PVR functionality of your SatCorder.
10) Component video output: For the analog component input of your television. These connections support HD signals.
11) S/PDIF - coaxial (top) and optical: Connect these outputs with a surround-sound-capable amplifier or television.
12) On/Off switch: With this switch, you can disconnect your SatCorder from the power mains.
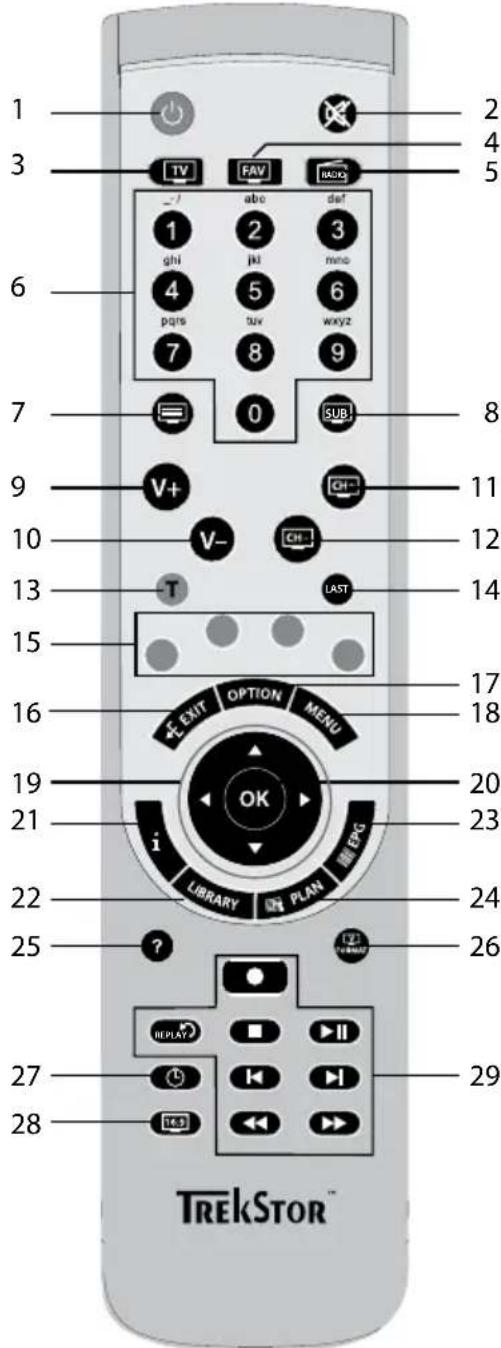
1.3 The Remote Control of the TrekStor SatCorder neptune Full-HD 1080i
text_image
1 2 3 TV FAV BACK - / abc def 1 2 3 ghi jkl mno 4 5 6 pqrs suv wxyz 7 8 9 SUB 7 8 9 V+ CH- 10 V- CH- 12 13 -T LAST 14 15 16 EXIT OPTION MENU 17 18 19 OK 20 21 i LIBRARY PLAN EPG 23 22 ? 24 25 26 27 REPLAY II 27 I K I 28 <&& > TREKSTOR™1) ⏻ key: Switches between operation and standby mode.
2) Ⓧ key: Mutes the sound.
3) TV key: Switches to the display of the TV channel list.
4) FAV key: Switches to the display of the favorite lists or between the individual favorite lists.
5) ☐ key: Switches to the display of the radio station list.
6) Numeric pad: keys ① through ⑨ for selecting the channel and other user entries.
7) ☐ key: Starts the teletext display.
8) SUB key: Used to select subtitles and language channels in case of multichannel sound.
9) ⓥ key: Increases the volume.
10) ⓥ key: Decreases the volume.
11) ☑ key: Switches to the next channel in the current channel list.
12) Ⓗ key Switches to the previous channel in the current channel list.
13) Ⓣ key: The TrekStor key is a multi-purpose key.
14) (LAST) key: With this key, you can switch quickly between the last channels selected.
15) Color keys: These keys are used to select functions and actions in the screen menu.
16) ✕EXIT key: With this key, you can leave a menu.
17) OPTION key: Used to select options.
18) ☐ MENU key: Opens the main menu.
19) ☺ navigation keys: With these keys, you can navigate in menus, the EPG, and the Personal Planner and control many additional functions of your SatCorder.
20) Ⓞ key: This key makes a selection.
21) i key: With this key, you can display information about the selected channel and the program in progress.
22) (LIBRARY) key: Opens the library of the recordings saved on a USB 2.0 mass storage device (e.g. an external hard disk). (USB-PVR)
23) EPG key: Starts the EPG (Electronic Program Guide).
24) PLAN key: Opens the Personal Planner.
25) ☑ key: Displays additional information or help.
26) ☑ key: With this key, you can adapt the playback resolution of your SatCorder to the resolution of your television.
27) ☐ key: Switches on the sleep timer and selects the period of time until the automatic standby.
28) 16:9 key: Switches the aspect ratio of the screen between 16:9 and 4:3.
29) USB-PVR functions
USB-PVR functions
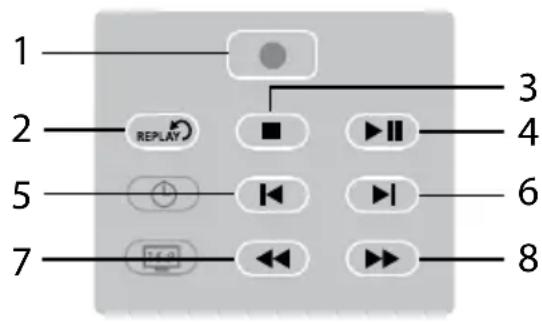
Please note: Like all other USB-PVR functions, the following functions of the SatCorder are available to you only if a USB 2.0 mass storage device (e.g. an external hard disk or USB stick) is connected.
text_image
1 2 REPLAY ■ ▶ II 5 ◀ ▶ 7 ◀ ▶ 3 4 6 81) ● key: This key starts a recording.
2) REPLAY key: Pressing the instant replay key repeats the last 30 seconds of the playback of a time shift recording.
3) ☐ key: The stop key ends a recording.
4) ▶▶▶ key: Starts a time shift recording or the playback of a recording.
5) ▶ key: Jumps to the previous bookmark.
6) ▶ key: Jumps to the next bookmark.
7) ◀◀ key: Fast rewind. You can change the playback speed by pressing this key several times.
8) ▶▶ key: Fast forward. You can change the playback speed by pressing this key several times.
2 Connecting your
TrekStor SatCorder neptune Full-HD 1080i
2.1 Installation of a Satellite Antenna
Please note: If you have already installed and aligned your satellite antenna, you can skip this chapter.
Selection of the Mounting Location of the Satellite Antenna
The mounting location for your satellite antenna must be selected in such a way that there are no obstructions between the satellite antenna and the satellite being received. For this reason, pay attention to protruding roof edges, downpipes, and other obstacles such as trees during installation. To be able to receive the ASTRA 19.2E (E = east) satellites, the antenna must be oriented to the south.
Please note: The software update sent via satellite is fed via ASTRA 19.2E.

natural_image
Simple line drawing of a house, tree, and satellite with a light beam projecting onto the roof (no text or symbols)Attach the antenna according to the installation instructions delivered with your satellite antenna. For the mounting, use a wall or mast mount that provides a fixed, secure hold for the antenna. Do not perform the final attachment of your satellite antenna until the positioning and thus any corrections or fine adjustments are completed.
Aligning the Satellite Antenna
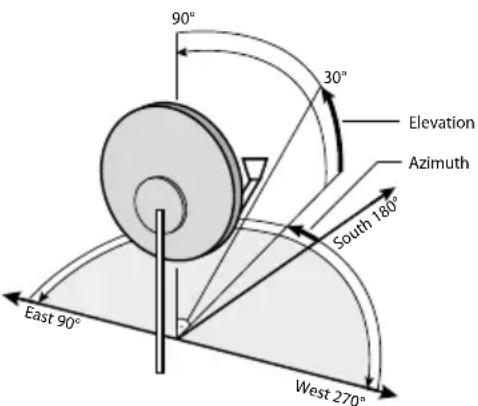
In order for the desired satellite to be targeted, the azimuth and elevation angles must be properly adjusted. The azimuth angle describes the rotation of the satellite dish to the right or left, while the elevation angle describes its inclination. Since the alignment depends on your geographical location, various values can be set.
First determine the elevation and azimuth angle, which depend on your place of residence. If no information regarding the angles has been provided in the documents of your satellite antenna, you will find extensive material on the Internet.
text_image
90° 30° Elevation Azimuth South 180° East 90° West 270°If you install an offset satellite antenna, you must first calculate the angle to be used for the alignment, that is, the angle adjusted to your satellite antenna. This is determined by deducting the offset angle from the elevation angle. Information regarding the offset angle can be found in the documents of your satellite antenna.
You can align the satellite antenna using a measuring device or using your television and SatCorder.
a) Connect the receiver to the LNB using a suitable coaxial cable.
b) Connect the SatCorder to your television. On your SatCorder, set a program that can be received via the satellites being set (e.g. the program ARD in Germany for ASTRA 19.2E).
c) Adjust your satellite antenna according to the inclination being set. Many antennas already have angle data on their mounts; otherwise, use an angle gauge to align.
d) To align the azimuth angle, turn your antenna slowly to the right or left until your SatCorder receives a television picture. For the fine adjustment of the antenna setting, use the bar display for signal strength and signal quality.
e) When you have found the maximum signal strength and quality, fix all the screws of your satellite antenna.
Now, as described in the "CHANNEL SEARCH" section, you can look for and save television and radio channels according to your preferences.
2.2 Connecting the Satellite Antenna
Please note: Do not connect your SatCorder to the power supply yet!
In case of a single subscriber installation, please connect your SatCorder and the universal LNB of the satellite antenna with a coaxial cable on whose end an F-plug has been mounted. This is screwed into the LNB in port of your SatCorder.
In case of a multi-subscriber installation, please use the coaxial cable to connect your SatCorder with a multiswitch.
In the following, you will find information regarding important technologies for satellite systems. If your LNB supports these technologies, you can use your SatCorder optimally.
DiSEqC (DIGITAL SATELLITE EQUIPMENT CONTROL): For digital-ready satellite systems, DiSEqC is the standard system for controlling several satellite positions via several LNBs or complex motorized satellite systems. Various versions of the standard exist with various scopes of function. The satellite positions are set via the various switching states. Depending on the DiSEqC version, four or more states are possible.

Unicable technology: Using Unicable, several satellite receivers can be supplied with an unlimited variety of programs via a common cable to the satellite antenna. This is possible since the coaxial cable does not carry the entire intermediate frequency band, but rather only the transponder required for the selected program. Every satellite receiver makes its individual program selection for the LNB using special control signals (DiSEqC). This means lower cabling costs for apartments to be equipped with satellite television since the antenna socket can be connected in series.
2.3 Connection to the Television
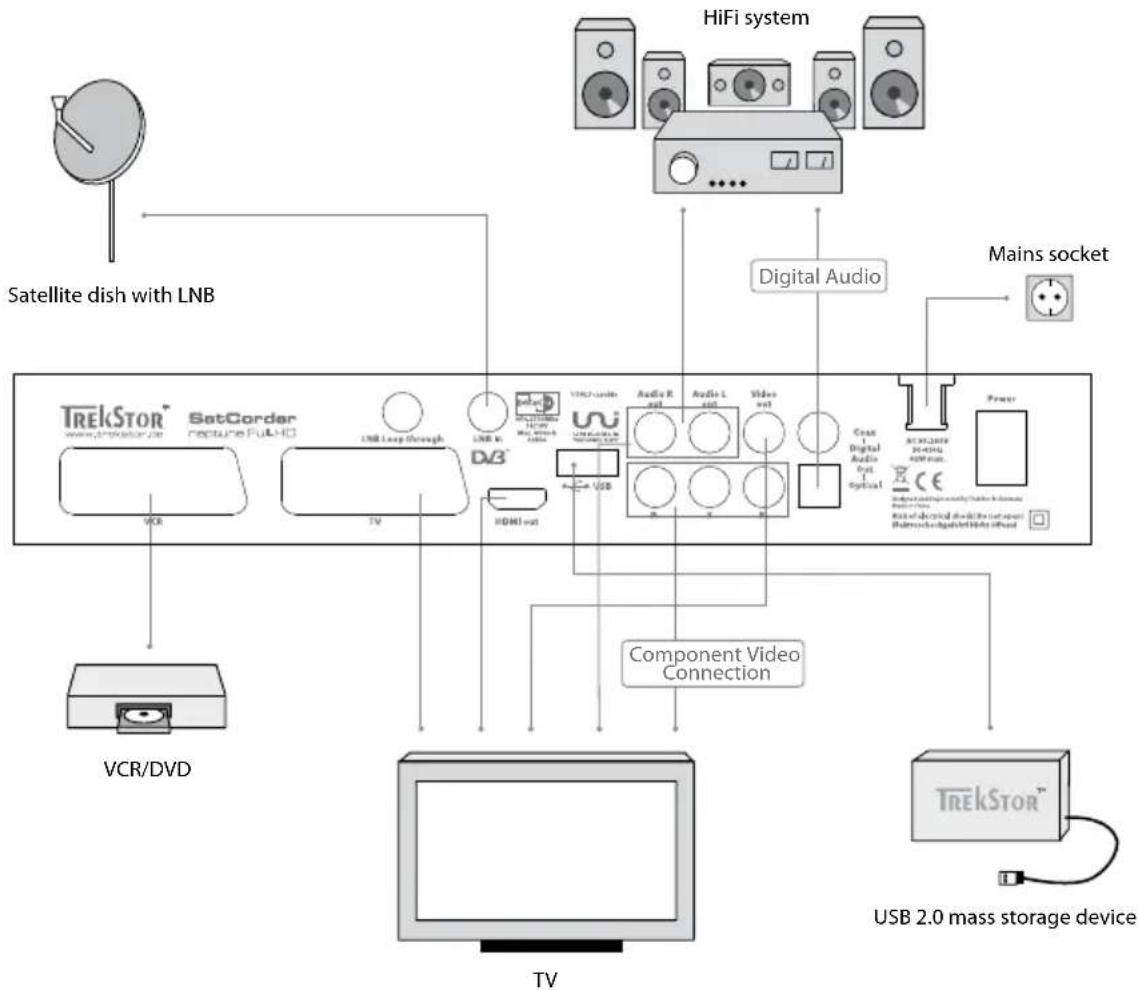
For the connection of your SatCorder to a television, you have several possibilities.
text_image
Satellite dish with LNB HiFi system Digital Audio Mains socket TREKSTOR® SetCorder recture FullHD LNB Loop Through DVD™ VCR TV HDMI out 12Hz/second Audio R out Audio L out Video out Creat Digital Audio out Optical Power VCR/DVD Component Video Connection USB 2.0 mass storage device TVDigital audio/video output (HDMI)•
For connection to a HD television, use an HDMI cable that transmits both video and audio signals. Encoded content is transmitted to your HD television in digital quality only when an HDMI cable is used. For this purpose, connect the HDMI output of your SatCorder and the HDMI input of your HD television using an HDMI cable.
Component output (YPbPr)•
A further possibility for the transmission of HD signals to your television is the use of the component output. For this purpose, connect the three component output ports to the corresponding inputs of your television. Please observe that a further connection is needed between your SatCorder and your television or stereo system for the transmission of audio signals.
SCART output•
Connect your SatCorder and television using a SCART cable. Both video and audio signals are output via the SCART output.
Composite output•
Connect your SatCorder and television using a composite video cable. Please observe that a further connection is needed between your SatCorder and your television or stereo system for the transmission of audio signals.
2.4 Connection to a Stereo System
You can connect your SatCorder to your stereo system or television using an analog cinch cable or a digital S/PDIF cable (optical or coaxial).
2.5 Connecting an External USB 2.0 Mass Storage Device
To be able to use the digital video recorder function (USB-PVR) of your SatCorder, please connect an external USB 2.0 hard disk (e.g. a TrekStor MovieStation or TrekStor DataStation) or a USB stick to the USB port on the rear side of your SatCorder.
2.6 Connecting a Video Recorder
If you want to connect your SatCorder to a video recorder, please connect it to the second SCART port or to the composite output.
2.7 Connection to the Power Supply
When you have completed connecting your SatCorder to the satellite system and your audio/video system, you can then connect it to the power supply.
3 Basic Settings of your
TrekStor SatCorder neptune Full-HD 1080i
Switch on your SatCorder by activating the mains switch on the back side of the device and then either pressing the standby key on the front side or the ⏻ key of the remote control.
When you switch on your SatCorder for the first time, a "QUICK START GUIDE" menu that helps you with the basic settings starts. This menu also opens if you reset the SatCorder.
Please use the directional keys Ⓧ on the remote control to change a setting and the Ⓞ key to confirm.
Select the menu language first and then the country in which you want to operate the SatCorder.
Next, you can set the date and time manually or select the automatic setting through the time signal emitted by the satellite.
If you have made both settings, please press ←EXIT to access the next step of the basic settings.
3.1 User Settings
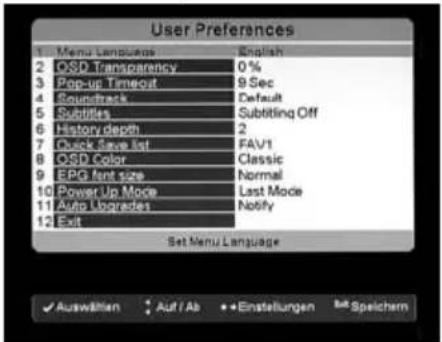
In this menu, you can make the most important settings of your SatCorder.
text_image
User Preferences 1 Menu Language English 2 OSD Transparency 0 % 3 Pop-up Timeout 9 Sec 4 Soundtrack Default 5 Subtitles Subtitling Off 6 History depth 2 7 Quick Save list FAV1 8 OSD Color Classic 9 EPG Rent size Normal 10 Power Up Mode Last Mode 11 Auto Upgrades Notify 12 Exit Set Menu Language ✓ Auswitten • Auf / Ab • Einstellungen ## Speichem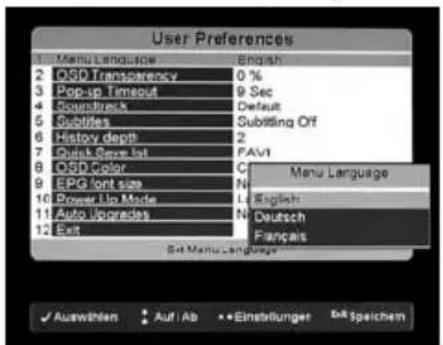
text_image
User Preferences Menu Language OSP Transparency 0 % Pop-up Timeout 9 Sec Soundtracks Default Subtries Submitting Off History depth 2 Quick Save list FAVI OSP Color C EPG font size N Power Use Mode L Auto Upgrades N Exit Menu Language English Deutsch Français Auswählen Auf/Ab •Einstellungen Eink Speichem
text_image
User Preferences 1. Menu Language English 2. OSD Transparency 0 % 3. Pop-up Timeout 9 Sec 4. Stoptrack Default 5. Subtitles Subtitling Off 6. History depth ? 7. Quick Save List Change Value 8. OSD Color Save Changes ? 9. EPG font size 10. Power Up Mode No ● Yes Use 11. Auto Upgrades Notify 12. Exit Set Menu Language Cancel ● Save & ExitMenu Language•
Under this menu item, you can select the menu language.
Please note: The menu language has no influence on the language in which the information from the EPG is displayed.
OSD Transparency•
Here you can set the transparency of the OSD (ON-SCREEN DISPLAY), that is, how much you can see of the current television image through a screen menu.
Display duration for pop-up information•
You can set the display duration of information windows to between 1 and 9 seconds "POP-UP TIMEOUT" menu item.
Soundtrack•
Here you can set a preferred language for programs broadcast in several languages. If a program is available in this language, it will be selected automatically.
Primary subtitle language•
Here you can set a preferred language for programs for which subtitles are broadcast in several languages. If subtitles are available in this language, it will be selected automatically.
Channel history•
Under "HISTORY DEPTH," you can determine the number of previously selected channels between which you can switch quickly using the Ⓤlast key of the remote control.
Quick Save List•
With this option, you can determine in which favorite list the favorites you select are saved. You can either use an existing list as your main list or you can determine that the favorite list has to be selected every time you save a new channel ("SELECT FAV List").
Color of the screen menu•
The "OSD Co" option lets you select the color of the screen menu (OSD).
EPG font size•
Here you can select how large the font in the EPG is and thus also how much information can be displayed at once.
Power Up Mode•
If you select the "STANDBY MODE" option, your SatCorder will be in standby mode after switching it on. If you select "LAST MODE", your SatCorder automatically switches to the mode in which it was before 'it was shut off.
Auto Upgrades•
If you select "NOTIFY", an Ⓐ symbol appears at the top of the OSD when a new update is available. If you select "AUTO UPGRADES", your SatCorder will update automatically when it is in standby mode.
3.2 Antenna Settings
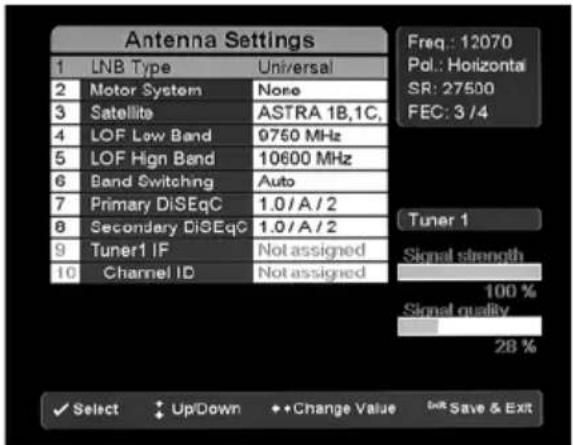
In this option menu, you can make settings for the satellite antenna (frequently called "satellite dish") you use. For optimum reception, follow the following instructions.
text_image
Antenna Settings 1 LNB Type Universal 2 Motor System None 3 Satellite ASTRA 1B,1C, 4 LOF Low Band 0750 MHz 5 LOF High Band 10600 MHz 6 Band Switching Auto 7 Primary DiSEqC 1.0/A/2 8 Secondary DiSEqC 1.0/A/2 9 Tuner1 IF Not assigned 10 Channel ID Not assigned Freq.: 12070 Pol.: Horizontal SR: 27500 FEC: 3/4 Tuner 1 Signal strength 100 % Signal quality 28 % ✓ Select Up/Down Change Value Init Save & ExitDisplay of the signal strength and signal quality•
Two bar displays on the right side of the screen show you the strength and quality of the signal provided by your satellite antenna. You can use these two displays to make a fine adjustment of the antenna alignment. Align the antenna in such a way that you have the maximum signal strength and signal quality.
- LNB Type
Select "U NIVERSAL" for a standard LNB or "UNICABLE" if you have a Unicable LNB.
Motor System•
If you have connected a motorized satellite antenna to your SatCorder, please use this option ("MATE") to set which signals are sent to the motor.
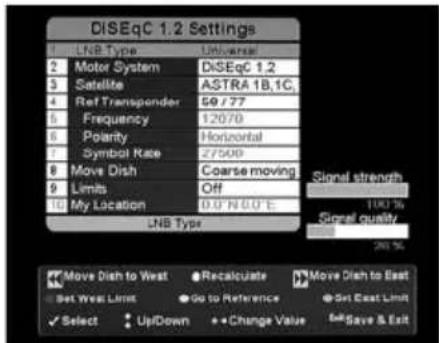
Motorized Dish
text_image
DISEqC 1.2 Settings LNB Type Universal 2 Motor System DISEqC 1.2 3 Satellite ASTRA 1B,1C, 4 Ref Transponder 59/77 5 Frequency 12070 6 Polarity Horizontal 7 Symbol Rate 27500 8 Move Dish Coarse moving 9 Limits Off 10 My Location 0.0°N 0.0°E Signal strength Signal quality LNB Type Move Dish to West Recalculate Move Dish to East Set West Limit Go to Reference Set East Limit ✓ Select Up/Down • Change Value Save & Exit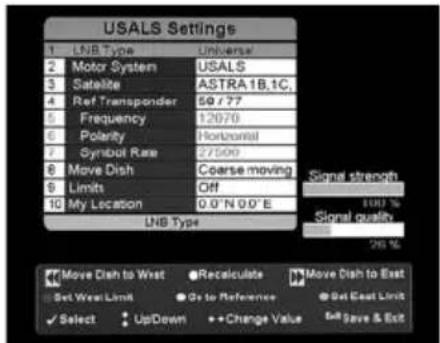
text_image
USALS Settings 1 LNB Type Universe 2 Motor System USALS 3 Satellite ASTRA 1B,1C, 4 Ref Transponder 50 / 77 5 Frequency 12070 6 Polarity Horizontal 7 Symbol Rate 27500 8 Move Dish Coarse moving Signal strength 9 Limit Off Signal quality 10 My Location 0.0°N 0.0°E Signal quality LNB Type 30% Move Dish to Wrist Recalculate Move Dish to Exit Set Wear Limit Go to Reference Set East Limit ✓ Select UpDown + Change Value & Save & ExitIf you have selected one of the options for a motorized satellite antenna and pressed the yellow function key on your remote control, a new menu opens. Here you can set and adjust the position of a satellite. You can use the bar displays for this purpose. Use the colored keys on your remote control to move the satellite antenna and define the limits. The functions of the individual keys are shown at the bottom of the screen.
Using the yellow "RECALCULATE" key, you can recalculate all satellite positions when the basic position of the satellite antenna has changed. If you move the satellite antenna, just set the position of one satellite and then press the yellow function key. Your SatCorder will then automatically calculate the right positions for all other satellites.
Satellite•
Here you can select the satellite whose position you want to set.
Reference Transponder•
Here you can set which transponder is used as the reference.
Move Dish•
With this option, you can set the movement speed of the satellite antenna to "FINE" or "COARSE".
Limits.
Here you can turn the set limits on or off.
Satellite settings•
Under this menu item, you can add satellites to the satellite list, delete them, or, if you use a motorized satellite antenna, set the motor position of the individual satellites. For this purpose, use the keys of your remote control shown at the bottom of the screen.
LOF Low and High Band•
Using this option, you can set the upper ("UPPER LOF") and lower ("LOWER LOF") frequency band of your LNB. The LOF (bCAL OSCILLATOR FREQUENCY) of the LNB can be found on the LNB itself or in the documentation of your LNB.
Band Switching•
Your SatCorder uses a 22kHz signal to change the frequency band of the LNB. If you are not sure whether your LNB supports this function, set this option to "Au".
Primary and Secondary DiSEqC•
You can connect up to two cascadable DiSEqC switches to your SatCorder. With this option, you can set the "TYPE" and "INPUT" for the DiSEqC switch.
• Channel ID (Unicable Only)
In a typical Unicable LNB installation, you can connect several receivers to a single LNB if each connected receiver has its own Unicable channel ID. Under this menu item, you can set the Unicable channel ID of your SatCorder.
• LNB Feed (Unicable Monoblock LNB Only)
With this option, you can set which "LNB FEED" of a Unicable Monoblock LNB of the SatCorder should be used.
3.3 Channel Search
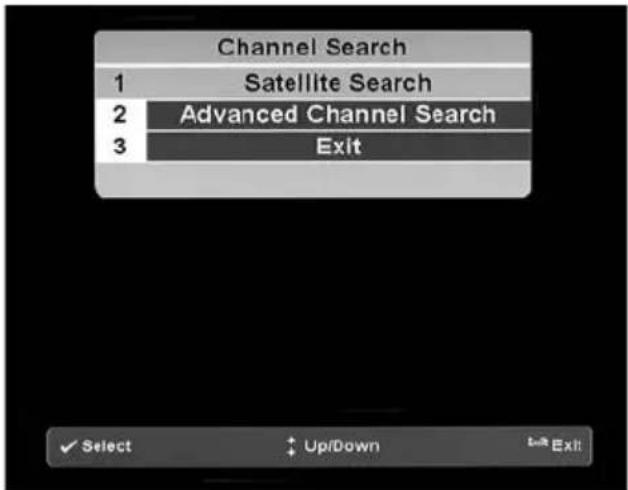
To be able to see the television programs broadcast by a satellite, you must first perform a channel search. The easiest way to do this is to use the "SATELLITE SEARCH", the "ADVANCED CHANNEL SEARCH" is suited for experienced users.
text_image
Channel Search 1 Satellite Search 2 Advanced Channel Search 3 Exit ✓ Select Up/Down Left ExitSatellite Search
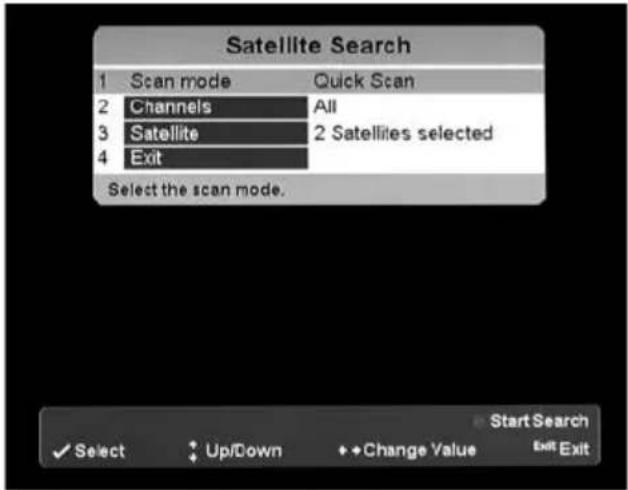
Before you can search for channels, you have to set three options in this menu.
text_image
Satellite Search 1 Scan mode Quick Scan 2 Channels All 3 Satellite 2 Satellites selected 4 Exit Select the scan mode. Start Search ✓ Select Up/Down Change Value Exit ExitScan Mode: Select "QUICK SCAN" to search for channels only on the transponders on the current transponder list for the selected satellites.
If you select "COMPLETE", channels are sought on all transponders of the selected satellites.
Channels: If you select "ALL", both the free-to-air and the pay TV channels are sought. If you select "FTA", only free-to-air channels are sought.
Satellite: Make a selection here to decide which satellite you want to search for channels.
When these options are set, you can start the channel search by pressing the red function key on your remote control.
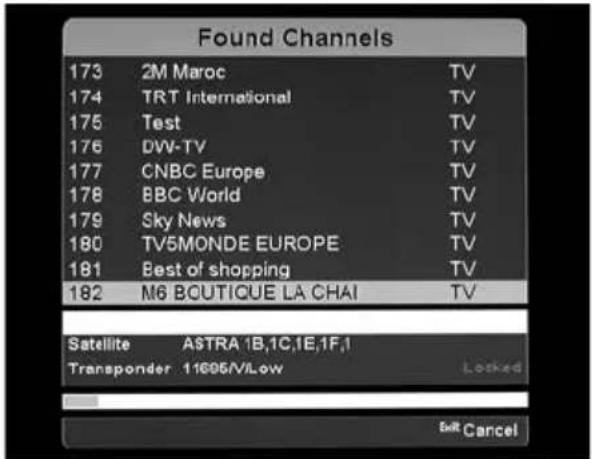
Finding and saving channels
text_image
Found Channels 173 2M Maroc TV 174 TRT International TV 175 Test TV 176 DVV-TV TV 177 CNBC Europe TV 178 BBC World TV 179 Sky News TV 180 TV5MONDE EUROPE TV 181 Best of shopping TV 182 M6 BOUTIQUE LA CHAI TV Satellite ASTRA 1B,1C,1E,1F,1 Transponder 11695/V/Low Locked BeR CancelAs soon as you have started the channel search, a progress bar and a list of the found channels appear. You can interrupt the search at any time by pressing the + exit key on your remote control. After the channel search is completed, please press the green function key on your remote control to save the channel list and end the channel search.
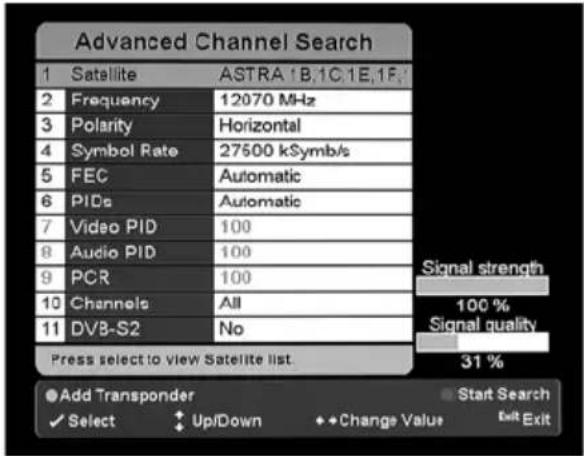
Advanced channel search
text_image
Advanced Channel Search 1 Satellite ASTRA 'B,1C,1E,1F' 2 Frequency 12070 MHz 3 Polarity Horizontal 4 Symbol Rate 27500 kSymb/s 5 FEC Automatic 6 PIDs Automatic 7 Video PID 100 8 Audio PID 100 9 PCR 100 10 Channels All 100 % 11 DV8-S2 No Signal quality Press select to view Satellite list 31 % ●Add Transponder ●Start Search ✓ Select ↑ Up/Down ◆ Change Value Exit ExitThe advanced channel search lets you perform a channel search with more detailed search parameters. The actual search procedure is started in the same way as described above under "SATELLITE SEARCH".
Satellite: Make a selection here to decide which satellite you want to search for channels.
Frequency: Here, set the frequency of the transponder you want to search.
Polarity: With this option you can set the polarization direction of the signal.
Symbol Rate: Here, set the symbol rate of the signal.
FEC: Use this option to set the forward error control (FEC).
PIDs: This can be used to you can select whether the program ID is assigned automatically or manually. If you select "MANA" here, you can set the audio and video program ID and the PCR ("PROGRAM CLOCK REFERENCE") for every channel.
Video PID: With this option, you can set the video program ID.
Audio PID: With this option, you can set the audio program ID.
PCR: Set the PCR with this option.
After you have made the user settings and antenna settings and performed a channel search, your SatCorder is ready for the reception of digital satellite television.
4 Operation of the
TrekStor SatCorder neptune Full-HD 1080i
4.1 Channel Selection
You can select a channel by:
- Entering the number of the channel from the current channel list with the numerical keys (① through ⑨) of your remote control. If you want to select the channel with number 23, for example, press the keys ② and ③ one after the other and wait until the channel changes. The numbers you entered are displayed in a small information box at the top left of the screen so that you can check them.
- Use the + or - key on the front of the SatCorder.
- Switch to the next or previous channel in the current channel list by pressing the ⏻ or the ⏻ key on your remote control. Alternatively, you can press ▲ or ▼ on the navigation button.
- In the program list, highlight a channel using ▲ or ▼ on the navigation key and confirm your selection with ⓄK.
4.2 Setting the Volume
You can increase or decrease the volume of the SatCorder using the Ⓧ and Ⓧ keys on your remote control. When you press the Ⓧ key, you can turn the sound of your SatCorder on and off.
Please note: The sound also remains off when you change the current channel.
4.3 Resolution
You can adapt the playback resolution of your SatCorder to the resolution of your television.
When you press the Ⓤ key on the remote control, the current resolution appears first. Every further press of the Ⓤ key changes the resolution. This happens in the following order: 576p → 720p → 1080i.
4.4 Program Information (Information Display)
text_image
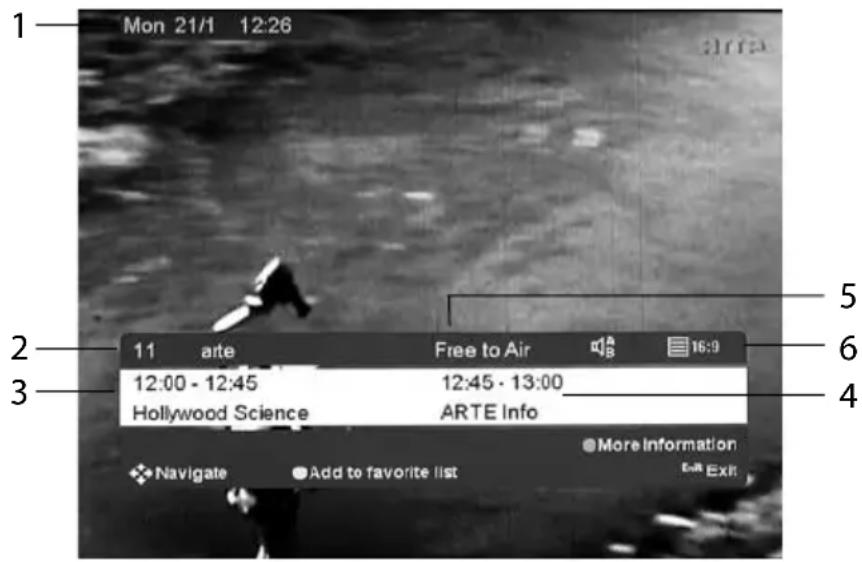
Mon 21/1 12:26 11 arte Free to Air 16:9 12:00 - 12:45 12:45 - 13:00 Hollywood Science ARTE Info More information Navigate Add to favorite list Exit ExitWhen you change the channel, an information display appears for a short time.
Please note: You can change the duration of this display in the user settings.
You can also turn the pop-up display of this program information on and off by pressing the ⓘ key of your remote control.
Information Regarding Channels and Programs
1) Date and current time
2) Number and name of the selected channel
3) Time bar - broadcast time and name of the current program
4) Time bar - broadcast time and name of the following program
5) Display of encoding: If a channel is broadcast without encryption, "FTA" appears here, in case of encrypted content, the name of the required Conditional Access Module (CI-CAM) is displayed.
6) These icons provide additional information regarding the broadcast program.
The program is broadcast in multichannel sound.
A Dolby Digital bitstream is broadcast.
16:9 The program is broadcast in 16:9 format.
The program has subtitles.
Teletext is available.
16 Rating recommended by the channel.
Information Regarding the Operation of the SatCorder
In this area of the information display, additional possibilities of operation are shown.
Press the Ⓞ key of the remote control to activate the reminder function.
Use the ▶ or ◀ key to change the current program on the time bar. Use the ▲ or ▼ key to change the channel.
The selected channel is added to your favorite list by pressing the yellow function key.
- If the channel broadcasts further information on the programs, this information is displayed by pressing the blue function key.
Briefly press the ←EXIT key to end the information display.
4.5 Messages
If a message is received, the letter symbol appears at the top of the screen. This generally occurs as notification of an available software update.
4.6 Teletext
If teletext is broadcast for the currently selected channel, the teletext symbol appears in the information display or in the EPG. Press the Ⓞ key of your remote control to display the teletext. Use the numeric keys to enter a page number.
4.7 Audio and Subtitle Languages
Some channels broadcast programs with various audio channels (multichannel sound) or with subtitles in various languages.
Press the 📄 key of your remote control to display all available languages. Use the circular control button of the remote control to select a language.
4.8 Standby Mode
If you are not using your SatCorder, you can reduce the power consumption by placing it in standby mode. Standby mode lets you reactivate it quickly. In standby mode, a display of the current time appears on the display of your SatCorder. Programmed recordings are carried out when the SatCorder is in standby mode.
Please note: To switch off the SatCorder completely and prevent unnecessary power consumption, please turn off your SatCorder using the mains switch on the back side. Please observe that no programmed recordings can be carried out while the mains switch is set to "¢".
4.9 Recording and Playback of Programs
Connecting a USB 2.0 Mass Storage Device
Your SatCorder has a USB 2.0 port on the back side. You can connect an external USB 2.0 hard disk (e.g. a TrekStor DataStation) or a USB stick.
If you connect a suitable USB 2.0 mass storage device, a message appears during the initialization of the storage device and once it has been successfully recognized. With a connected external USB 2.0 hard disk, you can use the versatile recording and playback functions of your SatCorder optimally. For this reason, the following assumes that an external USB 2.0 hard disk is being used for recordings.
Please note: The file system of the external USB 2.0 hard disk must be FAT32.
Please note: Please always unmount your USB 2.0 mass storage device prior to removing it. This is done by pressing the yellow function key on your remote control.
Time Shift
If you want to interrupt a television program in progress, just press the ▶II key on your remote control. The SatCorder immediately starts to record the program in progress on the connected USB 2.0 hard disk. A freeze frame of the moment in which you interrupted the program and the time shift counter appear on the screen. To continue the playback at the position at which you stopped, press the ▶II key again.
Instant Replay
If you press the 📊REPLAY key of the remote control, the last 30 seconds of the playback of a time shift recording in progress is repeated. If you activate the "INSTANT REPLAY" function in the "PVR SETTINGS" menu, the 📊REPLAY key also works during the normal playback of the television program as soon as the selected channel has been running for at least 30 seconds.
Record
With your SatCorder, you can record the current program as well as programming timed recordings by pressing the ● key.
If you want to record the current program, you have two possibilities:
- Endless recording: Start the recording by pressing the ● key on the remote control. To stop the recording, press the ■ key.
- Recording with automatic ending: When the information display is visible, the end time of the current program is set according to the data given in the EPG.
If you want to plan your recordings in advance, you can use the EPG or Personal Planner for this purpose.
Play mode
In addition to the recordings you make, your SatCorder is able to display images in JPEG format (*.jpg or *.jpeg) and play audio files in MP3 format and DVD video files (*.IFO).

text_image
Library 97% Used ARTE_0602_12_16_12.trp BBC World_1102_12_18_57.bmf BBC World_1102_12_18_57.trp DISCOVERY HD_2702_39_06_47.001 DISCOVERY HD_2702_39_06_47.002 DISCOVERY HD_2702_39_06_47.003 DISCOVERY HD_2702_39_06_47.004 DISCOVERY HD_2702_39_06_47.005 DISCOVERY HD_2702_39_06_47.trp DISCOVERY HD_2702_11_02_46.001 Length: 95+128 KB ARTE_0602_12_16_12.trp Play Select Folder Sort Up Folder Delete New Folder Rename Move UpDown Page UpDown Save & ExitWhen you press the key of your remote control, the media library appears on the screen ("LIBRARY"). Here, you receive an overview of the recordings and further media files located on the connected external hard disk.
To play back a file, select it with the ▲ or ▼ key and start the playback by pressing the ▶■ key. You can control the playback with the following keys on your remote control:
■ key: Ends the playback.
▶II key: Pauses and starts the playback.
or key: Fast forward or rewind.
or key: Selects a bookmark in a file.
Green function key: Places a bookmark
Red function key: Deletes a bookmark
Yellow function key: Displays the "G o TO POSITION" dialog. Here, you can jump to a certain playback position by entering the desired time in the recording using the remote control.
Blue function key: By pressing the blue function key, you can access the "E DIT FILE" mode, in which you can delete the part of a recording between two bookmarks.
Please note: If you want to play back DVD video files, please choose the IFO-file corresponding to the video you want to watch. Playback of the file VIDEO_TS.IFO is not possible.
4.10 Channel Lists
Your SatCorder has at least three channel lists: The TV list, the radio list, and the "My FAVORITES" list. You can also create further favorite lists as described below.
Selection of the active channel list
If you select one of the channels lists (TV list, radio list, or favorite list) using the TV, RVPS, or FAV key of your remote control, it will automatically become the active channel list used for channel selection.
Managing channel lists
In the "CHANNEL LISTS" menu, you can manage and organize the various channel lists.
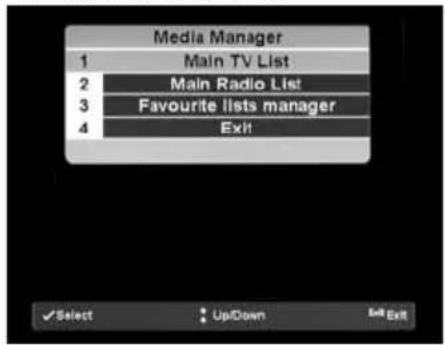
TV list and radio list
text_image
Media Manager 1 Main TV List 2 Main Radio List 3 Favourite lists manager 4 Exit ✓Select • Up/Down Set Exit
text_image
Main TV List 334 Bayerisches FS 335 Bayerisches FS 336 BBC Arabic 337 BBC C Beebies Polar 338 BBC Entertainment 339 BBC Knowledge Pole 340 BBC Lifestyle Pola 341 BBC Prime 342 BBC Prime 343 BBC PRIME Satellite: ADTRA.1B.10.1E.1F.1; CAS: Free to Air Delete all Up/Down +Page Up/Down Max Ch Start TV/Radio Pm/Lock/Unlock Exit
text_image
Main Radio List 11 BSCW SERVICE 12 SEUR FM 13 BFM 14 BR Verkehr 15 Bayern 1 16 Bayern 3 17 Bayern 4 Klassik 18 Bayern 2 19 Bremsen Cross 20 Bremsen Vier Satellite: ASTRA 1B,1C,1E,1F,1, CAS: Free to Air ● Deets all ● Up/Down ● Port ● Ti/Radio ■ Lock/Unlock ■ ExitYou can open the TV and radio lists in the main menu using the "CHANNEL LISTS" menu item or by pressing the Ⓞ key. These lists contain all television channels and radio stations found during the automatic or manual channel search. The channels are listed on the left side of the screen in a table with their program numbers. On the right side of the screen, information and a preview of the program in progress are provided for each television channel. Underneath that, you will find the available key commands.
4.11 Favorite list manager
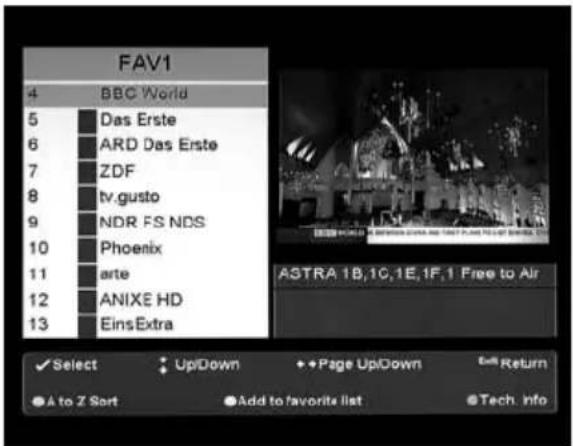
text_image
FAV1 4 BBC World 5 Das Erste 6 ARD Das Erste 7 ZDF 8 tv.gusto 9 NDR FS NDS 10 Phoenix 11 arte 12 ANIXE HD 13 EinsExtra ASTRA 1B,1C,1E,1F,1 Free to Air ✓ Select UpDown + + Page UpDown Edit Return ● A to Z Sort ● Add to favorite list ● Tech. InfoWith your SatCorder, you can create several personal favorite lists in which you can save the channels of your choice in a freely selectable order.
Creating, renaming, and removing favorite lists
In the "CHANNEL LISTS" menu, select "FAVORITE LIST MANAGER". A window in which the previously existing favorite lists and the available commands are displayed opens on the screen. To enter a name for a favorite list, use the numeric keys on the remote control.
Editing favorite lists
When you select a previously existing favorite list with the Ⓞ key of the remote control, an editing window opens. In this menu, you can select channels from the TV and radio lists and add them to your favorite list, as well as change the position of a channel in your favorite list.
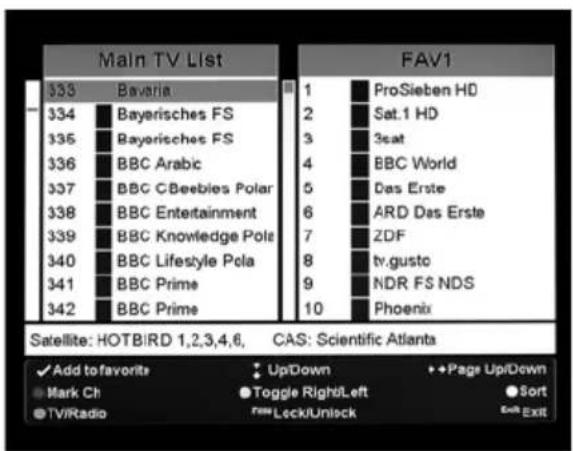
text_image
Main TV List 333 Bavaria 334 Bayerisches FS 335 Bayerisches FS 336 BBC Arabic 337 BBC C Beebles Polar 338 BBC Entertainment 339 BBC Knowledge Pole 340 BBC Lifestyle Pole 341 BBC Prime 342 BBC Prime FAV1 1 ProSieben HD 2 Sat.1 HD 3 3eat 4 BBC World 5 Das Erste 6 ARD Das Erste 7 ZDF 8 tv.gusto 9 NDR FS NDS 10 Phoenix Satellite: HOTBIRD 1,2,3,4,6, CAS: Scientific Atlanta ✓ Add to favorite Up/Down Page Up/Down ● Mark Ch Toggle Right/Left ● Sort ● TV/Radio Lock/Unlock Exit Exit5 The Main Menu of the
TrekStor SatCorderneptune Full-HD 1080i
To access the main menu of your SatCorder, please press the MENU key on your remote control.
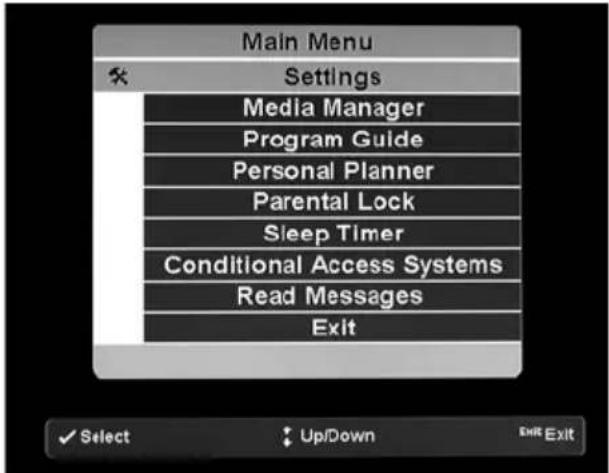
text_image
Main Menu Settings Media Manager Program Guide Personal Planner Parental Lock Sleep Timer Conditional Access Systems Read Messages ExitYou can navigate in the screen menu of your SatCorder using the navigation keys of your remote control. A selection or entry is confirmed by pressing the Ⓞ key. By pressing the ⏻EXIT key, you can leave the currently selected setting or current menu. In some menus, the four colored function keys of the remote control have special functions.
Please note: Since we are constantly refining the software of the SatCorder for you, the menus of your SatCorder may differ from the ones shown here.
6 Settings
This chapter explains the settings of your SatCorder.
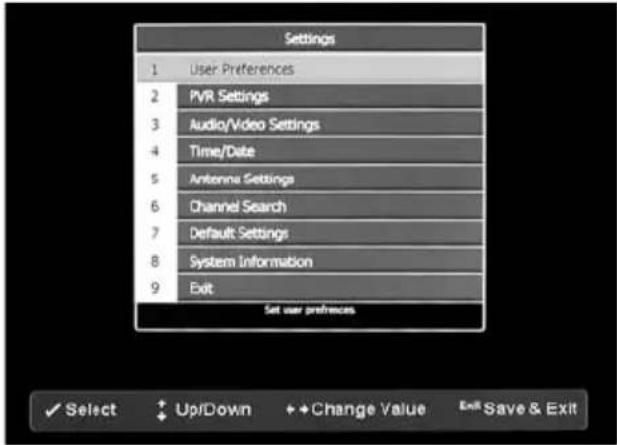
text_image
Settings 1 User Preferences 2 PVR Settings 3 Audio/Video Settings 4 Time/Date 5 Antenna Settings 6 Channel Search 7 Default Settings 8 System Information 9 Exit Set user preferences ✓ Select + Up/Down ◆ Change Value Exit Save & ExitTo change the settings of your SatCorder, select the "SETTINGS" item on the main menu. In this submenu, you can select the menu entries as usual.
Please note: With some options, you can also change the value with the ▶ or ◀ key of the navigation keys without having previously selected the option with the Ⓞ key.
Settings Only
This menu is explained in Section 3.1.
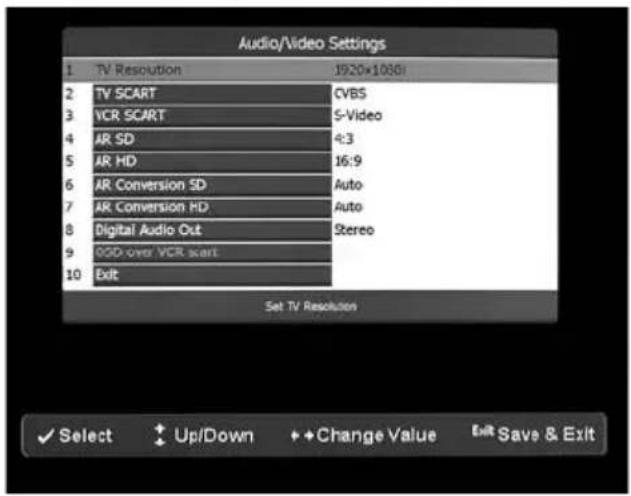
Audio/Video Settings•
In this submenu, you can adapt the settings of the audio and video output of your SatCorder.
text_image
Audio/Video Settings 1 TV Resolution 1920x1080 2 TV SCART CVBS 3 VCR SCART S-Video 4 AR SD 4:3 5 AR HD 16:9 6 AR Conversion SD Auto 7 AR Conversion HD Auto 8 Digital Audio Out Stereo 9 GSD over VCR start 10 Exit Set TV Resolution ✓ Select ↑ Up/Down ↔ Change Value Exit Save & ExitTV Resolution: Under this menu item, you can set the resolution of your television.
TV SCART: With this option, you can set the output on the TV SCART port.
VCR SCART: With this option, you can set the output on the VCR SCART port.
Aspect Ratio: You can set the aspect ratio of your television here (4:3 or 16:9).
Aspect Ratio Conversion: You can set the adaptation of the aspect ratio of a program to the aspect ratio of your television.
Digital Audio Out: Here, set the desired audio output mode for the optical and coaxial S/PDIF digital output.
OSC over VCR SCART: Here you can set whether the OSD display should also be output at the VCR SCART port.
Please note: This option is available only if TV-SCART is set to "RGB".
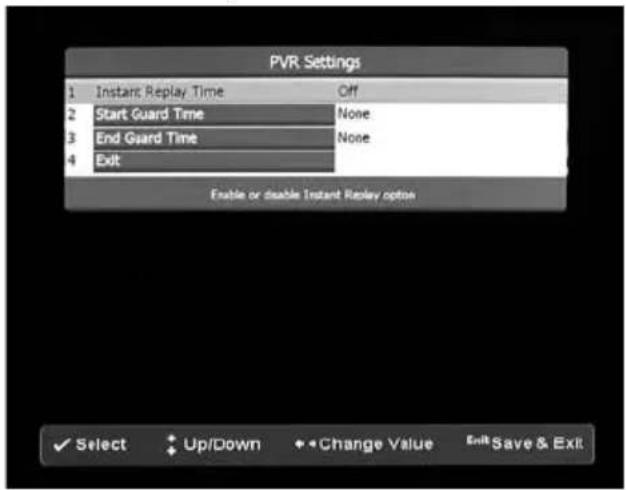
PVR Settings•
In this submenu, you can set the "INSTANT REPLAY" function and set a time buffer for recordings.
text_image
PVR Settings 1 Instant Replay Time Off 2 Start Guard Time None 3 End Guard Time None 4 Exit Enable or double Instant Replay option ✓ Select Up/Down Change Value Exit Save & ExitTime/Date•
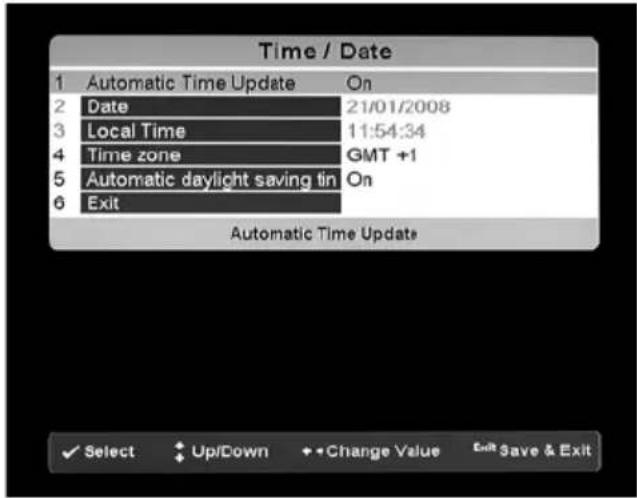
In this submenu, you can make the settings for the time and date.
text_image
Time / Date 1 Automatic Time Update On 2 Date 21/01/2008 3 Local Time 11:54:34 4 Time zone GMT +1 5 Automatic daylight saving tin On 6 Exit Automatic Time Update ✓ Select Up/Down • Change Value Exit Save & ExitAutomatic Time Update: When this option is active, your SatCorder tries to set the time and date automatically using the sent signals.
Please note: Some channels may broadcast an incorrect time or date.
Date: Here, you can set the date manually.
Local Time: Here, you can set the time manually.
Time Zone: The time broadcast by a channel is usually GMT (Greenwich Mean Time). To set the local time correctly, you can set your time zone here.
Automatic daylight saving time: When this option is selected, your SatCorder automatically switches between daylight saving time and standard time.
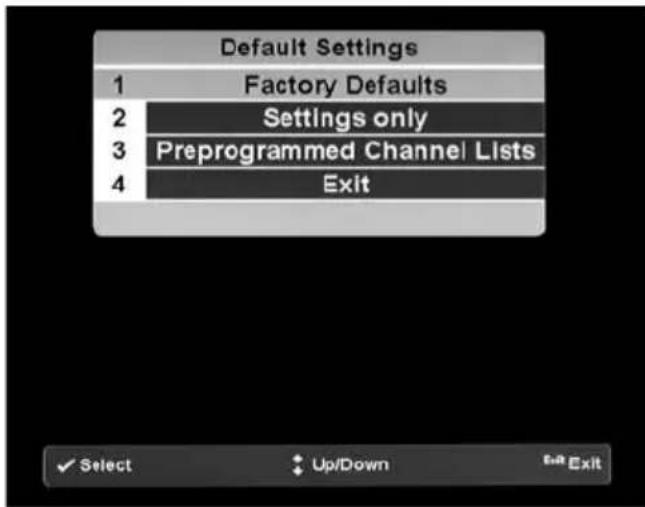
Default Settings•
Use this option to restore the default settings. This may be necessary, for example, if a large number of settings are incorrect. The device has the following three types of default settings: factory defaults, user settings, and preprogrammed channel lists.
text_image
Default Settings 1 Factory Defaults 2 Settings only 3 Preprogrammed Channel Lists 4 Exit ✓ Select Up/Down Exit ExitFactory Defaults: When you select this menu item and confirm with the Ⓞ key and the green function key, all settings are reset to the delivery state and the channel and favorite lists are deleted! After the factory default settings are restored, the "QUICK START" menu appears and you have to make the default settings again.
Settings Only: Use this option to delete the settings you made. The channel and favorite lists remain unchanged.
Please note: In case the menu looks distorted or is displayed in black and white after the reset of the user settings or restoration of the factory settings, change the video output as described in the "AUDIO/VIDEO SETTINGS" section.
Preprogrammed Channel Lists: When you select this option, the channel lists are replaced by the channel lists preprogrammed at the factory.
Antenna Settings•
This menu is explained in Section 3.2.
Channel Search•
This menu is explained in Section 3.3.
System Information•
In this menu, you can obtain information about the hardware version and installed software and perform a software update.
Product Information: When you select this menu item, information about the hardware version of your SatCorder and the currently installed software version appears. This information may be required if you contact our support.
Software Update: If you want to perform a software update on your SatCorder, two methods are available: via the satellite antenna (OTA) and via the USB interface.
Note: Do not interrupt the data transfer under any circumstances while performing a software update! Do not switch off the SatCorder during an update and do not remove the USB storage medium or disconnect your satellite antenna.
Please note: If you install a complete software package (with a bootloader), the user settings and channel lists are deleted.
Software Update via the Satellite Antenna (OTA)•
You can download software updates automatically while your SatCorder is in standby mode. For this purpose, select the "AUTO" setting from the "AUTO UPGRADES" options on the "USER PREFERENCES" menu. At the first startup after such an update, the SatCorder displays a message on the screen that an update was performed successfully.
When you perform an OTA software update, your SatCorder first searches for an update signal. This procedure can last several minutes. During this search, the "SOFTWARE UPDATE" message appears on the screen. To interrupt the search, please press the red function key or the + EXIT key on the remote control. If a new software version is available, you will be informed and asked if you want to download it. After an additional confirmation prompt to prevent accidental changes to the system, the download starts.
During the download, an "OTA" window with a progress bar appears on the screen. After the download of the new software version is complete, your SatCorder starts the update and then performs an automatic restart. In the case of this type of software update, the user settings and channel lists usually remain unchanged.
Please note: OTA software updates are broadcast through the ASTRA 19.2E satellite. Make sure that your satellite system is oriented toward this satellite.
Software Update via USB•
The software can be updated using a USB mass storage device (e.g. a USB stick or a TrekStor DataStation).
a) Download the most up-to-date version of the software from the TrekStor Website under http://www.trekstor.de.
b) Copy the software (*.bin file) into the main directory of the USB mass storage device.
c) Switch on your SatCorder.
d) In the "SETTINGS" menu, select the "SYSTEM INFORMATION" item.
e) Connect the USB mass storage device to the rear of your SatCorder using the USB port.
f) The "USB - READ STRUCTURES" message appears on the screen. Wait until the "USB - INIT OK" message appears.
g) If a compatibility message appears, press the Ⓞ key.
h) Select "SOFTWARE UPDATE" and press the Ⓞ key. Press the green function key on the remote control to copy the software update to your SatCorder and then again to confirm the security query.
Please note: Alternatively, you can proceed as follows after completing item b):
c) Switch your SatCorder off using the mains switch.
d) Connect the USB mass storage device to your SatCorder.
e) Press the - button on the front panel while switching on your SatCorder.
f) When the message "ON THE USB" is displayed on the VFD, you can stop pressing the - button and the software update starts.
After the software update has been copied and unpacked, your SatCorder starts the actual update and then performs an automatic restart. In the case of this type of software update, the user settings and channel lists usually remain unchanged.
7 Program Preview (EPG)
The EPG (Electronic Program Guide) provides information on the television schedule for the next seven days. The information displayed in the EPG are provided by the television channels and loaded to your SatCorder in the background. However, it may occur that some channels transmit no or incorrect information.
Please note: The "No DATA PRESENT" message means that either the currently selected channel does not transmit EPG information or the data has not yet been received.
Please note: In order for the EPG to work, the time and date must be set correctly.
7.1 Program Information (Current and Upcoming Program)
Each time you change the channel, an information window appears on the screen. In this window, the name of the channel, the current time, the start and end times, and the title of the current and upcoming program are displayed.
In addition, some symbols are displayed that provide you with information regarding the technical details of the broadcast programs.
Several audio channels are available.
The channel broadcasts programs in Dolby Digital.
Additional DVB subtitles
The channel broadcasts videotext.
Please note: The Dolby Digital symbol appears if a channel broadcasts programs in Dolby Digital 2.0 or in Dolby Digital 5.1. Therefore the symbol does not necessarily mean that programs are broadcast in Dolby Digital 5.1.
If EPG data is present, you can view the channel schedule in the course of the day using the ▶ and ◀ keys. Pressing the blue function key of the remote control shows you further information on the program displayed on the left side of the information window.
7.2 EPG Grid View
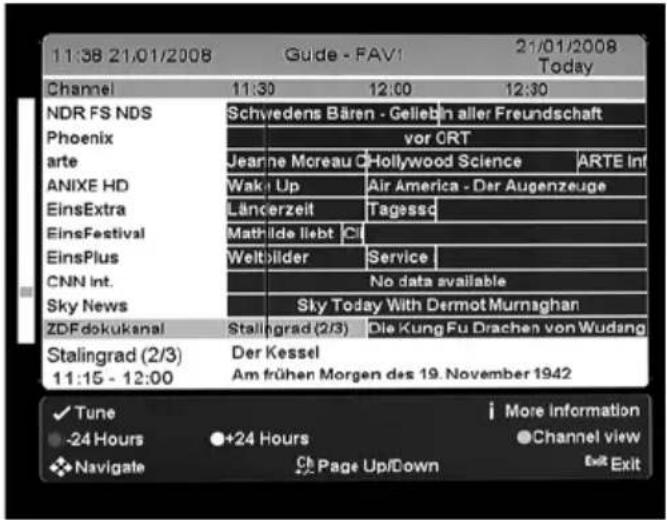
To access the grid view of the EPG, press the EPG key or select the EPG from the main menu.
text_image
11:38 21/01/2008 Guide - FAVI 21/01/2008 Today Channel 11:30 12:00 12:30 NDR FS NDS Schwedens Bären - GeliebIn aller Freundschaft Phoenix vor CRT arte Jeanne Moreau O Hollywood Science ARTE Int ANIXE HD Wake Up Air America - Der Augenzeuge EinsExtra Länderzeit Tagassc EinsFestival Mathilde Liebt Cl EinsPlus Weltbilder Service CNN int. No data available Sky News Sky Today With Dermot Murnaghan ZDFdokukanal Stalingrad (2/3) Die Kung Fu Drachen von Wudang Stalingrad (2/3) Der Kessel 11:15 - 12:00 Am frühen Morgen des 19. November 1942 ✓ Tune More Information -24 Hours +24 Hours Channel view ✿ Navigate Page Up/Down Exit ExitIn the grid view of the EPG, you can see the last active channel and further channels in the selected channel list and an excerpt of the program information found for this channel. The program marked in color is the program active in the EPG. For this program you can schedule a recording by pressing the ● key or you can activate the reminder function by pressing the Ⓞ key. With the ▲ and ▼ keys, you can change the active channel. Using the ▶ and ◀ key you can mark a later or earlier program as the active program and search the EPG for programs. With the green function key, you can switch to the next day in the EPG and to the previous day with the red function key.
For detailed information on an active program, press the ⓘ key.
Recording Functions: Press the ● key to program a recording for the active program. When you press the yellow function key, you can set the repeat properties (e.g. weekly, daily, on weekdays) for the recording (e.g. for several episodes of a series) directly in the EPG.
7.3 EPG Channel View
This view of the EPG shows you an overview of the programs of an individual channel. You can switch between the channel view and grid view by pressing the blue function key of the remote control.
8 Personal Planner
text_image
My Personal Planner 12:19 21/01/2006 99% Free Name Start Channel Mode arte New Planner Event Type Reminder Channel BBC World Name BBC NEWS Start Date 21.01.2008 Start Time 21:00 End Date 21.01.2008 End Time 21:35 Mode Notification Cycle Single Cancel Confirm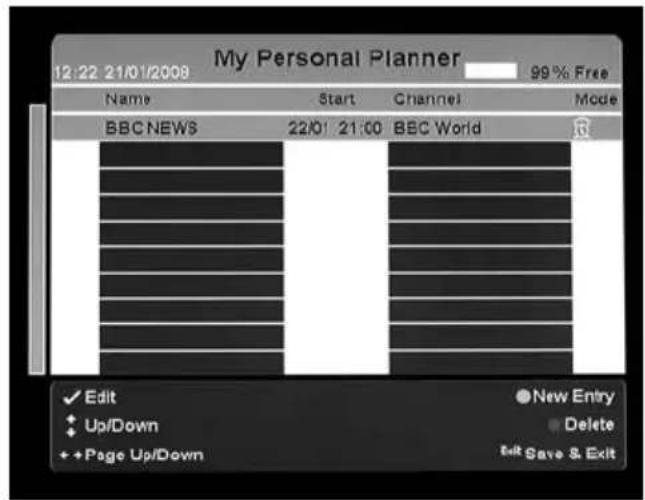
text_image
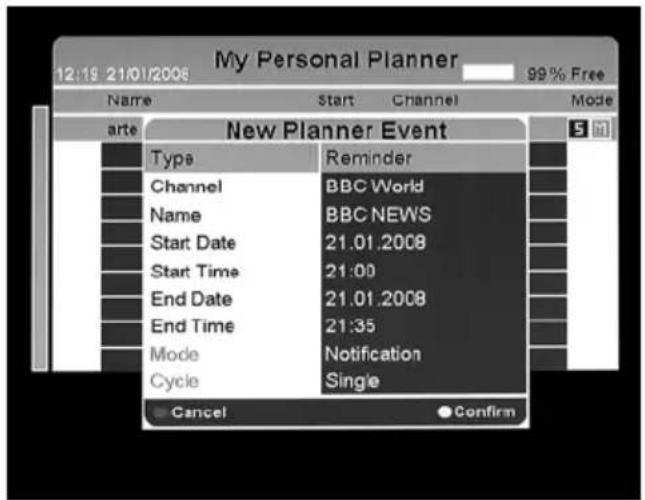
My Personal Planner 12:22 21/01/2008 99% Free Name Start Channel Mode BBC NEWS 22/01 21:00 BBC World Edit New Entry Up/Down Delete +Page Up/Down Edit Save & ExitThe Personal Planner shows you an overview of all planned and active events and information about the free space on the USB 2.0 mass storage device.
You can start the "PERSONAL PLANNER" from the main menu or by pressing the PLAN key on the remote control.
In the list of the Personal Planner, the name of the program, the date and time of the event, and the recording function are displayed for all planned events. In the Personal Planner, you can add and delete events.
In the first column of the Personal Planner, the status of an event is displayed:
The event is in progress. This symbol is red in case of a recording and green for a reminder.
There is a problem with this event (e.g. an overlapping with another event).
In the last column of the Personal Planner, the mode of an event is displayed:
Single reminder
® Single recording
⑦ Weekly
Daily
⑤ From Monday to Friday
Series timer: All entries in the EPG with the same title on this channel are recorded. This mode can only be generated in the EPG.
Reminder: Two minutes before the start a message is displayed; you can then decide whether the event is carried out or canceled.
© Notify
8.1 Adding and Editing Events in the Personal Planner
Press the blue function key to add a new event or select an event with the ▲ and ▼ keys and press the Ⓞ key to edit an event.
Use the ▲ and ▼ keys to enter the properties for the event and the Ⓞ key to confirm a selection.
Please note: Events generated in this way are only timed and not bound to a certain program as is the case when programming is performed via the EPG.
Type: Here you can select between recording, switchover, and reminder.
Channel: Here you can set the desired channel.
Name: Enter a name for the event using the numerical keys of the remote control.
Start Date: Enter the date of the starting time.
Start Time: Enter the time of the starting time.
End Date: Enter the date of the end time.
End Time: Enter the time of the end time.
Mode: The event mode can be set to "AUTOMATIC" or "NOTIFICATION". If "AUTOMATIC" is selected, the event starts without notification. If "NOTIFICATION" is selected a query appears on the screen three minutes before the event and the event can be confirmed with the green function key or canceled with the red one. This selection must then be confirmed again using the Ⓞkey. If the event if not confirmed, the event is canceled.
Cycle: The event can take place once ("SINGLE"), "DAILY", once a week ("WEEKLY") or "MONDAY TO FRIDAY".
8.2 Deleting an Event
To delete an event, select it with the ▲ and ▼ keys and press the red function key. Confirm this selection in the message that appears with the green function key or cancel the deletion with the red function key or the ←EXIT key.
9 Parental Lock
text_image
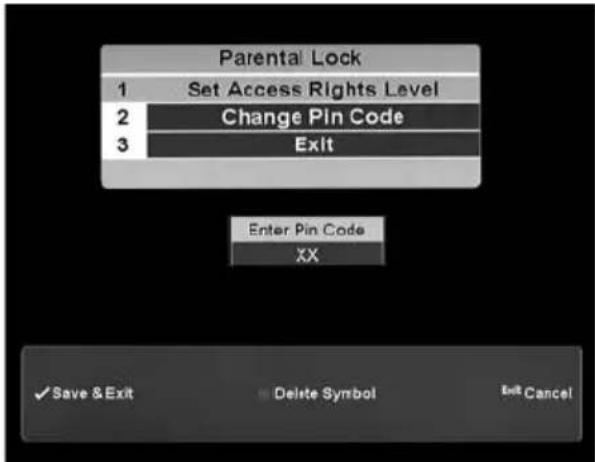
Parental Lock 1 Set Access Rights Level 2 Change Pin Code 3 Exit Enter Pin Code XX ✓ Save & Exit Delete Symbol Exit CancelYour SatCorder has a parental lock that lets you limit access to certain settings or programs. This limitation takes place using a four-digit PIN code. The standard functions such as the reception of non-blocked programs, the EPG, or the Personal Planner remain completely functional without the entry of the PIN.
If no PIN is set (default setting at delivery), all functions can be used without limitations.
9.1 Setting the Access Rights
text_image
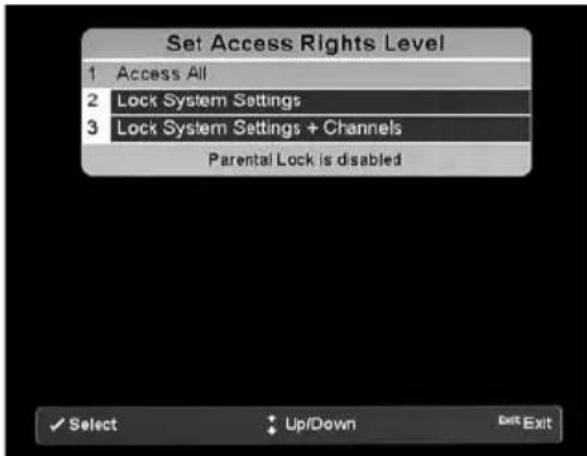
Set Access Rights Level 1 Access All 2 Lock System Settings 3 Lock System Settings + Channels Parental Lock is disabled ✓ Select Up/Down Exit ExitSelect "SET ACCESS RIGHTS" in the parental lock menu. If no PIN is set, you will be prompted to enter a PIN. If the PIN is entered, you can set the following access rights:
Access All: All programs and menus (except "SET ACCESS RIGHTS" and "CHANGE PIN CODE") are accessible to all users.
Lock System Settings: In this mode, all settings are blocked until the PIN is entered.
Lock System Settings + Channels: This mode blocks the settings and all channels marked in the lists. You must enter the PIN to activate a blocked channel or change settings.
9.2 Change PIN Code
Select this option to change the PIN code.
Please note: If you should forget the PIN code, please call our support.
10 Conditional Access System
text_image
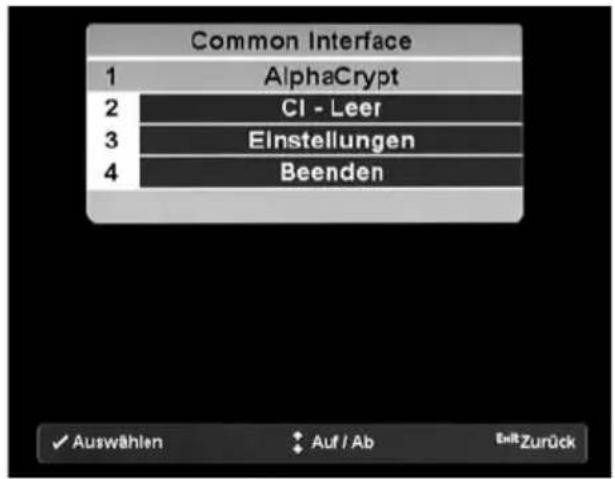
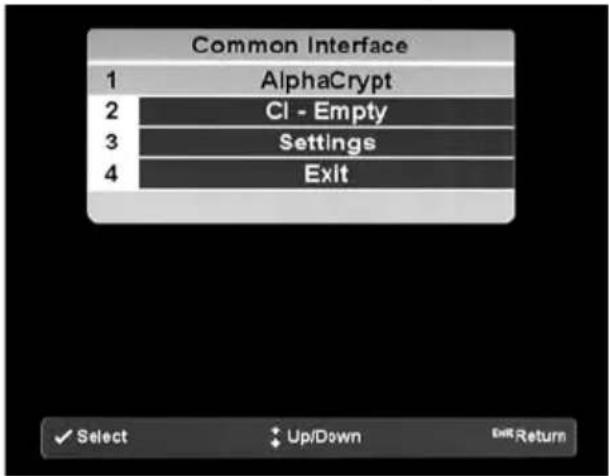
Common Interface 1 AlphaCrypt 2 CI - Empty 3 Settings 4 Exit ✓ Select ♦ Up/Down Exit ReturnIf you want to watch encoded channels (e.g. pay TV), you need a Conditional Access Module (CI-CAM) suited for the desired encoding method and an enabled smart card for the respective channel.
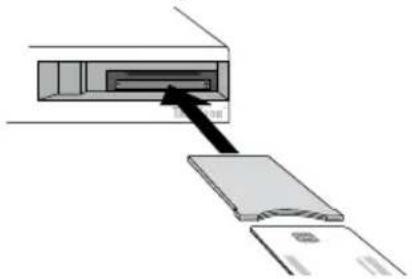
Insert the smart card according to the instructions of the manufacturer of your CAM into the module. While the SatCorder is switched off, push the module into one of the two Common Interface (CI) slots until you notice a resistance. To remove a CAM, carefully press the eject key next to the CI slot and remove the CAM.
natural_image
Diagram showing a device being inserted into a folder, with an arrow indicating the insertion direction (no text or symbols present)The communication of a CAM via pop-ups on the screen can be regulated on the "CONDITIONAL ACCESS SYSTEM" menu under the "Settings" menu item. To obtain information on an installed CAM, select it in the "CONDITIONAL ACCESS SYSTEM" menu. You can also make settings for an installed CAM here.
Please note: To guarantee a problem-free reception, you must observe the operating instructions of the Conditional Access Module and the smart card.
Instructions for safety and use:
Please also read the safety notices on page 33.


Only qualified persons may perform repairs on the product.
The product may not be opened or changed. The components cannot be serviced by the user.
- Never expose the device to moisture, condensation and liquids. Protect the device from extremely high and low temperatures and temperature fluctuations. Use the device within an ambient temperature of 5^ to 35^ .
Never place the device close to a source of heat, and protect it from direct sunlight.
• Make sure that the surroundings are as dust-free as possible when you use and store the device.
• Never clean the surface of the device with solvents, paint thinners, cleansers or other chemical products. Instead, use a soft, dry cloth or soft brush.
Notes:
Do not use USB cables longer than 3 meters.
The manufacturer retains the right to continually improve the product. These changes may be made without being directly described in these operating instructions. For this reason, the information provided in these operating instructions may not reflect the current state of the art.
The manufacturer only guarantees suitability for the product's intended purpose. In addition, the manufacturer is not responsible for damages or loss of data and subsequent consequences.
DiSEqC™ is a trademark of EUTELSAT
DVB is a registered trademark of the DVB Project
Dolby is a registered trademark of Dolby Laboratories
Unicable™ is a registered trademark of FTA Communication Technologies
Copyright © 2008 TrekStor GmbH & Co. KG. All rights reserved. Other cited product or company names may be trademarks or brand names of the respective owner.
Support
| Hotline E-Mail Language | |||
| AT | +49 431 - 24 89 45 70** | support.at@trekstor.de German | |
| BE | +49 431 - 24 89 45 80** | support.en@trekstor.de English | |
| CH | +49 431 - 24 89 45 73** | support.ch@trekstor.de German | |
| DE | 01805 - TREKSTOR* | ||
| 01805 - 87 35 78 67* | support.de@trekstor.de German | ||
| ES | +49 431 - 24 89 45 76** | support.es@trekstor.de Spanish | |
| FR | +49 431 - 24 89 45 74** | support.fr@trekstor.de French | |
| HU | +49 431 - 24 89 45 79** | support.en@trekstor.de English | |
| IT | +49 431 - 24 89 45 75** | support.it@trekstor.de Italian | |
| LU | +49 431 - 24 89 45 72** | support.lu@trekstor.de German, French | |
| NL | +49 431 - 24 89 45 81** | support.en@trekstor.de English | |
| PL | +49 431 - 24 89 45 77** | support.pl@trekstor.de Polish | |
| PT | +49 431 - 24 89 45 78** | support.en@trekstor.de English | |
| UK | +49 431 - 24 89 45 71** | support.uk@trekstor.de English | |
| GR | +49 431 - 24 89 45 82** | support.en@trekstor.de English | |
| TR | +49 431 - 24 89 45 83** | support.en@trekstor.de English | |
| RU | +49 431 - 24 89 45 84** | support.en@trekstor.de English | |
| SE | +49 431 - 24 89 45 92** | support.en@trekstor.de English | |
| UA | +49 431 - 24 89 45 93** | support.en@trekstor.de English | |
| SI | +49 431 - 24 89 45 94** | support.en@trekstor.de | English |
| CA | +49 431 - 24 89 45 95** | support.en@trekstor.de English | |
| +49 431 - 24 89 45 96** | support.fr@trekstor.de French | ||
| Other Countries | +49 431 - 24 89 45 99** | support.en@trekstor.de English | |