
Odan S - Satellite receiver TrekStor - Free user manual and instructions
Find the device manual for free Odan S TrekStor in PDF.


User questions about Odan S TrekStor
0 question about this device. Answer the ones you know or ask your own.
Ask a new question about this device
Download the instructions for your Satellite receiver in PDF format for free! Find your manual Odan S - TrekStor and take your electronic device back in hand. On this page are published all the documents necessary for the use of your device. Odan S by TrekStor.
USER MANUAL Odan S TrekStor
natural_image
Black Trekstor remote device with digital display and control panel (no visible text or symbols on main body)SatReceiver Odan S
INhaltsvErzElchNIs
Lieferumfang 3
Schutz Ihres SatReceiver
text_image
TREkSTOR® SatReceiver Odans S DV3S LNB Loop through LNB In 13/18V mm 500mA Max TVVCR AC ~ 100-240V 50/60Hz Digital Audio Coaxial1) Controls and connections of the SatReceiver Odan S 18
2) Connecting the TrekStor SatReceiver Odan S 20
2.1) Connection with your satellite system....20
2.2) Connection with your Home-Entertainment-System 21
2.3) Connection to the power supply 21
3) Quick installation of the TrekStor SatReceiver Odan S 21
4) Operating the TrekStor SatReceiver Odan S 23
4.1) General operation 23
4.2) Operating the main menu and changing the settings 23
4.3) Editing the channel and favorite lists 25
5) FAQ 27

OPERATING INSTRUCTIONS
Thank you for buying the TrekStor SatReceiver Odan S. We are confident that this product will be the source of much enjoyment. Please read the following instructions carefully so that you can become acquainted with the functions of this product and its use.
Current product information as well as a detailed user manual can be found at the TrekStor website www.trekstor.de.
Have you got questions about the operation or the functions of this product? On the TrekStor website you can find answers to the most frequently asked questions under "SERVICE" "FAQ".
You can also get quick assistance by contacting our support. If you want to contact our support, it is best to visit our website, www.trekstor.de, and fill out the support form that can be found under "SERVICE" → "SUPPORT". You can of course also contact us directly by e-mail or telephone. The more detailed your support request is, the quicker and better we will be able to help you!
Package contents
- SatReceiver Odan S
- Remote control
• 2 AAA batteries - Operating instructions
Safety information
Please read the following information carefully for your own security and follow them while using your TrekStor SatReceiver Odan S.
Putting up your SatReceiver
- Please run your SatReceiver only within buildings.
- Put your SatReceiver onto a plane and solid base. It must not stay next to a heater and should be protected against direct insolation.
• Make sure that your SatReceiver is ventilated adequately. Never cover the ventilation slots of the SatReceiver. Please ensure a sufficient air circulation at the location of your SatReceiver by leaving enough free space around it. - Do not place any items onto your SatReceiver. Large items may interrupt the air circulation, while small items might fall through the ventilation slits and damage the device.
- Your SatReceiver has to be protected against humidity, steam and liquids. Do not place any vessels filled with liquids next to your SatReceiver. For cleaning do not use any liquid detergents. They can damage your SatReceiver or even cause an electric shock!
Connecting your SatReceiver
- In order to avoid damaging your device and the satellite dish, please switch off your SatReceiver before connecting it with a LNB (Low Noise Block Converter) or with a multiswitch for a multiple subscriber system.
• The SatReceiver has to be switched off as well when connecting it to a TV or another device.
Power connection
- Connect your SatReceiver only to a power supply system, which is located within the specifications of 100-240 V AC, 50/60 Hz.
Protection of your SatReceiver
- If there is a thunderstorm, the SatReceiver should be switched off and the mains plug as well as the antenna cable should be pulled off.
⚠️ Please make sure that both the satellite antenna and the LNB are connected with the building's lightning protection or another suitable grounding.
- During longer absence (e.g. while being on holidays), disconnect as a precaution the SatReceiver from the net and your antenna system.
Maintenance
- Never open the housing of your SatReceiver. Otherwise there is the danger of an electric shock.
• Repairs during the warranty period may be carried out only by the TrekStor service team. - Please store the original packaging for safe transportation of your SatReceiver.
Avoiding "BURN-IN"
A long presentation of standing pictures (e.g. a test pattern) can damage your TV permanently. Plasma screens, rear projection television and CRT TVs are especially susceptible for that. Therefore please avoid presenting standing pictures for a longer time period on such devices.
1) Controls and connections of the SatReceiver Odan S
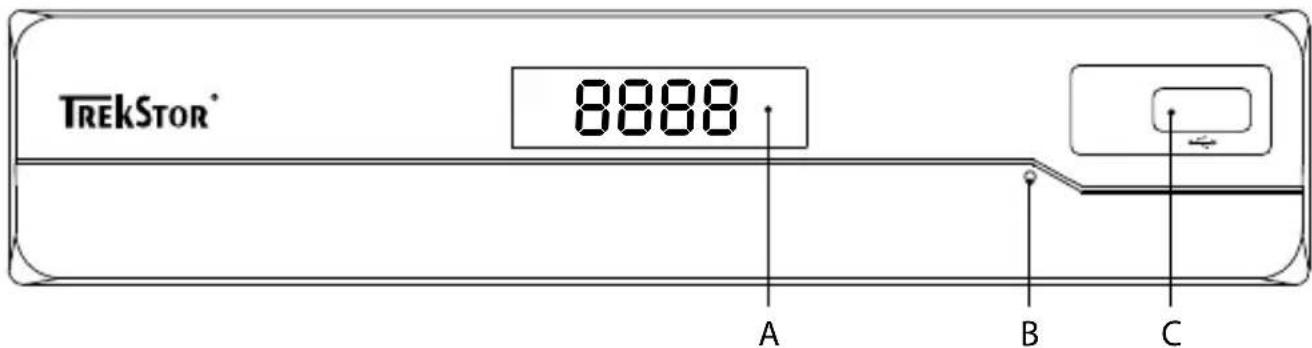
1.1) Controls on the front side
text_image
TrekStor® 8888 A B CA) Display: Shows you the number of the current station.
B) Operating mode display: Shows the current operating mode of the SatReceiver. The light shines green while operating and red in the standby mode.
C) USB Service Port: Is located behind the flap on the front side of the SatReceiver and will be needed for firmware updates or the media playback.
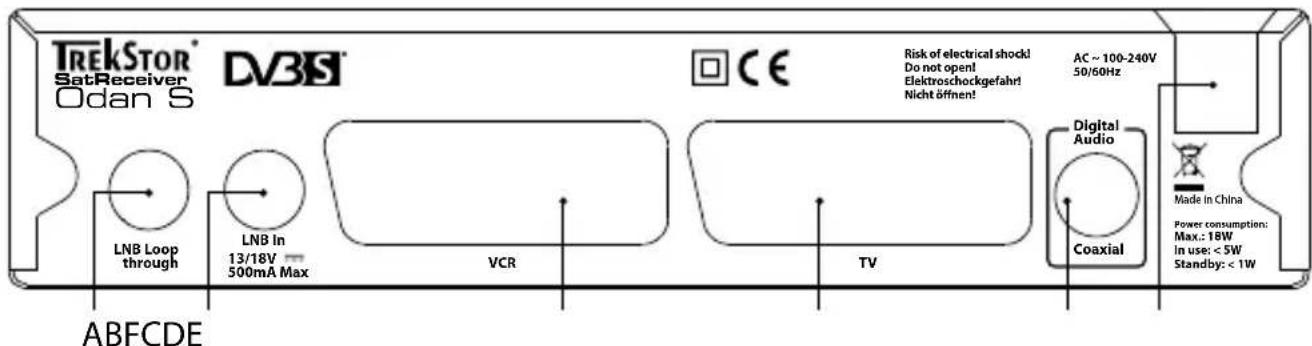
1.2) Connections on the back side
text_image
TREKSTOR® SatReceiver Odan S DV35® LNB Loop through LNB In 13/18V 500mA Max VCR CE Risk of electrical shock! Do not open! Elektroschockgefahr! Nicht öffnen! AC ~ 100-240V 50/60Hz Digital Audio Coaxial Made in China Power consumption: Max.: 18W In use: < SW Standby: < 1W ABFCDEA) LNB Loop Through: Output socket for forwarding the satellite signals to a TV or an additional receiver.
B) LNB In: Cable input for your satellite dish.
C) VCR SCART connection: To that connection you can connect a video recorder or a DVD player and forward their audio and video signals to your TV.
D) TV SCART output: Audio/video output for TVs.
E) S/PDIF output (coaxial): You can connect this output with a surround sound capable amplifier or a TV.
F) Power connection.
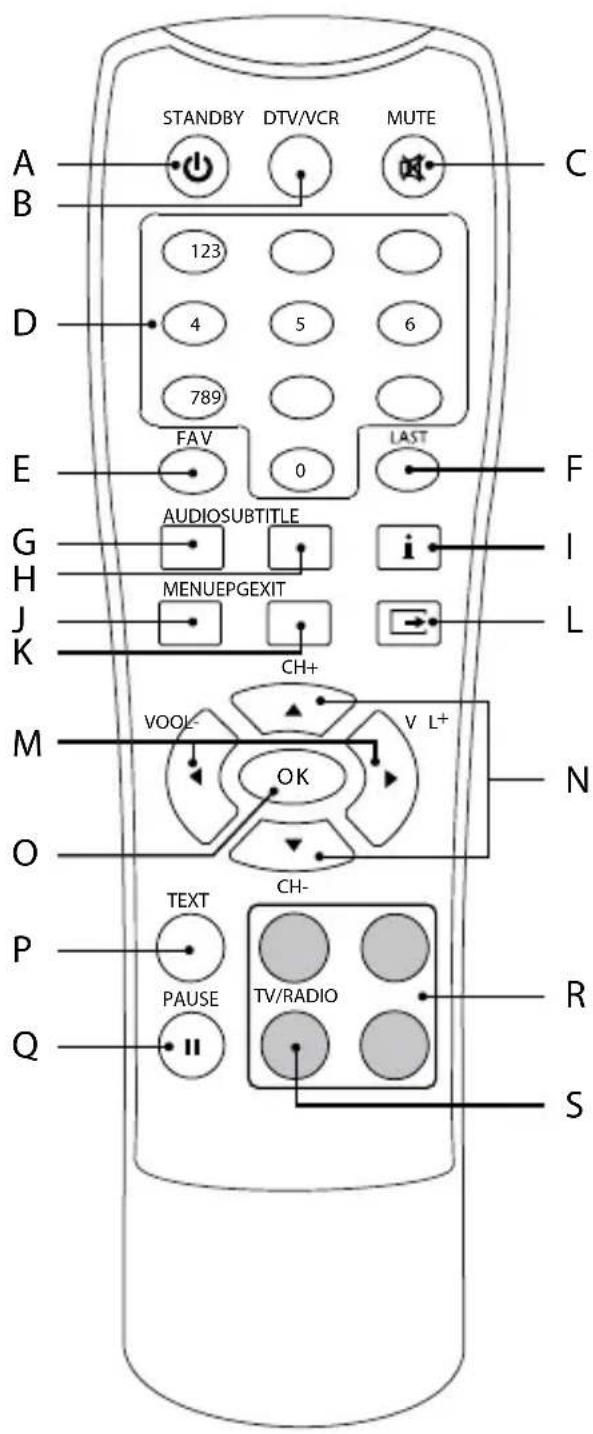
1.3) The remote control of the TrekStor SatReceiver Odan S
text_image
STANDBY DTV/VCR MUTE A C B 123 D 4 5 6 789 E F AUDIO SUBTITLE G i H MENUEPGEXIT L J CH+ M VOOL- V L+ O OK N P TEXT CH- Q PAUSE TV/RADIO R SA) ⏻ button: Switches between operation and standby mode.
B) DTV/VCR: Used to switch between the VCR SCART input and the DTV output mode.
C) Ⓧ button: Switches the sound reproduction mute.
D) Number pad: Buttons ① until ⑨ for choosing the channel and other user inputs.
E) FAV: For a fast switching between your favourite channels.
F) LAST button: Used to switch between the last two viewed channels.
G) AUDIO: Used to set the sound output
H) SUBTITLE: For selecting subtitles.
I) ⓘ button: For displaying information about the current channel and the running program.
J) MENU button: Opens the main menu.
K) EPG button: Opens the EPG (Electronic Program Guide). Pressing once again the button closes the EPG.
L) EXIT button: For leaving a menu and saving the current settings.
M) ▶ or ◀ button: Increases respective decreases the volume. These buttons help also to choose submenus of the main menu as well as settings inside the submenus.
N) ▲ or ▼ button: Switches to the next respective to the previous channel within the current channel list. These buttons help also to choose menu items and submenus.
O) OK button: Confirms a choice respective opens the current channel list.
P) TEXT button: Starts or stops displaying the video text.
Q) PAUSE button: Used to pause or playback the program being viewed.
R) Colored buttons: These buttons help to choose functions and actions within the screen menus.
S) Yellow key: Changes between the playback of TV and radio stations.
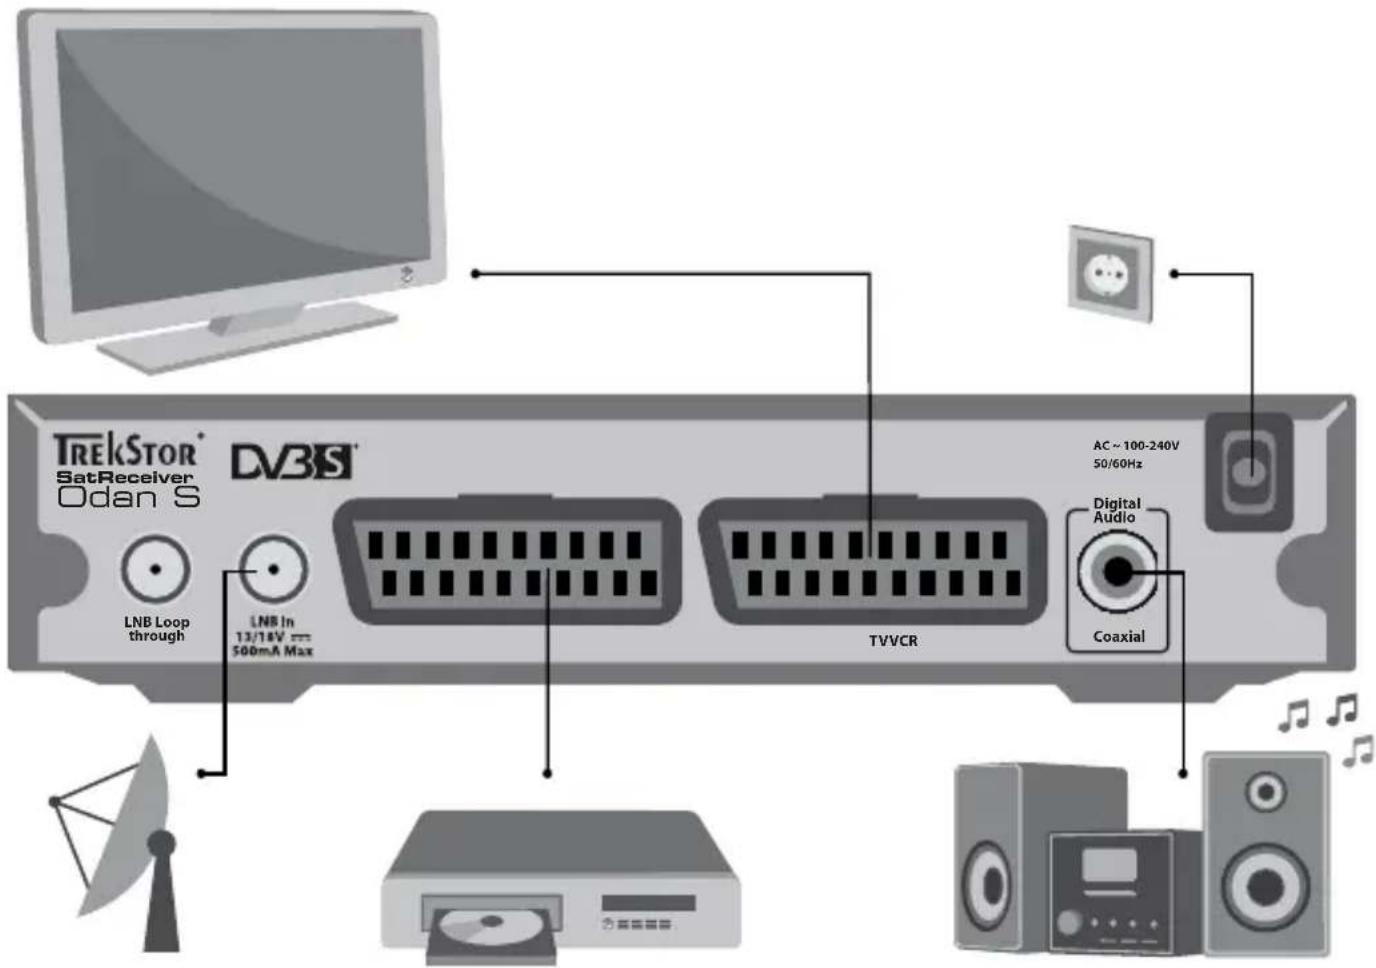
2) Connecting the TrekStor SatReceiver Odan S
Do not connect your SatReceiver to the power supply!
text_image
TREkSTOR® SatReceiver Odan S DV3S® LNB Loop through LNB In 13/18V mm 500mA Max TVVCR AC ~ 100-240V 50/60Hz Digital Audio Coaxial2.1) Connection with your satellite system
In case of a single participant installation, please connect your SatReceiver and the universal LNB of the satellite dish with a coaxial cable, of which end an F-jack is installed. The F-jack has to be screwed onto the "LNB IN" socket of your SatReceiver.
In case of a multiple participant installation, please use the coaxial cable for the connection of your SatReceiver onto a multiswitch.
2.2) Connection with your Home-Entertainment-System
For the connection of your SatReceiver to a TV or to your Home-Entertainment-System you have the following possibilities.
- SCART output
Connect the SCART output (TV) of your SatReceiver and the SCART input of your TV with a SCART cable. Via the SCART output both video and audio signals are delivered.
• Connection to an amplifier or a HiFi system
You can connect your SatReceiver with an analog cinch cable (audio L/R) or with a digital S/PDIF cable (coaxial) onto a suitable input of your amplifier or HiFi system.
• Connection of a video recorder or DVD player
In case you would like to forward the output of your video recorder or DVD player to your TV, please connect the audio/video source to the second SCART socket (VCR) of your SatReceiver. When you would like to record the output of your SatReceiver with a video recorder, please connect the input of your video recorder with the first SCART socket (TV) or the composite and the stereo audio output.
2.3) Connection to the power supply
When you have connected your SatReceiver with a satellite dish and your audio/video system, you can connect it with a power plug to the power supply.
3) Quick installation of the TrekStor SatReceiver Odan S
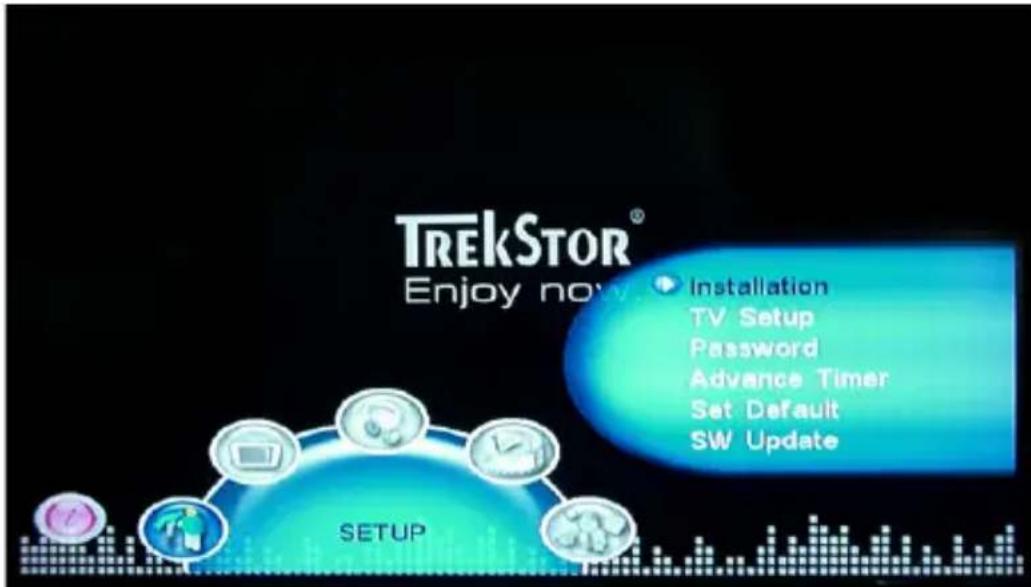
First of all the menu language should be chosen via the starting screen and a station scan should be performed. Hereby please proceed as follows:
text_image
TrekStor® Enjoy nov Installation TV Setup Password Advance Timer Set Default SW Update SETUPa) Please connect, as described above, your SatReceiver first with your satellite dish, then with your TV or your Home-Entertainment-System and afterwards with the power supply.
b) Switch on the SatReceiver with a push onto the ⏻ button of the remote control.
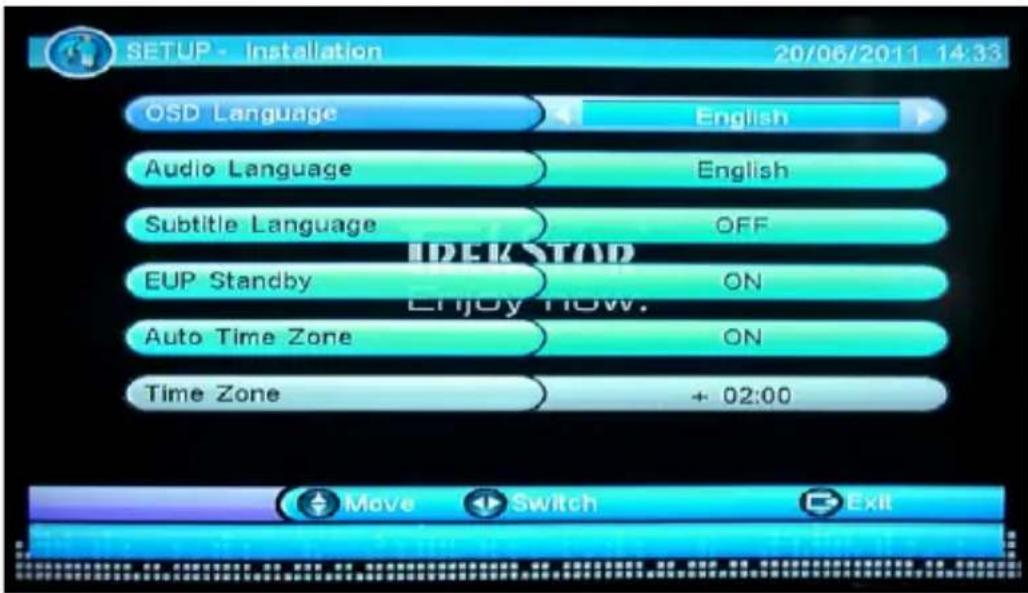
c) Please go now via "MENU" → "SETUP" → "INSTALLATION" → "GENERAL SETTING" to the language settings and choose your favorite menu language, which you would like to use.
text_image
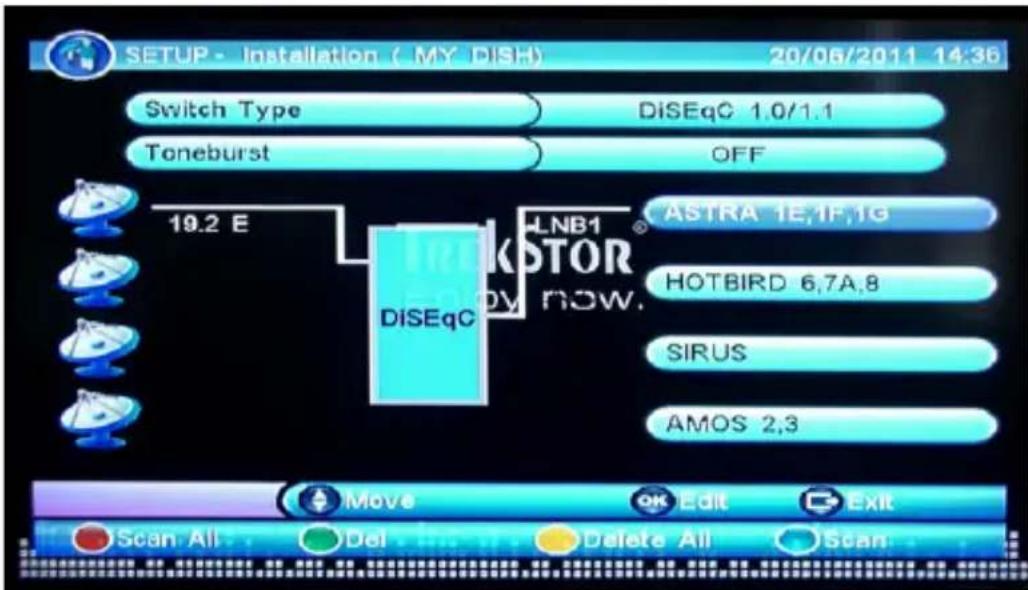
SETUP - Installation 20/06/2011 14:33 OSD Language English Audio Language English Subtitle Language OFF EUP Standby ON Auto Time Zone ON Time Zone + 02:00 IDEK STAD Enjoy NOW. Move Switch Exitd) Choose afterwards via "MENU" → "SETUP" → "INSTALLATION" to the submenu "My DISH". Inside this menu please choose the desired satellite. In most cases that is the Satellit Astra on the position 19.2° E.
text_image
SETUP - Installation ( MY DISH) 20/06/2011 14:36 Switch Type DiSEqC 1.0/1.1 Toneburst OFF 19.2 E DiSEqC LNB1 KOTOR ASTRA 1E,1F,1G HOTBIRD 6,7A,8 SIRUS AMOS 2,3e) Now press either the blue button, in order to start a single satellite search or the red button for a multi satellite search. While the channel search is running, you will be informed about the progress of the search and about all found TV and radio channels.
f) After having completed the channel search, the channel list will be stored automatically and the SatReceiver starts to playback. You can now edit the channel list by e.g. creating a favorite list. You will find an instruction for that under the section 'EITING THE CHANNEL ANF FAVORITE LIST".
4) Operating the TrekStor SatReceiver Odan S
4.1) Generaloperation
Turning the SatReceiver on/off
In case the SatReceiver is connected with the power supply, you will be able to set it into the stanby-mode by pressing the ⏻ button on the remote control; in order to put the SatReceiver into operation again, press the same button once more. To switch the SatReceiver completely off, it has to be disconnected from the power supply.
Adjusting the volume
You can raise or lower the volume by pressing the ▶ or ◀ button.
i If you keep the ▶ or ◀ button pressed, the volume changes constantly.
In case you are pressing the Ⓚ button, you can switch off the volume completely (mute) as well as loud again.
Changing channels
There are several possibilities to change a channel:
- With the numerical keys (① until ⑨) of your remote control you can insert the number of the desired channel. If, for example, you would like to choose the channel number 23, then press consecutively the keys ② and ③ and wait until the channel was changed.
- With the ▲ or ▼ button of the remote control you can switch to the next respective the previous channel.
- You can as well open the channel list by pressing the Ⓞ button. There you can mark a channel by pressing ▲, ▼, ▶ or ◀ and choose it with the Ⓞ button.
With this method you can as well choose a channel out of the favorite list. To open a favorite list or in order to switch between the favorite lists, please press the FAV button on the remote control.
- Press the LAST button on the remote control, in order to switch fast between the last two viewed channels.
4.2) Operating the main menu and changing the settings
The main menu is an overview, from which you have access to various settings and functions of your SatReceiver. To open the main menu, please press the MENU button.
Through pressing the ▶ or ◀ button, you will be able to mark a sub menu; and it will be opened by pressing the Ⓞk button. With the help of ▼ or ▲, you will be able to change between the menu items within the submenu and start an action by pressing Ⓞk. You can cancel an action or leave the sub or main menu by pressing EXIT.
Inside the main menu you can adjust the settings concerning the channel and favorite lists, configure the picture output or carry out time settings. Furthermore you can adjust the menu, audio and subtitle languages as well as change the banner time and carry out system settings.
In the following the most important menu points are shortly described.
• TV/Radio menu
TV/Radio guide
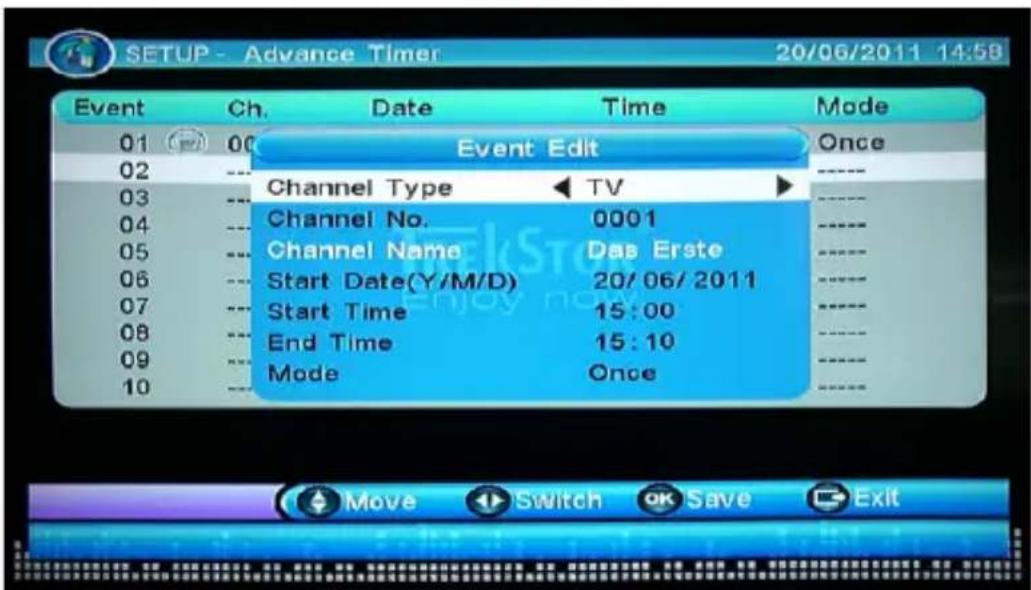
Under that point you have the possibility to edit your favorite channels of TV or radio as well as view program information via the EPG. Use the EPG also for programming a TV-show, so that you will not forget it any more.
text_image
SETUP - Advance Timer 20/06/2011 14:58 Event Ch. Data Time Mode 01 00 Event Edit Once 02 ----- Channel Type TV 03 ----- Channel No. 0001 04 ----- Channel Name Das Erste 05 ----- Start Date(Y/M/D) 20/06/2011 06 ----- Start Time 15:00 07 ----- End Time 15:10 08 ----- Mode Once 09 ----- 10 ------ Multimedia
My Album/My Music/My Movie
This function allows you to playback video, audio or picture files, which are stored on a hard disk or an USB-stick, on your TV. Just connect the volume via the USB port on the front side of your SatReceiver and choose, which file you would like to playback.
You can find information about the files, which can be played, on the product page on www.trekstor.de.
- Accessory
Calculator
When you choose this function, a calculator appears on the screen of the TV. Use that function, if you like to calculate something on the screen.
- Setup
Set up a password
With the help of that menu item, you can activate the password function, in order to lock for example for children improper channels. The default password of the SatReceiver is 0000. That can be changed if required.
Set Default
When choosing this menu item, the settings of the SatReceiver will be reset to the default settings and you can set up your SatReceiver completely new.
SW Update
That functions enables you, to carry out a firmware update of your SatReceiver via USB.
4.3) Editing the channel and favorite lists
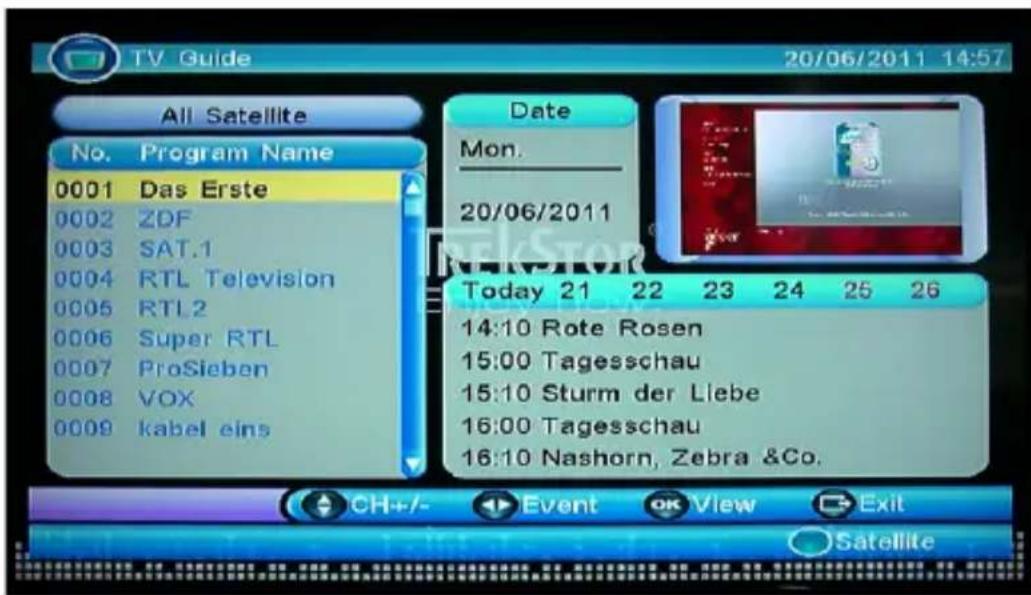
Open the main menu by pressing the menu button, choose "TV List" and open it it with the Ⓞ button.
With the help of the channel list editor you can edit the channel and favorite lists of the SatReceiver. On the left side of the screen you will find the channel list. With the ▼ or ▲ button you will be able to move the marking of one channel from top down; with the ◀ or ▶ button you will be able to move within the available options. With the help of the colored buttons of your remote control you can perform different actions, which will be explained on the bottom side of the screen.
On the right side of the screen a preview of the active channel as well as technical information about the channel are displayed.
You can save the channel list or carry out an action by pressing the Ⓞ button; with Ⓑ EXIT you will be able to leave the channel list editor or to cancel an action.
text_image
TV Guide 20/06/2011 14:57 All Satellite No. Program Name 0001 Das Erste 0002 ZDF 0003 SAT.1 0004 RTL Television 0005 RTL2 0006 Super RTL 0007 ProSieben 0008 VOX 0009 kabel eins Date Mon. 20/06/2011 Today 21 22 23 24 25 26 14:10 Rote Rosen 15:00 Tagesschau 15:10 Sturm der Liebe 16:00 Tagesschau 16:10 Nashorn, Zebra &Co.• Add a channel to the favorite list
All together you have the choice between eight different favorite lists (shown symbolically), to which you can assign a channel. For this purpose just press one of the numbers 1 until 8 and the current channel will be added to the desired favorite list. The yellow glowing symbols under the preview show, to which favorites the current channel was assigned. In order to cancel a selection, press the relevant number again. In case you are outside the menu, press the FAV button, in order to switch between the single favorite lists.
- Locking a channel
Use that function, if you would like to lock a channel, which is for example unsuitable for children. When switching to a locked channel, you will be requested to enter the password.
• Edit channel information
Choose that oprion, when you would like to edit information concerning the current channel (e.g. program name).
- Moving a channel
When you choose that option, a symbol next to the name of the marked channel is displayed and you will be able to move the channel with the buttons ▲ or ▼ to its new position. A push onto the Ⓞ button finishes moving the channels within the list and the channel remains on its current position.
- sorting a channel
This function allows you to sort channels either alphabetically (red button) or by locked respective by unlocked channels (green button).
- skipping a channel
With this function, you will be able to skip a marked channel, which means, the channel will not be displayed any more when changing the channels with ▲ or ▼. The channel will only be displayed after entering the channel number or after directly choosing it within the channel list. You can mark a channel for skipping by pressing the green button.
- Deleting a channel
Choose this option, in order to delete the channel out of the channel list. You will be asked to confirm your choice by pressing the Ⓞ button.
- searching a channel
When you choose this option, a search field appears through which you can look for a channel inside the current list.
5) FAQ
In this chapter you receive answers to the most frequently asked questions as well as notes about troubleshooting.
I have connected the SatReceiver to my TV. Why is no picture displayed on the screen of my TV respective why is there no sound output?
i That problem may have several causes. Please check the following points:
1) Please make sure, that you have chosen the right AV source on your TV or HiFi system.
2) Please check, if you have connected the correct cable for video/audio output signal. You can find information about the right connection of the SatReceiver to your TV and your Home Entertainment-System within the chapter "CONNECTION WITH YOUR HOME-ENTERTAINMENT-SYSTEM" inside that manual.
3) Even if you have connected your SatReceiver correctly, a wrong video output signal may be adjusted. In order to change the output signal, press the DTV/VCR button on the remote control. Please shortly wait until the SatReceiver and your TV have made the changes.
I only see the message "No SIGNAL" on the screen of my TV. What is the reason?
The SatReceiver has no connection to the satellite system.
1) Check the channel list, if the chosen channel is send by a satellite, to which your satellite system is adjusted.
2) Check the satellite dish as well as the cable, which is connected to the SatReceiver.
I only see the message "SCRAMBLED". What is the reason?
With the SatReceiver you will not able to receive locked channels (e.g. Pay-TV).
I have changed the settings of the SatReceiver but would like to get back to the default settings.
Please carry out the action "SET DEFAULT", which is described under "GENERAL OPERATION". Hereby the SatReceiver is put back to its delivery status. All stored channel lists are deleted when performing that action.
I have misaligned the menu language on the SatReceiver. How can I change it again?
Open the main menu by pressing the ⏚ button. Choose afterwards inside the revolving circle the tool symbol and confirm twice the first option with Ⓞ. Stay again at the first point and press the ⏅ button as long as the menu is displayed again in your language.
Why does the SatReceiver switch off after a certain time period?
The "EUP" is activated
The legislator prescribes, that a SatReceiver has to be preset in a way that it switches automatically into the standby mode after three hours, if there is no use of it. That time frame is adjusted under "EUP". If you wish, you can even deactivate the automatic cut-off by choosing "OFF" inside the "EUP" settings.
This function can be used as a Sleep-Timer. When the EUP is activated the device switches itself automatically off after 3 hours.
What is a firmware? And what is a firmware update?
The firmware is the program, which is responsible for the control of the SatReceiver. A firmware update is designed to transfer upgrades onto your SatReceiver. In case of problems with your SatReceiver please make sure that you have installed the latest firmware version.
When should I perform a firmware update?
A firmware update is advisable when the functions of the SatReceiver are disturbed. A firmware update can as well provide new functions or improve the already existing functions. Therefore it is useful, always to use the latest firmware. You can find the version number of the installed firmware ("SW VERSION") inside the main menu by pressing the info button.
Where can I find the newest firmware?
If there is a new firmware available for your SatReceiver, you can find it in the download area of the device on our website www.trekstor.de.
How can I perform a firmware update?
The firmware update is made via the "MENU" "SETUP" "SW-Update". A detailed manual for a firmware update can be found inside the ZIP archive of the firmware update, which can be downloaded from our website.
Instructions for safety and use:

Only qualified persons may perform technical work on the product. The product may not be opened or changed. The components cannot be serviced by the user.

Never expose the device to moisture, condensation and liquids.

Protect the device from extremely high and low temperatures and temperature fluctuations. Use the device within an ambient temperature of 5^ C to 40^ C.

Never place the device close to a source of heat, and protect it from direct sunlight.

Make sure that the surroundings are as dust-free as possible when you use and store the device.

Never clean the surface of the device with solvents, paint thinners, cleansers or other chemical products. Instead, use a soft, dry cloth or soft brush.

Batteries/rechargeable batteries contain chemical substances and must be disposed of properly. Batteries rechargeable batteries should not be thrown away in household garbage. They can be brought to the public collection points of your community or wherever batteries/rechargeable batteries are sold.
The manufacturer retains the right to continually improve the product. These changes may be made without being directly described in these operating instructions. For this reason, the information provided in these operating instructions may not reflect the current state of the art.
The manufacturer only guarantees suitability for the product's intended purpose. In addition, the manufacturer is not responsible for damages or loss of data and subsequent consequences.
Copyright © 2011 TrekStor GmbH. All rights reserved. Other cited product or company names may be trademarks or brand names of the respective owner.
EC DECLARATION OF CONFORMITY
As manufacturer and importer respectively:
TrekStor GmbH
Kastanienallee 8 - 10
D-64653 Lorsch, Germany
herewith declares that the products
Product: TrekStor SatReceiver Odan S
Type: Settop Box (STB)
comply with the following directive(s):
- 2004/108/EC EMC Directive: Electromagnetic Compatibility
• 2006/95/EC Low Voltage Directive
The following norms were consulted to assess conformity:
- EN 55013:2001 + A1:2003 + A2:2006
Sound and television broadcast receivers and associated equipment – Radio disturbance characteristics – Limits and methods of measurement (IEC/CISPR 13:2001, modified + A1:2003 + A2:2006)
·EN 55020:2007
Sound and television broadcast receivers and associated equipment – Immunity characteristics – Limits and methods of measurement (IEC/CISPR 20:2006)
· EN 60065:2002 + A2:2010
Audio, video and similar electronic apparatus – Safety requirements (IEC 60065:2001 modified + A2:2010 modified);
- EN 61000-3-2:2006 + A1:2009 + A2:2009
EMC: Part 3-2: Limits – Limits for harmonic current emissions (equipment input current 16 A per phase) (IEC 61000-3-2:2005 + A1:2008 + A2:2009)
·EN 61000-3-3:2008
EMC: Part 3-3: Limits – Limitation of voltage changes, voltage fluctuations and flicker in public low-voltage supply systems, for equipment with rated current 16 A per phase and not subjected to conditional connection (IEC 61000-3-3:2008)
The CE symbol confirms that this product conforms with the above mentioned norms and regulations.
The manufacturer also declares the conformity of the product according to the following directives:
•2001/95/EC General Product Safety
- 2002/95/EC RoHS: Hazardous substances in electrical and electronic equipment
•2008/28/EG Ecodesign requirements for energy-using products
Lorsch, 20.06.2011
T. Koroscha
Thorsten Koroscha, LPM
Supportinformationen
If you have any questions regarding your TrekStor product, please proceed as follows:
- Check the features as well as the functions of your device (apparent on the packaging), in order to use the correct settings.
• Read the manual carefully. - Inform yourself on our website www.trekstor.de/en about the up-to-date information concerning your product (e. g. available most recent firmware releases).
In the case you have further questions regarding your product, please note the following TrekStor support options:
FAQ The FAQ area of our website offers you a wide range of problem solving hints. Here you can obtain answers to the most frequently asked questions concerning our products.
E-Mail Please fill in the support form on our website or send an E-Mail to support.en@trekstor.de. You can find mailing addresses for other countries when you click "SERVICE" at the menu bar on our website.
Phone support Please find the number of the support hotline for your country on our website under "SERVICE" as well.