
D870T - Microscope Levenhuk - Free user manual and instructions
Find the device manual for free D870T Levenhuk in PDF.


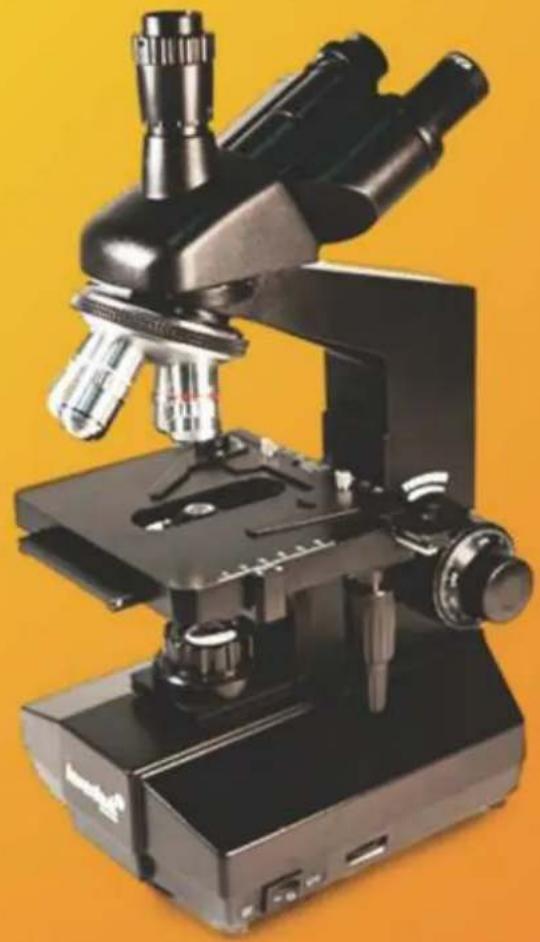
| Product Type | Trinocular Biological Microscope |
| Brand | Levenhuk |
| Model | D870T |
| Magnification Range | 40x - 1000x (with 10x eyepieces and 4x-100x objectives) |
| Head | Trinocular, inclined 30°, rotatable 360°, interpupillary distance 55-75 mm, diopter adjustment ±5 |
| Eyepieces | WF10x/18, 2 pcs |
| Objectives | Plan achromatic: 4x/0.1, 10x/0.25, 40x/0.65 (spring-loaded), 100x/1.25 (spring-loaded, oil immersion) |
| Revolving Nosepiece | 4-position, parfocal |
| Stage | 140 mm x 155 mm, coaxial controls, 70 mm travel, 0.1 mm increments, with specimen holder |
| Condenser | Abbe N.A. 1.25, iris diaphragm (2-30 mm), rack-and-pinion, 20 mm range |
| Focus System | Coaxial coarse and fine (0.002 mm increments), 25 mm range, tension adjustment |
| Illumination | 6V/20W halogen, brightness adjustable, collector lens |
| Built-in Camera | 8 MP C800 NG digital camera, 3264x2448 max. resolution, USB 2.0, software included |
| Power Supply | AC mains (voltage as per regional specification) |
| Warranty | International Lifetime Warranty (optics), 6 months (accessories) |
| Safety Features | Never look directly at Sun; use properly rated power supply; avoid flammable materials |
| Maintenance | Keep optics clean with brush and cloth; store in dry place; use dust cover |
Frequently Asked Questions - D870T Levenhuk
User questions about D870T Levenhuk
0 question about this device. Answer the ones you know or ask your own.
Ask a new question about this device
Download the instructions for your Microscope in PDF format for free! Find your manual D870T - Levenhuk and take your electronic device back in hand. On this page are published all the documents necessary for the use of your device. D870T by Levenhuk.
USER MANUAL D870T Levenhuk
Levenhuk biological microscopes
Levenhuk 850B (binocular)
Levenhuk 870T (trinocular)
Levenhuk D870T (trinocular)
User Manual
Návod k použití
Bedienungsanleitung
Instrukcja obstugi
Radost zaostřit
2 Binocular head / Trinocular head
3 Revolving nosepiece
4 Locking screw
5 Objective lens
6 Arm
7 Specimen holder
8 Stage
9 Abbe condenser
10 Stage left/right movement control
11 Iris diaphragm
12 Fine focus knob
13 Coarse focus knob
14 Condenser vertical movement control
15 Focus system tension adjustment ring
16 Stage locking knob
17 Collector lens
18 Base
19 Power switch
20 Brightness adjustment knob
21 Rubber feet
22 Lamp compartment locking screw
1 Okular
Never look directly at the Sun through optical devices or with the unaided eye! It can result in permanent eye damage or even BLINDNESS.
General Information
These microscopes are high precision instruments that may be used for clinical research and university studies; in laboratories and hospitals, technological centers and research institutes. They also perform well in medical studies in biology, bacteriology, cytology and pharmacology. Levenhuk 850B and 870T may be used for microphotography with additional accessories. The kit of Levenhuk D870T already includes an eyepiece digital camera that allows you to observe specimens on your PC monitor and save images on the hard drive.
This manual contains detailed information on the design and operational principles of your new microscope, as well as a troubleshooting and care and maintenance section. It is highly recommended that you read this manual before using the microscope for the first time. Abiding by the following instructions will ensure maximum service life of your microscope:
- This instrument was designed for high-power observations of various biological specimens. It should not be used for any other purpose.
- Do not try to take this microscope apart on your own, as you might damage the intricate optical system within. If the troubleshooting section of this manual did not contain a solution to your issue, you should contact the local Levenhuk service center.
- Always unplug the microscope from a power source before opening the base or changing the illumination lamp. Regardless of the lamp type (halogen or incandescent), give it some time to cool down before trying to change it, and always change it to a lamp of the same type. When using the microscope, try not to use it near flammable materials or substances (benzene, paper, cardboard, plastic, etc.), as the base may heat up during use, and might become a fire hazard.
- Always use the power supply with the proper voltage, i.e. indicated in the specifications of your new microscope. Plugging the instrument into a different power outlet may damage the electric circuitry of the microscope, burn out the lamp, or even cause a short circuit.
- Never touch the microscope optics with your fingers, as fingerprints and smudges will significantly reduce the quality of your views.
- These microscopes perform best under the following conditions: room temperature from 0 °C to 40 °C (32-104°F), relative humidity not exceeding 85%. High temperatures and humidity may cause lenses to fog from inside, thus damaging the optical system.
- Any microscope is a very delicate instrument, so it should be handled with care. Even a slight impact might damage it.
Operating principle
Light emitted from a lamp passes through the condenser and illuminates a specimen. The image is magnified by the objective lens, refracted by the prism and then magnified once more by the eyepiece.
Total magnification = (objective lens magnification) x (eyepiece magnification).
The kit of these microscopes includes two WF10x eyepieces with wide field of view:
| Magnification | 10x |
| Field of view | 18 mm (0.71 in) |
| Working distance | 24.95 mm (0.98 in) |
![graph TD A["Eyepiece"] --> B["Prism"] B --> C["Objective lens"] C --> D["Specimen"] D --> E["Condenser"] E --> F["Lamp"] style A fill:#f9f,stroke:#333 style F fill:#ccf,stroke:#333](/content/2026/05/766344/images/0134cbcceca4a23f6c9dc8f35c04e48226b0d854b766c3134f072ad2f087a4b7.jpg)
Objective lenses
The standard kit of these microscopes includes the following plan achromatic objective lenses: 4x, 10x, 40x (spring-loaded) and 100x (spring-loaded, oil immersion). When using the 100x objective lens, both the lens and the cover glass of the observed specimen should be immersed in a transparent oil of high refractive index. This displaces the air and, as a result, increases the quality of your views. If some air bubbles are still present, you may have to rotate the revolving nosepiece once, or add some more immersion oil. Upon finishing the high-power observations, you should wipe the objective lens and the cover glass clean. Otherwise, the oil will dry and reduce the quality of subsequent views.
| Plan achromatic objective lens | 4X | 10X | 40X | 100X |
| Magnification | 4 | 10 | 40 | 100 |
| Aperture | 0.1 mm | 0.25 mm | 0.65 mm | 1.25 mm |
| Working distance | 36.9 mm (1.45 in) | 7.116 mm (0.28 in) | 0.632 mm (0.025 in) | 0.158 mm (0.006 in) |
| Comments | Spring-loaded | Spring-loaded, oil immersion |
Binocular head
The binocular head of these microscopes may be inclined at a 30° angle and rotated 360 degrees. The interpupillary distance adjustment range is 55-75 mm (2.16-2.95 in), the diopter adjustment range is from +5 to -5 diopters on each eyepiece.
Revolving nosepiece
The state of the art nosepiece provides for smooth rotation and easily locks in place on the desired objective lens. The parfocal objective lenses used in these microscopes provide for simple switching from one magnification to the other, without having to refocus your view over and over again.
Stage
These microscopes are equipped with a 140 mm x 155 mm (5.5 in x 6.1 in) stage with coaxial controls. Press the stage clip lever and place a slide with a specimen on the stage. Release the lever and it will securely lock the slide in place. You can move the stage horizontally by using the coaxial controls below the stage. It moves within 70 mm (2.76 in) range in 0.1 mm (0.004 in) increments.
Abbe condenser
The numerical aperture (N.A.) of this high quality condenser is 1.25. Its position may be adjusted by turning the locking screws, without any additional tools:
- rotate the revolving nosepiece until either a 4x or a 10x objective lens is locked in place;
- rotate the iris diaphragm to reduce its diameter;
- lower the condenser until the diaphragm image is somewhat sharp;
- focus the view by loosening or tightening the locking screws.
The condenser has been aligned with the objective lens during production. If this alignment hasn't been performed, the field of view will be very irregular, with parts of it very bright, and others very dark. The rack-and-pinion mechanism moves the condenser up and down within a 20 mm (0.79 in) range. Generally, you would want to raise the condenser when using high-power objective lenses (40x, 100x) and lower it with low-power objective lenses (4x, 10x). The highest position of the condenser is locked at 0.2 mm away from the stage.
If the condenser-objective lens alignment has somehow gone awry, you have to perform the following operations: loosen the nut on the locking screw;
- place a slide with a specimen on the stage;
- raise the condenser to its highest position;
- tighten the locking screw until the condenser touches the bottom of the stage;
• retighten the nut on the locking screw.
Rotate the iris diaphragm to adjust its diameter in 2-30 mm (0.08-1.18 in) range, so that it corresponds with the N.A. of the objective lens currently in use. When the iris diameter is approximately 70-80% of the objective lens N.A., the observed image is sharp and clear. Remove one of the eyepieces and look through the tube. You will see the iris diaphragm. You can use a color filter with the diaphragm for additional contrast and detail on the image. The filters come in blue, green or yellow.
Focus system
The coarse and fine focus systems are operated with a rack-and-pinion mechanism. The coaxial design of the focus system allows you to adjust coarse and fine focus without any difficulties. Fine focus system adjusts in 0.002 mm (0.00008 in) increments; total adjustment range is 25 mm (0.98 in). You can use the coarse focus knob to quickly raise or lower the stage, and fine-tune the view with the fine focus knob.
Upon moving the stage into a desired position, you can secure it in place with the stage locking screw. Rotate it clockwise to lock the stage in its current position. It will remain in this position until you loosen the locking screw. If you are observing a large and heavy specimen, you might want to increase the coarse focus system knob tension. Rotate the adjustment ring on the focus knob and the stage will be lowered slowly and steadily, even with heavy specimens.
Illumination
Generally, a 6V/20W halogen lamp is used in the illumination system of a microscope. To adjust its brightness, rotate the corresponding knob, to better illuminate the observed specimen. The illumination should not be too bright with low-powered objective lenses and vice versa. When changing the lamp to a new one, make sure to align it along the optical axis, otherwise, the quality of your views will be significantly decreased.
To change the old lamp, loosen the screw on the bottom of the base, remove the cover and replace the lamp.
Assembly
Unpack your new microscope with great care. Check if all the parts and accessories are present. Note that some parts might have been disassembled for easier shipping, therefore, you will have to assemble them before you can begin your observations.
- Assemble the binocular head. Loosen the locking screw and remove the plastic cover from the arm. Remove the plastic cover from the binocular head. Attach the binocular head to the arm and secure it in place with a locking screw. Do not try to loosen the other two screws on the arm.
- Assemble objective lenses. Usually, we assemble the objective lenses on the factory lines, but in some models, they are
- shipped separately. First, remove the dust cap from the nosepiece and take out the objective lenses from their packaging. Attach the objective lenses to the nosepiece in ascending order (from lowest magnification to highest).
- Assemble eyepieces. Remove the dust cap from the tube and attach the eyepieces.
Using the microscope
- Choose a spot, where the microscope will not be in direct sunlight. Try to move as far away from windows as possible and do not point eyepieces toward windows. Direct sunlight may damage the optics and lower the contrast of images.
- Place a slide with a specimen on the stage and lock it in place. Make sure that the cover glass faces upwards, otherwise, you might have problems focusing your view at higher magnifications (40x or 100x).
- Use a low-power objective lens (4x or 10x) and turn the illumination on.
• Using the coaxial stage movement controls, position the slide, so that the specimen is centered above the condenser lens. - Focus your view with the coarse focus knob. It is much easier to focus your view at lower magnifications, so that when you use a high-power objective lens, you will only have to fine-tune the focus with the fine focus knob.
- Now that your view is focused, rotate the revolving nosepiece to a high-power objective lens. Thanks to the parfocal lenses in these microscopes, you will only have to use the fine focus knob to bring your views into focus. It has to be mentioned that 4x and 10x objective lenses will never touch the surface of the slide, due to the built-in limiters. And although 40x and 100x may reach the slide, thanks to their spring-loaded construction, they will never break it.
- If you cannot focus your view, you might want to try changing the diameter of the iris diaphragm, so that it corresponds to the N.A. of the objective lens used.
Troubleshooting
If you are experiencing some problems with your instrument during its service, refer to this section for possible solutions. However, if this doesn't help, you should contact your local service center. Remember, do not try to take the microscope apart, as this will make your warranty null and void, as well as may lead to irreversible damage to the intricate optical system of the instrument.
Problems with the microscope:
| Problem | Possible cause | Solution |
| Impossible to focus the view | The stage is too low | Raise the stage with the coarse focus knob |
| The objective lens often damages slides | The stage is too high | Lower the stage with the fine focus knob |
| Impossible to focus the view when using high-power objective lenses | The slide may have been placed upside down, or the cover glass is too thick | Place the slide properly or opt for a standard cover glass (0.17 mm (0.007 in) thick) |
| When rotating the nosepiece, objective lenses always scrape the surface | The cover glass is too thick | Opt for a standard cover glass (0.17 mm (0.007 in) thick) |
| Impossible to move the slide smoothly | The stage clips are not locked | Lock the stage clips manually |
| Incomplete binocular vision | Incorrect interpupillary distance | Adjust the interpupillary distance |
| Incomplete diopter adjustment | Readjust diopter settings | |
| Insufficient brightness | Check the illumination source and readjust the brightness |
Problems with the optical system:
| Problem | Possible cause | Solution |
| The field of view is reduced or not fully illuminated | The objective lens is not locked in place | Rotate the revolving nosepiece to lock the desired lens in place |
| The optical axis is not aligned | Readjust the illumination lamp | |
| The optics of the objective lens is dirty or dusty | Clean the objective lens | |
| The field of view is reduced or not fully illuminated | The optics of the objective lens is dusty or dirty | Clean the objective lens |
| The surface of the slide is dusty or dirty | Clean the slide | |
| The condenser lens is too low | Raise the condenser lens | |
| Poor quality of views: reduced contrast, blurred details, etc. | The specimen is not protected with cover glass | Put the cover glass over the specimen |
| The cover glass is too thick or too thin | Opt for a standard cover glass (0.17 mm (0.007 in) thick) | |
| The slide is placed upside down | Place the slide correctly | |
| The upper lens of the objective lens is dirty | Clean the lens | |
| The optics of the objective lens is dirty | Clean the objective lens | |
| Immersion oil was not used at high magnifications | Add immersion oil | |
| Air bubbles are present in the immersion oil | Rotate the revolving nosepiece or add some more oil | |
| Poor quality of views: reduced contrast, blurred details, etc. | Using immersion oil with low refractive index | Use the required immersion oil with high refractive indices |
| Prism surface is dirty | Clean the prism | |
| Iris diaphragm diameter is too wide or too small | Adjust the diameter | |
| Condenser lens is too low | Raise the condenser lens | |
| One side of the field of view is darker than the other | Condenser lens is placed incorrectly or is inclined. | Adjust the condenser lens |
| The objective lens is not aligned to the optical axis | Rotate the revolving nosepiece until the objective lens locks in place | |
| The view is constantly shifting during observations | The slide is not locked on the stage | The objective lens is not aligned to the optical axis |
| The objective lens is not aligned to the optical axis | Rotate the revolving nosepiece until the objective lens locks in place | |
| The observed image is yellow | A blue filter is not used | Use the blue filter |
| Condenser lens is too low | Iris diaphragm diameter is too low | Adjust the diameter |
| Condenser lens is too low | Raise the condenser lens | |
| The optics of the objective lens is dirty | Clean the objective lens |
Problems with electric parts:
| Problem | Possible cause | Solution |
| Illumination does not work, even though it is turned on | Power cable has disconnected | Check the power cable |
| The lamp is not installed | Install the lamp | |
| The fuse is blown | Replace the lamp or the fuse | |
| Lamps burn out quickly | Incorrect lamp is being used | Use the standard lamp |
| Lamp voltage is too high | Lamp voltage is too high | |
| The illumination is too dim | Incorrect lamp is being used | Use the standard lamp |
| The power source voltage is too low | Lamp voltage is too high | |
| The lamp keeps blinking, brightness keeps changing | Electrical surges | Adjust the power source |
| The filament is about to burn out | Change the lamp | |
| Power cable has disconnected | Check the power cable |
Care and maintenance
- Unpack the microscope with great care, make sure nothing falls on the ground;
- All the optics are calibrated on the factory line, do not try to take them apart on your own;
- The binocular head and the focus system are high-precision elements, and should not be taken apart. If you have any problems with either of them, contact our local service center;
- All mechanical elements have to be protected from dust; all the mechanisms should be greased regularly; all the optical elements should be kept clean;
- Store your microscope in a clean, dry place. Upon finishing your observations, replace the dust cover and unplug the instrument from the power source.
Digital camera
Levenhuk D870T comes with an 8 Mpx C800 NG digital camera.
The camera allows you to observe specimens in fine detail and true colors on your PC monitor and save images on the hard drive.
The special software that comes in the kit allows you to view and edit the resulting images. Supported file formats include: *.bmp, *.jpg, *.jpeg, *.png, *.tif, *.tiff, *.gif, *.psd, *.ico, *.emf, *.wmf, etc.
Connect the camera to your PC via a USB cable that also acts as a power cable, so you do not have to plug it into a power source.
Compatible OS: C800 NG - Windows XP/Vista/7/8.
| Camera model | C800 NG |
| Max. Resolution (for still images) | 3264x2448 |
| Megapixels | 8.0 |
| Sensor | 1/2.2° CMOS |
| Dimensions (cylined unit maximum diameter) | 50 mm (1.97") |
| Pixel size | 1.67μm x 1.67μm |
| Sensitivity, V/lux.sec@550 nm | 0.31 |
| Mounting location | Eyepiece tube (replaces the eyepiece) |
| Image format | BMP, TIFF, JPG, PICT, SFTL, etc. |
| Field of view diameter | 18 mm (0.71 in) |
| Spectral range | 400 nm - 650 nm |
| Exposure | ERS |
| White balance | Auto/manual |
| Exposure control | Auto/manual |
| Software image control | Image size, brightness, exposure control |
| Interface | USB 2.0, 480 Mb/s |
| System requirements | Windows XP/Vista/7/8; USB port |
| Software | Software for image viewing and editing |
| Shell | Metal cylinder, painted black |
| Power source | USB 2.0 cable |
| Temperature range | -30 - 70 °C / -22-158 °F |
Generally, when using a low-power objective lens (4x, 10x) the image on the PC monitor will be too bright. In this case you can:
• reduce the illumination brightness;
• reduce the iris diaphragm diameter;
• lower the Abbe condenser lens.
When using a high-power objective lens (40x, 100x) the image on the PC monitor will be too dark. In this case you can:
• increase the illumination brightness;
- increase the iris diaphragm diameter'
- raise the Abbe condenser lens.
Caution
Never look at the sources of bright light or lasers through the camera or the microscope: it will cause PERMANENT RETINAL DAMAGE and may lead to BLINDNESS!
Do not try to take the camera or the microscope apart on your own.
Protect the camera and the microscope from moisture; do not use them in rainy weather.
Protect the camera and the microscope from impacts or excessive pressure.
Do not overtighten the locking screws.
Keep the camera and the microscope away from hazardous environments, home and care heaters, incandescent lamps or open fire.
When cleaning the lenses, first blow any dust or debris off the surface or wipe the off with a soft brush. Then wipe the lens with a soft cleaning cloth slightly damp with spirits or ether.
Never touch the optics with your fingers.
Levenhuk International Lifetime Warranty
All Levenhuk telescopes, microscopes, binoculars and other optical products, except for accessories, carry a lifetime warranty against defects in materials and workmanship. Lifetime warranty is a guarantee on the lifetime of the product on the market. All Levenhuk accessories are warranted to be free of defects in materials and workmanship for six months from date of retail purchase. Levenhuk will repair or replace such product or part thereof which, upon inspection by Levenhuk, is found to be defective in materials or workmanship. As a condition to the obligation of Levenhuk to repair or replace such product, the product must be returned to Levenhuk together with proof of purchase satisfactory to Levenhuk. This warranty does not cover consumable parts, such as bulbs (electrical, LED, halogen, energy-saving and other types of lamps), batteries (rechargeable and non-rechargeable), electrical consumables etc. For further details, please visit our web site: www.levenhuk.com/warranty
If warranty problems arise, or if you need assistance in using your product, contact the local Levenhuk branch.
Levenhuk optics cleaning tools
Levenhuk N18/N20/N38/N80 prepared slides
Botany, biology, zoology, physiology
Levenhuk K50 experiment kit
Levenhuk, Inc. 924-D East 124th Ave. Tampa, FL 33612 USA
Levenhuk ® is a registered trademark of Levenhuk, Inc.
© 2006–2019 Levenhuk, Inc. All rights reserved.
20190326


- LEVENHUK BIOLOGICAL MICROSCOPES
- GENERAL INFORMATION
- OPERATING PRINCIPLE
- OBJECTIVE LENSES
- BINOCULAR HEAD
- REVOLVING NOSEPIECE
- STAGE
- ABBE CONDENSER
- FOCUS SYSTEM
- ILLUMINATION
- ASSEMBLY
- USING THE MICROSCOPE
- TROUBLESHOOTING
- CARE AND MAINTENANCE
- DIGITAL CAMERA
- CAUTION
- LEVENHUK INTERNATIONAL LIFETIME WARRANTY
Brand : Levenhuk
Model : D870T
Category : Microscope