RG160 PRO - Smartphone RugGear - Free user manual and instructions
Find the device manual for free RG160 PRO RugGear in PDF.


| Product Type | Rugged Smartphone |
| Brand | RugGear |
| Model | RG160 PRO |
| Dimensions | 158.2 x 79.5 x 14.5 mm (6.23 x 3.13 x 0.57 in) |
| Weight | 230 g (8.11 oz) |
| Water Resistance | IP68, 1.5m for 30 minutes |
| Drop Resistance | MIL-STD-810G, 1.5m drop onto concrete |
| Operating System | Android 10 (Go Edition) |
| Processor | MediaTek Helio P22, Octa-core 2.0 GHz |
| RAM | 3 GB |
| Internal Storage | 32 GB, expandable via microSD up to 128 GB |
| Battery Capacity | 4200 mAh, removable |
| Display Size | 5.5 inches IPS LCD |
| Display Resolution | 1440 x 720 pixels, HD+ |
| Rear Camera | 13 MP, autofocus, LED flash |
| Front Camera | 5 MP |
| Connectivity | 4G LTE, Wi-Fi 802.11 b/g/n, Bluetooth 4.2, GPS |
| Sensors | Accelerometer, Proximity, Light |
| SIM Card | Dual Nano-SIM |
| USB Port | Micro-USB 2.0, OTG supported |
| Audio Jack | 3.5 mm |
| NFC | Yes |
| Special Features | Glove mode, programmable SOS button, PTT (Push-to-Talk) support |
| Maintenance & Cleaning | Clean with a soft, damp cloth. Avoid abrasive cleaners or solvents. Ensure charging port is dry. |
| Safety | Do not expose to extreme heat or cold. Use only approved chargers. Keep away from fire. |
| Spare Parts & Repairability | Replacement battery, screen assembly, charging port available from authorized service centers. |
| General Information | Designed for outdoor workers, industrial use, and extreme environments. Supports wet finger tracking. |
Frequently Asked Questions - RG160 PRO RugGear
User questions about RG160 PRO RugGear
0 question about this device. Answer the ones you know or ask your own.
Ask a new question about this device
Download the instructions for your Smartphone in PDF format for free! Find your manual RG160 PRO - RugGear and take your electronic device back in hand. On this page are published all the documents necessary for the use of your device. RG160 PRO by RugGear.
USER MANUAL RG160 PRO RugGear
QUICK START MANUAL_EN
1_Introduction 5
2_Faults and damages 6
3_Further safety advice 6
KEYS
4_Keys 8
QUICK START
5_First steps 10
5.1_Battery 10
5.1.1_Charging the battery 10
5.1.2_Battery use 10
5.1.3_Energy saving tips 11
5.2_Open up the battery cover 11
5.3_Installation of the SIM cards 11
5.4_Installation of the Micro-SD card 12
FIRST USE
6 First Use 12
6.1 Powering on your device 12
6.2 Powering off your device 13
6.3_Locking and unlocking the device 13
6.4 Device operating and several features 13
6.5_Operating instructions 14
6.6_Using the touchscreen (only RG160PRO) 14
6.7 Connecting the device with a computer 15
DISPLAY LAYOUT
7_Display layout 16
7.1_Status bar 16
7.2_Notification panel 17
OVERVIEW AND OPERATING INSTRUCTIONS
8.1 Calls 18
8.1.1_Make a call 18
8.1.2_Accept incoming calls 19
8.1.3_Call log 19
8.1.4 Further information 19
8.2 SMS and MMS 19
8.2.1_Write SMS and MMS 19
8.2.2 Read SMS and MMS 20
8.2.3 Delete SMS and MMS 20
8.3_Change settings 20
8.4 Take pictures or record a video 20
8.5_Programs and applications 20
8.5.1 Program installation 20
8.5.2_Open applications 21
8.5.3 Delete programs 21
INFORMATION
9_Troubleshooting 22
10_Maintenance 24
11 SAR 25
EU-Declaration of Conformity 28
Service Center 29
RESERVATION
We are continually working to develop and improve products. Any changes, errors or misprints do not form grounds for compensation.
All rights reserved.
RugGear Europe is a brand of i.safe MOBILE GmbH.
i.safe MOBILE GmbH cannot be held responsible for any damage or loss of data resulting from improper use of this device.
This document contains all instructions for safe use of the mobile device RG160 (RG160PRO).
More detailed instructions on the use of the device can be obtained from our Service Center.
(c) 2017 i.safe MOBILE GmbH
DW3170606
1 INTRODUCTION
This document contains information and safety regulations which are to be observed without fail for safe operation of the mobile device RG160 (RG160PRO) under the described conditions.
The current EU-declaration of conformity, safety instructions and manuals can be found at www.ruggear-europe.com, or requested with i.safe MOBILE GmbH.
NOTE
This document only contains the instructions which are necessary to set up and safely use your device as well as some basic information for troubleshooting.
To ensure the IP protection of the device please make sure that the cover of the headset and the USB port is properly sealed, the battery cover is in its correct place and all screws are tightened.
Please read these operating instructions carefully before you use this device.
2 FAULTS AND DAMAGES
If there is any reason to suspect that the safety of the device has been compromised, it must be withdrawn from use immediately.
Measures must be taken to prevent any accidental restarting of the device.
The safety of the device may be compromised if, for example:
Malfunctions occur.
The housing of the device or the battery shows damage.
The device has been subjected to excessive loads.
The device has been stored improperly.
3 FURTHER SAFETY ADVICE
Do not touch the screen of the device with sharp objects. Dust particles and dirt may scratch the screen. Please maintain the screen clean. Remove dust on the screen with a soft cloth gently and do not scratch the screen.
Charge the device under dry indoor conditions only.
Do not expose the device to high temperatures as the battery may heat up and cause fire or possibly explosions.
Do not charge the device near any flammable or explosive substances.
Do not charge the device in humid, dusty or excessively hot/cold surroundings (Charging is only permitted within a temperature range of 5 °C ... 35 °C).
Do not use the device in areas where regulations or legislatives prohibit the use of a mobile device.
SAFETY INSTRUCTIONS
Do not expose the device, the battery or the charger to strong magnetic fields, such as are emitted from induction ovens or microwaves.
Do not attempt to open or repair the device. Improper repair or opening can lead to the destruction of the device, fire or explosion. Only authorized personnel are allowed to repair the device.
Only use accessories approved by i.safe MOBILE GmbH.
Power off the device in hospitals or other places where the use of mobile devices is prohibited. This device may affect proper work of medical equipment, like pacemakers or hearing aid, so always keep a distance of at least 15 cm between the device and these equipment.
Observe all corresponding laws that are in force in the respective countries regarding the use of devices while operating a vehicle.
Please power off the device and disconnect the charging cable before cleaning the device.
Do not use any chemical cleaning agents to clean the device or the charger. Use a damp and anti-static soft cloth for cleaning.
Do not discard old and abandoned lithium batteries into the trash, send them to designated waste disposal locations.
The user alone is responsible for any and all damages and liabilities caused by malware downloaded during use of the network or other data-exchange functions of the device. i.safe MOBILE GmbH cannot be held responsible for any of these claims.
WARNING
i.safe MOBILE GmbH will not assume any liability for damages caused by disregarding any of these advices or by any inappropriate use of the device.
KEYS
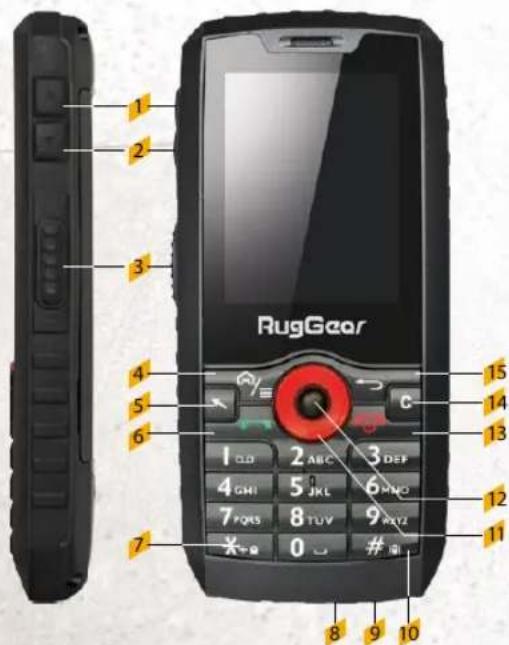
4 KEYS
1 VOLUME CONTROL:
Volume up.
2 VOLUME CONTROL:
Volume down.
3 SIDE KEY:
For Push-To-Talk applications.
4 OPTION KEY/MAIN MENU:
Allows access for different options during the use of basic functions. To activate and deactivate the screen lock. Long press to return to main menu.
5 MOUSE CURSOR:
To activate and deactivate the mouse cursor.
6 CALL KEY:
Dial-up, answering calls, Call log.
7 STAR KEY:
To activate and deactivate the key lock
([Option Key], then [Star Key]).
8_MICRO USB:
For charging and to connect to external USB devices.
(Attention! The flood-proof cannot be ensured during opened lock!).
9 HEADPHONE JACK:
For usage with 3,5 mm jack. To connect, open the lock
(Attention! The flood-proof cannot be ensured during opened lock!). The loudspeakers are muted during the use of a headset.
10_HASH KEY: Long press to set the device to silent mode.
11 NAVIGATION RING:
To control the cursor for different functions.
KEYS
9
12 CONFIRMATION KEY:
To confirm the chosen window.
13_ON/OFF KEY:
Long press to power ON/OFF the device.
To terminate a call and direct return to the home screen.
14_CLEAR KEY:
To delete entered characters.
15 BACK KEY:
Back to the previous screen mask.
text_image
RugGear 1 2 3 4 5 6 7 8 9 10 11 12 13 14 15 2 ABC 3 DEF 4 GHI 5 JKL 6 MNO 7 PQRS 8 TUV 9 PVT2 X 0 #座EN
QUICK START
5 FIRST STEPS
5.1\_BATTERY
Use the device only with the delivered battery. The battery is not fully charged upon delivery, but it contains enough energy to power on the device. To obtain best battery performance and battery life, let the battery discharge completely before charging it completely for the first three charging cycles.
5.1.1\_CHARGING THE BATTERY
Carefully open the cover of the USB-slot.
Connect the delivered USB-cable with the device.
Connect the plug with the socket of the power supply.
After charging, remove the USB-cable.
5.1.2 BATTERY USE
The actual standby time and talk time of the device depends on network conditions, working environment and usage.
When the battery is low, the device will prompt you to charge it. Failure to do so may result in a loss of unsaved data.
If the device is not charged for some time, it turns off.
WARNING
The device may only be charged at ambient temperatures in a range from 5 °C ... 35 °C. Please do not use charging equipment if the temperature exceeds this range. Only use the approved USB-cable and charger. Using any other cable may cause danger and will void the warranty.
QUICK START
11
5.1.3 ENERGY SAVING TIPS
Turn off wireless communication functions such as Bluetooth™, Wi-Fi™ or GPS when you do not need them.
Reduce the screen brightness.
Turn off the screen while not using the unit.
Disable the automatic synchronization of emails, calendars and other applications. This way you also save download volume when you are not connected to a WLAN network.
5.2 OPEN UP THE BATTERY COVER
Lay down the device to front face and open up the two screws with the delivered screw driver.
Now you can remove the battery cover and the battery.
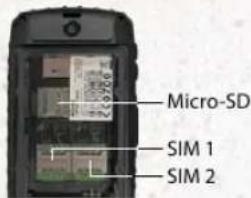
After removing the battery cover and the battery, you have access to the SIM-card-slot and the SD card slot.

text_image
Batterycover Screws Loudspeaker5.3 INSTALLATION OF THE SIM CARDS
The device features two SIM card slots (1, 2). If you have installed two SIM cards, you
can choose your primary card in
Please make sure that the SIM cards are correct installed!
text_image
Micro-SD SIM 1 SIM 2EN
WARNING
Only Mini SIM cards are allowed for use! The warranty is void if the wrong SIM cards are used!
5.4 INSTALLATION OF THE MICRO-SD CARD
The device accepts Micro-SD cards up to 32GB. Power off the device before you install the Micro-SD card. Open the Micro-SD card holder, insert the Micro-SD card into the slot and close the Micro-SD card holder.
If you want to remove the Micro-SD card from the device, first make sure that the card is not being used. To do so, select:
WARNING
Do not try to insert or remove any of the Mini SIM or Micro-SD cards when any external power supply is connected, otherwise the cards or the device may be damaged.
6 FIRST USE
Open up the battery cover (as described above) and install the SIM and Micro-SD card, and the delivered battery. Then close the battery cover. Secure it by turning the two screws with the delivered screw driver.
6.1 POWERING ON YOUR DEVICE
Press the [Power Key] until the RugGear brand logo lights up.
Depending on the security settings of your SIM card, the device
may ask you for your personal identification number (PIN) before starting up.
On first power on, the device asks you for your preferred language, current time, current date and personal information. Please enter this information.
You can choose to log on to your Google™ account or to create a new one. You can also do this later, however, please note that certain functions of the device such as the Google Play Store can only be used if your Google account is active.
6.2 POWERING OFF YOUR DEVICE
- Press and hold the [Power Key] to open the device options menu.
- Tap
. - Tap
.
6.3 LOCKING AND UNLOCKING THE DEVICE
Short press on [Option Key] and subsequent the [Star Key] to lock the device. The display will be turned off, the device and the keypad are now locked. When the screen is locked, you can still receive messages and calls. If you leave your device undisturbed for a while, the screen will lock automatically.
To unlock the device, press the [Option Key] and subsequent the [Star Key]. Now the device is unlocked.
6.4\_DEVICE OPERATING AND SEVERAL FEATURES
Besides the normal keys and the capacitive touchscreen (only RG160PRO), this device features the possibility of using a mouse cursor to operate the device. To activate the mouse cursor func-
tion press the [Mouse Cursor Key]. Move the mouse cursor by using the [Navigation Ring]. To confirm the selected option use the [Confirmation Key].
The operating system is based on Android™ 4.4.2. This enables you to choose from a wide range of offers from the GooglePlay™-Store and identify the many parallels in menu navigation.
As the device is not a smartphone in the proper sense, you may be confronted with restricted performance and display of some applications.
6.5 OPERATING INSTRUCTIONS
You can operate the device by using the mouse cursor and/or the navigation ring along with [Confirmation Key] or the touchscreen (only RG160PRO).
If you navigate the user interface by using the [Navigation Ring], the selected menu items are appeared in a brighter color. To confirm the required item push the [Confirmation Key].
To return to the previous screen use the [Back Key].
To return to the main menu use the [On/Off Key] or long press to [Option Key/main menu].
6.6 USING THE TOUCHSCREEN (ONLY RG160PRO)
This device features a capacitive touchscreen. It is not necessary to press the screen for it to work, a simple tap is enough.
The following gestures can be used with this device:
Tap
To open an application (app) tap it with a finger.
Tap and hold
Perform two taps onto a webpage or image to zoom in. Double tap again to zoom out.
Drag
Tap an icon and hold your finger to the screen.
Then drag it to where you would like to place it.
Flick
Tap the screen and flick your fingers left, right, up or down to scroll available panels or lists.
6.7 CONNECTING THE DEVICE WITH A COMPUTER
You can access the microSD card of the device on any compatible computer via the USB cable. This enables you to share images, videos, music and other files between the two devices.
-
Connect your device to the computer with the USB cable. When the device is connected to a computer for the first time, the computer will install the necessary drivers automatically.
-
Tap
in the dialogue box of your device. Open it by shortly pressing the [Options Key] and select . Now tap on and confirm .
NOTE
While USB mass storage function is enabled, some functions of the device may not be available.
7 DISPLAY LAYOUT
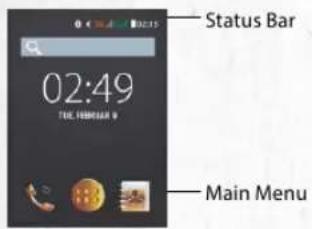
After you sign in or when you power on the device, by default the Home Screen opens:
text_image
Status Bar 02:49 THE FLOWER 9 Main MenuThe Home Screen is your starting point to access all the features on your device. A short tap to

STATUS BAR
The status bar appears at the top of every screen. On the right side, it displays device status icons, such as the status of the battery, GPS, data or mobile connections and the clock.
On the left side, it displays notification icons, such as missed calls or received messages. The following table shows the different symbols that might appear on the status bar of your device.
NOTIFICATION ICONS

2G network

HSPA (3G) network

Network strength

Phone network is searched

No SIM card or network

Connected to Wi-Fi
STATUS ICONS

Silent mode
(no ringtone/vibration)

Vibration alert only

Low battery

Full battery

Charging process
DISPLAY LAYOUT

Wi-Fi connection status

Roaming

Airplane mode (all wireless interfaces are off)

GPS is receiving location data

Bluetooth® connection status

One or several new e-mails

One or several new SMS

Alarm clock active

USB troubleshooting

USB connection established

Play/Pause

FM radio

Headset mode

Missed calls

Incoming call

Active call

Waiting call

Delete notification list

BT-Headphone connected

Voice message

Data connection

Settings

Little memory

Brightness adjustment

Download

Upload

Calendar entry

NOTIFICATION PANEL
text_image
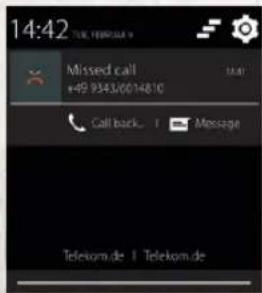
14:42 TUE, FEBRUATE 9 Missed call +49 9343/0014810 Call back... | Message Telekom.de | Telekom.deTo open the notification panel press the [Option Key] and select
Your device will notify you here about newly received message or upcoming events.
The notification panel also informs you about alarms, settings and other relevant information.
To open or delete individual notifications from the list, select them using the [Navigation Ring] or the [Mouse Cursor] and confirm with the [Confirmation Key]. Alternatively you may tap on the notification to select it or delete it by swiping it to the left or right side.
Use the Settings icon in the top right corner of the notification panel to access system settings. To close the notification panel, press the [Back Key] or the [Option Key].
8\_OVERVIEW AND OPERATING INSTRUCTIONS
8.1 CALLS
8.1.1 MAKE A CALL
There are separate ways to make a call:
- Dial number by using the physical keypad.
- Select the Telephone Icon 📋 on home screen.
Dial number by using the physical keypad or the keys displayed on the touchscreen (only RG160PRO). The keys can be hidden by pressing the (Back Key).
Use the telephone call log.
Use the contact list
Then push the [Call Key] or the 📄 symbol to dial up.
Incorrectly dialed digits can be deleted by pushing the [Back Key] or the ☐-symbol.
8.1.2 ACCEPT INCOMING CALLS
To accept incoming calls, push the [Call Key] or swipe the symbol on the screen to the right (only RG160PRO). To reject incoming calls, push the [On/Off Key] or swipe the symbol on the screen to the left (only RG 160 PRO).
8.1.3\_CALL LOG
To display the call log information press the [Call Key] or choose
8.1.4 FURTHER INFORMATION
By pressing the [Option Key] in the phone menu you can access contact groups and phone settings or create a new contact.
8.2 SMS AND MMS
8.2.1 WRITE SMS AND MMS
Select
By pressing the [Option Key], you can access text templates and other options.
Select + to attach a file. You can choose between your images, audio and video files as well as calendar entries and contacts. Furthermore, you can create a recording.
OVERVIEW AND OPERATING INSTRUCTIONS
OVERVIEW AND OPERATING INSTRUCTIONS
8.2.2\_READ SMS AND MMS
Select the
8.2.3\_DELETE SMS AND MMS
Select the
8.3\_CHANGE SETTINGS
To change the settings of the device or to activate/deactivate Wi-Fi and Bluetooth®, select
To activate the camera, select the
The picture or the video will be saved in
8.5 PROGRAMS AND APPLICATIONS
8.5.1 PROGRAM INSTALLATION
You can use your Google™-account to install several programs and applications from GooglePlay™-Store. These applications are stored in the main menu. They cannot be displayed on the home screen.
8.5.2 OPEN APPLICATIONS
Installed applications from GooglePlay-Store are stored in the main menu. Some default applications by Google are already installed.
8.5.3\_DELETE PROGRAMS
For delete an application, select
WARNING
Deleting of applications can cause technical restrictions on the device!
9 TROUBLESHOOTING
If problems occur when using the mobile, please try the following tips. If the problem is not solved, please contact your vendor or the Service Center directly.
THE DEVICE CANNOT BE POWERED ON
The battery voltage is too low.
Please recharge the battery.
The power on key is not pressed long enough.
Please press power on key for more than three seconds.
The connection to the battery is bad.
Remove the battery and clean the contacts.
The SIM card has a failure.
Please check or replace the SIM card.
THE DEVICE HAS INSUFFICIENT STANDBY TIME
The battery performance is reduced because of the age of the battery.
Please contact your vendor or the Service Center for a replacement battery.
Too many programs and functions are running at the same time.
Please reduce the number of running programs and functions.
THE DEVICE IS NOT CHARGING
Poor electrical contact.
Please check whether any contacts or plugs are loose or dirty.
Input voltage is too low.
Please charge the device for about one hour, remove the plug, wait a minute and then continue charging. During this time it is possible that the device cannot be powered on, as the voltage is too low.
A battery fault has occurred.
Please replace the battery.
CALLS ARE INTERRUPTED
SIM Card failures occur.
Please check the contacts of the SIM card or replace the card.
Network error.
Please change to a network provider with a stronger signal.
Poor network coverage.
If possible, leave the dead spot/facility/room.
OTHER PEOPLE ARE ANSWERING MY CALLS
The device has been set into divert your calls to another phone number.
Please check and cancel call divert.
THE DEVICE POWERS OFF AUTOMATICALLY
The charge of the battery is too low.
Please recharge the battery.
An error has occurred.
Please restart the device. If the problem reoccurs, please contact your vendor or the Service Center.
10 MAINTENANCE
If there is a problem with the device, please contact your vendor or consult the service center. If your device is in need of repair, you can either contact the service center or your vendor.
TRADEMARKS
RugGear (Europe) and the RugGear (Europe) logo are registered trademarks of i.safe MOBILE GmbH.
The Android™ logo, Google™ and Google Play™ Store are registered trademarks of Google, Inc
The Android robot is reproduced or modified from work created and shared by Google™ and used according to terms described in the Creative Commons 3.0 Attribution License.
Bluetooth® is a registered trademark of Bluetooth SIG, Inc. worldwide.
Wi-Fi® is a registered trademark of the Wi-Fi Alliance.
All other trademarks and copyrights are the properties of their respective owners.
RECYCLING
The crossed-out wheeled-bin symbol on your product, battery, literature or packaging reminds you that all electrical and electronic products, batteries, and accumulators must be taken to separate collection at the end of their working life. This requirement applies in the European Union. Do not dispose of these products as unsorted municipal waste.
Always return your used electronic products, batteries, and packaging materials to dedicated collection points. This way you help to prevent uncontrolled waste disposal and to promote the recycling of materials.
More detailed information is available from the product retailer, local waste authorities, national producer responsibility organizations or your local representative.
The content of this document is presented as it currently exists. i.safe MOBILE GmbH does not provide any explicit or tacit guarantee for the accuracy or completeness of the content of this document, including, but not restricted to, the tacit guarantee of market suitability or fitness for a specific purpose unless applicable laws or court decisions make liability mandatory. i.safe MOBILE GmbH reserves the right to make changes to this document or to withdraw it any time without prior notice.
11 SPECIFIC ABSORPTION RATE (SAR) CERTIFICATION INFORMATION
This device meets international guidelines for exposure to radio waves
Your mobile device is a radio transmitter and receiver. It is designed not to exceed the limits for exposure to radio waves (radio frequency electromagnetic fields) recommended by international guidelines. The guidelines were developed by an independent scientific organization (ICNIRP) and include a substantial safety margin designed to assure the safety of all persons, regardless of age and health.
The radio wave exposure guidelines use a unit of measurement known as the Specific Absorption or SAR. The SAR limit for mobile devices is 2.0 W/kg.
Tests for SAR are conducted using standard operating positions with the deice transmitting at its highest certified power level in all tested frequency bands. The highest SAR values under the ICNIRP guidelines for this device model are:
Maximum SAR for this model and conditions under which it was recorded
SAR (head)
0.393 W/kg
SAR (body-worn)
0.880 W/kg
During use, the actual SAR values for this device are usually well below the values stated above. This is because, for purposes of system efficiency and to minimize interference on the network, the operating power of your mobile device is automatically decreased when full power is not needed for the call. The lower the power output of the device, the lower its SAR value.
A body-worn SAR test has been performed on this device at a separation distance of 1.5 cm. To meet RF exposure guidelines during body-worn operation, the device must be positioned at least 1.5 cm away from the body.
Organizations such as the World Health Organization and the US Food and Drug Administration have suggested that if people are concerned and want to reduce their exposure, they could use a hands-free accessory to keep the wireless device away from the head and body during use, or they could reduce the amount of time spent using the device.
RugGear® EUROPE
A 100% of Large MOBILE
EU – Declaration of Conformity
according to directives 2014/53/EU and 2011/65/EU
March 2015/06/11 (see 2011/03/01)
The company i.safe MOBILE GmbH declares under its sole responsibility that the product to which this declaration relates is in accordance with the provisions of the following data, directives and standards:
Martin Haaf Managing Director
I safe MOBILE
Lsafe MOBILE GmbH
i Park Tauberfranken 10
57922 Lauda Koenigshofen
Germany
Transcribe: 100%278650000 - All rights reserved, plus NOTED Option
CONTACT/SERVICE CENTER
Find your RugGear Europe Service Center on our website: www.ruggear-europe.com/service
GET FURTHER INFORMATIONS
AND DOWNLOADS HERE!
WWW.RUGGEAR-EUROPE.COM
i.safe MOBILE GmbH
i_Park Tauberfranken 10 | 97922 Lauda-Koenigshofen | Germany info@ruggear-europe.com | www.ruggear-europe.com
INHALT
SICHERHEITSHINWEISE
natural_image
Black handheld mobile phone with visible ports and buttons (no readable text or symbols)text_image
Micro-SD SIM 1 SIM 2WARNUNG
8.5.2\_APPLIKATIONEN ÖFFNEN
EU – Declaration of Conformity
according to directives 2014/53/EU and 2011/65/EU
Source: Archillmore 2014/53/91 (doi: 2011/65181)
The company i.safe MOBILE GmbH declares under its sole responsibility that the product to which this declaration relates is in accordance with the provisions of the following data, directives and standards:
Martin Haaf Managing Director
I safe MOBILE
Lsafe MOBILE GmbH
i Park Tauberfranken 10
97922 Lauda Koenigshofen
Germany
Transitions: 10/09/23 17/08/24 (2003) - All rights reserved, Local 040786.5 Contact
KONTAKT/SERVICE CENTER
Finde dein RugGear Europe Service Center
unter: www.ruggear-europe.com/service
HIER GEHT'S ZU MEHR
INFORMATIONEN UND DOWNLOADS!
WWW.RUGGEAR-EUROPE.COM
i.safe MOBILE GmbH
i_Park Tauberfranken 10 | 97922 Lauda-Koenigshofen | Germany
info@ruggear-europe.com | www.ruggear-europe.com