
IAN 321923 - Uncategorized Livarno Lux - Free user manual and instructions
Find the device manual for free IAN 321923 Livarno Lux in PDF.


| Product Type | LED ceiling light with Bluetooth speaker |
| Model Number | IAN 321923 / 14138906L |
| Brand | Livarno Lux |
| Operating Voltage | 230-240 V~, 50 Hz |
| LED Power (non-replaceable) | max. 25 W |
| Speaker Power | max. 5 W |
| Total Rated Power | max. 30 W |
| Protection Type | IP20 (indoor use only) |
| Protection Class | 1 (with protective conductor) |
| Bluetooth Version | 5.0 |
| Bluetooth Range | up to 9 m |
| Speaker Frequency Range | 120-20000 Hz |
| Remote Control Type | Infrared (IR) |
| Remote Control Range | 5-6 m |
| Remote Control Batteries | 2 x 1.5 V AAA (included) |
| Dimmable | Yes (via remote control) |
| Timer Function | 30-minute timer |
| Intended Use | Indoor, dry and enclosed spaces, private household |
| Installation | Ceiling mount, professional electrical installation recommended |
| Maintenance | Disconnect power, clean with dry lint-free cloth when cool |
| Warranty | 36 months from date of purchase |
| Scope of Delivery | Light fixture, remote control, wall bracket, AAA batteries, mounting accessories, manual |
Frequently Asked Questions - IAN 321923 Livarno Lux
User questions about IAN 321923 Livarno Lux
0 question about this device. Answer the ones you know or ask your own.
Ask a new question about this device
Download the instructions for your Uncategorized in PDF format for free! Find your manual IAN 321923 - Livarno Lux and take your electronic device back in hand. On this page are published all the documents necessary for the use of your device. IAN 321923 by Livarno Lux.
USER MANUAL IAN 321923 Livarno Lux
LED-DECKENLEUCHTEMIT BLUETOOTH-LAUTSPRECHER
DE AT CH
LED-DECKENLEUCHTEMIT BLUETOOTH-LAUTSPRECHER
Assembly, operating and safety instructions
DE AT CH
Before reading, unfold both pages containing illustrations and familiarise yourself with all functions of the device.
GB Assembly, operating and safety instructions Page 15
flowchart
graph TD
    A["9"] --> B["Lighting"]
    C["10"] --> B
    D["11"] --> B
    B --> E["ON"]
    B --> F["OFF"]
    E --> G["Speaker 12"]
    F --> H["Speaker 13"]
    G --> I["ON"]
    H --> J["ON"]
    I --> K["Audio"]
    J --> L["Audio"]
    K --> M["Speaker 16"]
    L --> N["Speaker 17"]
    M --> O["Speaker 18"]
    N --> P["Speaker 19"]
Intended use....Page 16
Scope of delivery....Page 16
Parts description Page 17
Technical data......Page 17
Safety Page 17
Safety information......Page 17
Safety instructions for batteries / rechargeable batteries ......Page 19
Preparation......Page 19
Required tools and material....Page 19
Prior to installation Page 19
Set-up......Page 20
Installing the light Page 20
Installing the wall bracket....Page 20
Inserting / replacing batteries....Page 20
Operating the light by switch....Page 20
Using the remote control......Page 20
Switching the light on/off......Page 21
Dimming the light Page 21
30 minute timer Page 21
Bluetooth connection Page 21
Controlling the music volume Page 21
Selecting a song....Page 22
Maintenance and cleaning......Page 22
Disposal Page 22
Warranty and service......Page 22
Warranty declaration Page 22
Service address......Page 23
Declaration of conformity....Page 23
Manufacturer......Page 23
| List of pictograms used | |||
 | Please read the operating instructions! |  | Observe warnings and safety notes! |
 | Volts (alternating voltage) Caution! Dang |  electric shock! electric shock! | |
 | Hertz (frequency) For your safety |  | |
 | Watts (effective power) |  | Dispose of the packaging and device in an environmentally friendly manner! |
 | Protective conductor |  | Please dispose of the batteries in an environmentally-friendly manner! |
 | Switching cycles |  | This light is not suitable for external dimmers or electronic switches. |
 | LED operating life |  | Danger to life and risk of accidents for infants and children! |
 | This light is only suitable for indoor use in dry and enclosed spaces. |  | The packaging is made from 100 % recycled paper. |
 | Caution! Risk of burns due to hot surfaces! |  | Danger of explosion! |
 | Wear safety gloves! | ||
LED Ceiling Light with Bluetooth Speaker
- Introduction

Congratulations on your new product.
You have selected a high quality product.
Please be sure to carefully read the com-
plete operating instructions. Fold out the page with the illustrations. These instructions are part of the product and contain important information on setup and handling. Always follow all safety instructions. Before using this product for the first time verify the correct voltage and that all parts are properly installed. Should you have any questions or you are unsure about operating the product, please contact the dealer or service centre. Please keep these instructions
in a safe place and pass them on third parties as applicable.
Intended use

This light is only suitable for indoor use, in dry and enclosed rooms. This product is intended for private household use only.
- Scope of delivery
Check immediately after unpacking that the parts are complete and that the product is in proper condition.
1 LED ceiling light with Bluetooth speaker, model 14138906L
1 Remote control
1 Wall bracket for remote control (incl. 1 x adhesive pad, 2 x screws)
2 AAA batteries
3 Wall plugs
3 Screws
2 Protective tubes
1 Set of assembly instructions and instructions for use
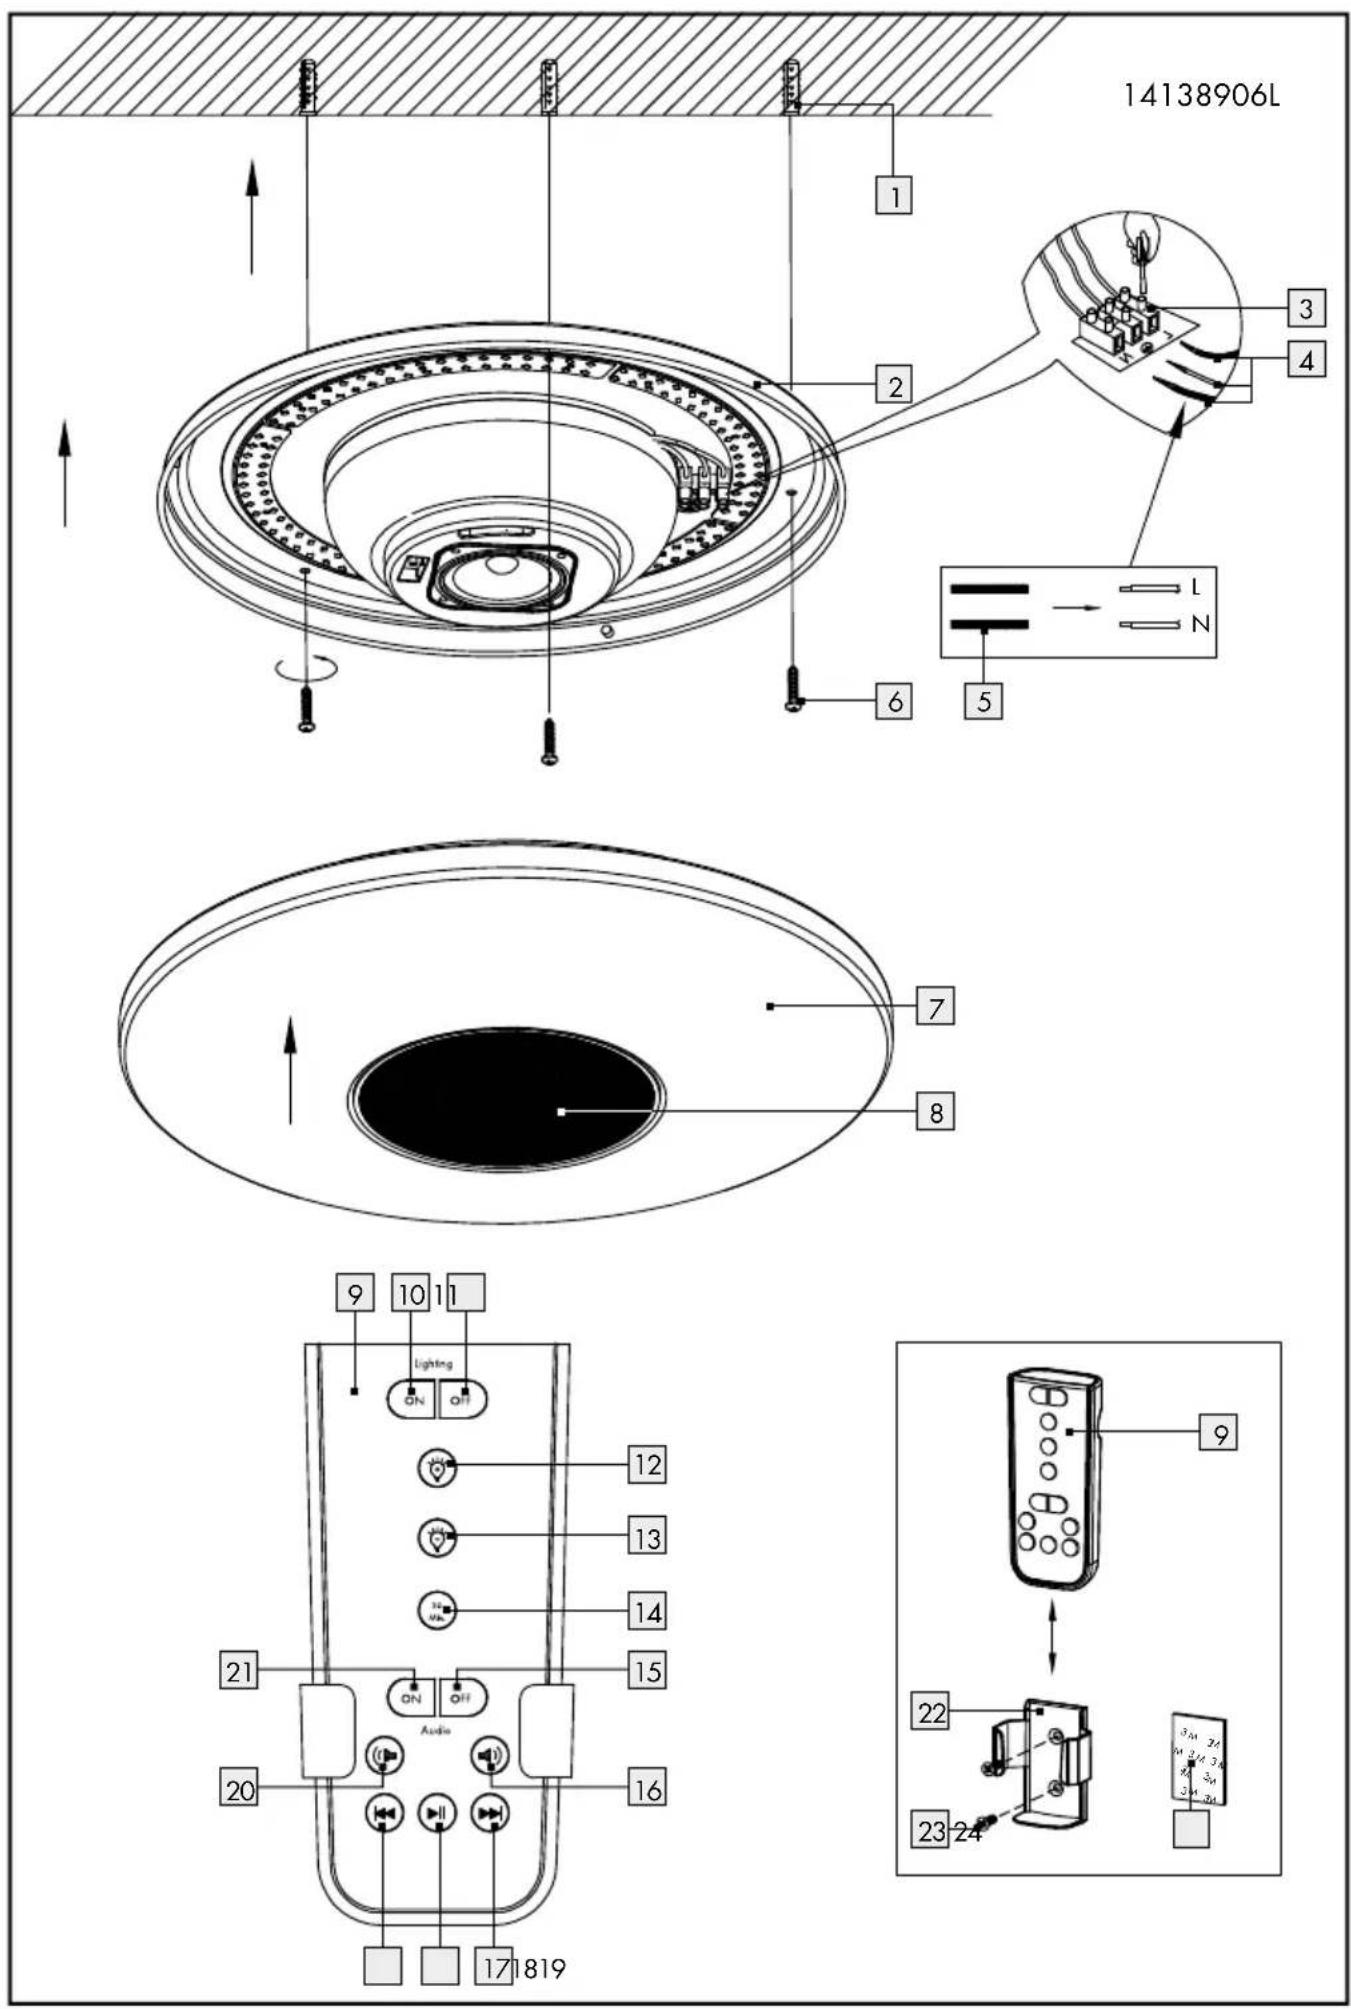
- Parts description
Light:
| 1 | Wall plug |
| 2 | Light fixture |
| 3 | Lustreterminal |
| 4 | Mains connection cable (external) |
| 5 | Protective tube |
| 6 | Screws |
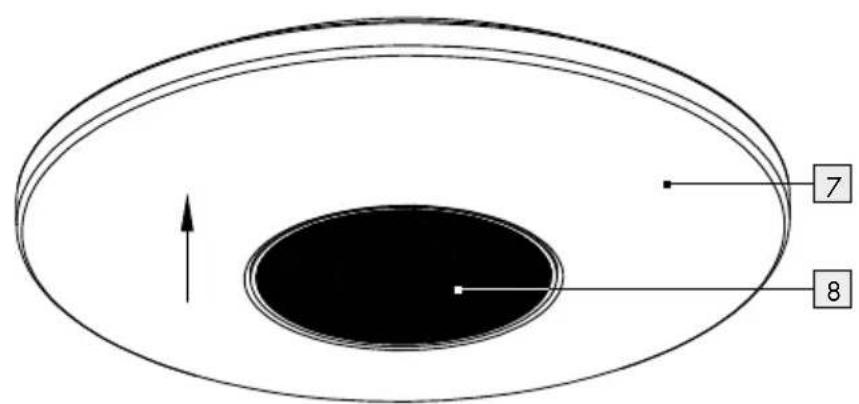
| 7 | Plastic cover |
| 8 | Speaker cover |
| 9 | Remote control |
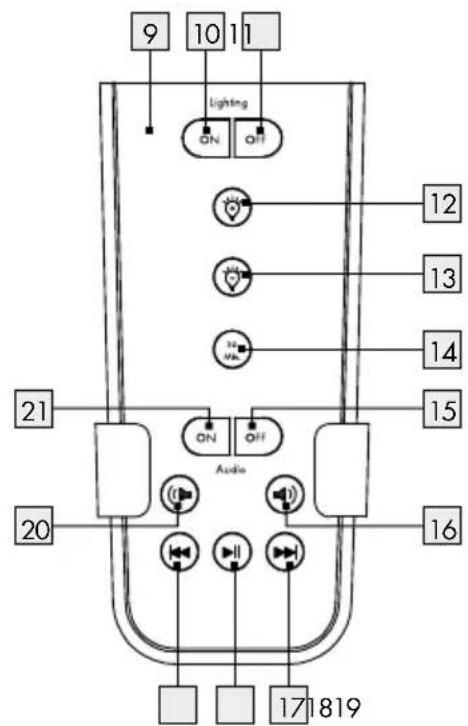
Remote control:
| 10 | ON button (lighting) |
| 11 | OFF button (lighting) |
| 12 | Dimmer button + |
| 13 | Dimmer button - |
| 14 | 30 minute timer button |
| 15 | OFF button (audio) |
| 16 | Volume button + |
| 17 | Select song button (next) |
| 18 | Hi Pause / Bluetooth connection standby button |
| 19 | Select song button (previous) |
| 20 | Volume button - |
| 21 | ON button (audio) |
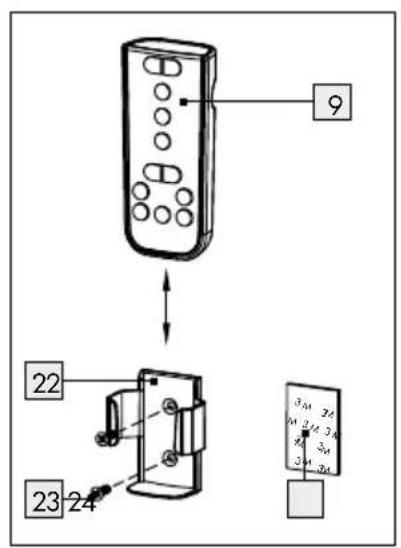
| 22 | Wall bracket (remote control) |
| 23 | Screws (remote control) |
| 24 | Adhesive pad (remote control) |
- Technical data
Model no.: 14138906L
Operating voltage: 230-240V\~, 50Hz
Illuminant: LEDs max. 25 W (non-replaceable) (speaker max. 5 Watt)
Rated power: LED, max. 30 Watt
Protection type: IP20 (only suitable for indoor use)
Protection class: 1/⊥
Speaker frequency range: 120-20000 Hz
Bluetooth version: 5.0
Bluetooth range: 9 m
Bluetooth
frequency range: 2.4 GHz band
RF output: +2 dBm
Remote control:
Batteries: 2 x 1.5 V AAA
Remote control range: 5–6 m (infrared)
Safety

Safety information
Damage due to failure to comply with these operating instructions will invalidate the guarantee! We assume no liability for consequential damage! We assume no liability for material damage or personal injury due to improper handling or failure to comply with the safety instructions!

WARNING! DANGER TO LIFE AND RISK OF ACCIDENTS FOR INFANTS AND CHILDREN!
Never leave children unsupervised with the packaging materials. The packaging material poses a suffocation hazard. Children frequently underestimate the dangers.
Do not leave the light or packaging material lying unattended. Plastic film or bags, Styrofoam etc. can turn into dangerous toys for children.

Avoid the risk of fatal injury from electric shock
■ Ensure that a qualified electrician, or a person trained to carry out electrical installations, performs the electrical installation.
Always check the light, power supply, and mains cable for damage before plugging it in. Never use the light if it shows any signs of damage.
WARNING!
A damaged mains cable indicates a life-threatening danger due to electric shock. In the event of damage, repairs or other problems with the light please contact the service centre or a qualified electrician.
Prior to installation, remove the fuse or switch off the circuit breaker (0 setting) in the fuse box.
Prior to installation, verify that the mains voltage on site corresponds with the operating voltage required for the light (see „Technical data“).
- Ensure that the light does not come into contact with water or other liquids under any circumstances.
Never open any of the components of the electrical equipment or insert any objects into the same components. This will pose a risk of fatal injury from electric shock.
Do not install the light on a wet or conductive substrate!

Prevent fire and injury hazards
- Check the light for damage immediately after unpacking. Contact the service centre if you find any damage.
CAUTION! RISK OF BURNS DUE TO HOT SURFACES!
Ensure that the light has been switched off and has cooled before touching it, to avoid burn injuries. Lamps develop a lot of heat in the area of the lamp head.
The lamp's light source is not replaceable, the entire light needs to be replaced if the light source reaches the end of its service life.
This light can be dimmed using a remote control.
Do not look directly into the light source (light bulb, LED etc.).
Do not use optical instruments to look at the light source (e.g. magnifying glass).

Safe working
Mount the light so that it is protected from moisture and dirt.
Carefully prepare the installation and allow sufficient time. Organise all parts and any necessary additional tools or materials before starting so they are easy to reach.
Always be attentive when working! Always pay attention to what you are doing and act with common sense. Never install the light if you are having difficulty concentrating or do not feel well.

Radio Frequency Interface Requirements – Related to European installation
Note: This equipment has been tested and found to comply with the limits for a EN 300 440 v2.1.1 receiver Category 3. These limits are designed to provide reasonable protection against harmful interference in a residential installation. This equipment is sensitive to other equipment that intentionally generates, radio frequency energy in the 2.4GHz that may conduce to the instability to use the Remote Control on it. However there is no guarantee that interference will not occur in a particular installation. If this equipment suffer from the harmful interference from another radio device to radio this can be determined by turning the respective equipment off and on, the user is encouraged to try to correct the interference by one or more of the following measures: Turn off the disturbance equipment and do not use the WiF camera in proximity of equipment that operate at such frequency with high transmitting power Increase the separation between the disturbance equipment Consult the dealer or an experienced radio / TV technician for help. The relevant declarations and documents are held by the manufacturer: https://www.briloner.com/de/service/informationen-zu-leuchten/eu-konformitaetserklaerung-fuer-funkanlagentyp.php

Safety instructions for batteries/rechargeable batteries
■ DANGER TO LIFE!
Keep batteries / rechargeable batteries out of reach of children. If accidentally swallowed seek immediate medical attention.
DANGER OF EXPLOSION!

Never recharge non-rechargeable batteries.
Do not short-circuit batteries / rechargeable batteries and / or open them. Overheating, fire or bursting can be the result.
■ Never throw batteries / rechargeable batteries into fire or water.
Do not exert mechanical loads to batteries / rechargeable batteries.
Risk of leakage of batteries / rechargeable batteries
Avoid extreme environmental conditions and temperatures, which could affect batteries / rechargeable batteries, e.g. radiators / direct sunlight.
If batteries / rechargeable batteries have leaked, avoid contact with skin, eyes and mucous membranes with the chemicals! Flush immediately the affected areas with fresh water and seek medical attention!
WEAR PROTECTIVE GLOVES!

Leaked or damaged batteries / rechargeable batteries can cause burns on contact with the skin. Wear suitable protective gloves at all times if such an event occurs.
In the event of a leakage of batteries / rechargeable batteries, immediately remove them from the product to prevent damage.
Only use the same type of batteries / rechargeable batteries. Do not mix used and new batteries/rechargeable batteries.
■ Remove batteries / rechargeable batteries if the product will not be used for a longer period.
Risk of damage of the product
Only use the specified type of battery / rechargeable battery!
Insert batteries / rechargeable batteries according to polarity marks (+) and (-) on the battery / rechargeable battery and the product.
- Clean the contacts on the battery / rechargeable battery and in the battery compartment before inserting!
■ Remove exhausted batteries/rechargeable batteries from the product immediately.
● Preparation
- Required tools and material
The tools and materials specified are not included. This information and these values are non-binding and are only provided as a reference. The nature of the material is determined by the individual local conditions.
- Pencil/marking tool
- 2-pole circuit tester
- Screwdriver
,- Electric drill - Drill bit (approx. ∅ 6 mm)
- Hammer
- Side cutter
- Ladder
- Prior to installation
Important: The electrical connection must be established by a qualified electrician or a person trained to perform electrical installations.
-This person must be familiar with the properties of the light and the connection regulations.
-
Familiarise yourself with all the instructions and diagrams in this manual, as well as with the light itself, before you install it.
Before installation ensure that the circuit, to which the light will be connected, is not energised. To do so, remove the fuse or switch off the circuit breaker in the fuse box (0 position). -
Check that the power is off using a 2-pole circuit tester.
☐ Unpack the LED ceiling light and place it on a non-slip base. (Be careful not to scratch it).
□ Apply light pressure to the plastic cover 7 with both hands. While pressing on it, turn the plastic cover 7 anti-clockwise (in the opposite direction of the arrow) as far as it will go and remove the plastic cover 7 by lifting it up.
Set-up
- Installing the light
Before installation, ensure that the circuit to which the light will be connected is not energised. To do so, remove the fuse or switch off the circuit breaker in the fuse box (0 setting).
☐ Hold the light fixture 2 to the desired installation position. Bear in mind the drill hole in the light fixture 2 through which the mains cable will be inserted.
☐ Mark three drill holes for the screws 6 (see fig.).
Drill the holes. Be sure not to damage the mains cable (external) 4.
☐ Insert the wall plugs 1 into the drilled holes. If necessary, use a hammer to help you.
☐ Guide the mains cable through the drill hole in the light fixture 2 provided for this purpose and attach the light to the ceiling.
Before the light is connected, the insulated ground wiring must be prepared with an additional insulation.
Feed the mains connection cable (external) through the included protective tubes ^5 .
Note: Be sure to correctly connect the individual leads on the mains cable (external) 4: live wire, black or brown = symbol L, neutral wire, blue = symbol N, earth wire, green-yellow= symbol ⏻
☐ Install the plastic cover 7 of the light. To do this, match the cover's three notches to the corresponding retaining bolts and press these upwards. Turn the cover clockwise (right, following the direction of the arrow) to fasten it. The adhesive label with the arrow can now be removed.
☐ Replace the fuse or switch on the circuit breaker (I setting) inside the fuse box.
Your LED ceiling light with Bluetooth speaker is now ready for use.
- Installing the wall bracket
☐ Install the wall bracket 22 for the remote control 9 using the screws 23 or the adhesive pad 24 (see fig.).
- Inserting / replacing batteries
Note: The remote control 9 requires two AAA batteries (included).
☐ Slide the battery cover (reverse) approx. 1 cm downwards to open and then lift off the cover.
☐ Insert two of the included AAA batteries in the battery compartment. Ensure correct polarity.
☐ Replace the cover and push it back to close the battery compartment.
Your remote control 9 is ready to use.
- Operating the light by switch
☐ The LED ceiling light can be switched on and off using the wall switch. The light intensity always corresponds to the brightness level that was last set. All other functions are controlled solely via remote control 9.
• Using the remote control
ATTENTION!
The functions of the remote control can only be used after switching the LED ceiling light 9 on with the wall switch.
- Switching the light on / off
1. Switching the light on
Press the "button (lighting) 10, to switch the LED ceiling light on. A beep confirms reception of the signal.
2. Switching the light off
☐ Press the "button (lighting) 11, to switch the LED ceiling light off. A beep confirms reception of the signal.
Dimming the light
1. Increasing brightness
Press the "button Dimmer + 12, to increase the brightness. A beep will sound when reaching the maximum brightness. Briefly pressing this button will gradually increase the brightness as pressed. Holding the "button Dimmer + 12 will automatically increase the brightness to the maximum.
2. Reducing the brightness
Press the "button Dimmer - 13 to reduce the brightness. A beep will sound when reaching the minimum brightness. Pressing it briefly will gradually decrease the brightness as pressed. Holding the "button Dimmer - 13 will automatically decrease the brightness to the minimum.
30 minute timer
1. Activating the timer
☐Pressthe button 30 14 for approx. 3 seconds to switch on timer mode. A protracted beep tone will sound as confirmation.
☐ The light and the Bluetooth function (music) will automatically switch off after approx. 30 minutes.
2. Deactivating the timer
☐ To deactivate the timer function during the 30 minute period, press the "30 Min" button 14 again, holding more than 3 seconds. A long beep will sound when the LED ceiling light receives the
signal, confirming deactivation of the timer function.
- Bluetoothconnection
1. Bluetooth connection
Press the audio "6N button (audio) 21. A beep confirms reception of the signal.
☐ Approx. 1–2 seconds later the Bluetooth connection will be accompanied by music and established automatically, the blue LED inside the LED ceiling light begins to flash rapidly.
☐ A brief melody will sound once connected.
☐ When connecting with your mobile, tablet, etc. for the first time, select Bluetooth connection „LED Ceiling Lamp“.
2. Disconnecting Bluetooth
Press the audio "DFF" button (audio) 15. A beep confirms reception of the signal. Bluetooth has been disconnected.
Once connected you may use the following audio controls:
• Controlling the music volume
1. Lowering the music volume
Press the "button Volume - 20 to lower the volume. A beep will sound when reaching the minimum volume. Pressing it briefly will gradually decrease the volume as pressed. Holding the "button Volume - 20 will automatically lower the volume to the minimum.
2. Increasing the music volume
Press the "button Volume + 16 to increase the volume. A beep will sound when reaching the maximum volume. Pressing it briefly will gradually increase the volume as pressed. Holding the "button Volume + 16 will automatically increase the volume to the maximum.
- Selecting a song
1. Previous song
Press the "Button Select song (previous) 19 to select a previous song or to replay the song from the beginning.
2. Next song
Press the "Button Select song (next) 17 to select the next song.
3. Pause
Press the "Button Pause / Bluetooth Connection Standby 18 briefly to pause. Holding the "button Pause / Bluetooth Connection Standby 18 will set the Bluetooth connection to standby for approx. 10 min. The Bluetooth connection will then be closed.
● Maintenance and cleaning
WARNING! RISK OF ELECTRIC SHOCK!
Disconnect the light from the mains circuit before cleaning. To do so, remove the fuse or switch off the circuit breaker in the fuse box (0 position).
- Do not use solvents, petrol, etc. They could damage the light.
- Allow the light to cool down completely.
WARNING! RISK OF ELECTRIC SHOCK!
For electrical safety, never clean the light with water or other liquids, or immerse it in water.
☐ Only use a dry, lint-free cloth for cleaning.
■ Then replace the fuse or switch on the circuit breaker in the fuse box (I position).
●Disposal
The packaging is made entirely of recyclable materials, which you may dispose of at local recycling facilities.
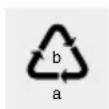
Observe the marking of the packaging materials for waste separation, which are marked with abbreviations (a) and numbers (b) with following meaning:
1-7: plastics / 20-22: paper and fibre-board / 80-98: composite materials.

The product and packaging materials are recyclable, dispose of it separately for better waste treatment. The Triman logo is valid in France only.
To help protect the environment, please dispose of the product properly when it has reached the end of its useful life and not in the household waste. Information on collection points and their opening hours can be obtained from your local authority.
Faulty or used batteries / rechargeable batteries must be recycled in accordance with Directive 2006/66/EC and its amendments. Please return the batteries/rechargeable batteries and/or the product to the available collection points.
Environmental damage through incorrect disposal of the batteries/rechargeable batteries!
Batteries / rechargeable batteries may not be disposed of with the usual domestic waste. They may contain toxic heavy metals and are subject to hazardous waste treatment rules and regulations. The chemical symbols for heavy metals are as follows: Cd = cadmium, Hg = mercury, Pb = lead. That is why you should dispose of used batteries / rechargeable batteries at a local collection point.
● Warranty and service
● Warranty declaration
This product has a warranty of 36 months from the date of purchase. The appliance has been carefully produced under strict quality control. During the warranty period we will repair any defects in material or manufacture free of charge. If defects are detected during the warranty period, please send the product
to the service address listed, specifying the following item number: 14138906L.
Wear parts (such as bulbs) and damage caused by improper handling, failure to observe the operating instructions or unauthorised manipulation are excluded from the warranty. Providing warranty services does not extend or renew the warranty period.
Serviceaddress
For all inquiries about your product, please have your receipt and the article number (e.g. IAN
123456_7890) ready as your proof of purchase.
- Declaration of conformity CE
This product fulfils the requirements of the applicable European and national directives. Conformity has been demonstrated. The relevant declarations and documents are held by the manufacturer.
Manufacturer


- LED-DECKENLEUCHTEMIT BLUETOOTH-LAUTSPRECHER
- DE AT CH
- Safety Page 17
- Preparation......Page 19
- Prior to installation Page 19
- Set-up......Page 20
- Maintenance and cleaning......Page 22
- Disposal Page 22
- Warranty and service......Page 22
- LED Ceiling Light with Bluetooth Speaker
- - Introduction
- Intended use
- - Scope of delivery
- - Parts description
- - Technical data
- Remote control:
- Safety
- Safety information
- WARNING! DANGER TO LIFE AND RISK OF ACCIDENTS FOR INFANTS AND CHILDREN!
- Avoid the risk of fatal injury from electric shock
- WARNING!
- Prevent fire and injury hazards
- CAUTION! RISK OF BURNS DUE TO HOT SURFACES!
- Safe working
- Radio Frequency Interface Requirements – Related to European installation
- Safety instructions for batteries/rechargeable batteries
- ■ DANGER TO LIFE!
- DANGER OF EXPLOSION!
- Risk of leakage of batteries / rechargeable batteries
- WEAR PROTECTIVE GLOVES!
- Risk of damage of the product
- ● Preparation
- - Required tools and material
- - Prior to installation
- Set-up
- - Installing the light
- - Installing the wall bracket
- - Inserting / replacing batteries
- - Operating the light by switch
- • Using the remote control
- ATTENTION!
- - Switching the light on / off
- Switching the light on
- Switching the light off
- Dimming the light
- Increasing brightness
- Reducing the brightness
- minute timer
- Activating the timer
- Deactivating the timer
- - Bluetoothconnection
- Bluetooth connection
- Disconnecting Bluetooth
- Once connected you may use the following audio controls:
- • Controlling the music volume
- Lowering the music volume
- Increasing the music volume
- - Selecting a song
- Previous song
- Next song
- Pause
- ● Maintenance and cleaning
- WARNING! RISK OF ELECTRIC SHOCK!
- ●Disposal
- Environmental damage through incorrect disposal of the batteries/rechargeable batteries!
- ● Warranty and service
- ● Warranty declaration
- Serviceaddress
- - Declaration of conformity CE
- Manufacturer
Brand : Livarno Lux
Model : IAN 321923
Category : Uncategorized