
GZ 620 - Bread maker Guzzanti - Free user manual and instructions
Find the device manual for free GZ 620 Guzzanti in PDF.


| Product Type | Bread Maker |
| Brand | Guzzanti |
| Model | GZ 620 |
| Power Supply | AC 220-240V, 50/60Hz |
| Power Consumption | Approx. 600-700W |
| Programs | 19 automatic programs (Basic, Quick, Sweet, French, Whole Wheat, Rice Bread, Gluten Free, Dessert, Mix, Dough, Knead, Cake, Jam, Yogurt, Bake, Sticky Rice, Rice Wine, Defrost, Stir-Fry) |
| Loaf Sizes | 500g, 750g, 1000g |
| Crust Color Settings | Light, Medium, Dark (for programs 1-7) |
| Delay Timer | Up to 15 hours |
| Keep Warm Function | Automatic 1-hour keep warm |
| Memory Function | Resumes program within 10 min of power interruption |
| Display Type | LCD display |
| Control Panel | Buttons: Menu, Weight, Color, Timer +/-, Start/Stop |
| Bread Pan | Non-stick coating, removable |
| Kneading Blade | Single, removable, with hook |
| Accessories Included | Measuring cup (240ml), measuring spoon (15ml and 5ml ends), hook, recipe book |
| Safety Features | Overheat protection (HHH display), safety lid, grounded plug |
| Cleaning | Bread pan and kneading blade dishwasher safe; housing wipe with damp cloth |
| Weight | Approx. 5 kg |
| Dimensions (L x W x H) | Approx. 35 x 24 x 30 cm |
| Cord Length | Approx. 1 m |
| Spare Parts Availability | Contact authorized service center for replacement bread pan, kneading blade, etc. |
| Certifications | CE, WEEE compliant |
Frequently Asked Questions - GZ 620 Guzzanti
User questions about GZ 620 Guzzanti
0 question about this device. Answer the ones you know or ask your own.
Ask a new question about this device
Download the instructions for your Bread maker in PDF format for free! Find your manual GZ 620 - Guzzanti and take your electronic device back in hand. On this page are published all the documents necessary for the use of your device. GZ 620 by Guzzanti.
USER MANUAL GZ 620 Guzzanti
natural_image
Line drawing of a standard loaf of bread maker with control panel and buttons (no text or symbols)NÁVOD K OBSLUZE NÁVOD NA OBSLUHU INSTRUKCJA OBSŁUGI HASZNÁLATI ÚTMUTATÓ NAVODILA ZA UPORABO GEBRAUCHSANLEITUNG INSTRUCTION MANUAL
DŮLEŽITÉ BEZPEČNOSTNÍ POKYNY
Program 8: Dessert (dezerty)
Program 14: Yogurt (jogurt)
Program 16: Sticky rice (rýže)
natural_image
Simple line drawing of a container with liquid and a small object inside, no text or symbols present.natural_image
Symbol of a trash bin crossed with no text or numbers, representing waste sorting or disposal (no text present)RECEPTY
natural_image
Symbol of a trash bin crossed with no text or numbers, representing environmental restriction (no text present)DÔLEŽITÉ BEZPEČNOSTNÉ POKYNY
Program 8: Dessert (dezerty)
Program 14: Yogurt (jogurt)
natural_image
Simple line drawing of a container with liquid and a small object inside, no text or symbols present.natural_image
Symbol of a trash bin crossed with a diagonal line and a horizontal bar below (no text or labels)RECEPTY
natural_image
Symbol of a trash bin crossed with no text or numbers, representing waste sorting or disposal (no text present)
Program 8: Dessert (desery)
Program 14: Yogurt (jogurt)
natural_image
Simple line drawing of a container with liquid and a small object inside, no text or symbols present.natural_image
Symbol of a trash bin crossed with diagonal lines, representing waste sorting or disposal (no text or labels)PRZEPISY
natural_image
Symbol of a trash bin crossed with no text or numbers, representing environmental protection (no text present)1. Program Basic (alap)
2. Program Quick (gyors)
natural_image
Simple line drawing of a container with liquid and a small object inside, no text or symbols present.natural_image
Symbol of a trash bin crossed with two crossed lines and a solid black rectangle below (no text or labels)natural_image
Symbol of a trash bin crossed with no text or numbers, representing environmental hazard (no text present)Program 14: Yogurt (jogurt)
Program 17: Rice wine (riževo vino)
Vzhajanje in peka lepljivega riža.
natural_image
Simple line drawing of a container with liquid and a small object inside, no text or symbols present.natural_image
Symbol of a trash bin crossed with no text or numbers, representing waste sorting or restriction (no text present)| Menu Sestavine Prostornina Prostornina Prostornina Opomba | ||||||
| 1 Osnovni kruh | teža štruce | 1000 g 750 500 g | ||||
| vrstni red čas 3:05 3:00 2:55 | ||||||
| [1] voda 320 ml 260 ml 180 ml | ||||||
| [2] | sol | 2 žlici | 1,5 žlice | 1 žlica | dajte v kot | |
| [3] | sladkor | 3 merice | 2,5 merice | 2 merici | dajte v kot | |
| [4] | olje | 4 merice 3 merice 2,5 merice | ||||
| [5] | moka z visoko vsebnostjo glutena | 3,5 skodelice/ 500 g | 2,75 skodelice/ 400 g | 2,25 skodelice/ 300 g | ||
| [6] | instant kvas | 1,5 žlice | 1,25 žlice | 1,0 žlica | dajte na suho moko, ne sme priti v stik s tekočino | |
| 2 Hitri kruh | teža štruce | 1000 g | 750 g | 500 g | ||
| vrstni red čas 2:05 2:00 1:55 | ||||||
| [1] voda 320 ml 260 ml 180 ml | temperatura vode 40-50 °C | |||||
| [2] | sol | 2 žlici | 1,5 žlice | 1 žlica | dajte v kot | |
| [3] | sladkor | 3 merice | 2,5 merice | 2 merici | dajte v kot | |
| [4] | olje | 4 merice 3 merice 2,5 merice | ||||
| [5] | moka zvisoko vsebnostjo glutena | 3,5 skodelice/ 500 g | 2,75 skodelice/ 400 g | 2,25 skodelice/ 300 g | ||
| [6] | instant kvas | 3,5 lyžice | 3 lyžice | 2,5 lyžice | dajte na suho moko, ne sme priti v stik s tekočino | |
| Menu Sestavine Prostornina Prostornina Prostornina Opomba | ||||||
| 3 Sladki kruh | teža štruce | 1000 g 750 g | 500 g | |||
| vrstni red čas 3:50 3:45 3:40 | ||||||
| [1] voda 300 ml 240 ml 160 ml | ||||||
| [2] | sol | 1 žlica | 0,5 žlice | 0,5 žlice | dajte v kot | |
| [3] | sladkor | 0,4 skodelice | 0,3 skodelice | 0,2 skodelice | dajte v kot | |
| [4] | olje | 2 odmerky | 1,5 odmerky | 1 odmerka | ||
| [5] | moka z visoko vsebnostjo glutena | 4 merice 3 | merice 2,5 | merice | ||
| [6] | polnozrnata moka | 3,5 skodelice/ 500 g | 2,75 skodelice/ 400 g | 2,25 skodelice/ 300 g | ||
| [7] | instant kvas | 1,5 žlice | 1,25 žlice | 1 žlica | dajte na suho moko, ne sme priti v stik s tekočino | |
| 4 Francoski kruh | teža štruce | 1000 g 750 g | 500 g | |||
| vrstni red čas 4:05 4:00 3:55 | ||||||
| [1] voda 320 ml 260 ml 180 ml | ||||||
| [2] | sol | 3 žlice | 2,5 žlice | 2 žlici | dajte v kot | |
| [3] | sladkor | 2 merici | 1,5 merice | 1,25 merice | dajte v kot | |
| [4] | olje | 2 merici | 1,5 merice | 1,25 merice | ||
| [5] | moka z visoko vsebnostjo glutena | 3,5 skodelice/ 500 g | 2,75 skodelice/ 400 g | 2,25 skodelice/ 300 g | ||
| [6] | instant kvas | 1,5 žlice | 1,25 žlice | 1 žlica | dajte na suho moko, ne sme priti v stik s tekočino | |
| 5 Polnozmati kruh | teža štruce | 1000 g 750 g | 500 g | |||
| vrstni red čas 4:05 4:00 3:55 | ||||||
| [1] voda 320 ml 260 ml 180 ml | ||||||
| [2] | sol | 1,5 žlice | 1 žlica | 0,5 žlice | dajte v kot | |
| [3] | sladkor | 3,5 merice | 3 merice | 2,5 merice | dajte v kot | |
| [4] | olje | 3 merice | 2,5 merice | 2 merici | ||
| [5] | moka z visoko vsebnostjo glutena | 1,75 skodelice/ 250 g | 1,5 skodelice/ 210 g | 1,25 skodelice/ 160 g | ||
| [6] | polnozrnata moka | 1,75 skodelice/ 250 g | 1,5 skodelice/ 210 g | 1 skodelica/ 140 g | ||
| Menu Sestavine Prostornina Prostornina Prostornina Opomba | ||||||
| [8] instant kvas 2,0 žlice 1,5 žlice 1,25 žlice | dajte na suhomoko, ne sme priti v stik s tekočino | |||||
| 6 Rizev kruh | teža štruce | 1000 g 750 g | 500 g | |||
| vrstni red čas 2:50 2:45 2:40 | ||||||
| [1] voda 200 ml 160 ml 100 ml | ||||||
| [2] | sol | 2 žlici | 1,5 žlice | 1 žlica | dajte v kot | |
| [3] | sladkor | 3 merice | 2,5 merice | 2 merici | dajte v kot | |
| [4] | olje | 4 žlice | 3 žlice | 2,5 žlice | ||
| [5] | kuhan riž | 2 skodelice | 1,5 skodelice | 1 skodelica | ohlajen kuhan riž | |
| [6] | moka z visoko vsebnostjo glutena | 2 skodelici/ 280 g | 1,5 skodelice/ 210 g | 1 skodelica/ 140 g | ||
| [7] | instant kvas | 2 žlici | 1,5 žlice | 1,25 žlice | dajte na suhomoko, ne sme priti v stik s tekočino | |
| 7 Brezglutenski kruh | teža štruce | 1000 g | 1000 g 500 g | |||
| vrstni red čas 3:05 3:00 2:55 | ||||||
| [1] voda 270 ml 210 ml 150 ml | ||||||
| [2] | sol | 1,5 žlice | 1 žlica | 0,5 žlice | dajte v kot | |
| [3] | sladkor | 3,5 merice | 3 merice | 2,5 merice | dajte v kot | |
| [4] | olje | 3 merice | 2,5 merice | 2 merici | ||
| [5] | brezglutenska moka | 2 skodelici/ 280 g | 1,5 skodelice/ 210 g | 1 skodelica/ 140 g | ||
| [6] | koruzna moka | 2 skodelici/ 280 g | 1,5 skodelice/ 210 g | 1 skodelica/ 140 g | lahko zamenjate z ovseno moko | |
| [7] instant kvas 1,5 žlice 1,25 žlice | 1 žlica | dajte na suhomoko, ne sme priti v stik s tekočino | ||||
| 8 Desert | vrstni red čas 1:40 | |||||
| [1] | jajca 2 ks | |||||
| [2] | mleko 1 skodelica | |||||
| [3] | kuhan riž | 1,5 skodelice | ||||
| [4] | sladkor | 0,5 skodelice | ||||
| [5] | rozine | 0,5 skodelice | ||||
| Menu Sestavine Prostornina Prostornina Prostornina Opomba | ||||||
| 9 Mix | vrstni red čas 0:15 | |||||
| [1] voda 330 ml | ||||||
| [2] sol 1 žlica dajte v kot | ||||||
| [3] olje 3 merice | ||||||
| [4] | moka z visoko vsebnostjo glutena | 2 merici | ||||
| 10 Cesto | vrstni red čas | 1:30 1000 g | 1:30 750 g | |||
| [1] voda 330 ml 260 ml | ||||||
| [2] sol 1 žlica 1 žlica dajte v kot | ||||||
| [3] olje 3 merice 2,5 merice | ||||||
| [4] | moka z visoko vsebnostjo glutena | 4 skodelice/ 560 g | 2,75 skodelice/ 400 g | |||
| [5] | instant kvas | 1,5 žlice | 1,5 žlice | |||
| 11 Hnetenie | vrstni red čas 0:45 | |||||
| [1] voda | ustrezna količina | |||||
| [2] sol 1 žlica | ||||||
| [3] olje 3 merice | ||||||
| [4] | moka z visoko vsebnostjo glutena | ustrezna količina | ||||
| 12 Koláč | vrstni red čas 2:20 | sladkor raztopite v jajcih in vodi, dobro zmešajte z električnim mešalnikom, nato dodajte ostale sestavine v posodo za kruh in izberite ustrezen program. | ||||
| [1] voda 30 ml | ||||||
| [2] | jajca | 3 ks | ||||
| [3] sladkor | 0,5 skodelice | |||||
| [4] olje | 2 merici | |||||
| [5] | samokysnúca můka | 2 skodelici/ 280 g | ||||
| [6] | instant kvas | 1 žlica | ||||
| 13 Džem | vrstni red čas 1:20 | v kašasti obliki, lahko dodate vodo | ||||
| [1] | sadje | 3 skodelice | ||||
| [2] | škrob | 0,5 skodelice | ||||
| [3] sladkor 1 skodelica | ||||||
natural_image
Symbol of a trash bin crossed with no text or numbers, representing environmental hazard (no text present)Programm 8: Dessert (Desserts)
Programm 14: Yogurt (Joghurt)
Programm 17: Rice wine (Reiswein)
natural_image
Simple line drawing of a container with liquid and a small object inside, no text or symbols present.natural_image
Symbol of a trash bin crossed with a diagonal line and a horizontal bar below (no text or numbers present)natural_image
Symbol of a trash bin crossed with no text or numbers, representing environmental protection (no text present)Before using the electrical appliance, the following basic precautions should always be followed:
- Read all instructions
- Before using check that the voltage of wall outlet corresponds to the one shown on the rating plate.
-
Do not operate any appliance with a damaged cord or plug or after the appliance malfunctions, or is dropped or damaged in any manner. Return appliance to manufacturer or the nearest authorized service agent for examination, repair or electrical or mechanical adjustment.
-
Do not touch hot surfaces. Use handles or knobs.
-
To protect against electric shock do not immerse cord, plugs, or housing in water or other liquid.
-
Unplug from outlet when not in use, before putting on or taking off parts, and before cleaning.
-
Do not let cord hang over edge of table or hot surface.
-
The use of accessory not recommended by the appliance manufacturer may cause injuries.
-
This appliance is not intended for used by persons (including children) with reduced physical, sensory or mental capabilities, or lack of experience and knowledge, unless they have been given supervision or instruction concerning use of the appliances by a person responsible for their safety.
-
Children should be supervised to ensure that they do not play with the appliance.
-
Do not place on or near a hot gas or electric burner, or in a heated oven.
-
Extreme caution must be used when moving an appliance containing hot oil or other hot liquids.
-
Do not touch any moving or spinning parts of the machine when baking.
-
Never switch on the appliance without properly placed bread pan filled ingredients.
-
Never beat the bread pan on the top or edge to remove the pan, this may damage the bread pan.
-
Metal foils or other materials must not be inserted into the bread maker as this can give rise to the risk of a fire or short circuit.
-
Never cover the bread maker with a towel or any other material, heat and steam must be able to escape freely. A fire can be caused if it is covered by, or comes into contact with combustible material.
-
Turn any control to OFF, then remove plug from wall outlet.
-
Do not operate the appliance for other than its intended use.
-
This appliance has been incorporated with a grounded plug. Please ensure the wall outlet in your house is well earthed.
-
Do not use outdoors.
- Save these instructions
KNOW YOUR BREAD MAKER
(Product may be subject to change without prior notice)
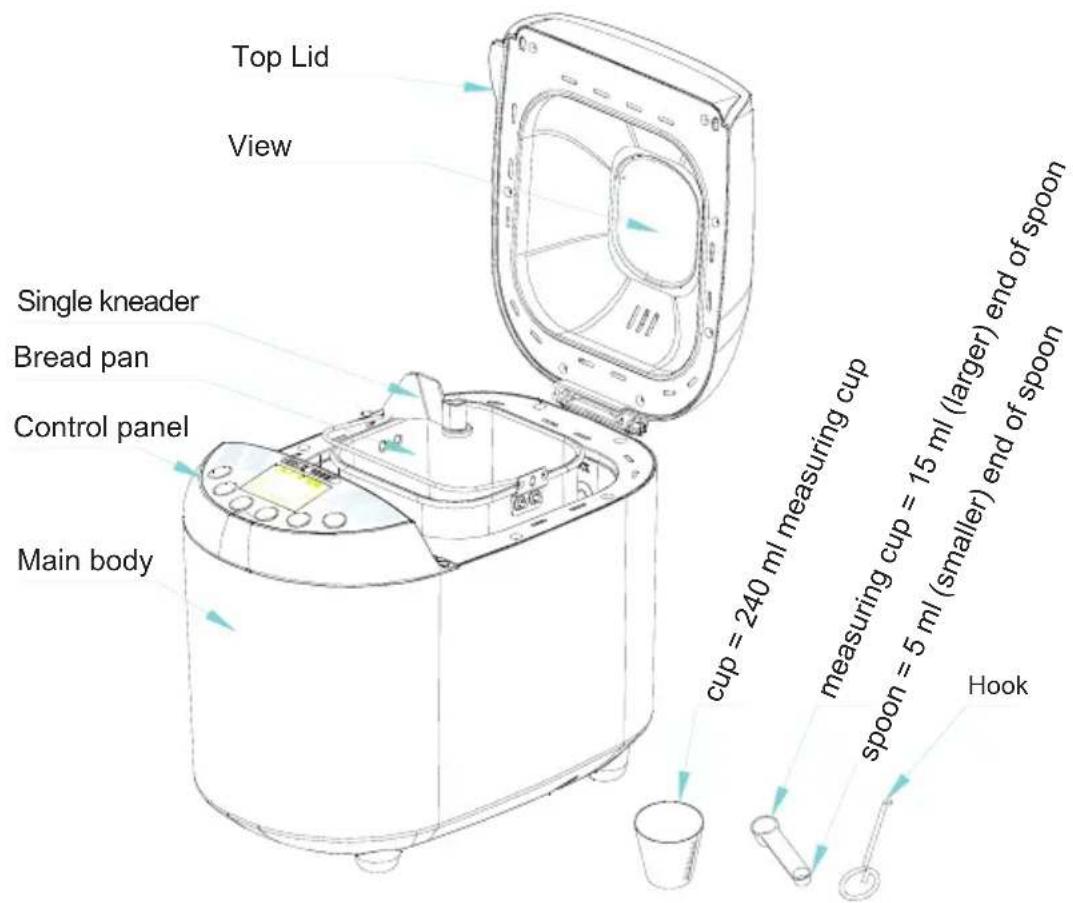
ININTRODUCCIONFOCANTOROLARANEL
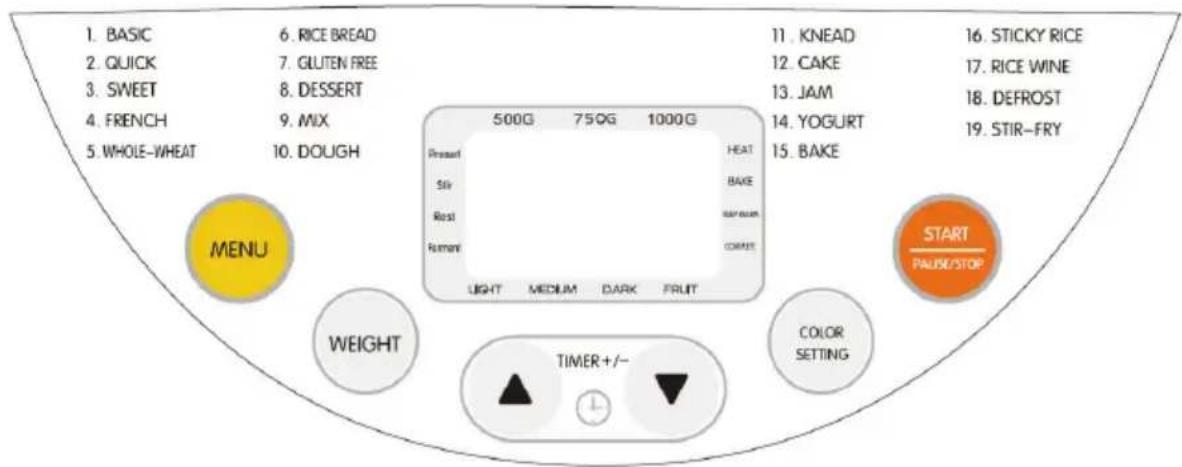
AFTER POWER-UP
As soon as the bread maker is plugged into power supply, a beep will be heard and “15:00” will be displayed. But the colon between the “3” and “00” don’t flash constantly. And “1” is the default program. The arrows point to “750g” and “MEDIUM” as they are default settings.
START/STOP
The button is used for starting and stopping the selected baking program.
To start a program, press the START/STOP button once. A short beep will be heard, the indicator will light up, and the two dots in the time display begin to flash and the program starts. Any other button is inactivated except the START/STOP button after a program has begun.
To stop the program, press the START/STOP button for approx. 3 seconds, then a beep will be heard, it means that the program has been switched off. This feature will help to prevent any unintentional disruption to the operation of program.
MENU
The MENU button is used to set different programs. Each time it is pressed (accompanied by a short beep) the program will vary. Press the button discontinuously, the 19 menus will be cycled to show on the LCD display. Select your desired program. The functions of 19 menus will be explained below.
Program 1: Basic
For white and mixed breads, it mainly consist of wheat flour or rye flour. The bread has a compact consistency. You can adjust the bread brown by setting the COLOR button.
Program 2: Quick
Kneading, rise and baking loaf within the time less than basic bread. But the bread baked on this setting is usually smaller with a dense texture.
Baking program 3: Sweet
For breads with additives such as fruit juices, grated coconut, raisins, dry fruits, chocolate or added sugar. Due to a longer phase of rising the bread will be light and airy.
Program 4: French
For light breads made from fine flour. Normally the bread is fluffy and has a crispy crust. This is not suitable for baking recipes requiring butter, margarine or milk.
Program 5: Whole Wheat
For breads with heavy varieties of flour that require a longer phase of kneading and rising (for example, whole wheat flour and rye flour). The bread will be more compact and heavy.
Program 6: Rice bread
Kneading, rise and baking loaf with the 1:1 mix of cooked rice and flour.
Program 7: Gluten free
Kneading, rise and baking GLUTEN free loaf. Normally for: gluten free flour, rice flour, sweet potato flour, corn flour and oat flour.
Program 8:Dessert
Kneading and baking those foods with more fat and protein.
Program 9: Mix
To make the flour and water or some others can well commix.
Program 10: Dough
Kneading and rise, but without baking. Remove the dough and use for making bread rolls, pizza, steamed bread, etc.
Program 11.knead
Setting the kneading time by user with different qty.
Program 12: Cake
Kneading, rise and baking, but rise with soda or baking powder.
Program 13: Jam
Boiling jams and marmalades.
Program 14: Yogurt
Rising and make the yogurt.
Program 15: Bake
For additional baking of breads that are too light or not baked through. In this program there is no kneading or raising.
Program 16: Sticky rice
Kneading and baking the mix of polished glutinous rice and rice.
Program 17: Rice wine
Rising and baking the polished glutinous rice.
Program 18: Defrost
Defrost those frost foods.
Program 19: Stir-fry
Kneading and baking some dry fruit, such as peanut, soybean etc.
COLOR
With the button you can select light, medium or dark color for the crust. This button is not applicable for the following program: Menu 9;10;11;13;15;16;17;18;19
LOAF SIZE
Select the weight (500g, 750g, 1000g). Press the LOAF SIZE button to choose your desired gross weight, see the mark beneath it for reference.
This button is only applicable for the following program: menu1-7
DELAY (▲ OR ▼)
If you want the appliance do not start working immediately you can use this button to set the delay time. You must decide how long it will be before your bread is ready by pressing the ▲ or ▼. Please note the delay time should include the baking time of program. That is, at the completion of delay time, there is hot bread can be serviced.
At first the program and degree of browning must be selected, then pressing ▲ or ▼ to increase or decrease the delay time at the increment of 10 minutes. The maximum delay is 15 hours.
Example: Now it is 8:30p.m, if you would like your bread to be ready in the next morning at 7 o'clock, i.e. in 10 hours and 30 minutes. Select your menu, color, loaf size then press the ▲ or ▼ to add the time until 10:30 appears on the LCD. Then press the START/STOP button to activate this delay program and the indicator will light up. You can see the dot flashed and LCD will count down to show the remaining time. You will get fresh bread at 7:00 in the morning, if you don't want to take out the bread immediately, the keeping warm time of 1 hour starts.
Note: For time delayed baking, do not use any easily perishable ingredients such as eggs, fresh milk, fruits, onions, etc.
KEEP WARM
Bread can be automatically kept warm for 1 hour after baking. During keeping warm, if you would like to take the bread out, switch the program off by pressing the START/STOP button.
MEMORY
If the power supply has been interrupted during the course of making bread, the process of making bread will be continued automatically within 10 minutes, even without pressing START/STOP button. If the interruption time exceeds 10 minutes, the memory cannot be kept, you must discard the ingredients in the bread pan and add the ingredients into bread pan again, and the bread maker must be restarted. But if the dough has not entered the rising phase when the power supply breaks off, you can press the START/STOP directly to continue the program from the beginning.
ENVIRONMENT
The machine may work well in a wide range of temperature, but there may be any difference in loaf size between a very warm room and a very cold room. We suggest that the room temperature should be within the range of 15^ to 34^ C.
WARNING DISPLAY
If the display shows “HHH” after you have pressed START/STOP button, (see below figure 1) the temperature inside is still too high. Then the program has to be stopped. Open the lid and let the machine cool down for 10 to 20 minutes. If the display shows “EE0” after you have pressed START/STOP button, (see below figure 2) the temperature sensor is disconnected please check the sensor carefully by Authorized expert.
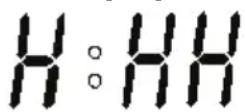
Figure 1
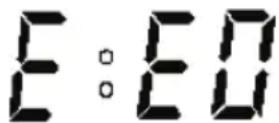
Figure 2
BEFORE THE FIRST USE
The appliance may emit a little smoke and a characteristic smell when you turn it on for the first time. This is normal and will soon stop. Make sure the appliance has sufficient ventilation.
- Unpack your appliance and check whether all parts and accessories are complete and free of damage.
- Clean all the parts according to the section "CLEANING AND MAINTENANCE".
- Set the bread maker on bake mode and bake empty for about 10 minutes. Then let it cool down and clean all the detached parts again.
- Dry all parts thoroughly and assemble them, the appliance is ready for use.
HOW TO MAKE BREAD
- Place the bread pan in position, and then turn it clockwise until they click in correct position. Fix the kneading blade onto the drive shaft. It is recommended to fill hole with heat-resisting margarine prior to place the kneading blade to avoid the dough sticking the kneading blade, also this would make the kneading blade be removed from bread easily.
- Place ingredients into the bread pan. Please keep to the order mentioned in the recipe. Usually the water or liquid substance should be put firstly, then add sugar, salt and flour, always add yeast or baking powder as the last ingredient.
Note: the quantities of flour and raising agent that may be used refer to the recipe.
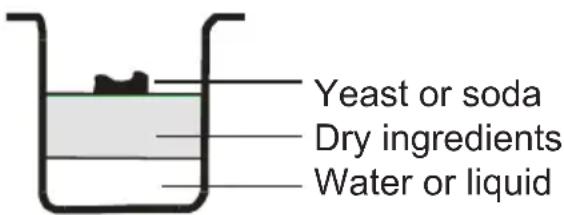
- Make a small indentation on the top of flour with finger, add yeast into the indentation, make sure it does not come into contact with the liquid or salt.
- Close the lid gently and plug the power cord into a wall outlet.
- Stlačením tlačidla MENU zvol'te požadovaný program.
- Press the MENU button until your desired program is selected.
- Press the LOAF SIZE button to select the desired size.
- Set the delay time by pressing ▲ or ▼ button. This step may be skipped if you want the bread maker to start working immediately.
- Press the START/STOP button once to start working, and the indicator will light up.
-
For the program of menu 1-7 beeps sound will be heard during operation. This is to prompt you to add ingredients. Open the Lid and put in some ingredients. It is possible that steam will escape through the vent in the lid during baking. This is normal.
-
Once the process has been completed, ten beeps will be heard. You can press START/STOP button for approx. 3 seconds to stop the process and take out the bread. Open the Lid and while using oven mitts, turn the bread pan in anti-clockwise and take out the bread pan.
Caution: the Bread pan and bread may be very hot! Always handle with care.
- Let the bread pan cool down before removing the bread. Then use non-stick spatula to gently loosen the sides of the bread from the pan.
- Turn bread pan upside down onto a wire cooling rack or clean cooking surface and gently shake until bread falls out.
- Let the bread cool for about 20 minutes before slicing. It is recommended slicing bread with electric cutter or dentate cutter, had better not with fruit knife or kitchen knife, otherwise the bread may be subject to deformation.
- If you are out of the room or have not pressed START/STOP button at the end of operation, the bread will be kept warm automatically for 1 hour, when keep warm is finished, one beep will be heard.
- When do not use or complete operation, unplug the power cord.
Note: Before slicing the loaf, use the hook to remove out the Kneading blade hidden on the bottom of loaf. The loaf is hot, never use the hand to remove the kneading blade.
Note: If bread has not been completely eaten up, advise you to store the remained bread in sealed plastic bag or vessel. Bread can be stored for about three days during room temperature, if you need storage for more days pack it with sealed plastic bag or vessel and then place it in the refrigerator, storage time is at most ten days. As bread made by ourselves does not add preservative, generally storage time is no longer than that for bread in market.
Quick breads are made with baking powder and baking soda that activated by moisture and heat. For perfect quick breads, it is suggested that all liquids be placed in the bottom of the bread pan; dry ingredients on top, During the initial mixing of quick bread batters, dry ingredients may collect in the corners of the pan, it may be necessary to help machine mix to avoid flour clumps. if so, use a rubber spatula.
CLEANING AND MAINTENANCE
Disconnect the machine from the power outlet and let it cool down before cleaning.
- Bread pan: remove the bread pan by turning it in anti-clockwise, then pulling the handle, wipe inside and outside of pan with damp clothes, do not use any sharp or abrasive agents for the consideration of protecting the non-stick coating. The pan must be dried completely before installing.
Note: Insert the bread pan and press down until it fixed in correct position. If it cannot be inserted, adjust the pan lightly to make it is on the correct position then turn it in clockwise.
- Kneading blade: If the kneading blade is difficult to remove from the bread, use the hook. Also wipe the blade carefully with a cotton damp cloth. Both the bread pan and kneading blade are dishwashing safe components.
- Housing: gently wipe the outer surface of housing with a wet cloth. Do not use any abrasive cleaner for cleaning, as this would degrade the high polish of the surface. Never immerse the housing into water for cleaning.
Note: It is suggested not disassembling the lid for cleaning.
- Before the bread maker is packed for storage, ensure that it has completely cooled down, clean and dry, and the lid is closed.
INTRODUCTION OF BREAD INGREDIENTS
1. Bread flour
Bread flour has high content of high gluten (so it can be also called high-gluten flour which contains high protein), it has good elastic and can keep the size of the bread from collapsing after rise. As the gluten content is higher than the common flour, so it can be used for making bread with large size and better inner fiber.
Bread flour is the most important ingredient of making bread.
2. Plain flour
Flour that contains no baking powder, it is applicable for making express bread.
3. Whole-wheat flour
Whole-wheat flour is ground from grain. It contains wheat skin and gluten. Whole-wheat flour is heavier and more nutrient than common flour. The bread made by whole-wheat flour is usually small in size. So many recipes usually combine the whole -wheat flour or bread flour to achieve the best result.
4. Black wheat flour
Black wheat flour, also named as “rough flour”, it is a kind of high fiber flour, and it is similar with whole-wheat flour. To obtain the large size after rising, it must be used in combination with high proportion of bread flour.
5. Self-rising flour
A type of flour that contains baking powder, it is used for making cakes specially.
6. Corn flour and oatmeal flour
Corn flour and oatmeal flour are ground from corn and oatmeal separately. They are the additive ingredients of making rough bread, which are used for enhancing the flavor and texture.
7. Sugar
Sugar is very important ingredient to increase sweet taste and color of bread. And it is also considered as nourishment in the yeast bread. White sugar is largely used. Brown sugar, powder sugar or cotton sugar may be called by special requirement.
8. Yeast
After yeasting process, the yeast will produce carbon dioxide. The carbon dioxide will expand bread and make the inner fiber soften. However, yeast fast breeding needs carbohydrate in sugar and flour as nourishment.
1 tbsp dry yeast =3 tsp dry yeast
1 tbsp dry yeast = 15ml
1 tsp dry yeast =5ml
Yeast must be stored in the refrigerator, as the fungus in it will be killed at high temperature, before using, check the production date and storage life of your yeast. Store it back to the refrigerator as soon as possible after each use. Usually the failure of bread rising is caused by the bad yeast.
The ways described below will check whether your yeast is fresh and active.
(1) Pour 1/2 cup warm water (45-500C) into a measuring cup.
(2) Put 1 tsp. white sugar into the cup and stir, then sprinkle 2 tsp. yeast over the water.
(3) Place the measuring cup in a warm place for about 10min. Do not stir the water.
(4) The froth should be up to 1 cup. Otherwise the yeast is dead or inactive.
9. Salt
Salt is necessary to improve bread flavor and crust color. But salt can also restrain yeast from rising. Never use too much salt in a recipe. But bread would be larger if without salt.
10. Egg
Eggs can improve bread texture, make the bread more nourish and large in size, the egg must be peeled and stirred evenly.
11. Grease, butter and vegetable oil
Grease can make bread soften and delay storage life. Butter should be melted or chopped to small particles before using.
12. Baking powder
Baking powder is used for rising the Ultra Fast bread and cake. As it does not need rise time, and it can produce the air, the air will form bubble to soften the texture of bread utilizing chemical principle.
13. Soda
It is similar with baking powder. It can also used in combination with baking powder.
14. Water and other liquid
Water is essential ingredient for making bread. Generally speaking, water temperature between 200C and 250C is the best. The water may be replaced with fresh milk or water mixed with 2% milk powder, which may enhance bread flavor and improve crust color. Some recipes may call for juice for the purpose of enhancing bread flavor, e.g. apple juice, orange juice, lemon juice and so on.
INGREDIENTS MEASUREMENT
One of important step for making good bread is proper amount of ingredients. It is strongly suggested that use measuring cup or measuring spoon to obtain accurate amount, otherwise the bread will be largely influenced.
1. Weighing liquid ingredients
Water, fresh milk or milk powder solution should be measured with measuring cups. Observe the level of the measuring cup with your eyes horizontally. When you measure cooking oil or other ingredients, clean the measuring cup thoroughly without any other ingredients.
2. Dry measurements
Dry measuring must be done by gently spooning ingredients into the measuring cup and then once filled, leveling off with a knife. Scooping or tapping a measuring cup with more than is required. This extra amount could affect the balance of the recipe. When measuring small amounts of dry ingredients, the measuring spoon must be used. Measurements must be level, not heaped as this small difference could throw out the critical balance of the recipe.
3. Adding sequence
The sequence of adding ingredients should be abided, generally speaking, the sequence is: liquid ingredient, eggs, salt and milk powder etc. When adding the ingredient, the flour can't be wet by liquid completely. The yeast can only be placed on the dry flour. And yeast can't touch with salt. After the flour has been kneaded for some time and a beep will prompt you to put fruit ingredients into the mixture. If the fruit ingredients are added too early, the flavor will be diminished after long time mixing. When you use the delay function for a long time, never add the perishable ingredients such as eggs, fruit ingredient.
TROUBLE SHOOTING
| NO. | PROBLEM CAUSE SOLUTION | ||
| 1 | Smoke from ventilation hole when baking | Some ingredients adhere to the heat element or nearby, for the first use, oil remained on the surface of heat element | Unplug the bread maker and clean the heat element, but be careful not to burn you, during the first use, dry operating and open the lid. |
| 2 | Bread bottom crust is too thick | Keep bread warm and leave bread in the bread pan for a long time so that water is losing too much | Take bread out soon without keeping it warm |
| 3 | It is very difficult to take bread out | Kneider adheres tightly to the shaft in bread pan | After taking bread out, put hot water into bread pan and immerge kneader for 10 minutes, then take it out and clean. |
| 4 | Stir ingredients not evenly and bake badly | 1.selected program menu is improper | Select the proper program menu |
| 2.after operating, open cover several times and bread is dry, no brown crust color | Don't open cover at the last rise | ||
| 3.Stir resistance is too large so that kneader almost can't rotate and stir adequately | Check kneader hole, then take bread pan out and operate without load, if not normal, contact with the authorized service facility. | ||
| 5 | Display “HHH” after pressing START/STOP button | The temperature in bread maker is too high to make bread. | Press START/STOP button and unplug bread maker, then take bread pan out and open cover until the bread maker cools down |
| 6 | Hear the motor noises but dough isn't stirred | Bread pan is fixed improperly or dough is too large to be stirred | Check whether bread pan is fixed properly and dough is made according to recipe and the ingredients is weighed accurately |
| 7 Bread size is so large as to push cover | Yeast is too much or flour is excessive or water is too much or environment temperature is too high | Check the above factors, reduce properly the amount according to the true reasons |
| 8 Bread size is too small or bread has no rise | No yeast or the amount of yeast is not enough, moreover, yeast may have a poor activity as water temperature is too high or yeast is mixed together with salt, or the environment temperature is lower. | Check the amount and performance of yeast, increase the environment temperature properly. |
| 9 Dough is so large to overflow bread pan | The amount of liquids is so much as to make dough soft and yeast is also excessive. | Reduce the amount of liquids and improve dough rigidity |
| 10 Bread collapses in the middle parts when baking dough | 1. used flour is not strong powder and can't make dough rise | Use bread flour or strong powder. |
| 2. yeast rate is too rapid or yeast temperature is too high | Yeast is used under room temperature | |
| 3. Excessive water makes dough too wet and soft. | According to the ability of absorbing water, adjust water on recipe | |
| 11 Bread weight is very large and organization construct is too dense | 1. Too much flour or short of water | Reduce flour or increase water |
| 2. Too many fruit ingredients or too much whole wheat flour | Reduce the amount of corresponding ingredients and increase yeast | |
| 12 Middle parts are hollow after cutting bread | 1. Excessive water or yeast or no salt | Reduce properly water or yeast and check salt |
| 2. water temperature is too high | Check water temperature | |
| 13. Bread surface is adhered to dry powder | 1. There is strong glutinosity ingredients in bread such as butter and bananas etc. | Do not add strong glutinosity ingredients into bread. |
| 2. Stir not adequately for short of water | Check water and mechanical construct of bread maker | |
| 14 Crust is too thick and baking color is too dark when making cakes or food with excessive sugar | Different recipes or ingredients have great effect on making bread, baking color will become very dark because of much sugar | If baking color is too dark for the recipe with excessive sugar, press START/STOP to interrupt the program ahead 5-10min of intended finishing time. Before removing out the bread you should keep the bread or cake in bread pan for about 20 minutes with cover closed |
ENVIRONMENT FRIENDLY DISPOSAL
natural_image
Symbol of a trash bin crossed with a diagonal line and a horizontal bar below (no text or labels)You can help protect the environment!
Please remember to respect the local regulations: hand in the non-working electrical equipments to an appropriate waste disposal center.
RECIPE
| Menus Ingredient Volume Volume Volume Remark | ||||||
| 1 Basic Bread | bread weight | 1000 g 750 500 g | ||||
| sequence time 3:05 3:00 | 2:55 | |||||
| [1] water 320 ml 260 ml 180 ml | ||||||
| [2] | salt | 2 spoons | 1.5 spoons | 1 spoon | put on the corner | |
| [3] | sugar | 3 scoops | 2.5 scoops | 2 scoops | put on the corner | |
| [4] | oil | 4 scoops | 3 scoops 2.5 scoops | |||
| [5] | high gluten flour | 3.5cups/500g | 2.75cups/400g | 2.25cups/300g | ||
| [6] instant yeast | 1.5 spoons | 1.25 spoons | 1.0 spoon | put on the dry flour, don't touch with any liquid | ||
| 2 Quick Bread | bread weight | 1000 g 750 g | 500 g | |||
| sequence time 2:05 2:00 | 1:55 | |||||
| [1] water 320 ml 260 ml 180 ml | water temperature 40-50°C | |||||
| [2] salt | 2 spoons | 1.5 spoons | 1spoon put on the corner | |||
| [3] | sugar | 3 scoops | 2.5 scoops | 2 scoops | put on the corner | |
| [4] | oil | 4 scoops | 3 scoops 2.5 scoops | |||
| [5] | high gluten flour | 3.5cups/500g | 2.75cups/400g | 2.25cups/300 | ||
| [6] | instant yeast | 3.5 spoons | 3 spoons | 2.5 spoons | put on the dry flour,don't touch with any liquid | |
| 3 Sweet bread | bread weight | 1000 g 750 g 500 g | ||||
| sequence time 3:50 3:45 | 3:40 | |||||
| [1] water 300 ml 240 ml 160 ml | ||||||
| [2] salt | 1spoon | 0.5 spoon 0.5 | spoon put | on the corner | ||
| [3] | sugar | 0.4 cup | 0.3 cup | 0.2 cup | put on the corner | |
| [4] | oil 2 scoops | 1.5 scoops | 1 scoop | |||
| [5] | high gluten flour | 4 scoops | 3 scoops 2.5 | scoops | ||
| [6] | whole-wheat bread | 3.5cups/500g | 2.75cups/400g | 2.25cups/300g | ||
| [7] instant yeast 1.5 | spoons 1.25 | spoons 1spoon | put on the dry flour, don't touch with any liquid | |||
| 4 French Bread | bread weight | 1000 g 750 g 500 g | ||||
| sequence time 4:05 4:00 | 3:55 | |||||
| [1] water 320 ml 260 ml 180 ml | ||||||
| [2] | salt | 3 spoons | 2.5 spoons | 2 spoons | put on the corner | |
| [3] | sugar | 2 scoops | 1.5 scoops | 1.25 scoops | put on the corner | |
| [4] | oil 2 scoops | 1.5 scoops | 1.25 scoops | |||
| [5] | high gluten flour | 3.5cups/500g | 2.75cups/400g | 2.25cups/300g | ||
| [6] instant yeast 1.5 | spoons 1.25 | spoons 1spoon | put on the dry flour, don't touch with any liquid | |||
| 5 Whole-wheat bread | bread weight | 1000 g 750 g 500 g | ||||
| sequence time 4:05 4:00 | 3:55 | |||||
| [1] water 320 ml 260 ml 180 ml | ||||||
| [2] | salt | 1.5 spoons | 1spoon | 0.5 spoon | put on the corner | |
| [3] | sugar | 3.5 scoops | 3 scoops | 2.5 scoops | put on the corner | |
| [4] | oil | 3 scoops | 2.5 scoops | 2 scoops | ||
| [5] | high gluten flour | 1.75cups/250g | 1.5cups/210g | 1.25cups/160g | ||
| [6] | whole-wheat flour | 1.75cups/250g | 1.5cups/210g | 1cups/140g | ||
| [7] | instant yeast | 2.0 spoons | 1.5 spoons | 1.25 spoons | put on the dry flour, don't touch with any liquid | |
| 6 Rice bread | bread weight | 1000 g 750 g 500 g | ||||
| sequence time 2:50 2:45 | 2:40 | |||||
| [1] water 200 ml 160 ml | 100 ml | |||||
| [2] salt | 2 spoons 1.5 spoons | 1 spoon | put on the corner | |||
| [3] | sugar | 3 scoops | 2.5 scoops | 2 scoops | put on the corner | |
| [4] | oil 4 spoons | 3 spoons | 2.5 spoons | |||
| [5] cooked rice | 2 cups | 1.5 cups | 1 cup | cup | use cool downed cooked rice | |
| [6] | high gluten flour | 2 cups/280g | 1.5 cups/210g | 1 cup/140g | ||
| [7] instant yeast | 2 spoons | 1.5 spoons | 1.25 spoons | put on the dry flour, don't touch with any liquid | ||
| 7 Gluten free bread | bread weight | 1000 g | 1000 g 500 g | |||
| sequence time 3:05 3:00 | 2:55 | |||||
| [1] water 270 ml 210 ml | 150 ml | |||||
| [2] | salt | 1.5 spoons | 1spoon | 0.5spoon | put on the corner | |
| [3] | sugar | 3.5 scoop | 3 scoop | 2.5 scoop | put on the corner | |
| [4] | oil 3 scoops | 2.5 scoops | 2 scoops | |||
| [5] | gluten free flour | 2 cups/280g | 1.5 cups/210g | 1 cup/140g | ||
| [6] corn | powder | 2 cups/280g | 1.5 cups/210g | 1 cup/140g | môžete nahradi'ovsenou múkou | |
| [7] | instant yeast | 1.5 spoons | 1.25 spoons | 1 spoon | put on the dry flour, don't touch with any liquid | |
| 8 Dessert | sequence time 1:40 | |||||
| [1] egg | 2 pcs | |||||
| [2] milk | 1 cups | |||||
| [3] cooked rice | 1.5 cups | |||||
| [4] sugar | 0.5 cups | |||||
| [5] raisin | 0.5 cups | |||||
| Menus Ingredient Volume Volume | ||||||
| 9 Mix | sequence time 0:15 | |||||
| [1] water 330ml | ||||||
| [2] salt 1spoon put on the corner | ||||||
| [3] oil 3 scoops | ||||||
| [4] high gluten flour | 4 cups/560g | |||||
| 10 Dough | sequence time | 1:301000 g | 1:30750 g | |||
| [1] water 330 ml 260 ml | ||||||
| [2] salt 1spoon 1spoon | put on the corner | |||||
| [3] oil 3 scoops 2.5 scoops | ||||||
| [4] high gluten flour | 4cups/560g | 2.75cups/400g | ||||
| [5] instant yeast 1.5 | spoons 1.5 | spoons | put on the dry flour, don't touch with any liquid | |||
| 11 Knead | sequence time 0:45 | |||||
| [1] water | appropriate amount | |||||
| [2] salt 1spoon | ||||||
| [3] oil 3scoop | ||||||
| [4] high gluten flour | appropriate amount | |||||
| 12 Cake | sequence time 2:20 | Dissolve sugar in egg and water, mix well by electric egg-beater to as a bulk, then put the other ingredients together into bread barrel, then start this menu. | ||||
| [1] water 30 ml | ||||||
| [2] egg 3 ks | ||||||
| [3] sugar 0.5cups | ||||||
| [4] oil 2scoop | ||||||
| [5] self-rising flour | 2cups/280g | |||||
| [6] instant yeast 1spoon | ||||||
| 13 Jam | sequence time 1:20 | stir to mushy, can put some water or not up to flavor | ||||
| [1] pulp 3 cups | ||||||
| [2] starch 0.5cups | ||||||
| [3] sugar 1cups | ||||||
| Menus Ingredient Volume Volume Volume Remark | ||||||
| 14Yogurt | sequence time 8:00 | |||||
| [1] milk | 1000ml | |||||
| [2] | lactic acid bacteria | 100ml | ||||
| 15Bake | [1] | adjust baking temperature by pressing crust button:100°C (light); 150°C (medium); 200°C (dark), default 150 °C | ||||
| 16 Sticky rice cake | sequence time 1:20 | With bake and stir functions, soak glutinous rice 30mins before use. | ||||
| [1] water 275ml | ||||||
| [2] | glutinous rice | 250g | ||||
| 17 Rice wine | sequence time 36:00:00 | soak in water 30mins before use | ||||
| [1] | glutinous rice | 500g | ||||
| [2] water | appropriate amount | |||||
| [3] | distiller's yeast | 1spoon(3g) | ||||
| 18Defrost | sequence time 0:30 | |||||
| [1] | ||||||
| [2] default 30 mins; adjustable from 0:10 to 2:00, 10 mins for each pressing | ||||||
| [3] | ||||||
| 19Stir-fry | sequence time 0:30 | |||||
| [1] peanuts 300 g | ||||||
| [2] | default 0:30; adjustable from 0:10 to 2:00, +/-1min for each short-pressing, +/- 10mins for each long-pressing | |||||
DISPOSAL OF USED ELECTRICAL AND ELECTRONIC EQUIPMENT
natural_image
Symbol of a trash bin crossed with no text or numbers, representing environmental restriction (no text present)This symbol on products or original documents means that used electric or electronic products must not be added to ordinary municipal waste. For proper disposal, renewal and recycling hand over these appliances to determined collection points. Alternatively, in some European Union states or other European countries you may return your appliances to the local retailer when buying an equivalent new appliance. Correct disposal of this product helps save valuable natural resources and prevents potential negative effects on the environment and human health, which could result from improper waste disposal. Ask your local authorities or collection facility for more details. In accordance with national regulations penalties may be imposed for the incorrect disposal of this type of waste.
For business entities in European Union states
If you want to dispose of electric or electronic appliances, ask your retailer or supplier for the necessary information.
Disposal in other countries outside the European Union.
This symbol is valid in the European Union. If you wish to dispose of this product, request the necessary information about the correct disposal method from the local council or from your retailer.


- DŮLEŽITÉ BEZPEČNOSTNÍ POKYNY
- Program 8: Dessert (dezerty)
- Program 14: Yogurt (jogurt)
- Program 16: Sticky rice (rýže)
- DÔLEŽITÉ BEZPEČNOSTNÉ POKYNY
- Program 8: Dessert (desery)
- Program Basic (alap)
- Program Quick (gyors)
- Program 17: Rice wine (riževo vino)
- Programm 8: Dessert (Desserts)
- Programm 14: Yogurt (Joghurt)
- Programm 17: Rice wine (Reiswein)
- KNOW YOUR BREAD MAKER
- AFTER POWER-UP
- START/STOP
- MENU
- Program 1: Basic
- Program 2: Quick
- Baking program 3: Sweet
- Program 4: French
- Program 5: Whole Wheat
- Program 6: Rice bread
- Program 7: Gluten free
- Program 8:Dessert
- Program 9: Mix
- Program 10: Dough
- Program 11.knead
- Program 12: Cake
- Program 13: Jam
- Program 14: Yogurt
- Program 15: Bake
- Program 16: Sticky rice
- Program 17: Rice wine
- Program 18: Defrost
- Program 19: Stir-fry
- COLOR
- LOAF SIZE
- DELAY (▲ OR ▼)
- KEEP WARM
- MEMORY
- ENVIRONMENT
- WARNING DISPLAY
- BEFORE THE FIRST USE
- HOW TO MAKE BREAD
- Caution: the Bread pan and bread may be very hot! Always handle with care.
- Note: Before slicing the loaf, use the hook to remove out the Kneading blade hidden on the bottom of loaf. The loaf is hot, never use the hand to remove the kneading blade.
- CLEANING AND MAINTENANCE
- INTRODUCTION OF BREAD INGREDIENTS
- Bread flour
- Plain flour
- Whole-wheat flour
- Black wheat flour
- Self-rising flour
- Corn flour and oatmeal flour
- Sugar
- Yeast
- Salt
- Egg
- Grease, butter and vegetable oil
- Baking powder
- Soda
- Water and other liquid
- INGREDIENTS MEASUREMENT
- Weighing liquid ingredients
- Dry measurements
- Adding sequence
- TROUBLE SHOOTING
- ENVIRONMENT FRIENDLY DISPOSAL
- RECIPE
- DISPOSAL OF USED ELECTRICAL AND ELECTRONIC EQUIPMENT
- For business entities in European Union states
- Disposal in other countries outside the European Union.
Brand : Guzzanti
Model : GZ 620
Category : Bread maker