
Senior T2 - Media player TESLA - Free user manual and instructions
Find the device manual for free Senior T2 TESLA in PDF.


| Product Type | DVB-T2 Digital Terrestrial Receiver |
| Brand | Tesla |
| Model | Senior T2 |
| Video Decoding | MPEG-2, MPEG-4, H.264, H.265 (HEVC) |
| Maximum Resolution | Full HD 1080p |
| Channel Memory | Up to 800 TV and radio stations |
| Favorite Groups | 8 groups |
| Parental Lock | Yes, with password (default: 0000) |
| Electronic Program Guide (EPG) | 7-day EPG |
| Time Shift | Yes, with USB storage |
| PVR (Personal Video Recorder) | Yes, via USB |
| USB Interface | USB 2.0 Host port (front) |
| Video Outputs | HDMI, SCART |
| Audio Outputs | Coaxial digital audio, SCART, HDMI |
| Network Connection | Ethernet (LAN) port |
| Antenna Input | F-type female, 75Ω |
| Power Supply | DC 12V, 1A (adapter included) |
| Remote Control | Two included: full-featured and Senior (large buttons) |
| Batteries for Remote | 2 x AAA (included) |
| Languages Supported | Multilingual menu and audio |
| Safety | Do not open; risk of electric shock. Use only supplied adapter. |
| Cleaning | Wipe with a dry, soft cloth. Do not use liquids or solvents. |
| Operating Temperature | 0°C to 40°C (estimated) |
Frequently Asked Questions - Senior T2 TESLA
User questions about Senior T2 TESLA
0 question about this device. Answer the ones you know or ask your own.
Ask a new question about this device
Download the instructions for your Media player in PDF format for free! Find your manual Senior T2 - TESLA and take your electronic device back in hand. On this page are published all the documents necessary for the use of your device. Senior T2 by TESLA.
USER MANUAL Senior T2 TESLA
PŘED POUŽITÍM SI PEČLIVĚ PŘEČTĚTE TUTO PŘÍRUČKU.
OBSAH
2. PŘEHLED
PRED POUŽITÍM SI POZORNE PREČÍTAJTE TÚTO PRÍRUČKU.
OBSAH
1. VŠEOBECNÉ VLASTNOSTI 29
2. PREHL'AD 30
2.1. Predná strana prijímača 30
2. PREHL'AD
P- Zmena staníc vzad
OK Potvrdenie vol'by či zobrazenia zoznamu staníc
TV/RADIO Prepína medzi TV a Radio programami
PLEASE READ THIS MANUAL CAREFULLY BEFORE USE.
Technical specifications and operating procedures in this manual are subject to change without notice.
In case of any questions regarding the period of use, please contact the manufacturer.

DEAR CUSTOMER,
Thank you for purchasing a product from the proven TESLA brand.
Please read this manual carefully before first use. It will be a good guide when getting to know your new device.
We hope that STB TESLA will be a pleasant companion for you. The data and advice used in this manual may be subject to future changes and improvements and are valid until the release of its current version, in January 2023.
Thank you for your understanding.
Full HD
1080
H.265
HEVC
DVB T
DV3T2

TIME SHIFT

SCART
HDMI


USB PVR

-
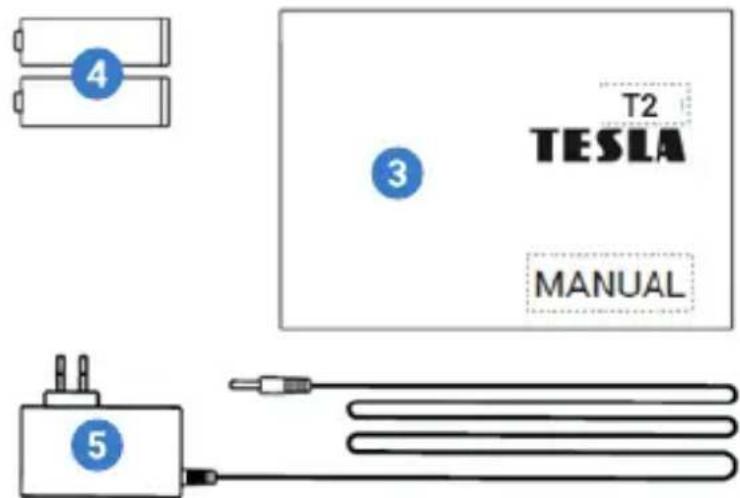
Apparatus
-
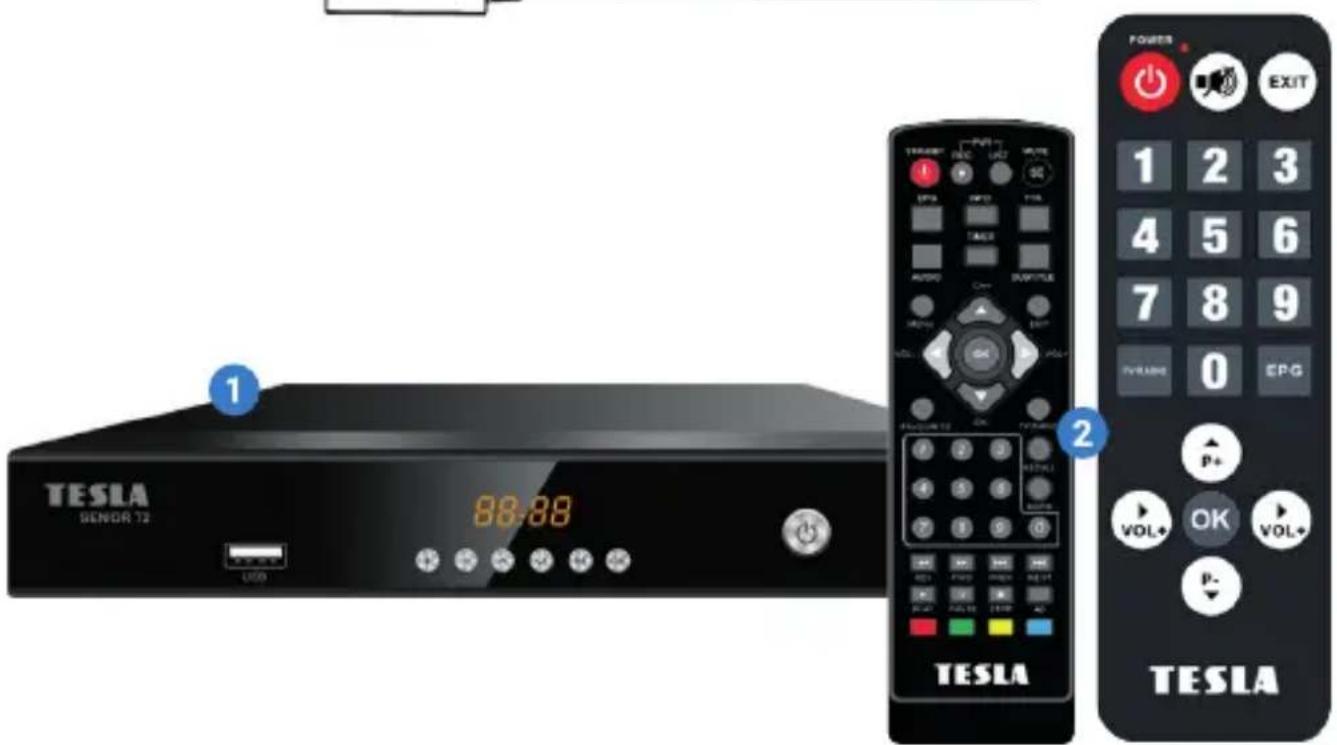
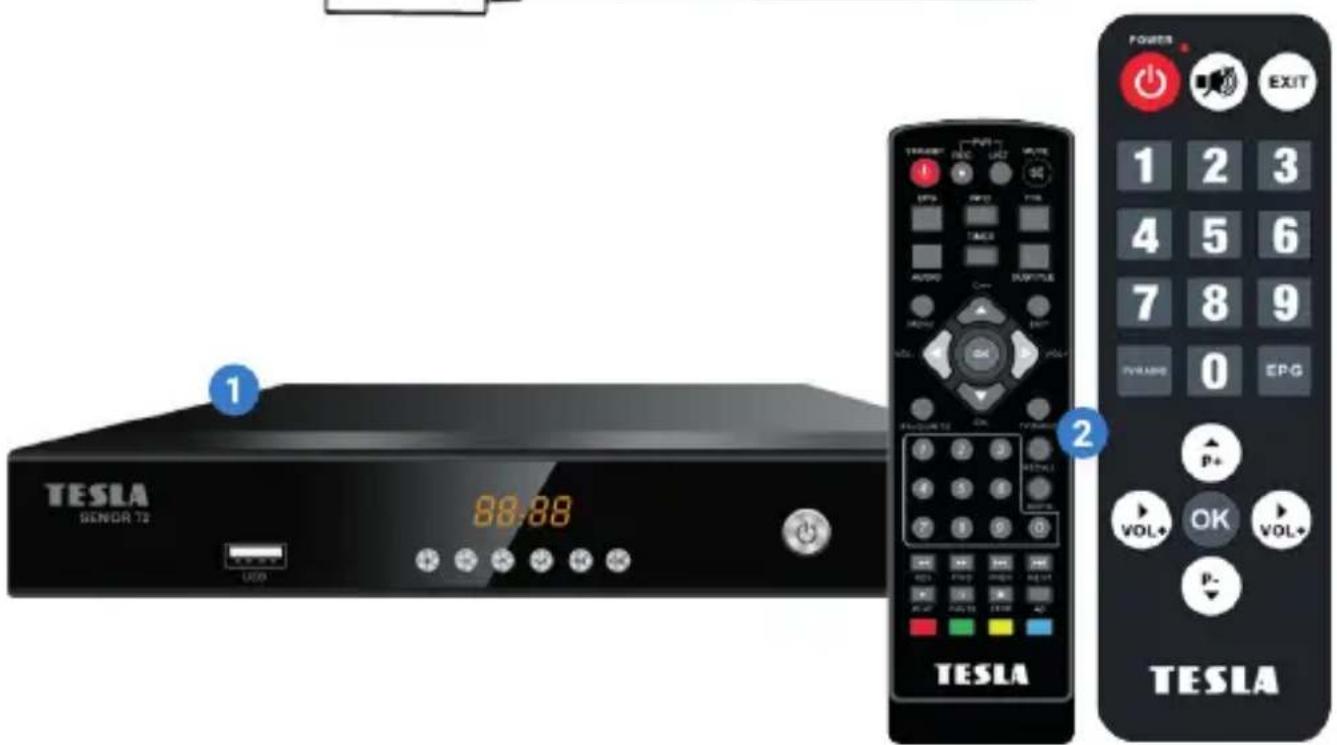
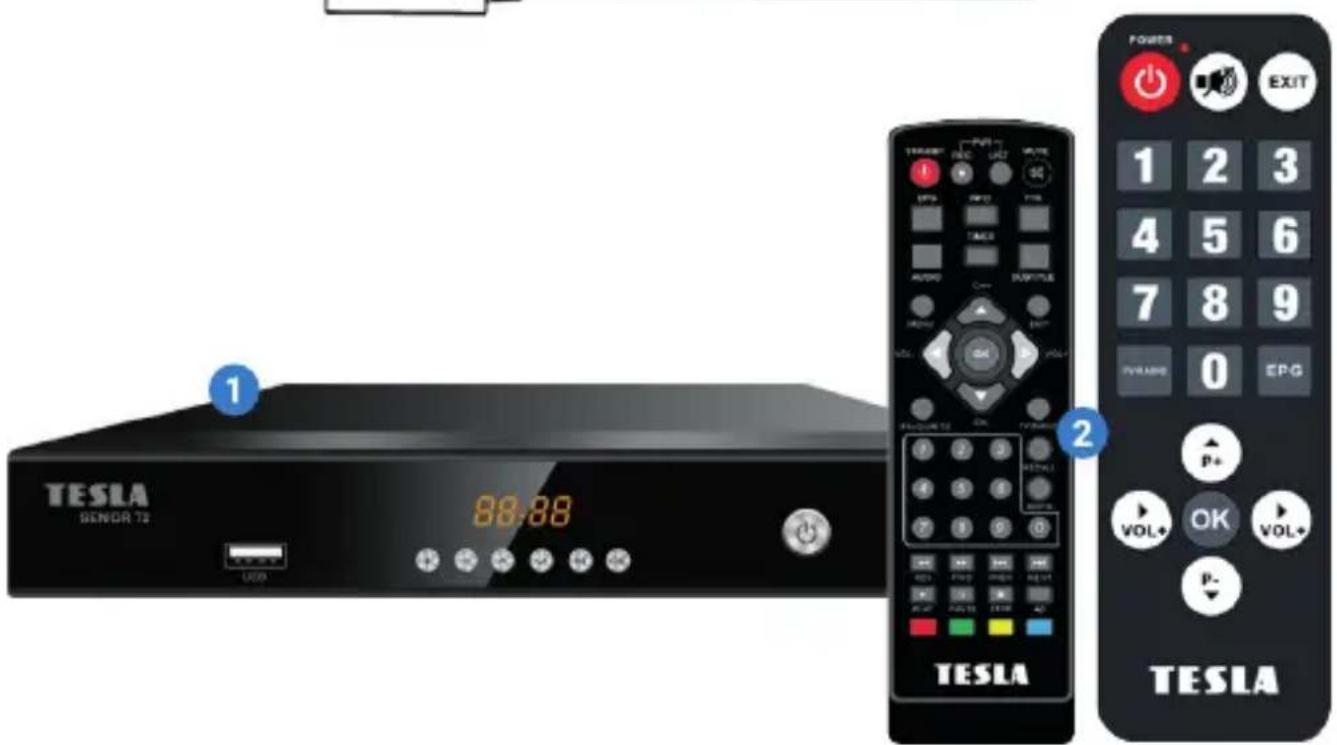
Remote control Senior - large with large buttons and Remote control full-sized
-
Operating Instructions
-
2 x AAA batteries
-
Power adapter
CONTENT
1. GENERAL PROPERTIES 52
2. OVERVIEW 53
2.1. Front side of the receiver 53
2.2. The back of the receiver 53
2.3. Full-featured remote control 54
2.3.1. Remote control Senior 55
3. INSTALLATION GUIDE 56
4. RECEIVER MENU 56
5. CHANNEL LIST 57
5.1. TV channel list 57
5.2. Radio channel list 57
5.3. Parental lock 57
6. CHANNEL SEARCH 58
6.1. Automatic search 58
6.2. Manual search 58
6.3. Region 58
6.4. Antenna power supply 5V 59
6.5. LCN - logical station numbering 59
6.6. Only unscrambled FTA stations 59
7. LANGUAGE 60
7.1. The first sound 60
7.2. The second sound 60
7.3. Subtitle language 60
7.4. Teletext 60
8. AV SETTINGS 61
8.1. TV standard 61
8.2. Output video resolution 61
8.3. Aspect ratio of the image 61
8.4. Image editing 61
8.5. SCART output 62
8.6. Digital audio output 62
8.7. Audio description for blind AD 62
8.8. AD sound volume 62
OBSAH
9. TIME 63
9.1. Use GMT time 63
9.2. GTM correction 63
9.3. Summer time 63
9.4. Date 63
9.5.Time 63
10. SYSTEM 64
10.1. Information 64
10.2. Factory settings 64
10.3. Timer setting 64
10.4. OSD settings 65
10.5. USB update and backup 65
10.6. CEC Switch 65
11. MULTIMEDIA 66
11.1. Music 66
11.2. Picture 66
11.3. Movie 66
11.4. Record manager 66
11.5. Recond DVR configuration 66
11.6. Storage format 66
12. NETWORK 67
12.1. Network settings 67
12.2. Online application 67
12.3. Update from the network 67
1. GENERAL PROPERTIES
• DVB-T2 compatible (MPEG-II / MPEG-IV / H.264/H.265)
• Memory for 800 stations
• Support for 8 favourite groups and parental lock
• Multilingual menu support
• Multilingual audio support
• DVB Subtitles support
• 7-day electronic program guide (EPG)
- Teletext output via VBI and OSD
- USB 2.0 interface
2. OVERVIEW
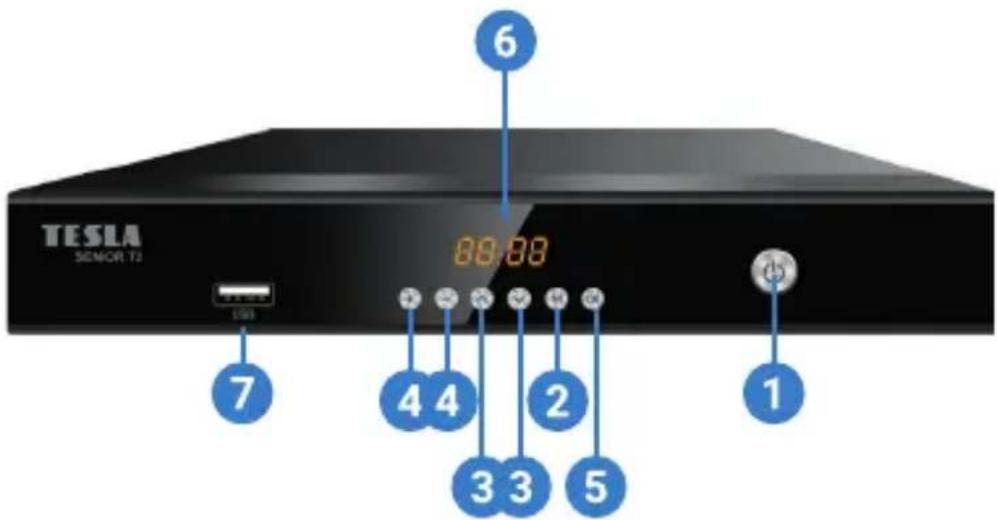
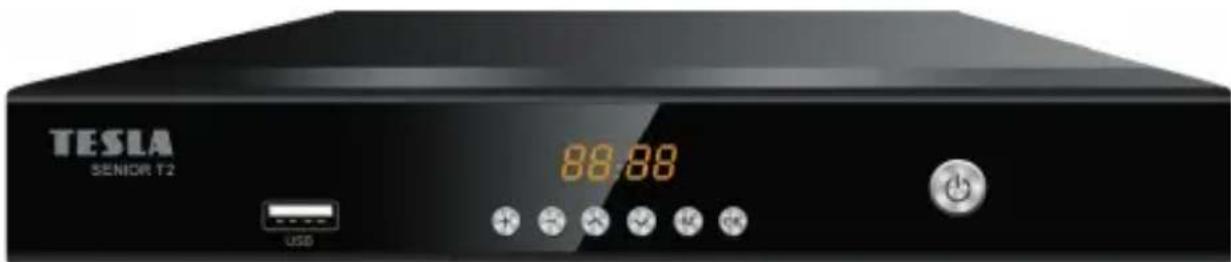
2.1. Front side of the receiver
1) POWER: Switch the receiver between operating and standby mode.
2) MENU: Displays the receiver menu.
3) P+/P-: Change the station or change the item in the menu of the receiver.
4) VOL+/-: Increase/decrease the volume.
5) OK: Confirm the selection or display the list of stations.
6) DISPLAY: Displays the number of the selected station. Shows local time in standby mode.
7) HOSTITELSKÝ PORT USB 2.0: USB2.0 port for connecting storage.
2.2. The back of the receiver
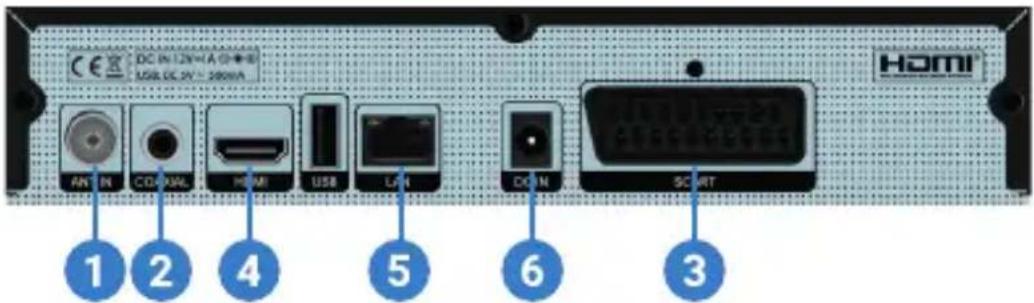
1) ANT IN: Connector for connecting the antenna.
2) COAXIAL: Digital audio output.
3) TV SCART: Analog way of connecting to the TV using a SCART cable.
4) HDMI: Connect to TV with HDMI cable.
5) LAN: Used to connect to the Internet using an Ethernet-LAN cable.
6) DC 12V: Connect the 12V power adapter.
2. OVERVIEW
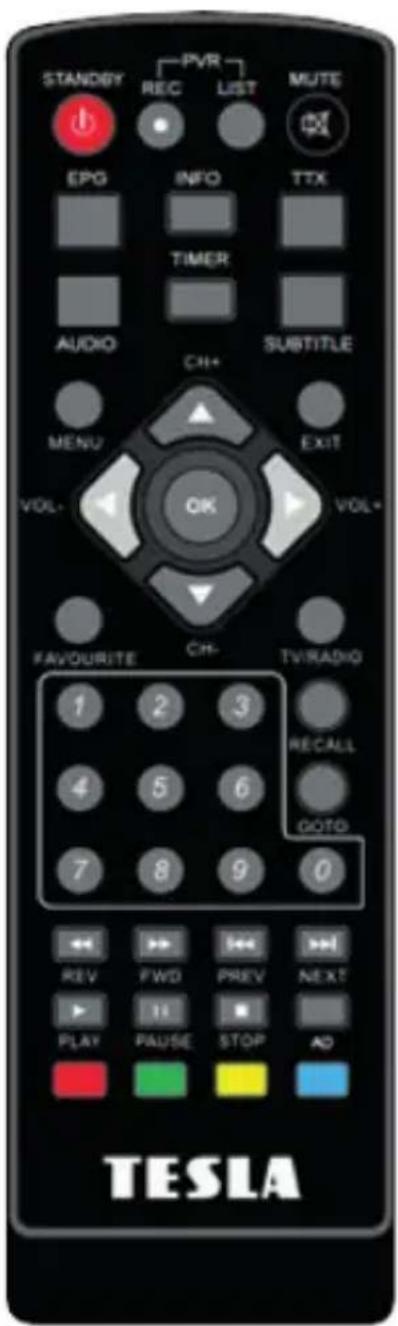
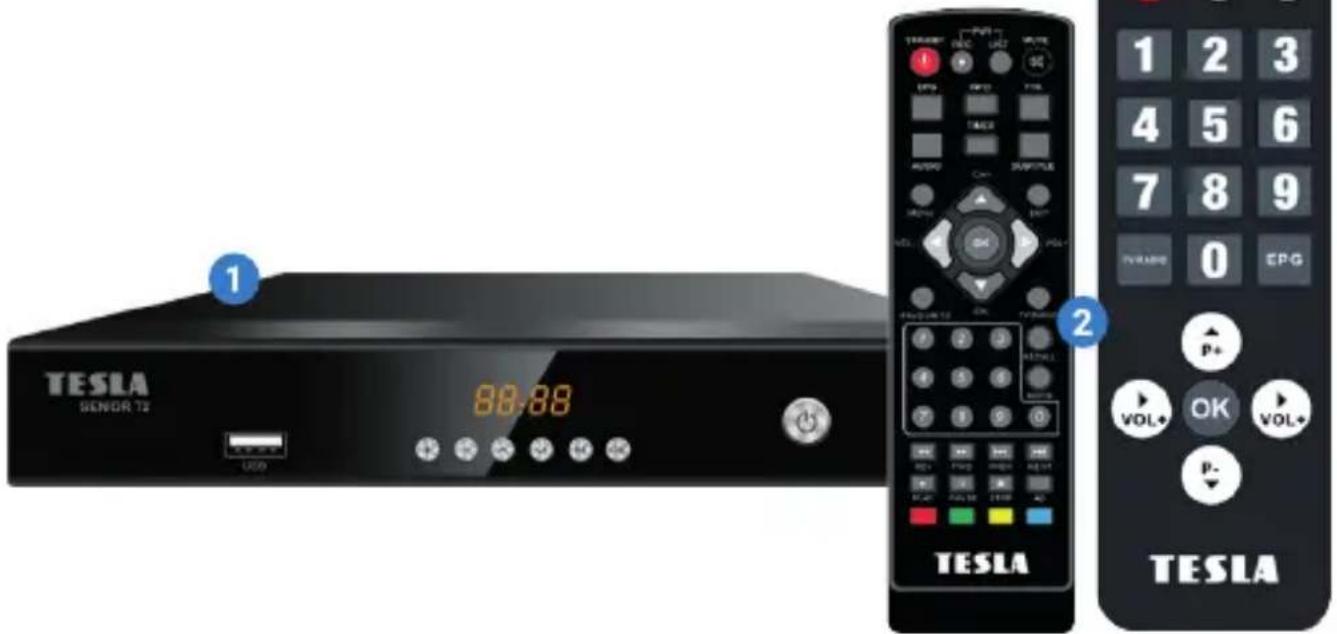
2.3. Full-featured remote Control

Switches between operation and standby mode

Mute the volume

ause/timeshift

top recording/playback

ecord
USB
Direct access to USB drive
AUDIO
Displays available soundtracks
TXT
Displays teletext
INFO
Shows info about the show
SUBTITLE
Shows closed captions
FAV
Displays a list of favorite stations
RECALL
Switches to the last watched program

changes the volume and allows
movement in the menu
It changes the program and enables

Movement in the menu
OK
It confirms the selected operations and
enables the program list to be displayed
MENU
Activates access to the main menu
or return to the live broadcast
EXIT
Press to go back one step

ward

ack
PAGE+/-
Page forward/backward

ast forward

1st rewind
(0\~9)
You select the TV/Radio preset directly
EPG
Electronic Program Guide
TV/RADIO
Switches between TV and Radio programs
DISPLAY
Changing the brightness of the display
SLEEP
Off timer
PVR
Direct access to USB drive
AD Ac
tivating the audio description function
for the blind
FIND
Station search function by name
2. OVERVIEW
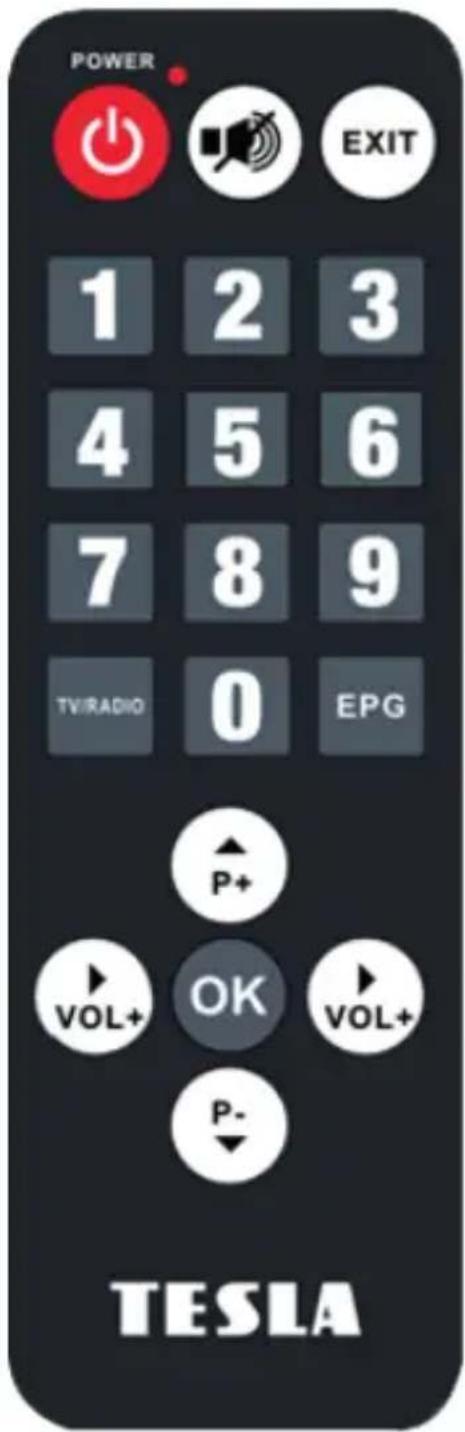
2.3.1. Senior remote control

Switches between operation and standby mode

Mute the volume
EXIT Press to go back one step
VOL+ Increase the volume
VOL- Volume down
P+ Change station forward
P- Change stations backwards
OK Confirming the selection or displaying the list of stations
TV/RADIO Switches between TV and Radio programs
EPG Electronic Program Guide
(0\~9) You select the TV/Radio preset directly
3. INSTALLATION GUIDE
After correctly connecting the necessary devices, turn on the TV and make sure that the receiver is connected to the mains. Press the power button to turn it on. If you are connecting the receiver for the first time or if you have restored the factory settings, the installation menu will appear on the screen in the form of a station search.
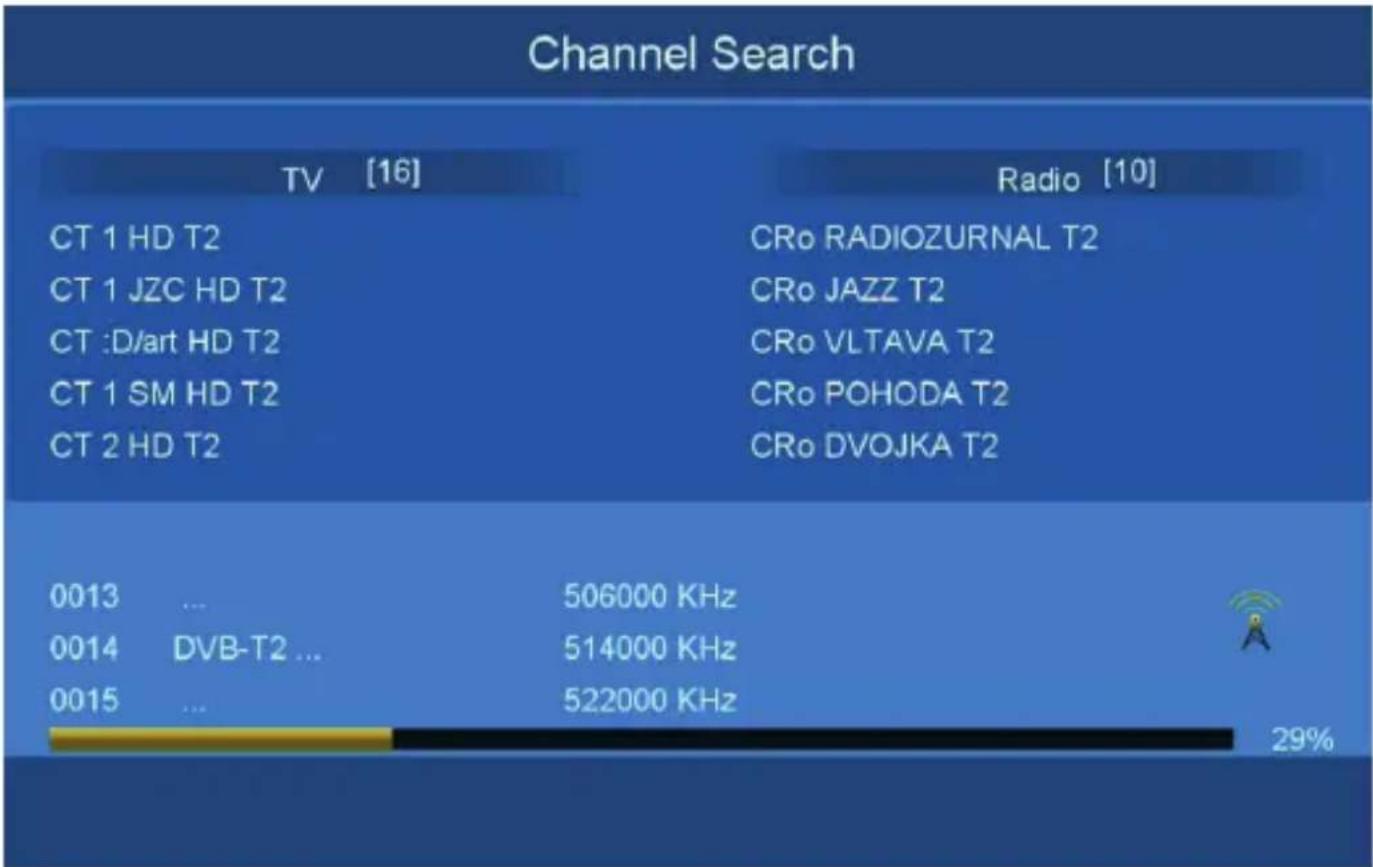
bar
Channel Search | Channel | Frequency (KHz) | Gain (%) | |---|---|---| | TV [16] | 506000 | 29 | | Radio [10] | 514000 | | | CT 1 HD T2 | 522000 | | | CT 1 JZC HD T2 | 522000 | | | CT :D/art HD T2 | 522000 | | | CT 1 SM HD T2 | 522000 | | | CT 2 HD T2 | 522000 | | The chart displays a single bar representing the total gain for each channel. The 'Radio' label is in the top right corner.4. RECEIVER MENU
MAIN MENU: Press the MENU button to open the main menu of the receiver.
5. CHANNEL LIST
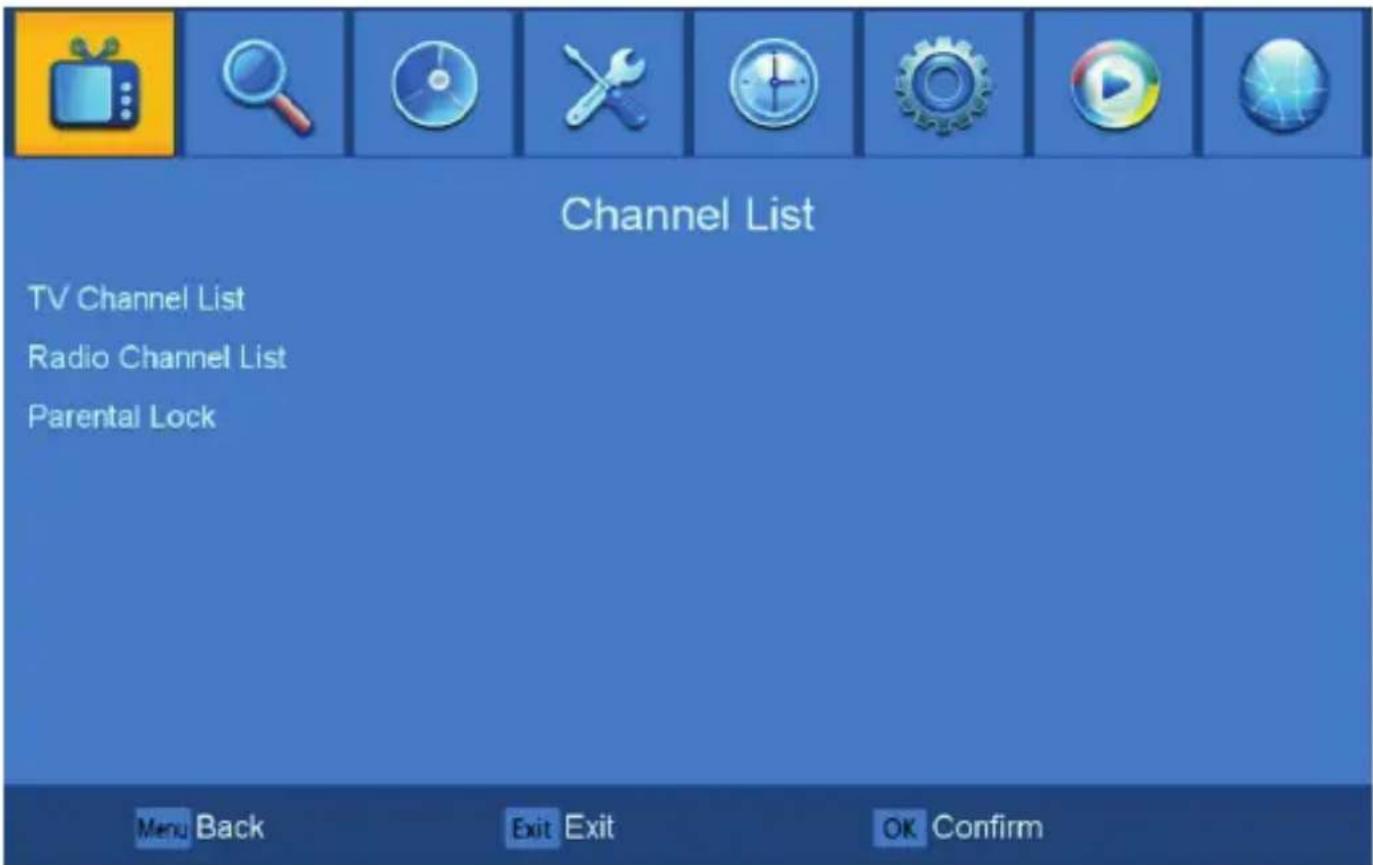
5.1. TV channel list
Here you can find all searched and saved TV stations.
5.2. Radio channel list
Here you can find all searched and saved radio stations.
5.3. Parental lock
You can set the parental lock in this menu. The receiver's default password is 0000. If the rated program exceeds the age set here, then the receiver will require a password. Otherwise, it will not be possible to watch the show.
6. CHANNEL SEARCH
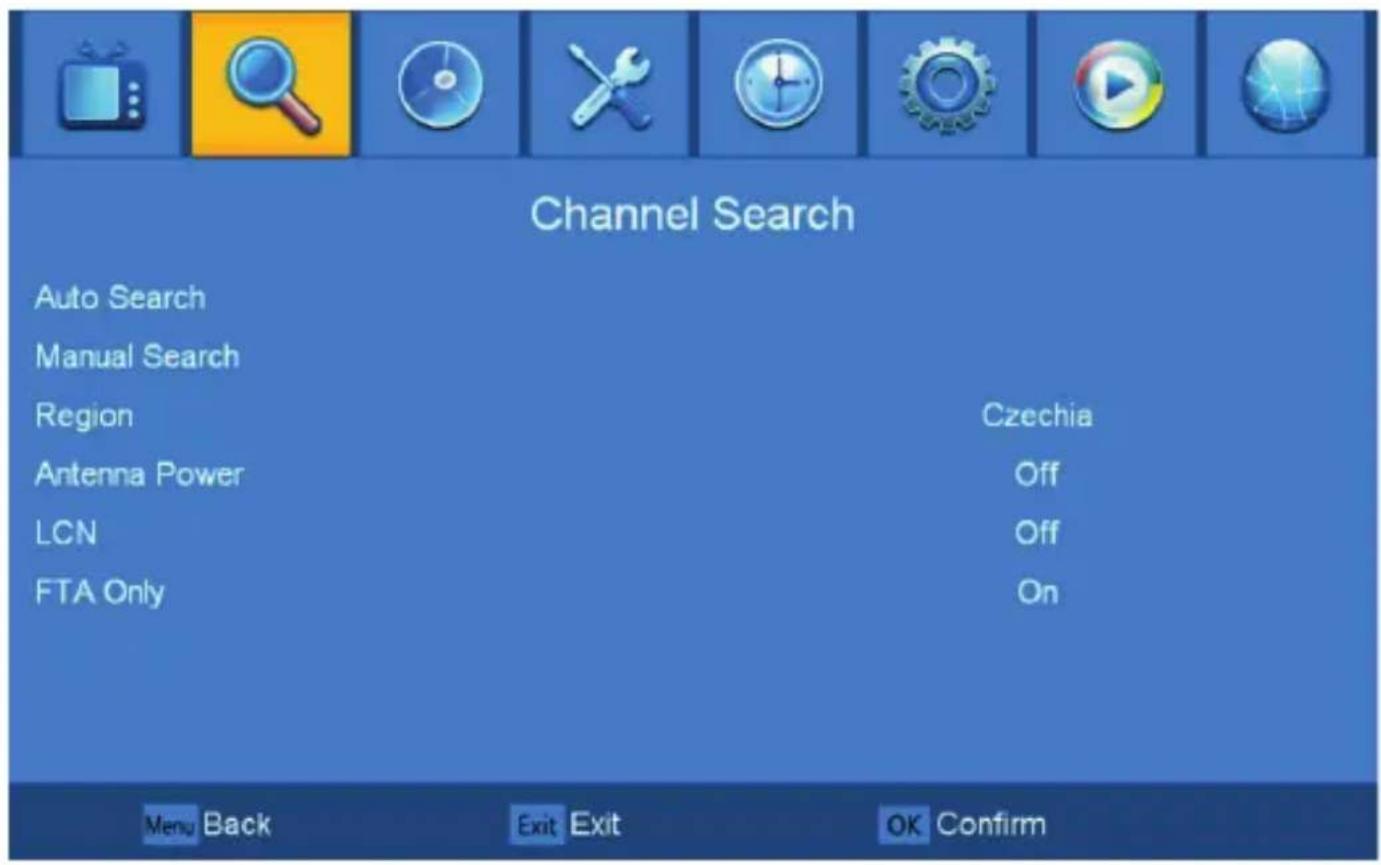
6.1. Automatic search
Automatically searches for and stores available stations.
6.2. Manual search
In this menu, you can manually search for stations from the selected channel.
6.3. Region
Select the country in which the receiver will be used.
6. SEARCHING FOR STATIONS
6.4. Antenna power supply 5V
In this menu you can turn on or off the 5V power supply for the antenna amplifier. A voltage of 5V will be available on the antenna connector.
Do not turn on this power when no amplifier is in use!
6.5. LCN - logical station numbering
6.6. Only unscrambled FTA stations
Select whether the receiver should only search for unscrambled stations.
7. LANGUAGE
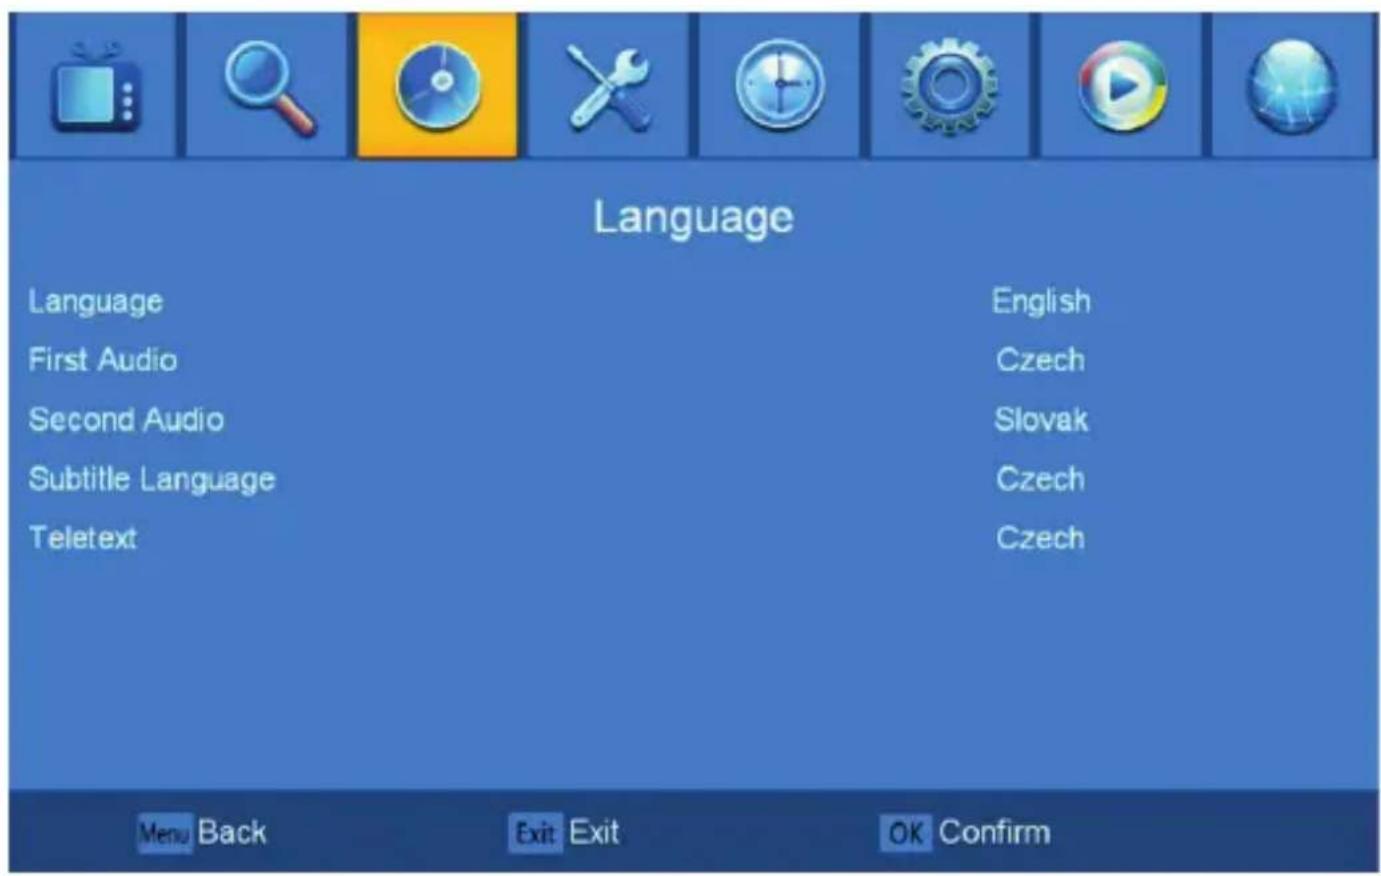
7.1. First audio
Set your preferred audio language.
7.2. Second audio
Set the second preferred language.
7.3. Subtitle language
Set subtitle language.
7.4. Teletext
Set the teletext language.
8. AV SETTINGS
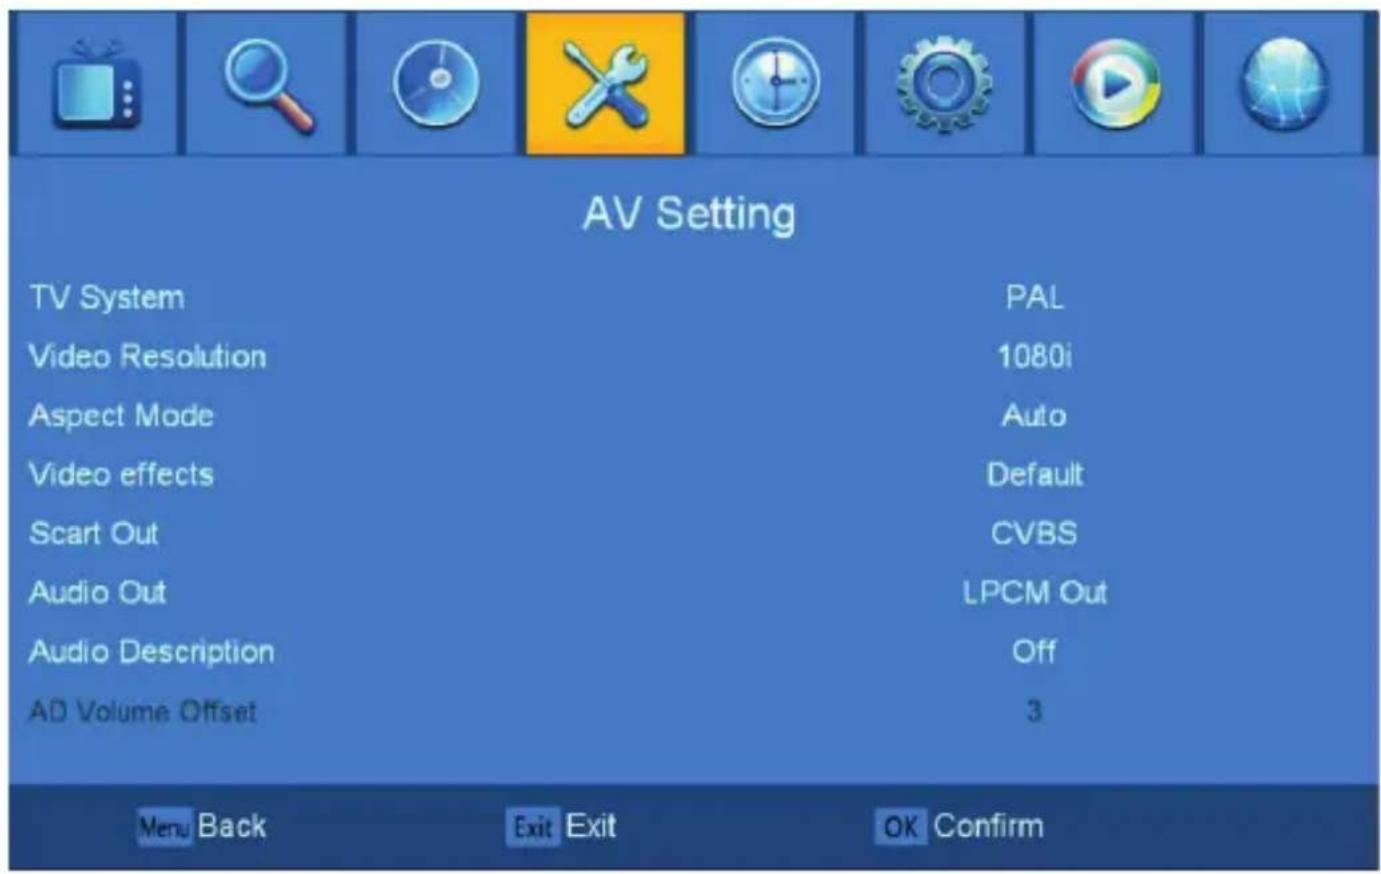
8.1. TV standard
The default value is PAL.
8.2. Output video resolution
Set the picture resolution on the HDMI connector.
8.3. Aspect mode
Set the display format according to the aspect ratio of the screen.
8.4. Video effects
8. AV SETTINGS
8.5. SCART output
Analog way of connecting to the TV using a SCART cable.
8.6. Digital audio output
Here you can set the digital audio data format on the output CINCH connector according to the needs of the home audio system.
8.7. Audio description for blind AD
Here you can activate additional audio description. The sound will only be available if it is broadcast by the selected station.
8.8. AD sound volume
9. TIME
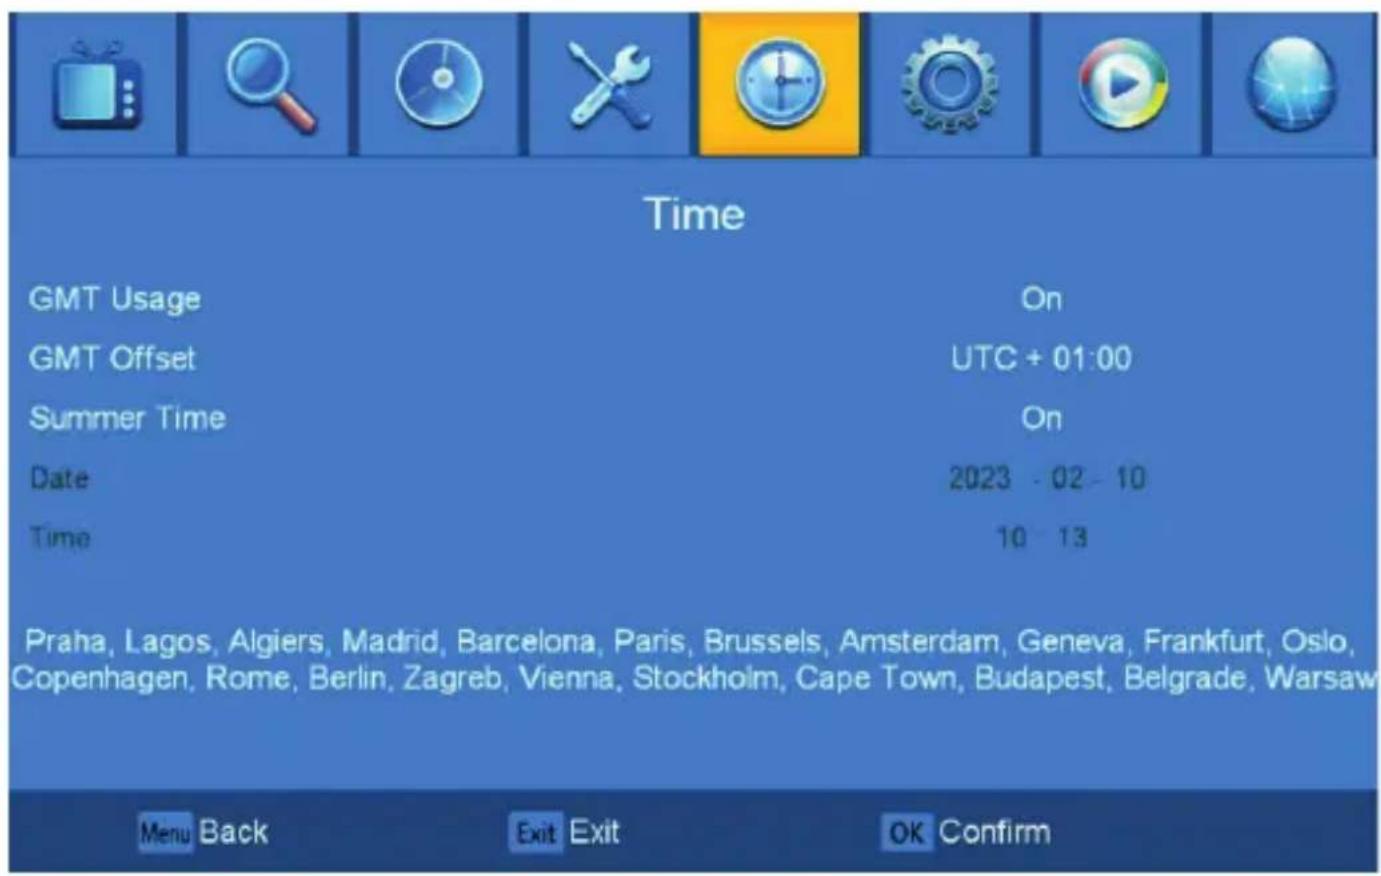
9.1. Use GMT time
Select off to set the time manually.
9.2. GTM correction
Select a time zone.
9.3. Summer time
9.4. Date
For manual entry.
9.5. Time
For manual entry.
10. SYSTEM
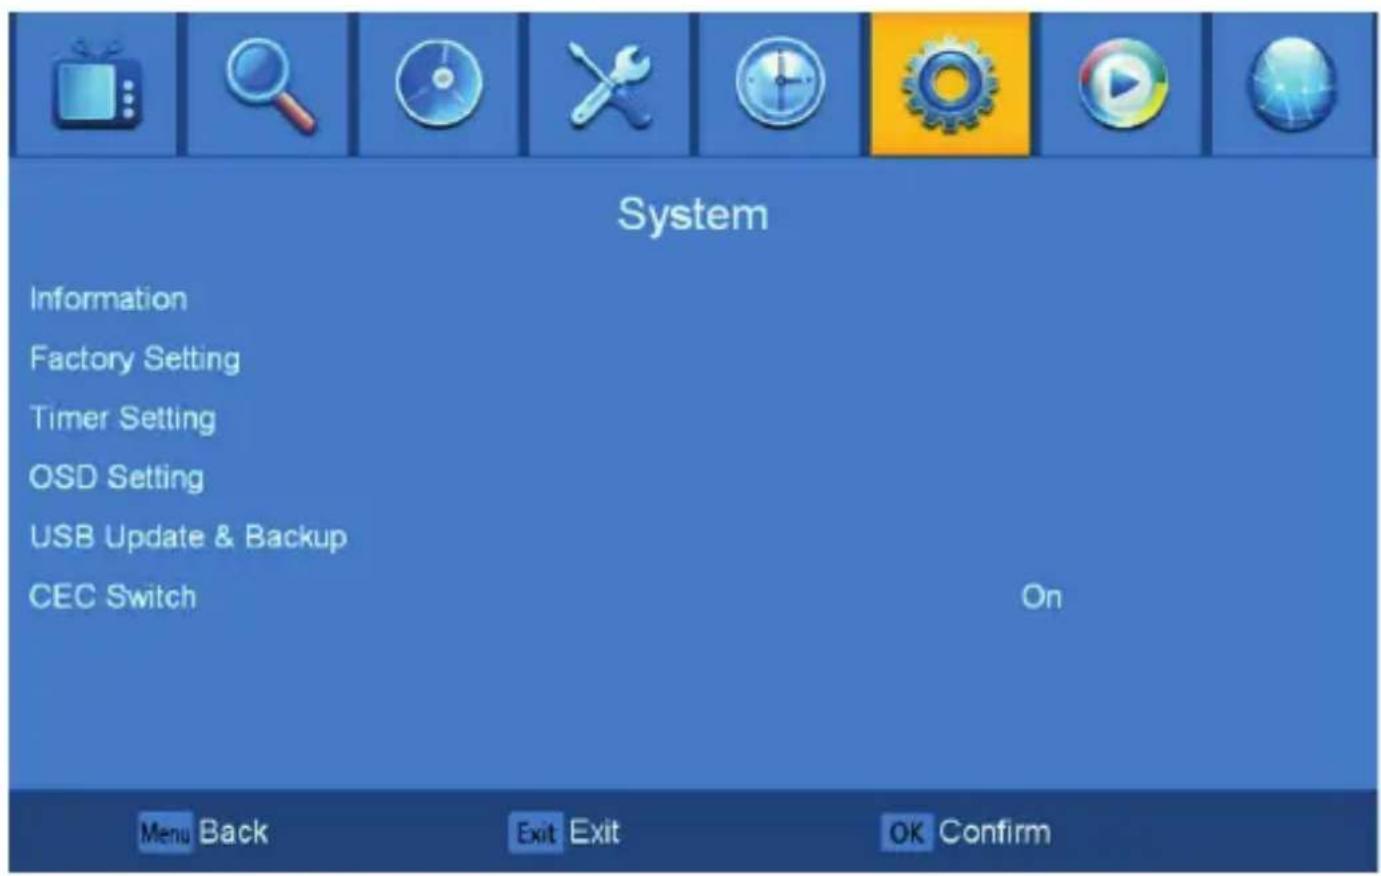
10.1. Information
Information about the HW model and SW model of the receiver.
10.2. Factory settings
After selecting the receiver password, all stations and receiver settings will be deleted to factory values.
10.3. Timer setting
10. SYSTEM
10.4. OSD settings
Submenu below to adjust OSD settings to your preference.
Show subtitles
Info banner display time
OSD menu transparency
Auto standby mode
10.5. USB update and backup
Update and backup via USB.
10.6. CEC Switch
Function for simultaneously turning on/off the receiver and TV with one controller. It is also necessary to activate the CEC function on the TV. This function is not guaranteed due to the low compatibility of devices on the market.
11. MULTIMEDIA
A USB drive must be inserted to play music, movies or pictures.
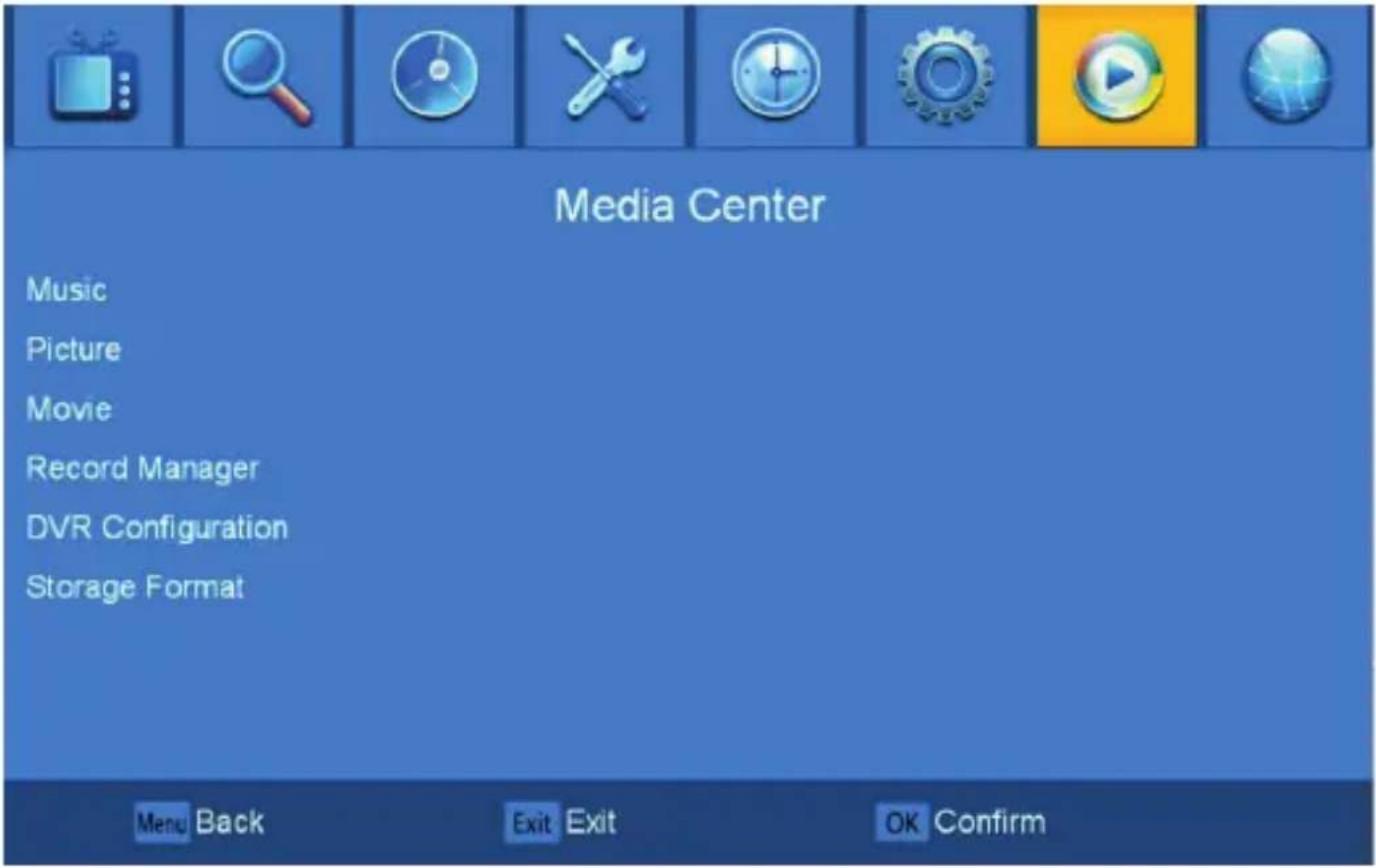
11.1. Music
11.2. Picture
11.3. Movie
11.4. Record manager
11.5. Record DVR configuration
11.6. Storage format
12. NETWORK
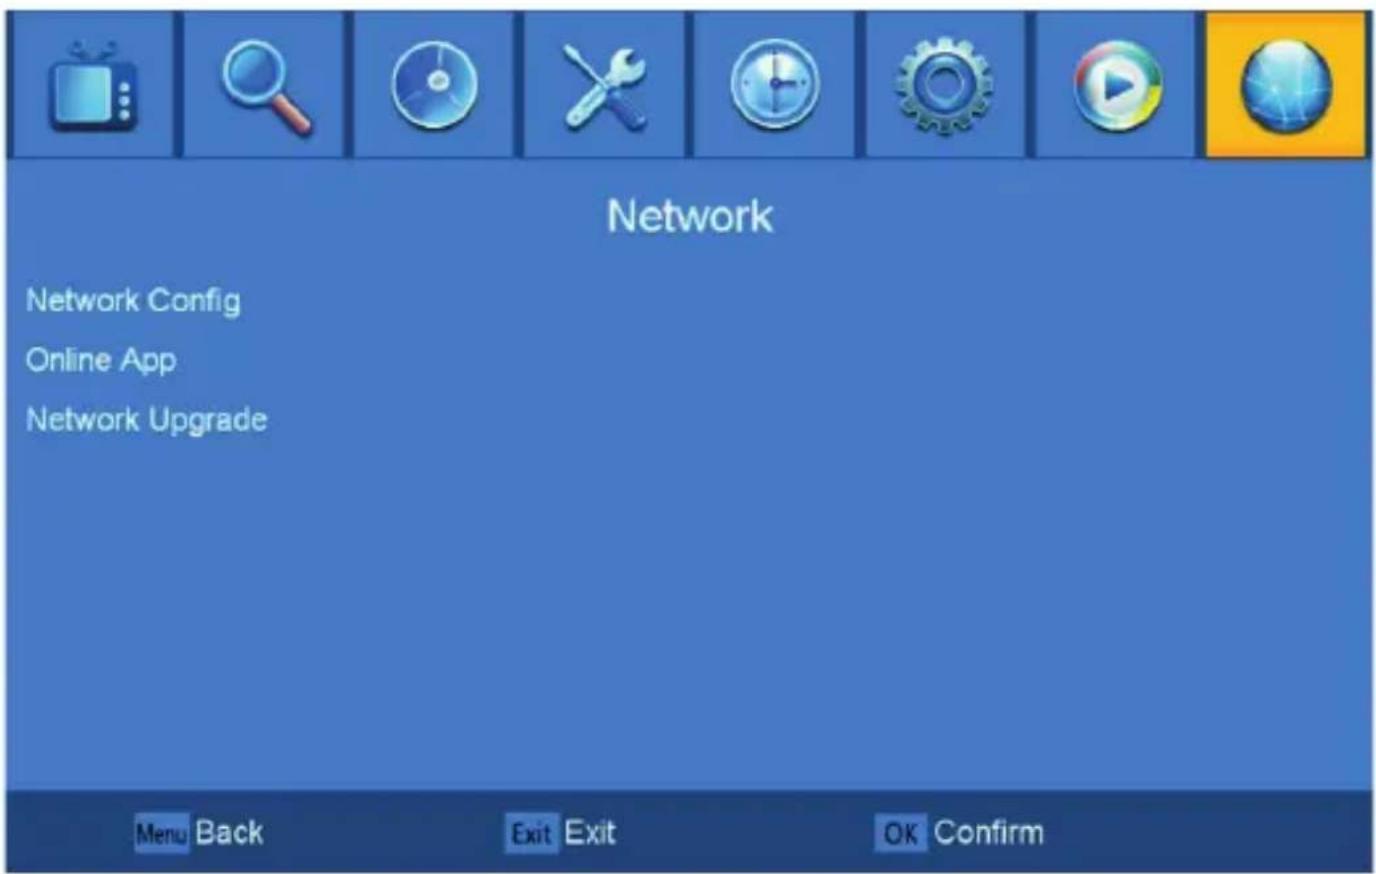
12.1. Network settings
12.2. Online application
12.3. Update from the network
TESLA Electronics LTD, as the manufacturer of this equipment, declares that the radio equipment type Senior T2 is in compliance with Directive 2014/53/EU. The full text of the EU declaration of conformity is available on the website www.eshop.tesla-electronics.eu.
TESLA
INSTRUKCJA OBSŁUGI CZ | SK | EN | PL
TESLA SENIOR T2
ODBIORNIK NADAWANIA NAZIEMNEGO

PROSIMY O UWAŻNE ZAPOZNANIE SIĘ Z NINIEJSZĄ INSTRUKCJĄ PRZED UŻYCIEM.
TREŚĆ
1. WŁAŚCIWOŚCI OGÓLNE 73
2. PRZEGLĄD 74
2.3.1. Pilot Senior 76
3. INSTRUKCJA INSTALACJI 77
4. MENU ODBIORNIKA 77
5. WYKAZ STACJI 77
2. PRZEGLĄD


- PŘED POUŽITÍM SI PEČLIVĚ PŘEČTĚTE TUTO PŘÍRUČKU.
- OBSAH
- PŘEHLED
- PRED POUŽITÍM SI POZORNE PREČÍTAJTE TÚTO PRÍRUČKU.
- VŠEOBECNÉ VLASTNOSTI 29
- PREHL'AD 30
- PREHL'AD
- PLEASE READ THIS MANUAL CAREFULLY BEFORE USE.
- DEAR CUSTOMER,
- CONTENT
- GENERAL PROPERTIES 52
- OVERVIEW 53
- INSTALLATION GUIDE 56
- RECEIVER MENU 56
- CHANNEL LIST 57
- CHANNEL SEARCH 58
- LANGUAGE 60
- AV SETTINGS 61
- TIME 63
- SYSTEM 64
- MULTIMEDIA 66
- NETWORK 67
- GENERAL PROPERTIES
- OVERVIEW
- Front side of the receiver
- The back of the receiver
- Full-featured remote Control
- Senior remote control
- INSTALLATION GUIDE
- RECEIVER MENU
- CHANNEL LIST
- TV channel list
- Radio channel list
- Parental lock
- CHANNEL SEARCH
- Automatic search
- Manual search
- Region
- SEARCHING FOR STATIONS
- Antenna power supply 5V
- LCN - logical station numbering
- Only unscrambled FTA stations
- LANGUAGE
- First audio
- Second audio
- Subtitle language
- Teletext
- AV SETTINGS
- TV standard
- Output video resolution
- Aspect mode
- Video effects
- SCART output
- Digital audio output
- Audio description for blind AD
- AD sound volume
- TIME
- Use GMT time
- GTM correction
- Summer time
- Date
- Time
- SYSTEM
- Information
- Factory settings
- Timer setting
- OSD settings
- USB update and backup
- CEC Switch
- MULTIMEDIA
- NETWORK
- TESLA
- INSTRUKCJA OBSŁUGI CZ | SK | EN | PL
- TESLA SENIOR T2
- ODBIORNIK NADAWANIA NAZIEMNEGO
- PROSIMY O UWAŻNE ZAPOZNANIE SIĘ Z NINIEJSZĄ INSTRUKCJĄ PRZED UŻYCIEM.
- TREŚĆ
- WŁAŚCIWOŚCI OGÓLNE 73
- PRZEGLĄD 74
- INSTRUKCJA INSTALACJI 77
- MENU ODBIORNIKA 77
- WYKAZ STACJI 77
- PRZEGLĄD
Brand : TESLA
Model : Senior T2
Category : Media player