
IAN 315367 - Uncategorized POWERFIX - Free user manual and instructions
Find the device manual for free IAN 315367 POWERFIX in PDF.


| Product Type | Digital Multimeter |
| Brand | Powerfix |
| Model | IAN 315367 |
| Category | Measuring Instruments |
| Languages | DE, EN, FI, LT, PL, SV, and more |
| Manual Pages | 30 |
| Dimensions | 150 x 80 x 30 mm |
| Weight | 200 g |
| Power Supply | 9V block battery (6LR61) |
| Display | 2000-count LCD with backlight |
| Measurement Functions | DC/AC voltage, DC/AC current, resistance, diode test, continuity |
| Measurement Ranges | 200mV - 600V (DC), 200mV - 600V (AC), 200μA - 10A (DC/AC), 200Ω - 20MΩ |
| Accuracy | ±0.5% (DC voltage), ±1.0% (AC voltage) |
| Safety Rating | CAT II 600V, CAT I 1000V |
| Overload Protection | Yes, for all ranges except AC current |
| Auto Power Off | After approx. 15 minutes |
| Accessories Included | Test leads, 9V battery, manual |
| Material | ABS plastic with rubber holster |
| Operating Temperature | 0°C to 40°C |
| Storage Temperature | -10°C to 50°C |
| Maintenance | Wipe with a dry cloth; avoid moisture |
| Disposal | Dispose of battery separately; electronic waste at designated collection points |
Frequently Asked Questions - IAN 315367 POWERFIX
User questions about IAN 315367 POWERFIX
0 question about this device. Answer the ones you know or ask your own.
Ask a new question about this device
Download the instructions for your Uncategorized in PDF format for free! Find your manual IAN 315367 - POWERFIX and take your electronic device back in hand. On this page are published all the documents necessary for the use of your device. IAN 315367 by POWERFIX.
USER MANUAL IAN 315367 POWERFIX
text_image
www.lidl-service.comHAND-HELD STAPLER SET
GB
HAND-HELD STAPLER SET
Operation and Safety Notes
SE
HÄFTPISTOL,SET
Before reading, unfold the page containing the illustrations and familiarise yourself with all functions of the device.
FI
GB Operation and Safety Notes Page 5
text_image
Technical diagram of a manual pushpin with numbered parts labeled 1 through 7| List of pictograms used | |||
 | Please read the operating instructions! | Danger of loss of life and accident to infants and children! | |
 | Observe the warnings and safety notices! | Wear personal protective equipment and always wear safety glasses. | |
Hand-Held Stapler Set
- Introduction
We congratulate you on the purchase of your new product. You have chosen a high quality product. Familiarise yourself with the product before using it for the first time. In addition, please carefully refer to the operating instructions and the safety advice below. Only use the product as instructed and only for the indicated field of application. Keep these instructions in a safe place. If you pass the product on to anyone else, please ensure that you also pass on all the documentation with it.
• Proper Use
The stapler gun is intended exclusively for stapling cardboard, leather, cloth (textile or natural fibres) or similar lightweight materials on to hardwood, softwood, chipboard or similar plywood-type materials. Any use other than previously mentioned or any product modification is prohibited and can lead to injuries and / or product damage. The manufacturer is not liable for any damages caused by any use other than for the intended purpose. The product is not intended for commercial use.
• Description of parts
1 Adjusting knob
2 Trigger
3 Carriage
4 Hook
5 Staple channel
6 Side wings
7 Driver
• Supply Scope
Immediately after unpacking, check that the delivery is complete and that the product and all its parts are in perfect condition. Do not under any circumstances assemble the product if the delivery is incomplete.
1 Hand-Held Stapler Set
500 Staples (8 mm)
500 U-staples (12 mm)
500 T-nails (10 mm)
1 Instructions for use
- Staples/nails
Note: The precision components of the device are designed to use the following standard, widely available staples and nails:
| Type | A(mm) | B(mm) | C(mm) |
Flat crown staples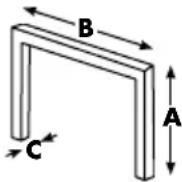 | 4 to max. 14 | 11.3 1.2 | to max. 1.3 |
Round crown staples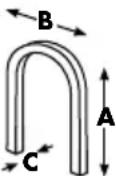 | 10 to max. 12 | 6.3 1.2 | to max. 1.3 |
T-nails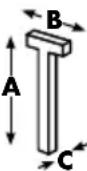 | 10 to max. 14 | 1.8 to 2.0 | 1.2 to max. 1.3 |

Safety advice
KEEP ALL THE SAFETY ADVICE AND INSTRUCTIONS IN A SAFE PLACE FOR FUTURE REFERENCE!


DANG RORNING!
LOSS OF LIFE AND ACCIDENT TO INFANTS AND CHILDREN!
Never leave children unsupervised with the packaging materials. Danger of suffocation. Keep out of the reach of children. It is not a toy.
This appliance can be used by children aged from 8 years and above and persons with reduced physical, sensory or mental capabilities or lack of experience and knowledge if they have been given supervision or instruction concerning use of the appliance in a safe way and understand the hazards involved. Children shall not play with the appliance. Cleaning and user maintenance shall not be made by children without supervision.
■ Always keep the product out of reach of children. Children often underestimate danger. Store the device indoors in an enclosed, dry place where it cannot be reached by children.
■ Ensure that staples and nails cannot under any circumstances strike people or animals. Failure to observe this advice may lead to injury.
Wear personal protective equipment and always wear safety glasses. This also applies to people who may be helping with the work by supporting or holding the workpiece.
CAUTION! Do not support yourself with your hands under any circumstances near or in front the stapler gun or on the surface being tacked. One slip may result in injury.
■ Every time before you use the device, check that it is in perfect condition. Damage to any of its components may lead to injury.
- Check that all parts have been assembled and fitted properly. Incorrect assembly or fitting may lead to injury.
- Remain alert at all times and always watch what you are doing. Proceed with caution. Just one moment of inattention during assembly may lead to injury.
Before moving or putting away the stapler gun, check that there are no staples or nails still in the device.
Operation
- Filling with staples / nails
⚠️ CAUTION! Use only the staples and nails described in these operating instructions (see "Staples / nails"). Failure to observe this advice may result in damage to the device.
Note: You can use three different types of staples / nails in the stapler gun; flat crown staples, round crown staples and T-nails.
Follow these steps:
-
Press in the staple pusher 3 slightly and then pull it downwards. Then pull the staple pusher 3 completely out of the magazine 5 (see Fig. A).
-
Push the staples or the T-nails into the magazine 5.
CAUTION! Ensure that the staples or T-nails are correctly inserted (see Figs. B, C, D).
- Push the staple pusher 3 back into the magazine 5. Press in the staple pusher 3 slightly and then pull it slightly upwards to fix it in place.
- Setting the impact force
CAUTION! Never screw the adjusting screw 1 completely out of the stapler gun. This could result in damage to the device.
☐ Screw out the adjusting screw 1 ☐ to reduce the impact force.
☐ Screw in the adjusting screw 1 to increase the impact force.
• Stapling
CAUTION! Never support yourself by placing your hands near or in front of the stapler gun or the workpiece surface. A slip can result in injury.
Follow these steps:
- Press the staple eject opening 7 on the spot where you wish to staple.
- Adjust the impact force to suit the materials, staples or nails.
- Press the operating lever 2 down firmly.
Examples of use:
The stapler gun is suitable for the following purposes:
- Attaching coverings to the seating surface of chairs.
- Attaching a skirting at the joint between wall and floor coverings.
- Stretching and stapling canvasses to frames.
- Attaching protective films to insulation materials when installing thermal insulation.
- Attaching decorative materials.
- Removing staples
⚠️ To avoid the risk of injury!
☐ Ensure that the operating handle 2 will not be pressed.
☐ Push the hook 4 under the staple or nail head (see Fig. F).
☐ Pull the rear part of the stapler gun upwards to draw out the staple or nail from the workpiece.
- Removing jammed staples from the stapler gun
Staples or nails may become jammed in the stapler gun during operation. Remove jammed staples as follows:
- Press in the staple pusher 3 slightly and then pull it downwards. Then pull the staple pusher 3 completely out of the magazine 5.
- Turn the stapler gun over so that the magazine 5 is pointing upwards.
- Press the magazine 5 at the side wings 6 backwards and pull the magazine 5 upwards (see Fig. E).
- Now remove the jammed staples from the magazine 5.
- Press the magazine 5 at the side wings 6 backwards and press it downwards until it engages to fix the magazine 5 back in place.
Note: Do not use the stapler gun if it shows more serious defects (damage to body etc.). If necessary have your stapler repaired by a qualified specialist. Take note that the manufacturer's original spare parts only should be used in any repair.
Tips
- In order to have a good quality of stapling, it is suggested to fill only one of staple / nail type in the staple gun in each time.
- When you want to change other types of staples, please make sure all remaining staples / nails are used up or not in staple gun before insert other types of staples / nails.
- Cleaning and care
■ Never use corrosive or abrasive cleaning agents. These may damage the surface of the product.
☐ The product must be kept clean, dry and free of oil or lubricants at all times.
□ Clean the product with a slightly dampened, non-fluffing cloth.
Service
☐ Securely pack the product or use the original packaging to prevent transport damage.
Meister Werkzeuge products are submitted to strict quality control. If a malfunction occurs, however, please send the product to our service address. A brief description of the defect will speed up troubleshooting and repairs. Please include the sales receipt with the product during the warranty period. If the repair is not covered by warranty, we will invoice you for the repair.
Important! We expressly state that according to the Product Liability Act, we are not liable for damages caused by our products, if these were caused by improper repair, or if parts were replaced not using our original parts or parts approved by us.
Please have your receipt and the item number (e.g. IAN 12345) ready as your proof of purchase when enquiring about your product.
- Disposal
The packaging is made entirely of recyclable materials, which you may dispose of at local recycling facilities.
Contact your local refuse disposal authority for more details of how to dispose of your worn-out product.
natural_image
Line drawing of hands using a tool to adjust or install a mechanical component (no text or symbols present)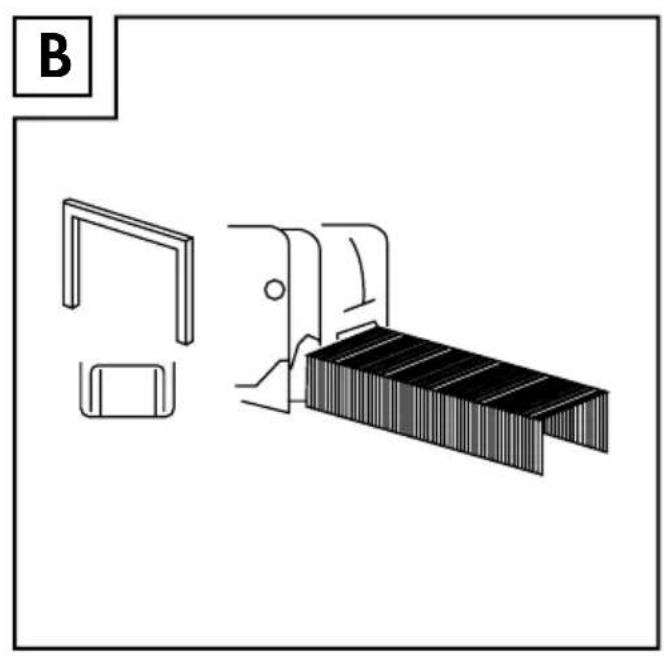
natural_image
Technical line drawing of a mechanical assembly with a bracket and a folded plate (no text or symbols)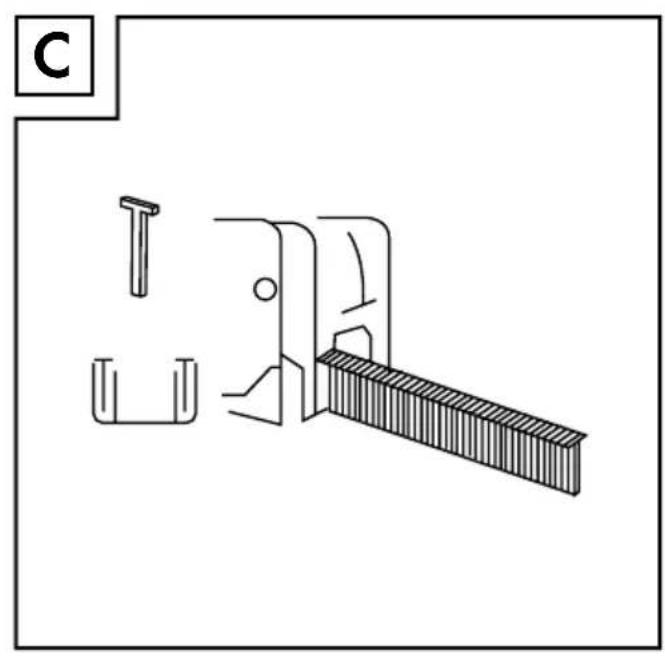
natural_image
Technical line drawing of a mechanical bracket assembly (no text or symbols)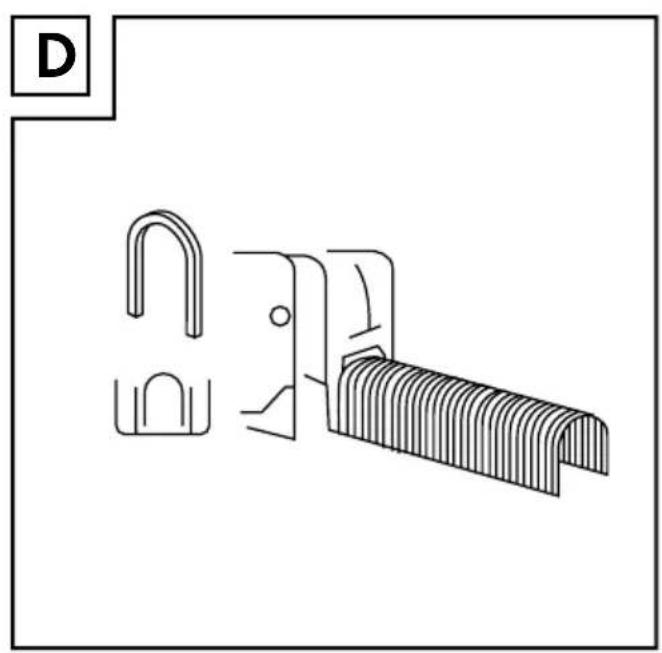
natural_image
Technical line drawing of a mechanical clamp or bracket component (no text or symbols)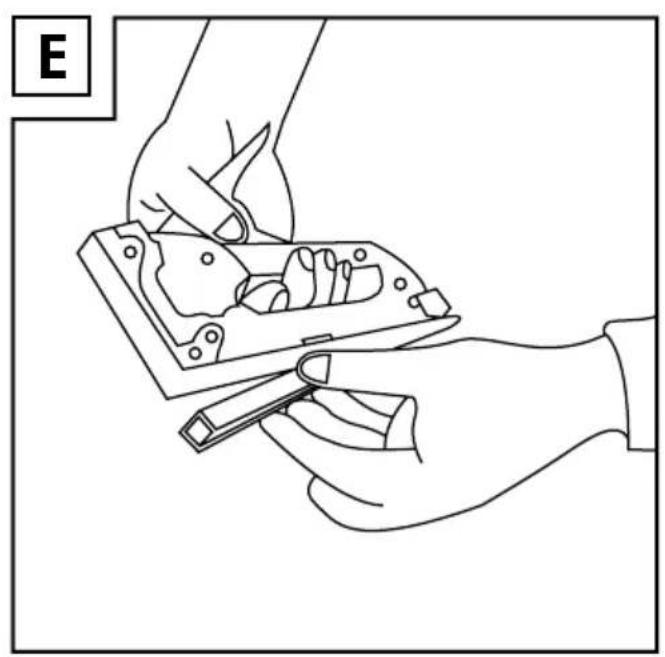
natural_image
Line drawing of two hands holding a mechanical component, no text or symbols present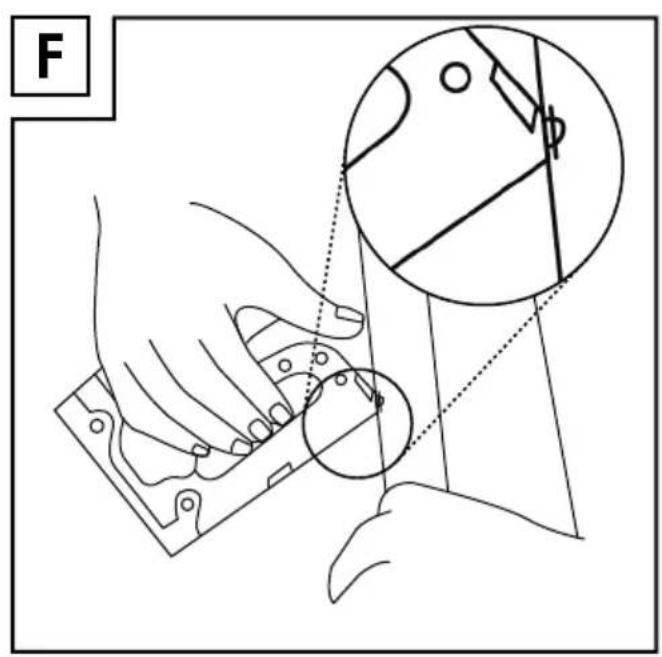
text_image
FCONMETALL MEISTER GMBH
Oberkamper Str. 37-39
42349 Wuppertal
Germany
Art.-Nr.: 1735273
Last Information Update · Tietojen tila