
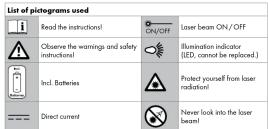
PLW A2 - Uncategorized PARKSIDE - Free user manual and instructions
Find the device manual for free PLW A2 PARKSIDE in PDF.

| Product Type | Laser Spirit Level |
| Brand | Parkside |
| Model | PLW A2 |
| Laser Class | 2 |
| Power Supply | 2 x 1.5V AAA batteries |
| Accuracy | ±0.5 mm/m (typical) |
| Working Range | Up to 10 m (depending on light conditions) |
| Laser Output | <1 mW, 635 nm red |
| Leveling Type | Manual via bubble vials |
| Laser Lines | Cross or single line (switchable) |
| Bubble Vial Illumination | Yes (switchable) |
| Magnet Mount | Yes (2 magnets) |
| Tripod Mount | 1/4" thread |
| Included Accessories | Tripod, 2 x AAA batteries, instruction manual |
| Dimensions (approx.) | 10 x 5 x 5 cm (without tripod) |
| Weight (approx.) | 150 g (without batteries) |
| Operating Temperature | -5°C to 40°C |
| Intended Use | Indoor horizontal/vertical alignment |
| Safety Features | Auto-off if not used, laser warning label |
| Maintenance | Clean with soft cloth; keep dry |
Frequently Asked Questions - PLW A2 PARKSIDE
User questions about PLW A2 PARKSIDE
0 question about this device. Answer the ones you know or ask your own.
Ask a new question about this device
Download the instructions for your Uncategorized in PDF format for free! Find your manual PLW A2 - PARKSIDE and take your electronic device back in hand. On this page are published all the documents necessary for the use of your device. PLW A2 by PARKSIDE.
USER MANUAL PLW A2 PARKSIDE
LASER SPIRIT LEVEL PLW A2
G
LASER SPIRIT LEVEL PLW A2
Operation and safety notes
广力云智慧零售收银系统
HU
LEZERES VIZMERTEK PLW A2
Laser spirit level PLW A2
We congratulate you on the purchase of your new product. You have chosen a high quality product. The instructions for use are part of the product. They contain important information concerning safety, use and disposal. Before using the product, please familiarise yourself with all of the safety information and instructions for use. Only use the product as described and for the specified applications. If you pass the product on to anyone else, please ensure that you also pass on all the documentation with it.
● Proper use
The product level is a measuring device and is intended for use in aligning objects horizontally and vertically, e.g. pictures or furniture. Measurements are performed using the laser beam and the spirit levels. The product is intended for use indoors at normal room temperatures only. The product is not intended for commercial use.
● Description of parts
1 Bubble level
2 Battery compartment 3 Traded with ball and socket head
3 Imped with ball and socket head 4 Clamping screw
5 Bubble level
6 Laser beam of
7 Laser beam On / Off switch 8 Illumination On / Off switch
9 Illumination indicator (LED, cannot be
replace
10 Battery arrangement
11 Positions of magnets 12 Position of laser beam
13 Switch for selecting I
(cross-hatch "CROSS" / Line "LINE")
0.1
- Includes 1 x laser spirit level
1 x Tripod
2 x Batteries 1.5 V=, AAA
1 x Instructi
- Technical
Laser class: 2
Accuracy:
Power supply: 2 x battery 1.5 V=,
Altitude:
Ambient temperature: -5 °C-40 °C
W. 1:
Working died: Max. height of
Max height of laser projection
(including tripod): 31.5cm
m = 311


Failure to observe this advice may result
in damage to the product.
■ Remove the batteries if the product breaks down or is defective. Otherwise there
down or is defective. Otherwise there is the danger that the laser may be in-
advertently switched on. This could lead
to permanent eye damage.
AS WARNING! Never open the product housing. This could result in personal in
jury or damage to the product. Always
have any repairs carried out at the ser-
vice centre or by an electrical equipment
- Do not use the product in places where
there is a danger of fire or explosion,
for example near inflammable liquids
or gases. Any adjustment to increase the power
- Any adjustment to increase the power of the laser is not permitted.
■ If a bubble level is damaged, avoid con-
tact of any kind with the fluid contained
in the bubble. However, should contact occur it is essential that the following adi
occur its exceptional for the following device is observed. First aid measures on:
SKIN CONTACT: Clean the affected
area immediately for at least 15 minutes
with plenty of soap and water. Contact a doctor's way to make this irritation.
EYE CONTACT: Flush the affected eye
immediately for at least 15 minutes with
plenty of water. When doing this, hold
the eye open with a thumb and index finger. Contact a doctor immediately
INHALATION: Ensure immediately
that there is an adequate supply of fresh
air. Introduce pure oxygen if breathing
problems are experienced. CONTACT WITH THE INSIDE OF
THE MOUTH: If the victim is conscious,
flush out the inside of the mouth imme-
dictely with plenty of water. Contact a
doctor immediately.
[Non-Text]
[Non-Text]
[Non-Text]
^
Warning!
Risk of injury from
laser bed
WARNING! Do no
ser beam or int
on result in penn
eye's natural re ke place
r direct the lase
eyes of people
laser beam strike
immediately an the beam.
the product sat
possible to childr
estimate the pa lated wife fave
direct the laser
an reflect light.
e beam can re
ys switch off the the product up
the product
Safety ins
batteries
ble batter
GER TO LIFE!
ngeable batteri
en. If accidenta
date medical a DANGER
DANUEL Never reck
able batte
circuit batteries,
ies and / or op ce or hunting c
r throw batterie
ies into fire or v
at exert mechanism
les, echarged
eakage of b
eable batter
extreme enviro
batteries/rechargeable batteries, e.g.
radiators/direct sunlight.
If batteries/rechargeable batteries have leaked, avoid contact with skin
have leaked, avoid腐蚀 with skin, eyes and mucous membranes with the
chemicals! Flush immediately the affect
ed areas with fresh water and seek
medical attention! WEAR PROTECTIVE
GLOVESI Leaked or dam-
aged batteries/rechargeable
batteries can cause burns on contact with dry light. Women should use
with the skin. Wear suitable protective gloves at all times if such an event occurs
In the event of a leakage of batteries /
rechargeable batteries, immediately
remove it from the product to prevent damage.
Only use the same type of batteries /
rechargeable batteries. Do not mix
used and new batteries / rechargeable
batteries. Remove the batteries / rechargerable
batteries if the product will not be used
for a longer period.
(1) 2017年1月1日
ask of damage of the product Only was the specified type of battery.
Only use the specified type of battery, rechargeable battery!
When inserting ensure the correct po-
lantyl! This is shown inside the battery
compartment! Clean the contacts on the battery and
clean the contacts on the battery and the battery compartment before inserting
Remove exhausted batteries/recharge
able batteries from the product immed
ately.
Preparing for first use
(1) (2)
Inserting / replacing buttering (figure 4)
Batteries (figure A) Switch off the product
Open the battery compartment 2,
Insert 2 batteries type 1.5V =
or replace the used batteries with new
polarity (+ / -) in accordance with the battery arrangement 10 inscribed on the housing. Reclose the battery compartment 2 Note: If the laser beam is too weak or no longer visible, it is time to replace the batteries.
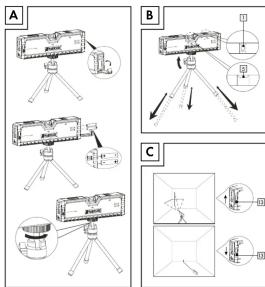
- Setting up the product
You can use the product with or without a
soa. Follow the steps below to check and on the product on the tripod:
Turn the tripod 3 with the screw complete-
ly into the threaded hole on the underside
of the housing. Make sure that the screw is tightened by and securely.
is tightened firmly and securely. Fold out the legs of the tripod 3.
Set the product on the tripod down on
the desired surface and align it.
To align the product, first release the clamping system 4 on the trained 3 by
clamping screw 4 on the mode 3 by screwing it anticlockwise.
Now turn and tilt the housing until the air
bubbles in the bubble levels 1 and 5
are centrally positioned between the two line markings (see figure B1)
Note: If the lighting conditions are
inadequate, switch on the illumination
for the bubbles using the illumination
On) Off switch [B]. Then fix the position of the housing by
then fix the position of the housing by tightening the clamping screw 4 on
the tripod clockwise.
Note: If the position of the product
has to be changed, you need to check whether the product requires to be
whether the product requires to be aligned again.
The tripod is not made for carrying loads.
For that reason do not load anything
onto the product when it is attached to the tripod.
Make sure not to bend the tripod's legs
Operation
1
WARNING! Do not look directly into
the laser beam or into the laser aperture [8]. This can result in permanent eye damage if
this can result in permanent eye damage if the eye's natural reflex to close does not
take place. If the laser beam strikes your
eyes, close them immediately and turn your hand out of the boom.
B
- Use with the tripod
□ Set the product on the tripod down in the
desired place and align it as described in the section 15. To view the product
In the Michigan - Sinking up the product. Switch on the product with the laser
beam On/Off switch 7. The product
projects two laser beams that intersect
one another at right angles on to a wall. Note: You may change the laser to a
Note: Too may change the faster to a line format ("LINE") or to cross-hotch format
("CROSS") by sliding the switch 13 (see
figure C).
□ If the laser beam is not exactly at the required height, you are using rules or
required height, you can call a root of another suitable measuring product to
mark vertical and horizontal points on
the wall. To do this, remark the desired
[Non-Text]
[Non-Text]
tical and use a spirit level if necessary.
。
- Use without a input - Hold the product with the wide
。
C
laser beam On / Off switch[7]. Note: If the light-up conditions are
Note: If the lighting conditions are inadequate, switch on the illumination
for the bubbles using the illumination
On/Off switch 8
□ Align the product so that the air bubbles
[Non-Text]
line markings (see figure B).
□ A second person can now mark the
desired points.
Note: The product has two magnets [1]
They allow you to attach the product to
surfaces that attract magnetic objects,
e.g. steel therve
te:
functional errors. If such functional errors
ur, remove the battery briefly and replace
gain.
M
cleaning and care
-
an from replying the baselines, the product pointeance-free.
1.2017
Clean the outside of the product only
with a soft, slightly moist cloth. Never
use liquids of cleaning agents, as they may damage the product.
□
paint brush.
Store the product in as dry and dust-free condensate as possible.
If the product is not to be used for a pro-
lor
sftc
Disposal
Disposal
: packaging is made entirely of recyclable
terials, which you may dispose of at local
yei
。
3
separation, which a
with abbreviations (a) and numbers (b) with following meaning:
1-7: plastics/20-22: paper
and fibreboard/80-98:
[Non-Text]
-
materials are recyclable, dispose
of it separately for better waste
treatment. The Triman logo is valid in German only.
• Contact your local refuse dispos
al authority for more details of
how to dispose of your worn-out
[Non-Text]
V
please dispose of the product
properly when it has reached the end of its useful life and act in
end of its useful life and not in the household waste. Information
on collection points and their
opening hours can be obtained
[Non-Text]
Equity or used batteries / rechargeable bat
eries must be recycled in accordance with
Directive 2006/66/EC and its amendments.
Please return the batteries / rechargeable batteries and / so the product to the available
cole
[Non-Text]
y
through incorrect disposal of the batteries /recharge
of the batteries/chargeable batteries!
[Non-Text]
Batteries / rechargeable batteries may not be
disposed of with the usual domestic waste. They may contain toxic heavy metals and are
they may contain loose heavy metals and ore subject to hazardous waste treatment rules
and regulations. The chemical symbols for
heavy metals are as follows: Cd = cadmium,
Ag = mercury, Pb = soda. That is why you should dispose of used batteries / secharge
m = 311
-
-
-
-
m = 311
1 + u1 - 1 = ( 1 + u) u1 < 1 = u
+
|
|
□
。
,
,
,
1
1
,
L
5
-
1
(1)
B
[Non-Text]
。
。
1
1
:
1
。
。
1
F
F
•
T
1
[Non-Text]
5
F
-
-
-
-
m = 311
The
m
-
+
-
-
+
-
-
-
-
1
-
-
T
|
L
-
。
i
F
1
1
F
1
1
1
1
。
6
-
-
1
。
[Non-Text]
。
1
1
3
1
[Non-Text]
。
L
C
9
[Non-Text]
+
[Non-Text]
m = 311
-
-
-
-
m = 311
[Non-Text]
[Non-Text]
[Non-Text]
[Non-Text]
[Non-Text]
[Non-Text]
[Non-Text]
[Non-Text]
[Non-Text]
[Non-Text]
[Non-Text]
[Non-Text]
[Non-Text]
[Non-Text]
[Non-Text]
[Non-Text]
[Non-Text]
[Non-Text]
[Non-Text]
[Non-Text]
[Non-Text]
[Non-Text]
[Non-Text]
[Non-Text]
[Non-Text]
[Non-Text]
[Non-Text]
[Non-Text]
[Non-Text]
[Non-Text]
[Non-Text]
[Non-Text]
[Non-Text]
[Non-Text]
[Non-Text]
[Non-Text]
[Non-Text]
[Non-Text]
[Non-Text]
[Non-Text]
[Non-Text]
[Non-Text]
[Non-Text]
[Non-Text]
[Non-Text]
[Non-Text]
[Non-Text]
m = 311
The Ground Truth image displays a single, solid horizontal line. According to Rule 2 (UNDERSCORE & LINE RULES), this is a stylistic or background line, not a placeholder underscore. Therefore, the OCR result must ignore it and output nothing or only meaningful text. The provided OCR content is "____", which consists of four underscores. This is an incorrect interpretation of the line as a placeholder, violating the rule that stylistic lines must be ignored. The OCR has hallucinated underscores where none should exist based on the GT's visual context. Hence, the OCR result is inconsistent with the Ground Truth.
-
m = 311
[Non-Text]
[Non-Text]
[Non-Text]
[Non-Text]
[Non-Text]
[Non-Text]
[Non-Text]
[Non-Text]
[Non-Text]
[Non-Text]
[Non-Text]
[Non-Text]
[Non-Text]
[Non-Text]
[Non-Text]
[Non-Text]
[Non-Text]
[Non-Text]
[Non-Text]
[Non-Text]
[Non-Text]
[Non-Text]
[Non-Text]
[Non-Text]
[Non-Text]
[Non-Text]
[Non-Text]
[Non-Text]
[Non-Text]
[Non-Text]
[Non-Text]
[Non-Text]
[Non-Text]
[Non-Text]
[Non-Text]
[Non-Text]
[Non-Text]
(No text)
CZ
CZ
CZ
CZ
CZ
CZ
m = 311
-
-
-
-
The Ground Truth image displays a single, solid horizontal line. According to Rule 2 (UNDERSCORE & LINE RULES), this is a stylistic or background line, not a placeholder underscore. Therefore, the OCR result must ignore it and output nothing or only meaningful text. The provided OCR content is "____", which consists of four underscores. This is an incorrect interpretation of the line as a placeholder, violating the rule that stylistic lines must be ignored. The OCR has hallucinated underscores where none should exist based on the GT's visual context. Hence, the OCR result is inconsistent with the Ground Truth.
n
F
-
-
-