
RVC701 - Vacuum Cleaner BLAUPUNKT - Free user manual and instructions
Find the device manual for free RVC701 BLAUPUNKT in PDF.

| Product Type | Canister Vacuum Cleaner |
| Model | RVC701 |
| Brand | Blaupunkt |
| Color | Black/Red |
| Dimensions (L x W x H) | Approx. 40 x 25 x 30 cm |
| Weight | 5.5 kg |
| Power Supply | 220-240 V, 50/60 Hz |
| Power Consumption | 2000 W |
| Suction Power | Adjustable, max 400 W |
| Dust Capacity | 2.5 L |
| Filtration System | HEPA 13 filter |
| Noise Level | 78 dB |
| Cord Length | 8 m |
| Operating Radius | 12 m |
| Attachments Included | Floor brush, crevice tool, upholstery tool |
| Bag Type | Disposable dust bag |
| Bag Indicator | Yes, full indicator light |
| Power Cord Rewind | Automatic |
| Carrying Handle | Yes |
| Maintenance | Clean filter regularly, replace bag when full |
| Safety Features | Overheating protection, automatic shut-off |
| Spare Parts Available | Filter, dust bags, brush roll |
| Repairability | Modular design, easy access to components |
Frequently Asked Questions - RVC701 BLAUPUNKT
User questions about RVC701 BLAUPUNKT
0 question about this device. Answer the ones you know or ask your own.
Ask a new question about this device
Download the instructions for your Vacuum Cleaner in PDF format for free! Find your manual RVC701 - BLAUPUNKT and take your electronic device back in hand. On this page are published all the documents necessary for the use of your device. RVC701 by BLAUPUNKT.
USER MANUAL RVC701 BLAUPUNKT
natural_image
Black robotic vacuum cleaner with blue circular sensor and tassels (no visible text or symbols)Enjoy it.
Robot vacuum cleaner
Staubsauger-Roboter
Robot odkurzający
Robotický vysavač
Robotický vysávač
Robotporszívó
Sesalni robot
Robotski usisivač
natural_image
Technical line drawing of a curved mechanical component with labeled parts (no text or symbols present)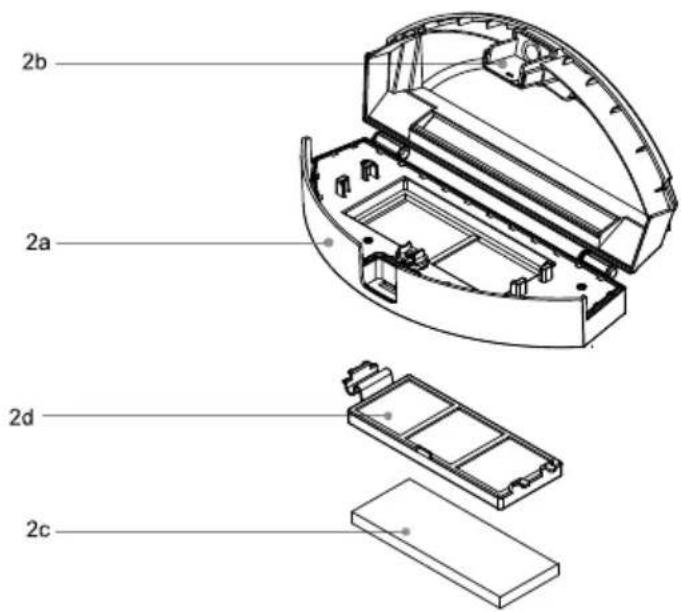

IMPORTANT NOTES
- Before using this device read the instruction manual and follow the instructions inside. The manufacturer is not liable for any damages caused by the misuse of this device due to inappropriate handling. Please keep this manual for future reference.
- This device is for domestic use only. Do not use for any other purposes.
- The device should be cleaned regularly complying with the recommendations described in the section on cleaning and maintenance.
- Do not place the device near sources of heat, flame, an electric heating element or a hot oven. Do not place on any other device.
- This equipment can be used by children aged 8 years and over under as long as supervision is provided. People with reduced physical or mental capabilities, as well as people with no previous experience of using this equipment must be supervised and made aware of the risks. The instruction manual should be used as a reference for the safe use of this equipment. Children should not play with the equipment.
• Children without ensured supervision should not be allowed to perform the cleaning and maintenance of equipment.
• Additional precautions should be taken when using this device in the presence of children or pets. Do not allow children to play with the device.
- Never use the product close to combustibles.
- Never expose the product to atmospheric conditions such as direct sun light or rain, etc... Never use the product in humid conditions (like bathroom or camping house).
- Only Original accessories should be used, as well as
accessories recommended by the manufacturer. Using accessories which are not recommended by the manufacturer may result in damage of the device and may render the device unsafe for use.
• The AC adapter should be connected to an outlet with characteristics consistent with the values on the rating label.
- If the cord or power plug or adaptor is damaged or the plug has a loose electrical outlet, do not charge the device and do not power it from the mains.
- Unplug the AC adapter from the electrical outlet when not in use.
- Do not connect or disconnect the adaptor from the power source with wet hands.
Do not vacuum without first ensuring that filters are installed correctly.
- You cannot vacuum very fine dust such as flour, cement, gypsum powder, toners, or dirt that may be hot, such as ash, cigarette butts, and matches.
- You should use the vacuum cleaner to clean dry surfaces only.
- Do not use the vacuum cleaner on damp and wet cleaned carpets and flooring.
- Do not place any objects on or add any load to the vacuum cleaner. Pay attention to children and animals when the vacuum cleaner is working (so that it is not lifted, hit, or sat on).
- Before starting the vacuum cleaner, make sure that all external doors are closed (the vacuum cleaner can only be used at home).

Conformity
Hereby, Blaupunkt Competence Center 2N-Everpol Sp. z o.o., declares that this equipment is in compliance with the essential requirement and other relevant provisions of Directive 2014/53/EU. Declaration of conformity can be obtained from the product page at www.blaupunkt.com.
Responsible party: 2N-Everpol Sp. z o.o, Puławska 403A, 02-801 Warsaw, Poland, Phone: +48 22 331 99 59, E-mail:
info@everpol.pl
When this crossed-out wheeled bin symbol is attached to a product it means that the product is covered by the European Directive 2012/19/EU. Please inform yourself about the local separate collection system for electrical and electronic products. Used appliance should be delivered to the dedicated collecting points due to hazardous components, which may affect the environment. Do not dispose this appliance in the common waste bin.
Your product contains batteries covered by the European Directive 2006/66/EC, which cannot be dispose with normal household waste. Please inform yourself about the local rules on separate collection of batteries because correct disposal helps to prevent negative consequences for the environmental and human health.
Environmental information
All unnecessary packaging has been omitted. We have tried to make the packaging easy to separate into three materials: cardboard (box), polystyrene foam (buffer) and poly ethylene (bags, protective foam sheet). Your system consists of material which can be recycled and reused if disassembled by a specialized company. Please observe the local regulations regarding the disposal of packaging materials, exhausted batteries and old equipment.

Your products is designed a manufactured with high quality materials and components, which can be recycled and reused.
DEVICE SPECIFICATIONS
Voltage: 24V
Amperage: 600mA
Set of brushes and filters: Blaupunkt ACC045
Battery: Li-ion, 2150mAh
POWER-SUPPLY SPECIFICATIONS
Input voltage: 100-240V\~50/60Hz
Input amperage: max. 400mA
Output voltage: 24V
Output amperage: 600mA
RVC701
- Control panel
1a. Power button
1b. HOME button
1c. PLAN button
1d. Display - Large pull-out dust bin
2a. Bin cover
2b. Bin opening lock
2c. HEPA filter
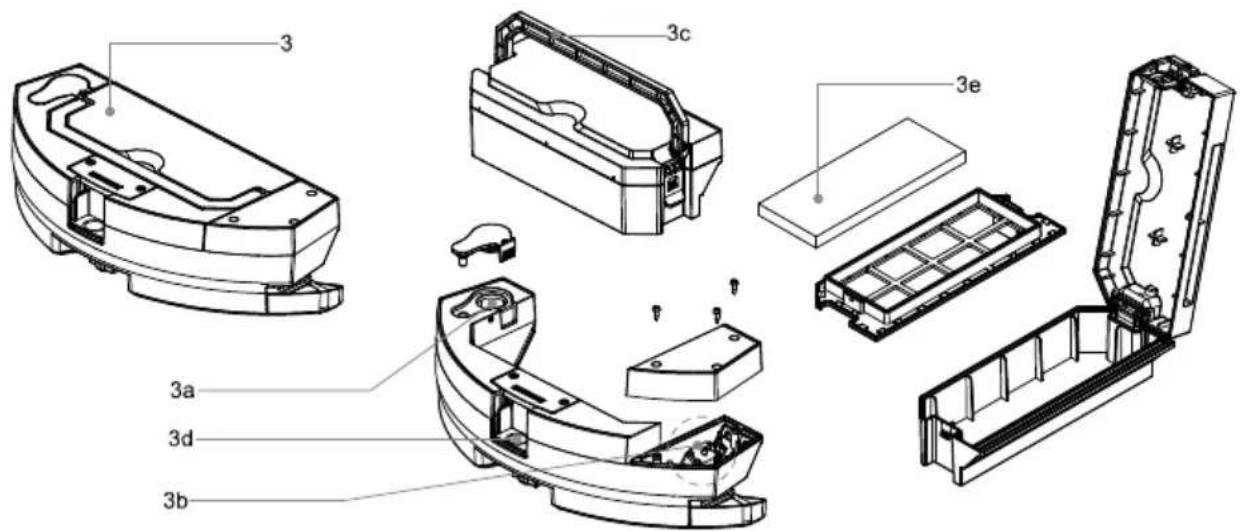
2d. Prefilter - Pull-out dust bin with an integrated water tank
3a. Water inlet
3b. Water pump
3c. Dust bin handle
3d. Dust bin latch
3e. HEPA filter - Bumper
- Front wheel
- Drive wheels
- Collector brushes
- Suction opening
-
Main collector brush
-
Main collector brush cover
- Surface-edge sensors (Anti-fall)
- Main switch
- Charging socket
- Robot charging connectors
- Charging station
- Remote control
16a. Display
16b. HOME button
16c. Direction buttons (allow the robot to move in the indicated directions; only works in standby mode)
16d. MAX button
16e. CLK button – sets the robot's timer
16f. PLAN button – allows you to schedule the robot's operating hours
16g.ON/OFF button – once pressed, the robot starts cleaning or enters standby mode
16h. MODE button – allows you to select the operating mode
BEFORE FIRST USE
- Remove all the paper, carton and foil protecting the vacuum and its parts.
- Install the collector brushes. Press the brush marked with L or R into the appropriate location marked L or R.
- Make sure that the main collector brush is installed correctly.
- Put the dust bin in the robot.
- Place the charging station in a convenient location and connect it to the mains. It is recommended to leave a free space around the station, 1 meter to the sides and 2 meters at the front.
1m
1m
2m
- Charge the device battery according to the instructions.
CHARGING THE DEVICE
- Plug the power supply plug into the charging station, then plug the power supply into an electrical socket. A blue LED will indicate that the station is correctly connected.
- Switch the vacuum cleaner on with the main switch.
- Place the robot vacuum cleaner on the charging station so that the charging connectors touch the corresponding plates on the charging station.
- The display will show "1111" indicating that charging is in process.
- When charging is complete, the display will show "FULL".
Tips:
The first charging should take 12 hours.
Charge the robot as soon as possible after the battery has been discharged.
If the robot is not to be used for a long time, make sure the battery is not discharged.
ROBOT ACTIVITY MODES (STATES)
- off: the robot is switched off with the main switch and does not consume power. It will not charge in the charging station.
- standby state: this state will be reached after the robot is stopped by using the on/off button or the robot is woken up from sleep with the on/off button
- sleep state: the robot will automatically go to sleep after two minutes of inactivity or 10 minutes if it is connected to WiFi and the application is not being used.
Battery power consumption in sleep mode is reduced. Press and hold the on/off button for 6 seconds to enter sleep mode.
DEVICE START-UP
Prepare the surface of the room to be cleaned. Remove sensitive objects, cables, sheets of paper. Raise backdrops, curtains, and drapes hanging to the floor. Cover delicate furniture.
Press the power button to start the robot vacuum cleaner. The robot will start to move and vacuum in automatic mode.
You can change the vacuum modes with the remote control when the vacuum cleaner is in standby mode or vacuuming. Press the Mode button to change the vacuum mode.
1111 - Cleaning along the edges
2222 - Spot cleaning
3333 - Ziqzag mode
4444 - Automatic cleaning
The vacuum power can be changed by pressing the MAX button on the remote control.
CONTROLLING THE ROBOT
- Remote robot control
When the robot is in standby mode, it can be moved by pressing the arrow buttons on the remote control, corresponding to the directions of movement.
- Programming the schedule using the robot's control panel
A. Setting the robot's system clock
A1. Press the "PLAN" button, the robot will display the currently set time.
A2. Two left digits will start flashing (hour). You can increase their value by pressing the "HOME" button.
Press the power @button to set the minutes.
A3. Two right digits will start flashing (minutes). You can increase their value by pressing the "HOME" button.
A4. Press the power Ⓞ button to save the changes. Press the "PLAN" button to exit the time setting mode.
B. Setting the scheduled cleaning time
B1. Hold the "PLAN" button for 5 seconds. The last two digits will start flashing.
B2. Select the schedule number by pressing the "HOME" button. Each press of the "HOME" button will increase the value by one. Confirm with the power button .
B3. Then set the desired hour and minutes.
B4. Press the power Ⓐ button to save the changes. Press the "PLAN" button to exit the schedule setting mode.
NOTES:
-
In order for the cleaning schedule to function properly, it is necessary to program the robot's internal time.
-
The robot will start cleaning at the scheduled time every day.
-
After turning the robot off with the main switch, the time and schedule settings will be reset.
-
To delete the schedule, set the time to 00:00.
-
Programming the schedule using the remote control
3a. Press and hold the "PLAN" button on the remote control for 5 seconds
3b. Use the arrow buttons to set the schedule time
3c. Press the "ON/OFF" button to confirm the schedule time. The robot's display will show the set time. Note: by setting the time on the remote control, you set the start delay in relation to its system time.
Example: time indicated on the remote control is 01:30 AM, the robot's internal time: 08:00 AM, the schedule will be set to 09:30 AM every day.
USING THE VIRTUAL WALL (MAGNETIC STRIP)
To reduce the robot's operating area, you can place the magnetic strip, which will create a virtual wall. As the robot approaches the strip, it will recognise it, makes a turn or turns around. The strip can be placed in the passageway between rooms or used to separate the device from cables or bowls for pets.
CONNECTING THE DEVICE WITH THE WIFI NETWORK AND APPLICATION
Note: The robot only uses a 2.4 GHz network. Make sure the router provides this connection.
Install the BlueBot APP on your phone. It is available from Google Play or Apple store. You can also scan the following code to load the appropriate link:
QR

iOS:Apple App store

Android: Google play store
Next, follow the instructions shown in the application:
-
Register a user account
-
Select the compatible model
-
Reset the vacuum cleaner connection parameters by pressing and holding the home button for 3 seconds
-
The application will ask you to enter the name of the WiFi network and the network access password
-
Connect the phone directly to the network generated by the robot named "RVC_xxxx"
-
If the robot establishes a network connection, a message will appear on the display saying "CONN". In case of an error message, repeat the connection procedure by entering the correct network parameters.
The application allows you to control the basic functions of the robot and monitor its operation. The application contains a detailed user manual for the application.
CLEANING AND MAINTENANCE
- Emptying and cleaning the dust bin:
Pull out the bin. Remove the cover and the internal filter. Empty the bin.
The bin may be cleaned under running water (do not wash in a dishwasher or washing machine). Clean the filter with a soft brush.
- Cleaning the device body
Clean the device with a damp cloth, and then wipe it dry. Do not immerse the device in water. Regularly remove any dirt that might block the air intake opening and sweeping brushes.
LIST OF MESSAGES:
| 1 | E2 | Main switch is off, battery cannot be charged |
| 2 | E3 | Supply voltage too low or automatic recharging of the battery is not possible |
| 3 | E11 | Left surface sensor error |
| 4 | E12 | Right surface sensor error |
| 5 | E13 | Central surface sensor error |
| 6 | E21 | Left wheel suspension error |
| 7 | E22 | Right wheel suspension error |
| 8 | E23 | Central wheel suspension error |
| 9 | E31 | Left bumper sensor error |
| 10 | E32 | Right bumper sensor error |
| 11 | E33 | Central bumper sensor error |
| 12 | E41 | Left wheel overload error |
| 13 | E42 | Right wheel overload error |
| 14 | E43 | Left sweeping brush overload error |
| 15 | E44 | Right sweeping brush overload error |
| 16 | E45 | Motor fan overload |
| 17 | E46 | Main collector brush overload error |
| 18 | L0 | Low battery charge level |
| 19 | 11:11 | Charging in progress |
| 20 | FULL | Battery charged |
| 21 | CONN | Establishing WiFi connection |
| 22 | FAIL | Error in establishing WiFi connection |
| 23 | SUCC | WiFi connection successful |
Akumulator: NiMH, 2150mAh
DANE TECHNICZNE ZASILACZA
PRACOVNÍ REŽIMY (STAVY) ROBOTA
Akumulator: NiMH, 2150mAh
TEHNIČNI PODATKI ZA NAPAJALNIK
Vhodna napetost: 100-240V\~ 50/60Hz
Vhodna intenzivnost: maks. 400mA
2d. Preliminarni filter
- Spremnik za prašinu na izvlačenje s integriranim spremnikom za vodu
3a. Otvor za vodu
3b. Crpka za vodu

- Enjoy it.
- IMPORTANT NOTES
- Conformity
- DEVICE SPECIFICATIONS
- POWER-SUPPLY SPECIFICATIONS
- RVC701
- BEFORE FIRST USE
- CHARGING THE DEVICE
- ROBOT ACTIVITY MODES (STATES)
- DEVICE START-UP
- CONTROLLING THE ROBOT
- USING THE VIRTUAL WALL (MAGNETIC STRIP)
- CONNECTING THE DEVICE WITH THE WIFI NETWORK AND APPLICATION
- CLEANING AND MAINTENANCE
- DANE TECHNICZNE ZASILACZA
- PRACOVNÍ REŽIMY (STAVY) ROBOTA
- TEHNIČNI PODATKI ZA NAPAJALNIK
Brand : BLAUPUNKT
Model : RVC701
Category : Vacuum Cleaner