BDCOM400 - Compressor BLACK & DECKER - Free user manual and instructions
Find the device manual for free BDCOM400 BLACK & DECKER in PDF.


| Product Type | Air Compressor |
| Brand | Black & Decker |
| Model | BDCOM400 |
| Supply Voltage | 220-240 V ~ 50 Hz |
| Motor Power | 1.5 kW (2 HP) |
| Tank Capacity | 25 liters |
| Maximum Pressure | 8 bar (116 psi) |
| Air Flow Rate | 200 L/min |
| Weight | 15 kg |
| Dimensions (L x W x H) | 55 x 35 x 50 cm |
| Noise Level | 80 dB(A) |
| Oil Type | Oil-free (reduced maintenance) |
| Main Functions | Tire inflation, pneumatic tool operation, painting |
| Maintenance and Cleaning | Drain condensate regularly; clean the air filter |
| Safety | Safety valve, automatic shutdown at max pressure |
| Spare Parts and Repairability | Air filter, valves, gaskets available |
| General Information | Portable compressor ideal for DIY and small workshop |
Frequently Asked Questions - BDCOM400 BLACK & DECKER
User questions about BDCOM400 BLACK & DECKER
0 question about this device. Answer the ones you know or ask your own.
Ask a new question about this device
Download the instructions for your Compressor in PDF format for free! Find your manual BDCOM400 - BLACK & DECKER and take your electronic device back in hand. On this page are published all the documents necessary for the use of your device. BDCOM400 by BLACK & DECKER.
USER MANUAL BDCOM400 BLACK & DECKER
text_image
BLACK+ DECKER™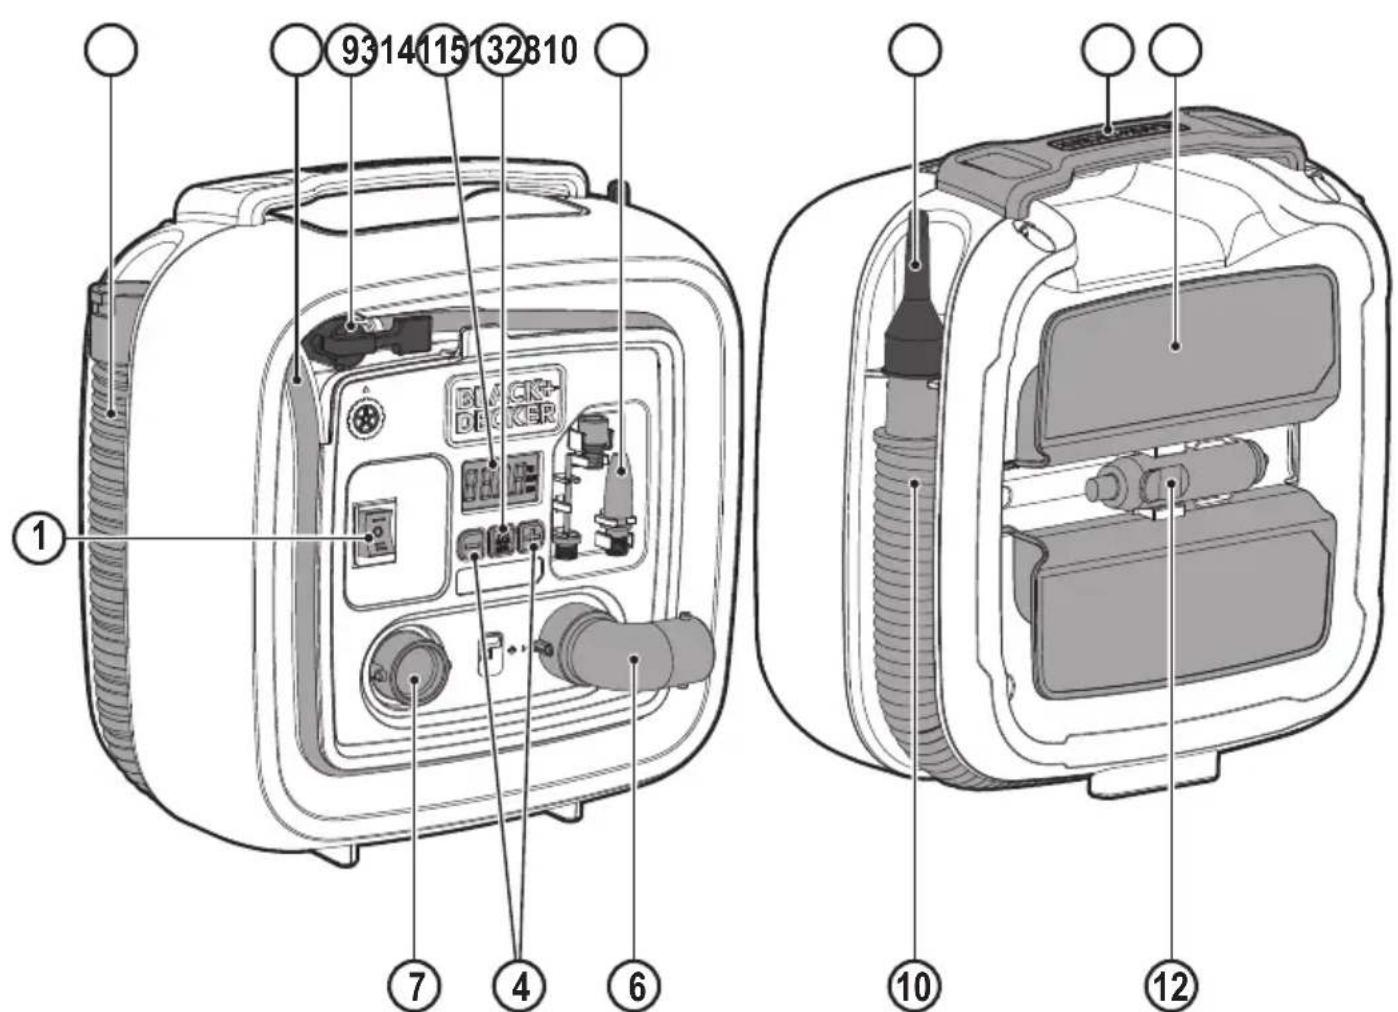
text_image
9314115132810 ① ⑦ ④ ⑥ ⑩ ⑫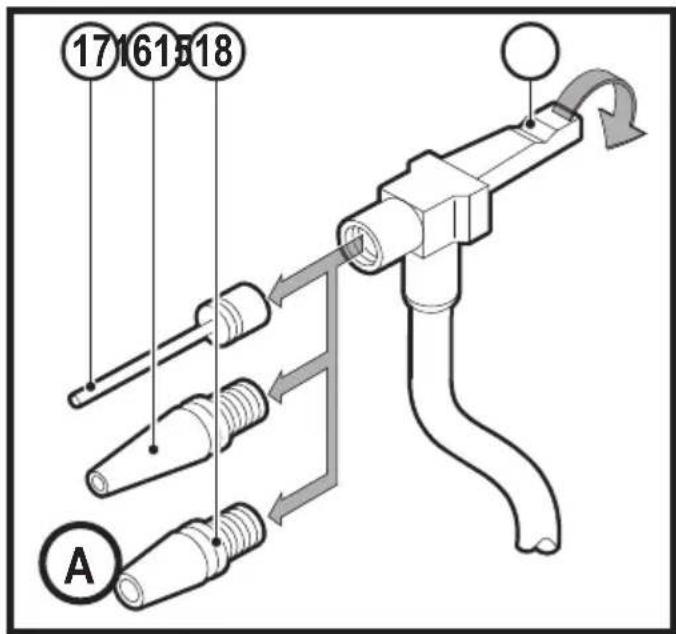
text_image
17 16 15 18 A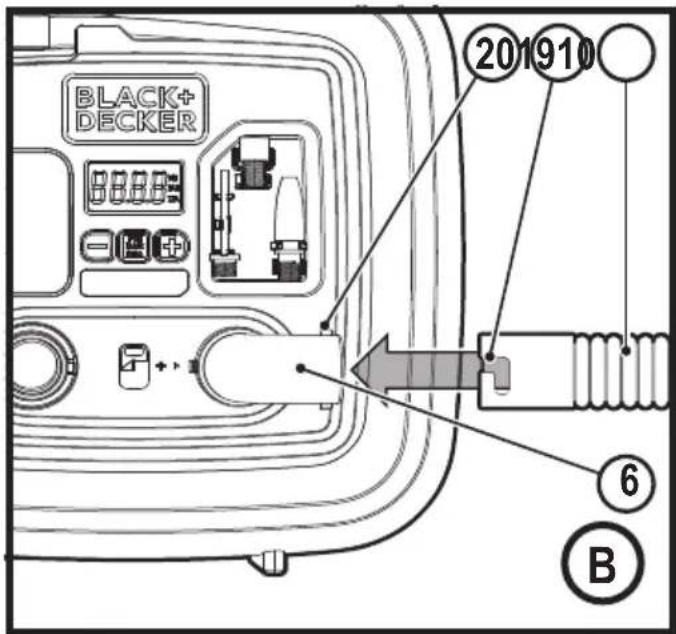
text_image
BLACK+ DECKER 201910 ⑥ B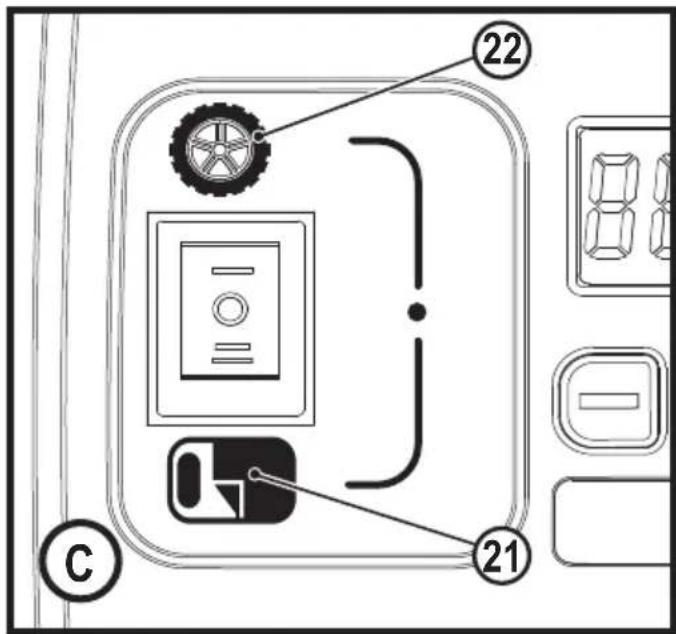
text_image
22 C 21Intended use
Your BLACK+DECKER BDCOM400 Inflation station has been designed to be used cordless or in most vehicles from the standard 12 Volt socket to inflate car and bike tyres, balls, rafts, air mattresses, swimming pool floats, etc. This appliances is intended for This tool is intended for consumer use only.
Read all of this manual carefully before operating the appliance.
Safety instructions

Warning! Read all safety warnings and all instructions.
Failure to follow the warnings and instructions listed below may result in electric shock, fire and/or serious injury.
- The intended use is described in this manual. The use of any accessory or attachment or the performance of any operation with this appliance other than those recommended in this instruction manual may present a risk of personal injury.
text_image
88.8.8 6 D 23 19- Retain this manual for future reference.
Using your appliance
- Do not use the appliance to pick up liquids or any materials that could catch fire.
- Do not immerse the appliance in water.
- Never pull the charger lead to disconnect the charger from the socket. Keep the charger lead away from heat, oil and sharp edges.
Safety of others
- This appliance can be used by children aged from 8 years and above and persons with reduced physical, sensory or mental capabilities or lack of experience and knowledge if they have been given supervision or instruction concerning use of the appliance in a safe way and understand the hazards involved.
Children shall not play with the appliance. Cleaning and user maintenance shall not be made by children without supervision. It must only be supplied at safety extra low voltage corresponding to the marking on the appliance.
Inspection and repairs
Before use, check the appliance for damaged or defective parts.
Check for breakage of parts, damage to switches and any other conditions that may affect its operation.
- Do not use the appliance if any part is damaged or defective.
- Have any damaged or defective parts repaired or replaced by an authorized repair agent.
- Regularly check the charger lead for damage. Replace the charger if the lead is damaged or defective.
- Never attempt to remove or replace any parts other than those specified in this manual.
Additional safety instructions
- Inflate bike tyres, balls, rafts, swimming pool floats, air mattresses, and more in and around the home. Recommended maximum continuous duty at 65 psi is 2 minutes on with 5 minutes off.
- The compressed air from your inflator is not safe for breathing. Never inhale air from your inflator or from a breathing device connected to the inflator.
- Too much air pressure causes a hazardous risk of bursting.
Check the manufacturer's maximum pressure rating for objects being inflated.
- Do not leave inflator running unattended. It could burst tyres or other items.
- Use a tire gauge to check the tyres pressure before each use and while inflating tyres; see the tyre sidewall for the correct tyre pressure.
- Do not modify or attempt to repair. Never drill into, weld, or make any modifications to the inflator or its attachments.
- Operate only with the accessories included or air handling parts acceptable for not less than 160 psi.
- The use of any accessory not recommended for use with this tool could be hazardous.
- Never “horseplay.” High pressure air is dangerous. Don’t direct air-flow at yourself or others.
Warning! Always leave the valve adaptor lever open when not in use.
- Inflator can become hot during use. Allow inflator to cool 30 minutes before storing away.
After use
- Unplug the charger before cleaning.
- When not in use, the appliance should be stored in a dry place.
- Children should not have access to stored appliances.
Residual risks
Additional residual risks may arise when using the tool which may not be included in the enclosed safety warnings. These risks can arise from misuse, prolonged use etc.
Even with the application of the relevant safety regulations and the implementation of safety devices, certain residual risks can not be avoided. These include:
- Injuries caused by touching any rotating/moving parts.
- Injuries caused when changing any parts, blades or accessories.
◆ Injuries caused by prolonged use of a tool. When using any tool for
prolonged periods ensure you take regular breaks.
◆ Impairment of hearing.
- Health hazards caused by breathing dust developed when using your tool (example:- working with wood, especially oak, beech and MDF.)
Labels on tools
The following pictograms, along with the date code, are shown on the tool:

Warning! To reduce the risk of injury, the user must read the instruction manual.

Do not expose the appliance to rain or high humidity.
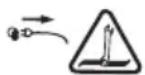
Before performing maintenance or cleaning on the appliance, unplug the supply cord.

Do not leave the inflator unattended.

Class III appliance
Features
This tool includes some or all of the following features.
- Main power switch
- LCD
- Mode toggle button
- Pressure setting buttons
- Handle
- High-volume pump inflate connection
- High-volume pump deflate connection
- High-pressure hose
- Universal valve adapter
- High-volume hose
- Tapered nozzle
- 12V DC vehicle connector
- Cord retainer
- Accessory storage
Assembly
Hose and cord storage
- Wrap the 12V DC cord around the cord retainer 13 and snap the 12V DC connector (12) into its storage location on the cord retainer.
- The high-pressure hose (8) is located in a storage channel around the face of the unit. Open the lever on the valve adapter (9) and slide the adapter over the nub (15) inside the channel. Close the lever to latch the adapter to the nub.
- The accessories are stored on the face of the unit inside the accessory storage area (14).
- The high-volume hose (10) is stored around the edge of the unit and snaps into position at both ends.
Fitting the accessories
Universal valve adapter (Fig. A)
Your inflator is supplied with the standard tapered nozzles (15) and (16) and the needle inflator nozzle (17), located on the front of the unit.
◆ To use the universal valve adaptor (9), make sure the lever is in the up position.
◆ Place the valve adapter over the stem of the inflator needle or tapered nozzle.
◆ Press the lever (18) on the valve adapter down to lock it in place.
◆ Place the inflation needle or tapered nozzle into the item to be inflated.
Note: Always make sure that the lever is in the up position when not in use. Operate your inflator only with the universal valve adaptor or with the included nozzles.
Note: Make sure the universal valve adapter is firmly locked in place before turning the inflator on.
High-volume hose (Fig. B)
- Remove the high-volume hose (10) from the storage location.
◆ Line up the notches (19) of the hose with the nubs (20) of the high-volume pump inflate connection (6). Then, slide the hose on and twist counter-clockwise to secure.
◆ To remove, twist the hose clockwise and slide hose off.
Note: Many inflatables have an internal flap that prevents air loss during inflation, especially air mattresses. Unless this flap is displaced by the nozzle, the inflatable will not inflate. Push the nozzle firmly into the valve to make sure that you push this flap out of the way.
Warning! Risk of Bursting. Excessive air pressure may cause a hazardous risk of bursting or personal injury. Check the manufacturer's maximum pressure rating for items being inflated.
Note: If the pressure rating for the item being inflated is above 100 psi, note that the maximum run time is 10 minutes, leave to rest for 20 minutes before reusing.
Switching on (Fig. C)
To turn on high-volume
The high-volume hose is meant to be used for objects that hold large amounts of air, such as air mattresses, rafts, and swimming pool floats.
Note: The high-volume mode DOES NOT have an auto shut-off feature.
- Attach the high-volume hose (10) to the high-volume pump inflate connection (6) as described in the “High volume hose” section.
- Insert the hose, or it's tapered nozzle (11) into the object being inflated.
◆ Press the high-volume side of the main power switch (1), indicated by the air mattress symbol (21).
◆ To turn off, push the power switch to the center position.
To turn on high-pressure
The high-pressure hose is meant to be used for objects that need more air pressure, such as tyres and basketballs.
◆ Remove the high-pressure hose (8) from the storage.
- Attach a nozzle as described in the “Universal valve adapter” section.
◆ Insert the nozzle into the object being inflated.
◆ Press the high-pressure side of the main power switch (1) indicated by the tire symbol (22).
◆ To turn off, push the power switch to the center position.
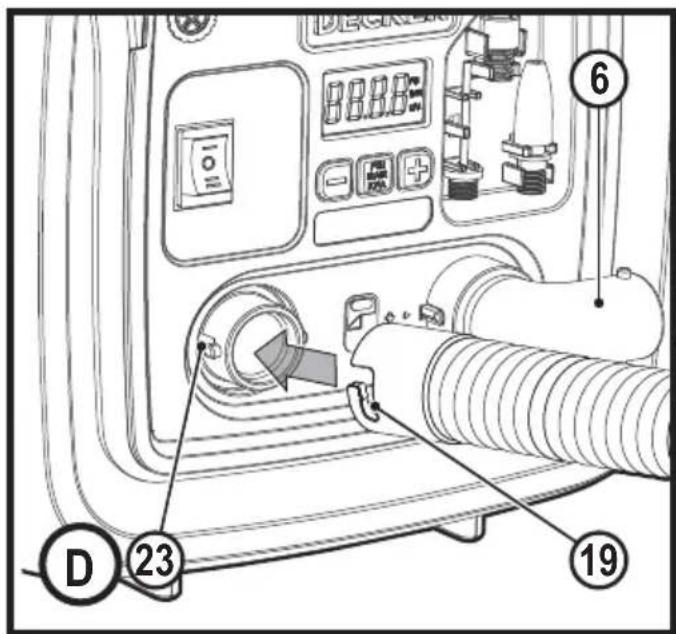
Deflate using the high-volume hose (Fig. D)
Warning! Beware of objects being ejected. When deflating, large amounts of air will exit the high-volume pump inflate connection (6). Ensure the high-volume pump inflate connection is not pointed at anyone or anything.
- Remove the high-volume hose (10) from the storage location.
◆ Line up the notches (19) of the hose with the nubs (23) of the high-volume pump deflate connection (7). Then, slide the hose on and twist counter-clockwise to secure. - Insert the hose, or it's tapered nozzle (11) into the object being deflated.
◆ Press the high-volume side of the main power switch (1), indicated by the air mattress symbol (21).
◆ To turn off, push the power switch to the center position.
◆ To remove the hose, twist the hose clockwise and slide hose off.
Setting the automatic shut-off pressure
Note: The LCD will only show inflation pressures when the inflator is being used. In both inflation and pump mode the unit will show battery status.
- To switch between the different units (psi, bar or kPa), press the mode toggle button (3) until the required units are displayed.
- Press the - or + pressure setting buttons (4) until the required pressure is displayed.
- After 3 seconds the display will flash and return to a reading of "0.0". This is normal.
- Connect the universal valve adaptor and accessories, if required, to the item to be inflated, making sure that the lever of the valve adaptor is in the down position to lock it in place.
◆ To start the inflator press the main power switch 1 on the side of the tire symbol 22. - When the item to be inflated has reached the preset value the unit will automatically turn off.
Note: You may notice the actual pressure reading may drop after a couple of seconds. This is normal.
◆ To stop the inflator at any time, press the main power button back to the center position.
Note: If the main power switch is turned off, all settings will be lost and will need to be reentered. This is a safety feature to prevent the risk of items over inflating.
Using the inflator as a pressure gauge
- Connect the universal valve adaptor 9 to the item to be checked.
- Press the main power switch 1 on the side of the tire symbol 22.
◆ The LCD will display the item's pressure. - After checking, press the main power button back to the center position and return the air hose to the storage location.
Maintenance
Your BLACK+DECKER cordless appliance has been designed to operate over a long period of time with a minimum of maintenance. Continuous satisfactory operation depends upon proper tool care and regular cleaning.
Warning! Before performing any maintenance on cordless appliances:
◆ Run the battery down completely if it is integral and then switch off.
◆ Unplug the charger before cleaning it. Your charger does not require any maintenance apart from regular cleaning.
- Regularly clean the ventilation slots in your appliance/charger using a soft brush or dry cloth.
◆ Regularly clean the motor housing using a damp cloth. Do not use any abrasive or solvent-based cleaner.
Protecting the environment

Separate collection. Products and batteries marked with this symbol must not be disposed of with normal household waste.
Products and batteries contain materials that can be recovered or recycled reducing the demand for raw materials.
Please recycle electrical products and batteries according to local provisions. Further information is available at www.2helpU.com
Technical Data
| BDCOM400 | |
| Voltage 12V DC | |
| Weight 1.83Kg | |
Guarantee
Black & Decker is confident of the quality of its products and offers consumers a 24 month guarantee from the date of purchase. This guarantee is in addition to and in no way prejudices your statutory rights. The guarantee is valid within the territories of the Member States of the European Union and the European Free Trade Area.
To claim on the guarantee, the claim must be in accordance with Black & Decker Terms and Conditions and you will need to submit proof of purchase to the seller or an authorised repair agent. Terms and conditions of the Black & Decker 2 year guarantee and the location of your nearest authorised repair agent can be obtained on the Internet at www.2helpU.com, or by contacting your local Black & Decker office at the address indicated in this manual.
Please visit our website www.blackanddecker.co.uk to register your new Black & Decker product and receive updates on new products and special offers.
| BDCOM400 | |
| Spenning 12V likestrøm | |
| Vekt 1,83 Kg | |