
DVR-S606 - DVD player PIONEER - Free user manual and instructions
Find the device manual for free DVR-S606 PIONEER in PDF.
| Product type | DVD burner drive (DVD±R/RW, CD-R/RW) |
| Brand | PIONEER |
| Model | DVR-S606 |
| Dimensions (L x H x D) | 167 x 56.2 x 272.8 mm |
| Weight | 2.1 kg |
| Power supply | AC adapter 100-240 V, 50/60 Hz; output +12 V/1.5 A and +5 V/1.5 A |
| Power consumption | DVD-ROM reading: 24-37 W; Standby: 8-17 W |
| Interfaces | USB 2.0 (4-pin); IEEE 1394a (2 ports, 6-pin) |
| Buffer memory | 2 MB |
| Write speeds | DVD-R: 1x/2x; DVD-R high speed: 1x/2x/4x; DVD-RW: 1x; DVD-RW high speed: 1x/2x; DVD+R: 2.4x; DVD+R high speed: 2.4x/4x; DVD+RW: 2.4x; CD-R: 4x/8x/12x/16x; CD-RW: 4x; CD-RW high speed: 4x/10x |
| Maximum read speeds | DVD-ROM single layer: 12x; DVD-ROM dual layer: 8x; DVD±R/RW: 6x; CD-ROM/CD-R/CD-RW: 32x; CD audio/video: 10x |
| Supported disc formats | DVD single/dual layer, DVD-R/RW, DVD+R/RW, CD-R/RW, CD-ROM, CD audio, CD video, CD-Extra, Photo CD |
| Operating temperature | +5°C to +35°C |
| Operating humidity | 5% to 85% (without condensation) |
| Orientation | Horizontal or vertical (with supplied stand) |
| Cleaning | Disconnect before cleaning; use a damp cloth; do not use liquid or aerosol products |
| Safety | Do not open the casing (risk of electric shock); Class 1 laser diode; do not expose to humidity or rain; use only the supplied power adapter |
| Supplied accessories | Power adapter, USB cable (1 m), IEEE 1394 cable (2 x 1.5 m), vertical stands (2), manual eject pin, instruction manual |
| Operating system compatibility | Windows 98SE, Windows 2000, Windows Me, Windows XP |
Frequently Asked Questions - DVR-S606 PIONEER
User questions about DVR-S606 PIONEER
0 question about this device. Answer the ones you know or ask your own.
Ask a new question about this device
Download the instructions for your DVD player in PDF format for free! Find your manual DVR-S606 - PIONEER and take your electronic device back in hand. On this page are published all the documents necessary for the use of your device. DVR-S606 by PIONEER.
USER MANUAL DVR-S606 PIONEER
Operating instructions
Mode d'emploi
Bedienungsanleitung
The lightning flash with arrowhead symbol, within an equilateral triangle, is intended to alert the user to the presence of uninsulated 'dangerous voltage' within the product's enclosure that may be of sufficient magnitude to constitute a risk of electric shock to persons.
CAUTION
RISK OF ELECTRIC SHOCK DO NOT OPEN

CAUTION:
TO PREVENT THE RISK OF ELECTRIC SHOCK,DO NOT REMOVE COVER OR BACK.NO USER-SERVICEABLE PARTS INSIDE,REFER SERVICING TO QUALIFIED SERVICE PERSONNEL.
The exclamation point within an equilateral triangle is intended to alert the user to the presence of important operating and maintenance (servicing) instructions in the literature accompanying the appliance, H002.En
IMPORTANT

DANGER D ELECTROCUTION NESPAS OUVRIF

ATTENTION:
POUR EVITER TOUT RISQUE D' ELECTROCUTION, NE PAS ENLEVER THE COUVERCE (NI LE PANNEAU ARRRIERE), AUCUNE PIECE REPARABLE PAR L' USTITILSEUR NE SE TROVUE! 'INTEREUR, CONFIRN TOUT ENTRETIEN A UN PERSONNEL QUALIFIE UNIQUEMENT.
Replacement and mounting of an AC plug on the power supply cord of this unit should be performed only by qualified service personnel.
IMPORTANT
FOR USE IN THE UNITED KINGDOM.
The wires in this mains lead are coloured in accordance with the following code :
Green and Yellow : Earth
Blue Neutral
Brown :Live
If the plug provided is unsuitable for your socket outlets, the plug must be cut off and a suitable plug fitted.
The cut-off plug should be disposed of and must not be inserted into any 13 amp socket as this can result in electric shock. The plug or adaptor or the distribution panel should be provided with 5A fuse, As the colours of the wires in the mains lead of this appliance may not correspond with coloured markings identifying the terminals in your plug, proceed as follows:
The wire which is coloured green and yellow must be connected to the terminal in the plug which is marked with the letter E or by the earth symbol (圆) ,or coloured green or green and yellow.
The wire which is coloured blue must be connected to the terminal which is marked with the letter N or coloured black.
The wire which is coloured brown must be connected to the terminal which is marked with the letter L or coloured red.
NOTE
After replacing or changing a fuse, the fuse cover in the plug must be replaced with a fuse cover which corresponds to the colour of the insert in the base of the plug or the word that is embossed on the base of the plug, and the appliance must not be used without a fuse cover. If lost replacement fuse covers can be obtained from: your dealer.
Only 5 A fuses approved by B.S.I. or A.S.T.A to B.S. 1362 should be used. H004BEn
FOR ENGLAND
This product complies with the Low Voltage Directive (73/23/EEC), EMC Directives (89/336/EEC, 92/31/EEC) and CE Marking Directive (93/68/EEC).
FOR FRANCE
This product contains a laser diode of higher class than 1. To ensure continued safety, do not remove any covers or attempt to gain access to the inside of the product.
Refer all servicing to qualified personnel.
The following caution label appears on your unit.
Location: Bottom of the unit
CLASS 1 LASER PRODUCT LASER KLASSE 1
H018A_En
ATTENTION
CLASS 1 LASER PRODUCT LASER KLASSE 1
H018A_Fr
VORSICHT
CLASS 1 LASER PRODUCT LASER KLASSE 1
H018A_Ge
PRECAUZIONE
CLASS 1 LASER PRODUCT LASER KLASSE 1
H018A_It
PRECAUCION
CLASS 1 LASER PRODUCT LASER KLASSE 1
H018A_Sp
LET OP
CLASS 1 LASER PRODUCT LASER KLASSE 1
H018A_Du
WARNING: THIS PRODUCT EQUIPPED WITH A THREE-WIRE GROUNDING (EARTHING) TYPE PLUG, A PLUG HAVING A THIRD (GROUNDING, EARTHING) PIN, IT WILL ONLY FIT INTO A GROUNDING (EARTHING) TYPE POWER OUTLET. THIS IS A SAFETY FEATURE. IF YOU ARE UNABLE TO INSERT THE PLUG INTO THE OUTLET, CONTACT YOUR ELECTRICIAN TO REPLACE YOUR OBSOLETE OUTLET. DO NOT DEFEAT THE SAFETY PURPOSE OF THE GROUNDING (EARTHING) TYPE PLUG. H043A En
ATTENTION: CE PRODUT ETANT MUNI D'UN TYPE DE FICHE A TROIS FILS DE TERRE, C'EST A DIRE UNE FICHE AVANT UNE TROSIÈME BROCHE DE TERRE, IL S'ADAPTERA UNIQUÉMENT DANS UNE PRISE DE TERRE. CECI EST UNE MESURE DE SECURITE. SIVOUS N'ARRIVEZ PAS A INSERER LA FICHE DANS LA PRISE DE COURANT CONTACTEZ VOTRE ELECTRIÇEN AFIN OU'IL CHANGE LA PRISE DE COURANT OBSOLETE. NE PAS MODIFIER LA FONCTION DE SECURITE OFFERTE PAR LA FICHE DE TERRE. H043 Fr
WARNING: DIESES GERATISTMITEINEMDREIAADRIGEN STECKER (MIT ERDUNGSLIETER) AUSGESTATTET. DIESER STECKER HAT EINEN DRITTEN STIFT (ERDUNGSSTIFT) UND PASSTAUSSICHERHEITSGRUNDENNURIN NETZSTECKDOSEN MIT ERDUNG. FALLS ES NICTMOLGICHIST, DEN NETZSTECKER IN DIE STECKDOSE Z STECKEN, WENDEN SIE SICH AN EINEN ELEKTRIKER, DAMIT ER DIE VERALTETE STECKDOSE AUSTAUSCHT. SETZEN SIESICH NICTÜBER DISESTERTEKHERHITSFUNTION DES STECKERS MIT ERDUNG HINweg.
H043 Ge
AVVERTENZA: QUESTO PRODOTTO, ESSENDOMUNITO DI UN TIPO DI SPINA A TRE POLI CON MESSA A TERRA, UNA SPINA AVENTE CIOE UN TERZO POLO DI TERRA, SI ADATTERA SOLTANTO AD UNA PRESA DOTATA DI MESSA A TERRA. QUESTO PER UNA MISURA DI SICUREZZA. SE NON RIUSCITE AD INSERIRE LA SPINA NELLA VOSTRA PRESA DI CORRENTE, CONTATTATE IL VS. ELETRICISTA PER SOSTITUIRE LA PRESA DI CORRENTE PROBABILMENTE OBSOLETA. NON MODIFICARE LA MISURA DI SICUREZZA DATA DALLA MESSA A TERRA.
H043 It
CAUTION : USE OF CONTROLS OR ADJUSTMENTS OR PERFORMANCE OF PROCEDURES OTHER THAN THOSE SPECIFIED HEREIN MAY RESULT IN HAZARDOUS RADIATION EXPOSURE.
CAUTION : THE USE OF OPTICAL INSTRUMENTS WITH THIS PRODUCT WILL INCREASE EYE HAZARD.
H013 En
NOTE: This equipment has been tested and found to comply with the limits for a Class B digital device, pursuant to Part 15 of the FCC Rules. These limits are designed to provide reasonable protection against harmful interference in a residential installation. This equipment generates, uses, and can radiate radio frequency energy and, if not installed and used in accordance with the instructions, may cause harmful interference to radio communications. However, there is no guarantee that interference will not occur in a particular installation. If this equipment does cause harmful interference to radio or television reception, which can be determined by turning the equipment off and on, the user is encouraged to try to correct the interference by one or more of the following measures:
-Reorient or relocate the receiving antenna.
-Increase the separation between the equipment and receiver.
- Connect the equipment into an outlet on a circuit different from that to which the receiver is connected.
- Consult the dealer or an experienced radio/TV technician for help.
Information to User
H011En
Alteration or modifications carried out without appropriate authorization may invalidate the user's right to operate the equipment.
FEDERAL COMMUNICATIONS COMMISSION DECLARATION OF CONFORMITY
This device complies with part 15 of the FCC Rules. Operation is subject to the following two conditions: (1) This device may not cause harmful interference, and (2) this device must accept any interference received, including interference that may cause un-desired operation.
Product Name: DVD-R/RW CD-R/RW WRITER
Model Number: DVR-S606
Responsible Party Name: PIONEER ELECTRONICS (USA) INC. Customer Support Division
Address: 1925 E. DOMINGUEZ ST. LONG BEACH, CA 90810 U.S.A.
Phone: (310) 952-2820
CAUTION:
This product satisfies FCC regulations when shielded cables and connectors are used to connect the unit to other equipment. To prevent electromagnetic interference with electric appliances such as radios and televisions, use shielded cables and connectors for connections. H012 En
[For Canadian model]
This Class B digital apparatus complies with Canadian ICES-003.
Handling the cord on this product or cords associated with accessories sold with the product will expose you to lead, a chemical known to the State of California and other governmental entities to cause cancer and birth defects or other reproductive harm.
Wash hands after handling.
IMPORTANT NOTICE
Record the model number and serial numbers of this equipment below. The numbers are on the top panel.
Model No. DVR-S606
Serial No.
Keep these numbers for future use. H059 En
Thank you for buying this Pioneer product.
Please read through these operating instructions so you will know how to operate your model properly. After you have finished reading the instructions, put them away in a safe place for future reference.
WARNING: THE APPARATUS IS NOT WATERPROOFS, TO PREVENT FIRE OR SHOCK HAZARD, DO NOT EXPOSE THIS APPARATUS TO RAIN OR MOISTURE AND DO NOT PUT ANY WATER SOURCE NEAR THIS APPARATUS, SUCH AS VASE, FLOWER POT, COSMETICS CONTAINER AND MEDICINE BOTTLE ETC. H001BEn
Operating Environment
H045 En
Operating environment temperature and humidity:
+5°C - +35°C (+41°F - +95°F); less than 85%RH (cooling vents not blocked)
Do not install in the following locations
- Location exposed to direct sunlight or strong artificial light
- Location exposed to high humidity, or poorly ventilated location
Precautions Regarding Use
Pioneer may not be held liable for the loss of any data or any other direct or indirect damage suffered as the result of the use or breakdown of this product. It is strongly recommended that regular backups be taken of all critical data.
- Care must be taken not to infringe copyright restrictions under the laws of each country. If this device is used to record copyrighted materials, approval must be obtained from the respective copyright holders. The recording of copyrighted materials without the express approval of the respective copyright holders may result in legal penalties. Pioneer disclaims any and all responsibility for any legal damages resulting from the use of this device in the unauthorized copying of copyrighted materials.
All names of corporations, products, and systems listed herein, even when the (^TM) or () symbols are omitted, should be considered the registered trademarks of their respective owners.
[FOR NORTH AMERICA MODELS]
CONSULT WITH THE COMPANY SALES REPRESENTATIVE. "USE ONLY ULLISTED AND CANADIAN CERTIFIED POWER SUPPLY CORD." A POWER SUPPLY CORD TYPE SJT, 18 AWG MINIMUM, 3-WIRE GROUNDED TYPE SHALL BE USED WITH THIS EQUIPMENT.
[FOR EUROPEAN MODELS]
CONSULT WITH THE COMPANY SALES REPRESENTATIVE. "USE ONLY SAFETY LICENSED POWER SUPPLY CORD." A CERTIFIED POWER SUPPLY CORD IS TO BE USED WITH THIS EQUIPMENT. FOR A RATED CURRENT UP TO 6 A, A TYPE NOT LIGHTER THAN H05VV-F 3G 0.75 mm² OR H05VVH2-F 3G 0.75 mm² SHALL BE USED.
For pluggable equipment the socket-outlet shall be installed near the equipment and shall be easily accessible.
- READ INSTRUCTIONS - All the safety and operating instructions should be read before the appliance is operated.
- RETAIN INSTRUCTIONS - The safety and operating instructions should be retained for future reference.
- HEED WARNING - All warnings on the appliance and in the operating instructions should be adhered to.
- FOLLOW INSTRUCTIONS - All operating and use instructions should be followed.
- CLEANING - Unplug this product from the wall outlet before cleaning. Do not use liquid cleaners or aerosol cleaners. Use a damp cloth for cleaning.
- WATER AND MOISTURE - Do not use this product near water.
- ACCESSORIES - Do not place this product on an unstable cart, stand, or table. The product may fall and be seriously damaged.
- VENTILATION - Slots and openings in the cabinet and back or bottom are provided for ventilation and to ensure reliable operation of the product and to protect it from overheating. These openings must not be blocked or covered. They should never be blocked by placing the product on a bed, sofa, rug, or other similar surface. This product should never be placed in a built-in installation unless proper ventilation is provided.
- POWER SOURCES - This product should be operated only from the type of power source indicated on the marking label. If you are not sure of the type of power available, consult your dealer or local power company.
- PLUG - This product is equipped with a wired grounding-type plug (a plug having a third (grounding) pin). This plug will only fit into a grounding type power outlet. This is a safety feature. If you are unable to insert the plug fully into the outlet, contact your electrician to replace your obsolete outlet. Do not defeat the safety purpose of the grounding type plug.
- POWER-CORD PROTECTION - When unplugging the apparatus, pull on the plug - not on the cord. Do not handle the cord on plug with wet hands. Doing so could cause an electric short or shock. Do not allow anything to rest on the power cord. Do not locate this product where persons will walk on the cord.
- OVERLOADING - Do not overload wall outlets and extension cords as this can result in fire or electric shock.
- OBJECT AND LIQUID ENTRY – Never push objects of any kind into this product through openings as they may touch dangerous voltage points or short out parts that could result in a fire or electric shock. Never spill liquid of any kind on the product.
- CONDENSATION - Moisture will form in the operating section of the product and the product's performance will be impaired if the product is brought from cool surroundings into a warm room or if the room temperature rises suddenly. To prevent this, let the product stand in its new surroundings for about an hour or two before switching it on, or ensure that the room temperature rises gradually.
- SERVICING - Do not attempt to service this product yourself as opening or removing covers may expose you to dangerous voltage or other hazards. Refer all servicing to qualified service personnel.
- DAMAGE REQUIRING SERVICE - Unplug this product from the wall outlet and refer servicing to qualified service personnel under the following conditions:
a. When the power cord or plug is damaged.
b. If liquid has been spilled, or objects have fallen into the video product.
c. If the product has been exposed to rain or water.
d. If the product does not operate normally when the operating instructions are followed. Adjust only those controls that are covered by the operating instructions. Improper adjustment of other controls may result in damage and will often require extensive work by a qualified technician to restore the product to its normal operation.
e. If the product has been dropped or the cabinet has been damaged.
f. When the product exhibits a distinct change in performance – this indicates a need for service.
Write Speed
CLV 1X and 2X at DVD-R
CLV 1X, 2X and 4X at High-Speed DVD-R
CLV 1X at DVD-RW
CLV 1X and 2X at High-Speed DVD-RW
CLV 2.4X at DVD+R
CLV 2.4X and 4X at High-Speed DVD+R
CLV 2.4X at DVD+RW
CLV 4X, 8X, 12X and 16X at CD-R
CLV 4X at CD-RW
CLV 4X and 10X at High-Speed CD-RW
Maximum Read Speed
CAV 12X at DVD-ROM (single)
CAV 8X at DVD-ROM (dual)
CAV 6X at DVD-R, DVD-RW, DVD+R, DVD+RW
CAV 32X at CD-ROM, CD-R, CD-RW
CAV 10X at CD-Audio play, Video CD
- Buffer Memory Size :
2 MBytes (Write/Read)
Supports Video CD (single and multiple session)
- LCD Tilt Servo Mechanism
Horizontal/Vertical orientation available
- Low vibration Mechanism by DRA system
Supports CD text format
Disc Format (Read/Write)
DVD single layer/dual layer /120 mm disc/80 mm disc
DVD-R (In case of write, 650nm disc for General only.)
High-Speed DVD-R (4X-SPEED DVD-R Revision 1.0)
DVD-RW
- High-Speed DVD-RW (2X-SPEED DVD-RW Revision 1.0)
DVD+R (Version 1.0)
- High-Speed DVD+R (4X-SPEED DVD+R Version 1.1)
DVD+RW (Version 1.1)
- CD-ROM Mode 1
- CD-ROM XA Mode2 (form 1, form2)
- Photo CD (single and multiple session)
- CD-Extra (CD PLUS)
CD-R
- CD-RW, High-Speed CD-RW
Note:
Specific application program that support above format is needed to write.
FRONT VIEW
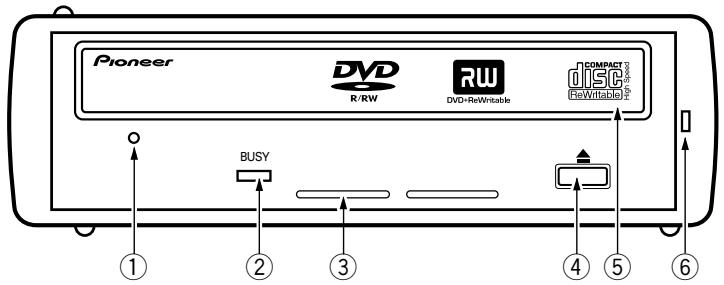
① Forced Ejection Hole
Insert a stiff rod into the hole and push to eject the tray when the tray doesn't unload by pressing the Eject button. In the normal operation, the eject button should be used to unload the tray. Make sure the power of the drive is turned off and wait more than one minute till the disc rotation is stopped when access the eject hole.
② BUSY Indicator
Operation status is indicated as follows.
During reading
Lights
During writing
Lights
③ Ventilation Hole
Do not block this part.
④ Eject Button (▲)
To unload /load the disc, press the button.
⑤ Disc Tray
Open the loading tray by pressing the eject button, then place a CD or DVD disc into the slit with the label facing up.
Press the eject button or push the front part of tray to load the tray with the disc.
Do not attempt to pull out the disc tray forcibly.
⑥ Power Indicator
Lights when the unit is on.
Precautions on playing 8 cm (3.15") Discs
An 8 cm (3.15") disc cannot be played even an adapter is attached to the disc when the drive is upright condition.
ABOUT REGION CODES
The region code can be changed ONLY 5 times, including the 1st setting. Please be aware the 5th change will be PERMANENT, therefore, please pay attention when changing region codes.
- Region codes are part of the DVD Standard. However, Region codes on DVD discs are optional. DVD discs with no specified Region code can be played on all players.
REAR VIEW
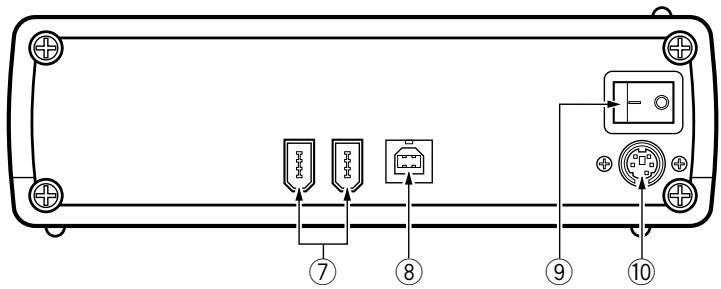
⑦ IEEE 1394 Connectors
Connects 6-pin IEEE 1394 I/O connectors.
USB 2.0 connector
Connects 4-pin USB 2.0 I/O connector.
⑨ Power switch
Turns power on/off.
10 DC IN
Connects supplied AC adapter.
Use only supplied AC adapter.
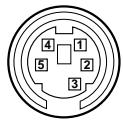
| Pin | Name | Pin | Name |
| 1 | +5 V | 4 | GND |
| 2 | +5 V | 5 | GND |
| 3 | +12 V |
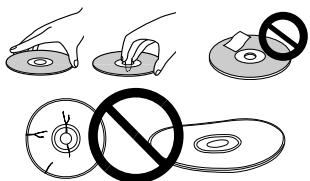
- Avoid touching or scratching the signal surface (shiny side) of the disc.
- Hold the disc by the edges or by the center hold and one edge.
- Do not affix paper or labels to the disc.
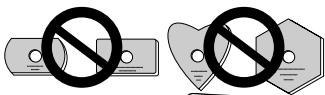
- Discard warped or cracked discs as they may cause damage to the drive.
- Avoid specially shaped discs such as hearts or polygons.
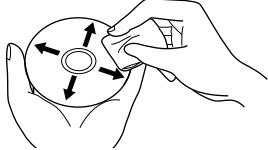
- Remove dust or lint from the disc with a soft cloth by wiping from the inside to the outside edge rather than in a circular motion.
- Do not use record-cleaning or anti-static agents as the solutions may cause damage to a disc.
Always be sure to store your discs in proper DVD-R storage cases when not in use, and always be sure to check for dirt or dust on discs (especially on the recording side) before use.
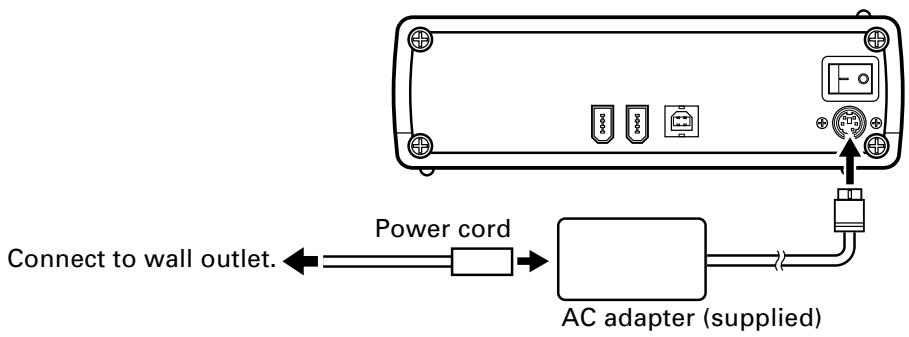
Connect the unit to the supplied AC adapter and connect the USB or IEEE 1394 cable.
AC adapter connection
Connect the AC adapter plug to the DC IN connector on the rear panel of the unit and use the supplied power cord to connect the AC adapter to a wall outlet.
Do not use other than the supplied AC adapter.
USB Cable Connection
This is a hot plug unit.
- Turn on the unit.
- Turn on the computer and start up Windows.
-
Connect the USB connector on the rear of the unit to the computer using the supplied USB cable.
-
Purchase a USB 2.0 board for computers without such a port. (Although connection to a USB 1.1 port is possible, the unit will then not yield specified optimum performance.)
Turn on the unit before connecting it to the computer.
Be sure not to disconnect it during data transfers.
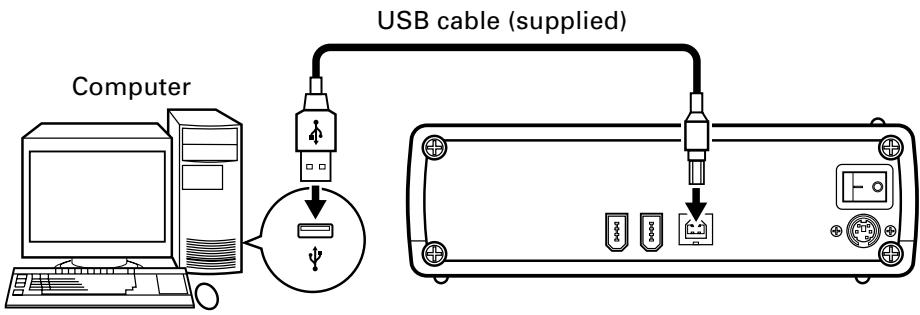
Note: Do not connect the unit using both the IEEE 1394 cable and the USB cable.
IEEE 1394 cable connection
This is a hot plug unit.
- Turn on the unit.
- Turn on the computer and start up Windows.
- Connect the IEEE 1394 connector on the rear of the unit to the computer using the supplied IEEE 1394 cable.
Purchase an IEEE 1394 board for computers without such a port.
- Use the supplied 4P-6P cable for computers with a 4-pin IEEE 1394 port and the 6P-6P cable for computers with a 6-pin IEEE 1394 port.
- The unit is provided with two IEEE 1394 ports to enable daisy chaining. Connect to one of the two ports.
Turn on the unit before connecting it to the computer.
Be sure not to disconnect it during data transfers.
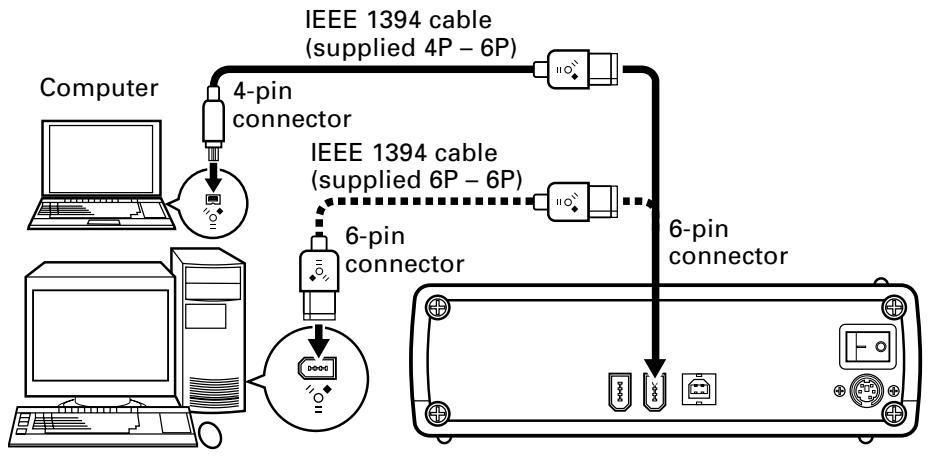
Note: Do not connect the unit using both the IEEE 1394 cable and the USB cable.
The computer writes DVD-R/RW discs when the supplied software has been installed. (The DVD-R/RW writer will not work if the computer or operating system does not support the software.)
Starting DVD-R/RW writing
- Turn on the unit.
- Turn on the computer.
- Press the Eject button to open the disc tray.
- Place the disc in the tray label side up.
- Press the Eject button to close the disc tray.
- Start the program.
Ending DVD-R/RW writing
- Quit the program
- Press the Eject button to open the disc tray.
- Remove the disc.
- Press the Eject button to close the disc tray.
- Shut down the computer.
- Turn off the unit.
For details on how to install the software and write or play discs, see the supplied software manual or Help function.
Manual ejection of discs
Use the manual eject hole to remove discs in the following situations.
-
Do as follows if the unit malfunctions and pressing the Eject button fails to open the disc tray.
-
Shut down the computer and make sure that the disc stops spinning.
- Insert the supplied eject pin in the manual eject hole and press it in hard.
- When the disc tray protrudes by 5 to 10mm , take hold of the tray, open it and remove the disc.

Notes:
- Use only the supplied eject pin.
- Do not force the disc tray open when the disc is still spinning to prevent injury and damage to the unit.
- Do not place objects within an area less than 12 cm away from the front panel.
What may at first seem like a malfunction may only be a simple operation error. Check the list below before doing anything else.
If the problem still persists, contact your dealer or the local Pioneer Service Station.
Contact the software manufacturer for software problems.
The computer or software does not recognize the unit.
- The IEEE 1394 cable or power connector is not correctly plugged in.
Check cable connection. - The operating system does not support the unit.
Use an operating system that supports the unit. (See page 16 for a list of supported operating systems.)
[DVD-R/RW and CD-R/RW Discs]
Data cannot be recorded/errors occur during recording
- Check whether the discs used are the recommended type.
- Check whether there is enough free space on the disc.
- Check whether the required software is installed.
- Check whether the operating environment satisfies software requirements.
- The DVD-R disc can only be recorded at 4x or 2x speeds.
Check whether the disc is a 4x or 2x speed disc.
- Check whether the disc has been finalized (to prevent further recording).
- Check whether the disc is inserted with the label side up and the recording side facing down.
- Check whether the disc is dirty or damaged.
Failure to read recorded discs
- Check whether used disc is the recommended type.
- Check whether the disc is inserted with the label side up.
- Check whether the disc is an unrecorded disc.
- Check whether the disc is dirty or damaged.
- Check whether the required software is installed.
- Check whether the unit is on a level surface.
-
Condensation may have occurred on the optical components. Turn off the unit and wait awhile before trying again.
-
For details on how to record discs, see the Help function or the instruction manual supplied with the software.
[Setting]
This drive is Horizontal and Vertical Use.
- Use the supplied stand to place the unit in vertical position.
[Interface]
USB 2.0 or IEEE 1394a
[Disc Size]
-
12 cm( 4.72^ ) /8 cm( 3.15^ ) *
-
8 cm (3.15") discs cannot be used at upright position.
[Data Transfer Rate]
Data Read (Sustained)
DVD
Max. 16.62 MBytes/sec.
CD
Max. 4.92 MBytes/sec.
(13.7 - 32X CAV Mode over 16 block transfer)
Data Write (Sustained)
DVD
Ave. 5.54 MBytes/sec. (4X DVD-R)
CD
Ave. 2.46 MBytes/sec. (16X CD-R)
- The data transfer rate may not be output due to disc conditions (scratches, etc.).
[Access Time/ Seek Time]
Access time (Random average)
Seek time (Random average)
DVD-ROM 140 ms
CD-ROM 130 ms
DVD-ROM 120 ms
CD-ROM 100 ms
[Power Supply]
AC adapter (supplied): +12VDC / 0.5A, +5VDC / 0.9A
[AC Adapter]
Power source: 100 - 240 V AC, 50 / 60 Hz
Rated output: +12VDC / 1.5A, + 5VDC / 1.5A
[Power Consumption]
When playing DVD-ROM: 24 W (100 V) - 37 W (240 V)
Idle: 8 W (100 V) - 17 W (240 V)
[Other]
Supported operating systems: Windows 98SE, Windows 2000, Windows Me, Windows XP
Dimensions 167 (W) x 56.2 (H) x 272.8 (D) mm
(including front panel) 6-9/16 (W) x 2-7/32 (H) x 10-3/4 (D) in.
Weight 2.1 kg (4.63 lb)
Operation temperature +5^ to +35^ (41°F to 95°F)
Operation humidity 5% to 85% (no condensation)
Storage temperature - 40^ to +60^ (- 40^ to 140^ )
Storage humidity 5% to 90% (no condensation)
[Accessories]
AC adapter: 1
USB cable (1.0 m): 1
IEEE 1394 cable (1.5 m): 2
Vertical stand: 2
Manual eject pin: 1
Operating instructions (this manual): 1
NOTE:
- Specifications and design subject to possible modifications without notice, due to improvements.
Published by Pioneer Corporation.
Copyright © 2003 Pioneer Corporation.
All rights reserved.
[POUR MODELES EUROPEENS]
CONSULTEZ LE REPRESENTANT DES VENTES DE L'ENTREPRISE. "UTILISZE UNIQUÉMENT UN CORDON D'ALIMENTATION DON'T LA SECURTE EST GARANTIE." UN CORDON D'ALIMENTATION CERTIFÉ DOIT ÉTRE UTILISÉ AVEC CET APPAREL. POUR UN COURANT NOMINAL DE 6 AMPÈRES MAXIMUM, UN TYPE D'AU-MOINS H05VV-F 3G 0,75 mm² OU H05VVH2-F 0,75 mm² DOIT ÉTRE UTILISÉ.
DVD Max. 16,62 MBytes/sec.
CD Max. 4,92 MBytes/sec.
Max. 16,62 Mbyte/sec.
Cable USB (1,0 m): 1
Cable IEEE 1394 (1,5 m): 2
Soporte vertical: 2
Copyright © 2003 Pioneer Corporation.
Max. 16,62 MBytes/sec.
CD
Max. 4,92 MBytes/sec.
AFTER-SALES SERVICE FOR PIONEER PRODUCTS
Please contact the dealer or distributor from where you purchased the product for its after-sales service (including warranty conditions) or any other information. In case the necessary information is not available, please contact the Pioneer's subsidiaries (regional service headquarters) listed below:
PLEASE DO NOT SHIP YOUR PRODUCT TO THE COMPANIES at the addresses listed below for repair without advance contact, for these companies are not repair locations.
AMERICA
PIONEER ELECTRONICS (USA) INC.
CUSTOMER SUPPORT DIVISION
P.O. BOX 1760, LONG BEACH, CA 90801-1760, U.S.A.
EUROPE
PIONEER EUROPE NV
EUROPEAN SERVICE DIVISION
HAVEN 1087, KEETBERGLAAN 1, B-9120 MELSELE, BELGIUM
ASEAN
PIONEER ELECTRONICS ASIACENTRE PTE. LTD.
SERVICE DEPARTMENT
253, ALEXANDRA ROAD #04-01 SINGAPORE 159936
JAPAN AND OTHERS
PIONEER CORPORATION (HEAD OFFICE)
CUSTOMER SUPPORT CENTER
Published by Pioneer Corporation.
Copyright © 2003 Pioneer Corporation.
All rights reserved.
PIONEER CORPORATION 4-1, Meguro 1-Chome, Meguro-ku, Tokyo 153-8654, Japan
PIONEER ELECTRONICS (USA) INC.
Multimedia and Mass Storage Division:
2265 East 220th Street, Long Beach, CA 90810, U.S.A. TEL:800-444-OPTI (6784)
Customer Support Division:
1925 East Dominguez St. Long Beach, CA 90810, U.S.A. TEL: 310-952-2820
PIONEER EUROPE NV
Multimedia Division:
PIONEER House, Hollybush Hill STOKE POGES, SLOUGH SL2 4QP U.K. TEL: +44-1753-789-789
PIONEER ELECTRONICS OF CANADA, INC.
Industrial Products Department:
300 Allstate Parkway, Markham, Ontario L3R OP2, Canada TEL: 905-479-4411
PIONEER ELECTRONICS AUSTRALIA PTY. LTD.
178-184 Boundary Road, Braeside, Victoria 3195, Australia TEL:+61-3-9586-6300
PIONEER ELECTRONICS ASIACENTRE PTE. LTD.
253 Alexandra Road, #04-01, Singapore 159936 TEL: +65-6472-1111