
RB 030 P - Alarm Clock ECG - Free user manual and instructions
Find the device manual for free RB 030 P ECG in PDF.


| Type of product | Alarm clock radio |
| Brand | ECG |
| Model | RB 030 P |
| Dimensions (approx.) | 15.0 x 10.0 x 5.0 cm |
| Weight (approx.) | 300 g |
| Power supply | AC adapter 230V~50Hz or 2 x AAA batteries (backup) |
| Radio frequency range | FM 87.5 – 108 MHz |
| Display type | LED digital display |
| Alarm functions | Dual alarm with snooze (9 min), sleep timer, radio or buzzer wake |
| Control type | Rotary knobs and button controls |
| Power consumption | 5 W (max) |
| Cleaning | Wipe with soft dry cloth; do not use liquid cleaners |
| Safety precautions | Keep away from water and moisture; use only supplied adapter |
| Battery backup | Preserves time and alarm settings during power outage |
| Spare parts | Battery cover accessible; no other user-replaceable parts |
| Repairability | Service by qualified personnel; no DIY repair advised |
Frequently Asked Questions - RB 030 P ECG
User questions about RB 030 P ECG
0 question about this device. Answer the ones you know or ask your own.
Ask a new question about this device
Download the instructions for your Alarm Clock in PDF format for free! Find your manual RB 030 P - ECG and take your electronic device back in hand. On this page are published all the documents necessary for the use of your device. RB 030 P by ECG.
USER MANUAL RB 030 P ECG
CZ
Pohled shora A
-
Projector
-
DOWN arrow/Projection
-
Volume
-
Radio/Falling asleep with music
-
Snooze/Dimming display
-
UP arrow/Nap
-
Device settings/Preset memory
-
Alarm clock 1-2
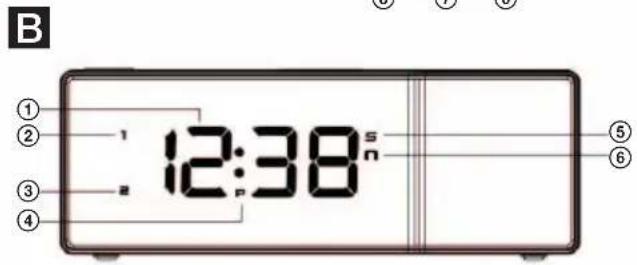
Frontal view B
-
Time
-
Alarm 1
-
Alarm 2
-
AM/PM indicator
-
Sleep timer with music
-
Nap timer
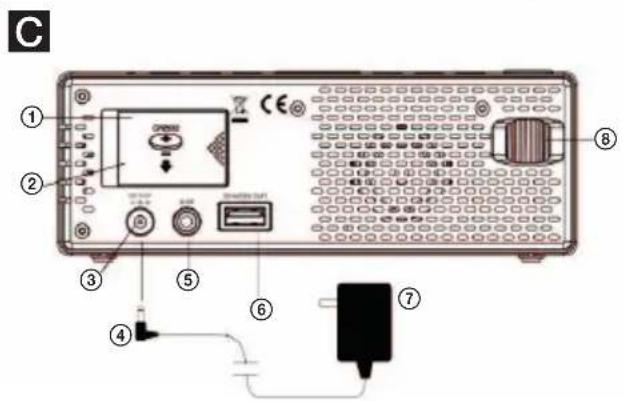
View from the right C
-
Battery space cover
-
Insert battery CR2032
-
DC power jack
-
Power connector (DC jack)
-
External line input AUX
-
USB connector (for charging)
-
AC power adapter
-
Knob
HR
Pogled s gornje strane A
-
Projektor
-
Strelica DOLJE/projekcija
-
Glasnoća
-
Radio/Odlazak na spavanje uz glazbu
-
Spavanje/zatamnjivanje zaslona
-
Strelica GORE/spavanje
-
Postavke uređaja/zadane memorije
-
Budilica 1-2
Pogled sprijeda B
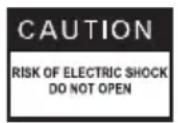
The lightning symbol warns the user about dangerous voltage inside the device box, which could cause injury by shock upon coming into contact with the internal elements of the device.
CAUTION
To reduce the risk of fire or electric shock, do not remove the cover of the device. Have a qualified service technician perform repairs on the device.

WARNING
The exclamation mark alerts the user to important operational instructions in the manual.

WARNING
The device, including accessories. should not be exposed to dripping or splashing water and objects, containing liquids should not be placed on it, e.g. vases. You will reduce the risk of electric shock or damage to the device.
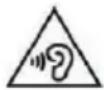
To prevent possible hearing damage, avoid prolonged listening at high volume.

Appliance Protection Class II with double insulation. This device may not be grounded.
Read carefully and keep for future use!
- Before plugging the device in and starting using it, please read this manual thoroughly and follow the provided instructions. Keep this manual for future reference.
- Follow all warnings on the product and in the documentation supplied with the appliance.
- Unplug the device before cleaning. Do not use liquid cleaners or spray cleaners for cleaning. Use wet cloth for cleaning.
- Use only accessories recommended by the manufacturer. Otherwise there is a risk of injury or damage to the device.
- Do not use the device near water and in wet locations such as near a pool, bathtub, kitchen sink, in a damp cellar, laundry room and so on. The device must not be exposed to dripping or splashing water, do not place containers filled with liquids on the device.
- Place the device on a horizontal, flat and firm surface with good ventilation. Do not cover the air vents. Doing so may damage the device by overheating. Do not place the device in a confined space with poor ventilation, for example, in glass cabinets or on tight shelves.
- The appliance should be powered only from a power sources indicated on the product label. If you are unsure of your power network parameters, consult your vendor or your electricity provider.
- The power cord should be led so as to avoid stepping on the cord or its excessive straining or pinching. Pay special attention to places where the power cord leaves the appliance and close to the adapter. If the device is not used for longer periods, unplug the adapter from the wall outlet. Unplug the power supply also during a thunderstorm to prevent damage by lightning.
- The electrical outlet has to be constantly accessible.
- Protect the device against infiltration of liquids or foreign objects and do not insert any object into the ventilation openings, with potentially hazardous contact with voltage inside the device.
- Do not open the device box. There are no elements inside that can be configured by the user. Have a qualified service technician perform repairs on the device.
- In the following cases, unplug the device and contact a qualified service:
• The power cord was damaged
• The device was infiltrated by a foreign object or liquid, or it was exposed to rain or water.
- The appliance does not operate normally in accordance with the manual. Set only the elements described in the operating manual.
-
The device shows significant functionality changes, indicating need for service.
-
Do not expose the device to heat sources such as radiators, heating or other heat-producing appliances such as amplifiers.
- Changes or modifications not expressly approved by the responsible authority can lead to loss of authorization to use the device.
USING THE SYSTEM
Installation
Connect power adapter (C⑦) to the electrical outlet and to DC connector of the adapter. (C④) connect to the DC 5.5V jack (C③). Radio alarm clock is now ready to use.
GB
Installation of backup battery
You need for backup power of the radio alarm clock lithium battery CR2032 (not included) in case of power failure of the power grid.
- Place the device on an even surface.
- Remove the battery space cover (C①).
- Insert new CR2032 battery in the battery space (C②) with the symbol + upwards as marked.
- Replace the battery space cover.
If there is a power failure, the LED display goes out and the radio or alarm clock will not function during the power outage. The new backup battery retains clock settings and other device settings for approximately 3 days. Ensure that a new lithium battery CR2032 is used.
Time setting, 12/24 hour mode and interval for the snooze
- Press SET once (A⑦), the hours will flash. Using arrows ▲ a ▼ (A② and ⑥) set the hour (hold for speedy change).
- Press SET again, the minutes' display starts flashing. Using arrows ▲ and ▼ set minutes.
- Press SET, the display shows and flashes symbol "24H". Using arrows ▲ and ▼ select the time display format "12H" or "24H".
- Press SET, the display shows and flashes the symbol "05". Using ▲ and ▼ set the snooze time (delaying alarm) in the range 5 to 60 minutes.
- Press SET again (or after 10 seconds if no button is pressed), the device exits the setting mode.
Note: If you select the 12-hour clock format, the time will be displayed with symbol "P" (PM) in the afternoon hours. There is no indicator for morning hours (AM).
Setting the alarm clocks
- Press again AL 1.2 (A⑧) symbol 1 and hour flashes. Using arrows ▲ and ▼ (A② and ⑥) set the hour of the first alarm.
- Press again AL 1.2 to set minutes. Using arrows ▲ and ▼ set the minutes of the first alarm clock.
-
Press again AL 1.2. The display shows "OFF" (alarm off). If you want to select the source of sound for the alarm, select using arrows ▲ and ▼
rd: radio alarm
bu: buzzer alarm
OFF: alarm clock is off -
Press again AL 1.2, the symbol 2 and the hour flashes. Using arrows ▲ and ▼ set the alarm of the second alarm clock.
-
Repeat the steps 2 and 3 to complete the setting of the second alarm clock.
-
If you press again AL 1.2 (or if you do not press any button in about 10 seconds), the device exits the alarm clock setting mode. When you select the radio alarm or the buzzer alarm, that alarm will be activated, which is indicated by display of symbol 1 and/or 2 on the left side of the display.
Stopping the alarm and turning it back on for the next day
When the alarm 1 or 2 sounds, its particular symbol 1 or 2 flashes. Press once AL 1.2 (A⑧) to stop the alarm and to activate it for the next day. Symbol 1 or 2 stops flashing and stays permanently displayed.
Note: When the alarm sounds you can press ▲ / NAP (A⑥) or RADIO/SLEEP (A④) to activate the nap timer or start the radio and turn off the alarm for the day.
Delayed alarm function – SNOOZE (the default interval is 5 minutes)
When the alarm sounds, you can press once Zz (A⑤) to mute the alarm and it sounds again after the set snooze interval.
Note: If the second alarm sounds when (or is delayed) the first alarm sounds, the first alarm is suppressed by the second alarm – the first alarm is reset for the next day.
Display brightness setup
By pressing the button Zz (A ⑤) you can set the brightness of the LED display. This can be done only when the radio does not play and when the alarm does not sound.
Using the nap timer
The nap timer (NAP) allows you to briefly relax and let it automatically wake you up in 5, 15, 30, 45, 60, 75 or 90 minutes.
- Press once ▲ / NAP (A⑥), the display shows the nap icon and the default nap time "05" (5 minutes).
- Press repeatedly ▲ / NAP to select the desired nap time. If you do not press any button for 5 seconds, the alarm clock exits the setting mode.
- During the timer countdown the nap symbol is shown on the display. When the timer countdown reaches 0 time the alarm sounds and the nap symbol flashes. Press once ▲ / NAP to stop the alarm, the nap symbol fades.
Note: If the nap timer is set to the time when the alarm should sound, the nap time will be automatically cancelled by the alarm.
FM antenna setting
Extend the telescopic antenna fully and change its orientation to ensure optimum FM reception. Do not disassemble, modify, and connect the antenna to other antennas.
Listening to FM radio
- Turn on the radio, press once SLEEP/RADIO (A④): the display shows "ON" and radio frequency in MHz.
- Using arrows ▲ / ▼ tune in the required radio station. Press and hold ▲ / ▼ to search the nearest station with clear reception.
- If you want to set volume, press once VOL (A③), the display shows "L07". Using ▲ / ▼ adjust volume in range from L01 (minimum) to L15 (maximum)
- Press Zz • ⚙ (A⑤) to turn off the radio.
Note: Keep the radio away from fluorescent lights and other electronic devices that could cause interference with radio reception
Using preset memory
This radio alarm clock offers a total of 10 memory presets for FM stations. You can save in memory your favourite stations and then quickly tune them in.
- Turn on the radio and tune to a station, which you want to store in memory
- Press and hold SET (A⑦). Flashing symbol "01" appear. Press shortly SET to store the frequency in the memory position 1.
- Using ▲/▼ tune another station, which you want to store in memory. Press and hold SET. Flashing symbol "01" appears. Using ▲/▼ select memory position "02" and press shortly SET to store the tuned frequency in the memory position 2.
-
You can store in the memory more stations by repeating steps 2 and 3.
-
You can always tune in the stored presets by pressing shortly SET when the radio is on.
- To edit the list of your saved stations, tune to the newly desired station and repeat steps 2 to 4 The originally saved stations will be overwritten.
Using function falling asleep with music
- Press twice RADIO/SLEEP (A④) to enter falling asleep with music mode. The display flashes the falling asleep symbol "L" and the set interval "05" (5 minutes).
- Press repeatedly RADIO/SLEEP to set as required the falling asleep with music interval to 15, 30, 45, 60, 75 or 90 minutes.
- When the display switches back to time display, you can display the remaining time to shutoff by pressing shortly RADIO/SLEEP.
- The radio will play for the set time and then automatically shuts down.
- If you want to turn off the radio before the set interval, press once Zz (A⑤).
Using the projection function
Press shortly the button ▼ (A②) on the left side of the device to switch on or off the projection function. When the projection is on, you can hold the button ▼ to turn the projected time upside down. On the rear side of the device is a knob (C⑧), with which you can rotate the projected time by 90°.
AUX input and playback music from your smartphone or MP3 player.
You can connect your telephone to radio alarm clock, tablet or MP3 player via AUX input (C⑤) and play music stored in the memory of these devices.
- Using audio cable connect the connector AUX Line-in (C⑤) on the rear of the radio alarm clock to the headphones connector on your phone or on an MP3 player.
- Play the desired music from the player.
Note: When you connect the cable to the connector AUX it is not possible to use the radio function and adjust the volume. Adjust the playback volume on the connected device.
USB connector for charging mobile phones
You can use the USB connector CHARGE OUT (C⑥) to charge your phone.
TROUBLESHOOTING
If your radio alarm clock shows incorrect time or does not function properly, which could be caused by static electricity or other interference, unplug the power connector (C④) from the DC outlet (C③) and remove the backup battery (C②). The device will be reset to default settings and you will need to set it again.
MAINTENANCE AND CLEANING OF THE DEVICE

Unplug the system before cleaning.
- Place the device on a flat surface protected from direct sunlight or excessive heat and humidity.
- Protect glossy furniture or furniture made of wood using a tablecloth or other protective materials between the furniture and the device.
- If the unit is not used for longer period, remove the batteries to prevent leakage and subsequent corrosion.
- Clean the surface of the device with a soft, dry cloth or lightly moistened with a mild detergent solution. Prevent moisture penetrating the device.
- Do not use cleaning agents containing alcohol, ammonia or abrasive ingredients.
TECHNICAL SPECIFICATIONS
| Model RB 030 P | |
| Power AC adapter: AC 100–240 V ~ | 50/60HzUSB power: 5 V, 250 mABackup battery: CR2032 (not included) |
| Time display format 24H/12H | |
| The duration of the alarm 1 hour (3 | minutes alarm, 9 minutes pause) |
| Radio stations memory 10 pre-sets | |
| Power input max. 3.5 W | |
| Dimensions and weight radio alarm | clock: 178 g, 168 × 58 × 42 mm (w × h × d)power adapter: 62 g |
GB
USE AND DISPOSAL OF WASTE
Wrapping paper and corrugated paperboard – deliver to scrapyard. Packing foil, PE bags, plastic elements – throw into plastic recycling containers.
DISPOSAL OF PRODUCTS AT THE END OF LIFETIME
Disposal of electric and electronic equipment (valid in EU member countries and other European countries with an implemented recycling system)
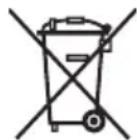
The represented symbol on the product or package means the product shall not be treated as domestic waste. Hand over the product to the specified location for recycling electric and electronic equipment. Prevent negative impacts on human health and the environment by properly recycling your product.
Recycling contributes to preserving natural resources. For more information on the recycling of this product, refer to your local authority, domestic waste processing organization or store, where you purchased the product.
This product complies with EU directive requirements on electromagnetic compatibility and electrical safety.

08/05

The instruction manual is available at website www.ecg-electro.eu. Changes in text and technical parameters reserved.
SIGURNOSNA UPOZORENJA

Oznaka visokog napona upozorenje je korisnicima da unutar uređaja postoje dijelovi pod visokim naponom koji mogu dotaknuti stijenku kućišta s unutrašnje strane i dovesti do električnog udara.
CAUTION
RISK OF ELECTRIC SHOCK DO NOT OPEN
UPOZORENJE
Kako bi se smanjio rizik od požara ili strujnog udara, nemojte skidati poklopac. Popravke povjerite isključivo kvalifi ciranim osobama.

UPOZORENJE
Uskličnik upozorava korisnika na važne upute u priručniku.

UPOZORENJE
Uređaj i pribor ne bi trebali biti izloženi kapljicama ili mlazovima tekućine, te ne bi trebalo stavljati posude s tekućinom na njih, npr. vaze. Tako ćete smanjiti rizik od strujnog udara ili oštećenja uređaja.

Kako biste spriječili oštećenje sluha, izbjegavajte dugotrajno slušanje pri visokoj glasnoći.
PEČAT I POTPIS PRODAVATELJA
www.ecg.cz

- CZ
- Pohled shora A
- Frontal view B
- View from the right C
- HR
- Pogled s gornje strane A
- Pogled sprijeda B
- CAUTION
- WARNING
- Read carefully and keep for future use!
- USING THE SYSTEM
- Installation
- GB
- Installation of backup battery
- Time setting, 12/24 hour mode and interval for the snooze
- Setting the alarm clocks
- Stopping the alarm and turning it back on for the next day
- Delayed alarm function – SNOOZE (the default interval is 5 minutes)
- Display brightness setup
- Using the nap timer
- FM antenna setting
- Listening to FM radio
- Using preset memory
- Using function falling asleep with music
- Using the projection function
- AUX input and playback music from your smartphone or MP3 player.
- USB connector for charging mobile phones
- TROUBLESHOOTING
- MAINTENANCE AND CLEANING OF THE DEVICE
- TECHNICAL SPECIFICATIONS
- USE AND DISPOSAL OF WASTE
- DISPOSAL OF PRODUCTS AT THE END OF LIFETIME
- SIGURNOSNA UPOZORENJA
- UPOZORENJE
- www.ecg.cz
Brand : ECG
Model : RB 030 P
Category : Alarm Clock