
086390000 - Vacuum Cleaner Eta - Free user manual and instructions
Find the device manual for free 086390000 Eta in PDF.


| Product Type | Vacuum Cleaner |
| Model | 086390000 |
| Brand | Eta |
| Protection Class | II |
| Functions | Vacuuming, blowing, exhaustion (via hose connection) |
| Dust Filter | Paper/synthetic, replaceable |
| Micro-filters | Suction and exhaust micro-filters; replace every ~5 dust filter changes |
| Optional Textile Filter | Reusable, sold separately (ETA 0863 00 130) |
| Included Accessories | Floor nozzle, upholstery nozzle, crevice telescopic nozzle, brush, suction hose, suction tubes, power cord, strap, two hose handles (32 mm and 35 mm) |
| Built-in Tool Socket | Yes, max 1000 W |
| Hose Handles | Handle B7 (32 mm) for ETA accessories; Handle B8 (35 mm) for external appliances |
| Floor Nozzle | For carpets and hard floors; brush retractable |
| Safety Features | Safety valve, lid locks, RCD recommended |
| Intended Use | Household, workshop, car cleaning (dry dust only) |
| Not Suitable For | Wet, hot, sharp, explosive materials; fine dust like cement or stone |
| Maintenance | Check brushes after each use; replace dust filter when full; replace micro-filters regularly; service after 300 hours or 3 years |
| Storage | Dry place, away from heat sources, out of reach of children |
| Warranty | Guarantee certificate valid only for Czech Republic and Slovak Republic |
Frequently Asked Questions - 086390000 Eta
User questions about 086390000 Eta
0 question about this device. Answer the ones you know or ask your own.
Ask a new question about this device
Download the instructions for your Vacuum Cleaner in PDF format for free! Find your manual 086390000 - Eta and take your electronic device back in hand. On this page are published all the documents necessary for the use of your device. 086390000 by Eta.
USER MANUAL 086390000 Eta
natural_image
Exterior view of a white and gray plastic appliance with a recessed top and side panel (no text or symbols visible)1
A
B
B1
natural_image
3D rendered image of a dark gray ergonomic device with a cylindrical top and base (no text or symbols visible)B6
B4
B5

B4
B5
natural_image
Coiled black rubber hose with a flanged end (no text or symbols visible)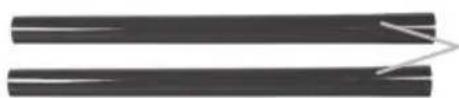
natural_image
Two parallel dark gray bars with a white arrow pointing right (no text or symbols)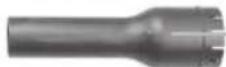
B7
B8
B2
natural_image
Coiled black electrical plug labeled B9, no visible text or symbols on the plug itselfB10
natural_image
Coiled black cable with metal clips and a hook, isolated on white background (no text or symbols)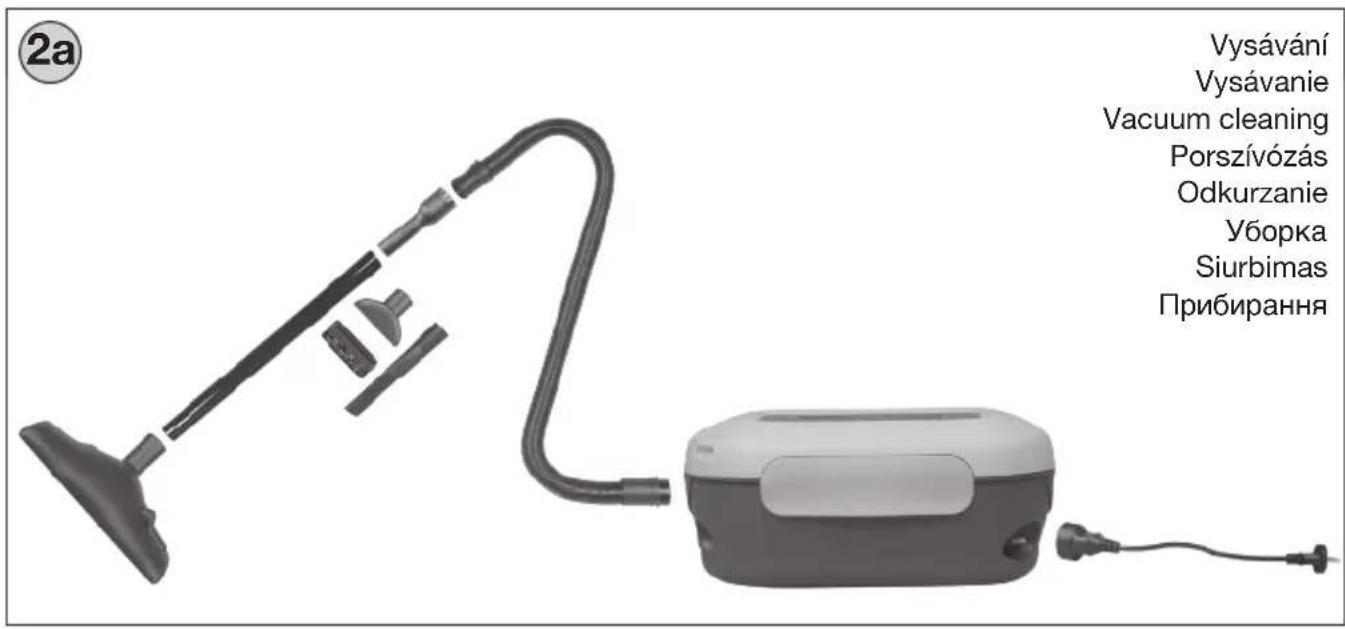
natural_image
Close-up of a white electric shaver with two directional arrows indicating left and right motion (no text or symbols)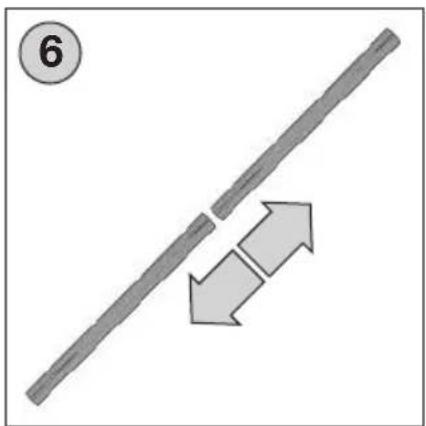
natural_image
Diagram showing two parallel lines with directional arrows, no text or symbols present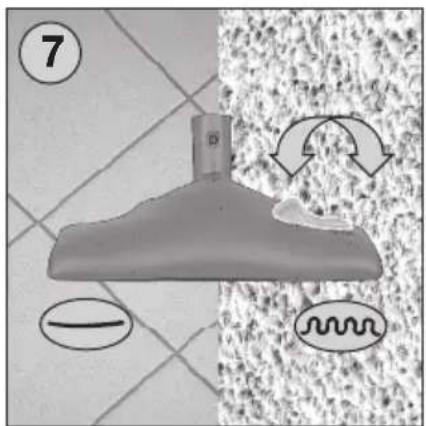
natural_image
Diagram of a mechanical component with directional arrows and a wavy line, no readable text or symbols present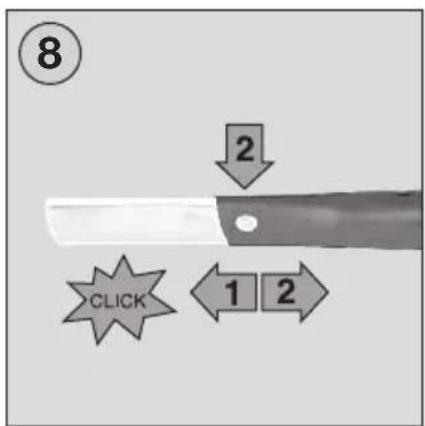
natural_image
Close-up of a hand holding a metal tool against a corrugated metal fence (no text or symbols visible)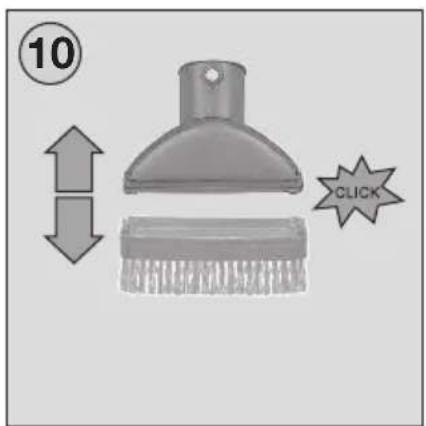
natural_image
Person using a cable to lift a seatbelt, no visible text or symbols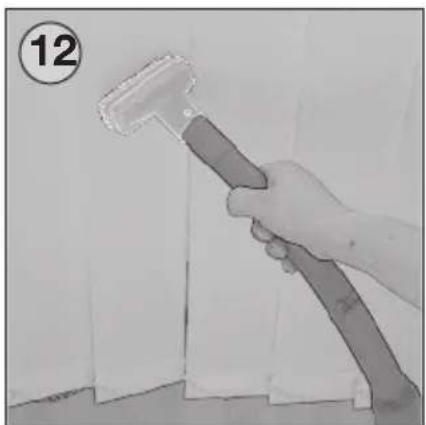
natural_image
Hand holding a tool applying paint to a wall, no text or symbols visible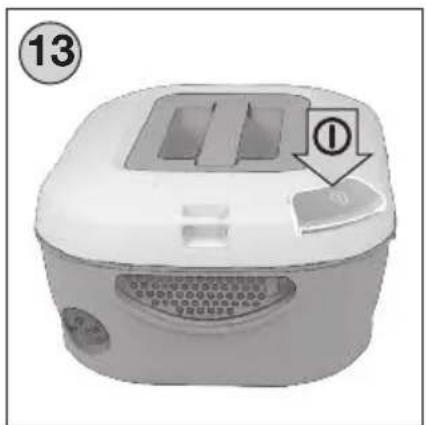
natural_image
Aerial view of a building interior with a large open space and a marked area, showing no visible text or symbols.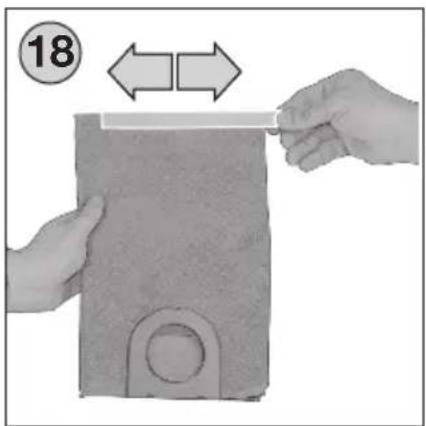
natural_image
Hand placing a textured bag into fragments with black star patterns (no text or symbols)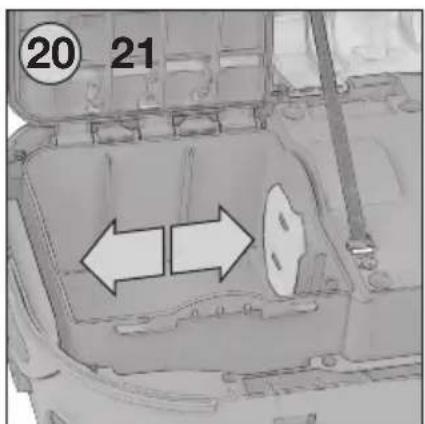
natural_image
Close-up of a mechanical component with plastic housing and mounting holes (no visible text or symbols)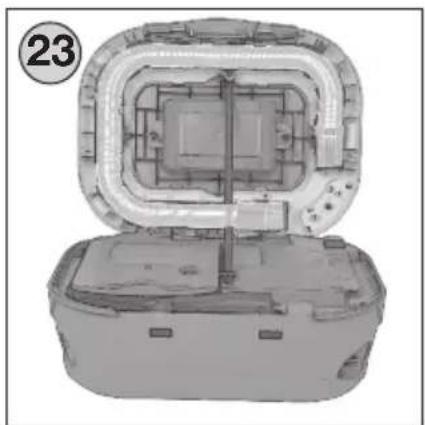
natural_image
Top-down view of a mechanical or electronic component with internal channels and housing (no visible text or symbols)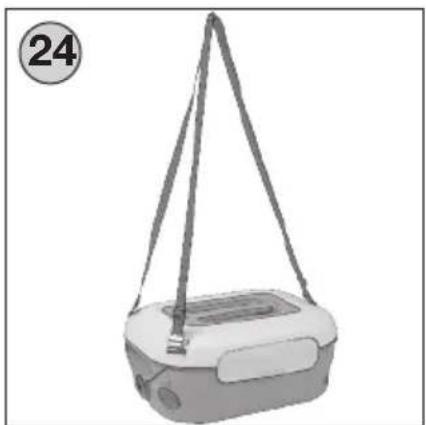
natural_image
Illustration of a handbag with straps and handle, no text or symbols presentNÁVOD K OBSLUZE
Vacuum cleaner 0863 is intended for household, workshop or car cleaning. It is designed for complete cleaning from dust and dry impurities. The vacuum cleaner has the function of concentrated air blowing which can be used for air cleaning of objects and blowing out impurities from areas that are difficult to access. Electric hand tools with the maximum input of 1000 W can be connected to the vacuum cleaner and you can extract dust and impurities created during work.
I. SAFETY WARNING
- Before the first use, read the instructions for use carefully, look at the picture and store the instructions for use for the future. Consider the instructions for use as a part of the appliance and pass them on to any other user of the appliance.
- Check whether the data on the type label correspond with the voltage in your electric power socket.
- Never use the appliance if its power cord or plug is damaged, if it does not work properly, if it fell down and was damaged. In this case take the appliance to a special service to check its safety and proper function.
- The appliance is intended for use in households only and for similar use!
- The appliance is not intended for use by people (including children) whose physical, sensual or mental inability or lack of experience and knowledge prevents safe use of the appliance if they are not supervised or if they have not been instructed regarding the use of the appliance by a person responsible for their safety. Children should be supervised to make sure they will not be playing with the appliance.
- Do not put the suction nozzle or the tube end or accessories close to eyes and ears and do not insert them into body orifices!
- Never use the vacuum cleaner with wet hands or feet!
- When you vacuum a staircase, never leave the vacuum cleaner higher than you stand yourself!
- Never leave the product unattended when in operation!
- Never immerse the vacuum cleaner into water (even its parts)!
- Never vacuum without a properly inserted dust filter and micro-filters!
- When handling the appliance, do not pull the hose and avoid rough handling of the vacuum cleaner!
- Before you start using the vacuum cleaner, please check that all the blocking mechanisms are in the right position.
- The vacuum cleaner is not suitable for vacuuming substances that can harm the human health.
- Never vacuum water, liquids or aggressive fluids!
- Do not vacuum wet or moist floor coverings; do not use the vacuum cleaner for outdoor areas! When moisture gets into the aggregate, there is a risk of its damage and disabling it. This defect is not covered by the warranty.
- Vacuum cleaning of some carpet types may result in generating static electricity. No static electricity discharge is dangerous to health.

- Do not vacuum sharp objects (e.g. glass, splinters), hot, combustible, explosive substances and dust (e.g. ashes, burning cigarette butts, magnesium and
aluminium dust), or lubricants (e.g. fats, oils), pyrotic substances (e.g. acids, solvent substances). Vacuuming these may lead to damage of the dust filter or the vacuum cleaner. - Pores of the dust filter may be clogged when vacuum cleaning very fine dust (e.g. fine sand, cement dust, plaster). Thus, air permeability will be reduced and the suction performance will drop. In this case the dust filter + micro-filters must be changed, even if the dust filter is not full yet.
- The vacuum cleaner is not suitable for vacuuming stone and concrete dust. Vacuuming the above mentioned objects/materials may lead to damage of the dust filter or the vacuum cleaner.
- Do not insert fingers or other things to input and output vents of the appliance. If the openings/elements for air flow are clogged (e.g. the hose), turn the appliance off and clear the clogging.
- If you are using the type equipped with the built-in socket for supply of electric tools, it has to be unplugged from the power supply before its cleaning and maintenance.
- Do not run over the power supply cord when using the vacuum cleaner and do not unplug it from the socket by pulling the power cord.
- Always switch off the vacuum cleaner first and unplug the power cord from power supply and only then replace the dust filter, the micro-filters, clean the vacuum cleaner or its accessories.
- The power cord must not be damaged with sharp or hot objects, open fire; it must not be sunk into water or bent over sharp edges and strained by pulling.
- If you need to use the extension cord, it has to be uncorrupted and it has to comply with the valid standards.
- For additional protection we recommend installation of current protection (RCD) to the power supply circuit with the nominal release current not exceeding 30 mA. Ask a control technician or an electrician for advice.
- If the power cord of the appliance is corrupted, it has to be replaced by the manufacturer, its service technician or a similarly qualified person so as to prevent dangerous situations.
- Never leave the vacuum cleaner exposed to weather conditions (rain, frost, direct sun radiation, etc.).
- In order to ensure safety and proper function of the appliance, use only original spare parts and accessories approved by the manufacturer.
- Never use the appliance for any other purpose than for the intended purpose described in these instructions for use!
- The manufacturer is not responsible for damage caused by improper use of the appliance and the accessories and its guarantee for the appliance does not apply in situations when the safety warnings above are not complied with. Failure to replace or maintain all filters regularly according to the instructions in Chapter IV. USING VACUUM CLEANER and also using non-original filters, the properties of which resulted in failure or damage of the vacuum cleaner, is also understood to be improper use of the appliance.
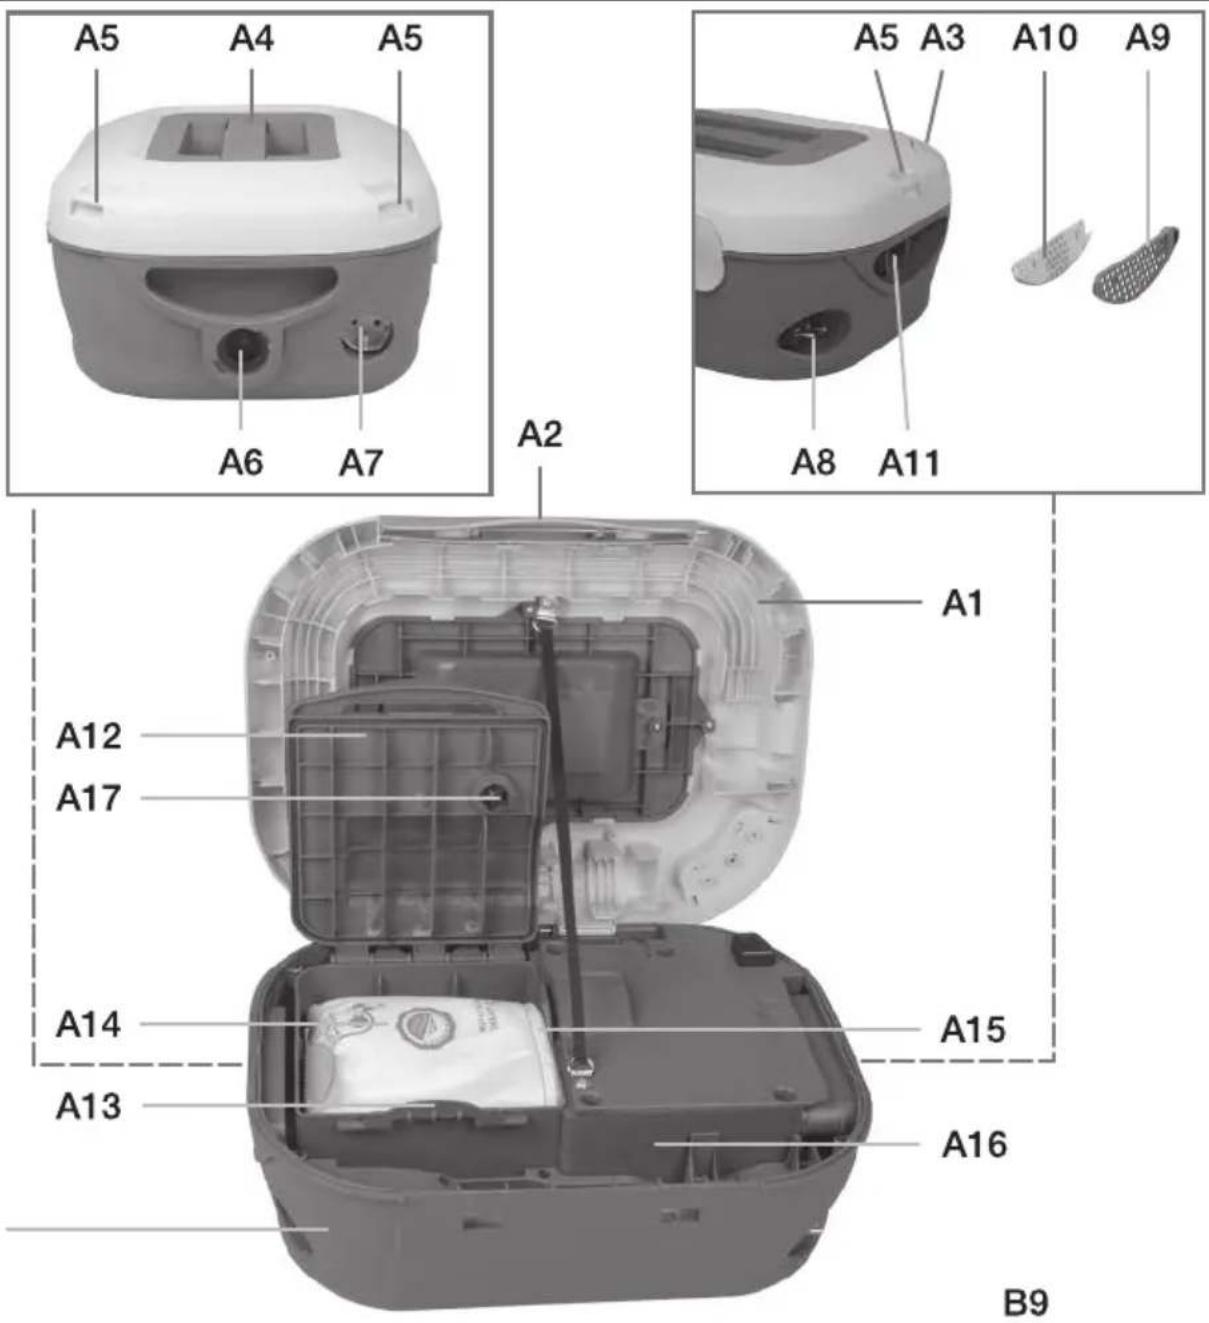
II. EQUIPMENT AND ACCESSORIES OF VACUUM CLEANER ETA - 0863 (Fig. 1)
A - vacuum cleaner
A1 - lid A10 - Exhaust micro-filter
A2 - lid lock button A11 - exhaust vent
A3 - START/STOP button A12 - lid of suction area
A4 - handle A13 - lid lock
A5 - segments for suspending A14 - dust filter
A6 - suction vent A15 - suction micro-filter
A7 - electric socket A16 - equipment storage space
A8 - connection plug A17 - safety valve
A9 - back cover (grid)
B - accessories
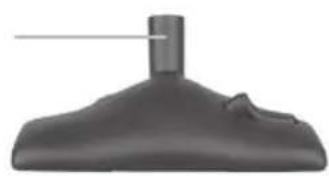
B1 - floor nozzle B6 - crevice telescopic nozzle
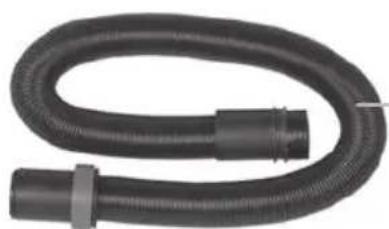
B2 - suction hose B7 - ETA appliance handle
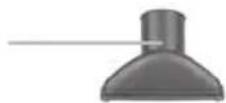
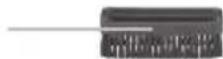
B3 - suction tube B8 - external equipment handle
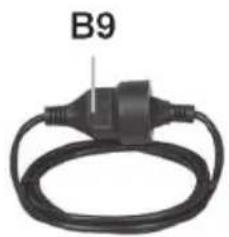
B4 - upholstery nozzle B9 - power cord
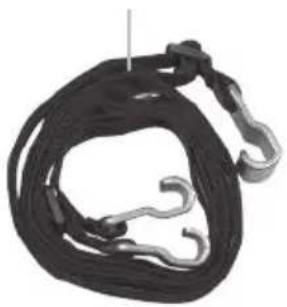
B5 - upholstery nozzle brush B10 - strap
Note
For all types of the vacuum cleaners you can buy extra accessories - the nozzle (ETA 1417 87 104) for vacuuming hard floorings and the textile filter (ETA 0863 00 130).
III. PREPARING THE VACUUM CLEANER
Floor nozzle B1
- Connect and disconnect the accessories in the same way as the tube. The nozzle is designed to be used to clean carpets or smooth flooring (Fig. 7). If the floor nozzle is fitted with the brush, pull it out by switching the flap when vacuuming hard floorings.
Hose B2
- Connect the hose to the vacuum cleaner by sliding the end piece to the suction vent A6 or to the exhaust vent A10 to the maximum position and then turn the end piece clockwise (Fig. 3a, 3b).
- Move in the opposite direction when disconnecting the hose from the vacuum cleaner.
Suction tubes B3
- Connect the tubes by sliding the part with a smaller diameter to the part with a bigger diameter and turn slightly (Fig. 6).
- Move in the opposite direction when disconnecting the tubes.
- You can connect the tubes with the hose handle by slight pushing the handle to the tube.
- Move in the opposite direction when disconnecting the suction tubes.
Crevice/upholstery nozzle, brush

- Connect and disconnect the accessories (B4, B6) in the same way as for the tube. You can connect the accessories directly to the hose handle B7 or to the tube B3.
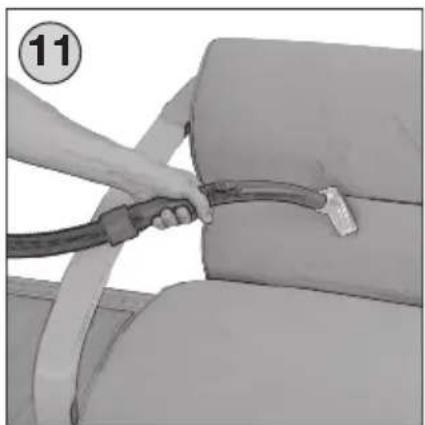
- The upholstery nozzle B4: is used for vacuuming various pieces of furniture (Fig. 11)
- Brush B5: fasten by sliding on the upholstery nozzle (Fig. 10) and vacuum various pieces of furniture (Fig. 12).
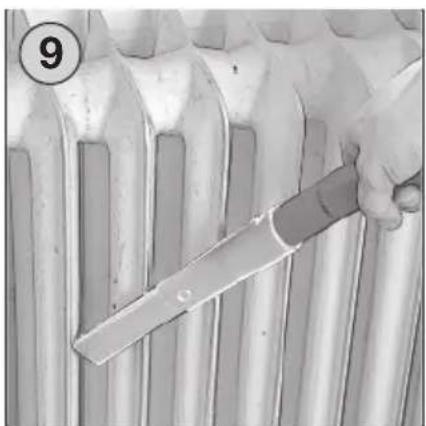
- Crevice nozzle B6: assemble the nozzle according to (Fig. 8) and vacuum places that are hard to access (Fig. 9).
Hose handles B7 / B8
Handle B7 (diameter 32 mm) - enables connection of the ETA accessories (e.g. tube, upholstery/crevice nozzle).
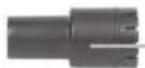
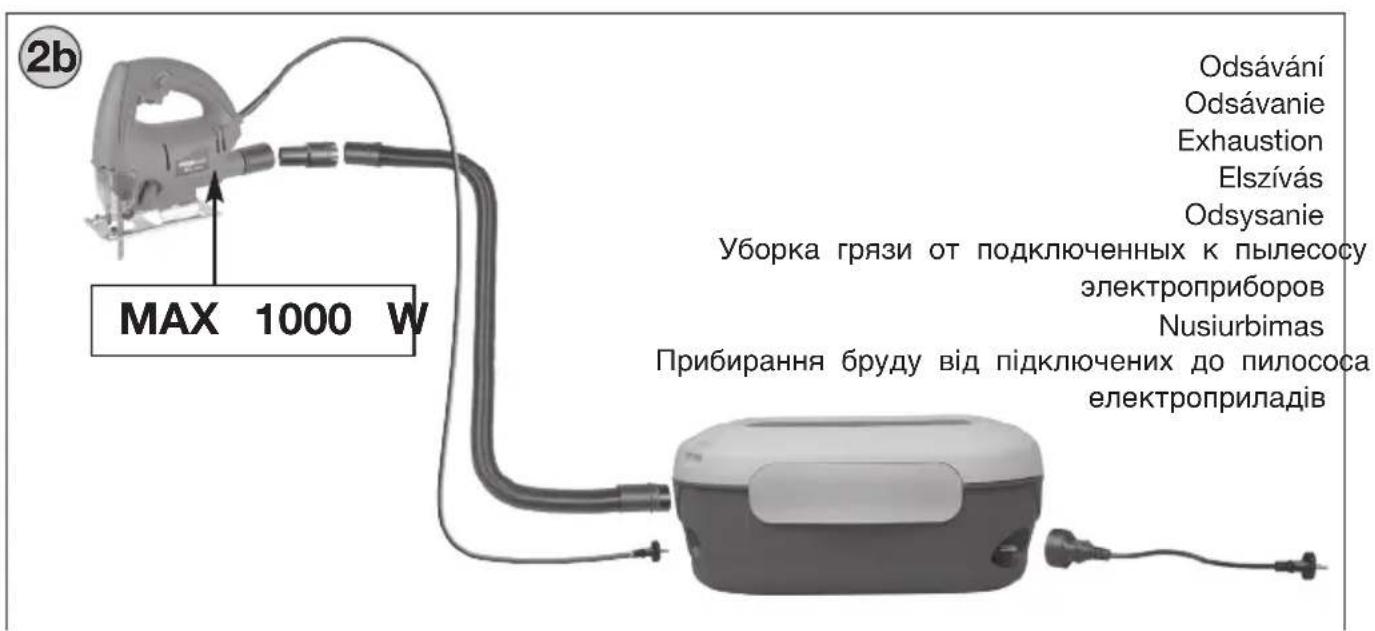
Handle B8 (diameter 35 mm) - enables connection of external appliances to the suction vent (e.g. grinding machine, saw, plane, etc.).
- Slide the selected handle on the hose end piece to the maximum position (you will hear a clicking sound), then move the blocking ring towards the handle (you will hear a clicking sound). In this way you will fasten the handle on the hose end piece (Fig. 4).
- Move in the opposite direction when disconnecting the handle from the hose end piece (it means move the blocking ring towards the hose (you will hear a clicking sound), then remove the handle from the hose by slight pulling.
Power cord B9
Slide the power cord end piece to the plug A8 in the vacuum cleaner and then plug it to the electric power (Fig. 5).
Strap B10
It is designed for easier carrying of the vacuum cleaner on the shoulder or otherwise.
Fasten the strap to the holes A5 in the lid using clamps (Fig. 24).
The vacuum cleaner can also be held and carried by the handle A4.
Electric built-in plug (A7)
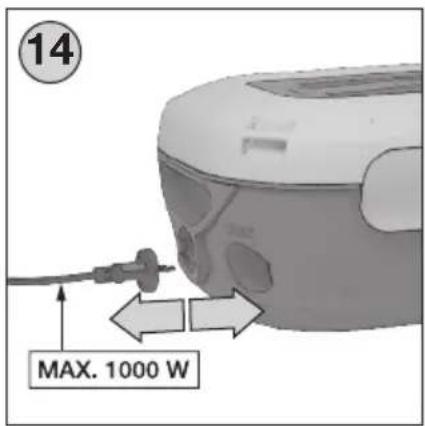
The socket is intended for power supply (e.g. for electric appliances with the maximum input of 1000 W). Plug the power cord plug of the respective appliance to the socket A7 (Fig. 14). An external appliance (e.g. an electric boring machine) can be switched on even if the vacuum cleaner is not on.
IV. USING THE VACUUM CLEANER
Remove all the packing material, take out the vacuum cleaner A and the accessories B.
1) Vacuum cleaning (Fig. 2a)
Insert the end piece of the suction hose B2 to the suction vent of the vacuum cleaner A6 (Fig. 3a). Assemble the vacuum cleaner accessories (B1, B3, B7). According to your cleaning activity you may want to assemble other accessories (B4, B5, B6). The vacuum cleaner can be switched on or off by pushing the button A3 marked with the symbol "①② (Fig. 13). Disconnect the vacuum cleaner from the electric power when you have finished vacuum cleaning.

2) Exhaustion (Fig. 2b)
Insert the end piece of the suction hose B2 to the suction vent of the vacuum cleaner A6 (Fig. 3a). Assemble the vacuum cleaner accessories (B8). Connect external appliances to the suction hose handle to the exhaustion vent (e.g. saws, grinding machines). The vacuum cleaner can be switched on or off by pushing the button A3 marked with the symbol "①④(Fig. 13). Disconnect the vacuum cleaner from the electric power when you have finished vacuum cleaning.
CAUTION
- Never vacuum dust without the dust filter and micro-filters on.
3) Blowing (Fig. 2c)
Remove the back cover A9 from the vacuum cleaner and take out the micro-filter A10. Insert the end piece of the suction hose B2 to the exhaust vent of the vacuum cleaner A11 (Fig. 3b). Assemble the vacuum cleaner accessories (B3, B7). According to your cleaning activity you may want to assemble other accessories (B6). The vacuum cleaner can be switched on or off by pushing the button A3 marked with the symbol "①①(Fig. 13). Disconnect the vacuum cleaner from the electric power when you have finished vacuum cleaning.
CAUTION
- When using the function we recommend removing the dust filter from the suction vent of the vacuum cleaner for higher air performance.
- Be extra careful when using the function. Always use the eye protection!
- Make sure that the air flow is not directed to persons. The blown away material can be thrown to them. Keep safe distance.
Dust filter replacement
Do not forget to control and replace the dust filter regularly. If you find that the suction performance of the vacuum cleaner is lower, make sure that the filter is not full and if so, replace it with a new one.
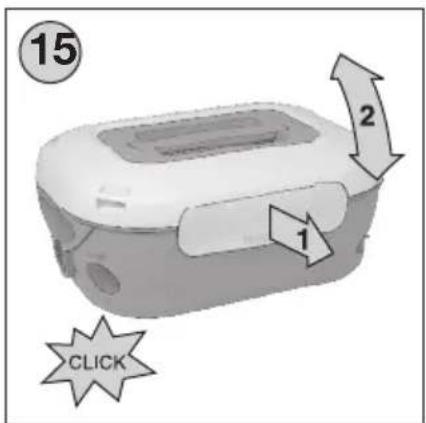
- Lift off the vacuum cleaner lid A1 to the blocked position by pulling the lock A2 slightly (Fig. 15).
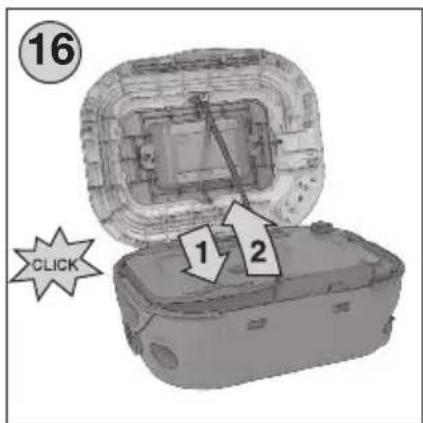
- Release the lid lock by slight pulling of the lock A13 (in the direction of the arrow) and then lift off the lid A12 of the suction area (Fig. 16).
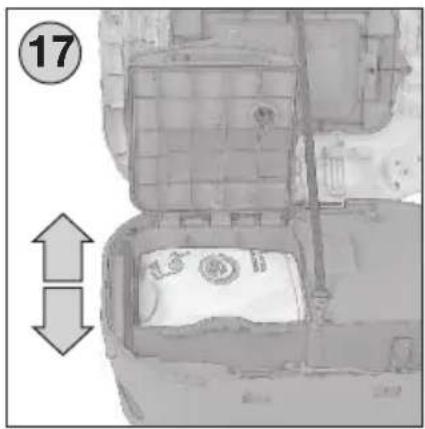
- Hold the carton front and pull out the dust filter A14 (Fig. 17). Dispose of the dust filter with common municipal waste.
- Slide the front of a new dust filter into the two ribs in the suction area to the maximum position.
- Snap the suction area lid shut. You will hear a clicking sound.
CAUTION
- Make sure that the dust filter front in located at the right place in the suction area of the vacuum cleaner.
- Take care that the binding surfaces and the sealing elements are functional.
Replacement of the textile dust filter.
A textile filter can be used for all types of the vacuum cleaner. But it is not
supplied as a part of the type, you can buy it separately (as a spare part). The textile dust filter has the function of the paper/synthetic dust filter. The process of its inserting and removing is the same as the process of replacement of the paper/synthetic dust filter. The textile dust filter is intended for repeated use.
Take the following steps when emptying the textile filter
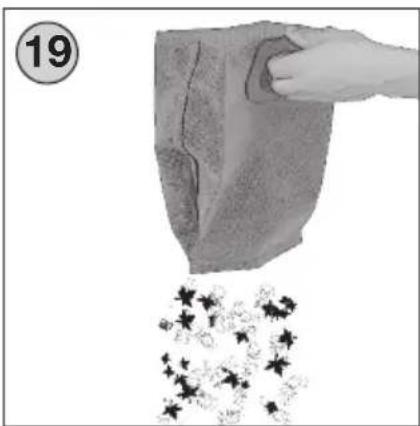
1) Take out the securing lath by side drag (Fig. 18), the textile filter will open, impurities can be removed and the filter has to be knocked out (Fig. 19).
2) Slide on the securing lath by the opposite movement. Take the steps above to fix the textile dust filter back to the holder in the suction area.
CAUTION
- For sanitary reasons we recommend emptying the container outside housing premises.
- Never wash the textile dust filter, do not wet it, etc. (cleaning by knocking out only), never use damaged textile dust filter!
Replacing micro-filters
After filling about 5 dust filters, micro-filters must be replaced with new ones. Dispose of the used dust synthetic filter together with micro-filters with the common municipal waste. You can buy filters and micro-filters in shops with electric appliances.
Suction micro-filter
- Remove the micro-filter A15 in the suction area (Fig. 20).
- Insert the micro-filter in such a way that the rougher part of the micro-filter is directed to the suction area of the vacuum cleaner.
Exhaust micro-filter
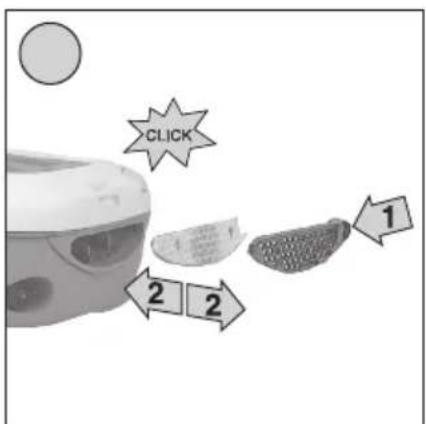
Push the lock in the back part of the back cover A9 and then remove the cover from the vacuum cleaner (Fig. 21). Take out the micro-filter A10 by pulling. Insert the new micro-filter back to the cover. Insert the boss on the back cover to the hole in the vacuum cleaner case and snap the cover shut. You will hear a clicking sound.
CAUTION
- Failure to replace micro-filters may lead to the vacuum cleaner defect! Keep the direction of inserting suction or exhaust micro-filters to the vacuum cleaner.
Storing accessories
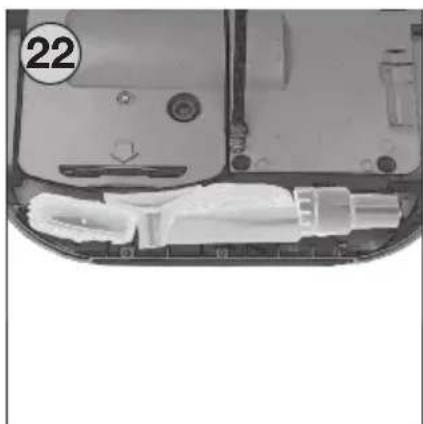
Put the accessories (upholstery, crevice nozzles, brush, handles and strap) to the inside space of the vacuum cleaner A16 (Fig. 22). Put the suction hose to the internal space of the vacuum cleaner cover A1 (Fig. 23). The remaining accessories, the floor nozzle, the suction tubes and the hose can be disassembled or left assembled. When storing, always set the floor nozzle to the carpet position (i.e. with the brush retracted); thus you will prevent bending of the bristles.

V. MAINTENANCE
Store the vacuum cleaner at a dry place, far enough from heat sources (e.g.
fireplace, stove, heating element) and protect it against weather conditions (e.g. rain, sunshine). Treat the appliance surface with a soft damp cloth, do not use coarse and aggressive detergents! For failure-free operation of the vacuum cleaner we recommend checking the aggregate and the general condition of the vacuum cleaner, carrying out repair control of carbon brushes and bearings in a specialized service centre after 300 hours of operation, but not later than in 3 years. Store the appliance properly cleaned at a dry, dust-free place out of reach of children and incapacitated people.
Floor nozzle
It is recommended to check the brushes or collectors for possible impurities after each vacuuming. If there are some impurities, remove them.
VI. TROUBLESHOOTING Problem Cause Solution
| Motor won't start Power | supply not Check the cord, connected | plug and the socket |
| The button is not in the Press the " 0 position " 1 button | ① button | |
| The lid cannot be Dust filter not inserted Check/repair fixing of the carton closed properly in the holder head in the holder | ||
| Suction power Dust bag insufficient | full Replace or empty the bag | |
| Clogged micro-filters Replace the micro-filters | ||
| Nozzles, suction hose or tube is blocked. | Remove the blocking objects | |
VII. ECOLOGY

If the dimensions allow, there are marks of materials used for production of packing, components and accessories as well as their recycling on all parts. The symbols specified on the product or in the accompanying documentation mean that the used electrical or electronic products must not be disposed of together with municipal waste. For proper disposal of the product, hand it over at special collection places where it will be received free of charge. Suitable disposal of the product can help to maintain valuable natural resources and to prevent possible negative impacts on the environment and human health, which could be the possible consequences of improper waste disposal. Ask for more details at the local authorities or at a collection site. Fines can be imposed for improper disposal of this type of waste in agreement with the national regulations. If the appliance is to be put out of operation, after disconnecting from power supply we recommend its cut-off and in this way it will not be possible to use the appliance again.
Replacement of parts that require intervention in the electric part of the appliance must be carried out by a specialized service!

Failure to comply with the instructions of the manufacturer will lead to expiration of the right to guarantee repair!
VIII. TECHNICAL DATA
Voltage (V) specified on the type label of the appliance Input (W) specified on the type label of the appliance Input MAX. (W) specified on the type label of the appliance Protection class appliance II.
The product has received ES declaration of conformity according to Act as amended.
The product matches the requirements of the below statutory order as amended.
– Committee Regulation No. 2006/95/ES as amended, setting the technical requirements of the electrical appliance as low.
- Committee Regulation No. 2004/108/ES as amended, setting the technical requirements of products in terms of their electromagnetic compatibility.
The manufacturer reserves the right to make insignificant changes to the standard make that do not affect the function.
TO AVOID DANGER OF SUFFOCATION, KEEP THIS PLASTIC BAG AWAY FROM BABIES AND CHILDREN. DO NOT USE THIS BAG IN CRIBS, BEDS, CARRIAGES OR PLAYPENS. THIS BAG IS NOT A TOY.
MANUFACTURER: ETA a.s., Poličská 444, 539 01 Hlinsko, Czech Republic.
NÁVOD K OBSLUZE
Guarantee certificate is valid only for Czech Republic and Slovak Republic.
- NÁVOD K OBSLUZE
- SAFETY WARNING
- EQUIPMENT AND ACCESSORIES OF VACUUM CLEANER ETA - 0863 (Fig. 1)
- A - vacuum cleaner
- B - accessories
- Note
- PREPARING THE VACUUM CLEANER
- Floor nozzle B1
- Hose B2
- Suction tubes B3
- Crevice/upholstery nozzle, brush
- Hose handles B7 / B8
- Power cord B9
- Strap B10
- Electric built-in plug (A7)
- USING THE VACUUM CLEANER
- 1) Vacuum cleaning (Fig. 2a)
- 2) Exhaustion (Fig. 2b)
- CAUTION
- 3) Blowing (Fig. 2c)
- Dust filter replacement
- Replacement of the textile dust filter.
- Take the following steps when emptying the textile filter
- Replacing micro-filters
- Suction micro-filter
- Exhaust micro-filter
- Storing accessories
- MAINTENANCE
- Floor nozzle
- ECOLOGY
- TECHNICAL DATA
Brand : Eta
Model : 086390000
Category : Vacuum Cleaner