
Chiara - Food Processor Klarstein - Free user manual and instructions
Find the device manual for free Chiara Klarstein in PDF.

User questions about Chiara Klarstein
0 question about this device. Answer the ones you know or ask your own.
Ask a new question about this device
Download the instructions for your Food Processor in PDF format for free! Find your manual Chiara - Klarstein and take your electronic device back in hand. On this page are published all the documents necessary for the use of your device. Chiara by Klarstein.
USER MANUAL Chiara Klarstein
KLARSTEIN
www.klarstein.com

area
| Category | Value | | -------- | ----- | | 1 | 100 | | 2 | 100 | | 3 | 100 | | 4 | 100 | | 5 | 100 | | 6 | 100 | | 7 | 100 | | 8 | 100 | | 9 | 100 | | 10 | 100 | | 11 | 100 | | 12 | 100 | | 13 | 100 | | 14 | 100 | | 15 | 100 | | 16 | 100 | | 17 | 100 | | 18 | 100 | | 19 | 100 | | 20 | 100 | | 21 | 100 | | 22 | 100 | | 23 | 100 | | 24 | 100 | | 25 | 100 | | 26 | 100 | | 27 | 100 | | 28 | 100 | | 29 | 100 | | 30 | 100 | | 31 | 100 | | 32 | 100 | | 33 | 100 | | 34 | 100 | | 35 | 100 | | 36 | 100 | | 37 | 100 | | 38 | 100 | | 39 | 100 | | 40 | 100 | | 41 | 100 | | 42 | 100 | | 43 | 100 | | 44 | 100 | | 45 | 100 | | 46 | 100 | | 47 | 100 | | 48 | 100 | | 49 | 100 | | 50 | 100 | | 51 | 100 | | 52 | 100 | | 53 | 100 | | 54 | 100 | | 55 | 100 | | 56 | 100 | | 57 | 100 | | 58 | 100 | | 59 | 100 | | 60 | 100 | | 61 | 100 | | 62 | 100 | | 63 | 100 | | 64 | 100 | | 65 | 100 | | 66 | 100 | | 67 | 100 | | 68 | 100 | | 69 | 100 | | 70 | 100 | | 71 | 100 | | 72 | 100 | | 73 | 100 | | 74 | 100 | | 75 | 100 | | 76 | 100 | | 77 | 100 | | 78 | 100 | | 79 | 100 | | 80 | 100 | | Note: The actual values are not provided in the code. The code generates random data for the first few categories (e.g., '2' and '3') and do not provide the corresponding values for the last few categories (e.g., '4'). The values for the last few categories are estimated based on the formula 'E'(l) * (ln(2)) / ln(2) * E'(l)'.INHALT
Technische Daten 3
natural_image
Line drawing of a medical device with a central cap and curved internal structure (no text or symbols)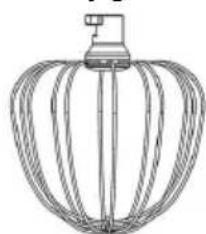
natural_image
Line drawing of a mechanical fan or rack with multiple blades and a handle (no text or symbols)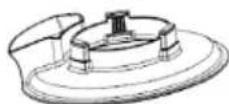
FUNKTIONSTASTEN
natural_image
Line drawing of a modern kitchen mixer with control panel and rotary knob (no text or symbols)natural_image
Line drawing of a kitchen stand with a sewing machine and a mechanical component, no text or symbols present.
natural_image
Line drawing of a kitchen stand with control panel and buttons (no text or symbols)natural_image
Line drawing of a Kiosk with control panel and buttons (no text or symbols)natural_image
Line drawing of a manual washing machine with no visible text or symbols
natural_image
Line drawing of a kitchen mixer with a bowl and brush (no text or symbols)natural_image
Line drawing of a modern kitchen mixer with control panel and buttons (no text or symbols)
WARNUNG
natural_image
Line drawing of a kitchen mixer with a close-up inset showing internal components (no text or labels)
WARNUNG
natural_image
Line drawing of a kitchen mixer with control panel and buttons (no text or symbols)
WARNUNG
natural_image
Line drawing of a kitchen mixer with no visible text or symbolsnatural_image
Symbol of a trash bin crossed with no visible text or labelsBerlin Brands Group UK Limited
PO Box 42
272 Kensington High Street
London, W8 6ND
United Kingdom
OPTIONALES ZUBEHÖR
natural_image
Line drawing of a kitchen feedstock with a handle and screw base (no text or symbols)Zubehör
natural_image
Illustration showing a hand adjusting a circular component with directional arrows, next to a device with a dial (no text or symbols)natural_image
Technical line drawing of a mechanical device with internal components and a circular component, no text or symbols present.natural_image
Technical line drawing of a mechanical device with a pipe fitting and directional arrow (no text or symbols)natural_image
Illustration of a hand turning a circular component with arrows indicating rotation (no text or symbols)natural_image
Illustration showing two-step mechanical assembly: one with a valve and arrow, the other with a hand adjusting a component (no text or symbols)natural_image
Technical line drawing of a mechanical assembly with no visible text or symbolsnatural_image
Line drawing of a hand using a tool to adjust or install a component (no text or symbols present)natural_image
Exploded view of a multi-cylinder drainage system with numbered components (no text or symbols visible)natural_image
Illustration showing a hand holding a small object next to a device with a rotary knob, no text or symbols present.Congratulations on your purchase. Please read the following instructions carefully and follow them to prevent potential damage. We accept no liability for damage caused by disregarding the instructions and improper use. Please scan the QR code to access the latest operating instructions and further information about the product.

INHALT
Technical Data 49
Safety Instructions 50
Scope of delivery 53
Device Overview 54
Function keys 55
Installation 56
Speedsettings 59
Operation 60
Cleaning and maintenance 67
Error messages and troubleshooting 68
Disposal Considerations 69
Manufacturer & Importer (UK) 69
Optional Accessories 70
Meat Grinder (10046348) 70
Pasta Maker (10046349) 79
Salad Maker (10046350) 85
TECHNICAL DATA
| Article number 10045124, 10045125, 10045126 | |
| Power supply 220-240 V ~ 50/60 Hz | |
| Power 1600 W | |
| Adjustable speed Steps 1-12 | |
| Bowl capacity 5 l | |
| Minimum flour 300 g | |
| Maximum weighable weight 1000 g | |
| Optional accessories | Meat Grinder (10046348), Pasta Maker (10046349), Salad Maker(10046350), Bowl (10046352) |
SAFETY INSTRUCTIONS
- Before using the food processor, read and follow all warnings and instructions in this manual, even if you are familiar with the product.
- Keep the device out of the reach of small children.
- This appliance is not intended to be used by persons (including children) with reduced physical, sensory or mental capabilities, or lack of experience and knowledge, unless they have been given supervision or instruction concerning use of the appliance by a person responsible for their safety.
- Children should be supervised to ensure that they do not play with the device.
- Make sure that children and small children do not play with plastic bags or packaging material.
- Be careful when transporting the device. Switch off the device and pull the power plug out before transport.
- Do not attempt to modify this product in any way.

CAUTION
Risk of injury! Never insert the plug into the socket before assembly is complete.
- Keep the power cord away from crowded and wet areas.
- Make sure that the outside of the device does not get wet (water splashes).
- Do not use the device with wet hands.
- Never immerse the device in water or any other liquid and do not use it near a sink, bathtub or shower.
- Always operate the device from a power source with the same voltage, frequency and power as specified on the rating plate.
- Route the power cord in a way that it is not likely to be walked on, pinched by objects placed on or near it, or resting on the device.
- Do not reach for a device that has fallen into water. Immediately unplug the power cord.
- Do not let the power cord hang over the edge of a table or counter or touch any hot surface.
- Do not use the device if it has been dropped or if any part of the device (including the cord or plug) has been damaged.
- If the power cord is damaged, it must be replaced by the manufacturer, its service agent or a similarly qualified person to avoid a hazard.
- The use of accessories not intended for use with this device may result in injury to the user or damage to the device.
- This thermal cooker is intended for use in households and similar environments such as: staff kitchens in shops and offices, farms and motels and B&B establishments.
- Do not leave the device unattended when it is running.
- Do not use the device to mix paint or other flammable liquids or in a place where flammable gases or vapours are present.
- To prevent electric shocks, do not place the device near the water or other liquid.

CAUTION
Risk of injury! Avoid contact with moving parts. Keep hands, hair, clothing, spatula and other utensils away from moving parts during operation to avoid personal injury and/or damage to the unit.
- Switch off the device and disconnect it from the power supply before changing accessories or approaching moving parts.
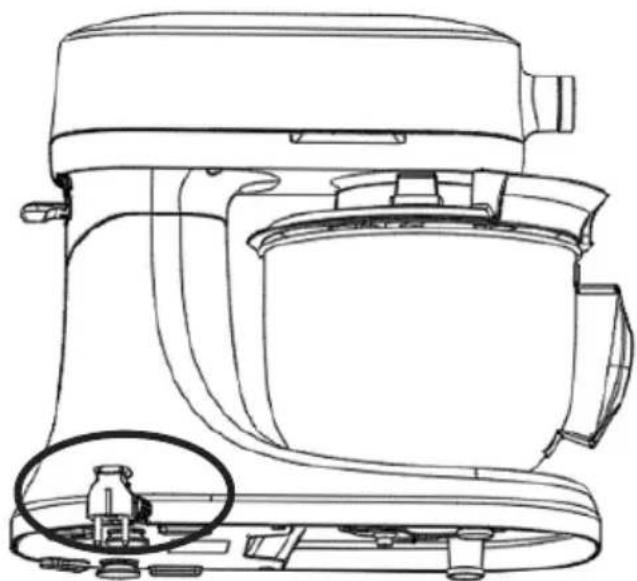
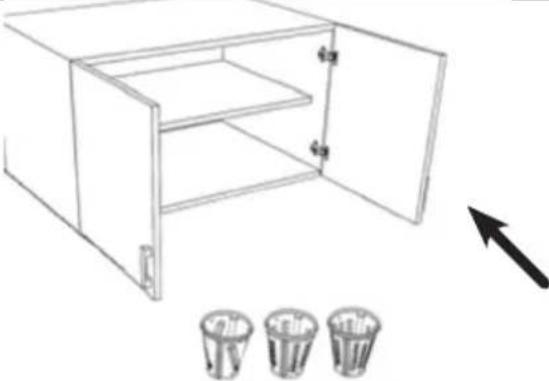
Always unplug the appliance from the outlet whenever the appliance is left unattended and before assembling, disassembling or cleaning it. - Only operate the device on a flat, level surface. Operation on sinks, drainers or uneven surfaces is prohibited.
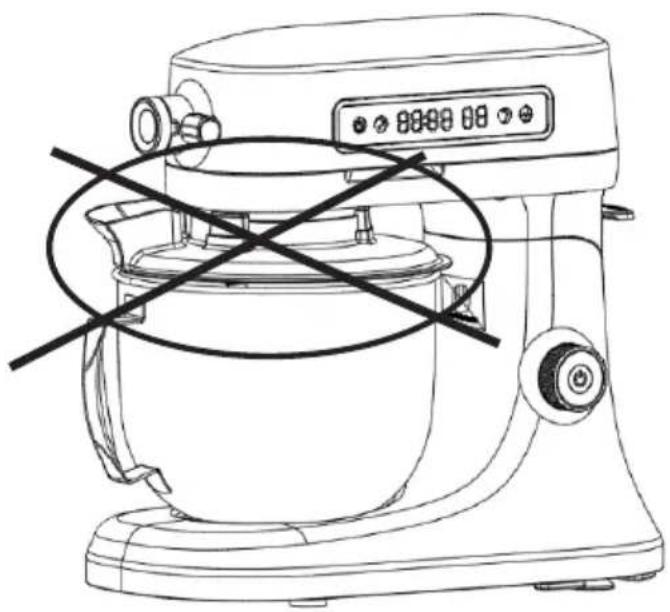
• Always operate the device with the lid on. - The top housing must be closed before starting the appliance. Otherwise the appliance will not start.
- Do not use the device for more than 2 minutes on the highest speed level 8, 9 or 10 as the motor can overheat. Turn off the device and allow it to cool for at least 1 minute before proceeding.
- There is a risk of injury if moving blades are accidentally exposed.
- Do not place the device on top of other devices, on uneven surfaces, or in locations where it may be exposed to: heat sources (radiators or stoves), direct sunlight, excessive dust, or mechanical vibration.
- The device should not be used outdoors, near a hot gas or electric burner, or in a heated oven.
- Do not place the device near heat sources such as radiators, heat registers, stoves or other devices that produce heat.
- Do not operate the device under or near flammable or combustible materials (curtains).
- Any type of maintenance, apart from normal cleaning, may only be carried out by a qualified electrician. This device contains no user-serviceable parts.
- If this device is used by third parties, please provide them with the operating instructions.
- Do not misuse the power cord. Never carry or pull the device by the power cord, or pull on it to unplug it from the outlet. Instead, grasp the plug and pull it out of the socket.
- Do not use the device in extremely hot or humid places or in direct sunlight.
- If possible, do not use the device with an extension cord.
- Do not place any other devices on the device.
- This device is intended for household use only.
- This product was not designed for purposes other than those specified in this user manual.
- Contact your local authority for the correct instructions on how to dispose of the device.
- No liability is assumed for damage caused by non-observance of these instructions or by other improper use or incorrect handling of the device.
- Switch off the machine when changing accessories or without touching parts that can be removed during use.
- When fitting, using and cleaning the machine, take care not to injure yourself
with sharp parts.
- Please use the recommended function to prepare the corresponding food to avoid damage to the machine and injury.
SCOPE OF DELIVERY
| Item Number | |
| Base 1 | |
| Mixing bowl 1 | |
| Beater 1 | |
| Dough hook 1 | |
| Whisk 1 | |
| Splash guard 1 | |
| Manual 1 |
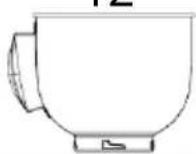
DEVICE OVERVIEW
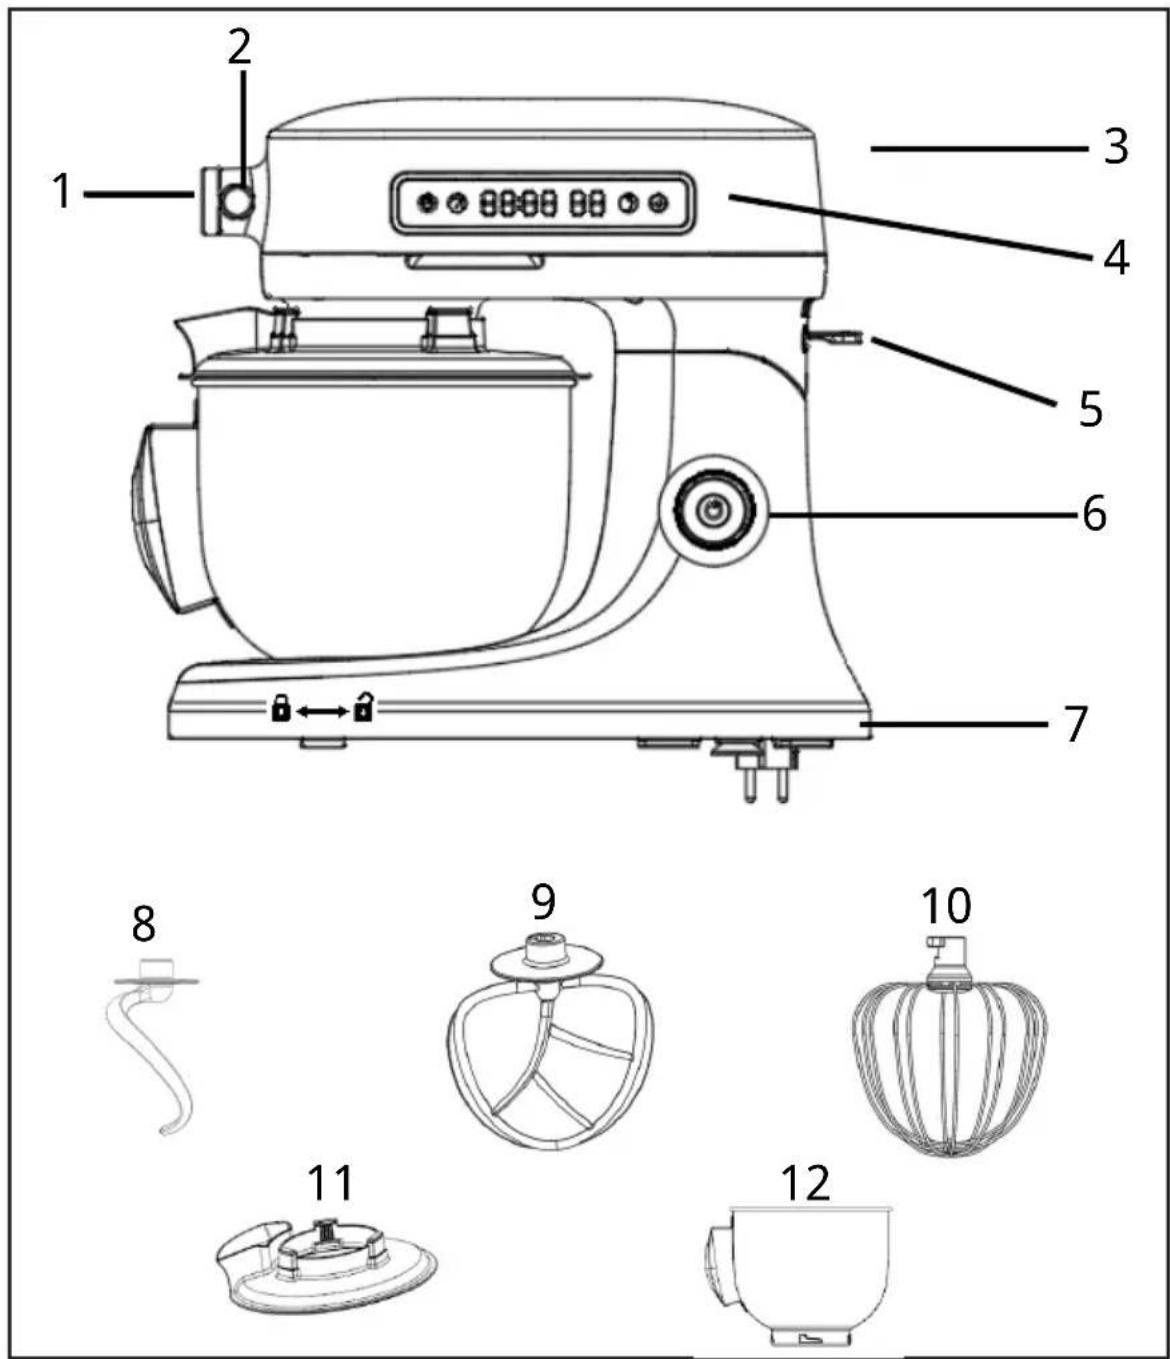
| 1 Outlet cover 2 Attachment knob 3 Top cover | ||
| 4 Touch screen 5 Tilt head button 6 On/Off and | Speedcontrol dial | |
| 7 Base 8 Dough hook 9 Beater | ||
| 10 Whisk 11 Splash guard 12 Mixing bowl |
FUNCTION KEYS
| Knead program Preset | kneading | Speed 1 in 30 seconds, speed 2 in 30 Second, Speed 3 in 4-5 minWarning: Do not set speed above 3 in kneading! | |
 |  | ||
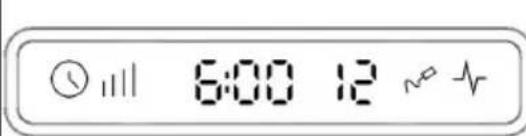
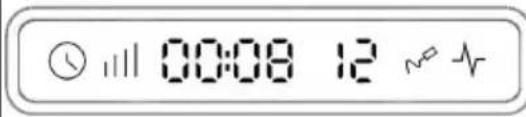
| Time icon Used to set the | working time | Touch time icon, then rotate the knob to set the working time according to amount of ingredients | |
 |  | ||
| Speed icon Used for speed | setting | Touch speed icon, then rotate the knob to set the speed according to amount of ingredients, then press the power button to start up. | |
 |  | ||
| Pulse function Used for | activating the pulse function for mixing cream & beating egg whites | Use this button to whip eggs whites 3 pcs minimum (about 100g, Egg yolk can not be added) 1~5 min in Pulse function | |
 |  | ||
| Power button Used for | pause, shutdown confirmation, exit, etc | When the machine is working, press this button to pause; After the machine stops working, long press 1.5 seconds to end current working.Machine is at standby mode, long press 2.5 seconds to shut down. | |
 |  | ||
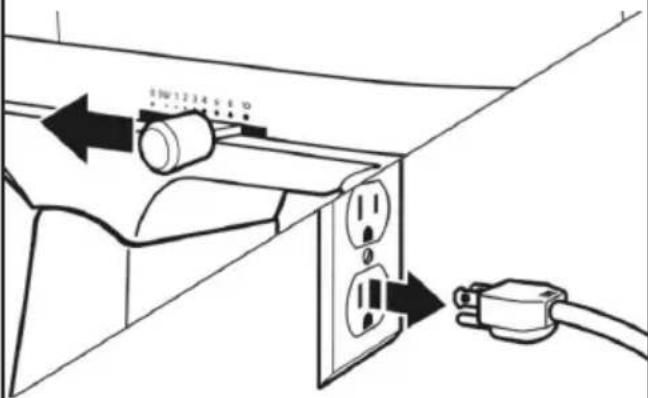
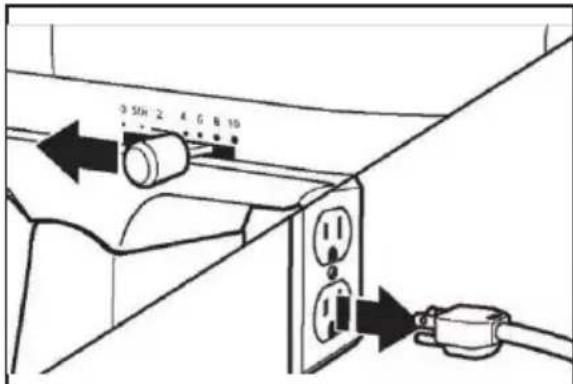
INSTALLATION
Important information about the location
- Place the thermal cooker on a stable, flat and level surface.
- Set up the thermal cooker so that there is no heat source nearby and there is no direct sunlight. Splashing water on the device can cause a short circuit.
Before first use
- Remove all packaging materials and dispose of them properly and carefully.
- It is strongly recommended that you thoroughly clean the device and accessories before use. See the section "Cleaning and Maintenance" for instructions.
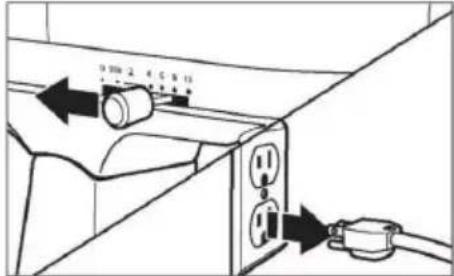
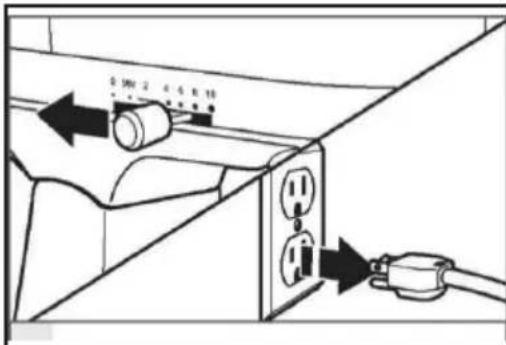
- Plug the power cord into well-grounded power outlet.
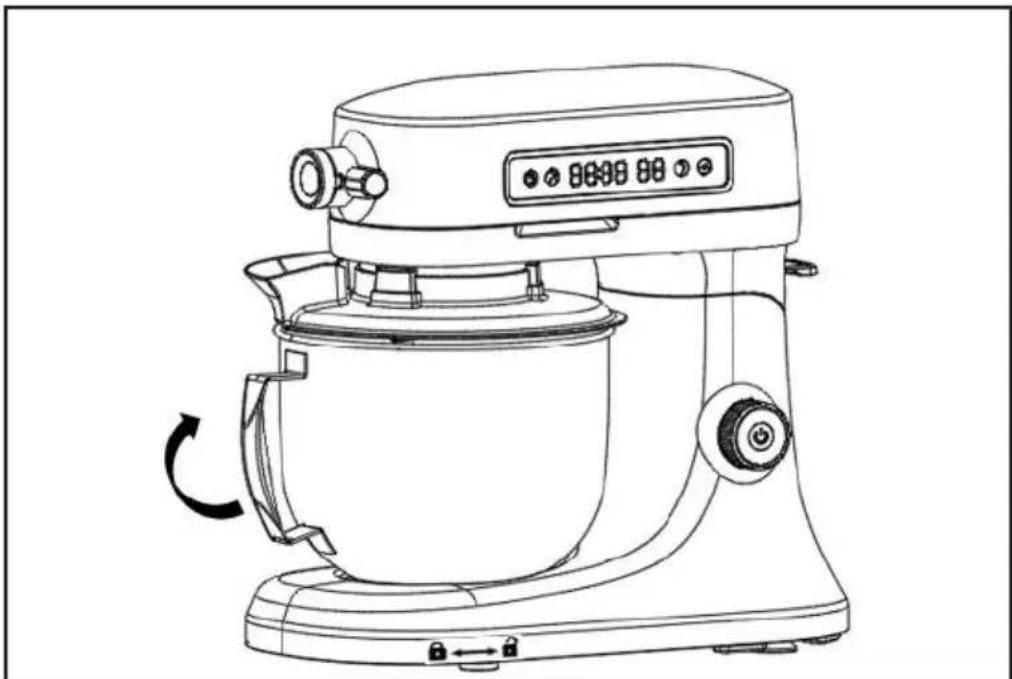
Mixing Bowl
Place the mixing bowl on the base and turn the bowl clockwise to secure it. Take the reverse rotation to release.
natural_image
Line drawing of a modern kitchen mixer with control panel and rotary knob (no text or symbols)Note: The machine does not work until the mixing bowl is locked into place.
Dough hook/ Beater/ Whisk installation
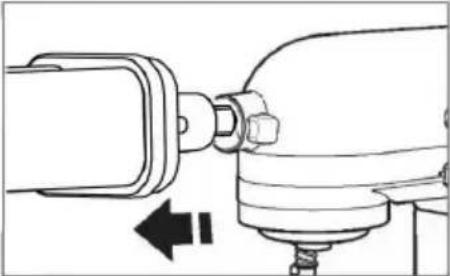
Insert the dough hook (beater/whisk) into the planet shaft so that the square groove of the dough hook is aligned with the planet shaft as shown in FIG 1. At the same time, insert the tool into the slot of the planet wheel shaft, push it slightly upwards and then turn the tool holder counter-clockwise until the shaft pin is aligned with the clip, as shown in Figure 3, i.e. the tool is installed. During installation, the nose should be raised for ease of operation. Once the mixing bowl has been installed, place the nose in a horizontal position as shown in Figure 4 (Note: the machine cannot be connected to the power supply while the kneading hook and other accessories are being installed!)
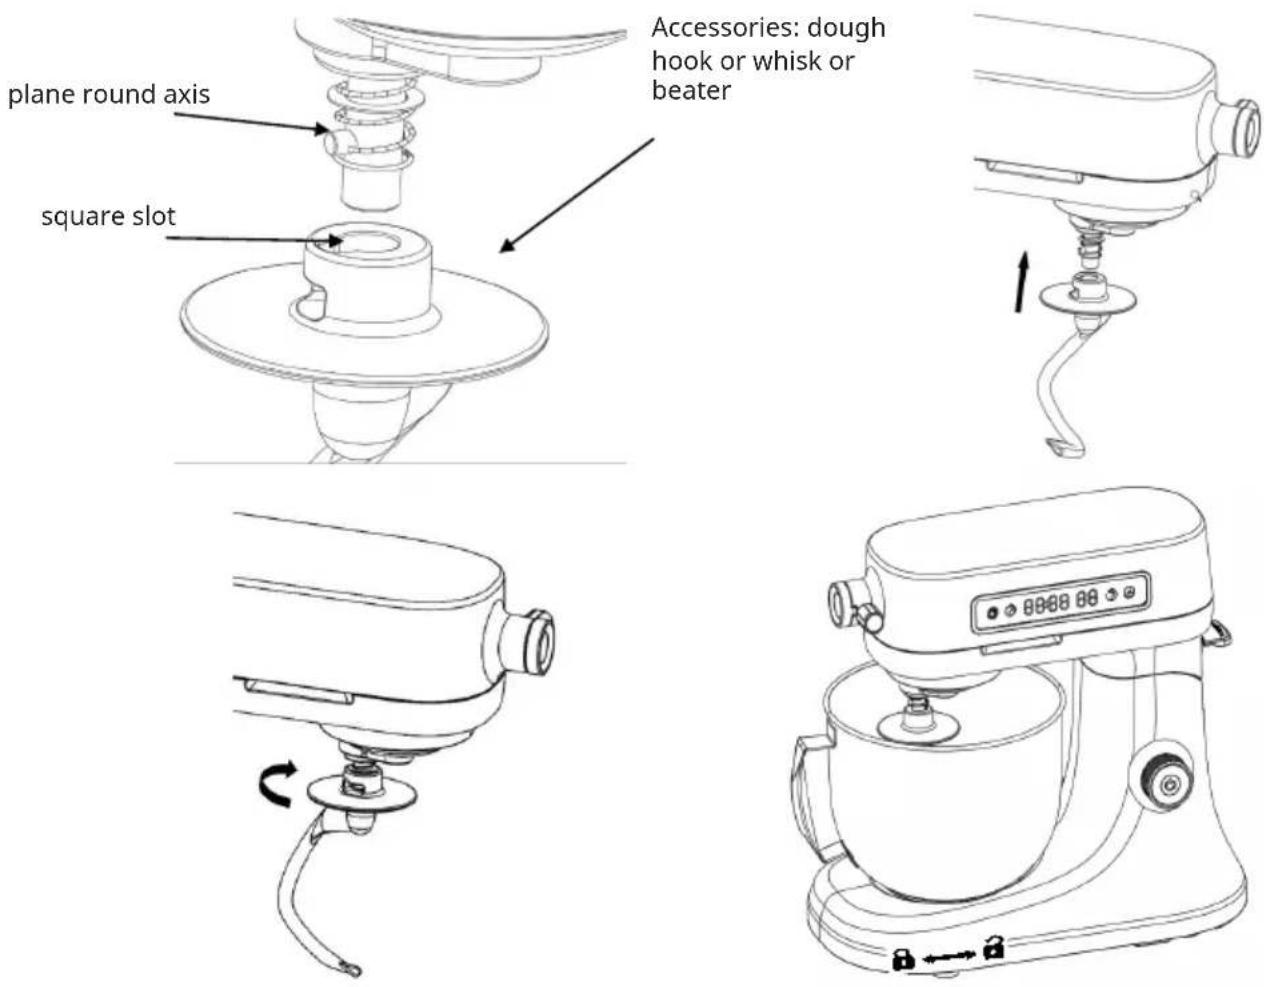
Accessories: dough hook or whisk or beater
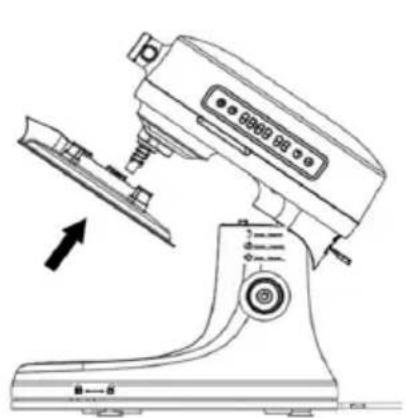
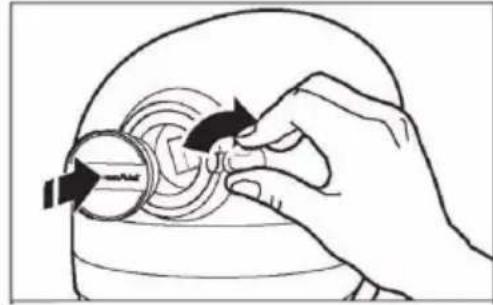
Splash guard
natural_image
Line drawing of a kitchen mixer with an arrow indicating the blade (no text or symbols present)
natural_image
Line drawing of a kitchen brush with control panel and base (no text or symbols)When kneading or stirring, fit the splash guard as shown in the illustration above. For ingredients larger than 300g, it is recommended to use the splash guard to prevent splashing.
SPEEDSETTINGS
| Speed Screen Function Operation instructions | |||
| 1-3 Kneading |  | and stirring the salad | Speed 1 for 30 seconds, speed 2 for 30 seconds and finally speed 3 for 4-5 minutes. The dough will be smooth and even. For salads, choose the right speed according to the amount of ingredients. Warning: Do not set speed above 3 when kneading! |
 | |||
| 3-6 For mixing |  | butter, jam, mashed potatoes, etc | Place ingredients in mixing bowl and mix on speed 3-6 (for delicate foods use low speed). |
 | |||
| 7-9 Use for |  | ingredients with small particles and require mixing at high speed. | Place the ingredients in a bowl and mix on speed 7-9. |
 | |||
| 9-11 For minced |  | meat and sausage (Optional function for meat grinder) | Cut the meat (20x20x 60mm) and attach the meat grinder (not included) to the machine. Chose one of three mincing discs (coarse, medium and thin) and set speed to 9-11 to mince meat. If sausage, replace with ham accessory, the operation time varies according to the amount of food |
 | |||
| 12/ P Use |  | beating eggs, mixing cream | Whip at least 3 egg whites (about 100g), set speed 12 or P , 1-5 minutes Press and hold P to run at highest speed. |
 | |||
OPERATION
Before the first use
- All parts must be thoroughly cleaned before first use. (See: Cleaning and maintenance)
- Connect the power cable to a well grounded socket.
Testing the machine
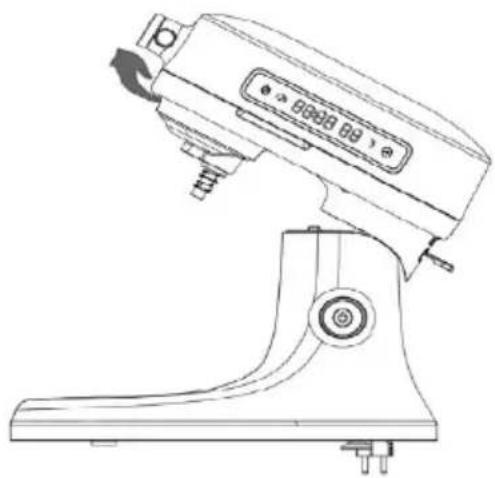
- Place the packed machine on the table, hold the head with your left hand, then press the head up button down with your right hand (Figure 1), the head will automatically lift up, the left hand gently holds the head up until it clicks, the machine is fully open and locked (Figure 2).
- Raise the head, place the bowl in the base and turn clockwise to lock (see installation instructions for specific operation) in Figure 3.
- Place the whisk in the accessory receptacle (see installation instructions for specific operation) in Figure 3.
- Press the head-up button with your right hand, then flatten the head with your left hand, release the head-up switch to secure, and lock the top housing in place as shown in Figure 4.
- After switching on, the unit will make a "beep" sound and the power button will start flashing. Press and hold the power button for 1-2 seconds, the machine will beep again and the screen will flash. The machine will enter standby mode.
- Turn the knob to speed 1 and run for 3–5 minutes. Press the Pulse icon in short operation, or set to speed 1–12 for about 1 minute (refer to the knob operation instructions).
- (You can also touch the time icon on the LCD screen, then rotate the knob to set the time, and touch the speed icon, then rotate the knob to set the desired speed, press the power button to start).
- After debugging is complete, press the power button to turn off the unit and unplug the power cord.
- Push the head-up to the right and hold the top housing to complete Figure 3.
- Remove the bowl.
natural_image
Line drawing of a Kiosk with control panel and buttons (no text or symbols)Figure 1 Figure 2

natural_image
Line drawing of a manual washing machine with no visible text or symbols
natural_image
Line drawing of a kitchen mixer with a bowl and brush (no text or symbols)Figure 3 Figure 4

natural_image
Line drawing of a modern kitchen mixer with control panel and buttons (no text or symbols)
WARNING
The machine is an electrical appliance, when the motor is running, it may produce a static reaction, so when using the machine, there must be a good grounding socket, see the
anti-static identification of the machine.
natural_image
Line drawing of a kitchen mixer with a close-up inset showing internal components (no text or symbols)
WARNING
Fingers should not be placed in the gap when the top of the machine is raised or closed. See the local anti-crushing hand marking.

natural_image
Line drawing of a kitchen mixer with digital display and control knob (no text or symbols)
WARNING
When the machine is operating at any speed, fingers, skin, clothing, hair or necklaces must not come into contact with the moving shaft to avoid mechanical hazards.
natural_image
Line drawing of a kitchen mixer with no visible text or symbolsKneading operation instructions
Accessories: Dough hook
Ingredients: Flour, water and other ingredients
Minimum capacity of the mixing bowl: 500 g flour with 300 g water
Maximum capacity: 1000 grams of flour and 600 grams of water
Method of operation:
- Pour the flour into the mixing bowl, the ratio of flour / water is 5:3 (for reference only, the user must adjust appropriately according to the actual use) and add the desired formula. Add the appropriate amount of water. For example: 1,000 grams of flour plus 600 grams of water.
- Press the tilting head button to raise the head.
- Insert the mixing bowl and turn clockwise until it clicks into place.
- Put the kneading hook in place, make sure it does not fall off.
- Press down the head lift lever and lower the mixing head completely.
- Plug in the power supply, knead at speed 1 for 30 seconds, then select speed 2 for 30 seconds and finally speed 3 for 4-5 minutes to obtain a smooth and even dough. The flour can also be mixed directly using the automatic kneading programme. Note: The user can still adjust the speed and kneading time between speed 1-3 according to actual requirements.
Make bread and other pastry
- Pour 500g flour, 60g sugar, 2 eggs, 10g sourdough, 3–6g salt, 220g milk into the mixing bowl, no butter.
- Press down the tilt head button and lift the nose.
- Place the mixing bowl and lock.
- Fit the dough hook.
- Press down the head lift lever and lower the mixing head completely.
- Plug in the power and set speed 1 for 30 seconds, then speed 2 for 30 seconds and speed 3 for 4 minutes. After the dough is formed, cut 60–75 grams of butter into 6x6 mm pieces, spread on the dough, stir at speed 4–5 for 6–8 minutes until the dough can be pulled very thin by hand. Then leaven for 30 minutes. Cut the dough into small pieces and put in the oven to make bread.
Note: Due to regional differences, making dough with different proportions of ingredients does not ensure the success of creating the perfect dough, so you can try adjusting the proportions of ingredients several times until success.
Mixing instructions
Quickly mix the mixture to the desired extent, used for making cakes, muffins, cold dishes, salads and other foods
Accessories: Beater
Ingredients: cucumber, purple cabbage, small tomatoes, apples, etc. (you can choose the ingredients according to your own preferences) and salad dressing
Minimum amount in bowl: 500 g of ingredients
Maximum amount: 1000 g of ingredients
Note: Do not exceed the maximum capacity, otherwise the food will overflow.
Method of operation:
- Wash the ingredients and cut into your favourite shape, then add to the mixing bowl and finish with the dressing.
- Press the head-up button and lift the nose.
- Put the mixing bowl in place in the machine.
- Attach the beater and place the splash guard on top of the bowl.
- Plug in, set speed 3–6 and mix for 1–3 minutes.
Note: Speed 1–9 is permitted for mixing. It is recommended to use speed 1–6 for large quantities of food or delicate food to avoid splashing or crushing.
- When the machine stops, tilt the head of the upper housing, turn the mixing bowl anticlockwise, remove the bowl and pour the mixed food into the desired bowl.
Whipping egg white/ Cream
Easily achieve the ideal puffed foam effect for protein, cream cakes, ice cream, bread, condensed milk, defatted cake, etc.
Egg White
Accessories: Whisk
Ingredients: Egg whites
Minimum amount: 3 (about 100 g)
Maximum amount: 12 (about 300 g)
Note: Do not exceed the maximum capacity, otherwise the food will overflow.
- Pour the egg whites into the bowl
- Pull the tilt-head button and lift up the upper housing.
- Insert mixing bowl and lock it in place.
- Fit the whisk, it must not fall off.
- Plug in and turn on the machine, turn the knob to speed 11 or 12 (speed 12 is recommended), the machine will work for 1–5 minutes until the egg whites turn into foam.
- According to the baking requirements, the whole egg can be beaten, but a certain proportion of white sugar, the specific amount can be determined according to the demand, must not exceed the maximum amount of eggs.
Beat cream
Accessories: Whisk
Ingredients: cream
Minimum amount: 500 g
Maximum amount: 1000 g
- Pour the cream into the bowl.
- Press down to tilt the head button and lift the upper housing.
- Put the mixing bowl back in place and lock it.
- Fit the whisk and place the splash guard on top of the mixing bowl.
- Plug in and switch on the machine, set the speed to 11 or 12 and stir for 15 minutes until the cream is foamy.
- When the machine has stopped, lift the upper hose, turn the mixing bowl anticlockwise, remove the mixing bowl and pour the mixed food into the desired bowl.
CLEANING AND MAINTENANCE
General cleaning instructions
• Always unplug the blender before cleaning.
• After use, allow the appliance to cool before cleaning.
- Do not immerse in water.
- Use a damp cloth and a non-abrasive detergent to clean the outside of the machine.
- Plastic parts should be cleaned with clean water and general detergent, do not use abrasive or other special detergents.
- The mixing bowl, blade discs, dough hook, whisk and beater can be cleaned with a general detergent, but do not use abrasive or other special detergents.
ERROR MESSAGES AND TROUBLESHOOTING
Errorcodes
| E 1 Motor stops working |
Troubleshooting
| Malfunction Possible cause | Solution | |
| The machine can not work. The | appliance is not plugged in. Plug in. | |
| The head button is not bounced in place. | Make sure that the head button is bounced in place. | |
| The appliance might be overheated. | Turn the appliance off for 10-15 seconds, then turn it back on. If the mixer still does not start, allow it to cool for 30 minutes before turning it back on. | |
| When the machine is working, the mixing bowl has abnormal sounds (the mixing tools hit bowl). | The mixing bowl is not locked in place. | Make sure, that the mixing bowl is locked correctly in place. |
| The mixing accessories are not reliably connected. | Make sure that the mixing accessories are properly connected. | |
| The machine is shaking to a big extent. | The rubber feet have been fallen off. | Make sure, that the rubber feet are properly connected. |
| The countertop used is not flat. Place the appliance on a flat countertop. | ||
DISPOSAL CONSIDERATIONS

natural_image
Symbol of a trash bin with crossed lines indicating no waste or discharge, and a solid rectangle below (no text or labels)If there is a legal regulation for the disposal of electrical and electronic devices in your country, this symbol on the product or on the packaging indicates that this product must not be disposed of with household waste. Instead, it must be taken to a collection point for the recycling of electrical and electronic equipment. By disposing of it in accordance with the rules, you are protecting the environment and the health of your fellow human beings from negative consequences. For information about the recycling and disposal of this product, please contact your local authority or your household waste disposal service.
MANUFACTURER & IMPORTER (UK)
Manufacturer:
Chal-Tec GmbH, Wallstrasse 16, 10179 Berlin, Germany.
Importer for Great Britain:
Berlin Brands Group UK Limited
PO Box 42
272 Kensington High Street
London, W8 6ND
United Kingdom
OPTIONAL ACCESSORIES
Optional accessories such as the meat grinder (10046348), the pasta maker (10046349), the salad maker (10046350) and a bowl (10046352) are not included in the scope of delivery and can be purchased separately.
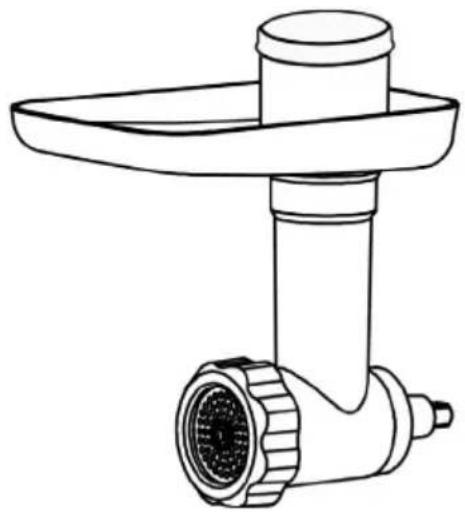
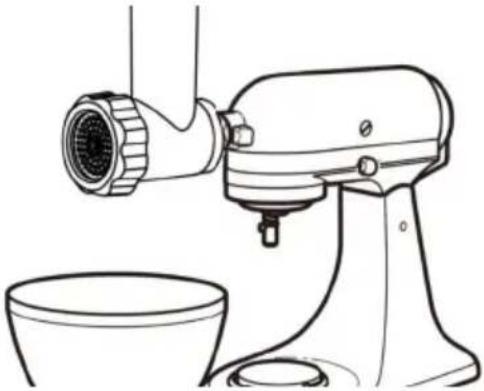
MEAT GRINDER (10046348)
Safety instructions Meat Grinder
- When the product is in operation, it is forbidden to touch metal products, crockery and other objects, or to insert the parts in motion, in order to avoid accidental damage or damage to the product.
- Do not assemble or disassemble the product before stopping work to avoid accidental injury.
- Do not wear a tie, scarf, long necklace or loose accessories or clothing, etc. when using this product. Long hair should be secured with hair clips to prevent it being caught in the product.
- Please do not use the product unattended to avoid accidental injury.
- If the product is damaged, do not use it to cause damage.
- When pushing food, please use the correct push rod and do not push food with objects other than the push rod to push food;
- It is forbidden to put the product into the disinfection cabinet for disinfection.
- When using the product, it is forbidden to put broken bones into the product, otherwise it will cause serious damage to the product.
- When using the product, it is forbidden to pour the meat skin and hard shell into the product, otherwise it will cause serious damage to the product.
- The mincing plate and mincing blade are very sharp, please take care when removing the mincing blade and accessories for cleaning.
- It is not intended for use by unsupervised children or people with insufficient experience or knowledge.
- If the product gets stuck or any other abnormal phenomena in the process of use, please turn off the power immediately, unplug the appliance and clean the ingredients before continuing to use.
- Make sure the table is clean before use.
• After use, please clean the parts that come into contact with food to prevent residues from corroding and causing odours. - It is recommended to use the product for 4–5 minutes and rest for 15 minutes to prolong the life of the machine and prevent safety hazards.
- It is recommended that this product should not be left idle on the mixer for more than 3 minutes.
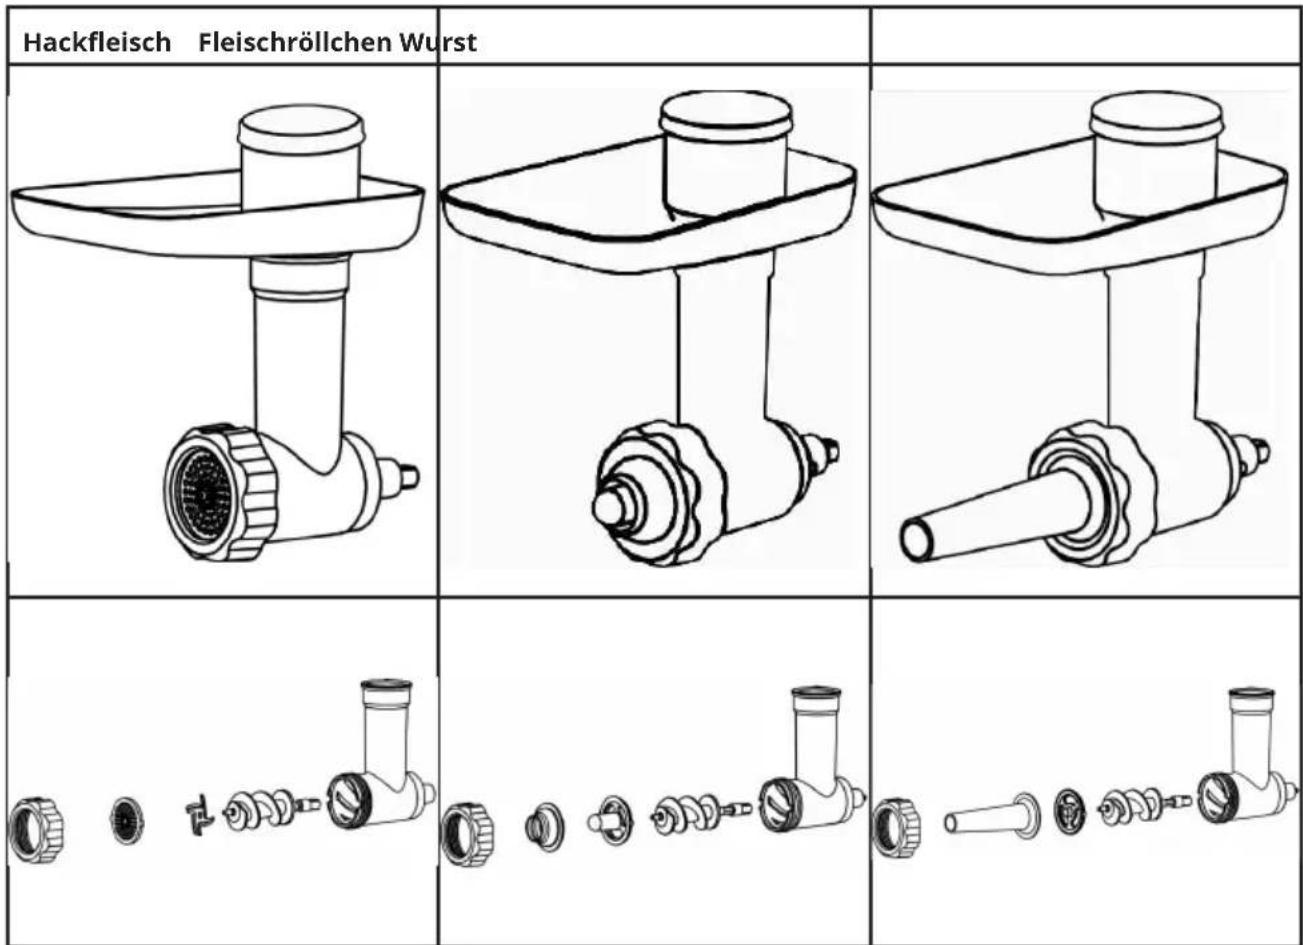
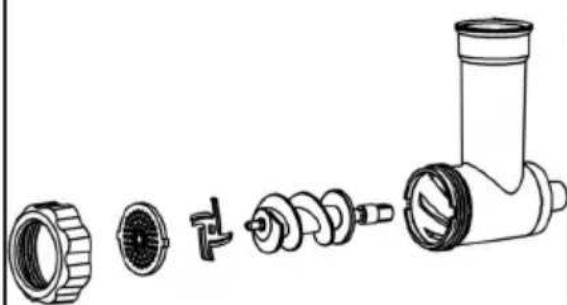
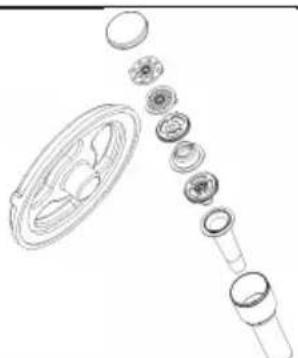
Overview Meat Grinder

Note: Due to the differences in product appearance, the diagram is for reference only. Please refer to the physical objects in the packaging box.
| 1 Push cover 8 Tightening ring | ||
| 2 Pusher 9 Medium blade | ||
| 3 Tray 10 Coarse blade | ||
| 4 Grinder body 11 Meat roll tool | ||
| 5 Grinder worm 12 Meat roll bracket | ||
| 6 Blade 13 Sausage tool | ||
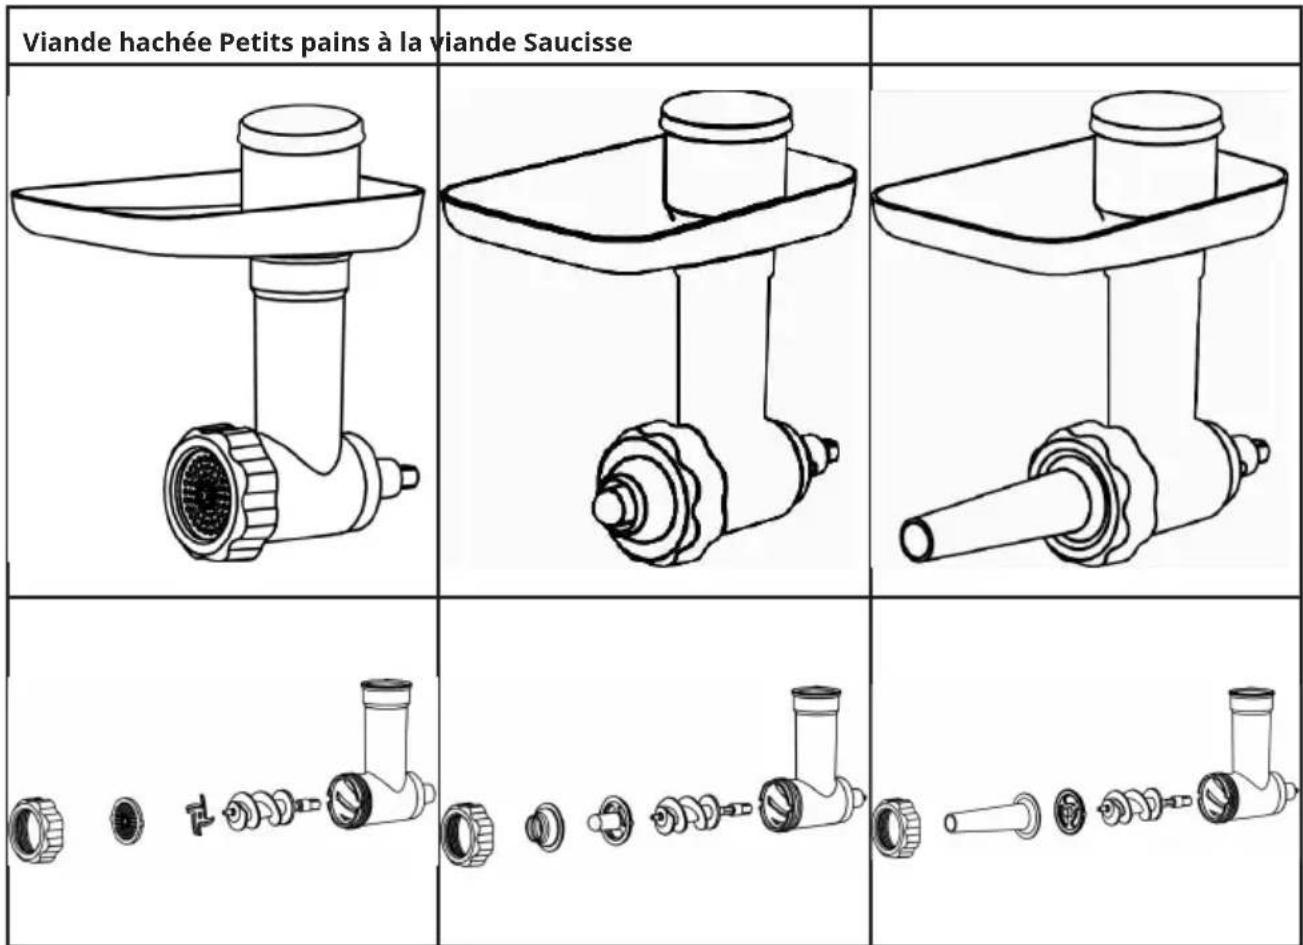
| 7 Fine blade 14 Sausage bracket |
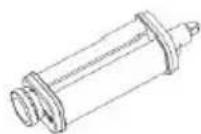
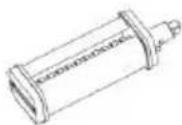
Assembled Meat Grinder
natural_image
Line drawing of a kitchen feedstock with a handle and screw base (no text or symbols)Attachments
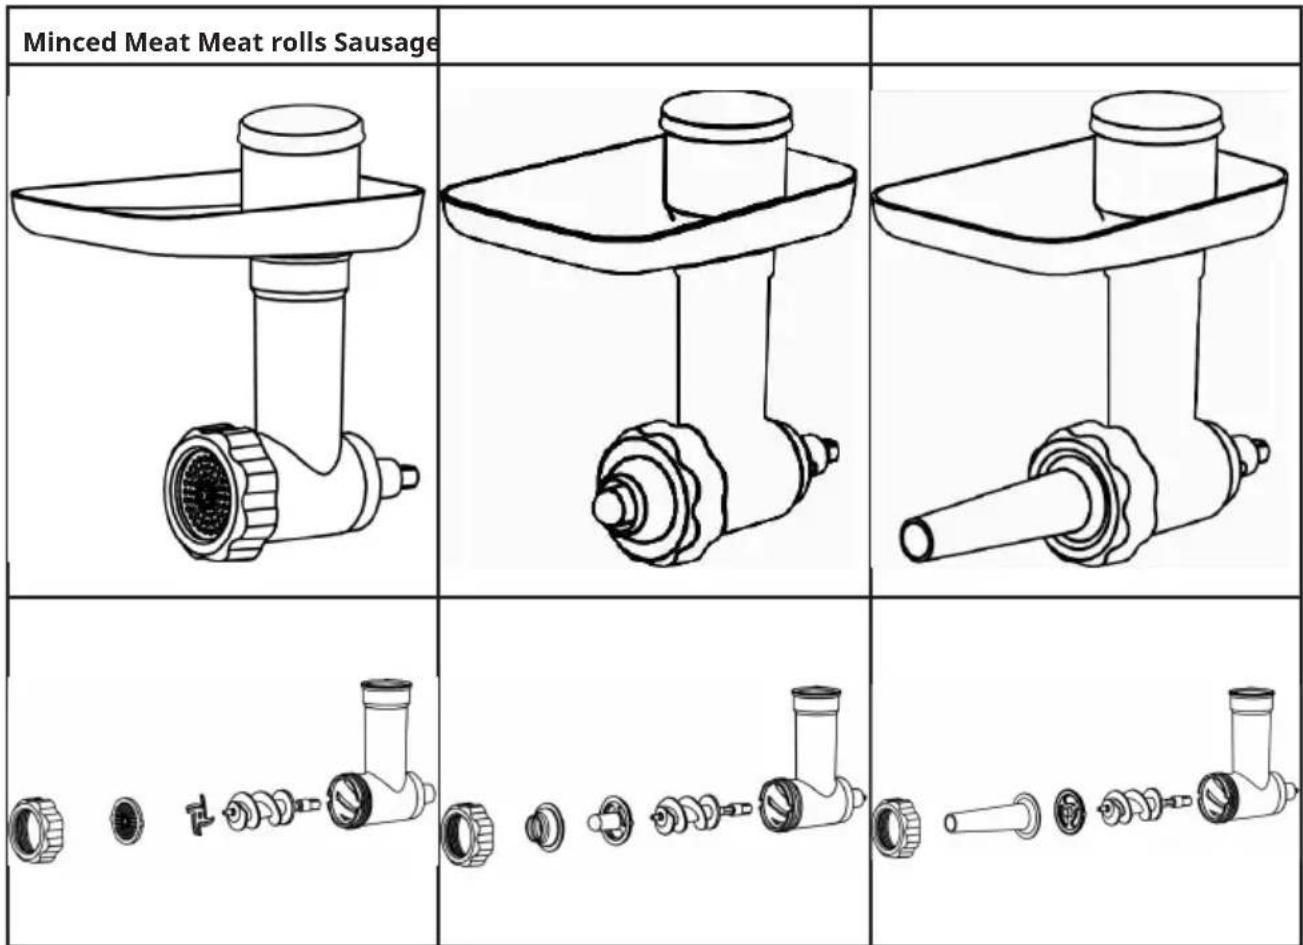
Attachment collocation
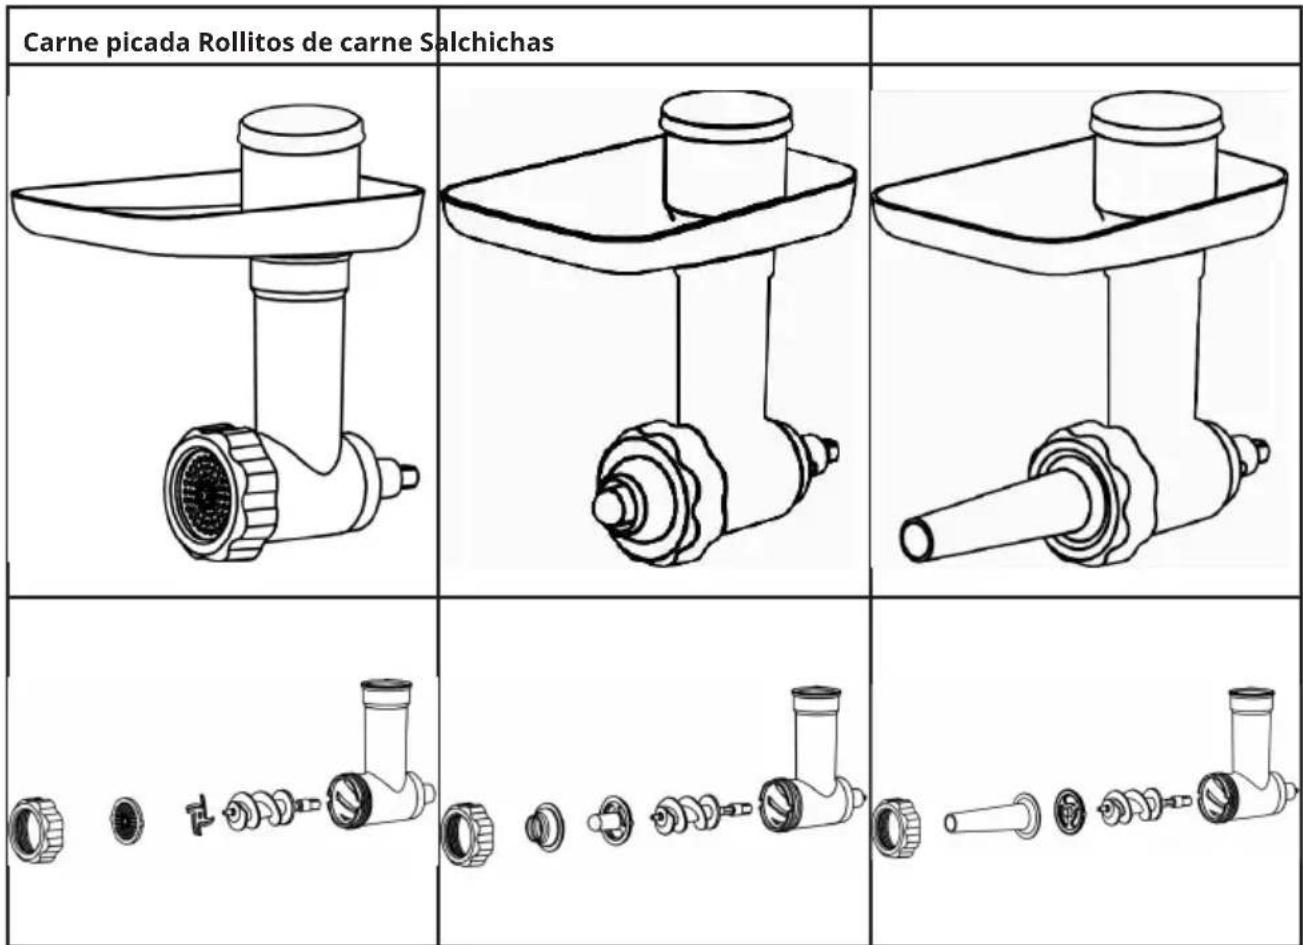
Meat grinder: meat grinder body + meat grinder worm + meat grinder blade + any specification knife plate + tighten ring.
Meat roll maker: meat grinder body + meat grinder worm + meat roll tool + bracket + tighten ring.
Sausage: meat grinder body + meat grinder worm + sausage bracket + sausage tool + tighten ring.
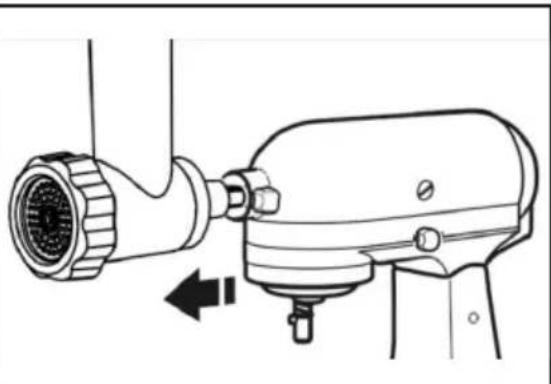
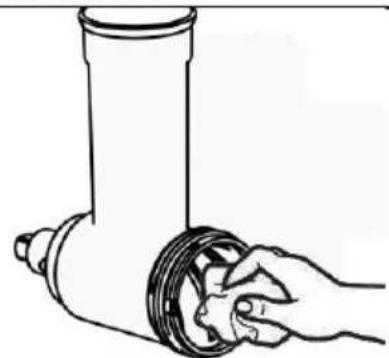
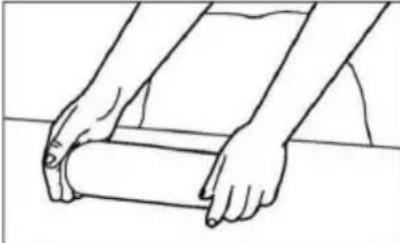
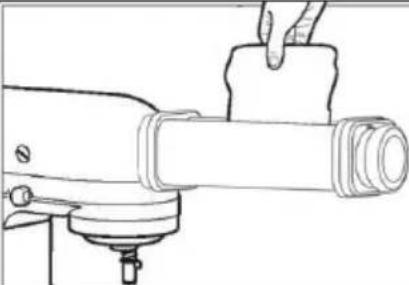
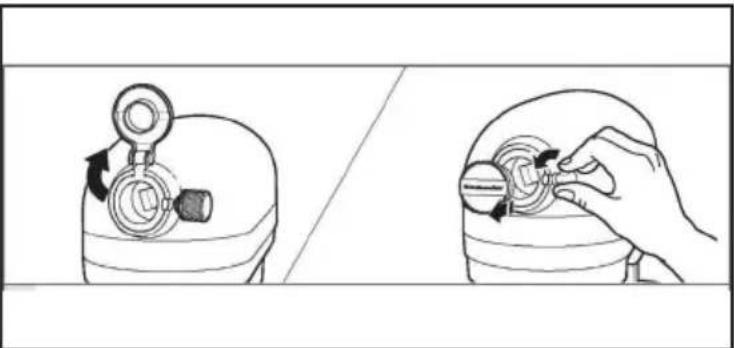
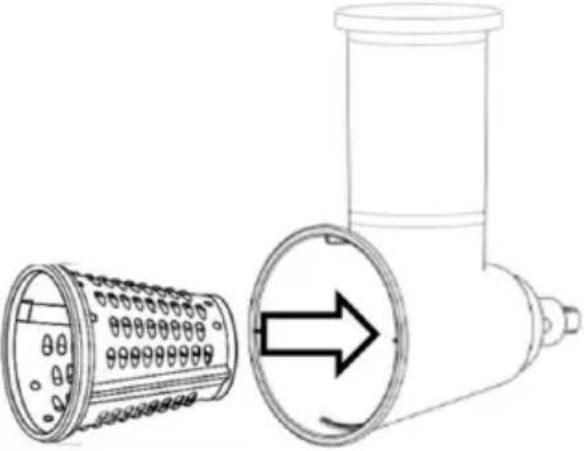
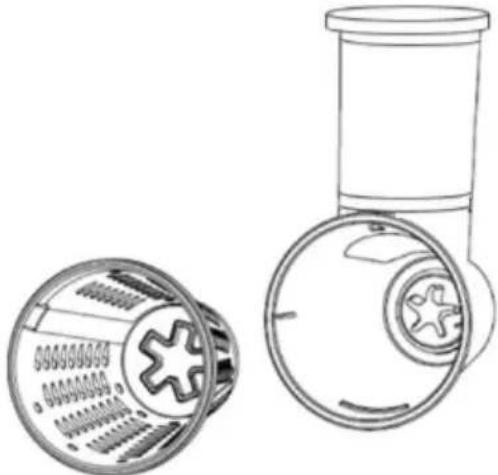
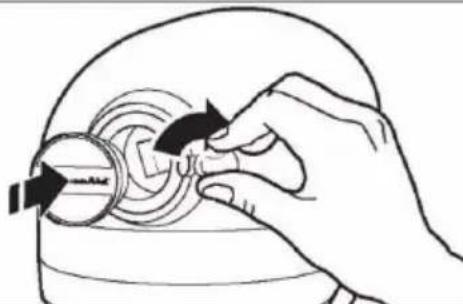
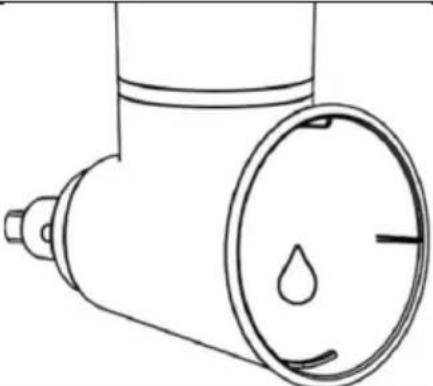
Installation Meat Grinder

natural_image
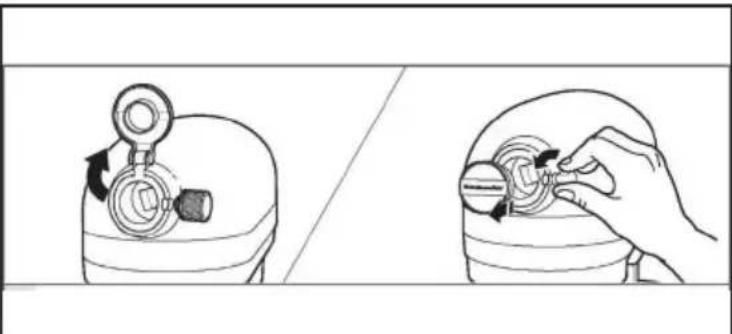
Illustration showing a hand adjusting a mechanical component with arrows indicating motion (no text or symbols)- Turn off the mixer and unplug it. 2. Lift or take off the mixer accessory interface cover.
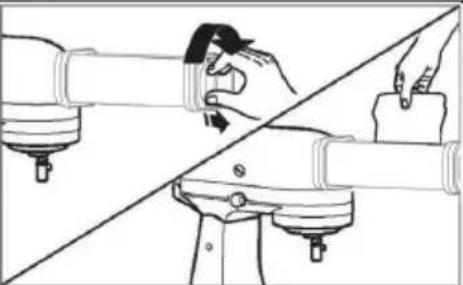
Insert the meat grinder worm into the body and select the accessories you require. Assemble the parts according to the drawing and tighten the ring and meat grinder body.
- The meat blade in a meat grinder needs to face outwards.
natural_image
Technical line drawing of a mechanical component with a circular housing and internal structure (no text or symbols)- The knife tray (Sausage bracket / Meat roll bracket) and the raised angle is aligned with the triple depression angle of the twisted meat.
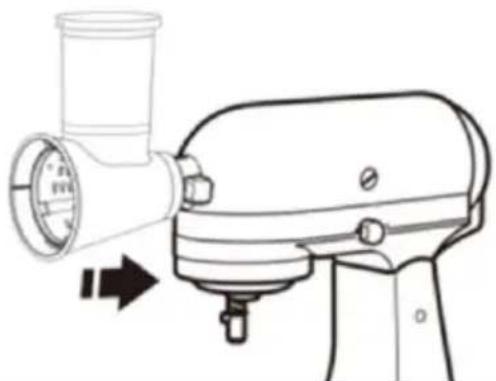
| 4. Insert the host shaft into the mixer interface to ensure that the shaft stuck into the jack of the interface. Rotate the wire cutter back and forth as required.When the fitting is properly cor- rectly, the pin on the accessory casing will fit the groove at the edge of the sleev | 5. Tighten the mixer accessory knob until the accessory is completely fixed to the mixer. |
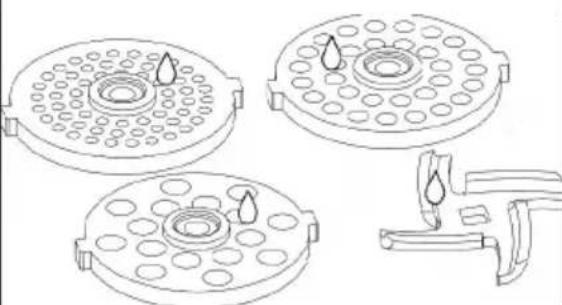
Speedsettings Meat Grinder
| Attachments Speed Recommendations for use | ||
| Minced Meat 4-6 Small holes: for raw meat, fish, | small nuts or cooked meat for stuffing;medium/large holes: for raw meat, fish and nuts.Tip: For meat, the outer skin and bones must be removed;for nuts, the hard shell must be removed. | |
| Meat rolls 1-2 Make meat rolls | ||
| Sausage 1-2 Make sausage, sausages and | other foods.(The casing needs to soak in cold water for 30 minutes). |
Operation
Before use
Before first use, remove the product package and tear off the warning label.
Thoroughly clean the product surface in contact with the food. Refer to "Cleaning the meat grinder" for instructions.
Usage
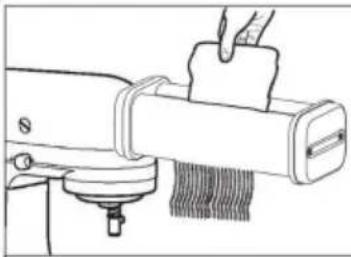
 |  |
| 1. Prepare the ingredients, clean and peel. Cut them into a size that can pass through the inlet | 2. Take a large bowl and put it under the mixer for serving the processed ingredient |
 | 3. Adjust the speed of mixer to the appropriate gear. Put the prepared ingredients into the tray, and use the push to slowly feed the prepared ingredients into the machine. Do not push food using items other than pusher. |
Remove accessories
natural_image
Technical line drawing of a mechanical device with a cylindrical component and directional arrow (no text or symbols)- Turn off mixer and unplug. 2. Remove the p
product from the mixer. After disassembling the product, remove the remaining ingredients.(Refer to „Cleaning the meat grinder”. Note: Installation and removal of the attachment are prohibited before the machine is completely stopped.
natural_image
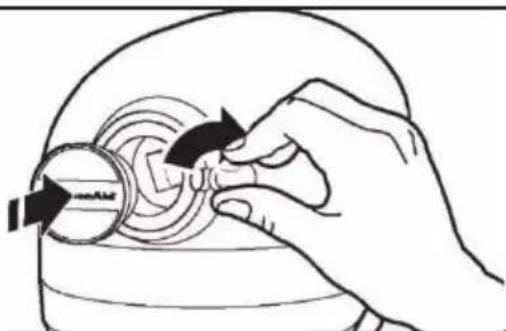
Illustration of a hand turning a circular component with arrows indicating rotation (no text or symbols)- After removing the accessories, reset the mixer interface cover and tighten the accessory knob on the mixer
Cleaning the meat grinder
- Do not use metal items (knives or any other sharp objects) to clean accessories.
- Do not use the towel or any other hard fabric to clean the accessories.
• After cleaning, do not dry the product at high temperature or exposure to the direct sunlight.
 |  |
| After using the product, remove the accessories and then use a clean brush to clean any remaining food from each accessory. You can use detergent to clean the toughest stains on the surface, then rinse with clean water. | After cleaning the meat knife and meat knife plate, it is recommended to use edible oil to prevent fading and rusting. |
 |  |
| After wiping off any surface moisture from the cleaned product and its accessories, reassemble and store in a dry place (room temperature). Do not disinfect the product in a disinfection cabinet. | Store the accessories in the pusher to avoid losing them.The direction of the enema scale plug is towards the inside of the pusher. |
Troubleshooting Meat Grinder
If your machine fails or cannot work properly when using meat grinder fittings, meat rolls fittings, or enema fittings, please check the following:
- Check that the mixer is working properly. If the mixer does not work, please contact the designated service point for repair.
- If the mixer works normally and this product does not work, please stop the operation, disassemble this product and install it correctly according to the "Product Installation Guidelines";
- If it is installed correctly according to the "Installation Meat Grinder", it still does not work. Please stop the mixer and return the product to the designated place for repair.
- When the product is running and shaking on the mixer, please stop the mixer and fully tighten the screws on the mixer.
- If this product runs slowly, please check if the host is set to a suitable speed, please refer to "Speed Setting Meat Grinder".
- If the product works normally but the food comes out slowly or not at all, please stop the mixer and disassemble the product to clean the blockage.
- When the product is running and the dough press cannot run but the dough cutter can run, please stop the mixer and return the product to the designated place for repair.
PASTA MAKER (10046349)
Safety instructions Pasta Maker
- During product operation, do not move the product or touch moving parts with your hands. This is to avoid accidental injury.
- During product operation, do not touch or insert metal products, tableware, and other items into moving parts. This is to avoid accidental injury or product damage.
- Do not use this product unattended. This is to avoid accidental injury.
- Before the product is completely stopped, do not install or disassemble it. This is to avoid injury.
- If any parts of the product are damaged, stop using it immediately.
- When using this product, do not wear ties, scarves, long necklaces, or loose accessories or clothing. Secure long hair with hair clips to avoid injury.
- Do not place the product in the dishwasher.
- Do not place the product in a disinfection cabinet.
- The product is only suitable for handling dough. To avoid damage to the product, please do not handle ingredients other than pasta.
- This product is not suitable for use by unattended children or people with insufficient knowledge.
- Before using the product, ensure the table is clean.
- If the product jams or experiences other abnormal phenomena, immediately turn off the power, unplug the plug, and clean the ingredients before continuing to use.
• After using the product, clean the areas that come into contact with food to avoid long-term use that may cause corrosion and emit odours.
Overview Pasta Maker
Pasta roller

Spaghetti cutter
Fettuccine cutter
Speedsettings: For all attachments speed 4-6 can be used.
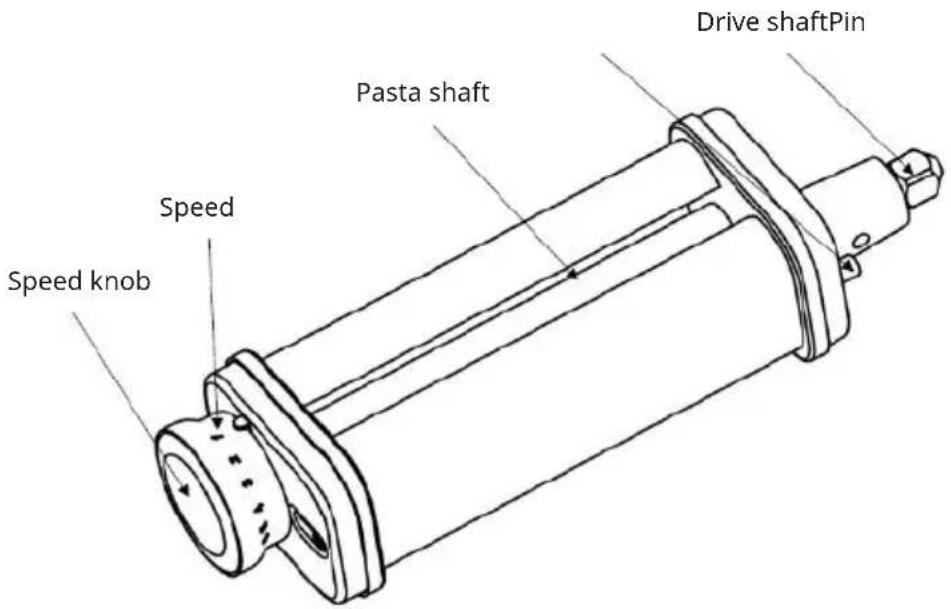
Note: Due to the differences in product appearance, the diagram is for reference only. Please refer to the physical objects in the packaging box.
Installation Pasta Maker
- Turn off the mixer and unplug it. 2. Lift or take off the mixer accessory interface cover.
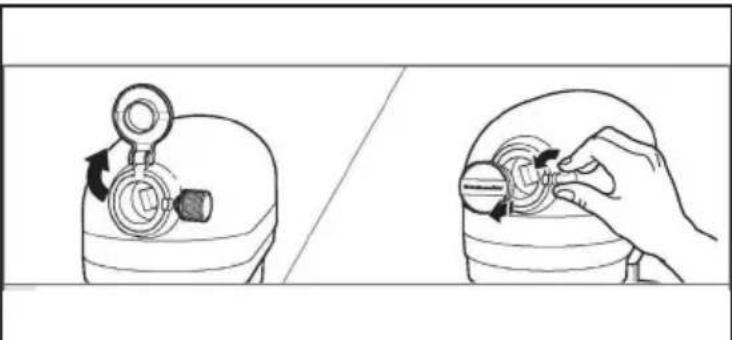
natural_image
Illustration showing a hand adjusting a mechanical component with directional arrows (no text or symbols)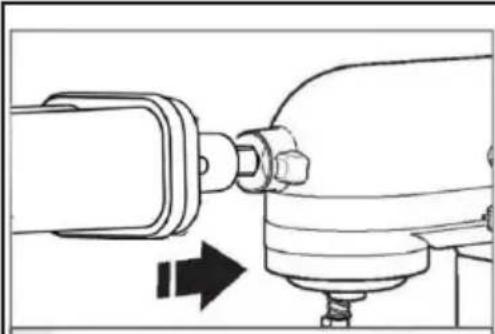
natural_image
Mechanical assembly diagram showing a shaft connected to a housing with directional arrows indicating motion (no text or symbols)- Insert the drive shaft of the noodle press/cutter into the interface of the Cuisine Machine, ensuring that the drive shaft fits perfectly into the square socket of the interface. Rotate the press or cutter back and forth as required. If the accessory is correctly positioned, the pins on the accessory housing will fit perfectly into the grooves on the edge of the sleeve.

natural_image
Line drawing of a hand using a screwdriver to adjust a component (no text or symbols present)- Tighten the knob of the cooker accessory until the accessory is fully secured to the cooker.
Operation Pasta Maker
Before first use, please remove the product packaging and remove the warning label, and thoroughly clean the surface of the product in contact with food. (Refer to "Cleaning the Pasta Maker").
 |  | |
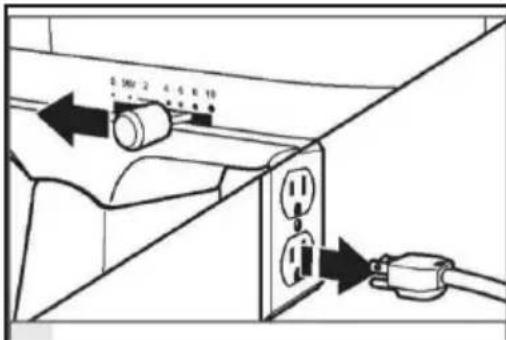
| 1. First, prepare the dough (refer to the recipe) and cut it into small pieces suitable for the kneading machine. | 2. Pull out the adjustment knob of the press and adjust it to the 8th gear. Release the knob so that it is flush with the press housing. | |
 |  | |
| 3. Flatten the dough by hand to a thickness of approximately 1cm, and sprinkle a small amount of flour between the kneading spindles. Place the flat dough between the kneading rollers and repeat this process until the surface of the dough is smooth and even (between the two kneading cycles, the dough can be folded along the long or short edges to help complete the kneading requirements more quickly). | 4. Gradually adjust the thickness adjustment knob gear and repeat the pressing operation until the desired thickness is achieved. Recommend using 5th or 4th gear as the final surface thickness. | |
 | ||
| 5. When making noodles, replace the noodle press with the selected slicer. Place the flattened dough between the cutting spindles, cut into the desired width of noodles, and cook as needed. | ||
Dissembly instructions Pasta Maker
 |  |
| Turn off the chef's machine and unplug it. | Remove the noodle press or cutter from the appliance. After removing the dough press or cutter, remove any remaining dry dough. (Refer to "Cleaning the Pasta Maker") |
 | |
| After removing the accessories, reset the accessory interface cover of the appliance and tighten the accessory knob on the appliance. |
Cleaning the Pasta Maker
- Do not use metal objects (knives or any other sharp objects) to clean the press and cutter.
- Do not clean the press and cutter in the dishwasher.
- Do not pass dishcloths or any other fabric through the press for cleaning.
| After cutting the pasta, leave the dough press and cutter to dry naturally for one hour, then use a cleaning brush to remove the dry pasta. If the dry dough is difficult to remove, try tapping the accessories with your hands. If necessary, use a toothpick. | After removing all residual dry dough, wipe the press and cutter with a soft dry cloth and place them in a dry place (room temperature). Do not clean the press and slicer in the dishwasher and do not disinfect this product in a disinfection cabinet. |
Troubleshooting Pasta Maker
If your appliance malfunctions or does not work when using the pasta press and cutter accessories, please check the following:
• Is the food processor connected to the power supply?
- Is the fuse in the power circuit of the appliance in normal working condition?
- If using a circuit breaker, make sure the circuit is closed.
- Switch off the Chef's Machine for 10-15 seconds and then switch it on again. If the machine still does not start, allow it to cool for 30 minutes before restarting.
• Is the speed of the appliance set correctly?
- Are the press and cutter correctly installed?
• Have you followed the instructions for use?
• Did you prepare the dough according to the recipe?
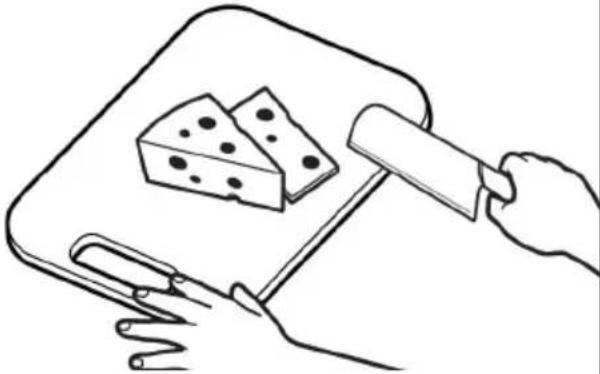
SALAD MAKER (10046350)
Safety instructions Salad Maker
- It is forbidden to touch the running tool with the hand during operation.
- When the product is working, it is forbidden to move the product or touch the moving parts to avoid accidental injury;
- When the product is working, it is forbidden to touch metal products, crockery and other objects or to touch the moving parts to avoid accidental damage or product damage.
- When pushing food, please use the correct push rod and do not push food with objects other than the push rod to push food.
- Please do not use the product unattended to avoid accidental injury.
- To avoid accidental injury, do not assemble or disassemble the product before stopping work.
- If the product is damaged, do not use it to cause damage.
- When using this product, do not wear a tie, scarf, long necklace or loose accessories or clothing, etc. Long hair should be fixed with hairpins so as not to get caught in the product.
- When using the product, it is forbidden to put hard food such as nuts into the product, otherwise it will cause serious damage to the product.
- It is forbidden to leave this product idle on the mixer for more than 3 minutes.
- The product tool is very sharp, please take care when removing and cleaning the accessories.
- It is not intended for use by unsupervised children or people with insufficient knowledge.
- Make sure the table is clean before use.
- If the product is stuck or other abnormal phenomena in the process of use, please turn off the power immediately, unplug the power cord and clean the ingredients before continuing to use.
• After using the product, please clean the parts in contact with food to avoid residue to corrode and emit peculiar smell. - It is recommended to use the product for 4-5 minutes and rest for 15 minutes, which is conducive to prolong the life of the machine and prevent safety hazards.
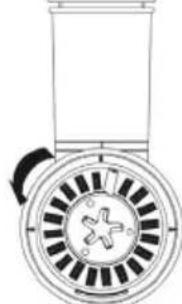
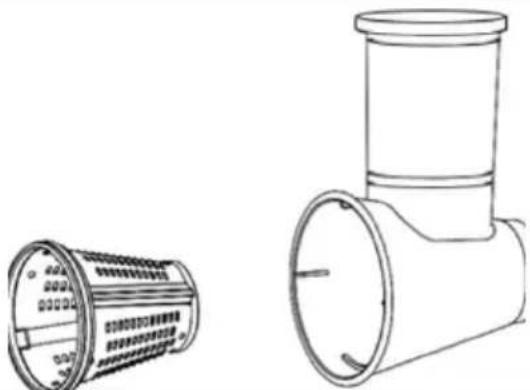
Overview Salad Maker

natural_image
Exploded view of a multi-section industrial pipe assembly with numbered components (no text or symbols visible)Note: Due to the differences in product appearance, the diagram is for reference only. Please refer to the physical objects in the packaging box.
| Part number Part name | |
| 1 Slicer blade | |
| 2 Slicing fine blade | |
| 3 Shredder coarse blade | |
| 4 Pusher | |
| 5 Shredder body |
Note: All parts can be used with speedsetting 4-6.
Installation Salad Maker
natural_image
Illustration showing a hand adjusting a mechanical component between two views (no text or symbols)- Turn off the mixer and unplug it. 2. Lift or take off the mixer accessory interface cover.
 |  |
| 3. Put the tool you need into the body | Note: The five corners of all kinds of tools should align at the internal clutch |
 |  |
| 4. Insert the host shaft into the mixer interface to ensure that the shaft stuck into the jack of the interface. Rotate the blade back and forth as required. When the fitting is properly correctly, the pin on the accessory casing will fit the groove at the edge of the sleeve. | 5. Tighten the mixer accessory knob until the accessory is completely fixed to the mixer. |
Operation Salad Maker
 |  |
| 1. Prepare the ingredients, clean and peel. Cut them into a size that can pass through the inlet. | 2. Take a large bowl and put it under the mixer for serving the processed ingredients. |
 |  |
| 3. Feed the prepared ingredients into the shredded cuts and push them slowly using the pusher. | Note: If there are a lot of ingredients in the shredded cuts that can not be dropped, please do not clean it by your hands during operation. Please dispose of after disassembling the mixer |
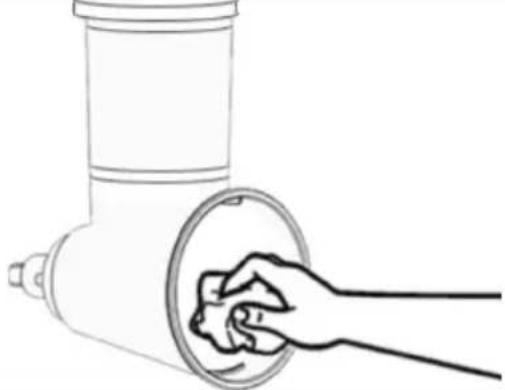
Dissembly instructions Salad Maker
 | |
| 1. Turn off the mixer and unplug. 2. Remove the blade from the mixer.Clean the ingredients after disassembling the cutter.(Refer to “Cleaning the Salad Maker”) | |
 |  |
| 3. After disassembling the accessory, reset the mixer accessory interface cover and tighten the accessory knob on the mixer. | 4. Extend your hand into the cutter barrel, lift the barrel upward, shake the barrel slightly, rotate counterclockwise a little, then pull the barrel out. |
Cleaning the Salad Maker (optional accessory 10046350)
• After using the product, please clean the parts that were in contact with food, to avoid residue to corrode and emit peculiar smell.
- The product tool is very sharp, please be careful when taking out the accessories to clean.
- Do not use metal items (knives or any other sharp objects) to clean the accessories.
- Do not use knife or any other cloth to clean the accessories.
- Do not place this product in direct sunlight or high temperature.
 |  |
| Take the blade out from the shredder and rinse the used product accessories with clean water. | Wipe away the moisture on the surface of the product.(Note: The blade is unusually sharp, please take protective measures when cleaning: such as wearing protective gloves) |
 |  |
| Note: If the product has vegetable pigment on the inner wall of the product after use, please wipe it with edible oil and rinse with water. (Example: Use peanut oil to clean the product). | Store the knives out of the reach of minors and avoid accidents when minors touch the knives |
Troubleshooting Salad Maker
- If your machine breaks down or does not work when using the shredder accessories, please check the following:
- Whether the blender is working properly. If the blender does not work, take it to the designated service point for repair;
- If the blender works normally and this product does not work, please stop operation, disassemble this product and install it correctly according to the „Salad Maker Installation“;
- If it has been correctly installed and it still does not work, please stop the mixer and return the product to the designated place for repair.
- When the product is running, the product is shaking on the mixer, please stop the mixer and fully tighten the screws on the mixer.
- This product is running slowly, please check whether the host is set to an appropriate speed.
- The product works normally but the food is slow or no food; please stop the mixer, disassemble the product to clean the blockage.
- When the product is running, the dough press can not run and the dough cutter can run. Please stop the mixer and return the product to the designated place for repair.
Estimado cliente
CONTENIDO
Datos técnicos 93
natural_image
Line drawing of a modern kitchen mixer with control panel and rotary knob (no text or symbols)natural_image
Line drawing of a kitchen stand with a sewing machine and a mechanical component, no text or symbols present.
natural_image
Line drawing of a kitchen stand with control panel and buttons (no text or symbols)natural_image
Line drawing of a Kiosk with control panel and buttons (no text or symbols)Figura 1 Figura 2
natural_image
Line drawing of a manual washing machine with no visible text or symbols
natural_image
Line drawing of a kitchen mixer with a bowl and brush (no text or symbols)Figura 3 Figura 4

natural_image
Line drawing of a modern kitchen mixer with control panel and buttons (no text or symbols)
ADVERTENCIA
natural_image
Line drawing of a kitchen mixer with a close-up inset showing internal components (no text or symbols)
ADVERTENCIA
natural_image
Line drawing of a kitchen mixer with control panel and buttons (no text or symbols)
ADVERTENCIA
natural_image
Line drawing of a kitchen mixer with no visible text or symbolsnatural_image
Symbol of a trash bin with crossed lines indicating no waste or discharge, and a solid rectangle below (no text or labels)Berlin Brands Group UK Limited
272 Kensington High Street
Londres, W8 6ND
Reino Unido
natural_image
Line drawing of a kitchen feedstock with a handle and screw base (no text or symbols)Archivos adjuntos
natural_image
Illustration showing a hand adjusting a device with a rotary knob and handle (no text or symbols)natural_image
Two-panel line drawing showing a kitchen tool and a food robotic arm (no text or symbols)- Apague la batidora y desenchúfela. 2.
natural_image
Illustration showing a hand holding a small object next to a device with a rotary knob, no text or symbols present.natural_image
Technical line drawing of a mechanical assembly with no visible text or symbolsnatural_image
Line drawing of a hand using a tool to adjust or install a component (no text or symbols present)natural_image
Exploded view of a multi-section industrial pipe assembly with numbered components (no text or symbols visible)SOMMAIRE
natural_image
Line drawing of a modern kitchen mixer with control panel and rotary knob (no text or symbols)natural_image
Line drawing of a kitchen mixer with an arrow indicating the blade (no text or symbols present)
natural_image
Line drawing of a kitchen stand with control panel and buttons (no text or symbols)natural_image
Line drawing of a Kiosk with control panel and buttons (no text or symbols)Figure 1 Figure 2

natural_image
Line drawing of a manual washing machine with no visible text or symbols
natural_image
Line drawing of a kitchen mixer with a bowl and brush (no text or symbols)Figure 3 Figure 4

natural_image
Line drawing of a modern kitchen mixer with control panel and buttons (no text or symbols)
AVERTISSEMENT
natural_image
Line drawing of a kitchen mixer with a close-up inset showing internal components (no text or symbols)
AVERTISSEMENT
natural_image
Line drawing of a kitchen mixer with control panel and buttons (no text or symbols)
AVERTISSEMENT
natural_image
Line drawing of a kitchen mixer with no visible text or symbolsnatural_image
Symbol of a trash bin with crossed lines indicating no waste or discharge, and a solid rectangle below (no text or labels)Berlin Brands Group UK Limited
PO Box 42
272 Kensington High Street
London, W8 6ND
United Kingdom
ACCESSOIRES EN OPTION
natural_image
Line drawing of a kitchen feedstock with a handle and screw base (no text or symbols)Pièces jointes
natural_image
Illustration showing a hand adjusting a circular component inside a device (no text or symbols present)natural_image
Technical line drawing of a mechanical component with a circular housing and internal structure (no text or symbols)natural_image
Technical line drawing of a mechanical device with a cylindrical component and directional arrow (no text or symbols)natural_image
Illustration of a hand turning a circular object with arrows indicating rotation (no text or symbols)natural_image
Illustration showing a hand adjusting a mechanical component with directional arrows (no text or symbols)natural_image
Technical line drawing of a mechanical assembly with no visible text or symbolsnatural_image
Line drawing of a hand using a tool to adjust or install a component (no text or symbols present)natural_image
Exploded view of a multi-cylinder drainage system with numbered components (no text or symbols visible)natural_image
Line drawing of a kitchen mixer with directional arrow indicating motion (no text or symbols)natural_image
Illustration of a hand holding a circular object with arrows indicating rotation or movement (no text or symbols)natural_image
Technical line drawing of a mechanical component with a circular base and radial slots (no text or symbols)INDICE
Dati tecnici 181
natural_image
Line drawing of a modern kitchen mixer with control panel and rotary knob (no text or symbols)natural_image
Line drawing of a sewing machine with a sewing machine and a sewing machine component, showing no text or symbols.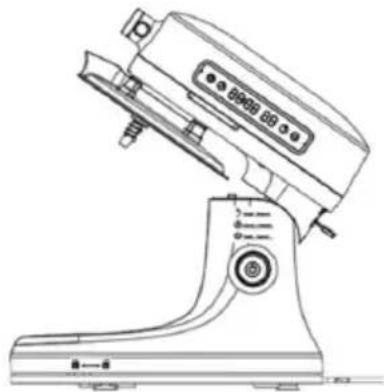
natural_image
Line drawing of a kitchen stand with control panel and buttons (no text or symbols)natural_image
Line drawing of a Kiosk with control panel and buttons (no text or symbols)natural_image
Line drawing of a manual washing machine with no visible text or symbols
natural_image
Line drawing of a kitchen mixer with a bowl and brush (no text or symbols)natural_image
Line drawing of a modern kitchen mixer with control panel and buttons (no text or symbols)
AVVERTENZA
natural_image
Line drawing of a kitchen mixer with a close-up inset showing internal components (no text or symbols)
AVVERTENZA
natural_image
Line drawing of a kitchen mixer with control panel and buttons (no text or symbols)
AVVERTENZA
natural_image
Line drawing of a kitchen mixer with no visible text or symbolsnatural_image
Symbol of a trash bin with crossed x and y axes, no text or labels presentBerlin Brands Group UK Limited
PO Box 42
272 Kensington High Street
London, W8 6ND
United Kingdom
ACCESSORI OPZIONALI
natural_image
Line drawing of a kitchen feedstock with a handle and screw base (no text or symbols)Accessori

natural_image
Illustration showing a hand adjusting a mechanical component with directional arrows (no text or symbols)natural_image
Technical line drawing of a mechanical component with a circular housing and internal structure (no text or symbols)natural_image
Technical line drawing of a mechanical device with a pipe fitting and directional arrow (no text or symbols)natural_image
Hand holding a circular object with arrows indicating rotation or movement (no text or symbols)natural_image
Illustration showing a hand holding a small object next to a device with a rotary knob, no text or symbols present.natural_image
Technical line drawing of a mechanical assembly with no visible text or symbolsnatural_image
Line drawing of a hand using a tool to adjust or install a component (no text or symbols present)natural_image
Exploded view of a multi-cylinder drainage system with numbered components (no text or symbols visible)natural_image
Illustration showing a hand holding a small object next to a device with a rotary knob, no text or symbols present.
- INHALT
- FUNKTIONSTASTEN
- WARNUNG
- OPTIONALES ZUBEHÖR
- TECHNICAL DATA
- SAFETY INSTRUCTIONS
- CAUTION
- SCOPE OF DELIVERY
- DEVICE OVERVIEW
- FUNCTION KEYS
- INSTALLATION
- Important information about the location
- Before first use
- Mixing Bowl
- Dough hook/ Beater/ Whisk installation
- Splash guard
- SPEEDSETTINGS
- OPERATION
- Before the first use
- Testing the machine
- WARNING
- Kneading operation instructions
- Method of operation:
- Make bread and other pastry
- Mixing instructions
- Whipping egg white/ Cream
- Egg White
- Beat cream
- Maximum amount: 1000 g
- CLEANING AND MAINTENANCE
- General cleaning instructions
- ERROR MESSAGES AND TROUBLESHOOTING
- Errorcodes
- Troubleshooting
- DISPOSAL CONSIDERATIONS
- MANUFACTURER & IMPORTER (UK)
- Manufacturer:
- Importer for Great Britain:
- OPTIONAL ACCESSORIES
- MEAT GRINDER (10046348)
- Safety instructions Meat Grinder
- Overview Meat Grinder
- Assembled Meat Grinder
- Attachments
- Attachment collocation
- Installation Meat Grinder
- Before use
- Usage
- Remove accessories
- Cleaning the meat grinder
- Troubleshooting Meat Grinder
- PASTA MAKER (10046349)
- Safety instructions Pasta Maker
- Overview Pasta Maker
- Installation Pasta Maker
- Operation Pasta Maker
- Dissembly instructions Pasta Maker
- Cleaning the Pasta Maker
- Troubleshooting Pasta Maker
- SALAD MAKER (10046350)
- Safety instructions Salad Maker
- Overview Salad Maker
- Installation Salad Maker
- Operation Salad Maker
- Dissembly instructions Salad Maker
- Cleaning the Salad Maker (optional accessory 10046350)
- Troubleshooting Salad Maker
- Estimado cliente
- CONTENIDO
- ADVERTENCIA
- Archivos adjuntos
- SOMMAIRE
- AVERTISSEMENT
- ACCESSOIRES EN OPTION
- Pièces jointes
- INDICE
- AVVERTENZA
- ACCESSORI OPZIONALI
Brand : Klarstein
Model : Chiara
Category : Food Processor