
FrostFusion Evo - Ice cream maker Klarstein - Free user manual and instructions
Find the device manual for free FrostFusion Evo Klarstein in PDF.

| Brand | Klarstein |
| Model | FrostFusion Evo |
| Product Type | Ice Cream Maker |
| Power Supply | 220-240 V ~ 50 Hz |
| Power Consumption | 100 W |
| Protection Class | I |
| Climate Type | N/SN |
| Weight | 6.9 kg |
| Dimensions (L × l × H) | 355 × 260 × 228 mm |
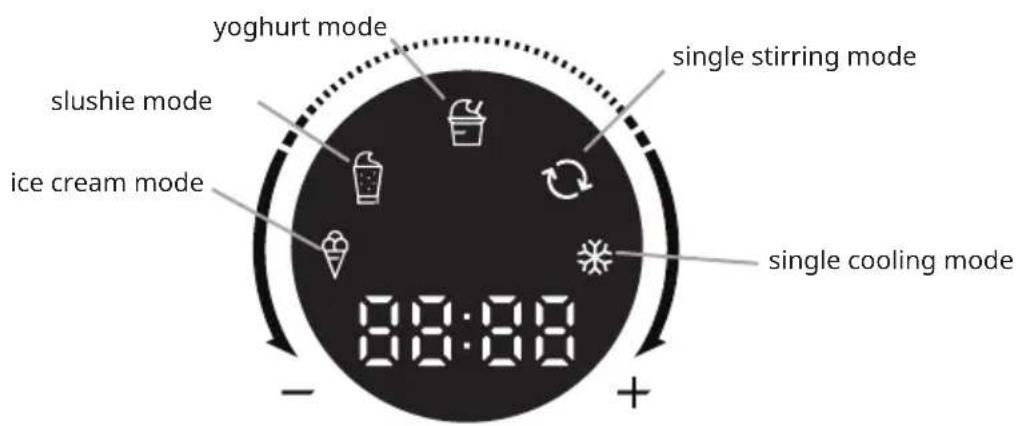
| Number of Modes | 5 modes: ice cream, smoothie, yogurt, simple stirring, simple cooling |
| Keep Cool Function | Yes, up to 1 hour after the cycle ends |
| Adjustable Timer | 5 to 60 minutes |
| Refrigerant | R600a (isobutane), flammable |
| Bowl Material | Stainless steel or plastic (not specified) |
| Cleaning | Removable bowl, blade and lid hand washable; do not immerse motor and cooling cylinder |
| Safety | Motor overcurrent protection, compressor protection (3 min), automatic shutdown in case of moisture on copper plates |
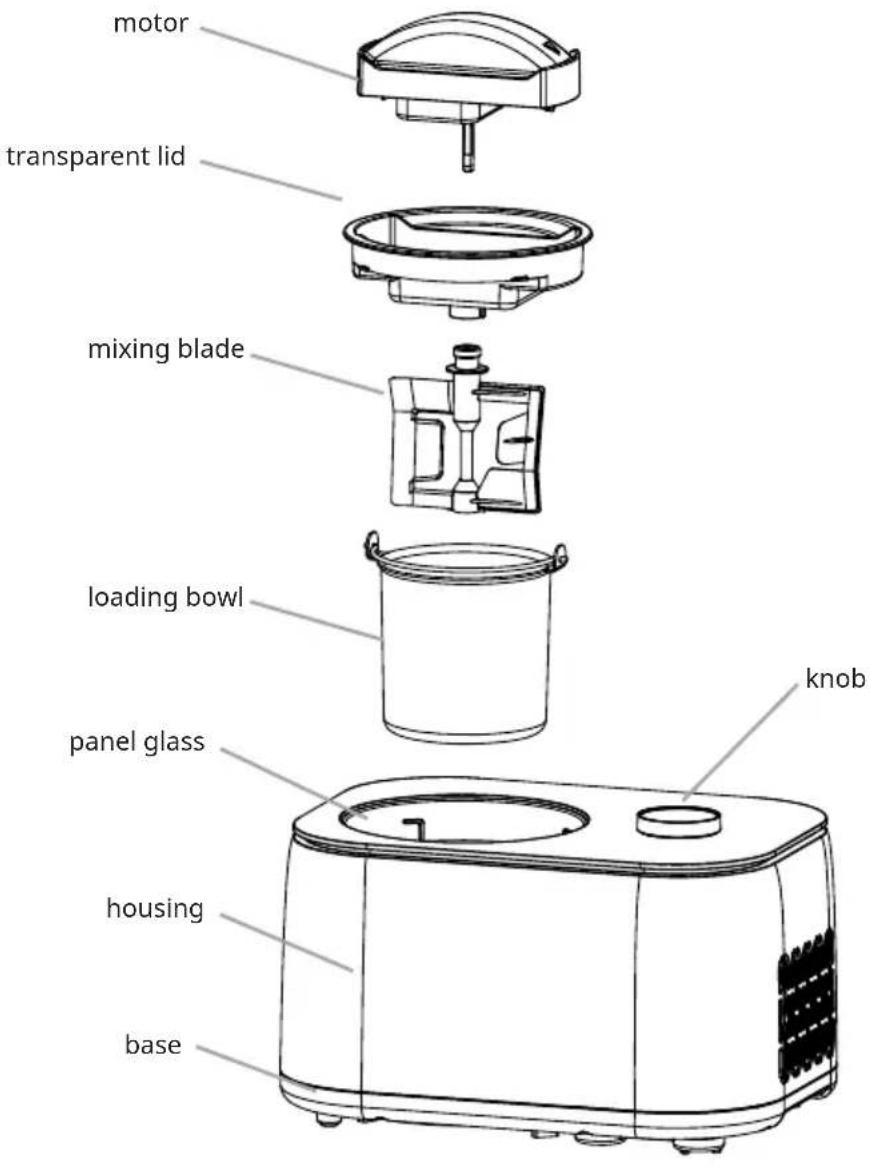
| Included Accessories | Loading bowl, mixing blade, transparent lid, removable motor |
| Number of manual pages | 88 pages (available in PDF) |
Frequently Asked Questions - FrostFusion Evo Klarstein
User questions about FrostFusion Evo Klarstein
0 question about this device. Answer the ones you know or ask your own.
Ask a new question about this device
Download the instructions for your Ice cream maker in PDF format for free! Find your manual FrostFusion Evo - Klarstein and take your electronic device back in hand. On this page are published all the documents necessary for the use of your device. FrostFusion Evo by Klarstein.
USER MANUAL FrostFusion Evo Klarstein
area
| Category | Value | | -------- | ----- | | 1 | 100 | | 2 | 100 | | 3 | 100 | | 4 | 100 | | 5 | 100 | | 6 | 100 | | 7 | 100 | | 8 | 100 | | 9 | 100 | | 10 | 100 | | 11 | 100 | | 12 | 100 | | 13 | 100 | | 14 | 100 | | 15 | 100 | | 16 | 100 | | 17 | 100 | | 18 | 100 | | 19 | 100 | | 20 | 100 | | 21 | 100 | | 22 | 100 | | 23 | 100 | | 24 | 100 | | 25 | 100 | | 26 | 100 | | 27 | 100 | | 28 | 100 | | 29 | 100 | | 30 | 100 | | 31 | 100 | | 32 | 100 | | 33 | 100 | | 34 | 100 | | 35 | 100 | | 36 | 100 | | 37 | 100 | | 38 | 100 | | 39 | 100 | | 40 | 100 | | 41 | 100 | | 42 | 100 | | 43 | 100 | | 44 | 100 | | 45 | 100 | | 46 | 100 | | 47 | 100 | | 48 | 100 | | 49 | 100 | | 50 | 100 | | 51 | 100 | | 52 | 100 | | 53 | 100 | | 54 | 100 | | 55 | 100 | | 56 | 100 | | 57 | 100 | | 58 | 100 | | 59 | 100 | | 60 | 100 | | 61 | 100 | | 62 | 100 | | 63 | 100 | | 64 | 100 | | 65 | 100 | | 66 | 100 | | 67 | 100 | | 68 | 100 | | 69 | 100 | | 70 | 100 | | 71 | 100 | | 72 | 100 | | 73 | 100 | | 74 | 100 | | 75 | 100 | | 76 | 100 | | 77 | 100 | | 78 | 100 | | 79 | 100 | | 80 | 100 | | Note: The actual values are not provided in the code. I have used the label 'Value' as a placeholder for the value detection. You would need to run the code to get the actual values from the code list. Please note that the actual values would be the result of this example. You would need to run the code to get the actual values from the code list. You would need to run the code to get the actual values from the code list. You would need to run the code to get the actual values from the code list. You would need to run the code to get the actual values from the code list. You would need to run the code to get the actual values from the code list. You would need to run the code to get the actual values from the code list. You would need to run the code to get the actual values from you would need to run the code. You would need to run the code to get the actual values from you would need to run the code.INHALT
Inhalt 3
natural_image
Simple line drawing of a bucket pouring liquid into a container (no text or symbols)Schritt 2
natural_image
Line drawing of a rectangular device with a downward arrow indicating force or motion (no text or symbols)
natural_image
Technical line drawing of a mechanical component with a central circular feature and a small protrusion (no text or symbols)natural_image
Technical line drawings of a mechanical device showing three sequential assembly steps (no text or symbols)Schritt 4
Schritt 6
natural_image
Pure technical diagram of a circular component with internal divisions and a curved base, no text or symbols present.
natural_image
Line drawing of a square-shaped appliance with a lid and ventilation slots, showing internal components (no text or symbols)BEDIENUNG
natural_image
Symbol of a trash bin crossed with a diagonal line, representing no waste or discharge (no text or labels)
Congratulations on purchasing this equipment. Please read this manual carefully and take care of the following hints on installation and use to avoid technical damages. Any failure caused by ignoring the items and cautions mentioned in the operation and installation instructions are not covered by our warranty and any liability. Scan the QR code to get access to the latest user manual and more product information.

CONTENTS
Contents 21
Safety Instructions 22
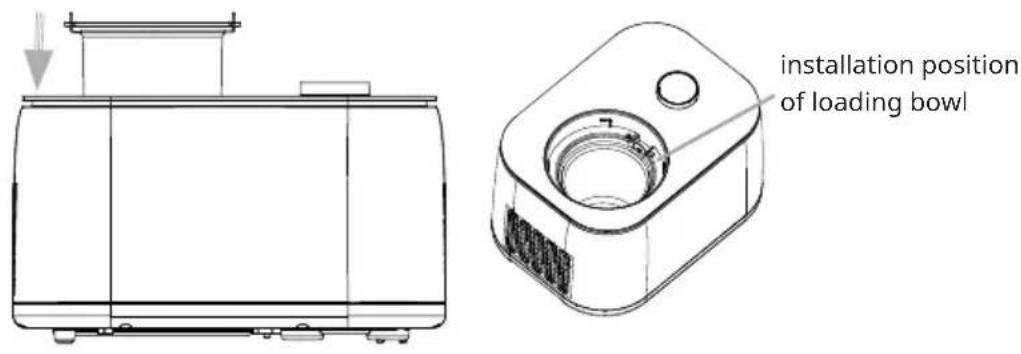
Product Overview 25
How to Make Ice Cream 27
Operation 30
Maintenance 32
Troubleshooting 33
Recipes 34
Disposal Considerations 36
Manufacturer & Importer (UK) 36
TECHNICAL DATA
| Item number 10048003 | |
| Power supply 220-240 V ~ 50 Hz | |
| Power consumption 100 W | |
| Protection Class I | |
| Climate type N/SN | |
| Weight 6.9 kg | |
| Dimensions (L×W×H) 355×260×228 mm | |
SAFETY INSTRUCTIONS
When using an electrical appliance, basic safety precautions should always be followed to reduce the risk of fire, electric shock, and/or injury, including the following:
- Read all instructions before using. Please keep the instruction manual.
- Ensure the voltage is compliant with the voltage range stated on the rating label, and ensure the earthing of the socket is in good condition.
- If the supply cord is damaged, it must be replaced by the manufacturer or its service agent or a similarly qualified person in order to avoid a hazard.
- This appliance is not intended for use by persons (including children) with reduced physical, sensory or mental capabilities, or lack of experience and knowledge, unless they have been given supervision or instruction concerning use of the appliance by a person responsible for their safety. Children should be supervised to ensure that they do not play with the appliance.
- This appliance can be used by children aged from 8 years and above and persons with reduced physical, sensory or mental capabilities or lack of experience and knowledge if they have been given supervision or instruction concerning use of the appliance in a safe way and understand the hazards involved. Children shall not play with the appliance. Cleaning and user maintenance shall not be made by children without supervision.
- This appliance is intended to be used in household and similar applications such as - staff kitchen areas in shops, offices and other working environments; - farm houses and by clients in hotels, motels and other residential type environments; - bed and breakfast type environments; - catering and similar non-retail applications.
- Warning: Do not store explosive substances such as aerosol cans with a flammable propellant in this appliance.
- Warning: Keep ventilation openings, in the appliance enclosure or in the built-in structure, clear of obstruction.
- Warning: Do not use mechanical devices or other means to accelerate the defrosting process, other than those recommended by the manufacturer.
- Warning: Do not damage the refrigerant circuit.
- Warning: Do not use electrical appliances inside the food storage compartments of the appliance, unless they are of the type recommended by the manufacturer.
- When positioning the appliance, ensure the supply cord is not trapped or damaged.
- Do not locate multiple portable socket-outlets or portable power supplies at the rear of the appliance.
- When disposing of the appliance, do so only at an authorized waste disposal centre. Do not expose to flame.

CAUTION: Risk of fire. The refrigerant (R600a) is flammable
The refrigerant isobutane (R600a) is contained within the refrigerant circuit of the appliance, a natural gas with a high level of environmental compatibility, which is nevertheless flammable. During transportation and installation of the appliance, ensure that none of the components of the refrigerant circuit becomes damaged.
If the refrigerant circuit should be damaged:
- Avoid opening flames and sources of ignition.
- Thoroughly ventilate the room in which the appliance is situated.
- The plug must be removed before cleaning, maintaining or filling the appliance
- Do not upend this product or incline it over a 45^ angle.
- To protect against risk of electric shock, do not pour water on cord, plug and ventilation, immerse the appliance in water or any other liquid.
- Unplug the appliance after using or before cleaning.
- Keep the appliance 8cm from other objects to ensure the good heat releasing.
- Do not use the accessories which are not recommended by Manufacturer.
- Do not use the appliance close by flames, hot plates or stoves.
- Do not switch on the power button frequently (ensure 5min. interval at least) to avoid the damage of compressor.
- Metal sheet or other electric objects are not allowed to be inserted into the appliance to avoid fire and short circuit.
- When take out the ice cream, do not knock the barrel or edge of barrel to protect the barrel from damage.
- Do not switch on the power before install well the barrel or blender blade.
- The initial temperature of the ice cream ingredients is 20 ± 3^ C . Do not place the prepared ice cream mixture in the freezer and then put it into the machine for production, as this will cause the ice cream to solidify immediately, causing the motor to enter a stalled state prematurely to protect the circuit, resulting in the machine incorrectly reporting that the ice cream production is complete.
- Do not remove the motor and transparent lid when the appliance is on working.
- Do not use outdoors.
- Never clean with scouring powders or hard implements. The transparent lid cannot be washed in a dishwasher. The motor and cooling barrel cannot be washed with water, but stains can be wiped off with a dry cloth.
- To avoid contamination of food, please respect the following instructions: - Opening the door for long periods can cause a significant increase of the temperature in the compartments of the appliance. - Clean regularly surfaces that can come in contact with food and accessible drainage systems
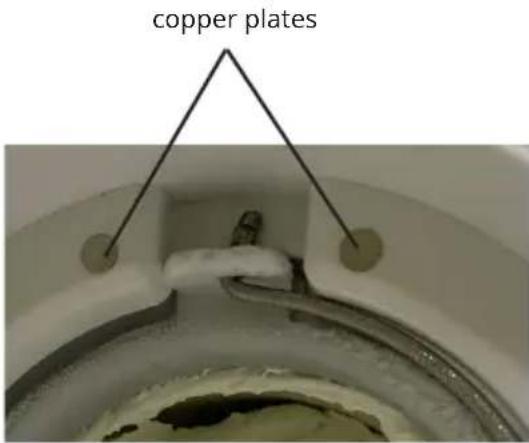
- There are two circular copper plates that serve as conductors where the transparent cover is installed on the motor assembly. When using the machine, wipe off any water stains on the transparent cover and copper plates. During operation, if the two copper plates become wet and connected, it will cause the motor to shut down. Unplug the power cord, wipe off the water stains, and restart the machine.
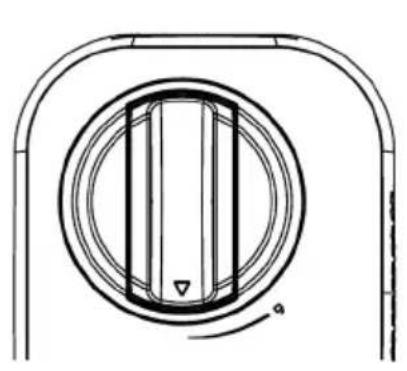
Control panel
HOW TO MAKE ICE CREAM
NOTE: Please thoroughly clean all parts that will contact with ice cream before use, including: cooling bowl, loading bowl, mixing blade, transparent lid, etc.
Before cleaning, you must ensure that the power cord plug is disconnected from the outlet. When making ice cream, keep the machine flat on a level surface to ensure that the compressor of the machine is working properly.
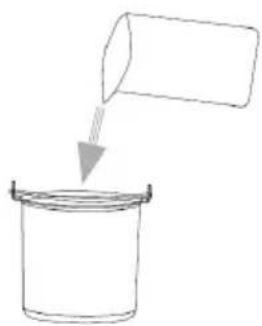
Step 1
Pour the well prepared recipe ingredients into the loading bowl, then have a uniform mixing.
natural_image
Simple line drawing of a container pouring liquid into a cylindrical container (no text or symbols)Step 2
Then put the loading bowl into the ice cream machine, both ends of the loading bowl handle shall be aligned with the groove of the upper cover.
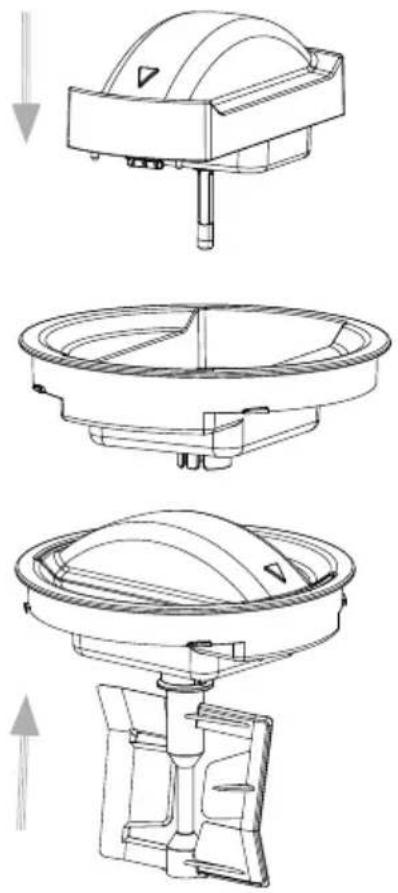
Step 3
Install the transparent lid and motor components.
natural_image
Technical line drawings of a mechanical device showing three sequential assembly steps (no text or symbols)Step 4
Install the mixing blade, transparent lid and motor components.
Step 5
Put the components installed in step 4 into the ice cream machine, make sure that the center of the convex hull of the loading bowl and the motor components of the mixing fan blade are in the same straight line, lock the components clockwise, and make sure that the triangle mark on the components rotates to the "LOCK" mark.
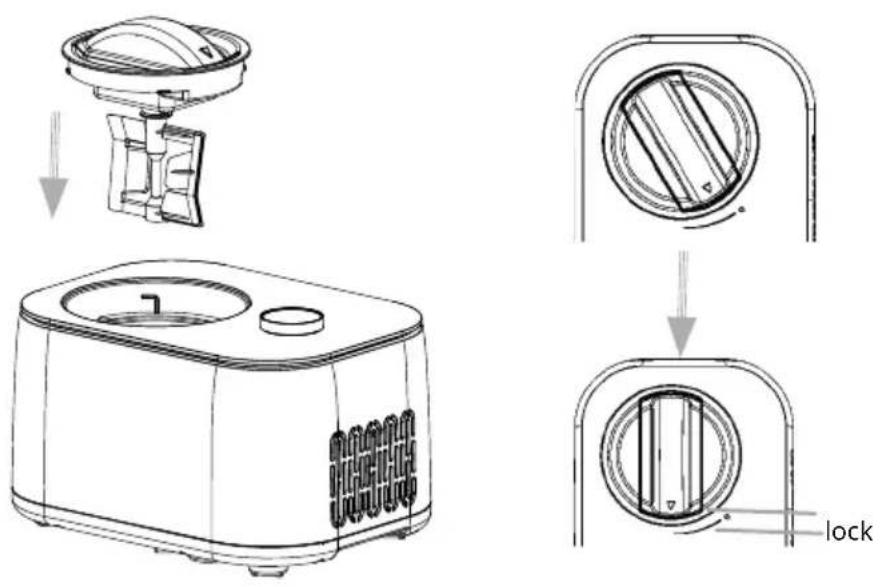
Step 6
Plug in the power supply, select the ice cream mode, and set the working time.
Step 7
When the ice cream is finished, there will be 10 short beeps and it will enter the keep-cool state.
Step 8
Turn the transparent lid and motor components anticlockwise. In the process of spinning out, there will be a slight friction sound, which is normal. When the triangle mark is aligned with the unlocking mark, take out the components and then take out the loading bowl.
natural_image
Pure technical diagram of a circular component with internal divisions and a curved base, no text or symbols present.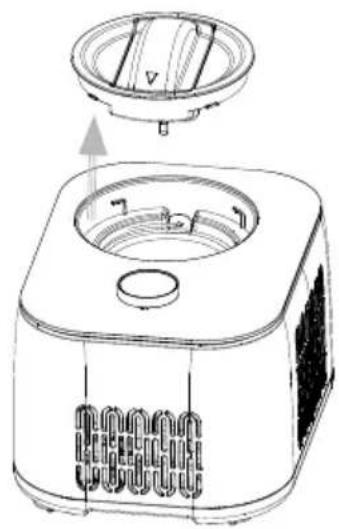
natural_image
Line drawing of a square-shaped appliance with a lid and ventilation slots, showing internal components (no text or symbols)OPERATION
Connect the power supply and plug the power cord into a suitable socket. The shape and voltage of the socket shall be the same as those indicated
The power management mode of this product is: off mode.
Power consumption: Max 0.5W.
The product enters off mode after 10 minutes of no user operation (after the main function ends).
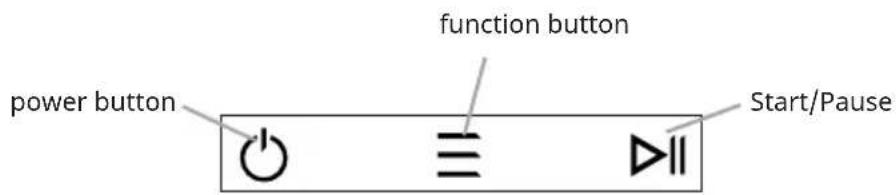
Touch control functions
1. Ice cream mode
Clicking the power button defaults to ice cream mode, and the working time is set by turning the knob (up to 60 minutes, minimum 5 minutes); Press the start button to start the compressor, stirring motor and cooling fan to start making ice cream; When the time or hardness reaches the set value (ice cream is made), there will be 10 short beeps, and the ice cream can be enjoyed; If there is no operation, the machine will automatically enter the keep-cool function (display COOL). The ice cream will taste better after being kept for a period of time under the keep-cool function. And 10 short beeps will appear after the keep-cool is completed.
2. Smoothie mode
After clicking the power button, select the smoothie mode through the function button, and set the working time (up to 60 minutes, minimum 5 minutes); Then press the start button, the machine will start to make smoothie, and when the time reaches the set value, the machine will have 10 beeps to indicate that it is completed. Finally, it automatically enters the single refrigeration keep-cool state (COOL is displayed). If there is no operation, the machine will always be in keep-cool state (it will not automatically shut down). (Note: The smoothie function of this product can only be used to make cola smoothie.)
3. Yogurt mode
After clicking the power button, select the yogurt mode through the function button, and set the working time (up to 24 hours, minimum 4 hours); Then press the start button, the machine will start to make yogurt, and when the time reaches the set value, the machine will have 10 beeps to indicate that it is completed. Finally, it automatically enters the single refrigeration keep-cool state (COOL is displayed). If there is no operation, the machine will always be in keep-cool state (it will not automatically shut down).
4. Single stirring mode
Select the single stirring mode and set the working time (up to 60 minutes, minimum 5 minutes); Press the start button, the stirring motor starts, to achieve the stirring function, when the time or softness reaches the set value, the machine
will sound 10 beeps to indicate that the stirring is completed.
5. Single cooling mode
Select single cooling mode and set the working time (up to 60 minutes, minimum 5 minutes); Press the start button to start the compressor and cooling fan to refrigerate, and when it ends, there will be 10 beeps to indicate that the cooling is complete.
Keep cool function
Just in case you may leave during the ice cream or smoothie making process and can't eat or save the finished ice cream or smoothie in time, resulting in the ice cream or smoothie melting, we have added the following user-friendly design: when the ice cream or smoothie is made without further operation, the machine will start the refrigeration function every once in a while to maintain the fresh taste and texture of the ice cream or smoothie. The keep-cool time is 1 hour, and there are 10 short beeps at the end, then the machine will automatically shut down.
Motor self-protection function
The motor itself has an overcurrent protection function, which will automatically stop when the ice cream hardness reaches the set value.
Compressor self-protection function
When the machine switches from ice cream mode or single refrigeration mode to shutdown mode and then back to ice cream mode or single refrigeration mode, the compressor will have a protection time of about 3 minutes; However, if you start the machine after unplugging the power cord, it will start again by default, and there is no delay in selecting ice cream mode or single refrigeration mode.
Controlling the volume of the ingredients
To avoid unnecessary spillage and waste, make sure that the ice cream ingredients do not exceed 60% of the volume of the inner bowl (as the ice cream will expand to a certain extent after it is formed). The proportion of ice cream ingredients shall not exceed 50%.
MAINTENANCE
Caution: The plug must be removed before cleaning to avoid electric shock.
- Take out the mixing blade, wipe it with a dampened cloth.
- Take out the removable bowl, clean it with a dampened soft cloth.
- Wipe the transparent lid and refill lid with a dampened cloth.
- Remove the dirty on the body or other places with a dampened cloth, and do not pour water on cord, plug and ventilation, immerse the appliance in water or any other liquid.
- Allow drying thoroughly with a dry cloth, then return the component to the original position.

WARNING: Risk of electric shock
Remove the plug before cleaning.
Wiring diagram
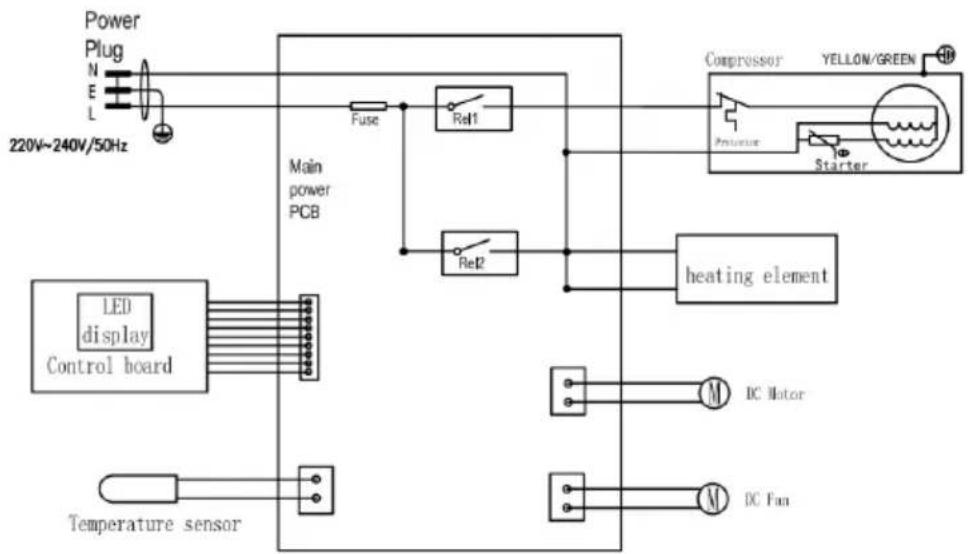
flowchart
graph TD
    A["Power Plug"] --> B["220V~240V/50Hz"]
    B --> C["Fuse"]
    C --> D["Main power PCB"]
    D --> E["Re1"]
    D --> F["Re2"]
    E --> G["heating element"]
    F --> G
    G --> H["BC Motor"]
    G --> I["BC Fan"]
    J["LED display Control board"] --> K["Control board"]
    L["Temperature sensor"] --> M["Control board"]
TROUBLESHOOTING
| Problem Possible reason | Solution | |
| It's not easy to remove the loading bowl once the ice cream has finished. | If the cooling bowl and the loading bowl are not wiped clean, water drops will remain between them, resulting in freezing. | Leave the loading bowl for 3-8 minutes before taking it out. |
| The transparent lid can be lifted off the mixing blade and will not get stuck in place. | Make sure the mixing blade is in place and pay attention to the alignment of the convex hull at the bottom. | Place the mixing blade in position, then secure the transparent cover. |
| The loading bowl cannot be placed in the cooling bowl. | Deformation caused by the loading bowl being used improperly. | Buy a new loading bowl. |
| At the start of the ice cream-making process, the mixing blade either got jammed or was seriously scratched. | Deformation caused by the loading bowl being used incorrectly. | Buy a new loading bowl. |
RECIPES
Basic ice cream
| Ingredients200g cream120g powdered milk180g water | Make according to the following formula. After mixing the formula mixture evenly, it can be made into ice cream within 60 minutes. |
Vanilla ice cream
| Ingredients226g whole milk106g granulated sugar167g heavy cream, well chilled1 – 2 teaspoons pure vanilla extract, to taste. | In a medium bowl, use a hand mixer or a whisk to combine the milk and granulated sugar until the sugar is dissolved, about 1 – 2 minutes on low speed. Stir in the heavy cream and vanilla to taste. Turn machine on, pour mixture into freezer bowl through ingredient spout and let mix until thickened, about 50 – 60 minutes. |
Basic chocolate ice cream
| Ingredients160g whole milk76g granulated sugar160g semi-sweet chocolate (your favourite), broken into 1.2cm pieces160g heavy cream, well chilled 0.6 teaspoon pure vanilla extract | Heat the whole milk until it is just bubbling around the edges (this may be done on the stovetop or in a microwave). In a blender or food processor fitted with the metal blade, pulse to process the sugar with the chocolate until the chocolate is very finely chopped. Add the hot milk, process until well blended and smooth. Transfer to a medium bowl and let the chocolate mixture cool completely. Stir in the heavy cream and vanilla to taste. It is best to pre-cooled in the refrigerator for about 15 minutes before making.Turn the machine on, pour mixture into removable bowl through ingredient spout and let mix until thickened, about 30 - 40 minutes. |
Fresh strawberry ice cream
| Ingredients167g fresh ripe strawberries, stemmed and sliced35g freshly squeezed lemon juice76g granulated sugar160g whole milk160g heavy cream0.6 teaspoon pure vanilla extract. | In a small bowl, combine the strawberries with the lemon juice and 76g granulated sugar, stir gently and allow to the strawberries to macerate in the juices for 2 hours.In a medium bowl, use a hand mixer or a whisk to combine the milk and granulated sugar until the sugar is dissolved.Stir in the heavy cream plus any accumulated juices from the strawberries and vanilla. Turn the machine on, pour mixture into removable bowl through ingredient spout and let mix until thickened, about 30 – 40 minutes. Add the sliced strawberries during the last 5 minutes of freezing. |
Fresh lemon sorbet
| Ingredients235g granulated sugar280g pure water80g freshly squeezed lemon juice0.5 tablespoon finely chopped lemon zest * | Combine the granulated sugar and water in a medium saucepan and bring to a boil over medium-high heat. Reduce heat to low and simmer without stirring until the sugar dissolves, about 3 – 5 minutes. Cool completely. This is called a simple syrup, and may be made ahead in larger quantities to have on hand for making fresh lemon sorbet. Keep refrigerated until ready to use.After cooling, add the lemon juice and zest; stir to combine. Turn the machine on, pour the lemon mixture into freezer bowl through ingredient spout and mix until thickened, about 50 – 60 minutes. |
Chocolate frozen yogurt
| Ingredients160g whole milk180g bittersweet or semisweet chocolate, chopped268g low-fat vanilla yogurt33g granulated sugar | Combine the milk and chocolate in a blender or food processor fitted with the metal blade and process until well blended and smooth, 15 seconds. Add the yogurt and sugar; process until smooth, about 15 seconds. Turn the machine on, pour mixture into removable bowl through ingredient spout and let mix until thickened, about 50 – 60 minutes. |
Slush ice
| Ingredients500 ml cola | . |
DISPOSAL CONSIDERATIONS
natural_image
Symbol of a trash bin with crossed lines indicating no waste or restriction, and a solid black rectangle below (no text or labels)If there is a legal regulation for the disposal of electrical and electronic devices in your country, this symbol on the product or on the packaging indicates that this product must not be disposed of with household waste. Instead, it must be taken to a collection point for the recycling of electrical and electronic equipment. By disposing of it in accordance with the rules, you are protecting the environment and the health of your fellow human beings from negative consequences. For information about the recycling and disposal of this product, please contact your local authority or your household waste disposal service.
MANUFACTURER & IMPORTER (UK)
Chal-Tec GmbH, Mühlenstraße 25, 10243 Berlin, Germany.
Contact: info@electronic-star.de
Chère cliente, cher client,
SOMMAIRE
Sommaire 37
natural_image
Simple line drawing of a container pouring liquid into a cylindrical container (no text or symbols)Étape 2
natural_image
Technical line drawings of a mechanical device showing three sequential assembly steps (no text or symbols)Étape 4
Étape 6
natural_image
Pure technical diagram of a circular component with internal divisions and a curved base, no text or symbols present.
natural_image
Line drawing of a square-shaped appliance with a lid and ventilation slots, showing internal components (no text or symbols)FONCTIONNEMENT
natural_image
Symbol of a trash bin with crossed lines indicating no waste, and a solid rectangle below (no text or labels)INDICE
Indice 53
natural_image
Simple line drawing of a container pouring liquid into a cylindrical container (no text or symbols)2° passaggio
natural_image
Technical line drawing of a rectangular device with a downward arrow indicating force or motion (no text or symbols)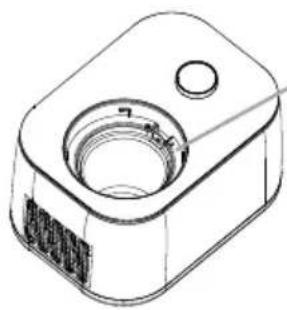
natural_image
Technical line drawing of a mechanical component with a central bore and flange (no text or symbols)natural_image
Technical line drawings of a mechanical device showing three sequential assembly steps (no text or symbols)4° passaggio
6° passaggio
natural_image
Pure technical diagram of a circular component with internal divisions and a curved base, no text or symbols present.
natural_image
Line drawing of a small kitchen appliance with a lid and ventilation slots (no text or symbols)UTILIZZO
natural_image
Symbol of a trash bin with crossed lines indicating no waste, and a solid rectangle below (no text or labels)ÍNDICE
Índice 69
natural_image
Simple line drawing of a container being poured into a cylindrical container (no text or symbols)Paso 2
natural_image
Technical line drawings of a mechanical device showing three sequential assembly steps (no text or symbols)Paso 4
Paso 6
natural_image
Pure technical diagram of a circular component with internal divisions and a curved base, no text or symbols present.