Aria Smart - Food processor Klarstein - Free user manual and instructions
Find the device manual for free Aria Smart Klarstein in PDF.


User questions about Aria Smart Klarstein
0 question about this device. Answer the ones you know or ask your own.
Ask a new question about this device
Download the instructions for your Food processor in PDF format for free! Find your manual Aria Smart - Klarstein and take your electronic device back in hand. On this page are published all the documents necessary for the use of your device. Aria Smart by Klarstein.
USER MANUAL Aria Smart Klarstein
Bella Food Processor
Berlin Brands Group UK Limited PO Box 42 272 Kensington High Street London, W8 6ND United Kingdom
Congratulations on your purchase. Please read the following instructions carefully and follow them to prevent potential damage. We accept no liability for damage caused by disregarding the instructions and improper use. Please scan the QR code to access the latest operating instructions and further information about the product.

CONTENTS
Safety Instructions 52
Device Overview 56
Installation 57
Assembly of the components 58
Operation and Programs 68
Preset programs 74
Functions 87
Device Control by Smartphone 90
Speeds and quantities 92
Cleaning and care 93
Error messages and troubleshooting 94
Technical Data 95
Disposal Considerations 96
Declaration of Conformity 96
SAFETY INSTRUCTIONS
- Before using the food processor, read and follow all warnings and instructions in this manual, even if you are familiar with the product.
- Keep the device out of the reach of small children. This appliance is not intended to be used by persons (including children) with reduced physical, sensory or mental capabilities, or lack of experience and knowledge, unless they have been given supervision or instruction concerning use of the appliance by a person responsible for their safety.
- Children should be supervised to ensure that they do not play with the device.
- Make sure that children and small children do not play with plastic bags or packaging material.
- This thermal cooker is heavy. Be careful when transporting it. Switch off the device and pull the power plug out before transport.
- Do not attempt to modify this product in any way.

CAUTION
Risk of injury! Never insert the plug into the socket before assembly is complete.
- Keep the power cord away from crowded and wet areas.
- Make sure that the outside of the device does not get wet (water splashes).
- Do not use the device with wet hands.
Never immerse the device in water or any other liquid and do not use it near a sink, bathtub or shower.
- Always operate the device from a power source with the same voltage, frequency and power as specified on the rating plate.
- Route the power cord so that it is not likely to be walked on, pinched by objects placed on or near it, or resting on the device.
- This thermal cooker is intended for use in households and similar environments such as: staff kitchens in shops and offices, farms and motels and B&B establishments.
- Keep the ventilation openings free of obstructions.

CAUTION
Risk of injury! Avoid contact with moving parts. Keep hands, hair, clothing, spatula and other utensils away from moving parts during operation to avoid personal injury and/or damage to the unit.
- Switch off the device and disconnect it from the power supply before changing accessories or approaching moving parts.
Always unplug the appliance from the outlet whenever the appliance is left unattended and before assembling, disassembling or cleaning it. - Be careful when pouring hot liquid into the food processor or blender as it may be expelled from the appliance by sudden evaporation.
- The device may only be used with the supplied base.

CAUTION
Risk of burns! The surfaces can become hot during operation and remain warm for a long time after use. Allow all parts to cool down completely before disassembling and cleaning the device.
- Only operate the device on a flat, level surface. Operation on sinks, drainers or uneven surfaces is prohibited.

CAUTION
Risk of injury! Keep hands and utensils out of the blender jar during use. The spatula can be used when the device is switched off and disconnected from the mains.
- Always operate the device with the lid on.
- Never bypass the safety interlocks.
- Do not attempt to open the lid or remove the blender jar when the appliance is in use.
- When opening the lid, pay attention to the highly heated food.
- Always insert the measuring cup/lid plug correctly into the opening at the top of the blender jug lid when processing food.
- Do not use the device for more than 2 minutes on the highest speed level 8, 9 or 10 as the motor can overheat. Turn off the device and allow it to cool for at least 1 minute before proceeding.

CAUTION
Risk of burns! When mixing/stirring hot liquids (never mix hot oil or fat), pour them through the jar's special removable lid. Start processing at a lower speed. Keep hands and other exposed skin away from the lid to avoid burns.
- There is a risk of injury if moving blades are accidentally exposed.
- Do not leave the device unattended when it is running.
- Do not use the blender jug to store food or drinks.
- Do not use the device to mix paint or other flammable liquids or in a place where flammable gases or vapours are present.
- Avoid spilling food or liquids on the power connector in the recess of the blender jar. In the event of a spillage, immediately turn off and unplug the device, allow the spillage to cool, and then clean up.
- Before use, make sure the blade sealing ring is correctly fitted and the blade assembly is securely mounted in the base.
- If the device is not assembled correctly, food can leak and damage the device.
- Be careful after using the heating function as the surfaces of the components will be hot for some time after use.
- Make sure the pot, pot lid and steamer basket are assembled correctly when using the steamer accessory.
- Do not touch any part of the steamer except the handles during use.
- Do not use the steamer without the lid on.
- When opening the steamer lid, be careful not to scald yourself on the escaping hot steam.
- With all other heating functions, make sure that you do not injure yourself with escaping hot steam.
- Make sure the vent hole in the steamer lid is not blocked during use.
- Be careful not to knock the steamer basket off the top of the bowl either during or after use.
- Do not reach for a device that has fallen into water. Immediately unplug the power cord.
- Do not let the power cord hang over the edge of a table or counter or touch any hot surface.
- Do not use the device if it has been dropped or if any part of the device (including the cord or plug) has been damaged.
- If the power cord is damaged, it must be replaced by the manufacturer, its service agent or a similarly qualified person to avoid a hazard.
-
The use of accessories not intended for use with this device may result in injury to the user or damage to the device.
-
Do not place the device on top of other devices, on uneven surfaces, or in locations where it may be exposed to: heat sources (radiators or stoves), direct sunlight, excessive dust, or mechanical vibration.
- The device should not be used outdoors, near a hot gas or electric burner, or in a heated oven.
- Do not place the device near heat sources such as radiators, heat registers, stoves or other devices that produce heat.
- Do not operate the device under or near flammable or combustible materials (curtains).
- Any type of maintenance, apart from normal cleaning, may only be carried out by a qualified electrician. This device contains no user-serviceable parts.
- If this device is used by third parties, please provide them with the operating instructions.
- Do not misuse the power cord. Never carry or pull the device by the power cord, or pull on it to unplug it from the outlet. Instead, grasp the plug and pull it out of the socket.
- Do not use the device in extremely hot or humid places or in direct sunlight.
- If possible, do not use the device with an extension cord.
- Do not place any other devices on the device.
- This device is intended for household use only.
- This product was not designed for purposes other than those specified in this user manual.
- Contact your local authority for the correct instructions on how to dispose of the device.
- No liability is assumed for damage caused by non-observance of these instructions or by other improper use or incorrect handling of the device.
Particular caution is required in the following situations:
- When handling the multifunction blade, when emptying the container and especially when cleaning.
- Do not touch the sharp edges of the blades. Only hold the top part when installing, removing and cleaning the blade.
- Incorrect use of the thermal cooker can lead to serious injuries. Only use your thermal cooker for its intended household use.
- To avoid the hazard of accidentally resetting the thermal protector, this thermal cooker must not be powered from an external switching device (timer) or connected to a circuit that is regularly turned on and off by the utility company.
DEVICE OVERVIEW
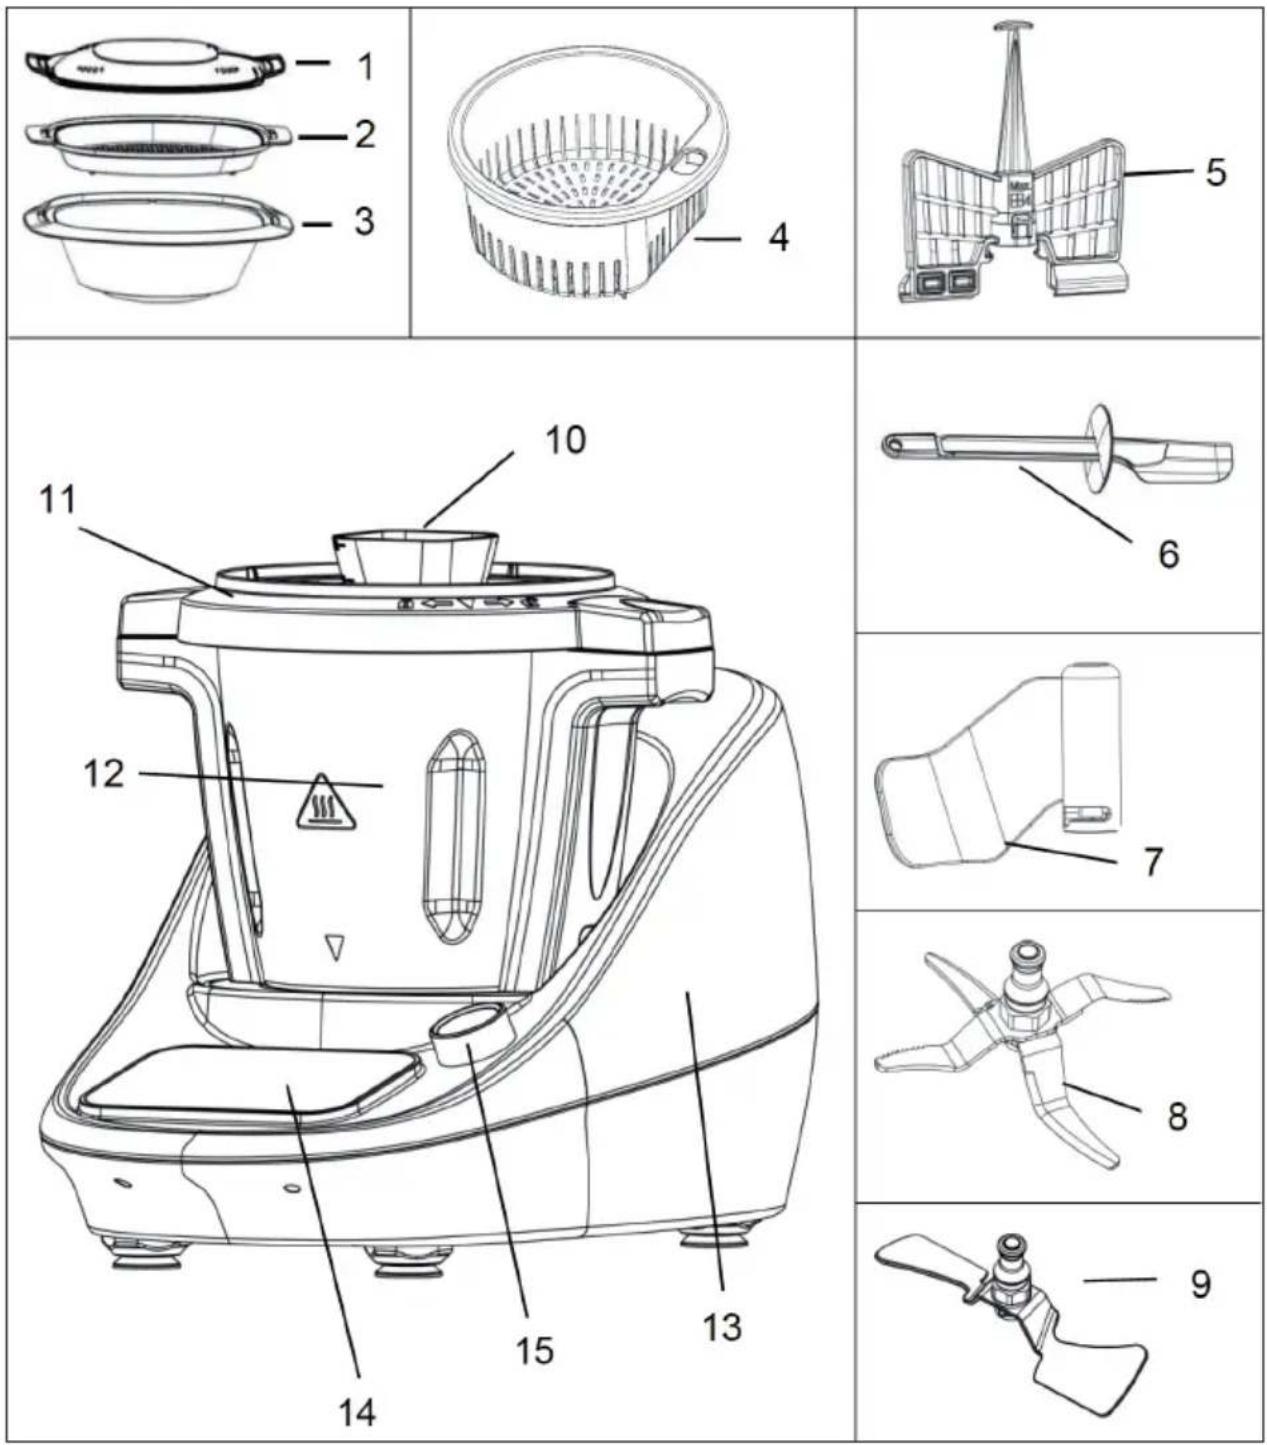
| 1 Steamer lid 9 Roast blade | ||
| 2 Steamer bowl 10 Measuring cup | ||
| 3 Steamer base 11 Blender jug lid | ||
| 4 Colander / steamer basket 12 Blender jar | ||
| 5 Whisk 13 Device base with non-slip feet | ||
| 6 Spatula 14 Touch sensitive control panel | ||
| 7 Dough hook | 15 | Function knob (can be pressed and rotated) |
| 8 Multifunction knife |
INSTALLATION
Important information about the location
- Place the thermal cooker on a stable, flat and level surface.
- Set up the thermal cooker so that there is no heat source nearby and there is no direct sunlight. Splashing water on the device can cause a short circuit.
- Keep enough space between the side panels and your device for good ventilation. Leave at least 10cm space between the back and sides of the unit and any wall.
- Leave enough space above the appliance to reach the lid and the steamer.
Before first use
- Remove all packaging materials and dispose of them properly and carefully.
- It is strongly recommended that you thoroughly clean the device and accessories before use. See the CLEANING AND MAINTENANCE section for instructions.
ASSEMBLY OF THE COMPONENTS
Drive coupler
The drive coupler and rubber seal, if not already installed, must be installed and secured to the bottom of the blender jar.
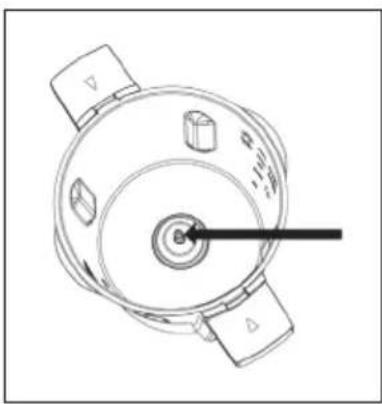
To do this, take the drive coupler and make sure the rubber grommet is in place over the bottom of the coupler as shown below. If you do not attach the rubber seal, liquids may leak from the bottom of the blender jug.
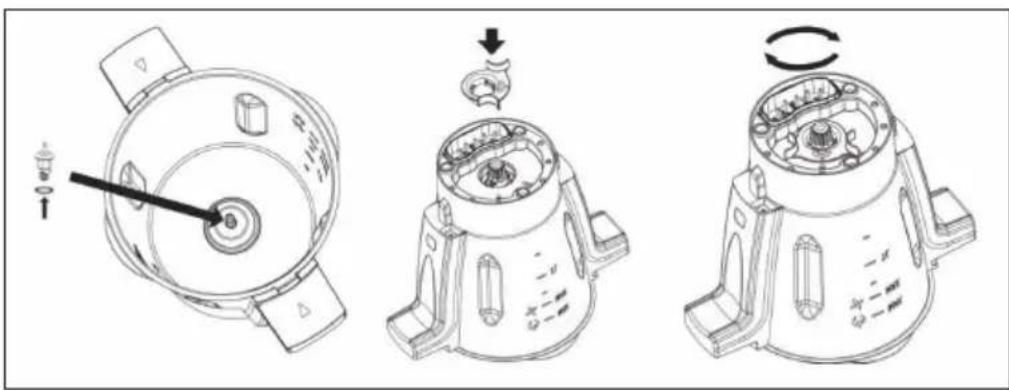
Lower the drive coupler down from the top of the blender jar and through the hex hole in the bottom of the blender jar.
Note: The drive coupler can only be fully inserted into the hex hole in three positions. Not in six positions of the hex hole. Therefore if the drive coupler will not go all the way into the hole, rotate the drive coupler one notch and push it in.
Hold the drive coupler and turn the blender jar upside down. With the other hand, take the locking sleeve and press the locking sleeve down, aligning the arrow on the sleeve with the unlocked padlock symbol on the bottom of the blender jar.
Multifunction blade
The multifunction blade is mainly used for chopping food.

CAUTION
Risk of injury! Take extra care when handling this accessory as the blades are very sharp and can cause injury if mishandled.
To install the multifunction blade, do the following:
1 Place the blender jar in the correct orientation onto the unit base and secure.
2 Grasp the top of the blade post. DO NOT grasp or touch the sharp edges of the blade.
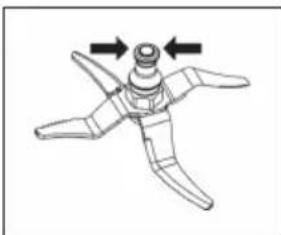
3 Lower the multifunction blade over the drive coupler in the bottom of the container, making sure the tabs on the drive coupler line up with the slots in the bottom of the blade. Then press down firmly and turn anti-clockwise until it clicks into place.
Note: The blender jar must be properly seated on the base of the unit or the blade will not install.
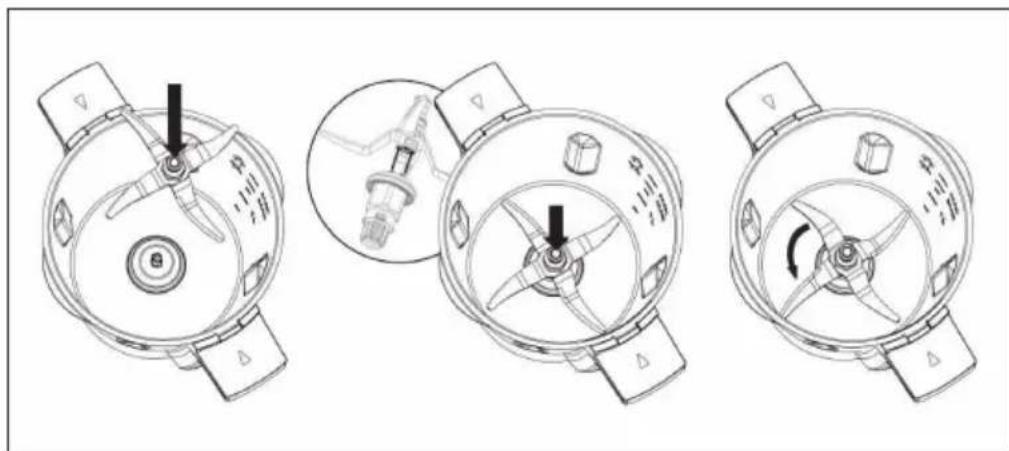
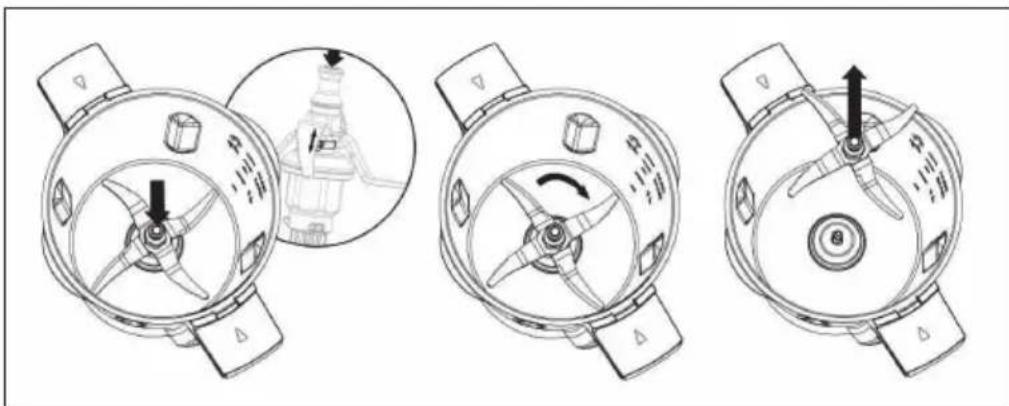
To remove the multifunction knife, proceed as follows:
1 Place the blender jar in the correct orientation onto the unit base and secure.
2 Grasp the top of the blade post, press down firmly, rotate clockwise, and then pull straight up to remove.
Note: The blender jug must be firmly seated on the base of the appliance, otherwise you will not be able to remove the blade.
Dough hook
The dough hook is mainly used for kneading dough.
Note: Do not use the dough hook above speed 3.
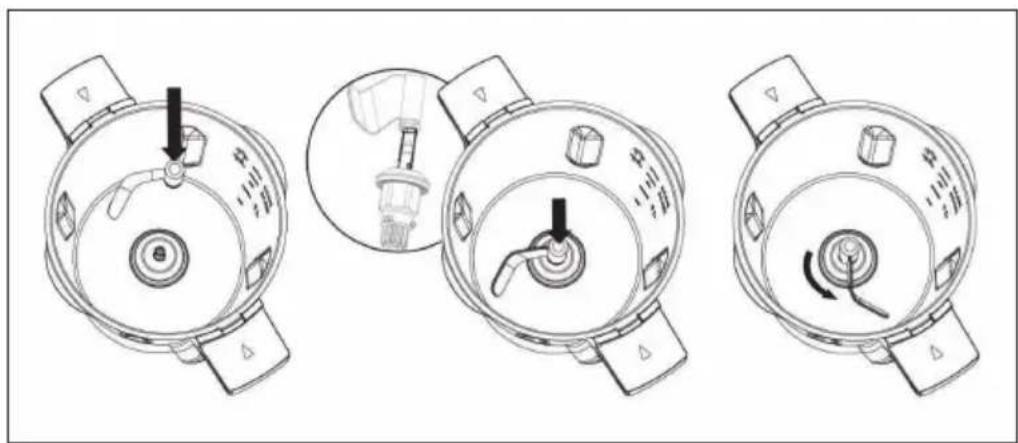
To install the dough hook, do the following:
1 Place the blender jar in the correct orientation onto the unit base and secure.
2 Grasp the top of the blade post.
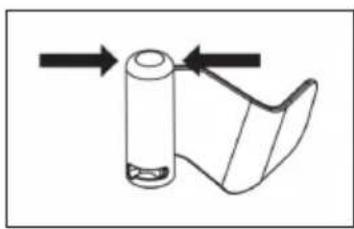
3 Lower the dough hook over the drive coupler in the bottom of the blender jar, making sure the tabs on the drive coupler line up with the slots in the bottom of the dough hook. Then press down firmly and turn anti-clockwise until it clicks into place.
Note: The blender jug must be firmly seated on the base of the appliance, otherwise you will not be able to remove the blade.
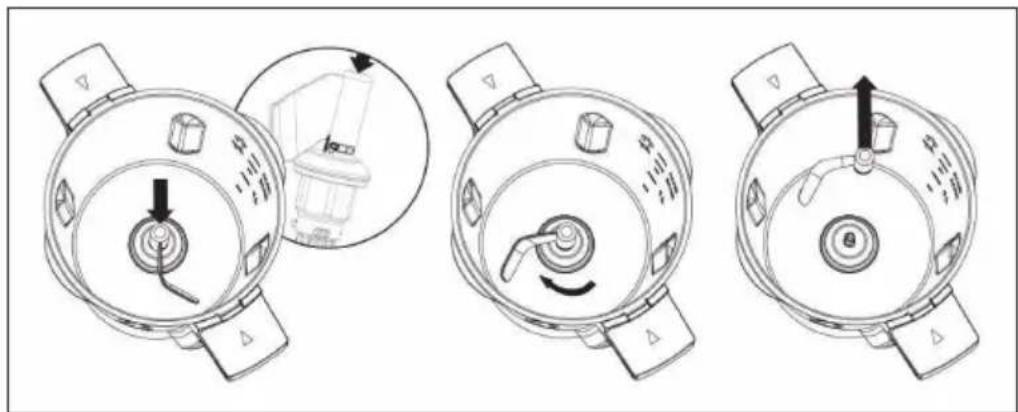
To remove the dough hook, proceed as follows:
1 Place the blender jar in the correct orientation onto the unit base and secure.
2 Grasp the top of the blade post, press down firmly, rotate clockwise, and then pull straight up to remove.
Note: The blender jug must be firmly seated on the base of the appliance, otherwise you will not be able to remove the blade.
Roast blade
The roast blade is mainly used for searing and stirring.
Note: Do not use the roast blade above speed 2.
To install the roast blade, do the following:
1 Place the blender jar in the correct orientation onto the unit base and secure.
2 Grasp the top of the blade post.
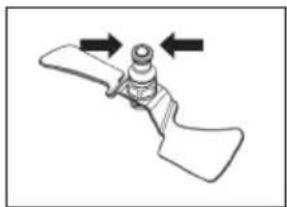
3 Lower the roast blade over the drive coupler in the bottom of the blender jar, making sure the tabs on the drive coupler line up with the slots in the bottom of the dough hook. Then press down firmly and turn anti-clockwise until it clicks into place.
Note: The blender jug must be firmly seated on the base of the appliance, otherwise you will not be able to remove the blade.
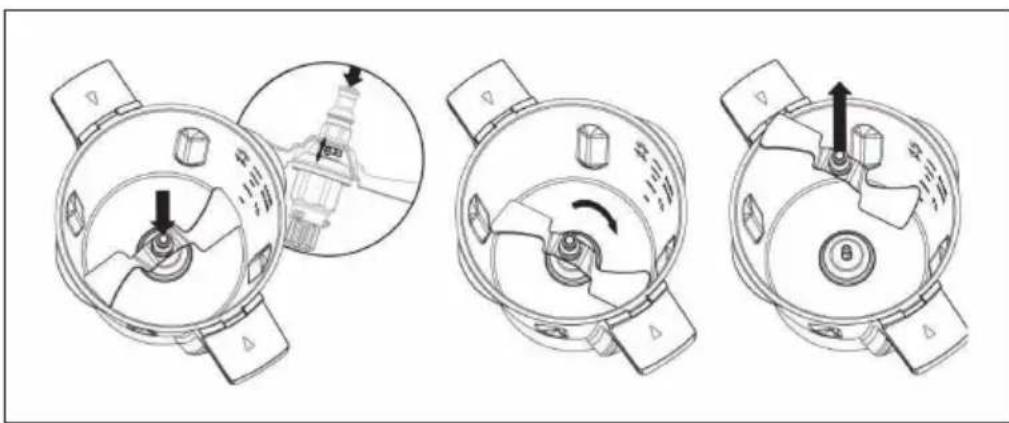
To remove the roast blade, proceed as follows:
1 Place the blender jar in the correct orientation onto the unit base and secure.
2 Grasp the top of the blade post, press down firmly, rotate clockwise, and then pull straight up to remove.
Note: The blender jug must be firmly seated on the base of the appliance, otherwise you will not be able to remove the blade.
Whisk
The whisk is mainly used for stirring and whisking food.
Note: Do not use the whisk above speed 4. Do not add ingredients to the blender jug while the appliance is whisking as the whisk may become jammed and damaged.
To attach the whisk, grasp the top of the whisk.
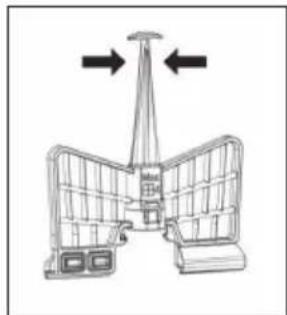
To insert the whisk, align the base of the whisk with the top of the multifunction blade and press down firmly on the whisk until it clicks into place. To remove the whisk, pull straight up and out.
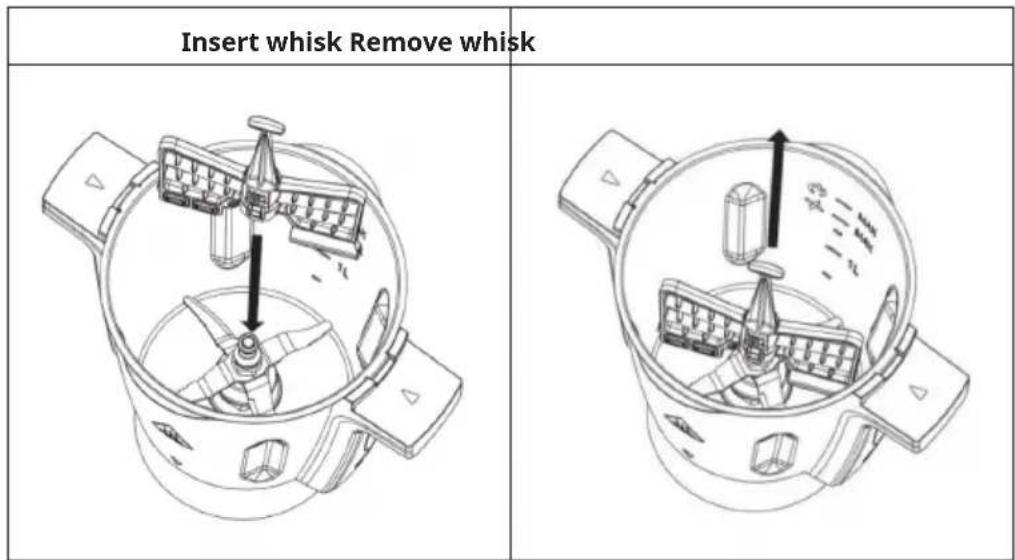
Installation of bowl and lid
The capacity of the container is marked on one side inside the container.
| MAX | The symbol indicates that the maximum capacity for blending is 2 litres. |
| -- MAX | The symbol indicates that the maximum capacity for heating without blending is 2.3 litres. |
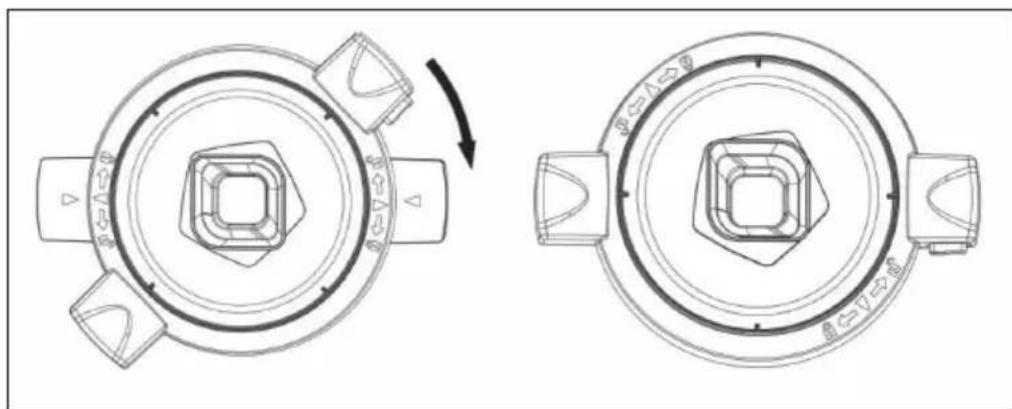
To attach the lid, place the lid on the top of the bowl and press down firmly so it lies flat on the rim of the blender jug. Then turn the lid clockwise to lock it on the bowl.
Note: If the lid is not properly attached and locked, the thermal cooker cannot be used.
To remove the lid, press the release button, rotate the lid anti-clockwise, and then pull straight up to remove.
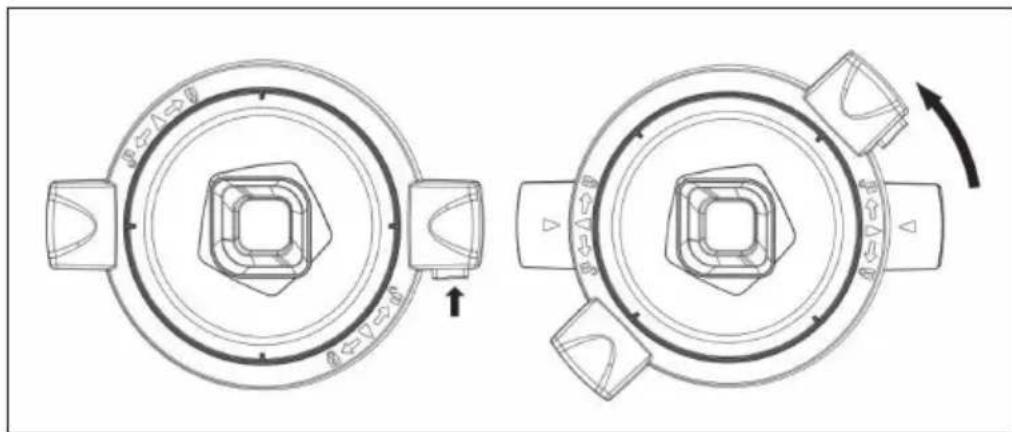
Place the blender jar in the correct orientation on the base unit.
Note: If the blender jug is not inserted correctly, the thermal cooker cannot be used.

Measuring cup
The measuring cup not only prevents food and liquids from splashing out of the hole in the lid, it is also a practical measuring cup.
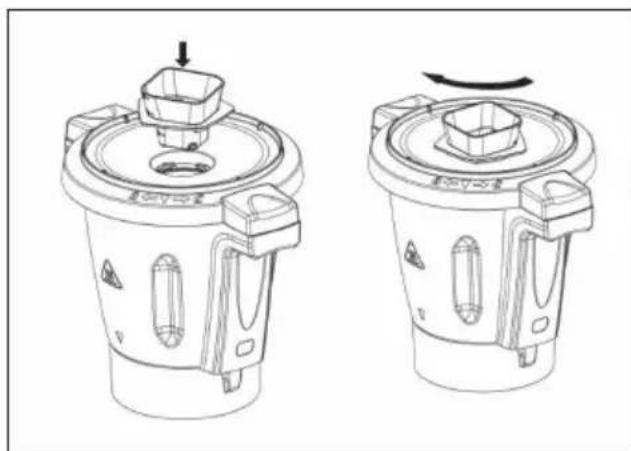
To connect the measuring cup to the lid, place the measuring cup in the opening and turn clockwise until it clicks into place. To remove, turn anticlockwise and lift straight up.
Note: The measuring cup is the only component that may be used to cover and seal the round hole in the blender jar lid. Do not cover the hole in the lid of the container with other objects such as towels, paper, cups or dishes, as this may cause injury or damage the device.
Spatula
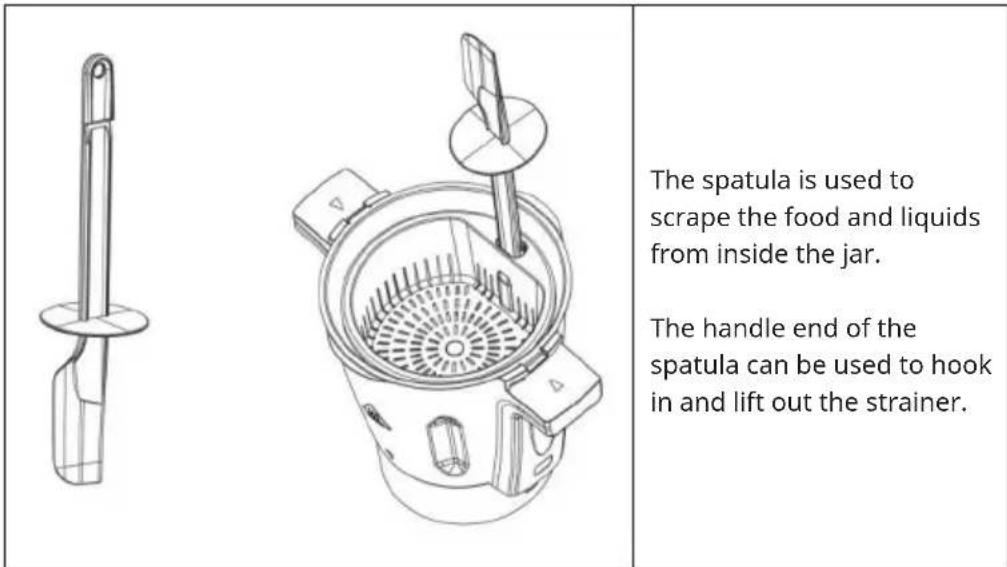
Note: Do not use other utensils as they may damage the inner surface of the glass. Only use the spatula when the device is switched off and the lid has been removed.
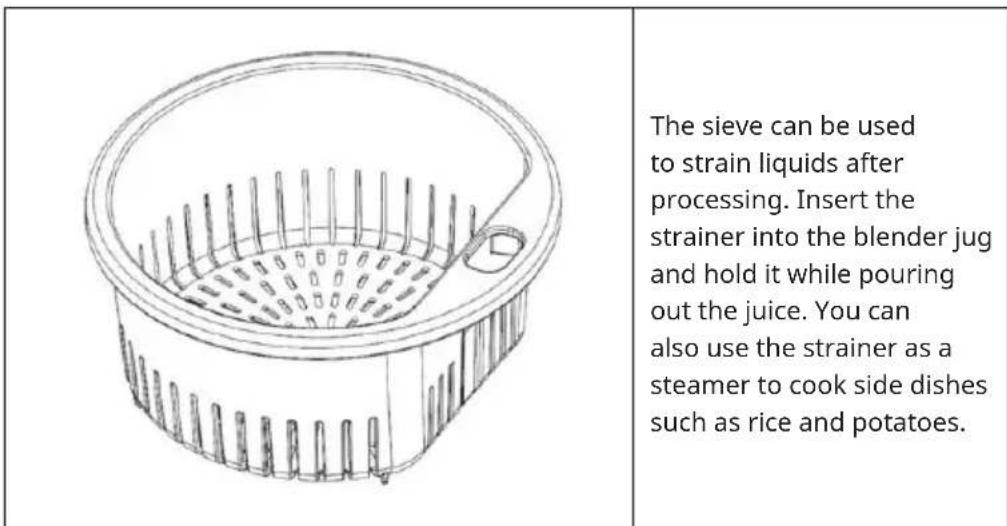
Colander / steamer basket
Assembling the steamer accessories
The steamer accessory is used to steam vegetables, fish and other foods that you would like to steam.
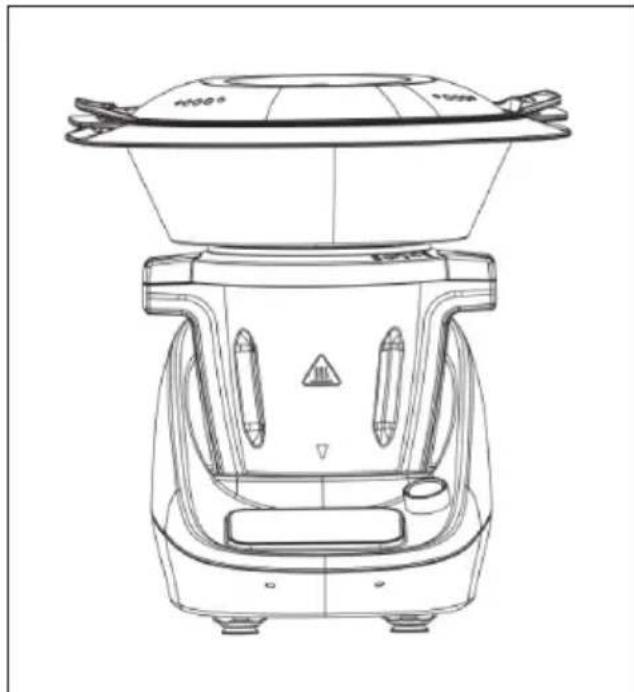
To put the steam cooker into operation, the lid must be placed on the blender jar and locked. Then the measuring cup must be removed. The steamer accessories (base, bowl and lid) are then placed on the lid of the blender jar.
Before steaming, make sure the steamer lid is on the steamer accessory.
Important notes on steam cooking:
- The steamer accessory must not be used in a microwave oven or with any other electrical appliance.
- When the steamer is in operation, do not touch any part of the steamer except the handles.
- Keep a sufficient distance from the steam outlet openings in the steamer lid to avoid injury from hot steam.
- Do not cover or block the openings in the steamer lid, otherwise the steam will find another way to escape and could cause serious injury or damage to surrounding property.
OPERATION AND PROGRAMS
Note: When you use the thermal cooker for the first time, you may notice a slight odour coming from the motor, which is normal. After some time, this smell will gradually disappear.
On/off switch
The switch can be found on the back of the device. Use this switch to turn the device on or off.
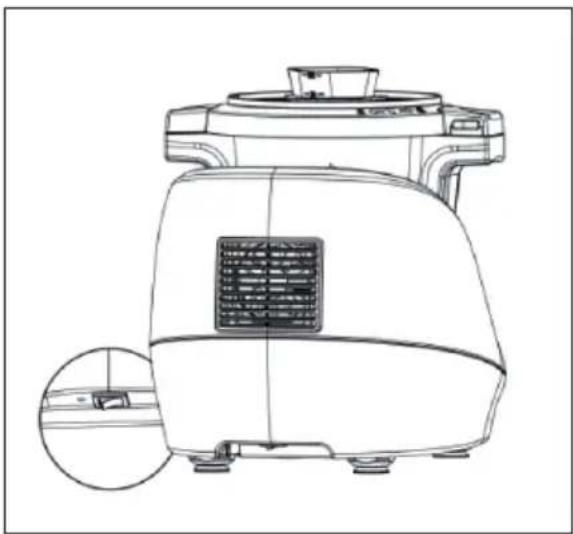
As soon as the device is switched on, a beep sounds and the indicator lights up.
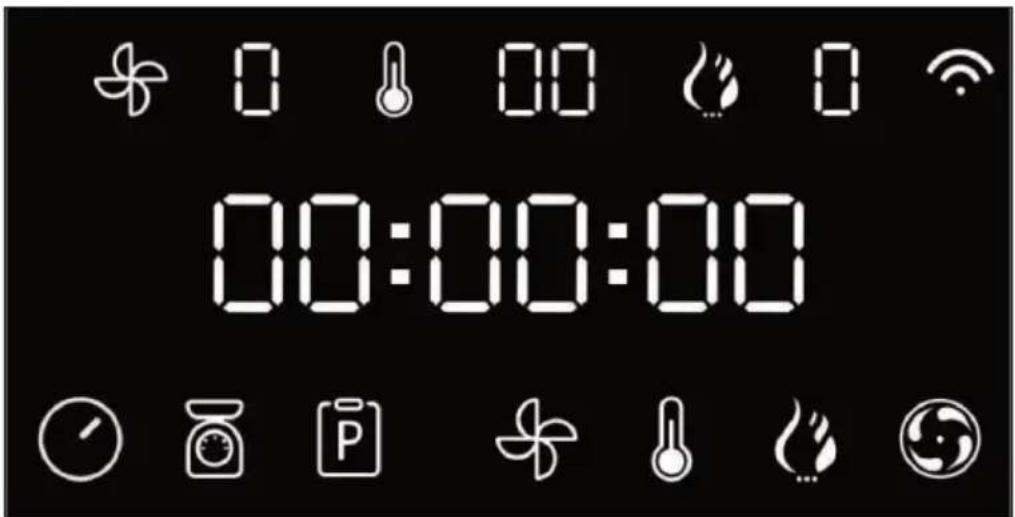
Note: All functions only work when the blender jug is installed and the lid is on and locked. Otherwise, only the scale function and the heating function will work. If the lid is not on, the heating process can be started, but the motor cannot be run until the lid is on and locked.
Control panel displays and function buttons
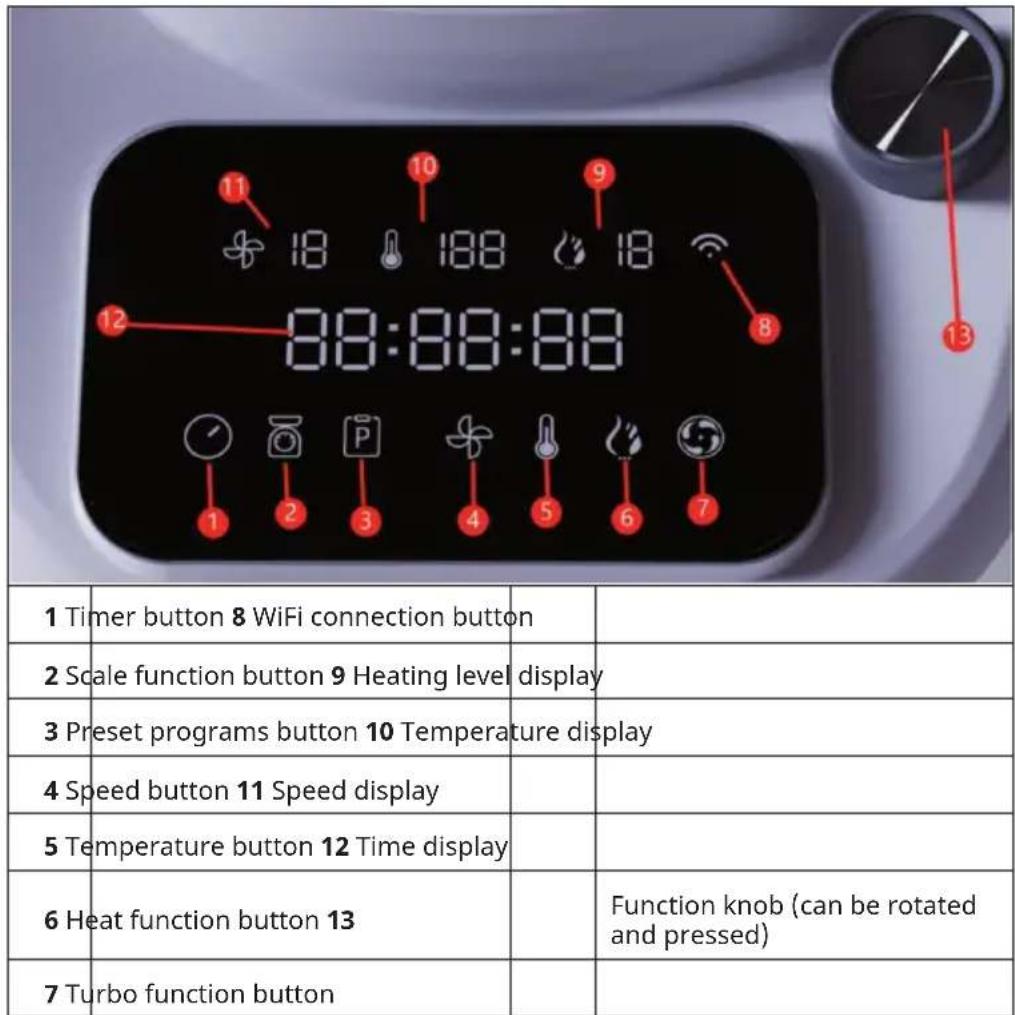
* Note: The scale function button will not appear if the blender jug is placed in the appliance with the lid on and locked.
Function knob
The function knob can be turned or pressed.
- Press the function knob to start or pause the device during operation.
- Turn the function knob clockwise to set the timer, speed, temperature and heating power.
Note: The blender jug and lid must be on and locked for the device to work, with the exception of the scale function and the heating function.
If the device is paused, it will automatically switch to standby mode after about 10 minutes and the display will turn off.
Set automatic switch-off timer

The time is displayed in hours : minutes : seconds.
- To set the desired operating time, touch the timer button to enter the minutes setting. The minute digits flash. Turn the function knob to set the desired minutes.
- Touch the timer button again to enter the seconds setting. The second digits flash. Rotate the function knob to set the desired seconds.
- Touch the timer button again to enter hour setting. The hour digits flash. Turn the function knob to set the desired number of hours between 1 and 12 hours.
Note: After setting the timer, wait 5 seconds until the timer stops flashing and the set time has been accepted. Then start the appliance by pressing the Start/ Pause button.
If you start the device without setting the timer, the timer will start counting up. Touch the timer button while working, the timer will start counting down and the device will turn off when the auto power off time is reached.
Example:
You have turned on the device and the timer counted up 15 seconds. When the timer reaches 15 seconds and you touch the timer button, the timer starts counting down from 15 seconds to 0. When the timer reaches 0, the device turns off, displays [End] and beeps. To clear the word [End] from the display, press the Start/Pause button.
Adjust speed

To set the desired speed, touch the speed button at the bottom of the display. The speed digit flashes.
Note: You have approximately 5 seconds to set the desired speed before the display returns to normal. Within 5 seconds, turn the function knob to set the desired speed.
Important notes on setting the speed:
- Some of the preset programs lock the speed so you cannot adjust them while running.
- The speed range is from level 1 to 10 (10 is the highest speed).
- When the device is in mixing and heating mode and the temperature is above 90^ , the maximum speed that can be selected is 1 to 4.
- If the device is in operation or set to a higher speed (5 to 10) and the temperature reaches 91^ or more, the speed will automatically be reduced to speed 4.
- When using the machine at speed 8, 9 or 10, do not run it for more than 2 minutes at a time without a 5 minute cool-down period in between.
Set the temperature
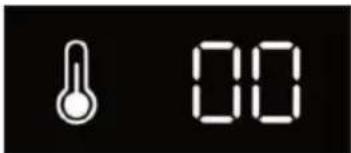
To set the desired temperature, touch the temperature button, and the bottom of the display to enter the temperature setting. The temperature digits flash.
Note: You have approximately 5 seconds to set the desired speed before the display returns to normal. Within 5 seconds, turn the function knob to set the desired speed.
Important notes on setting the speed:
- Some of the preset programs lock the temperature so you cannot adjust them while they are running.
- You can also adjust the temperature during operation, except for some of the preset programs.
- As you set the temperature, you will notice that the digits in the heat setting display will also increase depending on the temperature selected.
The temperature setting can be adjusted from 37-120 °C.
Note: The thermometer icon changes from white to red colour when the temperature reaches or exceeds 60^ + / - 5^
Set heating function

The heating power is displayed in steps from 0 to 10. 10 is the highest setting and means the device heats up faster.
To set the desired heating level, touch the heating function button at the bottom of the display to enter the heating power setting. The heating output digits flash.
Note: You have approximately 5 seconds to set the desired heat level before the display returns to normal. Within 5 seconds, turn the function knob to set the desired heat level.
Important notes on setting the heating output:
- Some of the preset programs lock the heat level so you cannot adjust them while they are running.
- When you set the heating level, the temperature display will show 100^ by default.
- You must select a setting from 1 to 10 for the heating function to work. If you leave the setting at 0, it will not be activated.
Turbo function
To set the turbo function, press and hold the turbo function button. This function starts the device at the highest speed. If you release the button for the turbo function, the device stops immediately.
Note: This function is only active for a maximum of 1 minute at a time. Make sure you have the correct ingredients and accessories for full speed use before using this feature. Otherwise, the product will be damaged.
Scale function
This thermal cooker has a built-in scale and can weigh from 1-4,999 grams in 1-gram increments.
Note: The scale function only works if the lid of the blender jug is not on the blender jug. Otherwise the button for the scale function will not be displayed.
In order to use the scale function, the device must be paused or in standby mode.
- Touch the scale button to activate the scale function.
- The timer digits will disappear and the scale digits will appear approximately 5 seconds later, flashing [0 00 0] to indicate the scale function has been activated.
- The ingredients are weighed as they are added to the jar and the display shows the value in grams.
Important notes on the scale function:
- If there are already ingredients in the jar and new ones are added, the scale will add both values and the display will show the total weight in the jar.
- If you add ingredients after exiting and restarting the scale function, the total weight will not be displayed. Only the weight of the newly added ingredients is displayed, and only when you are in scale mode. As a result, the gauge may show negative values when food is removed from inside the jar.
- Once the jar lid is in place and latched and the jar is placed in the device, the scale function disappears and the timer digits reappear.
PRESET PROGRAMS
There are a total of 18 preset programs in the memory of the thermal cooker, which make operation easier. Touch the preset program button to enter the preset program menu. Then turn the function knob to the desired program number from P01 - P18.
P01: Cleaning program
This is a cleaning program for the inside of the blender jug.
- Insert the whisk.
- Add 500ml of clean water and 1-2 drops of washing up liquid.
- Attach the lid and measuring cup, making sure they are secure and locked into place.
- Press the start button to begin.
| Preset Adjustable Accessories Please note: | ||||
| Speed 4 no Whisk | Add a few drops of washing up liquid. | |||
| Temperature (°C) 70 no | ||||
| Heating level 7 no | ||||
| Timer (min) 5 1-15 | ||||
P02: Smoothie (crush and mix)
Chop vegetables, meat, spices and crush ice in just a few seconds. Prepare milkshakes, sauces, dips and creams with a smooth and silky texture.
- Insert the multifunction knife.
- Add your ingredients.
- Attach the lid and measuring cup, making sure they are secure and locked into place.
- Press the start button to begin.
| Preset Adjustable Accessories Please note: | ||||
| Speed 10 no Knife | In this program, everything is finely pureed. | |||
| Temperature (°C) 0 no | ||||
| Heating level 0 no | ||||
| Timer (min) 0.5 0.5-2 | ||||
P03: Washing program
At 50^ , blood that has leaked from meat or pesticide residues on fruit and vegetables can be removed.
- Insert the multifunction knife.
- Pour 1.5 litres of cool (not hot and not refrigerator-cold) water into the blender jug.
- Insert the sieve.
- Put the ingredients in the sieve.
- Attach the lid and measuring cup, making sure they are secure and locked into place.
- Press the start button to begin.
| Preset Adjustable Accessories Please note: | ||||
| Speed 6 4-7 Knife / sieve | ||||
| Temperature (°C) | 50 no | |||
| Heating level 5 | 1-10 | |||
| Timer (min) | 5 | 1-10 | ||
P04: Thick soup
Slow cooking for total control over temperature and time for perfectly cooked and tender results.
- Insert the multifunction knife.
- Add the ingredients.
- Attach the lid and measuring cup, making sure they are secure and locked into place.
- Press the start button to begin.
Note: This program consists of eight steps. The device will automatically move to the next step when the previous step is completed.
Step 1:
| Preset Adjustable Accessories Please note: | ||||
| Speed 0 no Knife | 1-2 minutes after boiling, proceed to step 2. | |||
| Temperature (°C) 100 no | ||||
| Heating level 10 no | ||||
| Timer (min) 1-2 no | ||||
Step 2:
| Preset Adjustable Accessories Please note: | ||||
| Speed 0 no Knife | ||||
| Temperature (°C) 110 no | ### | |||
| Heating level 4 no | ||||
| Timer (min) 20 no | ||||
Step 3:
| Preset Adjustable Accessories Please note: | ||||
| Speed 3 no Knife | ||||
| Temperature (°C) 0 no | ### | |||
| Heating level 0 no | ||||
| Timer (min) | See note | no | ||
Note: Stage 3 will continue until the temperature of the ingredients drops to 90^ or less, and then it will automatically switch to Stage 4. There is no set time for Step 3 as it depends on the ambient temperature, the type of ingredients and the quantity of ingredients, as they cool down at different speeds.
Step 4:
Step 5:
| Preset Adjustable Accessories Please note: | ||||
| Speed 6 no Knife | ||||
| Temperature (°C) 0 no | ||||
| Heating level 0 no | ||||
| Timer (min) 5 no | ||||
Step 6:
| Preset Adjustable Accessories Please note: | ||||
| Speed 7 no Knife | ||||
| Temperature (°C) 0 no | ||||
| Heating level 0 no | ||||
| Timer (min) 5 no | ||||
Step 7:
| Preset Adjustable Accessories Please note: | ||||
| Speed 8 no Knife | ||||
| Temperature (°C) 0 no | ||||
| Heating level 0 no | ||||
| Timer (min) 5 no | ||||
| Preset Adjustable Accessories Please note: | ||||
| Speed 9 no Knife | ||||
| Temperature (°C) 0 no | ||||
| Heating level 0 no | ||||
| Timer (min) 5 no | ||||
Step 8
| Preset Adjustable Accessories Please note: | ||||
| Speed 10 no Knefe | ||||
| Temperature (°C) 0 no | ### | |||
| Heating level 0 no | ||||
| Timer (min) 1 no | ||||
P05: Cutting program
Cuts all kinds of ingredients, from meat or fish to fruit or vegetables.
- Insert the multifunction knife.
- Add the ingredients.
- Attach the lid and measuring cup, making sure they are secure and locked into place.
- Press the start button to begin.
| Preset Adjustable Accessories Please note: | ||||
| Speed 5 5-7 Knife | ||||
| Temperature (°C) 0 no | ||||
| Heating level 0 no | ||||
| Timer (min) 1 1-5 | ||||
P06: Roasting program
Cook, roast and stew all kinds of dishes that are usually prepared in a pan with this program.
| Preset Adjustable Accessories Please note: | ||||
| Speed 1 1-2 Roast blade | ||||
| Temperature (°C) | 120 120 | |||
| Heating level | 10 no | |||
| Timer (min) 5 | 1-30 | |||
- Insert the roasting blade.
- Add the ingredients.
- Attach the lid and measuring cup, making sure they are secure and locked into place.
- Press the start button to begin.
P07: Stirring program
Stirs food during cooking to ensure even heating and a professional texture. Cook delicious risottos, pasta salads, puddings or prepare hot chocolate.
- Insert the whisk.
- Add the ingredients.
- Attach the lid and measuring cup, making sure they are secure and locked into place.
- Press the start button to begin.
| Preset Adjustable Accessories Please note: | ||||
| Speed 2 0-3 Whisk | ||||
| Temperature (°C) 100 | 90-120 | |||
| Heating level 10 no | ||||
| Timer (min) 30 5-60 | ||||
P08: Kneading program
For the preparation of bread dough.
- Insert the dough hook.
- Add the ingredients.
- Attach the lid and measuring cup, making sure they are secure and locked into place.
- Press the start button to begin.
| Preset Adjustable Accessories Please note: | ||||
| Speed 3 no Whisk | ||||
| Temperature (°C) | 0 | 0 or 37 | ||
| Heating level 0 no | ||||
| Timer (min) | 6 | 3-20 | ||
P09: Steam program
This function is ideal for steaming vegetables. Thanks to the 2-stage steamer, you can save time because you can cook more than 1 ingredient at a time.
- Assemble the steamer accessories (base, bowl and lid).
- Put the ingredients in the steamer.
- Do not put more than 1.5 litres of cold water in the blender jug.
- Attach the lid and remove the measuring cup.
- Place the steamer accessory on the blender jug lid.
- Press the start button to begin.
| Preset Adjustable Accessories Please note: | ||||
| Speed 0 no Steam | m cooker | |||
| Temperature (°C) 120 | no | |||
| Heating level 10 no | ||||
| Timer (min) 20 15-60 | ||||
P10:Stew
Traditional stews that require long cooking times can be prepared with this program. Slow cooking + lots of time = best flavours.
- Insert the multifunction knife.
- Add the ingredients.
- Attach the lid and measuring cup, making sure they are secure and locked into place.
- Press the start button to begin.
Step 1:
| Preset Adjustable Accessories Please note: | ||||
| Speed 0 no Knife | ||||
| Temperature (°C) 100 no | ||||
| Heating level 10 no | ||||
| Timer (h) See note | 1-12 hours | |||
Note: The program will show 3 hours when activated. This refers to the total time for step 1 and step 2. The program will automatically switch to step 2 about 5 minutes after the ingredients have started to cook.
Step 2:
| Preset Adjustable Accessories Please note: | ||||
| Speed 0 no Knife | ||||
| Temperature (°C) 95 no | ||||
| Heating level 2 no | ||||
| Timer (h) No limit 1-12 hours | ||||
P11: Warming program
Keeps your food warm until it is served. After cooking your food, simply set the temperature of the thermo cooker to 65^ (default setting) for solid food or 80^ for liquid food (soups) and set the desired length of time.
- Make sure the multifunction knife is installed.
- Make sure the lid and measuring cup are secure and snapped into place.
- Press the start button to begin.
| Preset Adjustable Accessories Please note: | ||||
| Speed 0 no Knife | ||||
| Temperature (°C) 80 | 80 | |||
| Heating level 2 no | ||||
| Timer (h) 1 1-12 hours | ||||
P12:Warm-up program
Allows you to reheat cooked food.
Note: Only add thawed and not frozen food.
- Insert the multifunction knife.
- Add the pre-cooked ingredients.
- Attach the lid and measuring cup, making sure they are secure and locked into place.
- Press the start button to begin.
| Preset Adjustable Accessories Please note: | ||||
| Speed 0 no Knife | ||||
| Temperature (°C) 95 | 60-90 | # | ||
| Heating level 5 no | ||||
| Timer (min) 30 1-60 | ||||
P13:Boil in water
- Insert the multifunction knife.
- Add the ingredients.
- Pour enough water into the blender jug to cover all the ingredients.
- Attach the lid and measuring cup, making sure they are secure and locked into place.
- Press the start button to begin.
| Preset Adjustable Accessories Please note: | ||||
| Speed 0 no Knife | ||||
| Temperature (°C) 100 no | ||||
| Heating level 10 no | ||||
| Timer (min) | See note | no | ||
Note: Shut off about a minute or two after it reaches boiling point. If you need to keep boiling to cook the food, set it manually.
P14:Yoghurt
Home-made yoghurts are easy to prepare. The thermal cooker keeps the mixture at fermentation temperature so that the yoghurt is ready to cool and eat the next morning.
- Insert the multifunction knife.
- Add the ingredients.
- Attach the lid and measuring cup, making sure they are secure and locked into place.
- Press the start button to begin.
Note: This program consists of two steps; the total time is 8 hours, with the time during step 2 being adjustable between 3 and 12 hours. The device will automatically switch to step 2 after step 1 is completed.
Step 1:
| Preset Adjustable Accessories Please note: | ||||
| Speed 1 no Knife | Stir yoghurt or starter culture into milk and stir for half an hour. | |||
| Temperature (℃) 37 no | ||||
| Heating level 2 no | ||||
| Timer (min) See note | ||||
Note: The program will show 8 hours after selection, but will automatically switch to step 2 after about 30 minutes. The 8 hours shown refer to the total time for steps 1 and 2. During step 2, this time can be set between 3 and 12 hours.
Step 2:
| Preset Adjustable Accessories Please note: | ||||
| Speed 0 no Knife | Although the knife isn't needed for step 2, it stays in. | |||
| Temperature (°C) 37 | ||||
| Heating level 1 no | ||||
| Timer (h) 7.5 3-1 | 2 hours | |||
P15: Risotto
- Insert the multifunction knife.
- Put the desired amount of rice in the steamer basket and the appropriate amount of water in the blender jug.
- Attach the lid and measuring cup, making sure they are secure and locked into place.
- Press the start button to begin.
Note: This program consists of two steps. The device will automatically move to the next step when the previous step is completed.
Step 1:
Step 2:
| Preset Adjustable Accessories Please note: | ||||
| Speed 1 no Knife | Go to step 2 after the temperature has reached 90 °C. | |||
| Temperature (°C) 100 no | ||||
| Heating level 6 no | ||||
| Timer (min) See note no | ||||
| Preset Adjustable Accessories Please note: | ||||
| Speed 1 no Knife | ||||
| Temperature (°C) 96 no | ||||
| Heating level 4 no | ||||
| Timer (min) 18 no | ||||
P16: Porridge
Use this setting to cook softer foods like beans or porridge. This is ideal for foods that require milk or water to cook.
- Insert the multifunction knife.
- Add the ingredients.
- Attach the lid and measuring cup, making sure they are secure and locked into place.
- Press the start button to begin.
| Preset Adjustable Accessories Please note: | ||||
| Speed 2 1-2 Knife | ||||
| Temperature (°C) 90 no | ||||
| Heating level 10 no | ||||
| Timer (min) 12 10-B0 | ||||
P17: Rice porridge
- Insert the multifunction knife.
- Add the ingredients.
- Attach the lid and measuring cup, making sure they are secure and locked into place.
- Press the start button to begin.
Note: This program consists of two steps. The device will automatically switch to step 2 after step 1 is completed.
Step 1:
| Preset Adjustable Accessories Please note: | ||||
| Speed 1 no Knife | ||||
| Temperature (°C) 120 | no | |||
| Heating level 10 no | ||||
| Timer (min) | 6.5 | no | ||
Note: The program will display 46 minutes and 30 seconds when set, but will automatically advance to step 2 after approximately 6.5 minutes. The 46 minutes and 30 seconds displayed is the combined total time for steps 1 and 2.
Step 2:
| Preset Adjustable Accessories Please note: | ||||
| Speed 1 no Knife | ||||
| Temperature (°C) 98 | no | |||
| Heating level 5 no | ||||
| Timer (min) 40 30-60 | ||||
P18: Fast soup
- Insert the multifunction knife.
- Add the ingredients.
- Attach the lid and measuring cup, making sure they are secure and locked into place.
- Press the start button to begin.
Note: This program consists of three steps. The device will automatically move to the next step when the previous step is completed.
Step 1:
| Preset Adjustable Accessories Please note: | ||||
| Speed 10 no Knefe | ||||
| Temperature (°C) 0 no | ### | |||
| Heating level 0 no | ||||
| Timer (sec) 30 no | ||||
Note: The program will display 32 minutes and 30 seconds when it is set, but will automatically advance to step 2 after approximately 30 seconds. The 32 minutes and 30 seconds displayed is the total time for steps 1, 2 and 3.
Step 2:
| Preset Adjustable Accessories Please note: | ||||
| Speed 0 no Knife | ||||
| Temperature (°C) 120 no | ||||
| Heating level 10 no | ||||
| Timer (sec) | 2 no | |||
Step 3:
| Preset Adjustable Accessories Please note: | ||||
| Speed 2 no Knife | ||||
| Temperature (°C) 100 no | ### | |||
| Heating level 10 no | ||||
| Timer (sec) 30 15-60 | ||||
FUNCTIONS
| Function Description | Description | |
| 1 Chop | Chop all kinds of ingredients, from meat or fish to fruit or vegetables. Perfect cuts assured. | |
| 2 Mince | Mince vegetables, meat, spices and crush ice easily in just a few seconds. Perfect for processing raw ingredients. | |
| 3 Mash | Prepare sauces and creams with perfect texture or mash cold or hot ingredients just by adjusting speed and time to each food type. | |
| 4 Grind | Perfect ground level for all your recipes. Grind coffee, seeds, rice and dry nuts. It also allows preparing homemade flour. | |
| 5 Pulverise | Pulverise any type of ingredient until it reaches the finest texture. Prepare icing sugar or vanilla sugar for confectionery recipes. | |
| 6 Grate | Introduce ingredients in the jar, do not exceed halfway the jar, and set speed 10 for some seconds. Perfect results. | |
| 7 Blend | Blend perfect mixtures in the most simple way. Prepare delicious milkshakes, sponge cake dough, pancakes, crepes, beat eggs and more. | |
| 8 Whip | Whip cream or egg whites until stiff thanks to its butterfly whisk. This is the ideal function to turn into a professional cook. | |
| 9 Emulsify | This functions allows preparing dips, dressings and different types of mayonnaise easily. Just introduce ingredients in the jar, appliance will do the rest. Emulsifies evenly for you to finish off your dishes as desired. | |
| 10 Mix | Perform homogeneous mixtures with its 10 speeds. Perfect doughs obtained in the simplest way. | |
| 11 Cook | Cook all types of dishes, such as stews, chicken with almonds or ratatouille, all of them perfectly textured. | |
| 12 Stir | Stir foodstuffs as it cooks them to ensure uniform heating and to achieve professional textures. Cook delicious risottos, pasta salads, custard or prepare hot chocolate. | |
| Function Description | ||
| 13 Steam | This function is ideal for steaming the healthiest recipes. It allows saving time thanks to its 2-level steamer, as you can cook more than 1 dish at once. | |
| 14 Poach | Progressive and little-by-little cooking, with absolute control over temperature and time. Perfectly poached without paying attention to the clock. Perfect for obtaining soft, juicy results. | |
| 15 Comfit | Process ingredients at low temperatures and obtain irresistible results. This technique is ideal for cooking all types of foodstuffs, especially meat, hard fish and all kinds of poultry. | |
| 16 Knead | Knead perfect doughs in one whole piece. Kneading has never been as easy as with the exclusive spoon. It does not cut dough, instead it stretches it out for perfect results. Enjoy homemade bread and pizzas at any time. | |
| 17 Boil | Pour enough water into the jar as to cover all the ingredients, set 120 °C and heating power 10, and then choose the desired cooking time depending on the ingredients. | |
| 18 Keep warm | Keep your dishes hot until they are served. After cooking your dishes, just set the robot at 80 °C for liquid dishes or 45 °C for solid dishes for the desired amount of time. | |
| 19 Precision coo-king | This function is the widest and most general function out of all. It allows cooking any type of dish with absolute control over power. | |
| 20 Ferment | Use this function to prepare excellent doughs. It finishes off bread or confectionery recipes in little time, making dough rise quickly just by keeping it in the cup at 50 °C and speed 0. | |
| 21 Bain Marie | Prepare perfect flans and tender vegetables. To use this function, fill the jar with 2 litres of water, set no speed, 120 °C and heating power 10. When it starts boiling, lower heating power to 9 and and introduce the custard moulds until the base touches water. | |
| 22 Turbo | Process hard ingredients in the most effective way. Do not fill the jar over halfway to achieve maximum performance. | |
| Function Description | on | |
| 23 Slow Cook | The best risottos and traditional stews with its exclusive spoon and motion. This unique motion allows stirring and mixing recipes as if it was done with a real spoon. | |
| 24 Juice | Prepare lemonade, juices and multi-fruit shakes in just a few seconds. | |
| 25 Stir-frying | Stir-frying ingredients before cooking them enhances flavours and improves final results. Stir-fry from garlic to meats. Brown foodstuffs to taste, adjusting power and time. | |
| 26 Reheat | It allows reheating cooked food. If it has cooled down, it was cooked the day before or has thawed, reheat it at 95 °C and heating power 8. Just a few minutes and ready! | |
| 27 Yoghurt | Prepare homemade yoghurts easily. Just out all the ingredients in the jar and robot will do the rest for you. It keeps the mixture at ferment temperature so that the next morning yoghurt is ready to cool and eat. | |
| 28 Basket | It can be used to steam food inside the jar, and allows preparing up to 4 dishes at once. It also can be used to allow better evaporation of food or liquids, instead of the measuring cup. | |
| 29 Simmer | The traditional stews that require long-lasting cooking processes can be now done with the device. Slow cooking, long hours, the best flavours. | |
| 30 Zero speed | Cooking without speed setting allows you to cook without the lid and to stir it when desired. You can taste food as you cook it, as if it was cooked in a conventional pot or pan. | |
DEVICE CONTROL BY SMARTPHONE
If you integrate the device into your home WiFi, you can conveniently operate it via the associated Klarstein app. The app not only allows you to remotely control the device via your smartphone, but also gives you access to recipes and additional information.
Follow these steps to connect your smartphone to your Klarstein device:
1 Download the Klarstein app first by scanning the QR code with your smartphone (see below), or download it directly from App Store or Google Play.
2.2 Make sure your smartphone is connected to the same WiFi network that your Klarstein device is to be connected to.
3 Open the Klarstein app.
4 Sign in to your account. If you do not have an account, sign up in the Klarstein app.
5 Follow the instructions from the app.
App Download
Use the scan function of your smartphone to scan the QR code and save the app on your smartphone.
Note: The app provides further information on how to use the app and help on how to connect to your device as soon as you open it for the first time.

iOS Android

Troubleshooting connection problems
If your Klarstein device cannot be found in the WLAN, check the following:
1 The device is not plugged in. Make sure that your device is plugged into an electric socket.
2 The device is not in pairing mode. Make sure that the WiFi indicator (LED) on the smart device control panel is blinking as described in the 'Reset WiFi settings' instruction of your smart device (instructions are usually available on device connection process).
3 The WiFi access point does not operate on 2.4 GHz. Make sure that your access point operates on 2.4 GHz band and you have a separate SSID on 2.4 GHz band. If you are not sure about the operating band of your access point, please contact your internet provider company.
Important: please note that if your WiFi router is dual band - operating on both 2.4 GHz and 5 GHz band - you need to separate the SSIDs for each band and use the 2.4 GHz SSID for connection.
4 Firewall settings of your WiFi network; the firewall setting of yourWiFi network may not allow the Klarstein app to configure theWiFi settings on your smart device. Please make sure that you are not using a publicWiFi network, e.g. airports, dormitories, companies, etc.
5 Different credentials used in smartphone and the app. Make sure that the WiFi credentials entered in the Klarstein app are the same as the ones that your smartphone is connected to.
Following the above mentioned points, if your smart device still fails to connect to the app, please contact us via email for support:
appsupport@go-bbg.com
SPEEDS AND QUANTITIES
| Accessories Picture | Function Speed | Capacity Time | |||
| Multifunction knife | Cut (+) 5 | Maximum 2 L Cut food into 1 - 2 cm | 1 minute | ||
| Cut (++ ) 10 | Maximum 2 L Cut food into 1 - 2 cm | 1 minute | |||
| Dough hook Never use at the same time as the sieve / steamer basket! | Kneading dough for bread, pizza, etc. | 2-3 Maximum 800 g dough 5-20 minutes | |||
| Kneading dough for pasta | 3 Maximum | 600 g dough 3 minutes | |||
| Whisk | Stir 1-3 | Maximum 2 L | 10 minutes | ||
| Whip cream or egg whites | 4 | Maximum 2 L | 10 minutes | ||
| Steam cooker | Stewing vegetables | - | Maximum 2.3 L | 15 minutes | |
| Stewing meat - | Maximum 2.3 L 20-30 | minutes | |||
| Roast blade | Frying 1-2 | Maximum 2 L | 5-20 minutes | ||
| Mixing 1-2 | Maximum 2 L | 5-20 minutes | |||
CLEANING AND CARE
Note: All parts except the base of the appliance can be cleaned in the dishwasher at low heat (45-60 °C).
Wipe the motor base with a slightly damp cloth and mild detergent, then dry, making sure the electrical contact area is completely dry. Use a soft dry cloth to dry off.
- Cleaning the parts immediately after use ensures faster cleaning, extends the life of the device and accessories, and reduces staining of the plastic parts.
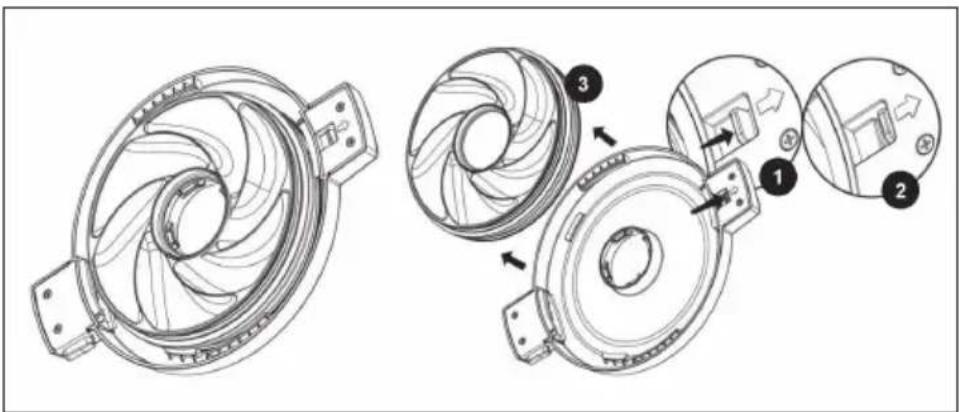
- The back of the pot lid can be removed for cleaning; follow these steps: Press the button on the back of the pot and then pull straight up to remove.
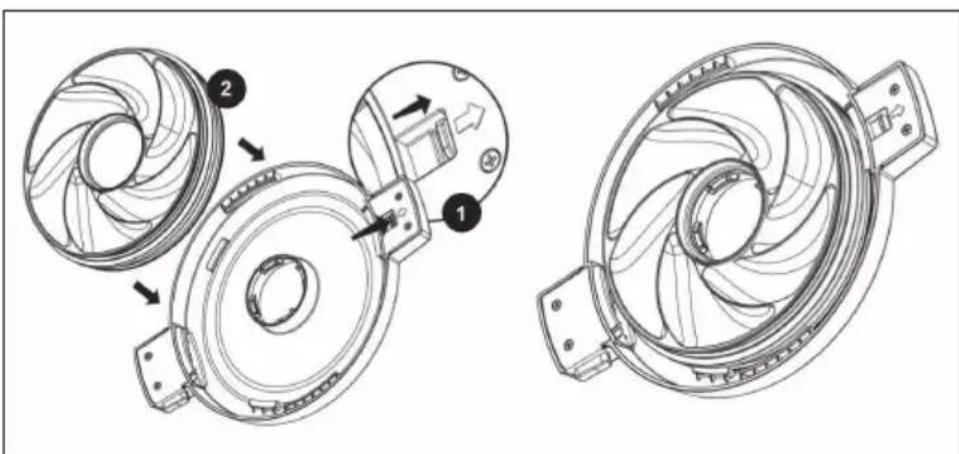
- To attach the back of the lid, do the following: Press the button on the back of the jar, insert the back, and then release the button.
ERROR MESSAGES AND TROUBLESHOOTING
| Code Description Reason Possible solution | |||
| E01 The safety switch has not been activated. | The lid is not properly attached to the blender jug or is not latched. | Make sure the lid is properly installed and latched. | |
| The blender jar is not properly seated in the base. | Make sure the blender jar is properly placed in the base. | ||
| E02 The temperature sensor was not recognised. | The blender jug has not been inserted correctly or the connection of the temperature sensor on the blender jug is damaged. | Make sure the blender jar is properly seated in the base. | |
| Make sure the connecting pins under the blender jar are not bent or broken. | |||
| E03 The motor and/or the blades are jammed. | Too many ingredients have been placed in the blender jug. | Reduce the volume of food in the blender jug. | |
| The ingredients are too big. Cut the food into smaller pieces and restart the appliance. | |||
| E04 The temperature is too high. | No food in container. Add food. | ||
| Too little food at high temperature for a long period of time. | Add more food. | ||
| E11 Use of a high speed with a high temperature at the same time. | The temperature in the vessel is above 90 °C while using speed level 4 or higher. | Chill the food to 90 °C or less or use a lower speed than level 4. | |
| E12 Weight overload from too many ingredients. | The added ingredients weigh more than the maximum allowable 4,999 grams. | Remove ingredients to reduce total weight to 4,999 grams or less. | |
TECHNICAL DATA
| Article number 10045491 | |
| Power supply 220-240 V ~ 50/60 Hz | |
| Power 1700 W | |
| Adjustable speed Steps 1-10 | |
| Adjustable timer 1 second - 12 hours | |
| Adjustable temperature 37-120 °C | |
| Maximum weighable weight 5000 g | |
| Item number 10045494 is a ceramic bowl that is not included in the scope of delivery but is available separately. | |
DISPOSAL CONSIDERATIONS

If there is a legal regulation for the disposal of electrical and electronic devices in your country, this symbol on the product or on the packaging indicates that this product must not be disposed of with household waste. Instead, it must be taken to a collection point for the recycling of electrical and electronic equipment. By disposing of it in accordance with the rules, you are protecting the environment and the health of your fellow human beings from negative consequences. For information about the recycling and disposal of this product, please contact your local authority or your household waste disposal service.
This product contains batteries. If there is a legal regulation for the disposal of batteries in your country, the batteries must not be disposed of with household waste. Find out about local regulations for disposing of batteries. By disposing of them in accordance with the rules, you are protecting the environment and the health of your fellow human beings from negative consequences.
DECLARATION OF CONFORMITY

Manufacturer:
Chal-Tec GmbH, Wallstrasse 16, 10179 Berlin, Germany.
Importer for Great Britain:
Berlin Brands Group UK Limited PO Box 42 272 Kensington High Street London, W8 6ND United Kingdom
Hereby, Chal-Tec GmbH declares that the radio equipment type Aria Smart is in compliance with Directive 2014/53/EU. The full text of the EU declaration of conformity is available at the following internet address: use.berlin/10045491
For Great Britain: Hereby, Chal-Tec GmbH declares that the radio equipment type Aria Smart is in compliance with the relevant statutory requirements. The full text of the declaration of conformity is available at the following internet address: use.berlin/10045491
Estimado cliente:
Cher client, chere clientele,
Berlin Brands Group UK Ltd
PO Box 42
272 Kensington High Street
London, W8 6ND
United Kingdom
Berlin Brands Group UK Limited
PO Box 42
272 Kensington High Street
London, W8 6ND
United Kingdom
