MFH440-LI20PROS - Multitools SCHEPPACH - Free user manual and instructions
Find the device manual for free MFH440-LI20PROS SCHEPPACH in PDF.

| Product Type | Cordless multifunction gardening tool |
| Brand | Scheppach |
| Model | MFH440-LI20PROS |
| Power Supply | 20 V DC lithium-ion battery (2× 4.0 Ah / 80 Wh) |
| Motor | 40 V DC motor (dual battery) |
| Charger | Input 115-230 V AC, 50/60 Hz, charging voltage 20 V, current 2.4 A, charging time ~120 min |
| Main Functions | Trimmer (line 380 mm), brushcutter (blade 255 mm), hedge trimmer (blade 395 mm), pole pruner (guide bar 25 cm) |
| Cutting Diameter (trimmer) | 380 mm |
| Cutting Diameter (brushcutter) | 255 mm |
| Cutting Length (hedge trimmer) | 400 mm |
| Cutting Length (pole pruner) | 260 mm |
| Cutting Speed (trimmer) | 4000 / 5500 / 6200 min⁻¹ |
| Cutting Speed (brushcutter) | 4000 / 5500 / 6200 min⁻¹ |
| Cutting Speed (hedge trimmer) | 880 / 1100 / 1360 min⁻¹ |
| Cutting Speed (pole pruner) | 3780 / 4350 / 5340 min⁻¹ |
| Chainsaw Chain | Pitch 3/8", thickness 1.27 mm, type 3/8.050-39, guide bar Kangxin AL10-39-507P |
| Oil Tank (chainsaw) | 140 cm³ |
| Batteries Included | 2 batteries 20 V, 4.0 Ah lithium-ion |
| Included Accessories | Charger, shoulder strap, spool of line, cutting blade, guards, Allen keys, assembly tool, guide bar and chain |
| Sound Pressure Level | Trimmer: 84 dB(A), brushcutter: 81.2 dB(A), hedge trimmer: 88.2 dB(A), pole pruner: 86.8 dB(A) |
| Vibration | Trimmer: 3.6 / 4.0 m/s², brushcutter: 3.7 / 3.5 m/s², hedge trimmer: 4.3 / 4.0 m/s², pole pruner: 4.0 / 3.7 m/s² |
| Weight | Approx. 5.5 kg (with battery, without accessories) |
| Safety | Safety switch, accelerator trigger, cutting unit guard, protective hood, shoulder strap with safety tab |
| Maintenance | Regular cleaning, lubrication of chain and gears, sharpening blades, checking screws |
| Warranty | Legal warranty (parts and labor according to conditions) |
Frequently Asked Questions - MFH440-LI20PROS SCHEPPACH
User questions about MFH440-LI20PROS SCHEPPACH
0 question about this device. Answer the ones you know or ask your own.
Ask a new question about this device
Download the instructions for your Multitools in PDF format for free! Find your manual MFH440-LI20PROS - SCHEPPACH and take your electronic device back in hand. On this page are published all the documents necessary for the use of your device. MFH440-LI20PROS by SCHEPPACH.
USER MANUAL MFH440-LI20PROS SCHEPPACH
natural_image
Product photo of a mechanical tool set including a pro-cut, shopped, and cable-coated tools, with no visible text or symbols.MFH440-LI20PROS
| DE | Akku-MultifunktionsgerätOriginalbedienungsanleitung | 7 |
| GB | Cordless multi-function deviceTranslation of original instruction manual | 30 |
| FR | Outil de jardinage multifonctions à batterieTraduction des instructions d'origine | 50 |


CAUTION!: Read the manual carefully before operating this machine!
natural_image
Black mechanical device with attached strap and labeled component '12' (no text or symbols on the device itself)
natural_image
Close-up of a person wearing a wheelchair using a metal clamp (no visible text or symbols)

natural_image
Illustration of two hands holding a circular device with arrows indicating motion or movement (no text or symbols)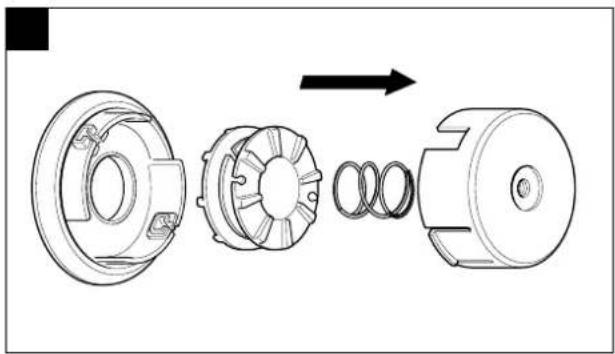
natural_image
Exploded view diagram of a mechanical assembly showing internal components and motion direction (no text or labels)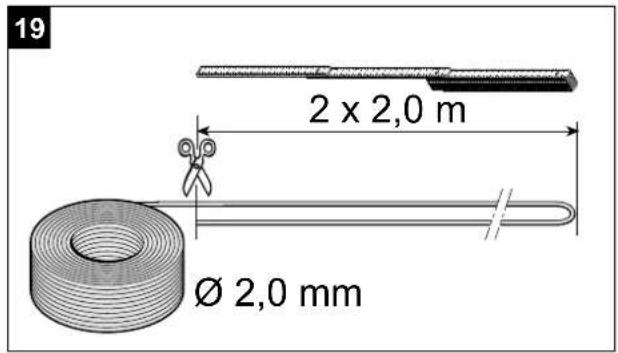

natural_image
Mechanical assembly diagram showing two views of a mechanical component with no visible text or symbols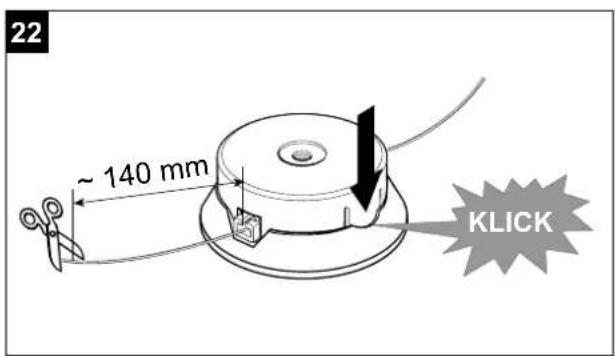

natural_image
Diagram of a mechanical tool interacting with a textured surface (no text or symbols)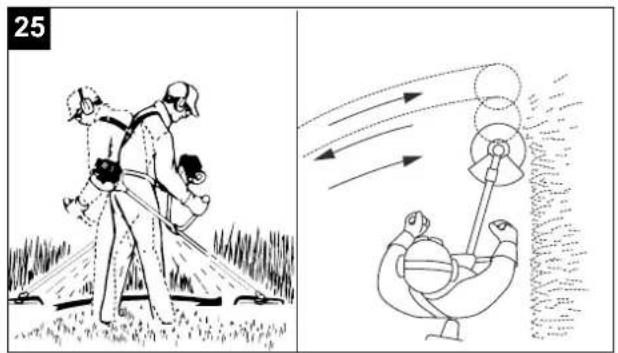


natural_image
Two black industrial battery units with control panel and indicator lights, next to a vertical arrow symbol (no text or labels)
natural_image
Two black cylindrical batteries on a base with a battery icon and a checkmark indicating the battery (no text or symbols on the devices themselves)
Günzburger Straße 69
89335 Ichenhausen
Verehrter Kunde,
Explanation of the symbols on the device
Symbols are used in this manual to draw your attention to potential hazards. The safety symbols and the accompanying explanations must be fully understood. The warnings themselves will not rectify a hazard and cannot replace proper accident prevention measures.
 | Read and understand all text in the operating instructions before start up. |
 | Observe all safety instructions before use. |
 | Always remove the rechargeable battery pack from the electrical tool before performing maintenance and service work! |
 | Use safety helmet, hearing protection and safety goggles! |
 | Wear sturdy footwear and work gloves! |
 | Do not operate the device in rain or in humid conditions. Danger of electric shock! |
 | Keep children, onlookers and helpers 15m away from the brush cutter. |
 | Attention! Danger of injury due to objects being flung away. |
 | Pay attention to kick-back! |
 | Attention, do not use saw blades or multi-part metallic cutting tools. |
 | Attention: Risk of injury!Do not allow hands and feet to come into contact with the blade when the engine is running. |
 | Pay attention to electrical connection cables! Keep a distance of at least 10m. |
 | Guaranteed sound power level, pole-mounted pruner and hedge trimmer |
 | Guaranteed sound power level, grass trimmer and brush cutter |
 | Grass trimmerCutting diameter 380 mm / max. speed 6500 rpm |
 | Brush cutterCutting diameter 255 mm / max. speed 6700 rpm |
 | Pole-mounted prunerCutting length 260 mm / cutting speed: max. 9 m/s |
 | Hedge trimmerCutting length 395 mm / max. speed 1200 rpm |
 | The product complies with the applicable European directives. |
 | Protect rechargeable batteries from water and moisture. |
 | Protect rechargeable batteries from heat and fire. |
 | Protect rechargeable batteries from temperatures over 45°C. |
 | Class II - double insulation |
 | Use only indoors! |
 | Do not throw old equipment away with household waste. |
 | Chain oil |
 | Prescribed running direction of the saw chain |
 | Direction of rotation of grass trimmer and brush cutter |
Table of contents: Page:
- Introduction...... 33
- Device description (Fig. 1 - 45) ...... 33
- Scope of delivery.... 33
- Proper use....33
- Safety information 34
- Technical data 38
- Unpacking 39
- Assembly.... 39
- Before commissioning 41
- Operation....41
- Working instructions.... 42
- Maintenance.... 45
- Storage....47
- Transport 47
- Disposal and recycling 48
- Troubleshooting 49
- Declaration of conformity 74
1. Introduction
Manufacturer:
Scheppach GmbH
Günzburger Straße 69
89335 Ichenhausen
Dear customer,
We hope your new tool brings you much enjoyment and success.
Note:
In accordance with the applicable product liability laws, the manufacturer of this device assumes no liability for damage to the device or caused by the device arising from:
- Improper handling,
- Failure to comply with the operating instructions.
- Repairs carried out by third parties, unauthorised specialists.
- Installing and replacing non-original spare parts,
• Application other than specified, - Failure of the electrical system in the event of the electrical regulations and VDE provisions 0100, DIN 57113 / VDE0113 not being observed.
Please consider:
Read through the complete text in the operating manual before installing and commissioning the device.
This operating manual should help you to familiarise yourself with your tool and to use it for its intended purpose.
The operating instructions include important instructions for the safe, proper and economic operation of the machine, for avoiding danger, for minimising repair costs and downtimes and for increasing the reliability and extending the service life of the machine. In addition to the safety instructions in this operating manual, you must also observe the regulations applicable to the operation of the machine in your country. Keep the operating manual package with the machine at all times and store it in a plastic cover to protect it from dirt and moisture. They must be read and carefully observed by all operating personnel before starting the work. The machine may only be used by personnel who have been trained to use it and who have been instructed with respect to the associated hazards. The required minimum age must be observed.
In addition to the safety instructions in this operating manual and the separate regulations of your country, the generally recognised technical rules relating to the operation of such machines must also be observed.
We accept no liability for accidents or damage that occur due to a failure to observe this manual and the safety instructions.
2. Device description (Fig. 1 - 45)
- Motor drive unit
1a. Rechargeable battery indicator - Control handle
- Safety switch
- Throttle
- On/off switch
- Pole-mounted pruner
- Brushcutter / grass trimmer
- Hedge trimmer
8a. Connecting rod - Cutting blade
- Cutting knife guard
- Cutting unit protection
- Carrying strap
- Chainsaw protection
- Adjustment lever
14a. Unlocking lever - Cutting unit
- Protective cover (trimmer + grass trimmer)
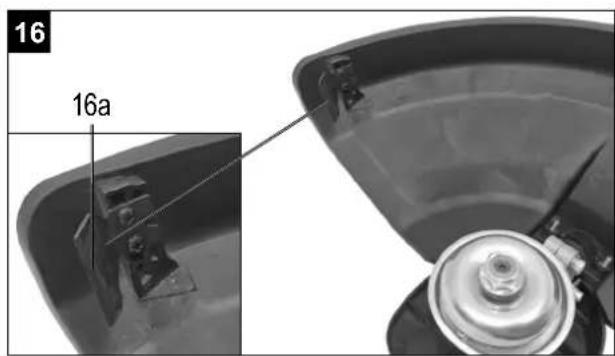
16a. Blade - Thread coil
17a. Trigger - Protective cover (top)
- Saw chain
- Chainsaw blade
- Chainsaw oil tank
- Handle
- Allen key size 4
- Allen key size 5
- Open-ended spanner size 8/10
- Assembly tool
- 2x rechargeable batteries 20V, 4.0Ah
- 20V charging unit
3. Scope of delivery
- 1x assembly tool
- 1x Allen key size 4
- 1x Allen key size 5
- 1x carrying strap
- 1x thread coil 2.0x4m
- 1x cutting blade
- 1x manual
• 1x chainsaw protection
• 1x Kangxin chain blade 10" - 1x Kangxin chain 10"
• 1x cutting unit protection - 2x rechargeable batteries 20V, 4.0Ah
- 20V charging unit
4. Proper use
The strimmer (using the cutting knife) is suitable for cutting shrubs, strong weed and undergrowth. The grass trimmer (using thread coil with trimming line) is suitable for cutting lawns, grass areas and light weed.
The hedge trimmer is suitable for cutting hedges, bushes and shrubs.
The pole-mounted pruner is intended for branch removal work. It is not suitable for extensive sawing work and tree felling or for sawing materials other than wood.
The observance of the manufacturer's usage instructions included is a prerequisite for the proper use of the device. Any other use not expressly permitted in these instructions may result in damage to the device and pose a serious danger to the user. Be sure to observe the restrictions in the safety instructions.
Please observe that our equipment was not designed with the intention of use for commercial or industrial purposes. We assume no guarantee if the equipment is used in commercial or industrial applications, or for equivalent work.
Attention! Due to physical hazards to the user, the multifunction device must not be used for the following work: cleaning pavements and as a shredder for shredding tree and hedge cuttings. Furthermore, the multifunction device must not be used for levelling ground elevations, such as molehills.
The multifunction device may only be used in its intended manner. Any use beyond this is improper. The user/operator, not the manufacturer, is responsible for damages or injuries of any type resulting from this.
Who is not permitted to use the device:
People who are not familiar with the operating manual, children under the age of 16, people under the influence of alcohol, drugs or medication, and people who are tired or unwell.
5. Safety information
⚠ WARNING! Read all safety information and instructions. Failure to observe safety information and instructions can result in electric shock, fire and/or serious injuries.
Save all warnings and instructions for future reference.
The term “electric tool” used in the safety instructions refers to mains-powered electrical tools (with a mains cable) and battery-powered electrical tools (without a mains cable).
Safety at the workplace
- Keep your work area clean and tidy. Disorganised and unlit work areas can result in accidents.
- Do not work with the device in an explosive environment where flammable liquids, gases or dusts may be located. Power tools create sparks which may ignite the dust or fumes.
- Keep children and bystanders away while operating a power tool. Distractions may cause you to lose control of the device.
Electrical safety
- Power tool plugs must match the outlet. Never modify the plug in any way. Do not use any adapter plugs with earthed (grounded) power tools. Unmodified plugs and matching outlets will reduce risk of electric shock.
- Avoid physical contact with earthed or grounded surfaces, such as pipes, radiators, ovens and refrigerators. There is an increased risk of electric shock if your body is earthed or grounded.
- Do not expose power tools to rain or wet conditions. Water entering a power tool will increase the risk of electric shock.
- Do not use the cable for another purpose, for example, carrying or hanging the power tool or pulling the plug out of the socket. Keep the cable away from heat, oil, sharp edges or moving device parts. Damaged or coiled cables increase the risk of an electric shock.
- If you work with a power tool outdoors, only use extension cables that are also suitable for outdoor use. Use of a cord suitable for outdoor use reduces the risk of electric shock.
- If operating a power tool in a damp location is unavoidable, use a residual current device (RCD) protected supply. Use of an RCD reduces the risk of electric shock.
Personal safety
- Stay alert, watch what you are doing and use common sense when operating a power tool. Do not use a power tool while you are tired or under the influence of drugs, alcohol or medication. A moment of carelessness when using electrical tools can result in serious injuries.
- Use personal protective equipment. Always wear eye protection. Protective equipment such as a dust mask, non-skid safety shoes, hard hat or hearing protection used for appropriate conditions will reduce personal injuries.
- Prevent unintentional starting. Ensure the switch is in the off-position before connecting to power source and/or battery pack, picking up or carrying the tool. Keeping your finger on the switch or having the device switched on when you connect it to the power supply may result in accidents.
-
Remove any adjusting key or wrench before turning the power tool on. A tool or spanner that is located in a rotating device part may result in injuries.
-
Do not overreach. Keep proper footing and balance at all times. This enables better control of the power tool in unexpected situations.
- Dress properly. Do not wear loose clothing or jewellery. Keep hair, clothing and gloves away from moving parts. Loose clothes, jewellery or long hair can be caught in moving parts.
- If dust extraction and collection devices can be mounted, make sure that they are connected and used properly. Use of dust collection can reduce dust-related hazards.
- Do not let familiarity gained from frequent use of tools allow you to become complacent and ignore tool safety principles. A careless action can cause severe injury within a fraction of a second.
Power tool use and care
- Do not overload the device. Use the correct power tool for your application. The correct power tool will do the job better and safer at the rate for which it was designed.
- Do not use the power tool if the switch does not turn it on and off. Any power tool that cannot be controlled with the switch is dangerous and must be repaired.
- Remove the plug from the socket and/or remove the battery before setting the device, changing accessories or putting the device away. Such preventive safety measures reduce the risk of starting the power tool accidentally.
- Store idle power tools out of the reach of children and Do not let people use the device if they are not familiar with it or if they have not read these instructions. Power tools are dangerous in the hands of untrained users.
- Maintain power tools. Check whether moving parts function properly and do not get stuck and whether parts are broken or are damaged and thus adversely affect the electric tool function. Have damaged parts repaired before using the device. Many accidents are caused by poorly maintained power tools.
- Always keep your cutting tools sharp and clean. Properly maintained cutting tools with sharp cutting edges are less likely to bind and are easier to control.
- Use the power tool, accessories and tool bits etc. in accordance with these instructions, taking into account the working conditions and the work to be performed. Use of the power tool for operations different from those intended could result in a hazardous situation.
- Keep handles and grasping surfaces dry, clean and free from oil and grease. Slippery handles and grasping surfaces do not allow for safe handling and control of the tool in unexpected situations.
Using and handling the rechargeable tool
- Only charge the rechargeable batteries with charging units recommended by the manufacturer.
A charging unit that is suitable for a particular type of rechargeable battery poses a fire hazard when used with other rechargeable batteries. - Only use the rechargeable batteries in power tools that are designed for them. The use of other rechargeable batteries can lead to injuries and a risk of fire.
- Keep the unused rechargeable battery away from paper clips, coins, keys, nails, screws or other small metal objects that could cause a short-circuit between the contacts. A short-circuit between the contacts of the rechargeable battery could result in burns or fires.
- Liquid may leak from the rechargeable battery if used incorrectly. Avoid contact with it. In case of accidental contact, rinse with water. If the liquid gets into your eyes, seek additional medical attention. Leaking battery fluid may cause skin irritation or burns.
Safety instructions for Li-Ion rechargeable batteries
- Do not open the rechargeable battery. There is a danger of a short circuit.
- Protect the rechargeable battery from heat, e.g. also from continuous sunlight, fire, water and moisture. There is a risk of explosion.
- Vapours may escape if the rechargeable battery is damaged or used improperly. Supply fresh air and consult a doctor in the event of discomfort. The vapours can irritate the respiratory tract.
- Liquid may leak from the rechargeable battery if used incorrectly. Avoid contact with it. In case of accidental contact, rinse with water. If the liquid gets into your eyes, seek additional medical attention. Leaking battery fluid may cause skin irritation or burns.
- Only use original rechargeable batteries with the voltage specified on the type plate of your power tool.
If other batteries are used, e.g. counterfeit batteries, refurbished rechargeable batteries or rechargeable batteries from other manufacturers, there is a risk of injury and damage to property due to exploding batteries. - The rechargeable battery voltage must match the charging voltage of the charging unit. Otherwise, there is a risk of fire and explosion.
- Only charge the rechargeable batteries with charging units recommended by the manufacturer. A charging unit that is suitable for a particular type of rechargeable battery poses a fire hazard when used with other rechargeable batteries.
- The rechargeable battery can be damaged by sharp objects such as nails or screwdrivers or by external forces. An internal short circuit may occur and the rechargeable battery could burn, smoke, explode or overheat.
⚠ Warning! This power tool generates an electromagnetic field during operation. This field can impair active or passive medical implants under certain conditions. In order to prevent the risk of serious or deadly injuries, we recommend that persons with medical implants consult with their physician and the manufacturer of the medical implant prior to operating the power tool.
⚠️ Risk of fire! Risk of explosion!
Never use a damaged, defective or deformed rechargeable batteries. Never open or damage the rechargeable battery and do not drop it. Never charge rechargeable batteries in environments with acids and highly flammable materials. Protect rechargeable batteries from heat and fire.
Only use the rechargeable battery in ambient temperatures between 10^ C and +40^ C.
Never place on radiators or expose to strong sunlight for extended periods of time.
Let the device cool down first after heavy use.
Short circuit - Do not bridge rechargeable battery contacts with metallic parts. When disposing, transporting or storing, the rechargeable battery must be packed (plastic bag, box) or the contacts must be masked.
⚠ Danger!
Pull out the rechargeable battery pack before carrying out any cleaning or maintenance work.
Service
- Only have your device repaired by qualified specialists and only with original spare parts. This ensures that safety of the device is maintained.
Safety instructions - Device transport
• Always stop the engine when transporting.
- Never carry or transport the power tool whilst the cutting tools is running.
- Only carry the power tool in the working position:
- Power tool on back, left hand on front handle and right hand on operating handle (even left-handers) cutting tool lowered to ground level.
Safety instructions - Pole-mounted pruner
- National regulations may restrict the use of the device.
-
Do not use the device while tired or unfocused, or under the influence of alcohol or drugs. Inattentiveness can result in serious injuries.
-
Ensure that no other people or animals are present in the work area (minimum distance of 15 m). You are responsible for safety in your work area and are liable for injuries to people or damage to property.
- Use approved safety goggles. Use approved hearing protection.
- Use good protective gloves.
- Use non-slip work shoes with steel toecaps. Never work with the device wearing sandals or barefoot.
• Always wear an approved safety helmet during forestation work. - Do not wear loose clothing or jewellery. Wear log trousers to protect your legs. Use a head covering if you have long hair. Loose clothes, jewellery and long hair can be caught in moving parts. Wear suitable sturdy, close-fitting work clothing.
- Keep body parts and clothing away from the cutting tool when starting the engine or when the engine is running.
- Always use a stable and safe working position with secure footing.
- Change your working position at regular intervals in order to prevent fatigue.
- Always stand below the cutting tool when cutting on a slope.
- Only work in daylight or with good, artificial lighting.
- Always carry out a visual inspection of the unit before use.
- Check whether all screws and connecting parts are tightened.
• Always hold the device firmly with both hands. - Do not use the pole-mounted pruner and the hedge trimmer in any position from which it can come within 10 m of high-voltage power lines.
- Check the device and its components and protective devices for damage or wear before each use and if necessary have the required repairs carried out. Never disable the protective and safety devices. Do not use the device if it is damaged or signs of wear and tear become apparent.
• Always replace a damaged cutting tool immediately with a new one. - If the cutting device is jammed, e.g. by thick branches, etc., the pole-mounted pruner must be put out of operation immediately - remove the rechargeable battery and only then may the cause of the blockage be removed.
- Before working with this device, check the work area for foreign objects and remove them. If you strike a foreign object while cutting, switch the device off and remove it.
- While using metal cutting tools, there is generally a risk of kickback, when the tool hits a solid obstacle (stones, trees, branches, etc.). The device is thrown back against the direction of rotation.
Grass trimmer/trimmer safety instructions
- National regulations may restrict the use of the device.
⚠ Attention! Remove stones, loose pieces of wood and other objects from the work area.
- Ensure that persons in the vicinity are not injured by foreign objects being flung away.
- Keep people in the vicinity at a distance.
- Ensure your have a secure footing, hold the device with both hands and switch it on.
- Run the device lightly over the surface of the lawn, try not to cut too deep.
- If possible, do not use when the grass is wet.
- Do not use the device in the rain or leave out in the rain.
- Do not use the cordless trimmer if the cover is damaged.
- Do not put your hands or feet in the area of the rotating tool before switching on.
- Always switch the cordless trimmer off when transporting it to and from working surfaces.
- Do not use the cordless trimmer if children or animals are in close proximity.
- Do not use the cordless trimmer if barefoot or wearing sandals. Wear sturdy footwear and long trousers.
- Always keep the ventilation slots free of grass and other residues.
- The operator is responsible for accidents sustained by other persons.
- Before finishing work, switch the device off and remove the rechargeable battery.
- Do not use the charging unit if it is damaged.
- Only use the rechargeable batteries and charging stations intended for the device. The use of third-party parts can cause a risk of fire.
- Do not use metal wire or any type of plastic-coated metal wire in the thread coil. This could seriously injure the user. The blade on the guard plate shortens the thread to the permissible length.
- Only use the grass trimmer in daylight or with good artificial lighting.
- Before commissioning the grass trimmer and after any potential impacts or collisions, check it for signs of wear or damage and have it repaired as necessary.
- Never use spare or accessory parts that are not intended or recommended by the manufacturer.
- Take care to avoid injury on any equipment that serves to trim the thread length. After drawing out a new thread, always hold the machine in its normal working position before switching it on.
- Never use the grass trimmer if the protective equipment is damaged or missing.
Safety instructions for hedge trimmers
- National regulations may restrict the use of the device.
- Do not use the pole-mounted pruner and the hedge trimmer in any position from which it can come within 10m of high-voltage power lines.
- Keep all body parts away from the cutting blade. Do not attempt to remove cuttings or hold material to be cut while the blade is running. Remove trapped cuttings only when the device is switched off. A moment of carelessness when using the hedge trimmer can result in serious injury.
- Carry the hedge trimmer by the handle with the blade stationary. Always put the protective cover on when transporting or storing the hedge trimmer. Careful handling of the device reduces the risk of injury from the blade.
- Hold the electric tool by the insulated gripping surfaces, because the cutting blade can come into contact with its own mains cable. If the cutting blade comes into contact with an energised line, device parts can become energised and cause an electric shock.
- Keep the cable away from the cutting area. During operation, the cable may be covered by bushes and accidentally cut.
- Please carefully read the follow the safety instructions and manual!
- The machine can cause serious injuries! Read the operating manual carefully for the correct handling, preparation, repair, starting and setting down of the machine. Familiarise yourself with all the adjustment parts and the correct use of the machine.
- The hedge trimmer may only be operated with both hands.
- When working with the hedge trimmer, ensure that you have a secure footing and wear sturdy footwear.
- Do not use in the rain or on wet hedges and do not leave the device outdoors. It must not be used while wet.
- Wearing safety goggles and hearing protection is recommended when cutting.
- Wear suitable work clothing such as gloves, non-slip shoes and no loose clothing. Wear long hair in a hair net.
- Avoid abnormal posture and ensure secure footing, especially when using ladders and steps.
- Keep the device at a sufficient distance from the body while working.
- Make sure that there are no people or animals in the working or pivot range.
- Carry the hedge trimmer only by the guide handle.
- Keep the cable out of the cutting area.
- Inspect the connection cable for signs of damage and ageing before use.
- The hedge trimmer may only be used if the connection cable is in undamaged condition.
- Do not pull the mains plug out of the socket by the cable. Do not carry the device by the cable. Avoid damaging the cable.
- Protect the cable from heat, aggressive liquids and sharp edges. Replace damaged cables immediately.
- If the cutting device is jammed, e.g. by thick branches, etc., the hedge trimmer must be put out of operation immediately - pull out the mains plug and only then may the cause of the blockage be removed.
- Store the device in a safe and dry location, out of reach of children.
- When transporting or storing the cutting device, always cover it with the cutting device guard.
- Avoid overloading the tool and misuse, i.e. the hedge trimmer is only to be used for cutting hedges, shrubs and bushes.
- The hedge trimmer must be checked and maintained properly on a regular basis. Replace damaged blades only in pairs. If damaged by dropping or impact, a professional inspection is essential.
- Care for and maintain your tool carefully. Keep your tool clean and sharp in order to be able to work well and safely. Observe and follow the instructions for maintenance and care.
- According to the regulations of the agricultural trade associations, only persons over 17 years of age may carry out work with electrically operated hedge trimmers. This is permitted for persons over 16 years of age with adult supervision.
- Do not use the machine with a defective or heavily worn cutting device.
- Familiarise yourself with your environment and pay attention to possible hazards that you may not hear due to the noise from the machine.
- Never attempt to use an incomplete machine or one which an unauthorised alteration has been implemented.
- Avoid using the hedge trimmer if people, and especially children, are in the vicinity.
- Children are not permitted to use the hedge trimmer.
- The noise developed at the workplace can exceed 85 dB (A). In this case, noise and hearing protection measures are required for the operator.
• Always ensure that all handles and guards are in place when using the hedge trimmer. - Before working, search the hedge for hidden objects, e.g. wire, etc.
-
This device is not designed to be operated by persons (including children) with impaired physical, sensory or mental capabilities, or who have insufficient experience and/or insufficient knowledge unless they are being supervised by a person who is responsible for their safety or they are receiving instruction about how this device is to be used. Children must not be left unattended, to ensure they do not play with the device.
-
Technical data
| MFH440-LI20PROS | |
| Technical data | |
| Grass trimmer cutting data | |
| Cutting diameter 380 mm | |
| Thread count | 1.6 mm |
| Thread length 4 m | |
| Grass trimmer speed rpm 4000 / 5500 / 6200 | |
| Brush cutter cutting data | |
| Cutting diameter 255 mm | |
| Cutting blade thickness 1.4 mm | |
| Number of teeth 3 | |
| Brush cutter speed rpm 4000 / 5500 / 6200 | |
| Hedge trimmer cutting data | |
| Cutting diameter 24 mm | |
| Blade angle adjustment +90°/0°/-75° (165°) | |
| Cutting length 400 mm | |
| Cutting speed rpm | 880 / 1100 / 1360 |
| Pole-mounted pruner cutting data | |
| Guide rail length | 10" / 25 cm |
| Cutting length 260 mm | |
| Cutting speed rpm | 3780 / 4350 / 5340 |
| Guide rail type | Kangxin AL10-39-507P |
| Saw chain pitch | 3/8" |
| Saw chain type | 3/8,050-39 |
| Drive link thickness" | 1.27" |
| Oil tank volume | 140 cm^3 |
| Drive | |
| DC motor | 40 V |
| DC rechargeable battery | 20 V |
| Data per rechargeable battery | |
| Rechargeable battery type | Lithium-ion |
| Capacity | 4000 mAh / 80Wh |
| Battery charger | |
| Input voltage | 115-230 V AC 50/60 Hz |
| Charge voltage | 20 V DC |
| Charge current | 2.4 A |
| Charging time (depending on charge status) | 120 min |
| Operating temperature | 0-40 °C |
| Protection class | II |
Technical changes reserved!
Information about noise level measured in accordance with applicable standards:
Grass trimmer sound pressure L_pA = 84 dB
Grass trimmer sound power L_WA = 96 dB
Measurement uncertainty K_PA = 1.2 dB
Brush cutter sound pressure L_nA = 81.2 dB
Brush cutter sound power L_WA = 92.1 dB
Measurement uncertainty K_PA = 3 dB
Hedge trimmer sound pressure L_pA = 88.2 dB
Hedge trimmer sound power L_WA = 101.3 dB
Measurement uncertainty K_PA = 3 dB
Pole-mounted pruner sound pressure L_pA = 86.8 dB
Pole-mounted pruner sound power L_WA = 100.6 dB
Measurement uncertainty K_PA = 3 dB
Wear hearing protection.
Excessive noise can result in a loss of hearing.
Grass trimmer: Vibration A_hv = 3.6 / 4.0 m/s^2
Brush cutter: Vibration A_bv = 3.7 / 3.5 m/s^2
Hedge trimmer: Vibration A _hv = 4.3 / 4.0 m/s ^2
Pole-mounted pruner: Vibration A _hv = 4.0 / 3.7 m/s ^2
Measurement uncertainty K_PA = 1.5 m/s^2
Keep the noise level and vibration to a minimum!
- Only use devices which are free of defects.
- Maintain and clean the device at regular intervals.
- Adapt your working methods to the device.
- Do not overload the device.
- Have the device checked if necessary.
- Switch the device off if it is not in use.
- Wear gloves.
We have marked points in these operating instructions that impact your safety with this symbol: △
7. Unpacking
- Open the packaging and carefully remove the device.
- Remove the packaging material, as well as the packaging and transport safety devices (if present).
- Check whether the scope of delivery is complete.
- Check the device and accessory parts for transport damage. In the event of complaints the carrier must be informed immediately. Later claims will not be recognised.
- If possible, keep the packaging until the expiry of the warranty period.
- Familiarise yourself with the product by means of the operating instructions before using for the first time.
- With accessories as well as wearing parts and replacement parts use only original parts. Replacement parts can be obtained from your dealer.
- When ordering please provide our article number as well as type and year of manufacture for your equipment.
⚠ WARNING!
The device and the packaging material are not children's toys! Do not let children play with plastic bags, films or small parts! There is a danger of choking or suffocating!
8. Assembly
⚠ Attention!
Always make sure the device is fully assembled before commissioning!
8.1 Fitting the handle (22) to the machine (Fig. 2 + 3)
• Install the front handle (22) (Fig. 2).
- Make sure to align the pin with the hole. Only loosely fasten the screws with the Allen key size 4 (23) before adjusting to the most comfortable working position with the carrying straps (12) (see 8.5). The front handle (22) should be aligned, then tighten the screws with the Allen key size 4 (23). (Fig. 2)
8.2 Installing the shaft (Fig. 4)
- Open the star grip (a) in order to release the fitting plate.
- Now slide the shaft (6/7/8) of the respective device head into the fitting. Make sure that the ball (b) is flush with the hole (c) and engages.
- Then fix the shaft (6/7/8) to the fitting by turning the star grip (a).
8.3 Fitting the protective cover (16 + 18) (Fig. 5)
- Fasten the protective cover (16 + 18) using the Allen key size 5 (24) provided as a standard accessory and tighten up the screws.
⚠ Warning! Never use the machine without the protection assembled!
8.4 Fitting/removing the thread coil (17) (Fig. 6 - 8)
The brushcutter / grass trimmer (7) attachment can be used as a grass trimmer with the thread coil (17).
- Remove the nut (i), cover (h) and the external flange (g) from the threaded mandrel (e). Attention - Left-handed thread! (Fig. 6)
- The nut (i), cover (h) and the external flange (g) are not required for fitting the thread coil (17).
- Hold the internal flange (f) using the Allen key size 5 (24) (see Fig. 8).
- Turn the thread coil (17) anti-clockwise on the threaded mandrel (e) and attach the thread coil (17) hand-tight onto the threaded mandrel (e).
- Removal of the thread coil (17) takes place in reverse order.
Note that the direction of rotation of the thread coil (17) must match with the direction of the arrow on the shield (16).
8.5 Fitting/removing the cutting blade (9)
(Fig. 9 - 11)
The brushcutter / grass trimmer (7) attachment can be used as a trimmer with the cutting blade (9).
- Remove the nut (i), cover (h) and the external flange (g) from the threaded mandrel (e). Attention - Left-handed thread! (Fig. 9)
- The internal flange (f) remains on the threaded mandrel (e).
- Place the cutting blade (9) on the internal flange (f). Note that the direction of rotation of the cutting blade (9) must match with the direction of the arrow on the shield (16).
- Then slide the external flange (g) and the cover (h) onto the threaded mandrel (e).
- Fasten the cutting blade (9) with the nut (i).
- Tighten the nut (i) with the assembly tool (26). To do this, hold the internal flange (f) using the Allen key size5 (24) (see Fig. 10).
- Removal of the cutting blade (9) takes place in reverse order.
⚠ Warning!
Please ensure that the trimmer is mounted correctly before use!
8.6 Attach the carrying strap (12) (Fig. 12 - 15)
- The device must be used with the carrying strap (12).
- First, balance the machine when the tool is switched off.
- Put on the carrying strap (12).
- Adjust the length of the belt so that the carabiner hook (j) is approx. one hand-width beneath the right hip. Hang the multifunction device on the carabiner hook (j).
- Hang and balance the machine.
- The cutting tool (9, 17) may just touch the ground in the normal working position.
- Hook the device to the carabiner hook (j) of the carrying strap (12) with the motor running.
- Safety tab (k) on the carrying strap (12).
ATTENTION! In an emergency, the safety tab (k) on the carrying strap (12) can be pulled. The machine then immediately detaches from the carrying strap (12) and falls to the floor.
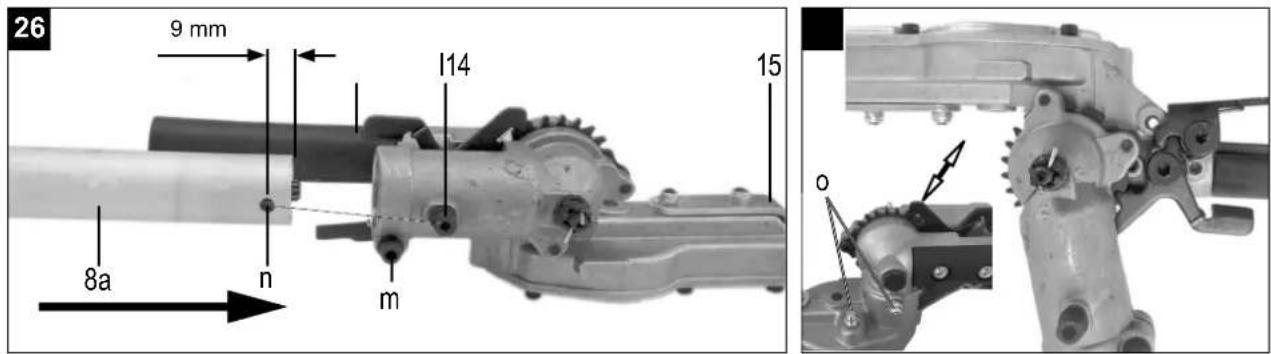
8.7 Installing the hedge trimmer (8)
(Fig. 26 - 28)
- Remove the screw (l), align the holes (n) so that they are flush and screw the screw (l) back in.
- Place the cutting unit (15) precisely on the connecting rod (8a) (Fig. 26).
- Clamp with screw (m).
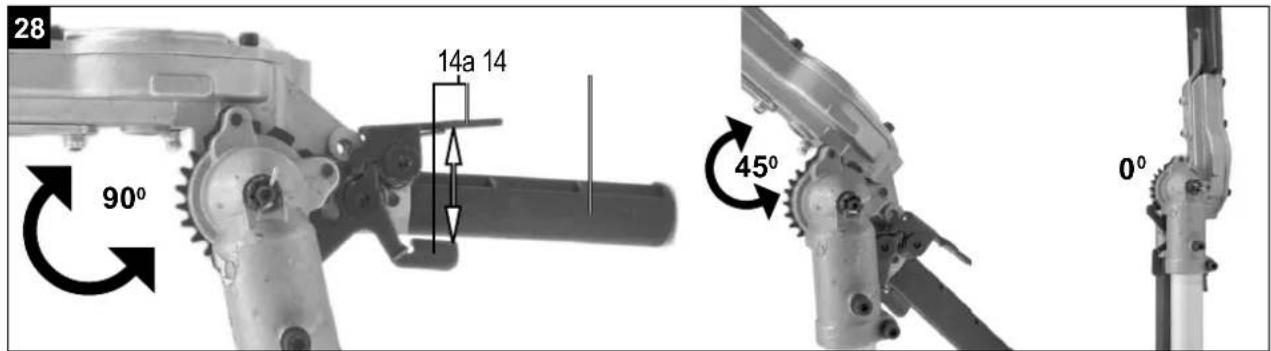
- Set the incline using the adjustment lever (14). Press both unlocking levers (14a) on the hedge trimmer (8) and adjust to the desired position. (Fig. 28).
- The hedge trimmer (8) can be angled from +90^ to -75^ (Fig. 28).
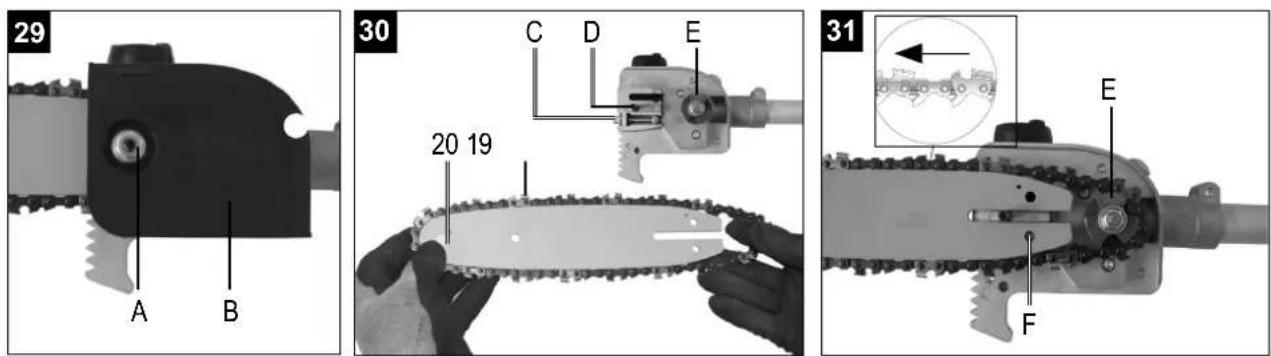
8.8 Installing the chainsaw blade (20) and the saw chain (19) (Fig. 29 - 30)
- Remove the chain cover (B) by loosening the fixing nut (A).
- Screw the chain tensioning screw (C) carefully up to the stop to the left. This makes it easier to insert the chainsaw blade (20). (Fig. 30)
- The saw chain (19) is placed in the circumferential groove of the chainsaw blade (20).
- Place the chainsaw blade (20) with the inserted saw chain (19) into the holder for the pole-mounted pruner (6). (Fig. 30)
- Pay attention to the alignment of the chain teeth (Fig. 31).
- Guide the saw chain (19) around the chain wheel (E). Make sure that the teeth of the saw chain (19) grip securely into the chain wheel (E).
- Place the chainsaw blade (20) into the transmission retainer (D). The chainsaw blade (20) must be hooked into the chain tensioning bolt (C).
- Refit the chain cover (B) and the fixing nut (A).
Attention!
Only fully tighten the fixing nut (A) after the chain tension has been adjusted (see section 8.8.1 "Tensioning the saw chain").
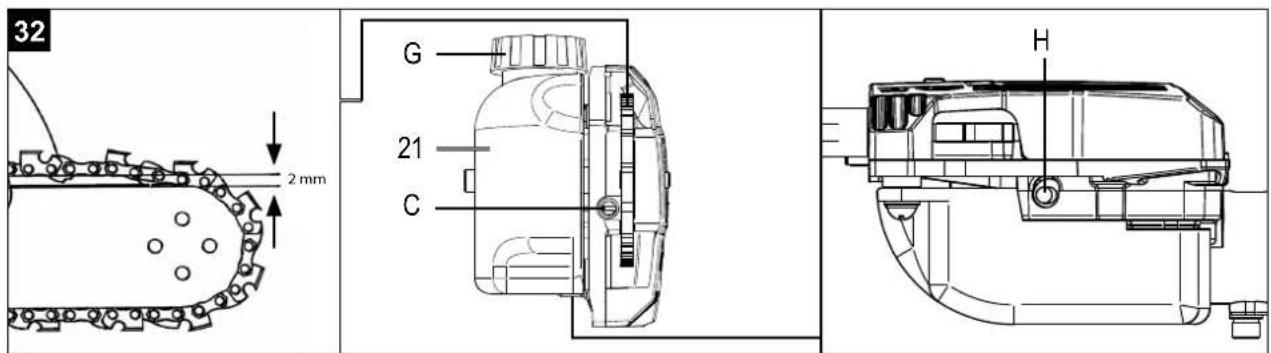
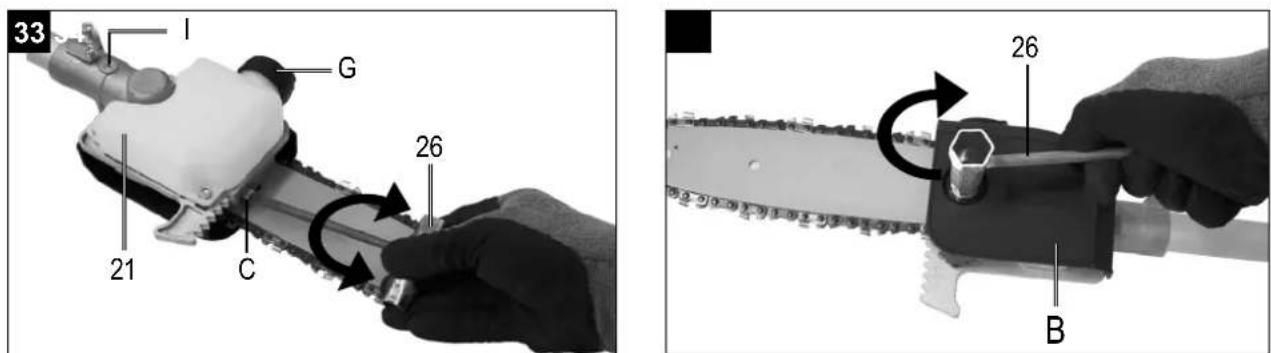
8.8.1 Tensioning the saw chain (19) (Fig. 32 - 34)
- Loosen the fixing nut (A) for the chain cover (B) a few turns using the assembly tool (26).
- Adjust chain tension with the chain tensioning screw (C) using the assembly tool (26).
Turning to the right increases the chain tension, turning to the left decreases the chain tension.
The saw chain (19) is tensioned correctly when it can be lifted approx. 2 mm in the centre of the chainsaw blade (20) (Fig. 32). - Retighten the fixing nut (A) for the chain cover (B) with the assembly tool (26).
- Attention! All chain links of the saw chain (19) must sit properly in the guide groove of the chain-saw blade (20).
Notes about tensioning the saw chain (19):
The saw chain (19) must be tensioned correctly in order to guarantee safe operation. You can identify the optimal tension when the saw chain (19) can be lifted approx. 2 mm in the centre of the chainsaw blade (20).
Check the chain tension every 10 mins at the latest and adjust it if necessary as the saw chain (19) heats up during sawing and therefore its length changes.
This particularly applies to new saw chains.
Slacken the saw chain (19) after work is complete because it shortens after cooling down. This prevents the saw chain (19) from getting damaged.
8.8.2 Filling the automatic saw chain lubrication (Fig. 32, 33)
⚠ WARNING!
Risk to health!
Inhalation of lubricating oil vapours and exhaust gases can cause serious damage to health, unconsciousness and in extreme cases death.
- Do not breathe in lubricating oil vapours.
- Only use the product outdoors.
⚠️ DANGER!
Risk of fire and explosion!
Oil can ignite during filling and possibly explode. This leads to severe burns or death.
It is recommended to use standard bio saw chain oil.
- Remove the oil tank cover (G) from the chainsaw oil tank (21).
- Fill the chainsaw oil tank (21) up to the MAX marking with saw chain oil.
- Close the oil tank cover (G).
9. Before commissioning
Caution! Only mount the rechargeable battery (27) after the device is fully assembled and all settings have been made. Always wear protective gloves when carrying out work on the device in order to prevent injuries.
Before each commissioning, check the device for the following:
- Faultless condition and completeness of the guards and the cutting device.
- Tight fit of all screw connections.
- Smooth running of all moving parts.
9.1 Mounting the rechargeable battery (27) (Fig. 35 - 37)
Push the rechargeable battery (27) into the intended rechargeable battery mount. Ensure that the rechargeable battery snaps in place! Removal of the rechargeable battery (27) takes place in reverse order!
9.2 Charge status of the rechargeable battery (27) on the device
(Fig. 37)
By pressing the rechargeable battery indicator (1a) on the motor drive unit (1), the status of the rechargeable battery (27) can be read off.
9.3 Charge status of the rechargeable battery (27)
By pressing the black button on the rechargeable battery (27), the status of the rechargeable battery (27) can be read off.
9.4 Charging the rechargeable battery (27) (Fig. 38 - 40)
- Remove the rechargeable battery pack (27) from the device.
- Check whether the mains voltage indicated on the type plate matches the mains voltage present. Plug the mains plug of the charging unit (28) into the socket.
- Insert the rechargeable battery (27) into the charging unit (28). A flashing green light on the rechargeable battery (27) indicates that the rechargeable battery (27) is charging.
- Depending on the charge status of the rechargeable battery (27), either 1, 2, 3 or 4 green lights light up on the rechargeable battery (27).
1 green light: Rechargeable battery 1/4 charged
2 green lights: Rechargeable battery 2/4 charged
3 green lights: Rechargeable battery 3/4 charged
4 green lights: Rechargeable battery fully charged
While charging, the rechargeable battery (27) may heat up slightly. However, this is normal. If it is not possible to charge the rechargeable battery pack (27), please check
- whether mains voltage is present at the socket
- whether there is perfect contact at the charging contacts.
If it is still not possible to charge the rechargeable battery pack (27), please send the charging unit (28) and the rechargeable battery pack (27) to our customer service.
In the interest of a long service life for the rechargeable battery pack (27), you should ensure that the rechargeable battery pack (27) is recharged in good time. This is certainly necessary if you notice that the performance of the cordless device is decreasing. Never discharge the rechargeable battery pack (27) completely. This will lead to a defect in the rechargeable battery pack (27)!
10. Operation
Starting the device
Do not start the device until you have fully assembled it.
⚠ Risk of injury!
Remove the corresponding transport protection and inspect the device to ensure that its operating status is good. Never use a cutting device that is damaged, poorly adjusted or maintained, or not fully mounted and secured.
Check before use!
- Check that the device is in a safe condition:
- Check the device for visible damage.
- Check that all parts of the device are securely attached.
- Check that all safety devices are in good condition.
Note: Do not start the engine in tall grass.
⚠ Attention: If the motor has been switched off, the cutting device continues running for a few seconds; therefore keep away from the cutting device until it comes to a complete standstill!
Starting (Fig. 1, 41)
Once the device is properly assembled, start the engine as follows:
Switching on
- Firmly hold the device by the control handle (2) with one hand and by the handle (22) with the other hand.
- To switch on the device, keep the on/off switch (5) pressed.
Controlling the speed (Fig. 41)
You can select the speed of the device by tapping the on/off switch (5). The speed stages change each time the on/off switch (5) is tapped.
The device adjusts the speed automatically to the attached cutting tool (6, 7, 8). (See section 6 "Technical data".)
Switching off
- To switch off the device, release the safety switch (3) and keep the on/off switch (5) pressed.
ATTENTION!
If the cutting device touches a foreign body, or the operating noise intensifies, or the electrical device vibrates unusually heavily, switch off the engine and allow the electrical device to come to a halt. Remove the battery and implement the following measures:
- check for damage
- check for loose parts and fasten all parts
- replace damaged parts with equivalent parts or have them repaired.
11. Working instructions
ATTENTION:
Only hold the device by the insulated gripping surfaces, because the cutting blade can come into contact with concealed power lines. If the cutting blade comes into contact with an energised line, device parts can become energised and cause an electric shock.
- Always hold the device tightly with both hands on the rear control handle (2) and front handle (22) (Fig. 14).
- Hold the rear control handle (2) with your right hand and the front handle (22) with your left hand.
• Always make sure that the cutting tool continues to rotate for a short time after the throttle lever (4) has been released.
- Always ensure that the engine is idling properly so that the cutting tool no longer rotates when the throttle (4) is not pressed.
- Always work with high speed so you have the best cutting results.
Attention!
- The cutting tool (9, 17) on the brushcutter / grass trimmer (7) must not touch the floor in the normal working position.
- When using the hedge trimmer (8) or pole-mounted pruner (6), the combination device should be swung horizontally.
11.1 Working with the brushcutter (9) / grass trimmer (7)
When working with the brushcutter (9) / grass trimmer (7), the protective cover (16, 18) for the blade and thread operation must be mounted in order to prevent objects being ejected.
The cutting blade (16a) in the shield (16) automatically cuts the thread to the optimum length. (Fig. 16)
11.1.1 Mowing with the brushcutter (9)
- With the device switched off, first familiarise yourself with the operation and guidance if you are working with a brushcutter (9) for the first time.
- The brushcutter (9) is designed so that it is operated solely from the right-hand side of the operator.
- Move the device with a uniform curved movement from left to right and back again. Then cut the next section. (Fig. 25)
- Attention: Always move the device back into the starting position before cutting the next path.
- Attention: Always be particularly careful when working in difficult terrain and on slopes. Cut long grass in stages to ensure that the device is not overloaded. First cut the tips, then work your way up in stages.
• Always wear protective goggles and hearing protection, and a hard hat when doing thinning work. - While using metal cutting tools, there is generally a risk of kickback, when the tool hits a solid obstacle (stones, trees, branches, etc.). The device is thrown back against the direction of rotation.
- With wild growth and undergrowth, “immerse” the brushcutter (7) from above. This chops the material to be cut.
- Attention! The cutting blade (9) is still running! Do not stop the cutting blade (9) with your hand.
- Keep the cutting blade (9) / thread coil (17) away from feet.
ATTENTION:
Use this work technique with particular care. The greater the distance between the cutting tool and the ground, the greater the danger that the material to be cut and foreign objects will be thrown to the side.
11.2 Mowing with the grass trimmer (7)
- Use the thread coil (17) to get a clean cut even on uneven edges, fence posts, and trees.
- Carefully bring the thread coil (17) up to an obstacle and cut around the obstacle with the tip of the trimming thread. When the trimming line comes into contact with stones, trees, and walls, the line wears out or breaks off ahead of time.
- Never replace the trimming thread with a metal wire - DANGER OF INJURY!
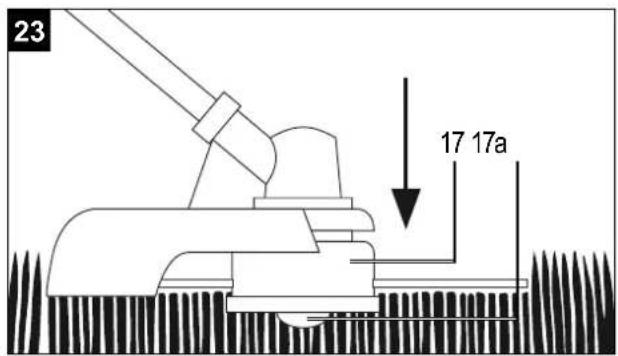
11.2.1 Automatic trimming thread (Fig. 16, 23)
- The grass trimmer is supplied with a filled thread coil (17).
• This line will wear out during work. - So that new thread is fed in, press the trigger (17a) on the thread coil (17) firmly on the floor with the motor running.
- The line is automatically fed due to centrifugal force. The thread is cut to the correct length by the cutting blade (16a) on the shield (16).
11.3 Working with the hedge trimmer (8)
- The hedge trimmer (8) is suitable for cutting hedges, bushes and shrubs.
- Hold the hedge trimmer (8) at a safe distance away from your body with two hands.
- The maximal diameter to cut depends on the wood's type, age, moisture and hardness.
- Therefore cut very thick branches using branch shears to your desired length before trimming the hedge.
- Thanks to the its double-sided cutting unit (15), the hedge trimmer (8) can be moved forward and backward or from one side to the other swinging it back and forth.
- Cut the sides of the hedges first and then the top edge.
- Cut hedges from bottom to the top.
- Cut the hedges in trapezium shape. This prevents the lower hedge area from becoming bare due to insufficient light.
- Stretch a guide over the complete length of the hedge when you want to shorten the upper edge of the hedge evenly.
- Trim in several passes if you have to cut down a large portion of the hedge.
- Make sure to remove any foreign objects from the hedges (e.g. wire), since they may damage the cutting unit (15) of the hedge trimmer (8).
- Attention! The blades are still running! Do not stop the blades with your hand.
The right time to cut:
- Leaf hedge: June and October
• Conifer hedge: April and August - Fast growing hedge: around every 6 weeks from May
Pay attention to nesting birds in the hedge. Delay the hedge cut or leave this area out if this is the case.
11.3.1 Hedge trimmer angle adjustment (8) (Fig. 28)
The hedge trimmer (8) can be adjusted to the working conditions by swivelling the cutting unit (15) from +90^ to -75^ . (Fig. 28).
Attention! Only adjust with the engine switched off!
- Press both unlocking levers (14a) on the cutting unit (15) and adjust to the desired position.
- Use the adjustment lever (14) to do this.
- Release both unlocking levers (14a) until they engage into the toothing.
- Before commissioning, check that the unlocking levers (14a) are properly engaged.
Attention!
The cutting unit (15) may only be used when both unlocking levers (14a) are engaged!
Oil the blades and the angle adjustment each time before starting work, with environmentally friendly lubricant. Also oil the blade regularly while working.
Attention!
Only oil with the engine switched off!
Attention!
Incorrect use and misuse can damage the hedge trimmer and cause severe injuries due to ejected parts.
To minimise the risk of accidents by using the cutting blade, take note of the following points:
- Never cut shrubs or timbers with a diameter of more than 2cm.
- Avoid contact with metal bodies, stones, etc.
- Periodically check the cutting blade for damages. Never continue to use a damaged cutting blade.
- When the cutting blade becomes apparently blunt, it must be sharpened by a qualified specialist. When the cutting blade is apparently out of balance, it must be replaced.
11.4 Working with the pole-mounted pruner (6) Oiling the saw chain (19) and guide bar
It is recommended to use commercial chain oil.
Remove the oil tank cover (G). (Fig. 32, 33).
Fill the chainsaw oil tank (21) (Fig. 32, 33) to 80% with saw chain oil.
Close the tank cap.
11.4.1 Oil supply control
Always make sure the automatic oiler system is working properly. Ensure that the chainsaw oil tank is always filled (21).
During sawing work, the rail and the saw chain (19) must always be oiled sufficiently in order to reduce friction on the chainsaw blade (20).
The chainsaw blade (20) and the saw chain (19) must never be without oil.
If you use the saw dry or with too little oil, the cutting performance reduces, the service life of the chain-saw blade (20) is reduced, the saw chain (19) becomes blunt quicker and the rail wears a great deal due to overheating. You can that there is too little oil if smoke forms or the guide rail discolours.
To check the saw chain lubrication, hold the chain-saw with the saw chain (19) over a sheet of paper and give it full throttle for a few seconds.
The oil quantity can be checked on the paper.
The saw chain (19) must always fling a small amount of oil. After a few seconds, a light oil trail must be visible. Always ensure that there is enough oil in the chainsaw oil tank (21) for saw chain lubrication.
11.4.2 Precautionary measures for the sawing work
- Never stand directly under the branch that you want to saw off!
- Possible risk of injury caused by falling branches and catapulting pieces of wood. In general, it is recommended to set the pole-mounted pruner (6) at an angle of 60^ to the branch.
- Hold the device firmly with both hands during the cutting process and always ensure that you are in a balanced position and have secure footing.
- Never use the device with only one hand! The loss of control of your tool can cause serious injury or death. Never work on a ladder, a tree branch or other unstable surfaces.
- Do not saw strong branches in one cut, always in several steps.
- Place the saw chain (19) on the branch to be cut.
- Apply light pressure to move the device, but do not overload the engine.
- Before cutting, clear the work area of obstructive branches and undergrowth. Then, keep the area clean, on which branches could fall after cutting and remove any obstacles there, if necessary.
- Always keep the work area clear, remove the cut branches immediately.
- Pay attention to your location, the wind direction and the possible felling direction of the branches.
- Be prepared for fallen branches to kick back.
- Place all other tools and devices at a safe distance from the branches to be cut, but not in the withdrawal area.
Always monitor the condition of the tree.
Look for rot and decay in the roots and branches. If they are rotten inside, they can break off and fall unexpectedly while cutting.
Also watch out for broken and dead branches that could come loose due to the vibrations and fall on you.
For very thick or tough branches, first make a small cut beneath the branch before working from top to bottom to prevent it breaking off.
Basic cutting technique
Heavy branches break off easily when sawing and long strips of bark break off from the trunk which causes lasting damage to the tree. You can significantly reduce this risk with the following cutting technique:
- First saw the branch about 10 cm away from the trunk on the underside of the branch.
- Make another cut about 15 cm to the trunk from above.
- Keep sawing until the branch breaks off. There is now no longer a risk of damaging the bark on the trunk.
- Finally, remove the remaining branch stump with a clean cut from above along the trunk.
- To keep the damage to the tree to a minimum, we also recommend sealing the cutting area with grafting wax.
Dangers from reactive forces
Reactive forces occur during the operation of the saw chain (19). The forces that are to be applied to the wood act against the operator. They occur when the moving saw chain (19) comes into contact with a solid object such as a branch or is jammed. These forces can lead to a loss of control and injuries.
Understanding how these forces occur can help you avoid the moment of shock and loss of control.
This saw is designed so that the kick-back effects are not as noticeable as with conventional chainsaws.
Nevertheless, always make Container you have a firm grip and secure footing so that you can keep control of the tool in case of doubt.
The most common effects are:
- Kick-back
- Recoil
- Kick-back
Kick-back
Kick-back can occur if the running saw chain (19) strikes a solid object on the upper quarter of the chainsaw blade (20) or becomes jammed.
The cutting force of the saw chain (19) exerts a rotational force on the saw in the opposite direction to the saw chain movement. This leads to an upward movement of the chainsaw blade (20).
Avoid kickback
The best protection is to avoid situations that lead to kickbacks.
- Always keep an eye on the position of the upper guide rail.
- Never let this point come into contact with an object. Do not cut anything with it. Be particularly careful in the vicinity of wire fences and when cutting small, hard branches that can jam the saw chain (19) easily.
- Only cut one branch at a time.
Kick-back
Retraction occurs when the saw chain (19) suddenly becomes stuck on the underside of the guide bar because it is jammed or hits a foreign object in the wood. The saw chain (19) then pulls the saw forwards.
Retraction often occurs when the saw chain (19) is not running at full speed when it comes into contact with the wood.
Avoiding retraction
Be aware of the forces and situations that can lead to the saw chain (19) becoming jammed on the underside of the guide bar. Always start cutting with the saw chain (19) running at full speed.
Recoil
Recoil occurs when the saw chain (19) suddenly becomes stuck on the top of the guide bar because it is jammed or hits a foreign object in the wood. The saw chain (19) can then suddenly push the saw towards the operator. Recoil often occurs when the top of the blade is being used for cutting.
Avoiding recoil
Be aware of the forces and situations that can lead to the saw chain (19) becoming jammed on the top of the guide bar. Do not cut more than one branch at a time. Do not tilt the chainsaw blade (20) to the side when pulling it out of a cutting slit, as this could jam the saw chain (19).
12. Maintenance
WARNING!
Unplug the mains plug from the socket before carrying out any work on the device.
Always wear protective gloves during all work on and around the cutting tools.
If not in use, or if in transport or in storage, always mount transport protection to all cutting tools (6, 7, 8). (Fig. 1)
Always switch the motor off before carrying out any maintenance and cleaning work.
-
Do not spray the device with water. This damages the engine.
-
Clean the device with a cloth, hand brush, etc.
- Use a damp cloth to clean the plastic parts. Do not use cleaning agents, solvents or sharp objects.
- For technical reasons, wet grass and weeds wrap around the drive axle beneath the protective cover (16, 18) while working. Remove this, otherwise the engine will overheat due to excessive friction. (Fig. 24)
12.1 Regular checks
Note that the following information relates to normal use.
Under certain circumstances (longer daily work, heavy levels of dust, etc.), shorten the intervals specified accordingly.
Before starting work, after filling the tank, after an impact or if dropped:
- Check the outer surface of the flexible drive shaft for nicks, cracks, wear, discolouration, deformation and other damage. The flexible drive shaft must be replaced if it is damaged, discoloured or deformed.
- Check the cutting tools for firm seating, general visual inspection for cracks and damage.
- Replace damaged or blunt cutting tools immediately, even with hairline cracks.
- Sharpen the cutting tools (also if necessary).
Weekly check:
• Gear lubrication (also if necessary).
If necessary:
- Tighten the accessible fastening screws and nuts. Check all bolts and nuts for looseness and tighten securely if necessary.
- Check the grip screws for looseness and tighten securely if necessary.
Excessive wear and damage to the device can be prevented if the specifications in this user manual are adhered to.
12.2 Maintenance of the brushcutter / grass trim-mer (7)
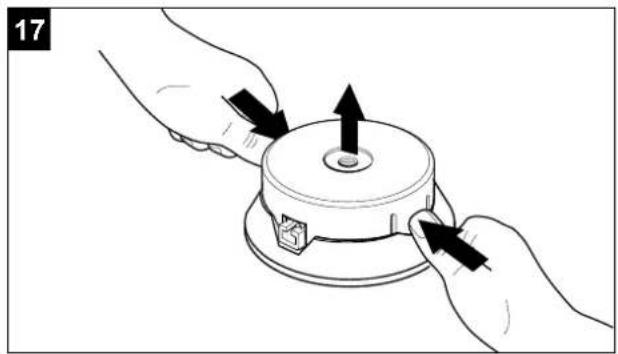
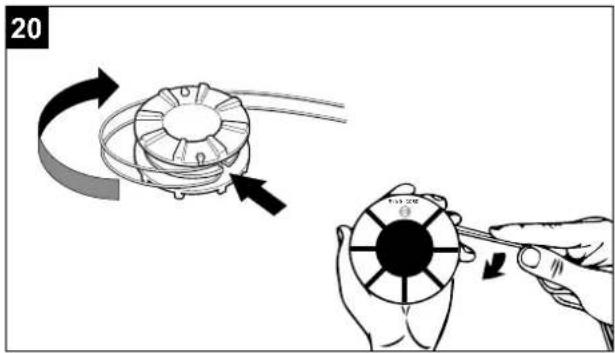
12.2.1 Replacement of the thread coil (17) (Fig. 17 - 22)
- Pull the coil cover off the thread coil (17) by firmly pressing the retaining lugs.
- Remove the coil with the thread remnants and the compression spring.
- Remove the used coil.
- Take the new coil and pull out 10 cm of both threads.
- Now place the coil on the conical pointed spring and guide both threads through the eyelets on the thread coil (17).
- Now place the coil cover on the new coil.
Turn it so that the recesses in the coil cover align with the eyelets in the thread coil (17).
- Now press the thread cover together with the coil until it engages in the thread coil housing.
- The blade (16a) in the cutting protection (16) shortens the trimming thread to the correct length when the machine starts up again.
12.2.2 Grinding the cutting blade (9)
If the blades become slightly dull, you can sharpen them yourself.
- Fasten the cutting blade (9) in a vice.
- Grind all 3 blades of the cutting blade (9) using a flat file and make sure to maintain the angle of the cutting edge ( 25^ ). Only file in one direction.
- Replace the blades after sharpening them five times at the latest.
Replace the cutting blade (9) if the cutting edge is heavily worn or broken.
The brushcutter (7) can vibrate excessively if the blades are not balanced; therefore there is a danger of injury!
12.2.3 Lubricating the brushcutter / grass trim-mer (7) (Fig. 7)
Treat with lithium-based grease.
- Remove the screw (d) and add grease until grease comes out.
- Then refit the screw (d).
Attention! Top up with only a little grease. Under no circumstances overfill.
12.3 Maintenance of the pole-mounted pruner (6)
12.3.1 Looking after the chainsaw blade (20) and the pole-mounted pruner (6)
Turn the chainsaw blade (20) over every time the saw chain (19) is sharpened or replaced. This will prevent wearing the chainsaw blade (20) on one side, especially at the tip and the underside.
Regularly clean the following parts of the pole-mount-
ed pruner (6):
1 = the opening for the oil feed
2 = the oil channel
3 = the circumferential groove of the rail

12.3.2 Maintenance and sharpening of the saw chain (19)
A properly sharpened saw chain (19) goes effortlessly through the wood and requires very little pressure. Do not work with a dull or damaged saw chain (19). It increases physical exertion, magnifies the vibrations and leads to unsatisfactory results as well as greater wear and tear.
- Clean the saw chain (19).
- Check the chain for breaks in the links and damaged rivets.
- Replace damaged and worn chain parts with suitable spare parts, which you can file down to the shape and size of the original parts if necessary.
- Sharpening a saw chain (19) should only be carried out by experienced users!
Note the angles and dimensions specified below. If the saw chain (19) is not properly sharpened or the depth gauge is too small, there is a higher risk of kickback effects and the resulting injuries!
- The saw chain (19) cannot be fixed on the guide rail. It is therefore best to remove the saw chain (19) from the rail and then sharpen it.
- Select a sharpening tool that is suitable for the chain pitch.
The chain pitch (e.g. 3/8") is marked in the depth gauge of each knife.
Only use files specifically for saw chains (19)!
Other files have the wrong shape and the wrong edge.
Select the diameter of the file according to your chain pitch. Be sure to also note the following angles when sharpening the chain blades.
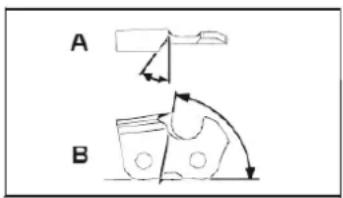
A = file angle
B = angle of the side plate
Furthermore, the angle must be maintained for all blades.
If the angles are uneven, the saw chain (19) will run erratically, wear out quickly and break prematurely. Since these requirements can only be met with sufficient and regular practice:
- Use a file holder
A file holder must be used when sharpening the saw chain (19) by hand. The correct filing angles are marked on it.
- Hold the file horizontally (at the correct angle to the guide rail) and file according to the angle marking on the file holder. Support the file holder on the top plate and the depth gauge.
• Always file the blade from the inside out. - The file only sharpens as it moves forward. Lift the file off as you move backwards.
- Do not touch the fastening straps or dynamic links with the file.
-
Turn the file regularly to avoid wear on one side.
-
Use a piece of hard wood to remove the burr from cut edges.
- All blades must have the same length, otherwise they will also be of different heights.
- This causes the saw chain (19) to run erratically and increases the danger of it breaking.
12.3.3 Lubricating the pole-mounted pruner (6) transmission (Fig. 33)
Lubricate the drive every 10 to 20 operating hours.
- Apply a grease gun (not included in the scope of delivery) to the grease nipple (I).
- Squeeze some grease into it.
⚠ Attention!
Top up with only a little grease. Under no circumstances overfill.
12.4 Maintenance of the hedge trimmer (8)
12.4.1 Visual inspection of the hedge trimmer (8) Check the hedge trimmer (8) for obvious defects such as:
- loose fastenings
- worn or damaged components
- bent, broken or damaged cutting device
- covers or protective devices correctly mounted and intact.
- Wear, especially sliding clearance of the cutting device.
Replace damaged or blunt cutting tools (6, 7, 8) immediately, even if only slightly damaged.
12.4.2 Lubricating the transmission, hedge trimmer (8) (Fig. 27)
Lubricate the drive every 10 to 20 operating hours.
- Apply the grease gun to the grease nipple (o) (Fig. 27).
- Squeeze some grease into it.
⚠ Attention! Top up with only a little grease. Under no circumstances overfill.
Oil the cutting device device and the angle adjustment with environmentally friendly lubricating oil.
The user is responsible for all damage caused by failure to observe the instructions given in this user manual. This also applies to unauthorised modifications to the device, use of unauthorised spare parts, attachments, work tools, use other than intended and use for other than the intended purpose, consequential damage caused by the use of defective components.
Wearing parts
Even when used as intended, some components are subject to normal wear and tear.
These must be replaced regularly depending on the type and duration of use. These parts include the cutting tool and the retaining plate.
⚠ Warning!
Only use original spare parts and accessories from the manufacturer. Failure to do so can reduce performance, result in injuries and void your warranty.
Spare parts / accessories
Battery - Article-No.: 7909205706
Charger - Article-No.: 7911401701
Service information
With this product, it is necessary to note that the following parts are subject to natural or usage-related wear, or that the following parts are required as consumables.
Wearing parts*: Carbon brushes, nylon coil, blade, saw chain, chain blade
* may not be included in the scope of supply!
Important note in the case of repairs:
When returning the device for repair, please ensure for safety reasons that it is free of oil and fuel when it is sent to the service centre.
Spare parts and accessories can be obtained from our service centre. To do this, scan the QR code on the cover page.
13. Storage
Cleaning
- Keep the handles free of oil so that you always have a secure grip.
- If necessary, clean the device with a damp cloth and, if necessary, with a mild flushing liquid.
Attention!
- Never immerse the device in water or other liquids for cleaning.
- Store the device in a secure and dry place and out of reach of children.
Note: Store the device in a dry location, far away from potential sources of ignition, such as furnaces, hot water boilers with gas, gas dryers, etc.
14. Transport
Always mount transport protection (10, 11, 13) to all cutting tools (9, 15, 17, 20). (Fig. 1)
The device must be secured against tipping and slipping during transport in vehicles in order to prevent damage and injuries.
15. Disposal and recycling
Information on packaging


The packaging materials are recyclable. Please dispose of packaging in an environmentally friendly manner.
Information on the German Electrical and Electronic Equipment Act (ElectroG)
Electrical and electronic appliances do not belong in household waste, but should be collected and disposed of separately.
- Used batteries or rechargeable batteries that are not installed permanently in the old appliance must be removed non-destructively before disposal. Their disposal is regulated by the battery law.
- Owners or users of electrical and electronic appliances are obliged by law to return them after use.
- The end user bears personal responsibility for deleting his personal data from the old appliance to be disposed of.
- The symbol of the crossed-through rubbish bin means that electrical and electronic appliances may not be disposed of in the household rubbish.
-
Electrical and electronic appliances can be handed in at the following places at no charge:
-
Public disposal or collection points (e.g. municipal works yards).
- Points of sale of electrical appliances (stationary and online) provided traders are obliged to take them back or offer this voluntarily.
- Up to three waste electrical devices per type of device, with an edge length of no more than 25 centimetres, can be returned free of charge to the manufacturer without prior purchase of a new device from the manufacturer or taken to another authorised collection point in your vicinity.
-
Further supplementary take-back conditions of the manufacturers and distributors can be obtained from the respective customer service.
-
If the manufacturer delivers a new electrical appliance to a private household, the manufacturer can arrange for the free collection of the old electrical appliance upon request from the end user. Please contact the manufacturer's customer service for this.
- These statements only apply to appliances that are installed and sold in the countries of the European Union and are subject to European Directive 2012/19/EU. Different provisions may apply to the disposal of electrical and electronic appliances in countries outside the European Union.
Information on the German Battery Act (BattG) Used batteries and rechargeable batteries do not belong in household waste, but should be collected and disposed of separately.
- For safe removal of batteries or rechargeable batteries from the electrical appliance and for information on their type or chemical system, follow the further information within the operating or installation instructions.
- Owners or users of batteries and rechargeable batteries are obliged by law to return them after use. Return is limited to the handover of customary household quantities.
- Used batteries can contain harmful substances or heavy metals that can cause damage to the environment and human health. Reuse of the used batteries and use of the resources contained therein contributes to the protection of these two essential commodities.
- The symbol of the crossed-through rubbish bin means that batteries and rechargeable batteries may not be disposed of in household rubbish.
-
In addition, if the symbol Hg, Cd or Pb appears under the rubbish bin, this stands for the following:
-
Hg: Battery contains more than 0.0005% mercury
- Cd: Battery contains more than 0.002% cadmium
- Pb: Battery contains more than 0.004% lead
- Rechargeable batteries and batteries can be handed in at the following places at no charge:
- Public service disposal or collection points (e.g. municipal building yards)
- Points of sale of batteries and rechargeable batteries
- Disposal points of the common take-back system for the used batteries of appliances
- Disposal point of the manufacturer (if not a member of the common take-back system)
- These statements apply only to rechargeable batteries and batteries that are sold in the countries of the European Union and that are subject to European Directive 2006/66/EU. Different provisions can apply to the disposal of rechargeable batteries and batteries in countries outside the European Union.
Removing the rechargeable battery before disposing of the appliance
- The integrated rechargeable battery must be removed before disposal of the appliance and disposed of separately in an environmentally friendly manner.
- Mask off the contacts and package the rechargeable battery such that it cannot move in the packaging. Please observe any additional national regulations.
Contact your local refuse disposal authority for more details of how to dispose of your worn-out electrical devices.
Fuels and oils
- Before disposing of the unit, the fuel tank and the engine oil tank must be emptied!
- Fuel and engine oil do not belong in household waste or drains, but must be collected or disposed of separately!
- Empty oil and fuel tanks must be disposed of in an environmentally friendly manner.
16. Troubleshooting
The following table shows fault symptoms and describes remedial measures in the event of your machine failing to work properly. If you cannot localise and rectify the problem with this, please contact your service workshop.
| Fault Possible cause Remedy | ||
| Device does not start. • Battery empty• Rechargeable battery not inserted correctly• On/Off switch defective• Carbon brushes worn• Engine defective | • Charge battery• Remove rechargeable battery and reinsert• Repair by an authorised service centre• Repair by an authorised service centre• Repair by an authorised service centre | |
| Device runs intermittently. • Power cable is damaged• Internal connections loose• On/Off switch defective | • Check the extension cable and have it repaired if necessary.• Repair by an authorised service centre• Repair by an authorised service centre | |
| Poor cutting quality | • Cutting blades are blunt | • Have the blades sharpened or the cutter bar replaced |
| Motor running but transmission does not move. | • The drive is jammed by a thick branch or other object | • Switch off the hedge trimmer immediately, unplug it and remove the blockage |
| The pole-mounted pruner does not saw, plucks or vibrates. | • Chain tension too high• Chain blunt• Chain mounted incorrectly• Chain worn | • Check and adjust chain tension• Have chain sharpened or replaced• Re-mount chain• Replace chain |
Günzburger Straße 69
89335 Ichenhausen
Cher client,

natural_image
Technical line drawing of a mechanical assembly with exploded view, showing components like chains, gears, and parts (no text or labels)EC Declaration of Conformity
Cordless multi-function device
MFH440-LI20PROS
Nom d'article:
Standard references:
EN 62841-1:2015; EN 62841-4-2:2019; EN 50636-2-91:2014; EN ISO 11680-1:2021; EN ISO 11806-1:2022; EN IEC 55014-1:2021; EN IEC 55014-2:2021
This declaration of conformity is issued under the sole responsibility of the manufacturer.
The object of the declaration described above fulfils the regulations of the directive 2011/65/EU of the European Parliament and Council from 8th June 2011, on the restriction of the use of certain hazardous substances in electrical and electronic equipment.
EC Declaration of Conformity
Standard references:
EN 60335-2-29:2021/A1:2021; EN 60335-1:2012/A15:2021; EN 62233:2008
This declaration of conformity is issued under the sole responsibility of the manufacturer.
Apparent defects must be notified within 8 days from the receipt of the goods. Otherwise, the buyeris rights of claim due to such defects are invalidated. We guarantee for our machines in case of proper treatment for the time of the statutory warranty period from delivery in such a way that we replace any machine part free of charge which provably becomes unusable due to faulty material
or defects of fabrication within such period of time. With respect to parts not manufactured by us we only warrant insofar as we are entitled to warranty claims against the upstream suppliers. The costs for the installation of the new parts shall be borne by the buyer. The cancellation of sale or the reduction of purchase price as well as any other claims for damages shall be excluded.