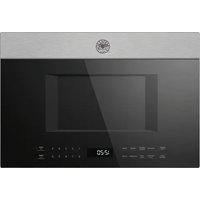
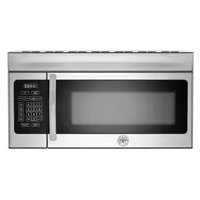
Master KOTR24XV - Microwave Oven BERTAZZONI - Free user manual and instructions
Find the device manual for free Master KOTR24XV BERTAZZONI in PDF.


| Brand | Bertazzoni |
| Model | KOTR24XV |
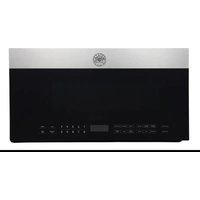
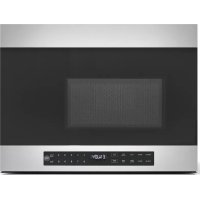
| Product Type | Microwave oven with built-in hood |
| Supply Voltage | 120 V ~ 60 Hz |
| Input Power | 1500 W |
| Output Power | 1000 W |
| Power Levels | 11 (0% to 100%) |
| Vent Type | Top, rear, or recirculation venting |
| Weight Range for Defrost | 0.1 to 6.0 lb (0.05 to 2.7 kg) |
| Appliance Weight | 63 to 85 lb (28.5 to 38.5 kg) |
| Automatic Functions | Sensor cooking, sensor reheating, auto defrost (meat, poultry, fish, bread), popcorn |
| Safety Lock | Child lock |
| Surface Lighting | 2 levels (high, low) + off |
| Fan | 2 speeds (high, low) |
| Turntable | Can be turned on/off |
| Display | Digital with 12-hour clock |
| Included Items | Glass tray, roller ring, grill, grease filters (2), exhaust adapter, mounting kit |
| Installation | Wall-mount under upper cabinet. Compatible with gas and electric ranges |
| Maintenance | Clean with mild detergent and damp cloth. Washable grease filters. Replaceable charcoal filter (depending on model) |
| Finish | Stainless steel |
| Certifications | Compliant with FCC Part 18 |
Frequently Asked Questions - Master KOTR24XV BERTAZZONI
User questions about Master KOTR24XV BERTAZZONI
0 question about this device. Answer the ones you know or ask your own.
Ask a new question about this device
Download the instructions for your Microwave Oven in PDF format for free! Find your manual Master KOTR24XV - BERTAZZONI and take your electronic device back in hand. On this page are published all the documents necessary for the use of your device. Master KOTR24XV by BERTAZZONI.
USER MANUAL Master KOTR24XV BERTAZZONI
| EN | INSTALLATION MANUALUSER AND MAINTENANCE MANUALOVER THE RANGE MICROWAVE OVEN | 3 |
| FR | MANUEL D'INSTALLATIONMANUEL D'UTILISATION ET D'ENTRETIENFOUR À MICRO-ONDES A HOTTE INTEGREE | 49 |
FROM THE DESK OF OUR PRESIDENT
Dear new owner of a Bertazzoni appliance,
I want to thank you for choosing one of our beautiful products for your home.
My family started manufacturing kitchen appliances in Italy in 1882, building a reputation for quality of engineering and passion for good food.
Today, our products stand out because of their unique blend of authentic Italian design and superior appliance technology. It is our mission to make products that function perfectly and bring joy to their owners.
By making beautiful products we respond to our customers' flair for good design. By making them versatile and easy-to-use, cooking with Bertazzoni becomes a real pleasure.
This manual will help you learn to use and care for your Bertazzoni appliance in the safest and most effective way, so that it can give you the highest satisfaction for years to come.
Enjoy!
Paolo Bertazzoni
President
Microwave Oven
INSTRUCTION MANUAL
Model: KOTR24XV
Read these instructions carefully before using your microwave oven and keep it carefully. If you follow the instructions, your oven will provide you with many years of good service.
SAVE THESE INSTRUCTIONS CAREFULLY
PRECAUTIONS TO AVOID POSSIBLE EXPOSURE TO EXCESSIVE MICROWAVE ENERGY
(a) Do not attempt to operate this oven with the door open since open-door operation can result in harmful exposure to microwave energy.
It is important not to defeat or tamper with the safety interlocks.
(b) Do not place any object between the oven front face and the door or allows soil or cleaner residue to accumulate on sealing surfaces.
(c) Do not operate the oven if it is damaged. It is particularly important that the oven door close properly and that there is no damage to the:
(1) DOOR (bent)
(2) HINGES AND LATCHES (broken or loosened)
(3) DOOR SEALS AND SEALING SURFACES
(d) The oven should not be adjusted or repaired by anyone except properly qualified service personnel.
Specifications
| Model | KOTR24XV |
| Rated Voltage | 120 VAC, 60 Hz |
| Microwave Input | 1500 W |
| Microwave Output | 1000 W |
IMPORTANT SAFETY INSTRUCTIONS
When using electrical appliances basic safety precautions should be followed, including the following:
WARNING - To reduce the risk of burns, electric shock, fire, injury to persons or exposure to excessive microwave energy:
- Read all instructions before using the appliance.
- Read and follow the specific: "PRECAUTIONS TO AVOID POSSIBLE EXPOSURE TO EXCESSIVE MICROWAVE ENERGY" found on page 2.
- This appliance must be grounded. Connect only to properly grounded outlet. See “GROUNDING INSTRUCTIONS” found on page 4.
- Install or locate this appliance only in accordance with the provided installation instructions.
- Some products such as whole eggs and sealed containers - for example, closed glass jars - are able to explode and should not be heated in this oven.
- Use this appliance only for its intended use as described in the manual. Do not use corrosive chemicals or vapors in this appliance. This type of oven is specifically designed to heat, cook or dry food. It is not designed for industrial or laboratory use.
- HOT CONTENTS CAN CAUSE SEVERE BURNS. DO NOT ALLOW CHILDREN TO USE THE MICROWAVE. Use caution when removing hot items.
- Do not operate this appliance if it has a damaged cord or plug, if it is not working properly, or if it has been damaged or dropped.
- This appliance should be serviced only by qualified service personnel. Contact nearest authorized service facility for examination, repair, or adjustment.
- Do not cover or block any openings on the appliance.
- Do not store this appliance outdoors. Do not use this product near water - for example, near a kitchen sink, in a wet basement, near a swimming pool, or similar location.
- Do not immerse cord or plug in water.
- Keep cord away from heated surface.
- Do not let cord hang over edge of table or counter.
- When cleaning surfaces of door and oven that comes together on closing the door, use only mild, nonabrasive soaps, or detergent applied with a sponge or soft cloth.
- To reduce the risk of fire in the oven cavity:
1). Do not overcook food. Carefully attend appliance when paper, plastic, or other combustible materials are placed inside the oven to facilitate cooking.
2). Remove wire twist-ties from paper or plastic bag before placing bag in oven.
3). If material inside of the oven ignite, keep oven door closed, turn oven off, and disconnect the power cord, or shut off power at the fuse or circuit breaker panel.
4). Do not use the cavity for storage purposes. Do not leave paper products, cooking utensils, or food in the cavity when not in use.
- Liquids, such as water, coffee, or tea are able to be overheated beyond the boiling point without appearing to be boiling. Visible bubbling or boiling when the container is removed from the microwave oven is not always present.
THIS COULD RESULT IN VERY HOT LIQUID SUDDENLY BOILING OVER WHEN THE CONTAINER IS DISTURBED OR A UTENSIL IS INSERTED INTO THE LIQUID.
To reduce the risk of injury to persons:
1) Do not overheat the liquid.
2) Stir the liquid both before and halfway through heating it.
3) Do not use straight-sided containers with narrow necks.
4) After heating, allow the container to stand in the microwave oven for a short time before removing the container.
5) Use extreme care when inserting a spoon or other utensil into the container.
-
Clean Ventilation Hoods Frequently - Grease should not be allowed to accumulate on hood or filter.
-
When flaming foods under the hood, turn the fan on.
-
Use care when cleaning the vent-hood filter. Corrosive cleaning agents, such as lye-based oven cleaners, may damage the filter.
-
Suitable for use above both gas and electric cooking equipment.
SAVE THESE INSTRUCTIONS
GROUNDING INSTRUCTIONS
This appliance must be grounded. In the event of an electrical short circuit, grounding reduces the risk of electric shock by providing an escape wire for the electric current. This appliance is equipped with a cord having a grounding wire with a grounding plug. The plug must be plugged into an outlet that is properly installed and grounded.
WARNING - Improper use of the grounding can result in a risk of electric shock.
Consult a qualified electrician or serviceman if the grounding instructions are not completely understood, or if doubt exists as to whether the appliance is properly grounded. If it is necessary to use an extension cord, use only a 3-wire extension cord that has a 3-blade grounded plug, and 3-slot receptacle that will accept the plug on the appliance. The marked rating of the extension cord shall be equal to or greater than the electrical rating of the appliance.
DANGER - Electric Shock Hazard
Touching some of the internal components can cause serious personal injury or death. Do not disassemble this appliance.
WARNING - Electric Shock Hazard
Improper use of the grounding can result in electric shock. Do not plug into an outlet until appliance is properly installed and grounded.
- A short power-supply cord is provided to reduce the risks resulting from becoming entangled in or tripping over a longer cord.
- Longer cord sets or extension cords are available and may be used if care is exercised in their use.
- If a long cord or extension cord is used:
1) The marked electrical rating of the cord set or extension cord should be at least as great as the electrical rating of the appliance.
2) The extension cord must be a grounding-type 3-wire cord.
3) The longer cord should be arranged so that it will not drape over the counter top or tabletop where it can be pulled on by children or tripped over unintentionally.
RADIO INTERFERENCE
This product has been tested and found to comply with the limits or Microwave Oven, pursuant to Part 18 of the FCC Rules. This product can radiate radio frequency energy, which could cause interference to such products as radio, TV, baby monitor, cordless phone, Bluetooth, wireless router, etc., which can be confirmed by turning this product off and on. If present, the user is encouraged to try to correct by taking one or more of the following countermeasures:
(1) Increase the spacing distance between the microwave oven and other product receiving the interference.
(2) If possible, use a properly installed receiver antenna and/or reorient the receiving antenna of the other product receiving the interference.
(3) Plug the microwave oven into a different outlet from the other product receiving the interference.
(4) Clean door and sealing surfaces of the oven. (SeeCare and Cleaning of Your Microwave Oven)
UTENSILS
CAUTION - Personal Injury Hazard
Tightly-closed utensils could explode. Closed containers should be opened and plastic pouches should be pierced before cooking.
See the instructions on "Materials you can use in microwave oven or to be avoided in microwave oven."
There may be certain non-metallic utensils that are not safe to use for microwaving. If in doubt, you can test the utensil in question following the procedure below.
Utensil Test:
- Fill a microwave-safe container with 1 cup of cold water (250ml) along with the utensil in question.
- Cook on maximum power for 1 minute.
- Carefully feel the utensil. If the empty utensil is warm, do not use it for microwave cooking.
- Do not exceed 1 minute cooking time.
Materials you can use in microwave oven
| Utensils | Remarks |
| Browning dish | Follow manufacturer* instructions. The bottom of browning dish must be at least 3/16 inch (5mm) above the turntable. Incorrect usage may cause the turntable to break. |
| Dinnerware | Microwave-safe only. Follow manufacturer's instructions. Do not use cracked or chipped dishes. |
| Glass jars | Always remove lid. Use only to heat food until just warm. Most glass jars are not heat resistant and may break. |
| Glassware | Heat-resistant oven glassware only. Make sure there is no metallic trim. Do not use cracked or chipped dishes. |
| Oven cooking bags | Follow manufacturer* instructions. Do not close with metal tie. Make slits to allow steam to escape. |
| Paper plates and cups | Use for short*erm cooking/warming only. Do not leave oven unattended while cooking. |
| Paper towels | Use to cover food for reheating and absorbing fat. Use with supervision for a short-term cooking only. |
| Parchment paper | Use as a cover to prevent splattering or a wrap for steaming. |
Materials you can use in microwave oven
| Utensils | Remarks |
| Plastic | Microwave-safe only. Follow the manufacturer* instructions. Should be labeled “Microwave Safe”. Some plastic containers soften, as the food inside gets hot. “Boiling bags” and tightly closed plastic bags should be slit, pierced or vented as directed by package. |
| Plastic wrap | Microwave-safe only. Use to cover food during cooking to retain moisture. Do not allow plastic wrap to touch food. |
| Thermometers | Microwave-safe only (meat and candy thermometers). |
| Wax paper | Use as a cover to prevent splattering and retain moisture. |
Materials you can use in microwave oven
| Utensils | Remarks |
| Aluminum tray | May cause arcing. Transfer food into microwave-safe dish. |
| Food carton with metal handle | May cause arcing. Transfer food into microwave-safe dish. |
| Metal or metal trimmed utensils | Metal shields the food from microwave energy. Metal trim may cause arcing. |
| Metal twist ties | May cause arcing and could cause a fire in the oven. |
| Paper bags | May cause a fire in the oven. |
| Plastic foam | Plastic foam may melt or contaminate the liquid inside when exposed to high temperature. |
| Wood | Wood will dry out when used in the microwave oven and may split or crack. |
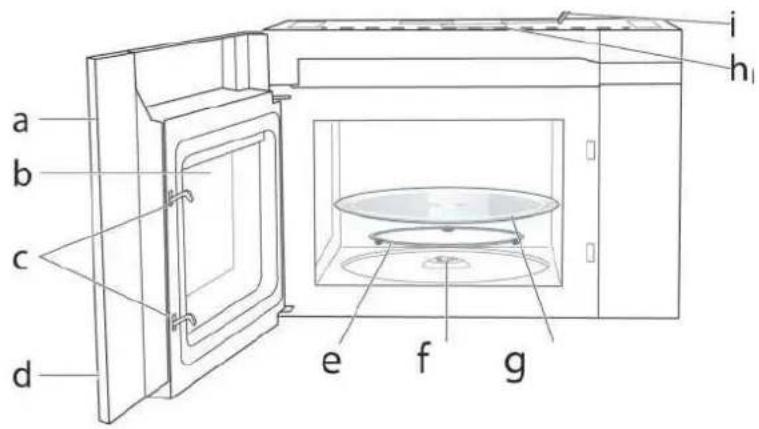
Front view
Bottom view
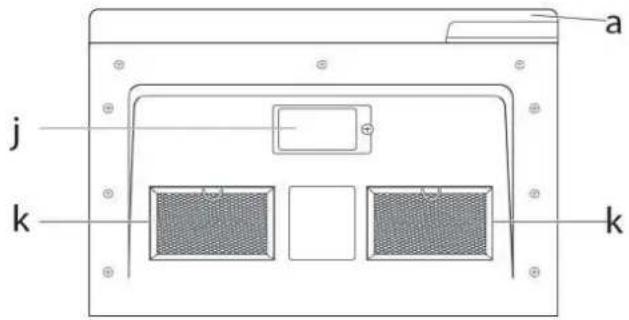

Door

Window

Interlock System

Control Panel

Turntable Ring Assembly

Turntable Coupler

Glass Turntable

Top Grille

Power Cord

Surface Lights

Grease Filters
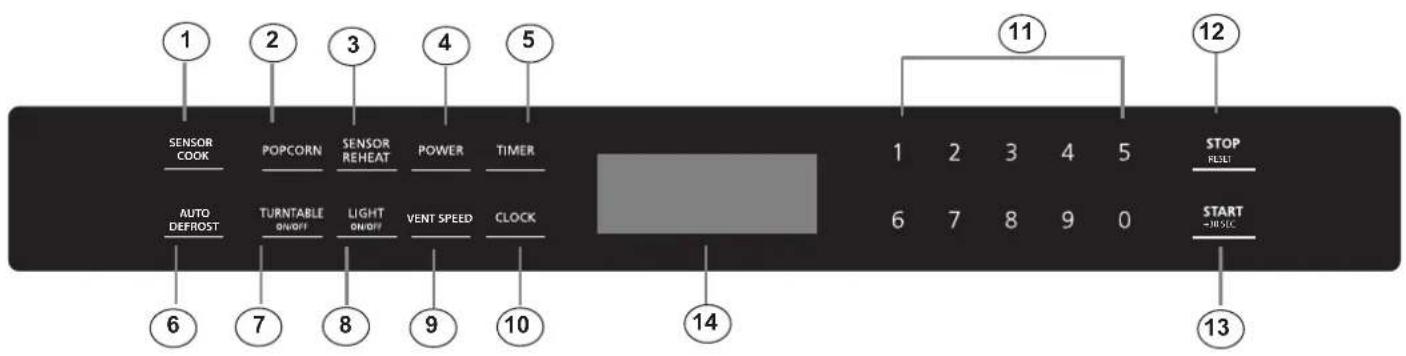
11 power levels are available.
| Level | 10 | 9 | 8 | 7 | 6 | 5 | 4 | 3 | 2 | 1 | 0 |
| Power | 100% | 90% | 80% | 70% | 60% | 50% | 40% | 30% | 20% | 10% | 0% |
| Display | PL-HI | PL-90 | PL-80 | PL-70 | PL-60 | PL-50 | PL-40 | PL-30 | PL-20 | PL-10 | PL-0 |
2. Power On
When the microwave oven is electrified, the screen will display "12:00 "PRESS CLOCK ENTERTIME". The buzzer will ring once. Press number keys to set clock or press "STOP/RESET" to exit clock setting mode. If there is no operation within 5 minutes, the oven will enter waiting state.
3. Clock
The clock can be set in 12-hour mode.
1) In waiting state, press "Clock" once. the screen will display "12:00 PRESS CLOCK ENTER TIME".
2) Press the number keys and enter the correct time. For example, time is 10:12 now, please press "1,0,1,2" in turn.
3) Press "Start/+30 Sec" button to confirm the clock.
4. Kitchen Timer
1) Press "Timer " once ENTER TIME " will blink in the display.
2) Press the number keys and enter the timer time.(The maximum value is 99:99).
3) Press "Start/+30 Sec" to confirm setting. The kitchen time will start counting down.
5. Time Cook
1) In waiting state, press the number keys to set the cooking time. (The maximum value is 99:99).
2) Press "Power" repeatedly to adjust the power level. The default power is PL-HI.
3) Press "Start/+30 Sec" to start microwave cooking.
6. Lock-out Function for Children
You can use this function to prevent children from accidentally turning the oven on.
To activate the lock:
In waiting state, press and hold "STOP/RESET" for three seconds. A long beep sounds and the locked icon will display.
To deactivate the lock:
In locked state, press and hold "STOP/RESET" for three seconds. A long beep sounds.
7. Speed y Cooking
(1) In waiting state, instant cooking at 100% power level can be started by select a cooking time from 1 to 9 minutes by pressing number pads1 to 9.
(2) In waiting state, instant cooking at 100% power level with 30 seconds' cooking time can be started by pressing "Start/+30 Sec". Each press on the same button will increase cooking time by 30 seconds. The maximum cooking time is 99 minutes and 99 seconds.
8. Popcorn
1) Press "Popcorn" repeatedly until the number you wish appears in the display.
"1" SET: approximate 3.2 ounces
"2" SET: approximate 1.75 ounces
For example, press "Popcorn" once, "3.2" appears in the screen.
2) Press "START/+30SEC" to cook.
9. Auto Defrost
1) Press "Auto Defrost" once, the screen will display "MEAT".
2) Press "Auto Defrost" repeatedly to choose the desired function. And "MEAT", "POULTRY", "FISH" or "BREAD" will display in turn.
3) Press " START/+30SEC" to confirm the function. The screen will display "ENTER WEIGHT".
4) Press the number keys to set the weight of the food.
5) Press " START/+30SEC" to start defrosting.
Auto Defrost programs
| Press button | Food | Weight range |
| 1 | Meat | 0.1 - 6.0 lbs |
| 2 | Poultry | 0.1 - 6.0 lbs |
| 3 | Fish | 0.1 - 6.0 lbs |
| 4 | Bread | 0.1 - 6.0 lbs |
10. Sensor Reheat
1) Press "Sensor Reheat" once, the screen will display "BEVERAGE".
2) Press " Sensor Reheat " repeatedly until the menu you wish appears in the display.
3) Press " START/+30SEC" to confirm.
4) Press the number key "1-3" to set the weight of the food. (For the menus "Dinner Plate, Pizza, Casserole", please skip this step.)
5) Press "START/+30SEC" to start sensor cook mode. The appliance starts sensing. The microwave is operating during sensing. When sensing is complete, beeps will sound and the calculated cook time will start to count down.
Note: Do not open the door during the sensing process, or the program will be cancelled.
Sensor Reheat programs
| Program no. | Menu | Quantity |
| 1 | Beverage | 1 - 3 cups |
| 2 | Dinner Plate | 1 plate |
| 3 | Pizza | 1 - 4 slices |
| 4 | Soup/Sauce | 1-3 cups |
| 5 | Casserole | 10.5 oz |
11. Sensor Cook
1) Press "Sensor Cook" once, the screen will display "POTATO".
2) Press "Sensor Cook" repeatedly until the menu you wish appears in the display.
3) Press "START/+30SEC" to start sensor cook mode. The appliance starts sensing. The microwave is operating during sensing. When sensing is complete, beeps will sound and the calculated cook time will start to count down.
Note: Do not open the door during the sensing process, or the program will be cancelled.
Sensor Cook programs
| Program no. | Menu | Quantity |
| 1 | Potato | 1 - 4 potatoes |
| 2 | Fresh Vegetable | 6/16 oz |
| 3 | Frozen Vegetable | 8/16 oz |
| 4 | Frozen Dinner | 10/20 oz |
| 5 | Rice | 1 - 2 cups |
| 6 | Frozen Breakfast | 8 - 12 oz |
| 7 | Meat | 9-19 oz |
12. Multi-Stage Cooking
Notes: (1) Two cooking stages can be set in multi-stage cooking.
(2) If you set defrost function, it will work automatically in the first stage.
Example: Defrost the Poultry for 2.0 lbs and then cook with 80% microwave power for 5 minutes.
(1) In waiting state, press number keys to set the microwave cooking time to 5 minutes.
(2) Press "Power" repeatedly to set the power level of PL-80.
(3) Press "AutoDefrosthen the screen will display " Poultry".
(4) Press " START/+30SEC " to confirm the menu.
(5) Press number keys to set the weight for 2.0 lbs.
(6) Press " START/+30SEC " to start cooking.
13. Operating the Ventilation Fan
1) Press "Vent Speed" once to start ventilation fan, the screen will display "HIGH". The oven will return to waiting state after 2 seconds.
2) Press "Vent Speed" twice, the screen will display "LOW". The oven will return to waiting state after 2 seconds.
3) Press "Vent Speed" thrice to turn off the ventilation fan, the screen will display "OFF". The oven will return to waiting state after 2 seconds.
14. Turning the Light on/off
The appliance is equipped with a cooking surface light, to light the surface underneath the appliance. With the “Light On/Off” button you can set two brightness levels.
| Display | Brightness |
| HI | High |
| LO | Low |
| OFF | Off |
15. Turning the turntable on / off
For best cooking results, leave the turntable on. It can be turned off for large dishes. To turn the turntable off, press "Turntable On/Off" once.
The screen will display "OFF" for 2 seconds. Press "Turntable On/Off" again to turn the turntable on. The screen will display "ON" for 2 seconds.
MAINTENANCE
Troubleshooting
Check your problem by using the chart below and try the solutions for each problem. If the microwave oven still does not work properly, contact the nearest authorized service center.
| TROUBLE | POSSIBLE CAUSE | POSSIBLE REMEDY |
| Oven will not start | a. Electrical cord for oven is not plugged in.b. Door is open.c. Wrong operation is set. | a. Plug into the outlet.b. Close the door and try again.c. Check instructions. |
| Arcing or sparking | a. Materials to be avoided in microwave oven were used.b. The oven is operated when empty.c. Spilled food remains in the cavity. | a. Use microwave-safe cookware only.b. Do not operate with oven empty.c. Clean cavity with wet towel. |
| Unevenly cooked foods | a. Materials to be avoided in microwave oven were used.b. Food is not defrosted completely.c. Cooking time, power level is not suitable.d. Food is not turned or stirred. | a. Use microwave-safe cookware only.b. Completely defrost food.c. Use correct cooking time, power level.d. Turn or stir food. |
| Overcooked foods | Cooking time, power level is not suitable. | Use correct cooking time, power level. |
| Undercooked foods | a. Materials to be avoided in microwave oven were used.b. Food is not defrosted completely.c. Oven ventilation ports are restricted.d. Cooking time, power level is not suitable. | a. Use microwave-safe cookware only.b. Completely defrost food.c. Check to see that oven ventilation ports are not restricted.d. Use correct cooking time, power level. |
| Improper defrosting | a. Materials to be avoided in microwave oven were used.b. Cooking time, power level is not suitable.c. Food is not turned or stirred. | a. Use microwave-safe cookware only.b. Use correct cooking time, power level.c. Turn or stir food. |
| InstallationInstructions | Over the RangeMicrowave Oven |
BEFORE YOU BEGIN
Read these instructions completely and carefully.
- IMPORTANT — Save these instructions for local inspector's use.
• IMPORTANT — Observe all governing codes and ordinances. - Note to Installer — Be sure to leave these instructions with the Consumer.
Note to Consumer — Keep these instructions for future reference.
Skill level - Installation of this appliance requires basic mechanical and electrical skills.
Proper installation is the responsibility of the installer.
Product failure due to improper installation is not covered under the Warranty.
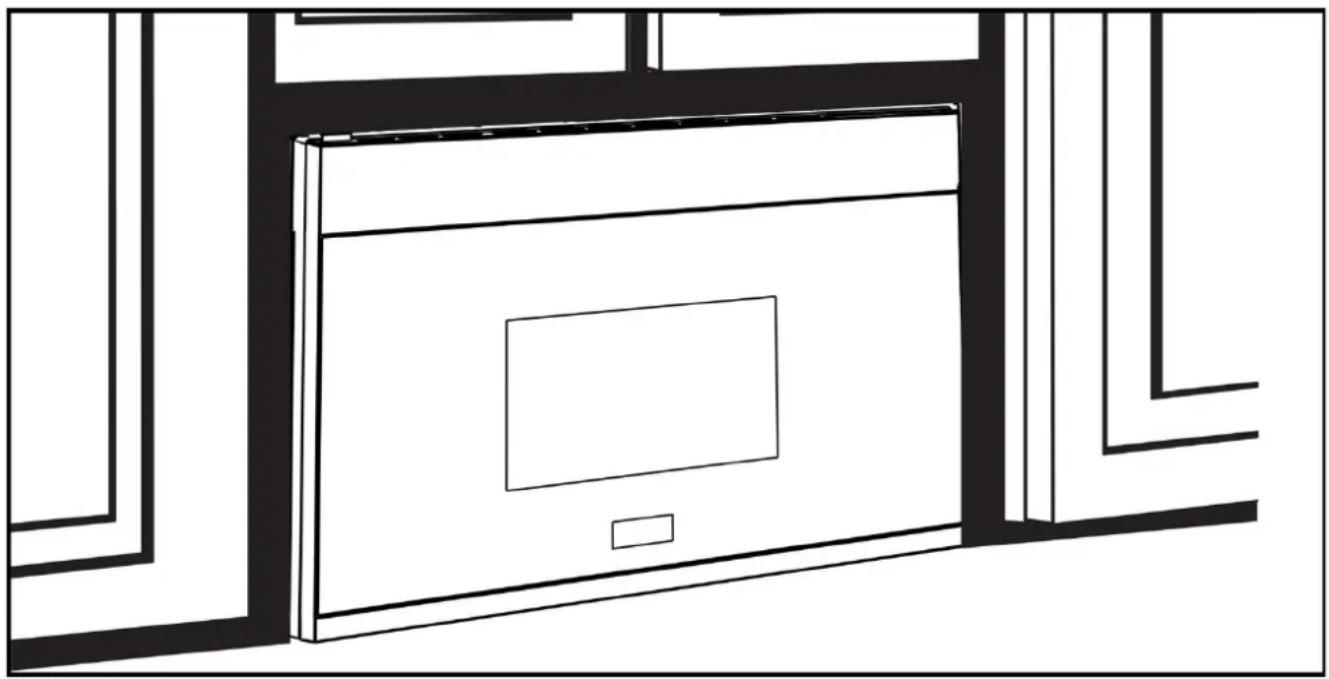
natural_image
Line drawing of a laptop computer monitor with a blank screen, placed on a desk with window frames (no text or symbols)READ CAREFULLY.
KEEP THESE INSTRUCTIONS.
CONTENTS
General information
Important Safety Instructions 23
Electrical Requirements 23
Damage - Shipment/Installation.... 24
Parts Included 24
Tools You Will Need 25
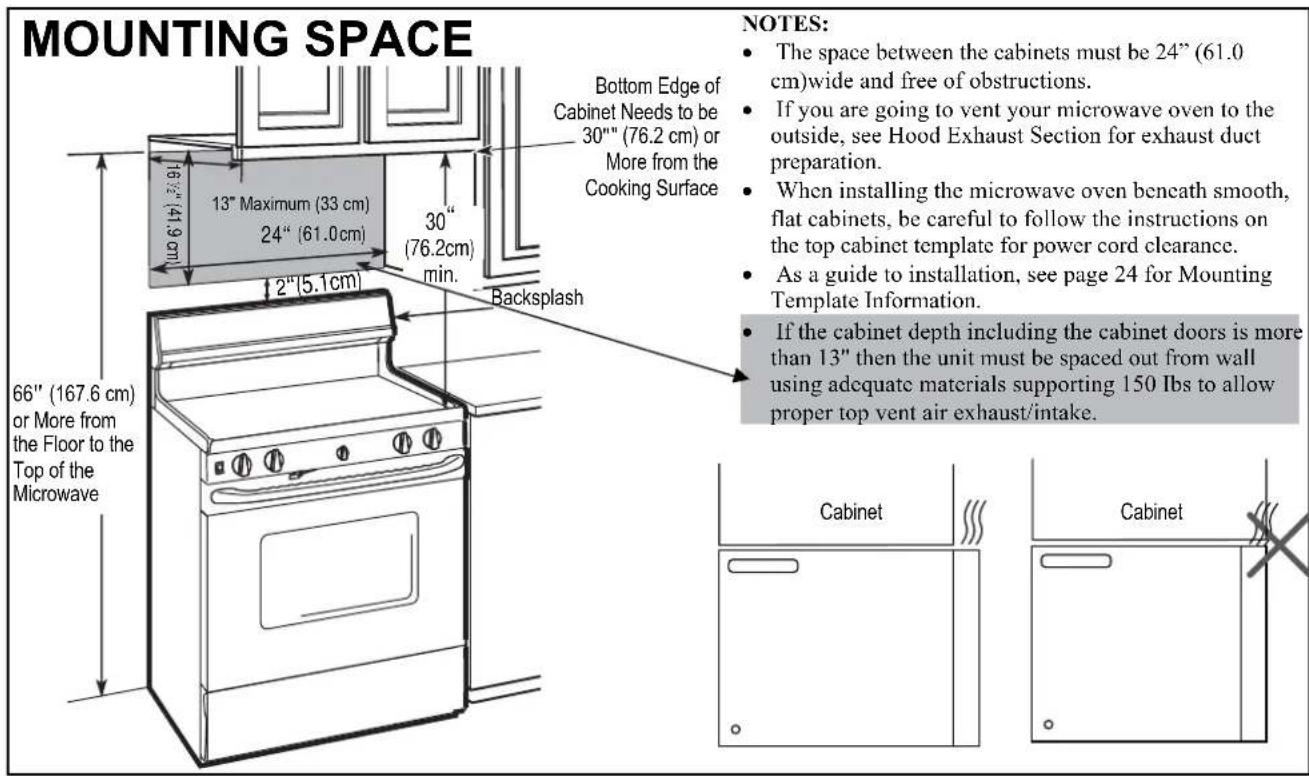
Mounting Space 25
Step-by-step installation guide
Placement of The Mounting Plate 26-28
Removing the Mounting Plate 26
Finding the Wall Studs.... 26
Determining Wall Plate Location 27
Aligning the Wall Plate 28
Installation Types.... 29-42
Hood Exhaust 30-31
A Outside Top Exhaust 32-35
Attach Mounting Plate to Wall 32
Preparation of Top Cabinet 32
Adapting Microwave Blower for
Outside top Exhaust 33-34
Checking for Proper Damper Operation 34
Mount the Microwave Oven 34-35
Adjust the Exhaust Adaptor 35
Connecting Ductwork.... 35
B Outside Back Exhaust.... 36-39
Preparing Rear Wall for Outside Back Exhaust... 36
Remove Blower Plate 36
Attach Mounting Plate to Wall 37
Preparation of Top Cabinet 37
Adapting Microwave Blower
for Outside Back Exhaust 37-38
Mount the Microwave Oven 39
C Recirculating 40-42
Attach Mounting Plate to Wall 32
Preparation of Top Cabinet.... 33
Check Blower Plate 41
Mount the Microwave Oven 41-42
Installing or Change the Charcoal Filter 42
Before You Use Your Microwave 44
Template Information 46
IMPORTANT SAFETY INSTRUCTIONS
This product requires a three-prong grounded outlet. The installer must perform a ground continuity check on the power outlet box before beginning the installation to ensure that the outlet box is properly grounded. If not properly grounded, or if the outlet box does not meet electrical requirements noted (under ELECTRICAL REQUIREMENTS), a qualified electrician should be employed to correct any deficiencies.
natural_image
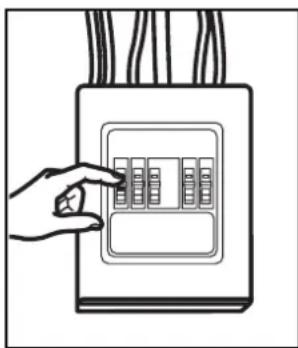
Illustration of a hand pointing at an electrical outlet with multiple switches (no text or symbols)CAUTION: For personal safety, remove house fuse or open circuit breaker before beginning installation to avoid severe or fatal shock injury.
CAUTION: For personal safety, the mounting surface must be capable of supporting the cabinet load, in addition to the added weight of this 63-85 pound (28.5-38.5 kg) product, plus additional oven loads of up to 50 pounds (22.7 kg) or a total weight of 113-135 pounds (51.3-61.2 kg).
CAUTION: For personal safety, this product cannot be installed in cabinet arrangements such as an island or a peninsula. It must be mounted to BOTH a top cabinet AND a wall.
NOTE: For easier installation and personal safety, it is recommended that two people install this product. IMPORTANT - PLEASE READ CAREFULLY. FOR PERSONAL SAFETY, THIS APPLIANCE MUST BE PROPERLY GROUNDED TO AVOID SEVERE OR FATAL SHOCK.
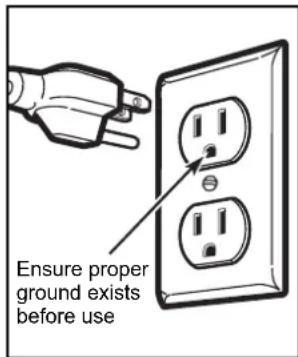
The power cord of this appliance is equipped with a three-prong (grounding) plug which mates with a standard three-prong (grounding) wall receptacle to minimize the possibility of electric shock hazard from this appliance.
You should have the wall receptacle and circuit checked by a qualified electrician to make sure the receptacle is properly grounded.
Where a standard two-prong wall receptacle is encountered, it is very important to have it replaced with a properly grounded three-prong wall receptacle, installed by a qualified electrician.
DO NOT, UNDER ANY CIRCUMSTANCES, CUT, DEFORM OR REMOVE ANY OF THE PRONGS FROM THE POWER CORD. DO NOT USE WITH AN EXTENSION CORD.
ELECTRICAL REQUIREMENTS
Product rating is 120 VAC, 60 Hz, 15 amps and 1.6 kilowatts. This product must be connected to a separate and dedicated supply circuit of the proper voltage and frequency. Wire size must conform to the requirements of the National Electrical Code or the prevailing local code for this kilowatt rating. The power supply cord and plug should be brought to a separate and dedicated 15- to 20- ampere branch circuit single grounded outlet. The outlet box should be located in the cabinet above the microwave oven. The outlier box and supply circuit should be installed by a qualified electrician and conform to the National Electrical Code or the prevailing local code.
DAMAGE—SHIPMENT/ INSTALLATION
- If the unit is damaged in shipment, return the unit to the store in which it was bought for repair or replacement.
- If the unit is damaged by the customer, repair or replacement is the responsibility of the customer.
- If the unit is damaged by the installer (if other than the customer), repair or replacement must be made by arrangement between customer and installer.
PARTS INCLUDED
HARDWARE PACKET
| PART | QUANTITY | |
 | Wood Screws (1/4" x 2") | 2 |
 | Toggle Bolts (and wing nuts) (3/16" x 3") | 2 |
 | Self-Aligning Machine Screws (1/4"-28 x 31/4") | 3 |
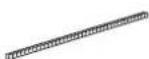 | Nylon Grommet (for metal cabinets) | 1 |
You will find the installation hardware contained in a packet with the unit. Check to make sure you have all these parts.
NOTE: Some extra parts are included.
PARTS INCLUDED (CONT.) ADDITIONAL PARTS
| PART | QUANTITY | |
 | Top Cabinet Template | 1 |
 | Rear Wall Template | 1 |
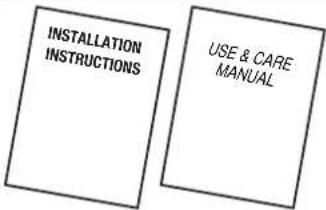 | Installation Instructions | 1 |
| Use & Care Manual | 1 | |
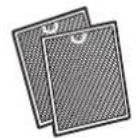 | Separately Packed Grease Filters | 2 |
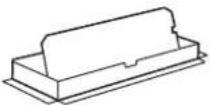 | Exhaust adaptor | 1 |
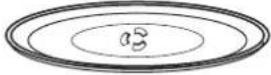 | Glass Tray 1 | |
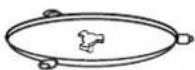 | Turntable Ring | 1 |
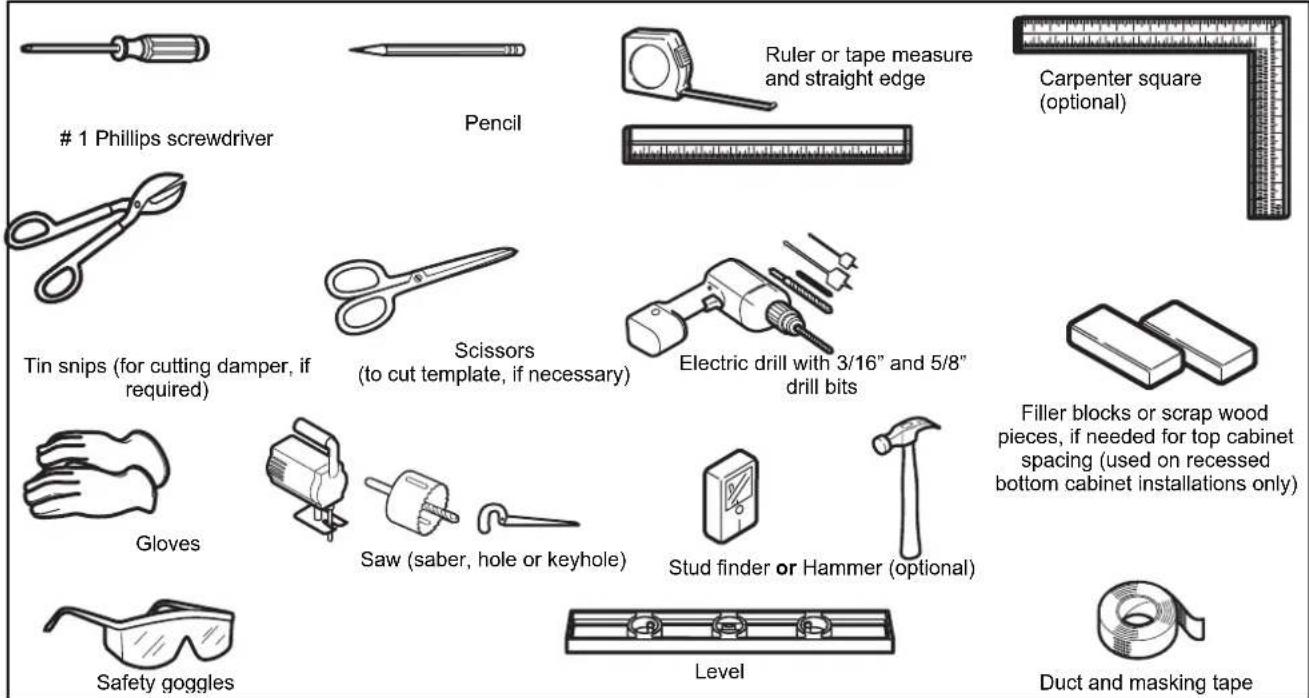
TOOLS YOU WILL NEED
1 PLACEMENT OF THE MOUNTING PLATE
A. REMOVING THE MICROWAVE OVEN FROM THE CARTON/REMOVING THE MOUNTING PLATE
1 Remove the installation instructions, use and care, exhaust adapter, turntable ring, shelf, filters, glass tray and the small hardware bag. Do not remove the Styrofoam protecting the front of the oven.
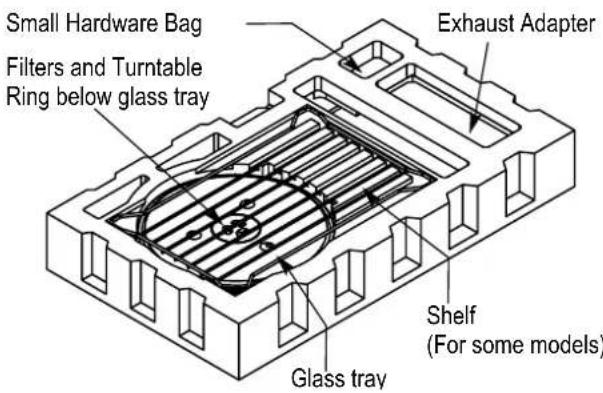
2 Fold back all 4 carton flaps fully against carton sides. Then carefully roll the oven and carton over onto the top side. The oven should be resting in the Styrofoam.

3 Pull the carton up and off the oven.
4 Cut the middle of the outer protective plastic bag to remove the mounting plate.
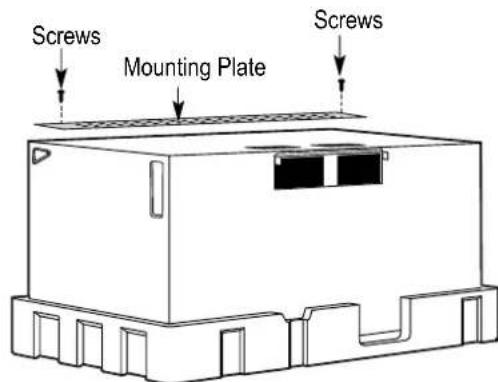
5 Remove the screws from each end of the mounting plate. This plate will be used as the rear wall template and for mounting. Reinstall the screws into the holes where they were removed.
B. FINDING THE WALL STUDS
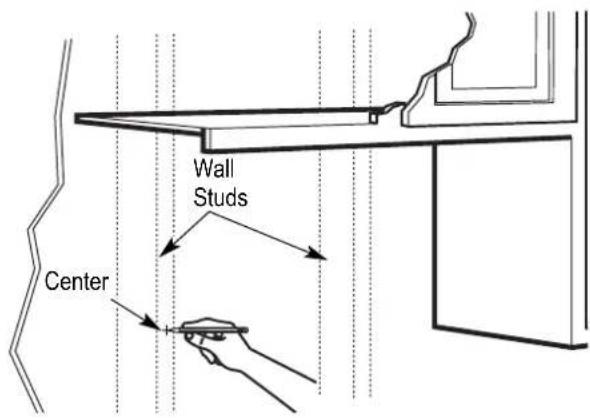
1 Find the studs, using one of the following methods:
A. Stud finder - a magnetic device which locates nails.
B. Use a hammer to tap lightly across the mounting surface to find a solid sound. This will indicate a stud location.
2 After locating the stud(s), find the center by probing the wall with a small nail to find the edges of the stud. Then place a mark halfway between the edges. The center of any adjacent studs should be 16" (40.6 cm) or 24" (61 cm) from this mark.
3 Draw a line down the center of the studs.
THE MICROWAVE MUST BE CONNECTED TO AT LEAST ONE WALL STUD.
C. DETERMINING WALL PLATE LOCATION UNDER YOUR CABINET
Plate position-beneath flat bottom cabinet
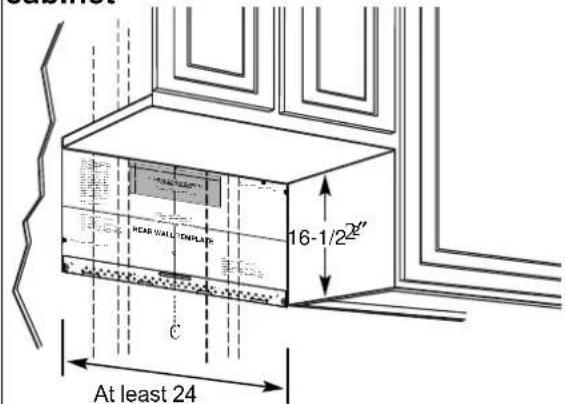
Draw a vertical line on the wall at the center of the 24" wide space.
Tape the Rear Wall Template onto the wall matching the centerline and touching the bottom of the cabinet.
Plate position-beneath framed recessed cabinet bottom
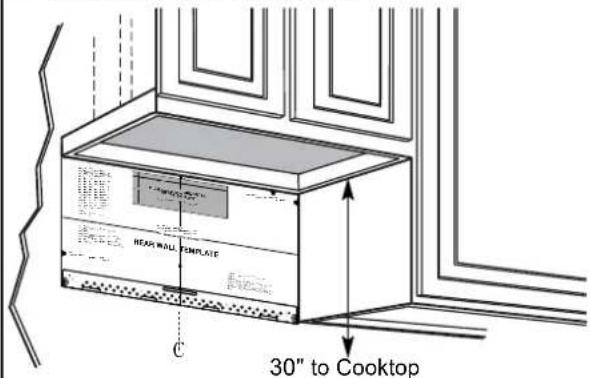
Draw a vertical line on the wall at the center of the 24"space.
Tape the Rear Wall Template onto the wall matching the centerline and touching the bottom cabinet frame.
Plate position-beneath recessed bottom cabinet with front overhang
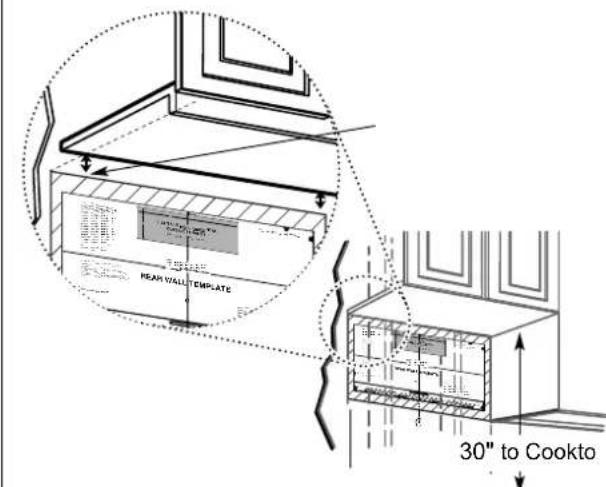
Draw a line on the back wall equal to the depth of the front overhang.
Your cabinets may have decorative trim that interferes with the microwave installation. Remove the decorative trim to install the microwave properly and to make it level.
Use a level to make sure the cabinet bottom is level.
If the cabinets have a front overhang only, with no back or side frame, install the mounting plate down the same distance as the front overhang depth. This will keep the microwave level.
1 Measure the inside depth of the front overhang.
2 Draw a horizontal line on the back wall an equal distance below the cabinet bottom as the inside depth of the front overhang.
3 For this type of installation with front overhang only, align the mounting tabs with this horizontal line, not touching the cabinet bottom as described in Step D.
D. ALIGNING THE WALL PLATE
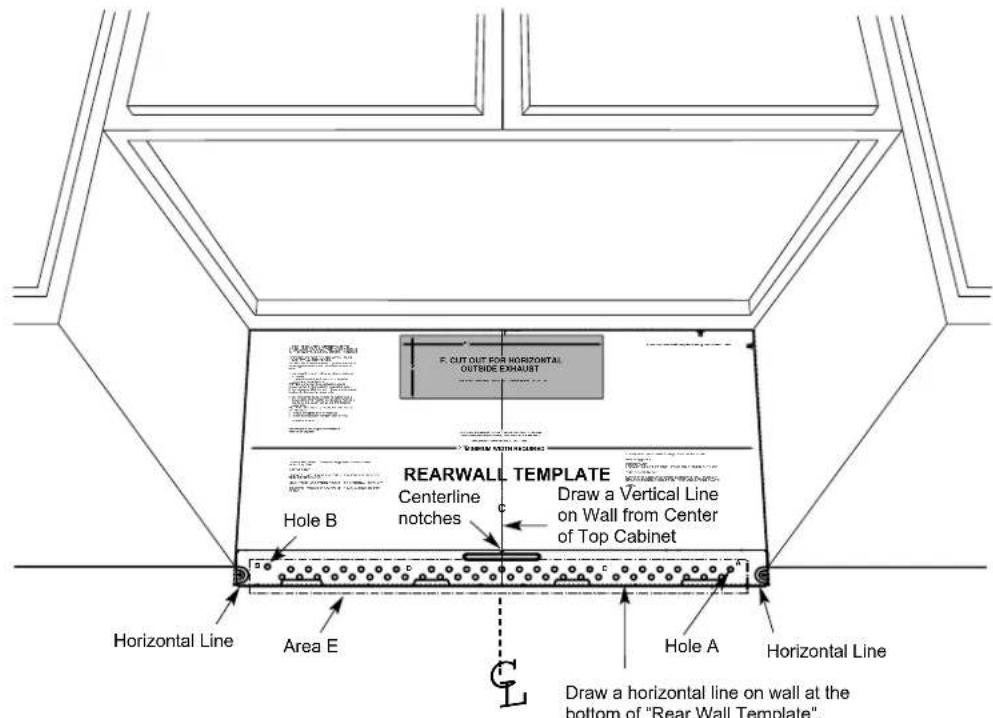
CAUTION: Wear gloves to avoid cutting fingers on sharp edges.
1 Draw a vertical line on the wall at the center of the 24" wide space.
2 Draw a horizontal line on the wall at the bottom of "Rear Wall Template".
3 Find a wall stud in area "E" of mounting plate Refer to section 1B. Finding the wall studs.
4 For attaching the mounting plate into stud drill a 3/16" hole into wood stud. Drill a 5/8" hole for toggle bolt in 1 other location (Hole A or Hole B) NOTE: DO NOT MOUNT THE PLATE AT THIS TIME.
NOTE: Holes A and B are inside area E. If neither of Holes A and B are not in a stud, find a stud somewhere in area E and draw a circle to line up with the stud. It is important to have at least one wood screw mounted firmly in a stud to support the weight of the microwave. Set the mounting plate aside.
2 INSTALLATION TYPES (Choose A, B or C)
This microwave oven is designed for adaptation to the following three types of ventilation:
A. Outside Top Exhaust (Vertical Duct)
B. Outside Back Exhaust (Horizontal Duct)
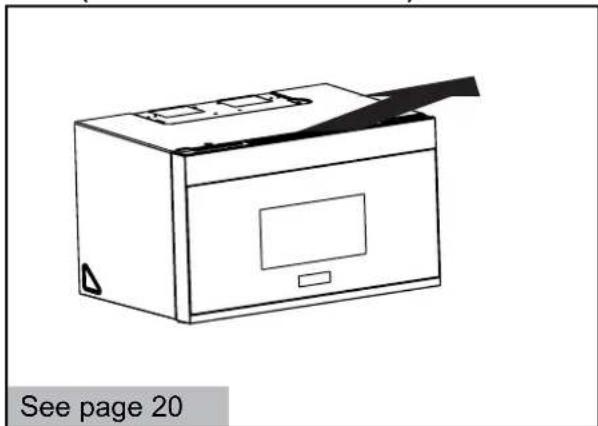
C. Recirculating (Non-Vented Ductless)
A OUTSIDE TOP EXHAUST (VERTICAL DUCT)
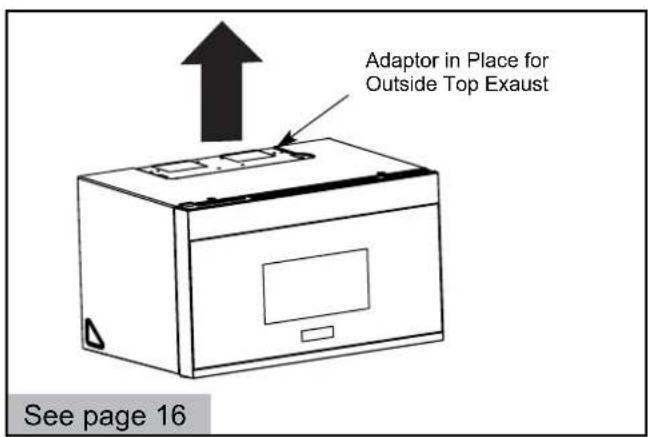
NOTE: This microwave is shipped assembled for Recirculating. Select the type of ventilation required for your installation and proceed to that section.
B OUTSIDE BACK EXHAUST (HORIZONTAL DUCT)
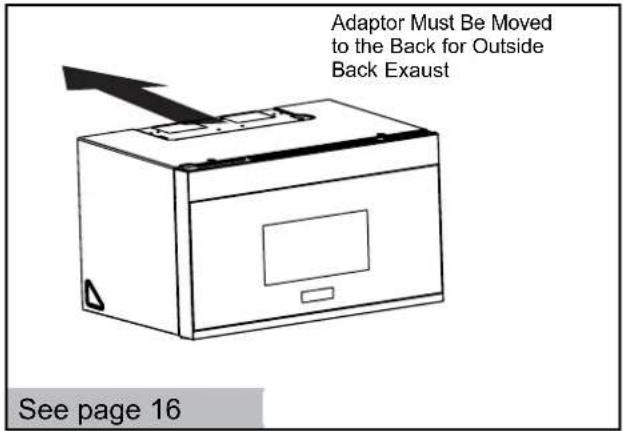
C RECIRCULATING (NON-VENTED DUCTLESS)
natural_image
Line drawing of a box with a lid and a paper airplane, labeled 'See page 20' (no other text or symbols)Models are shipped for recirculating exhaust. Some models have a disposable charcoal filter installed to help remove smoke and odors.
NOTE: Read the next two pages only if you plan to vent your exhaust to the outside. If you plan to recirculate the air back into the room, proceed to page 20.
INSTALLATION INSTRUCTIONS FOR EXTERNAL EXHAUST DUCTING
NOTE: If you need to install ducts, note that the total duct length of 31/4" x 10" (8.2 x 25.4 cm) rectangular or 5" (12.7 cm) diameter/6" (15.2 cm) diameter round duct should not exceed 120 equivalent feet (36.5 m).
Outside ventilation requires an EXTERNAL EXHAUST DUCT.
Read the following carefully.
NOTE: It is important that venting be installed using the most direct route and with as few elbows as possible. This ensures clear venting of exhaust and helps prevent blockages. Also, make sure dampers swing freely and nothing is blocking the ducts.
Exhaust connection:
The exhaust adaptor has been designed to mate with a standard 31/4" x 10" (8.2 x 25.4 cm) rectangular duct.
If a round duct is required, a rectangular-to-round transition adaptor must be used. A 5" (12.7cm)/6" (15.2cm) diameter duct is acceptable to use.
Maximum duct length:
For satisfactory air movement, the total duct length of 3W x 10" (8.2 x 25.4 cm) rectangular or 5" (12.7 cm) diameter/6" (15.2 cm) diameter round duct should not exceed 120 equivalent feet (36.5 m).
Elbows, transitions, wall and roof caps, etc., present additional resistance to airflow and are equivalent to a section of straight duct which is longer than their actual physical size.
When calculating the total duct length, add the equivalent lengths of all transitions and adaptors plus the length of all straight duct sections. The chart below shows you how to calculate total equivalent ductwork length using the approximate feet of equivalent length of some typical ducts.
| DUCT PIECES | EQUIVALENT LENGTH | x | NUMBER USED | = | EQUIVALENT LENGTH | |
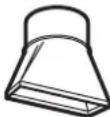 | Rectangular-to-Round Transition Adaptor* | 5 Ft. (1.5 m) | x | () | = | Ft. or m |
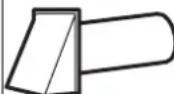 | Wall Cap | 40 Ft. (12.2 m) | x | () | = | Ft. or m |
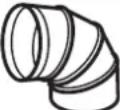 | 90° Elbow | 10 Ft. (3 m) | x | () | = | Ft. or m |
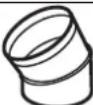 | 45° Elbow | 5 Ft. (1.5 m) | x | () | = | Ft. or m |
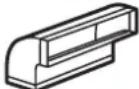 | 90° Elbow | 25 Ft. (7.6 m) | x | () | = | Ft. or m |
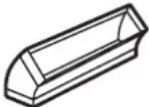 | 45° Elbow | 5 Ft. (1.5 m) | x | () | = | Ft. or m |
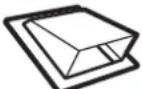 | Roof Cap | 24 Ft. (7.3 m) | x | () | = | Ft. or m |
| [7DH7] | Straight Duct 6" (15.2 cm) Round or 314" x 10" (8.2 x 25.4 cm Rectangular) | 1 Ft. (0.3 m) | x | () | = | Ft. or m |
| Total Ductwork = | Ft. or m | |||||
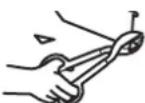
* IMPORTANT: If a rectangular-to-round transition adaptor is used, the bottom corners of the damper will have to be cut to fit, using the tin snips, in order to allow free movement of the damper.
Equivalent lengths of duct pieces are based on actual tests and reflect requirements for good venting performance with any vent hood.
EXTERNAL EXHAUST DUCTING
OUTSIDE TOP EXHAUST (EXAMPLE ONLY)
The following chart describes an example of one possible ductwork installation.
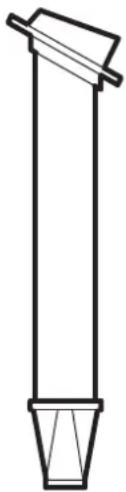
natural_image
Simple line drawing of a cylindrical object with a flanged top and base (no text or symbols)| DUCT PIECES | EQUIVALENT LENGTH x NUMBER USED = | EQUIVALENT LENGTH | ||||
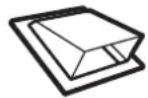 | Roof Cap | 24 Ft. (7.3 m) | x | (1) | = | 24 Ft. (7.3 m) |
| 12 Ft. (3.6 m) Straight Duct (6"/15.2 cm Round) | 12 Ft. (3.6 m) | x | (1) | = | 12 Ft. (3.6 m) | |
| Rectangular-to-Round Transition Adaptor* | 5 Ft. (1.5 m) | x | (1) | = | 5 Ft. (1.5 m) | |
| Equivalent lengths of duct pieces are based on actual tests and reflect requirements for good venting performance with any vent hood. | Total Length = | 41 Ft. (12.5 m) | ||||
* IMPORTANT: If a rectangular-to-round transition adaptor is used, the bottom corners of the damper will have to be cut to fit, using the tin snips, in order to allow free movement of the damper.
OUTSIDE BACK EXHAUST (EXAMPLE ONLY)
The following chart describes an example of one possible ductwork installation.
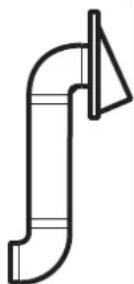
| DUCT PIECES | EQUIVALENT LENGTH x NUMBER USED = | EQUIVALENT LENGTH | ||||
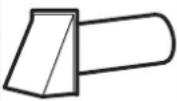 | Wall Cap | 40 Ft. (12.2 m) | x | (1) | = | 40 Ft. (12.2 m) |
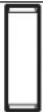 | 3 Ft. Straight Duct (31/4" x 10"/8.2 x 25.4 cm Rectangular) | 3 Ft. (0.9 m) | x | (1) | = | 3 Ft. (0.9 m) |
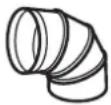 | 90° Elbow | 10 Ft. (3 m) | x | (2) | = | 20 Ft. (3 m) |
| Equivalent lengths of duct pieces are based on actual tests and reflect requirements for good venting performance with any vent hood. | Total Length = | 63 Ft. (19.2 m) | ||||
NOTE: For back exhaust, care should be taken to align exhaust with space between studs, or wall should be prepared at the time it is constructed by leaving enough space between the wall studs to accommodate exhaust.
A OUTSIDE TOP EXHAUST (Vertical Duct)
INSTALLATION OVERVIEW
A1. Attach Mounting Plate to Wall A2. Prepare Top Cabinet
A3. Adapting Microwave Blower for Outside Top Exhaust
A4. Check Damper Operation
A5. Mount Microwave Oven A6. Adjust Exhaust Adaptor A7. Connect Ductwork IMPORTANT NOTES:
- Make sure the screws for the blower motor and blower plate are securely tightened when they are reinstalled. This will help to prevent excessive vibration.
• Make sure the motor wiring has been properly routed and secured, and that the wires are not pinched.
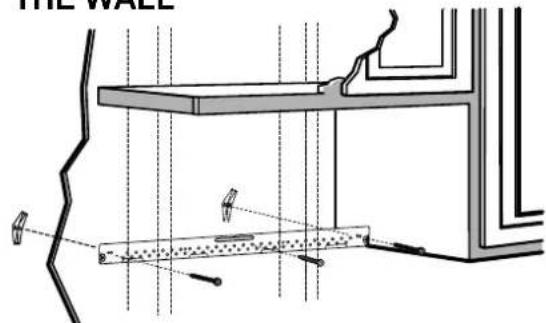
A1. ATTACH THE MOUNTING PLATE TO THE WALL
natural_image
Technical line drawing of a wall assembly with structural components and alignment indicators (no text or symbols)Attach the plate to the wall using toggle bolts. At least one wood screw must be used to attach the plate to a wall stud.
1 Remove the toggle wings from the bolts.
2 Insert the bolts into the mounting plate through the holes designated to go into drywall and reattach the toggle wings to 34 " (19 mm) onto each bolt.
To use toggle bolts:
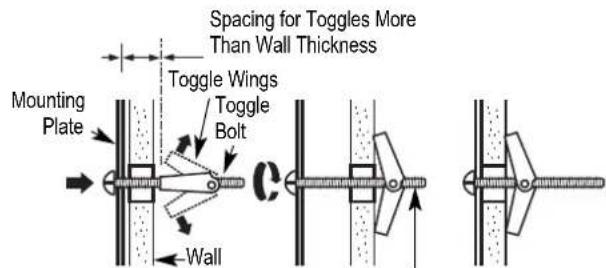
Bolt End
3 Place the mounting plate against the wall and insert the toggle wings into the holes in the wall to mount the plate.
NOTE: Before tightening toggle bolts and wood screw, make sure the bottom of the mounting plate touch the bottom of the cabinet when pushed flush against the wall and that the plate is properly centered under the cabinet.
CAUTION: Be careful to avoid pinching fingers between the back of the mounting plate and the wall.
4 Tighten all bolts. Pull the plate away from the wall to help tighten the bolts.
A2. USE TOP CABINET TEMPLATE FOR PREPARATION OF TOP CABINET
You need to drill holes for the top support screws, a hole large enough for the power cord to fit through, and a cutout large enough for the exhaust adaptor.
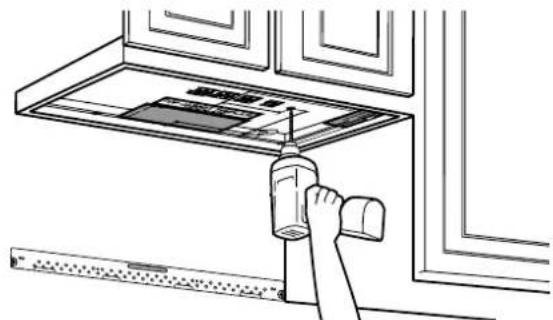
natural_image
Line drawing of a hand cleaning a wall-mounted device with a handle (no text or symbols)- Read the instructions on the TOP CABINET TEMPLATE.
- Tape it underneath the top cabinet.
- Drill the holes, following the instructions on the TOP CABINET TEMPLATE.
CAUTION: Wear safety goggles when drilling holes in the cabinet bottom.
A3. ADAPTING MICROWAVE BLOWER FOR OUTSIDE TOP EXHAUST
1 Place the microwave in its upright position, with the top of the unit facing up.
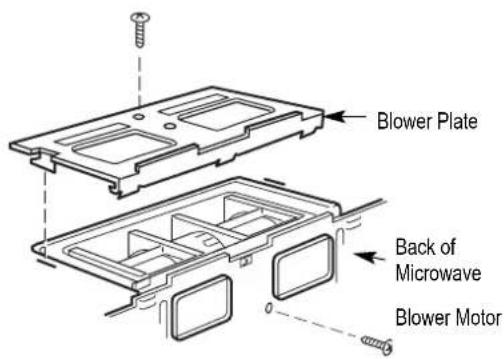
Remove the screw that holds the blower plate to the microwave. Remove and save the screw holding the blower motor to the microwave.
2 Carefully pull out the blower unit. The wires will extend far enough to allow you to adjust the blower unit.
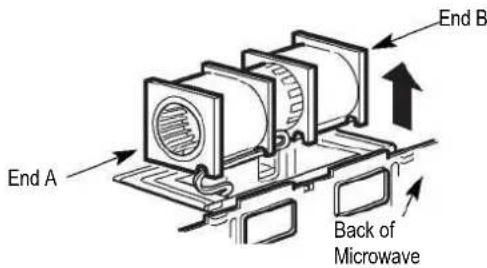
3 Roll the blower unit 90° so that fan blade openings are facing out the top of the microwave.
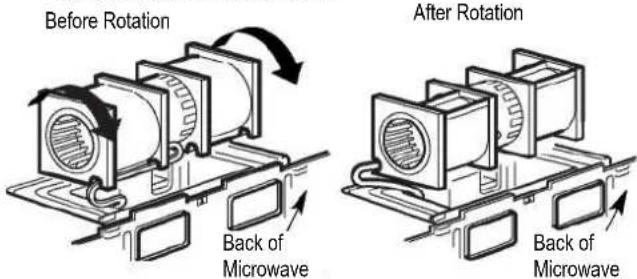
4 Place the blower unit back into the opening.
AFTER: Fan Blade Openings Facing Top
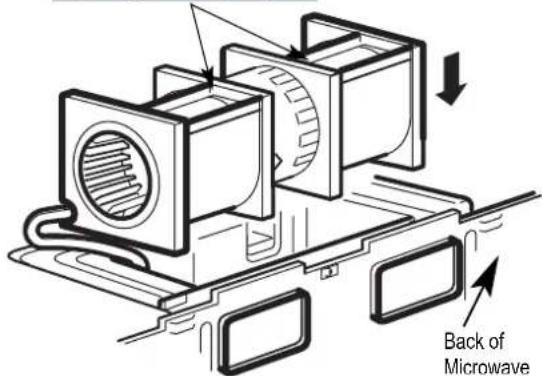
CAUTION: Do not pull or stretch the blower unit wiring. Make sure the wires are not pinched, and that they are properly secured.
A3. ADAPTING MICROWAVE BLOWER FOR OUTSIDE TOP EXHAUST
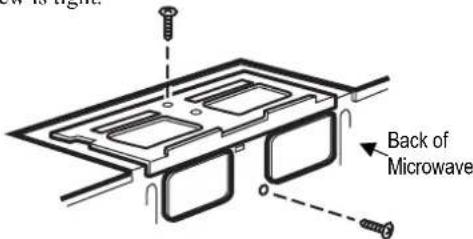
5 Secure blower unit to microwave with the screw removed in Step 1. Make sure the screw is tight.
6 Replace blower plate with the screw removed in Step 1. Make sure the screw is tight.
7 Attach the exhaust adaptor to the top of the blower plate by sliding it into the guides of the blower plate.
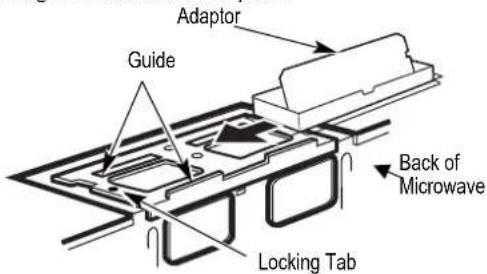
Push in securely until it is in the locking tabs. Take care to assure that the damper hinge is installed so that the damper swings freely.
- Make sure tape securing damper is removed and damper pivots easily before mounting microwave.
- You will need to make adjustments to assure proper alignment with your house exhaust duct after the microwave is installed.
natural_image
Three-panel line drawing showing people handling boxes and exchanging items, with no visible text or symbols.FOR EASIER INSTALLATION AND PERSONAL SAFETY, WE RECOMMEND THAT TWO PEOPLE INSTALL THIS MICROWAVE OVEN.
IMPORTANT: Do not grip or use the handle or heat shield during installation. Do not remove the cardboard spacers between the heat shield and door.
NOTE: If your cabinet is metal, use the nylon grommet around the power cord hole to prevent cutting of the cord.
NOTE: We recommend using filler blocks if the cabinet front hangs below the cabinet bottom shelf.
IMPORTANT: If filler blocks are not used, case damage may occur from overtightening screws.
NOTE: When mounting the microwave oven, thread power cord through hole in bottom of top cabinet. Keep it tight throughout Steps 1-3. Do not pinch cord or lift over by pulling cord.
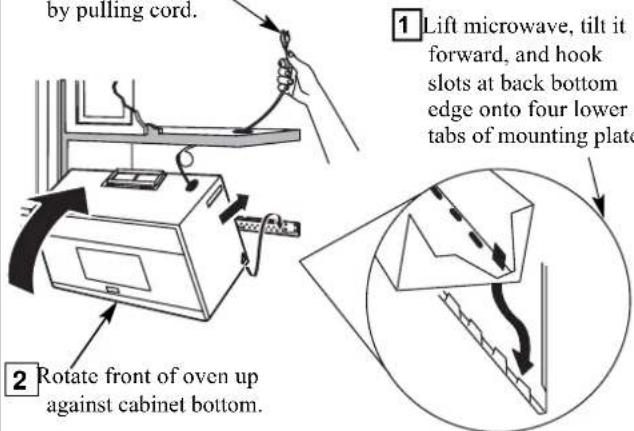
3 Insert a self-aligning screw through top center cabinet hole. Temporarily secure the oven by turning the screw at least two full turns after the threads have engaged. (It will be completely tightened later.) Be sure to keep power cord tight. Be careful not to pinch the cord, especially when mounting flush to bottom of cabinet.
4 Attach the microwave oven to the top cabinet.
5 Insert 2 self-aligning screws through outer top cabinet holes. Turn two full turns on each screw.
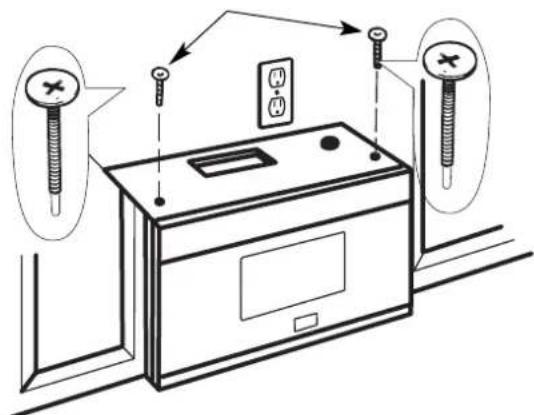
6 Tighten the outer two screws to the top of the microwave oven. (While tightening screws, hold the microwave oven in place against the wall and the top cabinet.)
natural_image
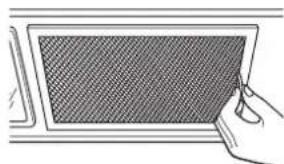
Illustration of a hand holding a rectangular device with a textured screen (no text or symbols visible)7 Install grease filters. See the Use and Care packed with the microwave.
A6. ADJUST THE EXHAUST ADAPTOR
Open the top cabinet and adjust the exhaust adaptor to connect to the house duct.
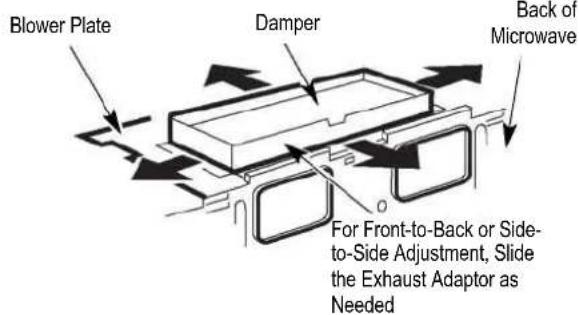
A7. CONNECTING DUCTWORK
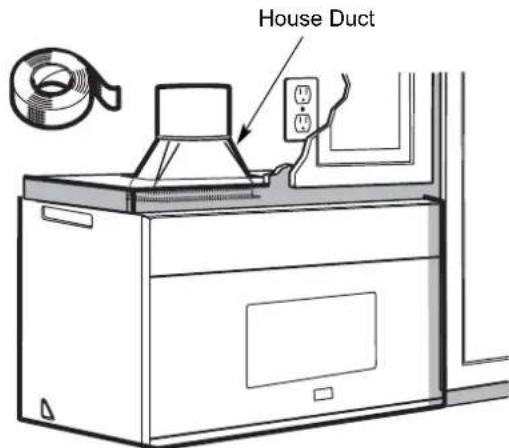
1 Extend the house duct down to connect to the exhaust adaptor.
2 Seal exhaust duct joints using furnace duct tape for high temperature applications.
B OUTSIDE BACK EXHAUST (Horizontal Duct)
INSTALLATION OVERVIEW
B1. Prepare Rear Wall
B2. Remove Blower Plate
B3. Attach Mounting Plate to Wall
B4. Prepare Top Cabinet
B5. Adjust Blower
B6. Mount the Microwave Oven
IMPORTANT NOTES:
- Make sure the screws for the blower motor and blower plate are securely tightened when they are reinstalled. This will help to prevent excessive vibration.
• Make sure the motor wiring has been properly routed and secured, and that the wires are not pinched.
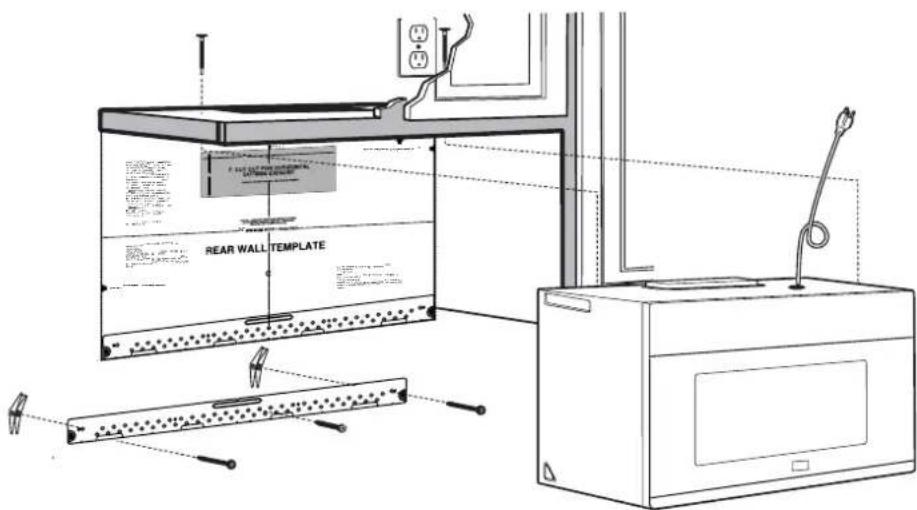
B1. PREPARING THE REAR WALL FOR OUTSIDE BACK EXHAUST
You need to cut an opening in the rear wall for outside exhaust.
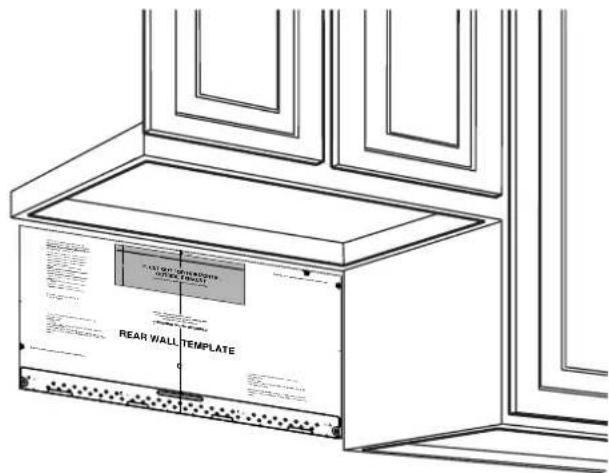
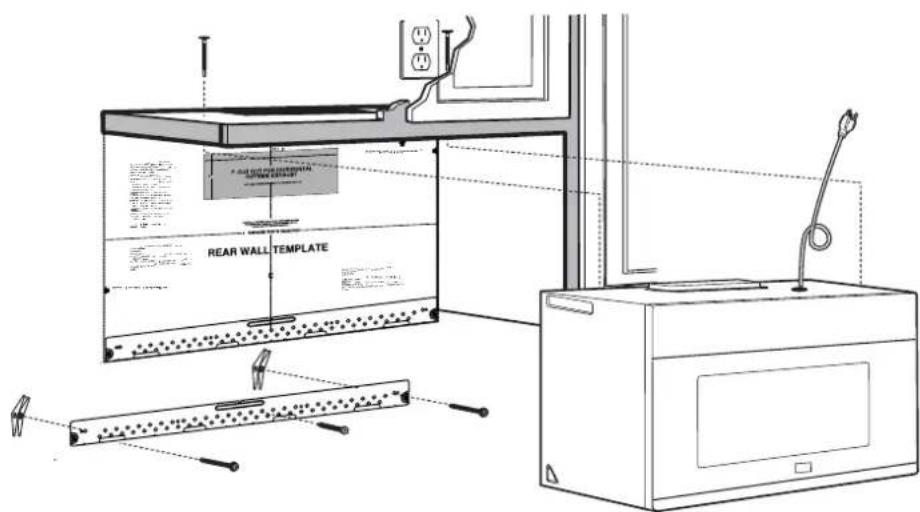
Read the instructions on the REAR WALL TEMPLATE.
- Tape it to the rear wall.
- Cut the opening, following the instructions of the REAR WALL TEMPLATE.
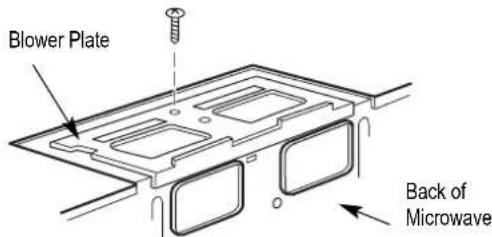
B2. REMOVE BLOWER PLATE
Remove and save the screw that holds the blower plate to the microwave. Lift off the blower plate.
B3. ATTACH THE MOUNTING PLATE TO THE WALL
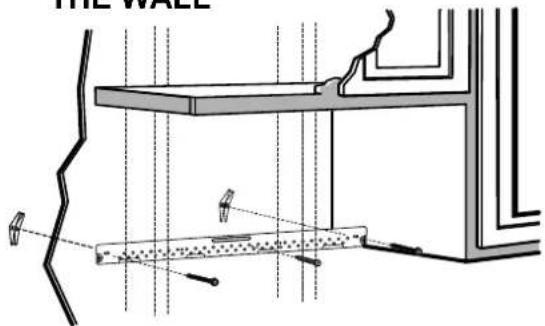
Attach the plate to the wall using toggle bolts.
At least one wood screw must be used to attach the plate to a wall stud.
1 Remove the toggle wings from the bolts.
2 Insert the bolts into the mounting plate through the holes designated to go into drywall and reattach the toggle wings to 34 " (19 mm) onto each bolt.
To use toggle bolts:
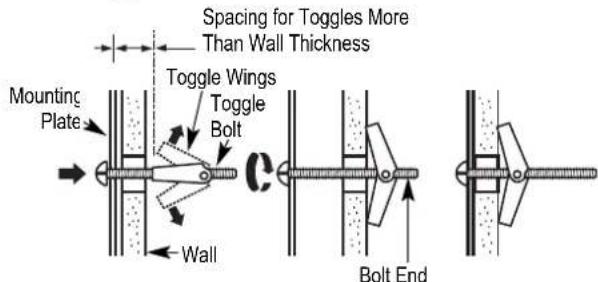
3 Place the mounting plate against the wall and insert the toggle wings into the holes in the wall to mount the plate.
NOTE: Before tightening toggle bolts and wood screw, make sure the bottom of the mounting plate touch the bottom of the cabinet when pushed flush against the wall and that the plate is properly centered under the cabinet.
CAUTION: Be careful to avoid pinching fingers between the back of the mounting plate and the wall.
4 Tighten all bolts. Pull the plate away from the wall to help tighten the bolts.
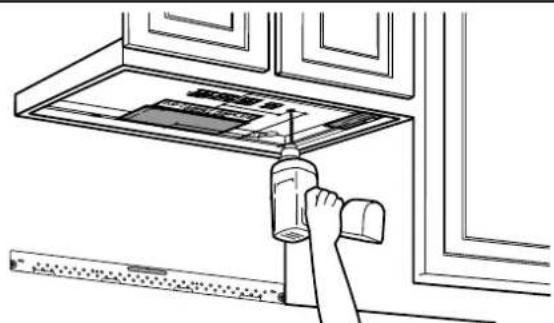
B4. USE TOP CABINET TEMPLATE FOR PREPARATION OF TOP CABINET
You need to drill holes for the top support screws and a hole large enough for the power cord to fit through.
natural_image
Line drawing of a hand using a tool to press or install a device on a wall-mounted device (no text or symbols visible)- Read the instructions on the TOP CABINET TEMPLATE.
- Tape it underneath the top cabinet.
- Drill the holes, following the instructions on the TOP CABINET TEMPLATE.
CAUTION: Wear safety goggles when drilling holes in the cabinet bottom.
B5. ADAPTING MICROWAVE BLOWER FOR OUTSIDE BACK EXHAUST
1 Remove and save screw that holds blower motor to microwave.
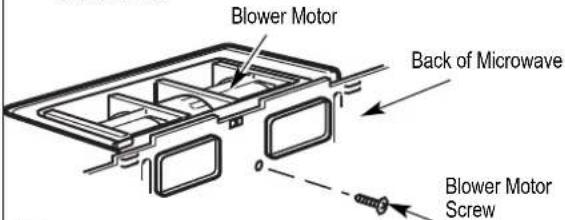
2 Carefully pull out the blower unit. The wires will extend far enough to allow you to adjust the blower unit.
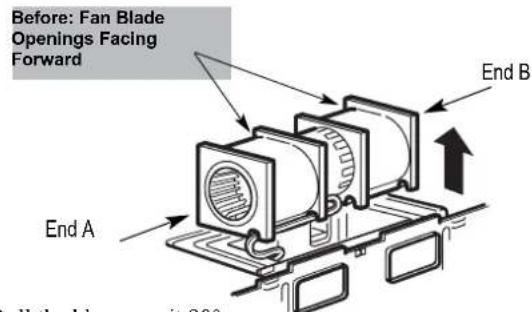
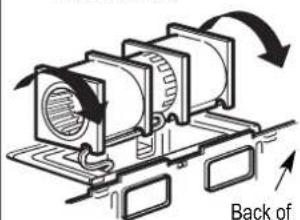
3 Roll the blower unit 90°
Before Rotation
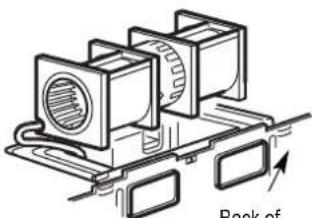
After Rotation
Back of Microwave
natural_image
Technical diagram of a mechanical component with labeled 'Back of' (no readable text or symbols beyond label)Back of Microwave
4 Rotate blower unit counterclockwise 180°.
8 Place the blower unit back into the opening.
After Rotation
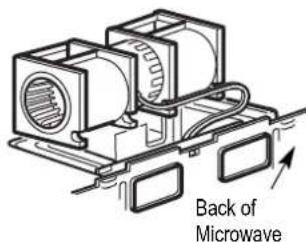
5 Gently remove the wires from the grooves.
Reroute the wires through grooves on other side of the blower unit.
Before Rerouting
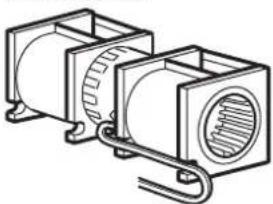
natural_image
Technical line drawing of two rectangular electronic components with internal circuitry and mounting brackets (no text or symbols)After Rerouting
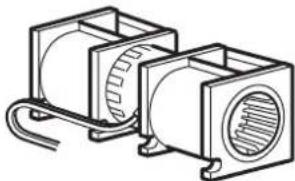
natural_image
Technical line drawing of two cylindrical electronic components with visible wiring (no text or symbols)Wires Routed Through Right Side
Wires Routed Through Left Side
6 Roll the blower unit 90° so that fan blade openings are facing out the back of the microwave.
Before Rolling
After Rolling
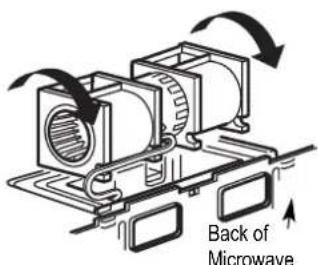
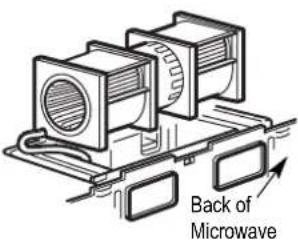
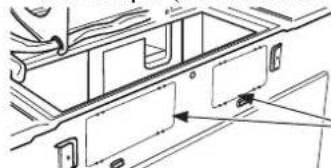
7 Remove the knockout plates in the back of the unit with snips. (For some models)
natural_image
Technical line drawing of a vehicle chassis frame with mounting brackets and structural details (no text or symbols)Back of Microwave
Snip all 4 webs on each knockout panel and remove the metal knockouts for rear airflow. Please take care to remove any sharp edges created from removing the knockout plates.
AFTER: Fan Blade Openings Facing Back
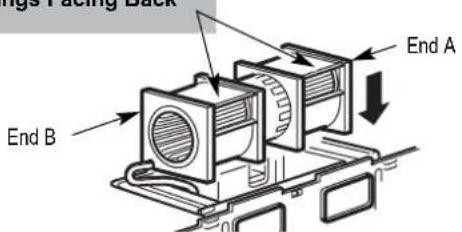
CAUTION: Do not pull or stretch the blower unit wiring. Make sure the wires are not pinched, and that they are properly secured.
NOTE: The blower unit exhaust openings should match exhaust openings on rear of microwave oven.
9 Secure the blower unit to the microwave with the original screw.
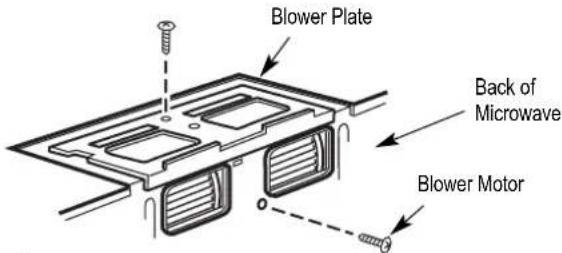
10 Replace the blower plate in the same position as before with the screw. Make sure the screw is tight.
11 Attach the exhaust adaptor to the rear of the oven by sliding it into the guides at the top center of the back of the oven.
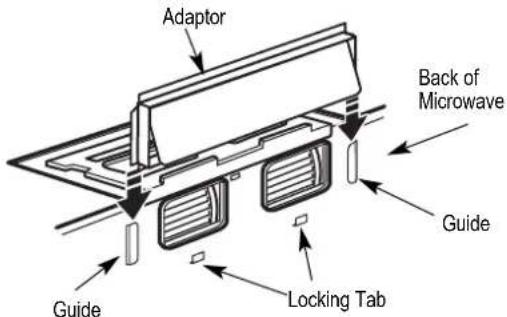
Push in securely until it is in the lower locking tabs. Take care to assure that the damper hinge is installed so that it is at the top and that the damper swings freely.
natural_image
Three line drawings showing people handling boxes, crossed by a black X (no text or symbols)FOR EASIER INSTALLATION AND PERSONAL SAFETY, WE RECOMMEND THAT TWO PEOPLE INSTALL THIS MICROWAVE OVEN.
IMPORTANT: Do not grip or use the handle or heat shield during installation. Do not remove the cardboard spacers between the heat shield and door.
NOTE: If your cabinet is metal, use the nylon grommet around the power cord hole to prevent cutting of the cord.
NOTE: We recommend using filler blocks if the cabinet front hangs below the cabinet bottom shelf.
IMPORTANT: If filler blocks are not used, case damage may occur from overtightening screws.
NOTE: When mounting the microwave oven, thread power cord through hole in bottom of top cabinet. Keep it tight throughout Steps 1-3. Do not pinch cord or lift oven by pulling cord.
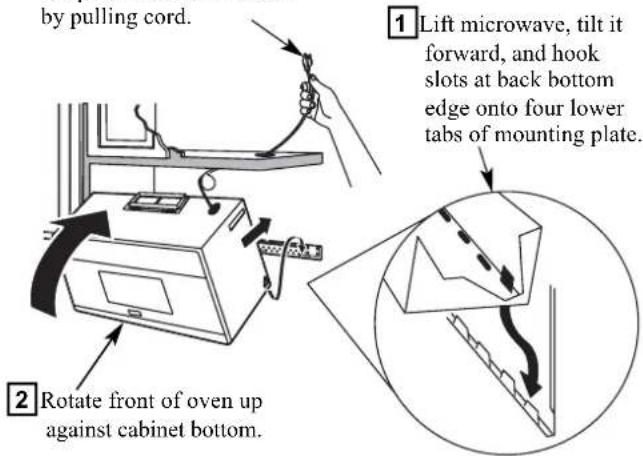
2 Rotate front of oven up against cabinet bottom.
3 Insert a self-aligning screw through top center cabinet hole. Temporarily secure the oven by turning the screw at least two full turns after the threads have engaged. (It will be completely tightened later.) Be sure to keep power cord tight. Be careful not to pinch the cord, especially when mounting flush to bottom of cabinet.
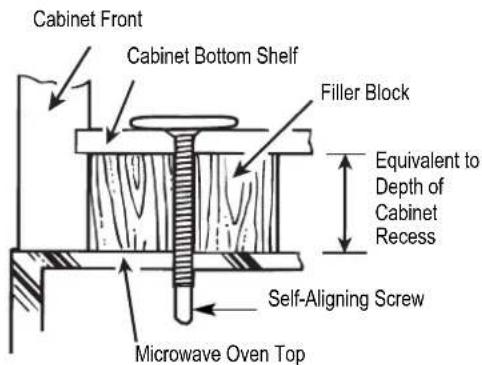
4 Attach the microwave oven to the top cabinet.
5 Insert 2 self-aligning screws through outer top cabinet holes. Turn two full turns on each screw.
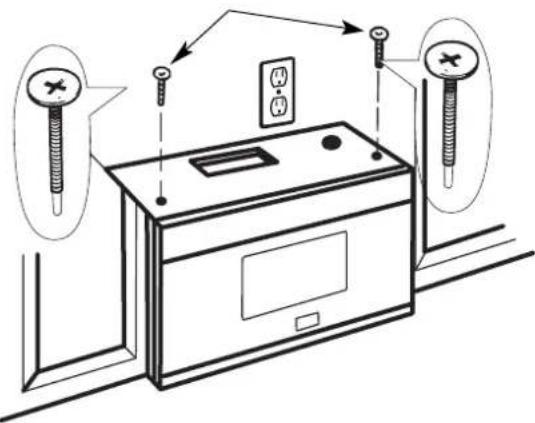
6 Tighten the outer two screws to the top of the microwave oven. (While tightening screws, hold the microwave oven in place against the wall and the top cabinet.)
natural_image
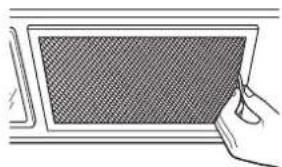
Line drawing of a hand holding a grid-patterned rectangular object on a flat surface (no text or symbols)7 Install grease filters. See the Use and Care packed with the microwave.
INSTALLATION OVERVIEW
C1. Attach Mounting Plate to Wall
C2. Prepare Top Cabinet
C3. Check Blower Plate
C4. Mount the Microwave Oven
C5. Install or change Charcoal Filter
IMPORTANT NOTES:
- Make sure the screws for the blower motor and blower plate are securely tightened when they are reinstalled. This will help to prevent excessive vibration.
• Make sure the motor wiring has been properly routed and secured, and that the wires are not pinched.
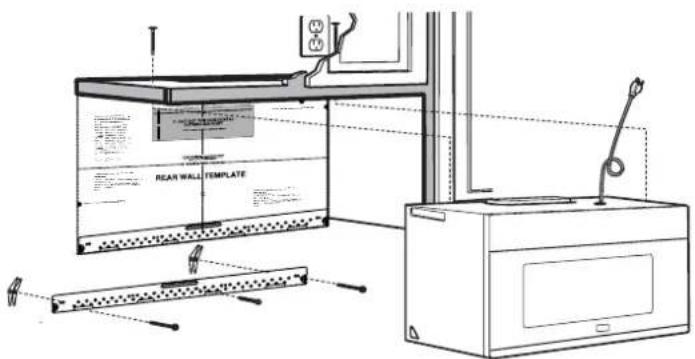
C1. ATTACH THE MOUNTING PLATE TO THE WALL
natural_image
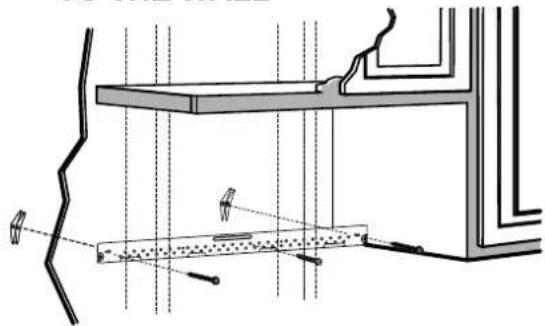
Technical line drawing of a structural assembly with beams, supports, and a floor (no text or symbols)Attach the plate to the wall using toggle bolts. At least one wood screw must be used to attach the plate to a wall stud.
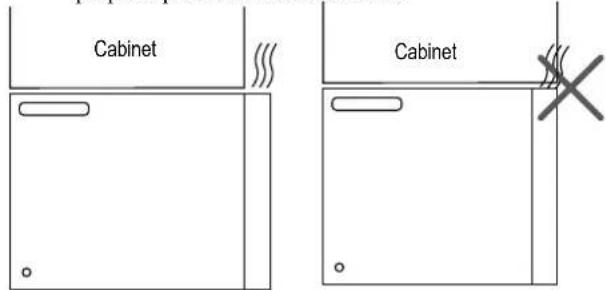
NOTE: If the cabinet depth including the cabinet doors is more than 13"" then the unit must be spaced out from wall using adequate materials supporting 150 lbs to allow proper top vent air exhaust/intake.
1 Remove the toggle wings from the bolts.
2 Insert the bolts into the mounting plate through the holes designated to go into drywall and reattach the toggle wings to 34 " (19 mm) onto each bolt.
To use toggle bolts:
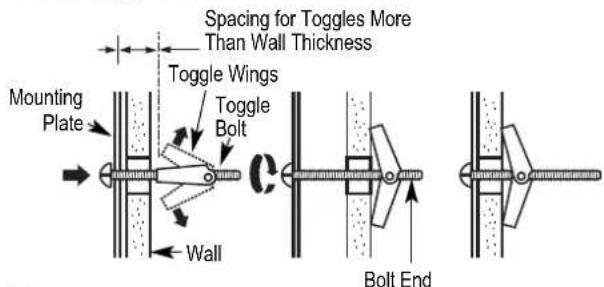
3 Place the mounting plate against the wall and insert the toggle wings into the holes in the wall to mount the plate.
NOTE: Before tightening toggle bolts and wood screw, make sure the bottom of the mounting plate touch the bottom of the cabinet when pushed flush against the wall and that the plate is properly centered under the cabinet.
CAUTION: Be careful to avoid pinching fingers between the back of the mounting plate and the wall.
4 Tighten all bolts. Pull the plate away from the wall to help tighten the bolts.
C RECIRCULATING (Non-Vented Ductless)
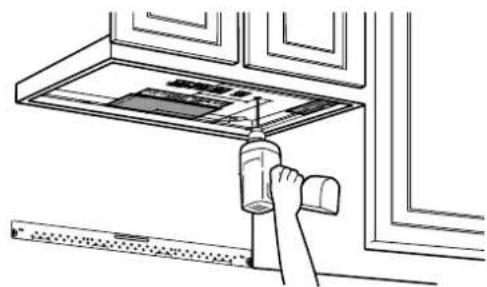
C2. USE TOP CABINET TEMPLATE FOR PREPARATION OF TOP CABINET
You need to drill holes for the top support screws and a hole large enough for the power cord to fit through.
natural_image
Line drawing of a hand using a spray gun to clean or store items on a kitchen counter (no text or symbols)- Read the instructions on the TOP CABINET TEMPLATE.
- Tape it underneath the top cabinet.
NOTE: Adjust top template accordingly if the microwave is being spaced out from the wall due to cabinet depth (including cabinet doors) of more than 13". - Drill the holes, following the instructions on the TOP CABINET TEMPLATE.
CAUTION: Wear safety goggles when drilling holes in the cabinet bottom.
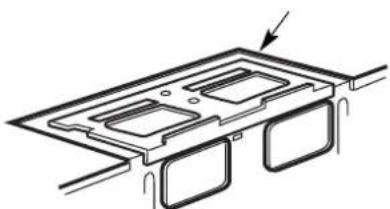
C3. CHECK BLOWER PLATE
Blower Plate
natural_image
Technical line drawing of a mechanical component with mounting holes and a directional arrow (no text or symbols)- Place the microwave in its upright position, with the top of the unit facing up.
- Check to see that the blower plate is correctly installed on the unit.
natural_image
Illustration of three scenes showing people handling boxes and passing through a doorway (no text or symbols)FOR EASIER INSTALLATION AND PERSONAL SAFETY, WE RECOMMEND THAT TWO PEOPLE INSTALL THIS MICROWAVE OVEN.
IMPORTANT: Do not grip or use the handle or heat shield during installation. Do not remove the cardboard spacers between the heat shield and door.
NOTE: If your cabinet is metal, use the nylon grommet around the power cord hole to prevent cutting of the cord.
NOTE: We recommend using filler blocks if the cabinet front hangs below the cabinet bottom shelf.
IMPORTANT: If filler blocks are not used, case damage may occur from overtightening screws.
NOTE: When mounting the microwave oven, thread power cord through hole in bottom of top cabinet. Keep it tight throughout Steps 1-3. Do not pinch cord or lift oven by pulling cord.
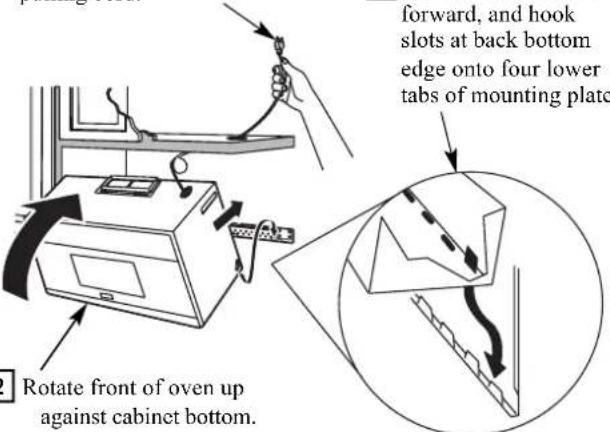
2 Rotate front of oven up against cabinet bottom.
3 Insert a self-aligning screw through top center cabinet hole. Temporarily secure the oven by turning the screw at least two full turns after the threads have engaged. (It will be completely tightened later.) Be sure to keep power cord tight. Be careful not to pinch the cord, especially when mounting flush to bottom of cabinet.
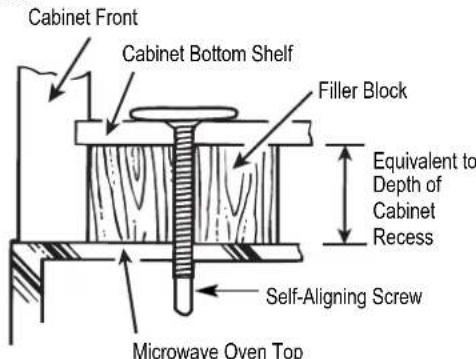
4 Attach the microwave oven to the top cabinet.
5 Insert 2 self-aligning screws through outer top cabinet holes. Turn two full turns on each screw.
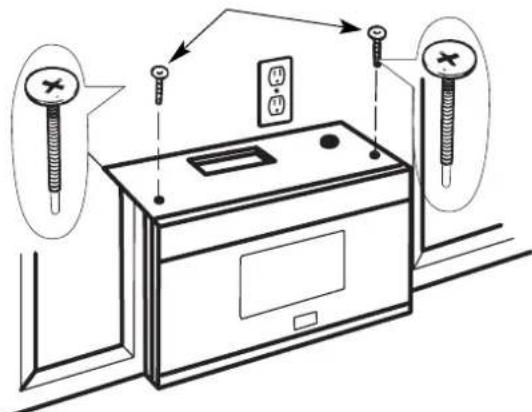
6 Tighten the outer two screws to the top of the microwave oven. (While tightening screws, hold the microwave oven in place against the wall and the top cabinet.)
natural_image
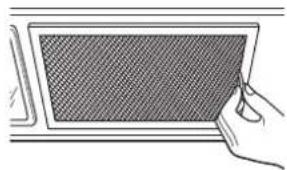
Hand holding a grid-patterned rectangular object on a flat surface (no text or symbols visible)7 Install grease filters. See the Use and Care packed with the microwave.
C5. INSTALLING OR CHANGE THE CHARCOAL FILTER (Some Models)
NOTE: The charcoal filter is factory installed in some models. Refer to the Use and Care to see if yours is factory installed and for replacement information.
For models without the recirculation filter access door, follow these steps to replace or install a charcoal filter.
1 Unplug microwave oven or disconnect power.
2 Open the microwave door and remove the two vent mounting screws located on top of the microwave using a #1 Phillips screwdriver.
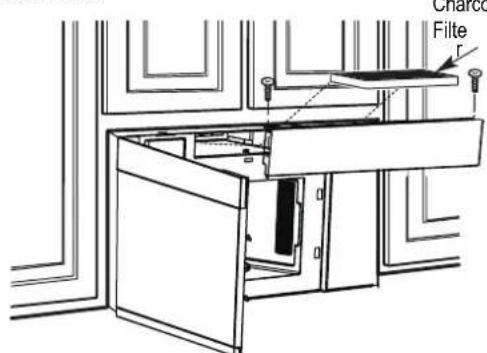
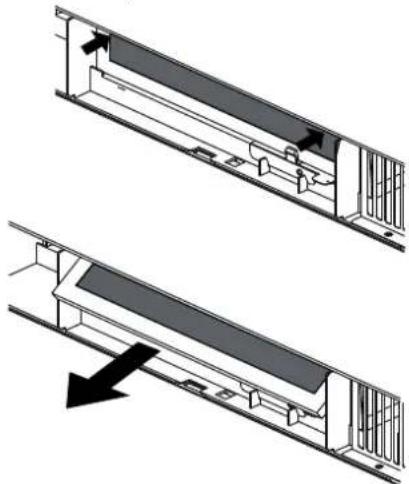
3 Remove the charcoal filter by pushing the top of the filter inwards, then pull it forward out from the unit.
natural_image
Technical diagram showing two mechanical assembly steps with arrows indicating motion direction (no text or symbols)4 Slide the top of the new charcoal filter into the top of the filter cavity.
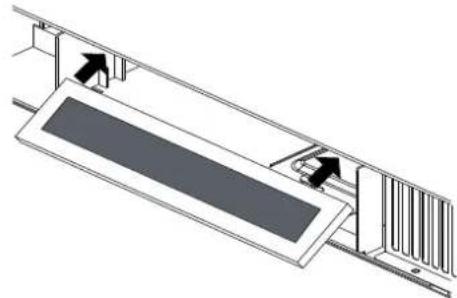
natural_image
Technical diagram of a mechanical assembly with directional arrows indicating movement or force (no text or symbols present)5 Press the bottom of charcoal filter to place it into the correct position.
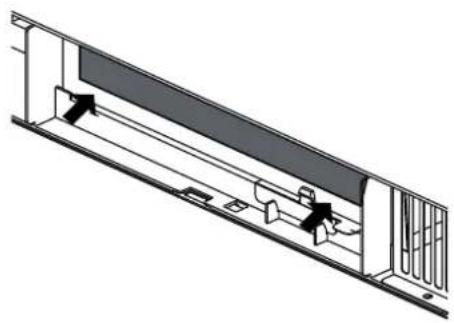
natural_image
Technical line drawing of a mechanical assembly with no visible text or symbols6 Reinstall the vent by sliding the bottom of the vent into place. Push the vent top into position and slide right into place. Replace the two vent mounting screws located on top of the microwave using a #1 Phillips screwdriver.

natural_image
Line drawing of a cabinet interior with doors and doors, no text or symbols present7 Close the microwave door. Plug in microwave oven or reconnect power.
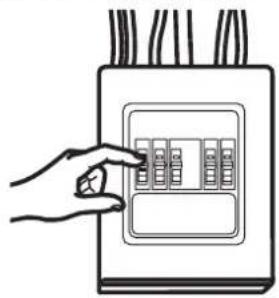
- Make sure the microwave oven has been installed according to instructions.
- Replace house fuse or turn breaker back on.
natural_image
Hand placing a button into an electrical outlet box (no text or symbols visible)-
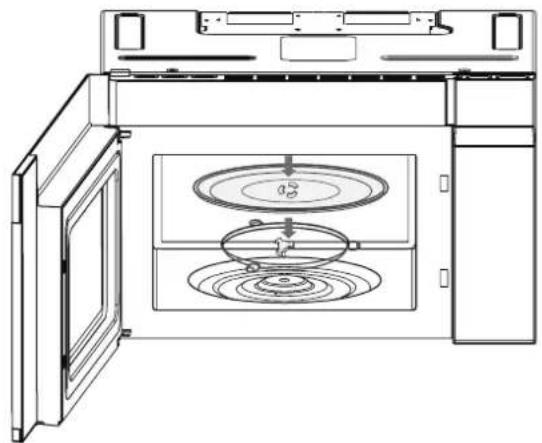
Remove all packing material from the microwave oven.
-
Install turntable ring and glas s tray in cavity.
natural_image
Technical line drawing of an open oven with internal circular components and a central dial (no text or symbols)- Read the USE & CARE Manual.
- KEEP INSTALLATION INSTRUCTIONS FOR THE LOCAL INSPECTOR'S USE.
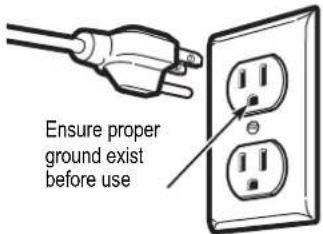
- Plug power cord into a separate and dedicated 15- to 20-amp electrical outlet.
- FILL OUT PRODUCT REGISTRATION CARD AN SEND IN.
For any warranty information and service request, contact us:

In USA: https://us.bertazzoni.com/more/support In Canada: https://ca.bertazzoni.com/more/support
DU BUREAU DE NOTRE PRÉSIDENT
natural_image
Line drawing of a laptop computer monitor with a blank screen, placed on a shelf (no text or symbols)LIRE SOIGNEUSEMENT. CONSERVER CES INSTRUCTIONS.
SOMMAIRE
natural_image
Illustration of a hand inserting a cable into an electrical outlet box (no text or symbols visible)natural_image
Three technical line drawings of electrical components: a motor, a plug with a screw, and a hook (no text or symbols)natural_image
Line drawing of a portable printer with a paper clip, labeled 'Voir page 20' at the bottom (no other text or symbols)natural_image
Simple line drawing of a vertical cylindrical object with a flanged top and base (no text or symbols)natural_image
Technical line drawing of a structural assembly with beams, columns, and supports (no text or symbols)natural_image
Line drawing of a hand using a tool to clean or install a wall-mounted device (no text or symbols visible)natural_image
Illustration of three scenes showing people exchanging boxes and passing through a doorway (no text or symbols)POUR FACILITER L'INSTALLATION ET LA SÉCURITÉ PERSONNELLE, NOUS RECOMMANDONS QUE DEUX PERSONNES SOIENT PRÉSENTES POUR INSTALLER CE FOUR À MICRO-ONDES.
natural_image
Line drawing of a hand holding a grid-patterned device (no text or symbols)natural_image
Technical line drawing of a structural assembly with beams and supports, no text or symbols presentnatural_image
Line drawing of a hand using a tool to clean or install a wall-mounted device (no text or symbols visible)natural_image
Diagram of a mechanical device with rotating components and directional arrows, no readable text or symbols present.natural_image
Technical line drawing of two cylindrical electronic components with internal circuitry (no text or symbols)Après la nouvelle
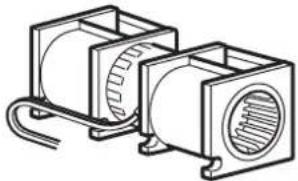
natural_image
Technical line drawing of two cylindrical electronic components with a coiled cable (no text or symbols)natural_image
Technical line drawing of a vehicle chassis frame with mounting brackets and structural elements (no text or symbols)natural_image
Three-panel line drawing showing a person handling a box, another with a cross mark, and a third reviewing documents (no text or symbols)POUR FACILITER L'INSTALLATION ET LA SÉCURITÉ PERSONNELLE, NOUS RECOMMANDONS QUE DEUX PERSONNES SOIENT PRÉSENTES POUR INSTALLER CE FOUR À MICRO-ONDES.
natural_image
Illustration of a hand holding a rectangular device with a mesh screen (no text or symbols visible)natural_image
Architectural cross-section diagram showing structural layers and window connections (no text or labels)natural_image
Line drawing of a hand using a tool to clean or install a cabinet (no text or symbols visible)• Lire les instructions relatives au GABARIT MEUBLE HAUT.
natural_image
Technical line drawing of a mechanical component with mounting holes and a directional arrow (no text or symbols)natural_image
Three line drawings showing people exchanging boxes and interacting with a document (no text or symbols present)POUR FACILITER L'INSTALLATION ET LA SÉCURITÉ PERSONNELLE, NOUS RECOMMANDONS QUE DEUX PERSONNES SOIENT PRÉSENTES POUR INSTALLER CE FOUR À MICRO-ONDES.
natural_image
Illustration of a hand holding a grid-patterned rectangular object (no text or symbols)natural_image
Technical diagram showing two views of a mechanical assembly with arrows indicating direction (no text or symbols present)natural_image
Technical diagram of a mechanical assembly with directional arrows indicating movement or force (no text or symbols present)natural_image
Technical line drawing of a mechanical assembly with no visible text or symbolsnatural_image
Line drawing of a cabinet or storage unit with doors and windows, no text or symbols presentnatural_image
Hand placing a button into an electrical outlet box (no text or symbols visible)natural_image
Technical line drawing of an open oven with internal circular components and a central dial (no text or symbols)- Lire le manuel UTILISATION ET ENTRETIEN.
- CONSERVER LES INSTRUCTIONS D'INSTALLATION À L'INTENTION DE L'INSPECTION LOCALE.
© 2023 BERTAZZONI. All rights
reserved. KOTR24XV_v.01
PN:16170000B05516
- FROM THE DESK OF OUR PRESIDENT
- Microwave Oven
- INSTRUCTION MANUAL
- PRECAUTIONS TO AVOID POSSIBLE EXPOSURE TO EXCESSIVE MICROWAVE ENERGY
- IMPORTANT SAFETY INSTRUCTIONS
- SAVE THESE INSTRUCTIONS
- GROUNDING INSTRUCTIONS
- DANGER - Electric Shock Hazard
- WARNING - Electric Shock Hazard
- RADIO INTERFERENCE
- UTENSILS
- Utensil Test:
- Power On
- Clock
- Kitchen Timer
- Time Cook
- Lock-out Function for Children
- Speed y Cooking
- Popcorn
- Auto Defrost
- Sensor Reheat
- Sensor Cook
- Multi-Stage Cooking
- Operating the Ventilation Fan
- Turning the Light on/off
- Turning the turntable on / off
- MAINTENANCE
- Troubleshooting
- BEFORE YOU BEGIN
- CONTENTS
- General information
- Step-by-step installation guide
- ELECTRICAL REQUIREMENTS
- DAMAGE—SHIPMENT/ INSTALLATION
- PARTS INCLUDED
- Phillips screwdriver
- PLACEMENT OF THE MOUNTING PLATE
- REMOVING THE MICROWAVE OVEN FROM THE CARTON/REMOVING THE MOUNTING PLATE
- FINDING THE WALL STUDS
- DETERMINING WALL PLATE LOCATION UNDER YOUR CABINET
- INSTALLATION TYPES (Choose A, B or C)
- INSTALLATION INSTRUCTIONS FOR EXTERNAL EXHAUST DUCTING
- Exhaust connection:
- Maximum duct length:
- EXTERNAL EXHAUST DUCTING
- OUTSIDE TOP EXHAUST (EXAMPLE ONLY)
- OUTSIDE BACK EXHAUST (EXAMPLE ONLY)
- A OUTSIDE TOP EXHAUST (Vertical Duct)
- INSTALLATION OVERVIEW
- A2. USE TOP CABINET TEMPLATE FOR PREPARATION OF TOP CABINET
- A3. ADAPTING MICROWAVE BLOWER FOR OUTSIDE TOP EXHAUST
- A6. ADJUST THE EXHAUST ADAPTOR
- A7. CONNECTING DUCTWORK
- B OUTSIDE BACK EXHAUST (Horizontal Duct)
- IMPORTANT NOTES:
- B1. PREPARING THE REAR WALL FOR OUTSIDE BACK EXHAUST
- B2. REMOVE BLOWER PLATE
- C1. ATTACH THE MOUNTING PLATE TO THE WALL
- To use toggle bolts:
- C RECIRCULATING (Non-Vented Ductless)
- C2. USE TOP CABINET TEMPLATE FOR PREPARATION OF TOP CABINET
- C3. CHECK BLOWER PLATE
- C5. INSTALLING OR CHANGE THE CHARCOAL FILTER (Some Models)
- DU BUREAU DE NOTRE PRÉSIDENT
- SOMMAIRE
Brand : BERTAZZONI
Model : Master KOTR24XV
Category : Microwave Oven