
Aegis 360 - Car seat Luvion - Free user manual and instructions
Find the device manual for free Aegis 360 Luvion in PDF.


| Product Type | i-Size Convertible Car Seat |
| Brand | Luvion |
| Model | Aegis 360 |
| Category | Car Seat |
| Compliance | R129 (i-Size) |
| Child Height | 40 to 150 cm |
| Child Weight | 0 to 36 kg |
| Recommended Age | From birth to approximately 12 years |
| Installation | Rear-facing (40-105 cm) / Forward-facing (76-150 cm) |
| Fixation | ISOFIX + Top Tether + seat belt (depending on size) |
| Rotation | 360° with locking system |
| Recline | Multiple positions |
| Harness | 5-point (for 40-105 cm) |
| Headrest | Height adjustable |
| Seat width | 630 mm |
| Care | Removable cover washable at 30°C, do not bleach, do not iron, do not tumble dry |
| Safety | Green indicators for ISOFIX and Top Tether |
| Included accessories | Infant insert for 40-105 cm |
| Spare parts | Official Luvion cover only |
Frequently Asked Questions - Aegis 360 Luvion
User questions about Aegis 360 Luvion
0 question about this device. Answer the ones you know or ask your own.
Ask a new question about this device
Download the instructions for your Car seat in PDF format for free! Find your manual Aegis 360 - Luvion and take your electronic device back in hand. On this page are published all the documents necessary for the use of your device. Aegis 360 by Luvion.
USER MANUAL Aegis 360 Luvion

EN - Please read instructions before use.
Read the instructions and warnings carefully and keep them for future reference.
INTRODUCTION
Thank you for purchasing the LUVION AEGIS 360 convertible car seat. Make sure you always keep your original proof of purchase. For warranty cases you will always be asked to show a copy of your proof of purchase. For warranty claims you can contact the Luvion dealer or the local Luvion representative. More information can be found at www.luvion.com
This manual contains all the information you need, to be able to use this LUVION AEGIS 360 convertible car seat safely and with pleasure. Before using the car seat, we recommend that you read this instruction manual carefully. To ensure full protection of your child, please follow the description in this instruction manual to correctly use and install the car seat. We ask for your extra attention for the safety instructions. Keep the instruction manual for future reference. It is very important that the instruction manual is kept with the child restraint throughout its life.
PURPOSE OF THE AEGIS 360 CAR SEAT
General description of the characteristics and technical specifications
The Aegis 360 car seat 40-150 cm, is designed to provide safety and protection for children during car journeys. It's main purpose is to minimise the risk of injury in the event of an accident or sudden braking, ensuring that the child is correctly restrained and in a suitable position, as well as ensuring that during the normal course of traffic the child is in the most suitable conditions possible for his or her well-being. The car seat must be used in accordance with the manufacturer's specifications, complying with current safety regulations. It is crucial to install and adjust the car seat correctly to ensure its effectiveness. In addition, it is essential to select the most suitable installation mode for your child's weight and height as he/she grows.
The use of a car seat is not only a vital safety measure, but also a legal obligation in many countries. Ensuring that your child travels in a properly installed and approved car seat contributes significantly to reducing risks during travel. Seat width (R8): 630 mm
INDEX
-
Important information 6
-
LUVION Aegis 360 i-Size Safety Instructions 7
-
Installation notes 7
-
Preparatory work and functions....9 4.1. Prepare ISOFIX....9
4.2. Adjustment of harness and head restraint in 5-point harness installation ..... 9 4.3. Head restraint adjustment ..... 10 4.4. Child seat recline function ..... 10 4.5. 360° rotation function ..... 10
-
Rearward-facing installation....11 5.1. Size 15,74"-41,33" with 5-point harness + ISOFIX + Top tether....11
-
Forward-facing installation....13 6.1. Size 29,92"-41,33" with 5-point harness + ISOFIX + Top tether....13 6.2. Size 39,37"-59,05" with vehicle seat belts....15 6.3. Size 39,37"-59,05" with seat belt + ISOFIX....16
-
Removal of the car seat ....17
-
Removal of the 5-point harness system ....18
-
Care and maintenance 19
9.1. Care of the harness buckle .... 19 9.2. Cleaning the seat cover .... 20 9.3. Inner cushion of the seat cover .... 21
- Frequently asked questions 21
1. IMPORTANT INFORMATION
The size range of the car seat is as follows: 40-150cm (15,74"-59,05") or age: 0-12 years, weight: 0-36kg (0-79,36 lb) approx. Please follow the instructions in this manual carefully, failure to follow the instructions may affect the safety of your child, the manufacturer cannot be held responsible for incorrect use.
Notice regarding i-Size Child Restraint Systems (40-105cm, 15,74"-41,33"). This is an i-Size Child Restraint System. It is approved in accordance with UN Regulation R129 for use in i-Size compliant vehicle seats as indicated by the vehicle manufacturers in the vehicle owner's manual. If in doubt, please consult the manufacturer of the Child Restraint System or the retailer.
Notice about child restraint systems of the i-Size (100-150cm, 39,37"-59,05") booster seat category. This is a child restraint system for i-Size booster seats. It is approved in accordance with UN Regulation R129, for use primarily in "i-Size category seating positions" as indicated by the vehicle manufacturers in the vehicle owner's manual. If in doubt, please consult the Child Restraint System manufacturer or the retailer.
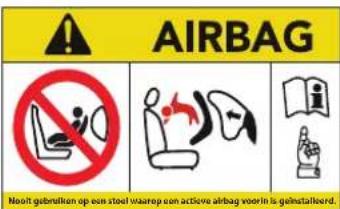
DO NOT USE REARWARD-FACING CHILD RESTRAINTS IN SEATING POSITIONS WHERE AN ACTIVE FRONTAL AIRBAG IS FITTED.
IMPORTANT - DO NOT USE THE FORWARD FACING SYSTEM BEFORE THE CHILD'S AGE EXCEEDS 15 MONTHS (SEE INSTRUCTIONS).
2. LUVION AEGIS 360 I-SIZE SAFETY INSTRUCTIONS
General Information
• The LUVION Aegis 360 i-Size is designed for car use only.
• Before purchase, ensure compatibility with your vehicle.
• After purchase, install the seat according to the manual. If you experience installation issues, contact your distributor before use.
• This car seat is designed for intensive use for approximately 12 years.
Installation and Usage
- Use only the designated load-bearing contact points as specified in the manual.
- Ensure the Child Restraint System (CRS) is fully installed and correctly secured. All rigid parts and plastic components should be positioned to avoid interference with moving vehicle seats or doors.
- Rear-facing car seats must never be used in a seat with an active front airbag.
- Forward-facing mode is only allowed for children over 15 months old (see manual for details).
• Always tighten all securing straps to ensure a snug fit. Straps should lie flat, not twisted. - Any lap belt must be positioned low, and crash shields must be correctly installed to secure the child's pelvis.
- If the vehicle's headrest obstructs proper adjustment of the child seat's headrest, remove it.
-
Make sure you can fit no more than one finger between the harnesses and your child (1cm). If there is more space than 1 cm, tighten the harness belt further.
-
Make sure the headrest is adjusted to the proper height.
- Replace the car seat immediately if it has been involved in an accident, even if no visible damage is present.
- Do not modify or add components to the car seat without manufacturer approval, as this may compromise safety.
- If the seat lacks a textile cover, keep it out of direct sunlight to prevent overheating.
- Never leave children unattended in the car seat.
- Ensure luggage and other loose objects are securely fastened to prevent injury in a crash. Do not place heavy objects on the seat or near the child.
- Keep the car seat free from corrosion.
- The cover and crotch pad can be removed for washing. If the cover needs to be replaced at any time, only use the official LUVION cover because it constitutes an integral part of the restraint performance.
- Ensure the adult seat belt buckle aligns correctly with the restraint's main load-bearing contact points. If unsure, contact the manufacturer.
- For i-Size models, always check the vehicle manufacturer's manual for additional guidelines.
• Always keep the car seat securely fastened, even when not in use, to prevent it from moving in a collision. - Retain the instruction manual throughout the car seat's lifetime.
- The illustrations in this manual are for reference only and may differ slightly from your model.
Safety Precautions
Maintenance & Compliance
3. INSTALLATION NOTES
Before buying this product make sure the car seat is compatible with the vehicle it is to be used in.
Before using the "i-Size" car seat, you must IMPERATIVELY read the instruction manual of the vehicle, before installing your child car seat. This manual will indicate the places compatible with the class size of the car seat, i-Size Universal ISOFIX approved.
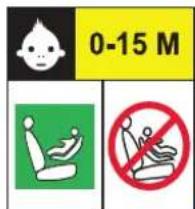
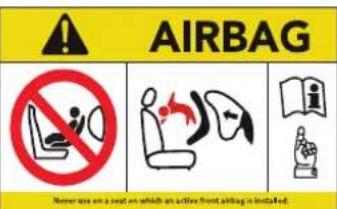
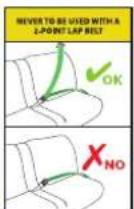
| WARNING | |
| Do not use forward facing before the child is more than 15 months old.Do not use load contact points other than those described in the instructions and marked on the child restraint system (See instructions). | |
 |  |
| Reverse direction of travel size range:40-105cm | In the direction of travel size range:76-150cm |
| Method of installation of the child car seat: | |
| Rearward facing: 40-105cm | Forward facing: 76-150cm |
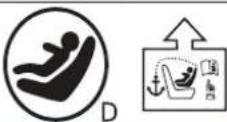 | 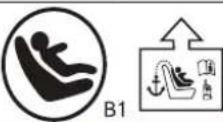 |
| Size range 100-150 cm (39,37"-59,05"): Adult seat belt+ISOFIX or Adult seat belt | |
 | ?1 Cannot be used on the front passenger seat with the airbag activated. ?2 Only suitable for seats with seat belts. |
![graph TD A["01"] --> C["Step"] B["02"] --> C["Step"]](/content/2026/05/755210/images/bcc62d2fe4c7d5ae083023ad47f1d45bb5c67ef8f524b0ff0b1639f27c53cd7a.jpg)
4. PREPARATORY WORK AND FUNCTIONS
4.1 Prepare ISOFIX
- If your car is not equipped with the ISOFIX guide anchorage, insert the guide anchorage (02) into the ISOFIX anchorage (01) (fig. 1) TIPS: The ISOFIX anchorages are located between the backrest and the seat cushion.
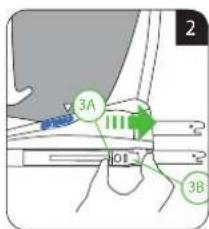
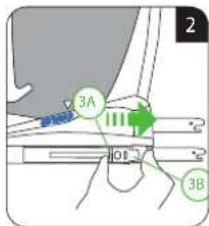
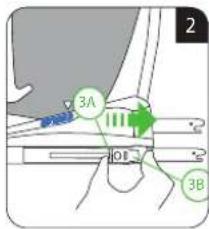
- First press the second button (3A) and then press the ISOFIX release button (3B), push them together backwards to the last position until you hear a "click" (fig. 2)
4.2 Adjustment of harness and head restraints
- In 5-point harness installation (Size range 15,74"-41,33")
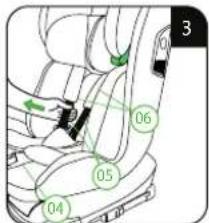
- Press the central adjuster (04) and pull the shoulder belts (05) towards you, without pulling the shoulder straps (06), release the 5-point harness as far as it will go (fig. 3)
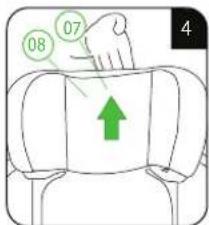
- Pull up the adjustment ring (07), raising or lowering the head restraint (08) to the desired position. The head restraint (08) must be positioned so that the shoulder belts (05) are at the height of the child's shoulders (fig. 4)
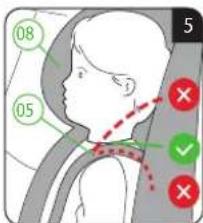
- It is important to adjust the head restraint (08) correctly to protect the child safely. The height of the head restraint (08) must be such that the shoulder belts (05) are at the child's shoulder height (fig. 5)
NOTE: The belts (05) must not go behind the child's back or at or above the child's ears.
∴ m = 3/11
∴ m = 3/11
LUVION
Provision Baby students
∴ m = 3/11
PREPARATORY WORK AND FUNCTIONS
4.3 Headrest adjustment (Size range 100-150cm)
- Ensure that the 5-point harness is stored correctly (see section 8)
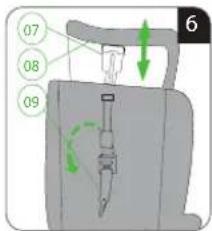
- Turn the head restraint base (09) to the lower position and then pull up the adjustment ring (07). While pulling up or pushing down the head restraint (08) to the desired position, release the adjustment ring (07) and the head restraint will lock automatically (fig. 6)
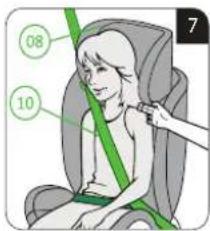
- The head restraint (08) is in the correct position when the diagonal section (10) of the vehicle seat belt sits on the child's shoulders, there is a gap of approximately 2 finger widths between the child's shoulders and the lower edge of the head restraint (fig. 7)
4.4 Child seat recline function
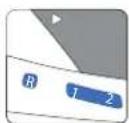
- For forward facing 76-105cm (29,92"-41,33"): position 1-2.
- Forward orientation 100-150cm (39,37"-59,05"): position 1
- Rearward facing 40-105cm (15,74"-41,33"): position R
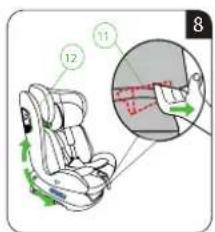
- Press the release button (11) in the direction of the arrow to release the seat (12), adjust the seat (12) to the desired position and then release the release button (11). (fig. 8)
4.5 360° rotation function
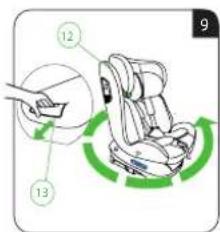
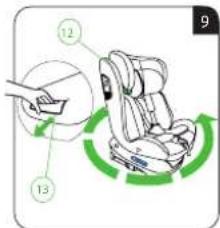
- Press the unlocking button (13) to release the seat (12), then turn the seat (12) to the desired position, release the unlocking button (13) and turn the seat to lock it automatically (fig. 9).
CAUTIONI Always make sure that the rotating part of the child seat is fully engaged by trying to rotate the seat (12) in both directions.
5. REARWARD-FACING INSTALLATION
5.1 Size range 40-105cm. With 5-point harness + ISOFIX + top tether
• Prepare the ISOFIX (see section 3.1)
- Ensure that the 5-point harness is correctly installed (see section 8)
- Ensure that the 5-point harness is correctly adjusted (see section 3.2)
- Adjust the seat to the maximum recline position and ensure that the recline mechanism is securely locked (see section 3.4)
- Ensure that the child car seat is in the rearward-facing position (see section 3.5) and that the rotation mechanism is properly locked.
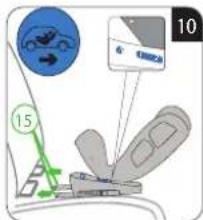
- Then place the child seat on the vehicle seat facing the rear of the vehicle in the rearward direction of travel. (fig 10)
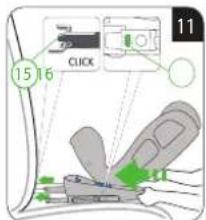
- Insert the ISOFIX connectors (15) into the guide anchorage (02, fig. 1) until a click is heard and the indicators (16) are completely green (fig 10,11).
- WARNING! The ISOFIX connectors (15) will only be attached when the two indicators (16) are completely green.
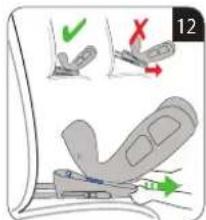
- Push the seat back until it engages against the vehicle seat backrest (fig. 11,12)
Installation and use of the top tether
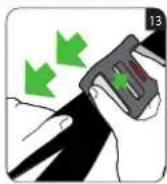
- Pull the top tether strap out of the bag and press the release button on the top tether adjuster to release it (fig. 13)
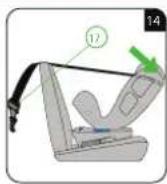
- Insert the top tether strap into the belt guide slot (17) and tighten the strap (fig .14)
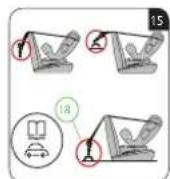
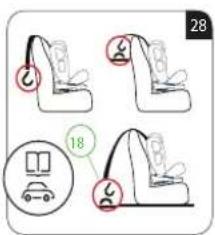
- Hook the carabiner (18) to the top tether anchorage point recommended in your vehicle owner's guide. Look for this sign (9) on your vehicle or consult your vehicle dealer (fig. 15)
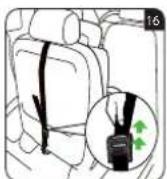
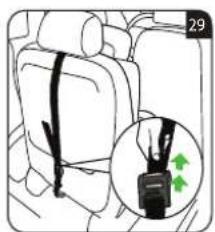
- Tighten the free end of the top tether strap until the indicator shows green (fig 16)
- Follow the steps in the section "Securing the child with the 5-point harness" to secure the child to the seat.
Securing the child with the 5-point harness
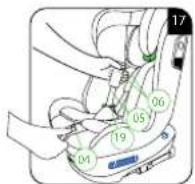
- Press the red button (19) to release the buckle and press the central adjuster (04) to remove the shoulder belts (05), Do not pull the shoulder straps (06, fig.17)
- Place the child in the child seat.
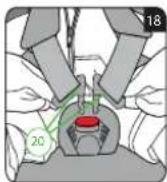
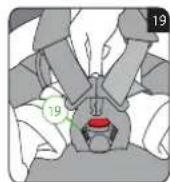
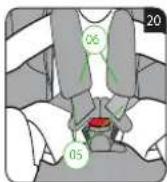
• Make sure that the child's back is supported by the backrest of the chair. - Bring the two buckle fasteners (20) together and insert them into the buckle (19), you will hear a "click" when it is properly closed (fig.18, 19, 20)
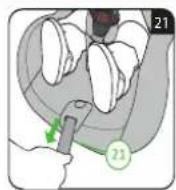
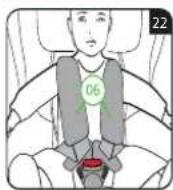
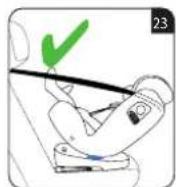
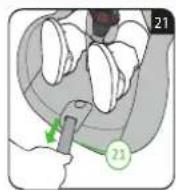
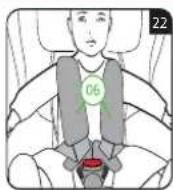
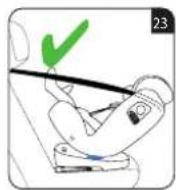
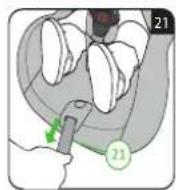
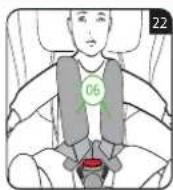
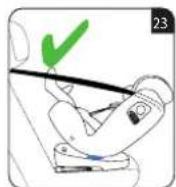
- Pull the adjustment strap 21) until the harness lies flat and snug against the child's body (fig.21, 22, 23)
For your child's safety, be sure to carry out the following checks before each journey:
- Make sure that the ISOFIX connectors are properly engaged in the anchorages and that the indicators are completely green.
- Ensure that the child seat is positioned against the back of the vehicle seat.
• Make sure that the top anchor is tight and that the indicator is completely green. - Ensure that the 5-point harness is securely fastened to the child and that the straps are not twisted.
- Ensure that the shoulder straps are in the correct position on the child's shoulders and are not twisted.
- Ensure that the harness buckle is securely fastened.
6. FORWARD-FACING INSTALLATION
6.1 Size range 76-105cm with 5-point harness + ISOFIX + top tether
• Prepare the ISOFIX (see section 4.1)
- Ensure that the 5-point harness is correctly installed (see section 9)
- Ensure that the 5-point harness is correctly adjusted (see section 4.2)
- This child seat has 4 recline positions for forward facing, adjust the seat to the desired recline position and ensure that the recline mechanism is securely locked. (See section 4.4)
- Ensure that the child car seat is in the forward-facing position (see section 4.5) and that the rotation mechanism is securely locked.
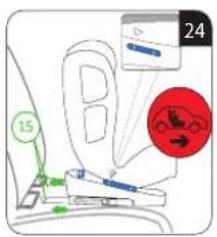
- Place the child seat on the vehicle seat facing the front of the vehicle in the direction of travel (fig. 24)
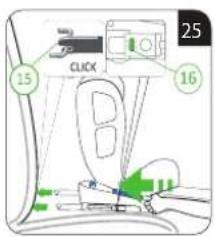
- Insert the ISOFIX connectors (15) into the guide anchoring (02, fig. 1) until a click is heard and the indicators (16) are completely green (fig 24, 25).
CAUTION! The ISOFIX connectors (15) are only attached when the two indicators (16) are completely green.
10
LUVION: Provision Baby products
1
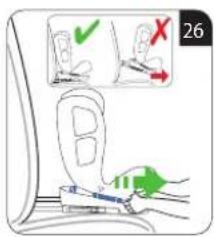
- Push the seat back until it engages with the vehicle backseat, then try to remove the child seat and check that it cannot be removed (fig. 26)
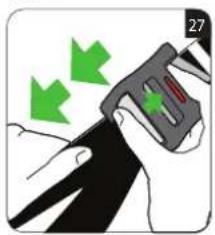
- Pull the top tether strap out of the bag and press the release button on the top tether strap adjuster to release the strap (fig. 27)
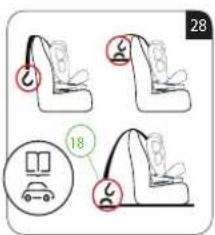
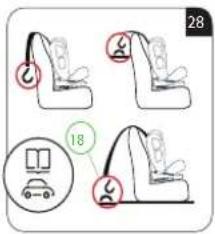
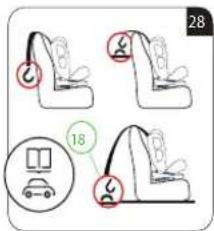
- Hook the carabiner (18) to the top tether anchorage point recommended in your vehicle owner's guide. Look for this sign on your vehicle ( ) or consult your vehicle dealer. (fig.28)
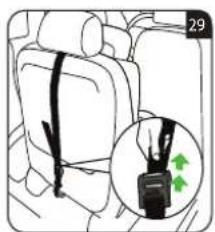
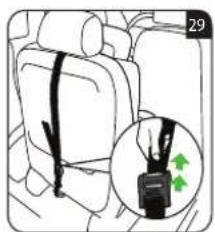
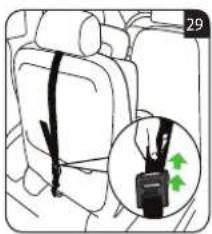
- Tighten the free end of the upper tether strap until the indicator shows green (fig 29)
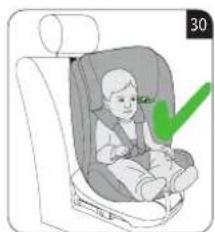
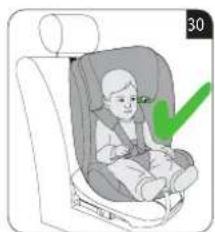
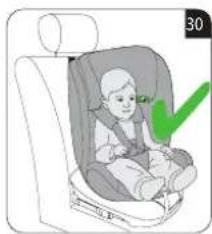
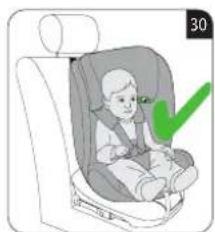
- Follow the steps in the section "Securing the child with the 5-point harness" to secure the child to the seat (fig 30)
For your child's safety, ensure that the following checks are carried out before each journey:
- Make sure that the ISOFIX connectors are properly engaged in the anchorages and that the indicators are completely green.
- Ensure that the child seat is positioned against the back of the vehicle seat.
- Make sure that the top anchor is tight and that the Indicator is completely green.
- Ensure that the 5-point harness is securely fastened to the child and that the straps are not twisted.
- Ensure that the shoulder straps are in the correct position on the child's shoulders and are not twisted.
- Ensure that the harness buckle is securely fastened.
6.2 Size range 100-150cm only with vehicle seatbelt
- Push back the ISOFIX and fold up and store the top tether.
- Ensure that the 5-point harness is stored correctly (see section 7)
- Adjust the head restraint to the correct position (see section 3.3)
- Ensure that the seat is in the forward-facing position and that the rotation mechanism is securely locked. (See section 3.5)
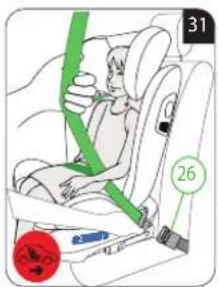
- Place the child car seat on the vehicle seat facing the front of the vehicle in the direction of travel, and place the child in the child car seat (fig.31)
- Pull the vehicle belt as far as possible and guide it around the front of the child and secure the buckle(26), a "click" will be heard. (fig. 31, 32)
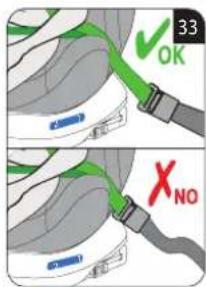
- Place the lap belt section (28) on the same side as the vehicle seat buckle (26) and the lower part of the lap belt section (27) under the child's armrest and through the green belt guide slot (29) of the child seat. (fig.33)
CAUTION: Ensure that the vehicle belt is not twisted at any point. Ensure that the adult safety belt buckle is in relation to the main load bearing contact points of the restraint. The user is recommende to contact the child restraint manufacturer if in doubt about this point (fig. 33).

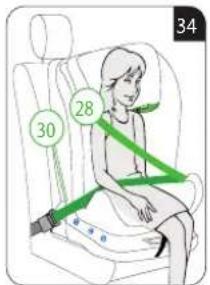
- Place the other side of the lap belt section (28) on the opposite side of the child seat through the green hole of the belt guide (30) (fig.34)
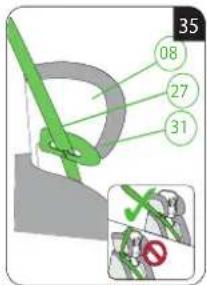
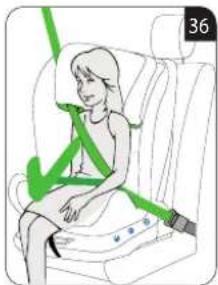
- Route the upper part of the diagonal belt section (27) through the green belt guide (31) of the head restraint (08) and make sure that the vehicle belt is not twisted at any point. Make sure
19
LUVION
Provision Baby students
∴ m = 3/11
that the vehicle lap belt is above the child's collarbone and not in front of the child's neck. (fig. 35, 36)
TIP: If necessary, you can adjust the head restraint.
For your child's safety, ensure that the following checks are carried out before each journey:
- Ensure that the child car seat is in the vehicle seat facing the front of the vehicle in the direction of travel.
- Ensure that the lap belt section(28) on the same side as the vehicle seat buckle(26) and the lower part of the diagonal belt section (27) are under the child restraint armrest and through the green hole in the child seat belt guide (29). Make sure that the lap belt section (28) on the same side as the vehicle seat buckle (26) and the lower part of the lap belt section (27) are under the child restraint armrest and through the green recess in the belt guide (29) of the child restraint.
- Secure the other side of the lap belt section (28) on the opposite side of the child seat through the opening in the green belt guide (30).
• Pass the upper part of the diagonal belt section (27) through the green belt guide (31) of the head restraint (08). - Ensure that the top of the diagonal section of the belt (27) is above the child's collarbone and not in front of the child's neck.
- Ensure that each child restraint strap attached to the vehicle is fastened and that the strap is not twisted.
6.3 Size 100-150cm (39,37"-59,05") with seat belt + ISOFIX
• Prepare the ISOFIX (see section 4.1)
- Ensure that the 5-point harness is stored correctly (see section 7)
- Adjust the head restraint to the correct position (see section 3.3)
- Ensure that the seat is in the forward-facing position and that the rotation mechanism is securely locked. (See section 3.5)
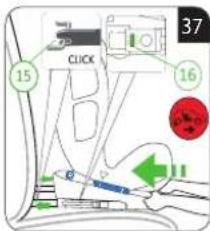
- Place the child seat on the vehicle seat facing the front of the vehicle in the direction of travel (fig.37)
- Insert the ISOFIX connectors (15) into the guide socket (02) until a "click" is heard and the indicators (16) are completely green (fig 37).
CAUTIONI The ISOFIX connectors (15) are only attached when both indicators (16) are completely green.
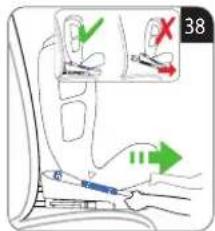
- Push the seat back until it clicks into the back of the vehicle seat, then try to remove the child seat and check that it cannot be removed (fig. 38)
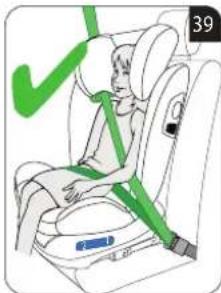
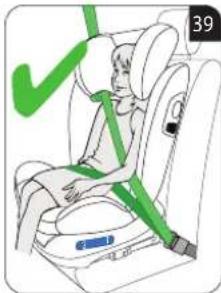
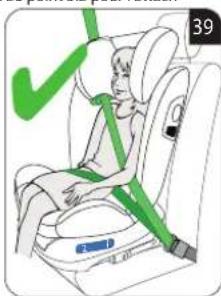
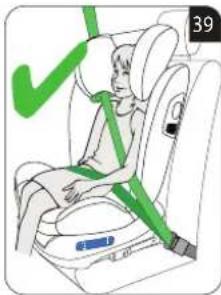
- Place the child in the child car seat and follow all the steps described in 5.2 to secure the child (fig. 39)
For your child's safety, ensure that the following checks are carried out before each journey:
- Ensure that the child car seat is placed on the vehicle seat facing the front of the vehicle in the direction of travel.
- Make sure that the ISOFIX connectors are properly engaged in the anchorages and that the indicators are completely green.
- Ensure that the lap belt section(28) on the same side as the vehicle seat buckle (26) and the lower part of the diagonal belt section (27) are under the child seat armrest and through the green belt guide hole (29) of the child seat. Make sure that the lap belt section (28) on the same side as the vehicle seat buckle (26) and the lower part of the lap belt section (27) are under the child restraint armrest and through the green belt guide recess (29) of the child restraint.
- Ensure that the other side of the lap belt section (28) on the opposite side of the child seat passes through the green belt guide slot (30).
• Pass the upper part of the diagonal belt section (27) through the green belt guide (31) of the head restraint (08). - Ensure that the top of the diagonal section of the belt (27) is above the child's collarbone and not in front of the child's neck.
- Ensure that each child restraint strap attached to the vehicle is fastened and that the strap is not twisted.
7. REMOVAL OF THE CAR SEAT
- Press the second button and the ISOFIX release button to release both sides of ISOFIX, push the ISOFIX towards the child seat base.
- Press the top tether release button to release the tether and unlock it from the vehicle's anchorage point.
- When the vehicle belt is in use for the 100-150cm size range, first release the vehicle buckle and
16
LUVION Downage Baby products
then remove the vehicle belt from the green child car seat head restraint guide.
8. REMOVAL OF THE 5-POINT HARNESS SYSTEM
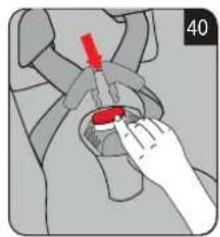
- Release the 5-point buckle. (fig. 40)
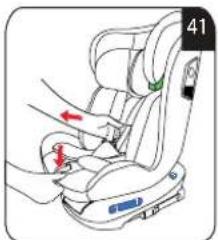
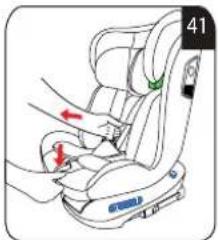
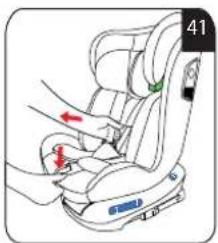
- Press the harness adjustment button and loosen the straps. (Fig. 41)
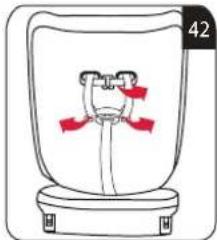
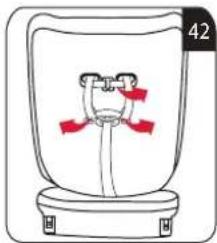
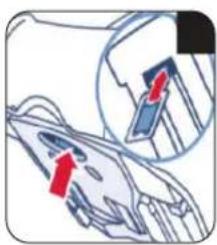
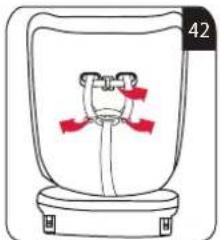
- Remove the shoulder straps and pads from the metal yokes on the back of the child seat. (fig. 42)
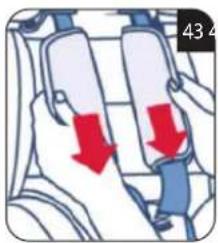
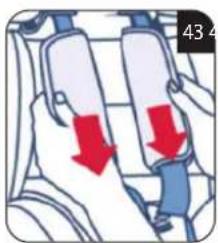
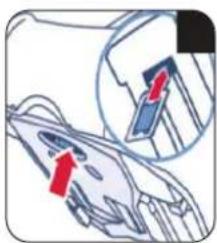
• Pull the braces and pads out of the slots. (fig. 43, 44)
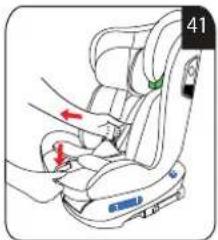
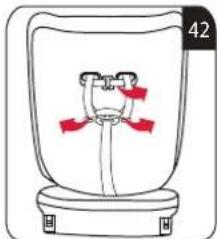
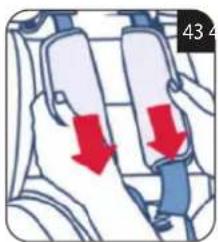
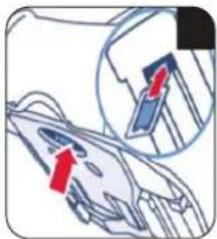
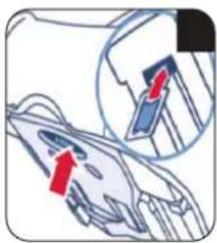
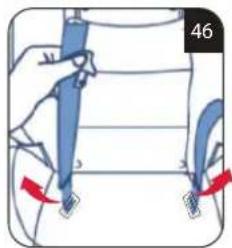
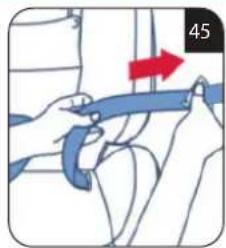
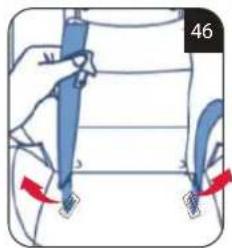
- Remove the strap tab. Then, remove the lower retaining strap (fig. 45, 46)
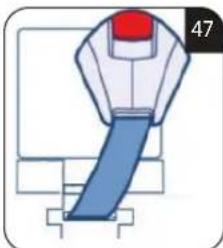
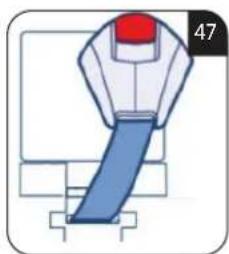
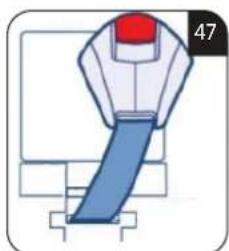
- Remove the buckle from the slots (fig. 47)
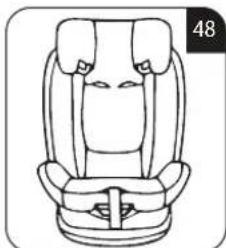
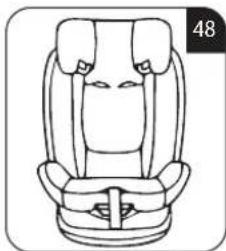
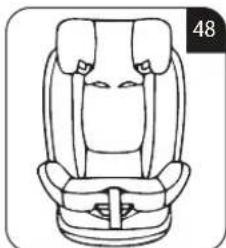
• Using the press studs, replace the upholstery and seat cushion as shown. (fig. 48)
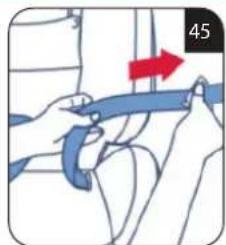
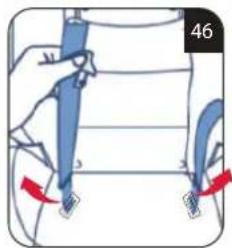
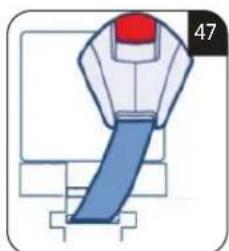
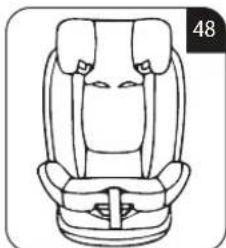
- When the vehicle belt is in use for the 100-150cm size range, first release the vehicle buckle and then remove the vehicle belt from the green child car seat head restraint guide.
9. CARE AND MAINTENANCE
9.1 Care of the harness buckle
- Buckle failure can cause injury, do not use oil or other lubricants on any part of the buckle. Buckle malfunction is often due to accumulation of debris, such as food crumbs or other small particles.
Signs of buckle malfunction are as follows:
- The buckle locks are slowly released when the red release button is pressed.
- The buckle fasteners do not lock securely into the buckle (i.e. they spring back if you try to push them in).
• The buckle fasteners engage without a "click". - Buckle fasteners are difficult to insert (you will notice resistance).
• The buckle opens only when extreme force is applied.
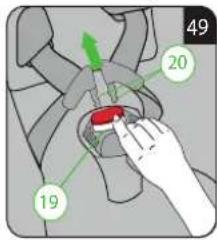
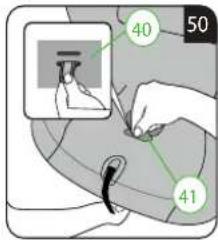
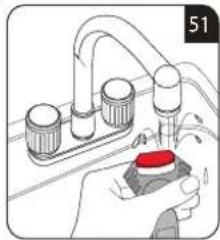
To clean or repair the harness buckle, wash the buckle to restore its proper function:
- Follow the steps in section 7 to remove the child seat buckle (fig. 49, 50)
∴ m = 3/11
∴ m = 3/11
LUVION
Provision Baby products
∴ m = 3/11
- Soak the harness buckle in warm water with mild detergent for at least one hour. Rinse and allow to air dry before replacing the buckle on the child seat (fig.51)
9.2 Cleaning the seat cover
Removing the seat cover:
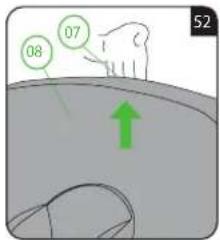
- Adjust the head restraint to the highest position (fig.52)
- Remove the head restraint cover first.
- Remove the remaining seat covers.
Fitting the seat cover:
- Repeat the above steps in reverse order.
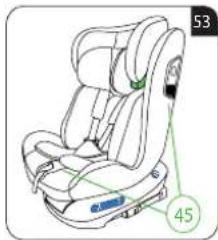
• To position and arrange the seat cover with the fabric tidier(45), make sure that all covers and upholstery are correctly positioned (fig.53)
Cleaning instructions for the seat cover:
- The seat cover is removable and washable. Refer to the instructions below or the contents of the seat cover fabric care label.
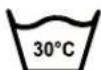
WASH AT MAX. 30 °C



TUMBLE DRY
DO NOT BLEACH DO NOT IRON DO NOT DRY CLEAN DO NOT
9.3 Inner cushion of the seat cover
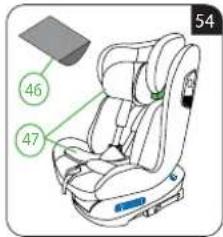
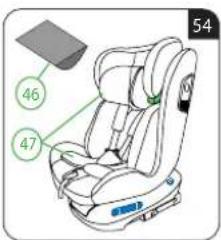
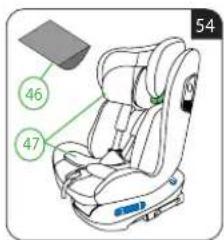
- The semi-circular foam cushion(46) and the inner cushion(47) of the seat cover are suitable for the size range 40-87cm (15,74"-34,25") in use (fig.54)
- The inner cushion (47) of the seat cover is suitable for a size of 40-105cm (15,74"-41,33"), (fig. 54).
CAUTION! Never use the child car seat without the supplied seat covers, the seat cover must not be replaced by any other than the one recommended by the manufacturer, as the seat cover is an integral part of the restraint's performance. always ensure that the seat covers and harness straps are correctly installed. If in doubt, consult our Customer Service or the retailer for advice.
- Frequently Asked Questions
| Question Answer | |
| The child has a lot of room to move around once in the seat, it is not well secured. | Please check that the harness and buckle are securely fastened. |
| Is it compatible with all cars? In general yes, except for two-seater vehicles and cannot be used for front seats. | |
| How can I tell if the car seat is correctly installed? | There are indicators that indicate whether the ISOFIX and the support are securely attached or not: if so, it turns green; if not, it turns red. |
| Can I use the car seat on a plane? This car seat is not suitable to be used on planes. | |
| What to do with the car seat after an accident? All infant car seats should be replaced after a car accident, as it is inevitable that the car seat's performance will be damaged during the impact, such as deformation, breakage, etc. For the safety of your baby, replace the car seat immediately after a car accident. | |
BELANGRIJK
Revenue Baby products
-
4. VOORBEREIDING EN FUNCTIES
LUVION Premium Baby products
Provision Baby products
-
The image is too blurry to recognize any text content.
LUVION
Provision Baby products
-
![graph TD A["01"] --> C["Green Arrow"] B["02"] --> C["Green Arrow"] C --> D["Gray Box"]](/content/2026/05/755210/images/0f1930bd7d8c7e8bb2dfa7c31185488dad633c37475aa8f4005a15c9e9ac0540.jpg)
LUVION: Provision Baby products
The image is too blurry to recognize any text content.
TRAVAUX PRÉPARATOIRES
5. INSTALLATION DOS À LA ROUTE
LUVION
Provision Baby products
LUVION: Brownian Baby products

Provision Baby products
∴ m = 3/11
- QUESTIONS FRÉQUEMMENT POSÉES
![graph TD A["01"] --> C["Green Arrow"] B["02"] --> C["Green Arrow"] C --> D["Gray Box"]](/content/2026/05/755210/images/8cd3ac26ed513bee2fbab4c5b869a72c0bd9053ac3e7faf83dc93908ef635362.jpg)
LUVION: Premium Baby products
10
LUVION: Brownian Baby products
LUVION
Provision Baby products
13
Provision Baby students
Revenue Baby products
The image is too blurry to recognize any text content.
Provision Baby products
25
2616 LZ Delft, the Netherlands
klantenservice@luvion.nl




- INTRODUCTION
- PURPOSE OF THE AEGIS 360 CAR SEAT
- GENERAL DESCRIPTION OF THE CHARACTERISTICS AND TECHNICAL SPECIFICATIONS
- INDEX
- IMPORTANT INFORMATION
- LUVION AEGIS 360 I-SIZE SAFETY INSTRUCTIONS
- GENERAL INFORMATION
- INSTALLATION AND USAGE
- SAFETY PRECAUTIONS
- MAINTENANCE & COMPLIANCE
- INSTALLATION NOTES
- PREPARATORY WORK AND FUNCTIONS
- 4.1 PREPARE ISOFIX
- 4.2 ADJUSTMENT OF HARNESS AND HEAD RESTRAINTS
- 4.3 HEADREST ADJUSTMENT (SIZE RANGE 100-150CM)
- 4.4 CHILD SEAT RECLINE FUNCTION
- 4.5 360° ROTATION FUNCTION
- REARWARD-FACING INSTALLATION
- INSTALLATION AND USE OF THE TOP TETHER
- SECURING THE CHILD WITH THE 5-POINT HARNESS
- FORWARD-FACING INSTALLATION
- REMOVAL OF THE CAR SEAT
- REMOVAL OF THE 5-POINT HARNESS SYSTEM
- CARE AND MAINTENANCE
- 9.1 CARE OF THE HARNESS BUCKLE
- 9.2 CLEANING THE SEAT COVER
- 9.3 INNER CUSHION OF THE SEAT COVER
- BELANGRIJK
- VOORBEREIDING EN FUNCTIES
- TRAVAUX PRÉPARATOIRES
- INSTALLATION DOS À LA ROUTE
Brand : Luvion
Model : Aegis 360
Category : Car seat