
Icon Deluxe - Baby monitor Luvion - Free user manual and instructions
Find the device manual for free Icon Deluxe Luvion in PDF.


| Product Type | Baby Monitor |
| Brand | Luvion |
| Model | Icon Deluxe |
| Color | White/Black |
| Parent Unit Display | 2.8 inch Color LCD |
| Camera Resolution | 720p HD |
| Night Vision | Yes, Infrared LEDs |
| Two-Way Talk | Yes |
| Temperature Sensor | Yes |
| Range (Outdoor) | Up to 300 meters |
| Range (Indoor) | Up to 50 meters |
| Frequency | 2.4 GHz |
| Security Encryption | 128-bit AES |
| Parent Unit Battery Life | Up to 10 hours |
| Power Adapter | AC 100-240V, 5V DC |
| Dimensions (Parent Unit) | 12 x 7 x 3 cm |
| Dimensions (Camera) | 8 x 8 x 12 cm |
| Weight (Parent Unit) | 200 g |
| Weight (Camera) | 250 g |
| Pan/Tilt/Zoom | Manual Pan, Tilt, Digital Zoom |
| Lullabies | Yes, Pre-loaded Melodies |
| Sound Level Indicator | Yes, Visual LED Bars |
| Cleaning Instructions | Wipe with dry, soft cloth |
| Spare Parts Availability | Replacement Adapters and Batteries Available |
| Certifications | CE, RoHS |
Frequently Asked Questions - Icon Deluxe Luvion
User questions about Icon Deluxe Luvion
0 question about this device. Answer the ones you know or ask your own.
Ask a new question about this device
Download the instructions for your Baby monitor in PDF format for free! Find your manual Icon Deluxe - Luvion and take your electronic device back in hand. On this page are published all the documents necessary for the use of your device. Icon Deluxe by Luvion.
USER MANUAL Icon Deluxe Luvion
FIGURES: FIGUREN / FIGURES / FIGURES 4
NEDERLANDS....12
ENGLISH 18
FRANÇAIS....26
CAMERA / CAMÉRA
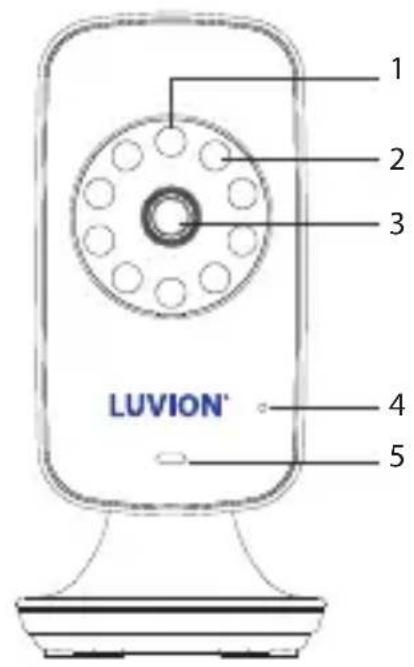

Fig. 1

PRODUCTOVERZICHT/ PRODUCT LAYOUT / DESCRIPTION DU PRODUIT
ICONEN / ICONS / ICÔNES
1
2
♪ ---- 3
4
5
6
7
°C 8
2----9
10
11
°F ---- 12
Fig. 3
INHOUD DOOS:
PROBLEEM & OPLOSSING
AFVOEREN VAN PRODUCT & BATTERIJ
This device is for indoor use only
- 1 camera
• 1 monitor - 2 adapters
- 1 screw, 1 plug
- This user manual
PRODUCT OVERVIEW
Camera (Fig. 1)
- Light sensor
- Infrared LED
- Camera Lens
- Microphone
- Power indication LED
- Speaker
- Pair button
- Adapter connection
- Temperature sensor
Monitor (Fig. 2)
- Charging LED
- Power indication LED
- Sound level indicator
- Zoom / View / Scan button
- Exit / Talk back button
- On /Off button
- Up button
- Right button
- Down button
- Menu / OK button
- Microphone
- Left button
- Stand
- Adapter connection
- Reset button
- Speaker
Icons (Fig. 3)
- Signal strength
- Alarm
- Lullabies
- Camera
- Volume
- Temperature
- Nightvision
-
Degrees Celsius
-
Zoom
-
Battery level
-
VOX
-
Degrees Fahrenheit
INTRODUCTION
Thank you for purchasing the Luvion Icon Deluxe baby monitor. From now on you can hear and see your baby, even up to 4 cameras simultaneously on the special 5" baby monitor screen. Make sure you always keep your original proof of purchase. For warranty cases you will always be asked to show a copy of your proof of purchase. For warranty claims you can contact the Luvion dealer or the local Luvion representative. More information can be found at www.luvion.com This manual contains all the information you need, to be able to use this Luvion Icon Deluxe baby monitor safely and with pleasure. Before using the baby monitor, we recommend that you read this manual carefully. We ask for your extra attention for the safety instructions.
SAFETY INSTRUCTIONS
- WARNING: CHOKING HAZARD - Keep the adapter cables out of the reach of children! NEVER place the camera or adapters within 1.5 meters of the crib / bed or a playground.
- Never use extension cables in combination with the adapters to prevent entanglement.
- Use only the originally supplied adapters. Use only on standard (100 \~ 240 volts AC) power points.
- This product contains small parts that your child can choke on. Keep small parts away from children.
- This product is not a toy. Don't let children play with it.
- The baby monitor is not suitable for use as a medical surveillance monitor.
- The baby monitor is not a substitute for parental supervision.
- Do not use the baby monitor in a damp environment or near water, such as in the bathroom, kitchen, laundry room or wet basement, etc.
• This product is only suitable for indoor use.
- It is important to first check the range and condition of the baby monitor before first use and then on a regular basis.
- Test the connection well when the camera is moved.
- Use the baby monitor at a temperature between 10 °C and 35 °C, do not place the baby monitor in direct sunlight or at other heat sources such as radiators, candles, gas cooker, etc. Ensure there is sufficient ventilation space around the baby monitor.
- Never dismantle the parent or baby unit yourself, this invalidates the warranty. This must be done by certified personnel, contact the seller of the local distributor for this.
- Only replace the battery with an original Luvion battery of the same type. Using the wrong battery can cause an explosion.
• Make sure that the Luvion Icon Deluxe is fully charged on first use. This guarantees an optimum battery life.
- Dispose of used batteries in accordance with local environmental regulations.
1. TRANSMISSION RANGE
To use the baby monitor you must establish a wireless connection between the camera and monitor. The range of this is influenced by environmental conditions.
- Any large metal object, such as a refrigerator, a mirror, metal doors or reinforced concrete between the camera and the monitor can block the signal.
• Signal strength can also be reduced by walls, or by radio or electrical equipment such as TVs, computers, cordless or mobile telephones, fluorescent lamps or dimmers. - Use of other 2.4 GHz products, such as wireless networks (Wi-Fi routers), Bluetooth systems or microwaves, may cause interference with this product, so keep the baby monitor at least 1.5m away from such products, or switch them off if they cause interference.
2. CAMERA SETUP
2.1 Power supply - Use mains power
- Connect the supplied adapter with a wall socket and the connection on the back of the camera (see Fig. 1).
- As soon as the adapter is connected, the Power indicator LED on the camera will light up.
2.2 Positioning the camera
Place the camera at the desired location and aim the lens by adjusting the camera. Make sure that the camera and the adapter cord are always out of reach of your baby. The camera can be placed on a cupboard or shelf or mounted on the wall. Do not place the baby monitor on soft padded blankets. Keep the camera away from heat sources such as radiators, chimneys, stoves and direct sunlight, and away from possible sources of interference such as TVs, microwaves and radios. Place the camera within 2 meters of your baby for optimum performance.
2.3 Nightvision (automatic)
The camera is equipped with nine high-intensity infrared LEDs to be able to capture a clear image in the dark. When the light sensor measures low light, night vision is automatically activated and the infrared LEDs come on. The image is displayed in black and white in night vision mode. If the night vision mode is active, the night vision icon 📋 is displayed at the top of the screen.
2.4 Room temperature measurement
The temperature sensor on the camera measures the room temperature. The room temperature is displayed on the monitor screen.
3. MONITOR SETUP
3.1 Power supply
The monitor works on a 3.7V 2000mAh (Li-ion) battery and on mains power via the supplied adapter.
Switch on the monitor
Press and hold the power button ⏻ for 3 seconds to turn on the monitor (see Fig. 4).
NOTE: Keep the power button pressed for 3 seconds to turn the monitor off.
Use of mains power
- Connect the supplied adapter with a wall socket and the connection on the side of the monitor (see Fig. 2).
- Press and hold the on/off button 3 seconds to turn on the monitor. The indicator LED on the monitor will light up and the image will appear on the screen (see Fig. 2).
NOTE 1: When the monitor is on, the green "power" LED lights up.
NOTE 2: The out of range icon will appear on the monitor screen when the camera is out of range.
NOTE 3: Press and hold the power button for 3 seconds to turn the monitor off.
3.2 Switch image on / off (power save / sound mode only)
Briefly press the power button to turn the display on or off.
3.3 Adjusting the volume
Press the up button ▲ to increase the volume, press the down button ▼ to decrease the volume.
3.4 Adjusting the brightness
Press the left button ◀to decrease the brightness, press the right button ▶to increase the brightness.
3.5 Switch scan function on / off
Press the scan button 📄 to start or stop the scan function (automatic switching between cameras), during the scan mode the scan icon 📋 will be displayed at the top of the screen. Each camera will be displayed for 10 seconds after which the next camera will be displayed.
3.6 Digital zoomfunction
Press and hold the Zoom / OK button 📄 for 2 seconds to zoom in or out. In zoomed mode you can use the arrow buttons (▲, ▼ and ) to move the image, when the image is zoomed in, the zoom icon is displayed at the top of the screen.
NOTE: The volume and brightness cannot be adjusted when the image is zoomed in.
3.7 Talk-back function
Hold down the Talk-back button ☐ to speak back. As long as the talk-back function is active, the microphone icon ♣ is displayed in the corner of the screen. Release the button to stop the talk function.
NOTE: The monitor speaker is turned off during the talk-back function.
4. MENU OPTIONS
4.1.1 Adding cameras
The supplied camera is already paired with the monitor, there is no need to do this again unless the connection is lost. Follow the steps below to pair an additional camera with the monitor, or to pair the camera again:
Note: If the √ symbol is displayed next to a camera channel, it means that a camera is already properly paired with the monitor on this channel. Pair a new camera on a camera channel without the √ symbol.
- Press the menu / Ok button Ⓗ on the monitor to display the menu on the screen. (see Fig. 2)
- Use the , , buttons to select the camera icon in the menu.
- Press the menu / Ok button Ⓐ to open the camera submenu. Select the camera channel to which you want to pair the camera with the ▲,▼ buttons.
- Press the menu / Ok button ⏻ to select the channel, use the▲,▼buttons to select the add camera icon 📄, then press the menu / Ok button ⏻
- Press the PAIR button on the back of the camera while the hourglass icon is displayed on the screen.
- If the pairing is successful, the ✅ icon appears on the screen. If the pairing is not successful, repeat the above steps.
4.1.2 Remove a camera
- Press the menu / Ok button 📄 on the monitor to display the menu on the screen. (see Fig. 2)
- Use the ↗, ↗, ↗ buttons to select the camera icon in the menu.
- Press the menu / Ok button Ⓓ to open the camera submenu. Select the camera channel of which you want to remove the camera with the ▲, ▼ buttons.
- Press the menu / Ok button 🔒 to select the channel, use the ▲, ▼ buttons to select the remove camera icon 📋 then press the menu / Ok button 🔒
- Select the √ symbol with the ▲,▼ buttons to remove the camera.
- Press the menu / Ok button ⏻ to confirm the selection.
4.2.1 Temperature unit setting
- Press the menu / Ok button 📄 on the monitor to display the menu on the screen. (see Fig. 2)
- Use the ▶, ▶, ▶ buttons to select the temperature icon in the menu.
- Press the menu / Ok button 📄 to open the temperature setting submenu.
- Select °C of °F with the ▲, ▼ buttons.
- Press the menu / Ok button ☐ to confirm the selection.
- Press the ⏻ button to exit the menu.
Note: The temperature detection range is 0 \~ 40 °C.
4.2.2 Temperature alarm settings
- Use the 4, 7 buttons to select the temperature alarm icon to activate the temperature alarm. Press the menu / Ok button to confirm
- Use the ▶, ▶, ▶ buttons to select the temperature alarm off icon to deactivate the temperature alarm. Press the menu / Ok button ⏻ to confirm.
4.2.3 Set temperature high and low warnings
-
Select ⬆ (red, high) or (green, low) with the ,▲ buttons to set the temperature maximum / minimum values for the temperature alarm.
-
Use the ,▲buttons to set the temperature above which the temperature alarm for a room that is too hot will be activated when ⚙ (red) is selected.
-
Use the ▲,▼, buttons to set the temperature at which the temperature alarm for a room that is too cold is activated if ⚙ (green) is selected.
NOTE: the default setting for a too high temperature is 36° C, the default setting for a too low temperature is 8° C. If the temperature exceeds these values, the temperature alarm icon is displayed on the screen and the user is alerted with beeps. Press a button on the monitor to stop the beeping and blinking.
4.3 Lullabies
The camera can play 8 different lullabies.
-
Press the menu / Ok button Ⓓ on the monitor to display the menu on the screen. (see Fig. 2)
-
Use the ▲, ▲, ▼ buttons to select the lullabies icon in the menu.
-
Press the menu / Ok button 📄 to open the lullabies submennu. Use the ←, ↓, buttons to select one of the three available lullabies, you can choose between 1 song play, loop (play all 8 songs continuously) ↓, or turn off lullabies
-
Press the menu / Ok button to confirm. NOTE: The default setting is lullabies off.
4.4 Set the alarm
You can use the alarm to remind yourself that it is time for feeding, changing diapers, sleeping etc.
-
Press the menu / Ok button 📄 on the monitor to display the menu on the screen. (see Fig. 2)
-
Use the ▲, ▲, ▼ buttons to select the alarm icon in the menu.
-
Press the menu / Ok button Ⓗ to open the alarm submenu. Use the ▼, ▶, ▼ buttons to set the timer for the alarm.
-
Press the menu / Ok button ☑ to confirm.
-
Press the button to exit the menu.
NOTE: The minimum time is 0.5 hours, the maximum time is 5 hours (7 levels)
NOTE: If an alarm is set, the alarm icon ⚙ will be displayed on the screen.
NOTE: The default setting is alarm off.
NOTE: Press a button on the monitor to turn off the alarm if it goes off.
NOTE: If you do not stop the alarm by pressing a button on the monitor, it will go off for 1 minute and then go off again for 1 minute after 3 minutes. In total, the alarm will sound 3 times before it stops.
4.5 VOX Sensitivity
In this submenu you can set the sensitivity of the VOX function (sound activation). If no sound is detected by the camera for 30 seconds, the monitor goes into sleep mode, the screen and the sound will turn off. As soon as the camera detects sound that is louder than the set sensitivity level, the monitor automatically switches on again, the image and sound are switched on again. Follow the instructions below to change the VOX level.
-
Press the menu / Ok button Ⓓ on the monitor to display the menu on the screen. (see Fig. 2)
-
Use the ▲, ▲, ▼ buttons to select the VOX icon in the menu.
-
Press the menu / Ok button 📄 to open the VOX submenu. Use the ▲, ▼ buttons to
select the desired VOX sensitivity.
- Press the menu / Ok button ☑ to confirm.
- Press the 📋 button to exit the menu.
NOTE: is the low VOX sensitivity level, the baby must make a lot of noise to activate the monitor.
NOTE: is the average VOX sensitivity level.
NOTE: 📄 is the high VOX sensitivity level, the baby does not have to make much noise to activate the monitor.
4.5 Language settings
In this submenu you can set the language of the menus.
- Press the menu / Ok button Ⓐ on the monitor to display the menu on the screen. (see Fig. 2)
- Use the ▲, ▲, ▼ to select the language icon in the menu.
- Press the menu / Ok button Ⓓ to open the language submenu. Use the ←, ↑, ↑ buttons to select the desired language.
- Press the menu / Ok button ☑ to confirm.
- Press the 📋 button to exit the menu.
TECHNICAL SPECIFICATIONS
| Technical specifications | |
| Frequency range 2412MHz ~2469MHz | |
| Power adapter Monitor adapter input: 100-240VAC 50 / 60HzMonitor adapter output: 5V DC 1ACamera adapter input: 100-240VAC 50 / 60HzCamera adapter output: 5V DC 1A | |
| Transmission range Tot 300m in open veld | Tot 50m binnenshuisHet precieze bereik kan op basis van de gebruik-somgeving sterk varieren. Muren en/of andere apparaten die op 2.4Ghz werken zijn van invloed op het bereik. |
| Display 5.0" Diagonal TFT LCD | |
| Battery monitor Li-ion 3.7V 2000mAh (7.4Wh) | |
| Battery life Up to 8 hour | |
| Maximum power <19dBm | |
| Temperature range Operating temperature: 0°C ~ 40°C | Battery charging temperature: 10°C ~ 40°C |
| Relative Humidity 15% ~ 85% | |
TROUBLESHOOTING
| Troubleshooting | |
| No reception on the monitor • The power adapters may not be connected properly.• Check if the camera and the monitor are on.• The distance between the camera and the monitor may be too large.• The camera and monitor may not be paired correctly. Pair the monitor with the camera again. | |
| Poor range / Out of range or interference / The image freezes / The resolution is poor | • Move the monitor closer to the camera.• The camera or monitor may be too close to many metal objects.• Other electronic devices interfere with the signal.• A WiFi network may interfere with the signal.• The battery may have been drained• Reduce the number of walls / floors / doors between the camera and the monitor. |
| Audio problems • If a loud beep is present (feedback beep), increase the distance between the monitor and the camera, or decrease the volume of the monitor, press the down button▼ to decrease the volume.• Check if there is noise in the vicinity of the camera.• Make sure the volume is not turned off . Press the up button▲ to increase the volume. | |
| The battery does not last long enough • Use the VOX mode, or connect the monitor to the mains. | |
| The monitor freezes / The image freezes / The monitor stops responding | • Remove the adapter from the monitor and replace it.• Press the reset button on the back of the monitor. |
CARE & MAINTENANCE
- Keep all parts and accessories out of the reach of children.
- Fingerprints or dirt on the camera lens can adversely affect the image quality.
- Avoid touching the lens with fingers.
• Use a soft, non-static or slightly damp cloth to clean the baby monitor. - Keep the camera dry. Moisture can permanently damage the electronics. Never use the baby unit or parent unit in a wet or damp environment.
• Do not use or store in dusty or dirty areas. - Do not store in warm places. High temperatures can adversely affect the life of the electronics and affect the plastic parts.
- Do not store in very cold places. This can cause moisture to damage the electronics.
• Leave the housing of the products closed. Opening the housing may damage the product and void the warranty.
• Do not drop the product and avoid violent shocks.
• Use this product only with the adapter that is supplied or is offered as an accessory for this product. Connecting other
adapters can lead to defects.
• Do not overload the outlet or extension cords. This can result in electric shock or fire.
• This system works at 2.4 GHz.
SAFETY REGULATIONS
Follow these safety rules to prevent injury from the baby monitor cables:
- Make sure the camera and adapter are out of reach of the baby and / or children (at least 1 meter).
PLEASE NOTE: Take this measure into account, even when the baby is not yet mobile.
- NEVER place the camera or cables in the crib or bed!
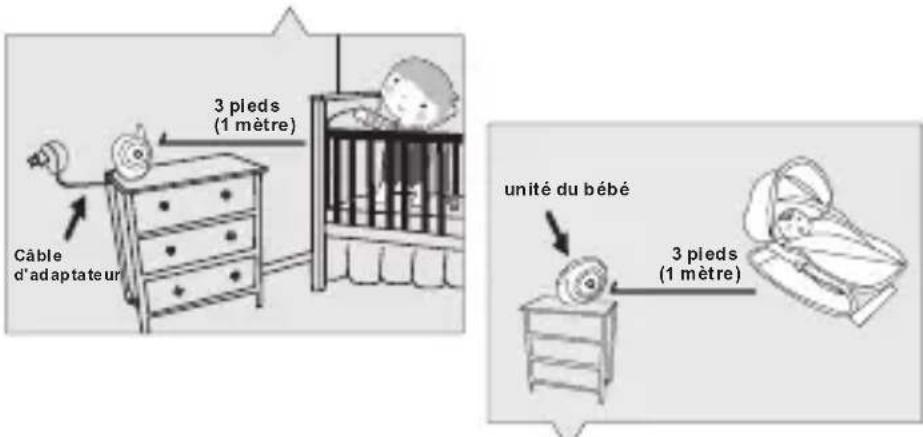
- Ensure that the adapter cables are safely concealed. Bundle too long wires with tape or wire ties.
- Use a wireless monitor to prevent the risk of wiring through the wiring.
- Never use extension cords with the AC adapters. Use only the supplied AC adapter.
General safety instructions:
- Read this user manual carefully and follow all instructions.
- Keep this manual for future reference.
- Ensure good heat dissipation; never cover the baby unit, parent unit and / or power adapters. Do not expose this product to temperatures above 45°C.
- Ensure that the wires are not damaged and prevent tripping over the wires.
- Keep small parts out of the reach of children.
- The product is not a toy. Don't let children play with it.
• This baby monitor is not a substitute for parental supervision. - Do not use the monitor or camera near water.
• Test this baby monitor and all functions before use so that you are familiar with all functions. - Never touch the power contact points with sharp or metal objects.
- Do not attempt to repair or adjust the electrical or mechanical functions of the device; contact the store where you purchased the product or Luvion if the product is defective.
DISPOSAL OF PRODUCT & BATTERY
- Dispose of this product in an environmentally friendly manner.
• Take these products to the collection points designated by the local authorities for the correct collection and processing of these products.
NOTE: Outdoor use in France, Italy and Ukraine is not permitted.
CE
This device is for indoor use only
This product complies with the essential requirements as described in the European directives. The declaration of conformity is available at: https://www.luvion.nl/doc/Icon-Deluxe


- PRODUCTOVERZICHT/ PRODUCT LAYOUT / DESCRIPTION DU PRODUIT
- ICONEN / ICONS / ICÔNES
- INHOUD DOOS
- AFVOEREN VAN PRODUCT & BATTERIJ
- PRODUCT OVERVIEW
- CAMERA (FIG. 1)
- MONITOR (FIG. 2)
- ICONS (FIG. 3)
- INTRODUCTION
- SAFETY INSTRUCTIONS
- TRANSMISSION RANGE
- CAMERA SETUP
- 2.1 POWER SUPPLY - USE MAINS POWER
- 2.2 POSITIONING THE CAMERA
- 2.3 NIGHTVISION (AUTOMATIC)
- 2.4 ROOM TEMPERATURE MEASUREMENT
- MONITOR SETUP
- 3.1 POWER SUPPLY
- SWITCH ON THE MONITOR
- USE OF MAINS POWER
- 3.2 SWITCH IMAGE ON / OFF (POWER SAVE / SOUND MODE ONLY)
- 3.3 ADJUSTING THE VOLUME
- 3.4 ADJUSTING THE BRIGHTNESS
- 3.5 SWITCH SCAN FUNCTION ON / OFF
- 3.6 DIGITAL ZOOMFUNCTION
- 3.7 TALK-BACK FUNCTION
- MENU OPTIONS
- 4.1.1 ADDING CAMERAS
- 4.1.2 REMOVE A CAMERA
- 4.2.1 TEMPERATURE UNIT SETTING
- 4.2.2 TEMPERATURE ALARM SETTINGS
- 4.2.3 SET TEMPERATURE HIGH AND LOW WARNINGS
- 4.3 LULLABIES
- 4.4 SET THE ALARM
- 4.5 VOX SENSITIVITY
- 4.5 LANGUAGE SETTINGS
- TROUBLESHOOTING
- CARE & MAINTENANCE
- SAFETY REGULATIONS
- GENERAL SAFETY INSTRUCTIONS
- DISPOSAL OF PRODUCT & BATTERY
Brand : Luvion
Model : Icon Deluxe
Category : Baby monitor